Working with the GenAI Summary
Real-Time Guidance Agent also offers an advanced generative AI-based Call Summary capability, in addition to our template-based Call Summary.
The GenAI Summary enables Real-Time Guidance Agent to present a completely dynamic call summary to an Agent using conversation content such as Intents, Entities, and Promises, which are detected in real-time based on the AI Model and guidelines configured for that specific Experience. It also supports enhanced summary formatting to improve the Agent’s workflow.
The GenAI-based Call Summary allows Agents to generate an On-Demand Summary while the call is in progress or view an auto-generated Summary at the end of the call. Agents can optionally edit the GenAI Summary during or after the call.
One powerful benefit of the Real-Time Guidance Agent GenAI-based Call Summary is that it potentially eliminates the need for a Business Analyst to review hundreds or even thousands of past conversations in order to design a summary format that is relevant for each BP -- minimizing the customer's time to value.
GenAI capabilities are more responsive to the 'back-and-forth' nature of call center conversations and do not rely solely on clean phrases or utterances to remain relevant.
GenAI Summary Components
The Real-Time Guidance Agent GenAI Summary displayed in the AI Agent Assist application is comprised of the following components:
Call Reasons - The purpose of the call (typically one or more detected Intents), along with any secondary issues or customer requests that may arise during the call.
Resolution Steps - A detailed description of the responses and actions taken by the Agent during the call.
Call Outcome - Describes the final resolution of the customer’s issue(s).
Customer Satisfaction - Describes how the customer felt during the call.
Entities - Optionally, the Entities that were uttered by the Customer or the Agent while the call was in progress.
Promises - Optionally, the Promises that were uttered by the Agent while the call was in progress and detected by Real-Time Guidance Agent for continued tracking.
Disposition - Optionally, the automated Call Disposition values that were detected during the call using the Disposition Configuration assigned to the current Experience.
Enabling the GenAI Summary
In order to use the generative AI-based Call Summary feature, a Business Analyst must enable it for the associated AI Agent Assist client application:
From the X-Console Resources menu section, select Applications. The Applications page is displayed.
Locate and click the Name of the relevant Agent AI Assist Application. The Details panel for the Application is displayed.
Click the Client Settings tab. The Client Settings panel is displayed.
In the Menu section, locate the GenAI field and ensure that the toggle to its right is turned on (green).
From the dropdown menu on the right side of the panel, select the Service Flow that will be run when the Agent submits the completed GenAI summary after a call. Only the available Service Flows will be listed in the dropdown.

To reveal all GenAI sub-components that are available for display, to the left of the GenAI Summary label, click the arrow icon, as shown above. For complete details on GenAI sub-components, click here.
Optionally, in the Summary Submit Options section, configure the method that will be used to submit the GenAI Summary at runtime. For more details, click here.
Click Save. The GenAI Summary feature is now enabled for the selected AI Agent application.
Configuring a GenAI Call Summary
After enabling the GenAI Summary, a Business Analyst can configure how the Summary will be generated at runtime and how it will be formatted for each Experience.
Important
In order for the GenAI Summary to function at runtime, its parent Experience must be trained with at least one Intent.
From the Real-Time Guidance Agent menu section in the X-Console, select Experiences. The Experiences page will be displayed.
Locate and click the name of the Experience for which you want to configure the GenAI Summary. The activity cards for that Experience will be displayed:
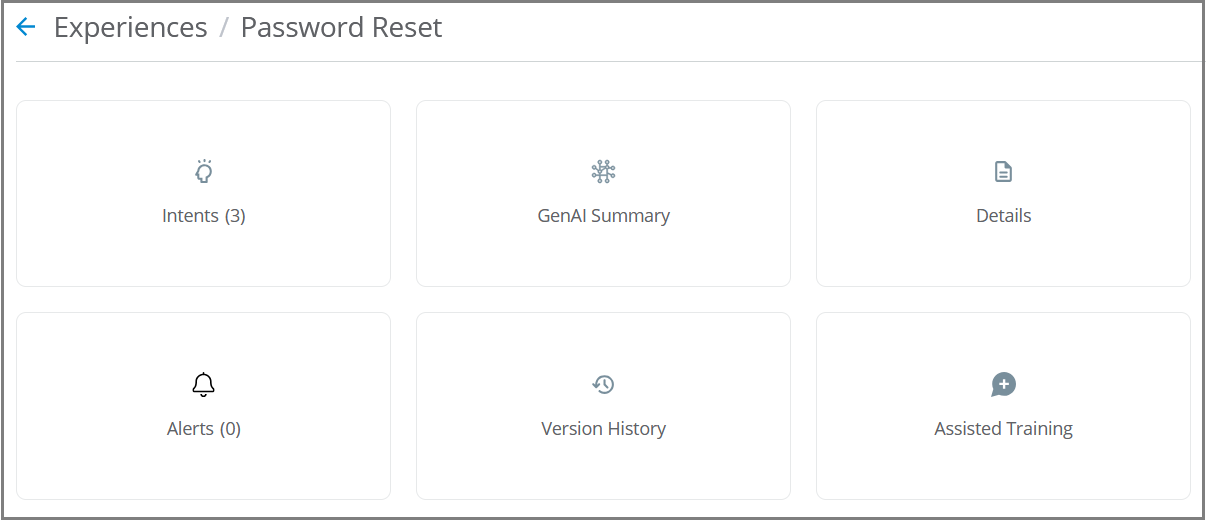
Click GenAI Summary. The GenAI Call Summary configuration page for the current Experience will be displayed:
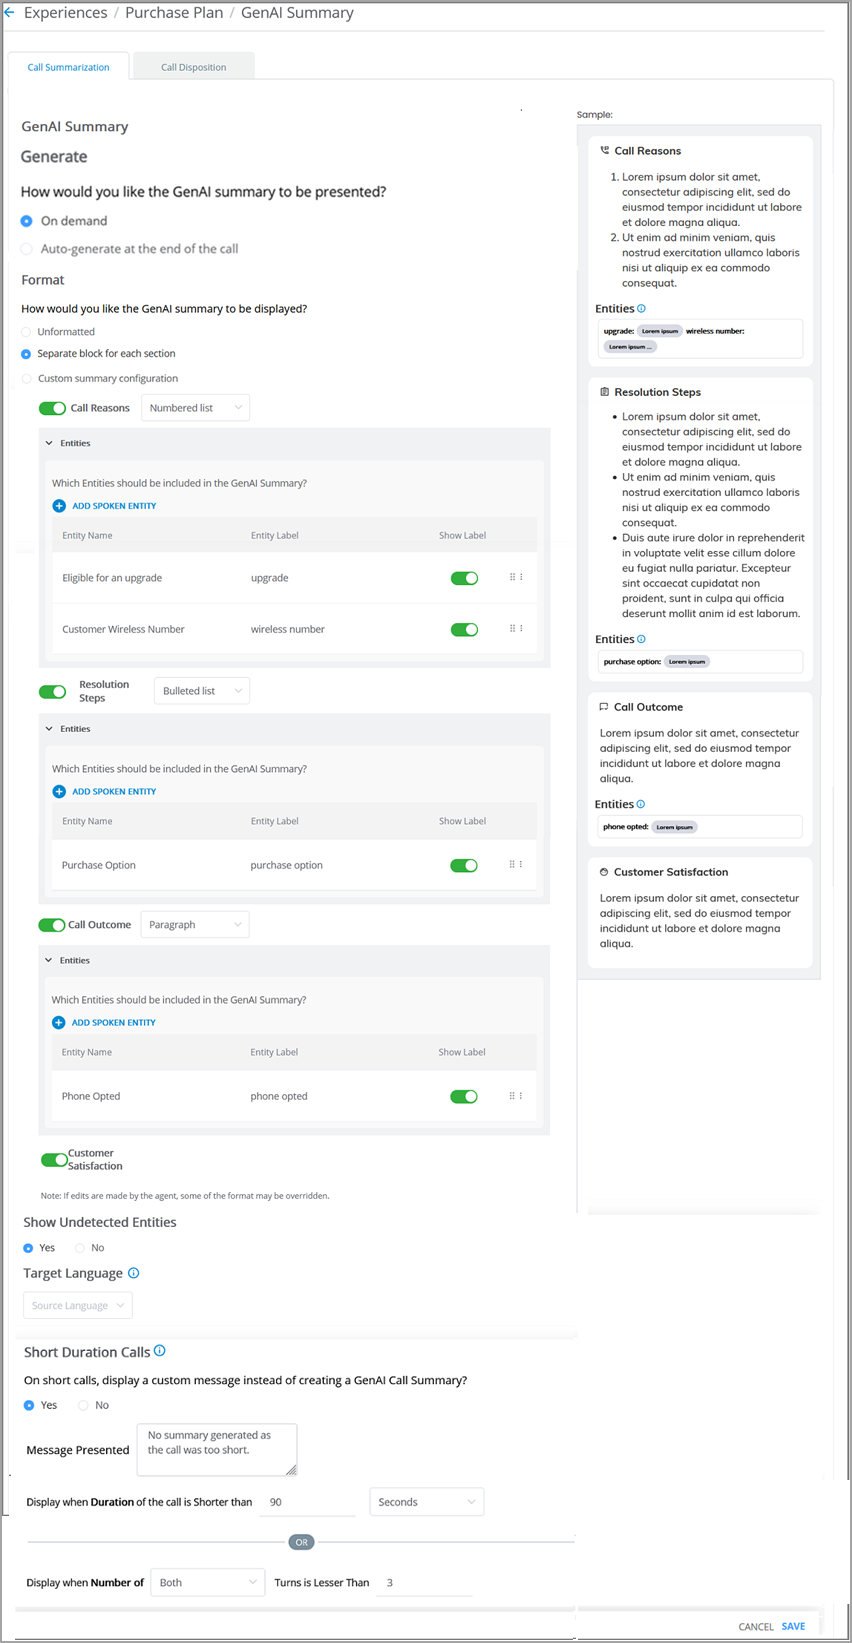
From the radio buttons in the Generate section, choose how the GenAI Summary will be generated at runtime.
On-Demand - Allows an Agent to view the AI-powered Call Summary while the call is in progress.
Auto-generate at the end of the call - Allows an Agent to view the AI-powered Call Summary once the call has ended.
From the radio buttons in the Format section, choose how the GenAI Summary will appear to the Agent:
Unformatted - The Call Reason, Resolution Steps, and Call Outcome components of the GenAI Summary will be displayed in a combined text block, without additional formatting.
Separate Block for Each Section - You can enable or disable individual components of the generated summary, including Call Reason, Resolution Steps, Call Outcome, and Customer Satisfaction , using the toggle switch for each. By default, all components are enabled. If you disable any of the components, they will not appear in the design preview on the right side of the page, and the summary generated in the AI Agent Application.
Note
At least one GenAI component should be enabled. If you try to disable the last component, a warning message will appear.
Each component of the GenAI Summary can be displayed according to the selection made for it in the dropdown list:
Numbered format
Bulleted format
Single text paragraph
Custom summary configuration - You can assign a specific version of the default Summary Template created in the Administration Platform to the selected Experience, enabling it to be automatically applied at the start of the call at runtime. Additionally, you can assign different versions of Templates to Call Reason type Intents, allowing the system to dynamically apply the relevant templates whenever the corresponding Intent is detected during the ongoing call. For more information on custom summary configuration, click here.
During the configuration of the Unformatted and Separate block for each section format, you can experiment with different block selections. Your choice is used in the simulated design preview, enabling you to better visualize how a format will appear to an Agent.
Caution
Switching the GenAI Summary Format from Unformatted to Separate Block for Each Section and vice versa will result in the loss of previous format settings. If you decide to switch, you will need to reconfigure the settings for the previous format.
From the Entities section, optionally add up to 20 Entities that will be recognized by Real-Time Guidance Agent during the call. You add an Entity for detection by mapping it and configuring its label and display position.
The values of configured Entities that are detected during the call will be displayed as part of the design preview, as well as the Summary that is shown to the Agent. In the Summary displayed during or after the call, a color-coding scheme is used to help the Agent understand the status of each Entity shown.
Complete details for adding and using Entities in the Summary are provided below.
In the Show Undetected Entities section, choose Yes to display every Entity value that has been mapped in the above step, even if that Entity was not detected by Real-Time Guidance Agent during the call. This option can benefit an Agent who will need to see all mapped Entities, whether detected or not. In the GenAI Summary, an undetected Entity is displayed with an empty (i.e., with no value) pink capsule.
At the lower right corner of the page, click Save. The new GenAI Summary configuration will be saved. To cancel your activity at anytime without saving, click Cancel.
After completing the configuration activity, the GenAI Summary is ready for use in the Agent AI Assist application. For more information about how the Agent uses the GenAI Summary during a call, click here.
Adding Entities to the GenAI Summary
The GenAI Summary can include the value of any Entity that has been mapped to the current Business Process. The Summary can be configured to display both detected Entities that were uttered by the Customer or the Agent during the call, as well as undetected Entities.
Important
Each Entity you add must already be (1) created in the AI Model, (2) mapped to exactly one Session Variable, and (3) trained for the current Experience.
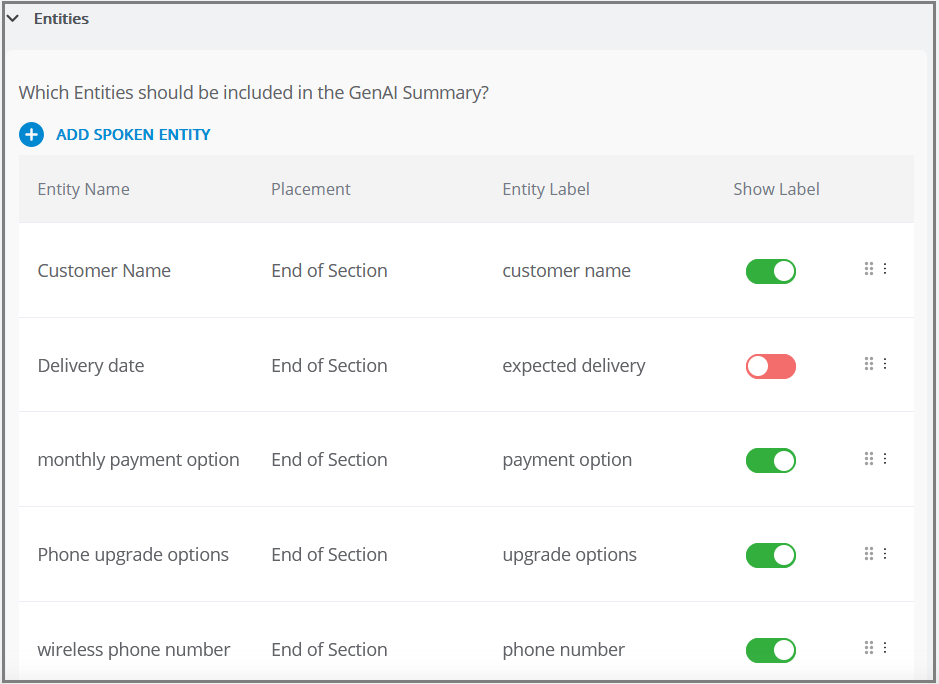
The Entities section of the GenAI Summary page lists all of the Entities that you want Real-Time Guidance Agent to detect during a call, and tells the AI Agent Assist application where and how they should appear in the Summary when it is displayed to an Agent.
After an Entity is added to this list, it can be edited or reordered as needed, as well as deleted.
At the top of the Entities list, click Add Entity. A new list row will appear.
Each listed Entity uses the following settings:
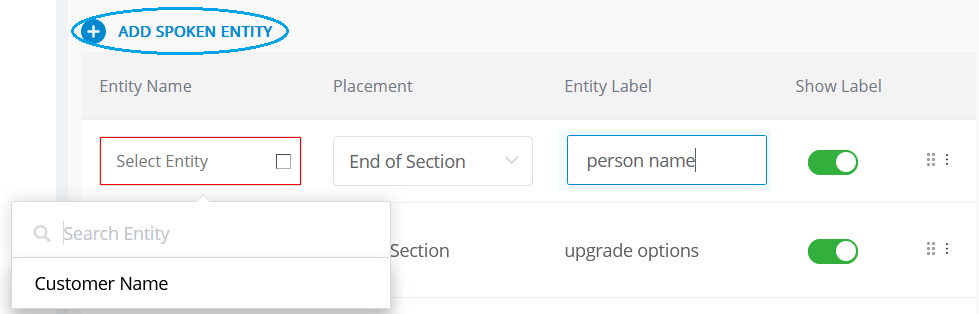
Entity Name | Click to open a dropdown menu and select the desired Entity. Only the Entities that are available for the current Business Process will be displayed. When the list is long, you can locate a specific Entity by entering a few letters from its name in the Search box at the top of the dropdown. ImportantEach Entity must be mapped to a unique Session Variable in the current Business Process. In the Separate Block for Each Section format, the Entities are associated with each GenAI component. If an Entity is assigned to one of the components, it will not appear in any other components. CautionDisabling the component will remove all Entities configured under it. If you decide to re-enable the component, you will need to reconfigure the Entities. |
Placement | In the current release, only End of Section positioning is supported. |
Entity Label | Enter a descriptive label that will be shown alongside the Entity in the GenAI Summary. This label will only be displayed if the Show Label in Summary option is toggled On (green). |
Show Label | When this switch is toggled On (green), the assigned Entity Label will be displayed before the Entity in the GenAI Summary, detailed below. You can also hide any Entity label by toggling the switch Off (red). |
Note
Currently, a maximum of 20 Entities can be added to an Experience for detection during a call.
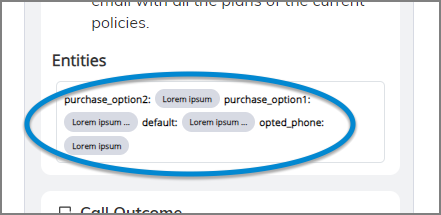
An Entity Label can be displayed before an Entity to clarify and help differentiate between Entities in the GenAI Summary.
When the Show Label switch is toggled On (green), the design preview, the Summary shown to the Agent, and the Conversation Summary variable that is saved with Summary submission will include the label(s) you have assigned:
Tip
You may want to turn an Entity Label off when the Entity value itself is self-explanatory. For example, the descriptive label 'Plan Name' may not be needed if all of its possible values will display a known plan name.
Turning off unnecessary labels will help to simplify and declutter the UI for end users.
To change the order of the listed Entities at any time, locate the Entity that you wish to move, click on the Reorder  icon at the right side of the list, and drag the Entity to its desired position.
 |
Changing the order of an Entity in the list also changes its order in the displayed Entities in the design preview, the Summary shown to the Agent, and the Conversation Summary variable that is saved with Summary submission.
Reordering can also impact which Entities are included in the minimum number of Entities that are shown to the Agent. By default, only the first four Entities will be displayed to a user before they click the Show more button.
Right-click on the Ellipse  icon at the right side of the listed Entity and click Edit to open the Entity and change any of its settings. When you are finished, right-click again on the Ellipse icon and click Save.
Right-click on the Ellipse icon at the right side of the listed Entity and click Delete. The current Entity will be removed immediately from the Entities list; however, you must click Save at the lower right corner of the GenAI Summary page in order to finalize the deletion.
Changing the Summary Target Language
Note
To enable this feature for your account, contact your Uniphore Support representative.
A Business Process must be mapped to the current Experience in order to enable the display of this feature.
At runtime, GenAI Call Summary output can be produced in a target language that is different from the default language that is configured for an Experience.
Setting a different target language forces the Call Summary to be generated and submitted in the selected language for its call session output, regardless of which language is used in real time by the Agent and end user. For example, a CRM used by your account may require the target language for processing.

To change the target output language, at the bottom of the GenAI Summary configuration page, select the desired language from the Target Language dropdown.
In order to be available for selection in the dropdown, the desired target language must already be configured with the Business Process being used by the current Experience.
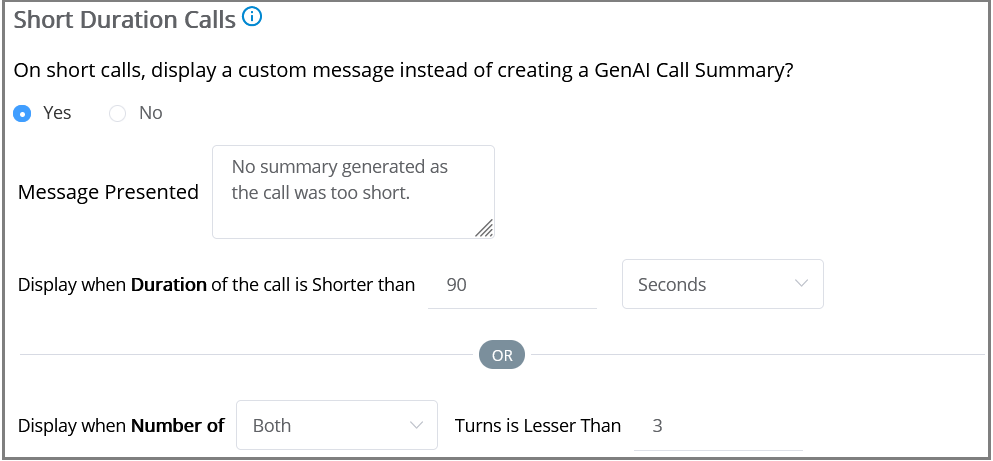
At run time, the GenAI Call Summary identifies short calls before they are sent to the LLM service and presents a notification message to an Agent indicating that no summary is generated due to the short duration.
Short-duration calls can be configured to identify short calls at run time and display a predefined custom message in the GenAI Call Summary when either the call duration is less than the specified duration or the number of speaker turns in the call is less than the specified turns.
Note
By default, the option to show a custom message on short calls will be selected as 'No'.
The short-duration call uses the following settings:
At the bottom of the GenAI Summary configuration page, select the option 'Yes' to show the customized notification message to the Agent when the call is identified as short.
Mention the Message to be presented to an Agent.
Mention any one of the following short call criteria:
Duration of the Short Call in seconds/minutes
Number of Speaker Turns to be considered for identifying short call
The call is identified as short when its duration or the number of speaker turns is less than the specified values.
Assigning a Summary Template to an Experience
Real-Time Guidance Agent leverages customized, industry-specific Summary Templates created in the Administration Platform to automatically generate a valuable and actionable AI-powered Call Summary to an Agent at the end of each call. This enables the Agent to view the contextualized call summaries that go beyond generic insights.
These Summary Templates, powered by Large Language Models (LLMs), support multiple languages and can be tailored to different industries. Multiple versions of industry-specific Summary Templates can be maintained for an account in the Administration Platform, based on the customer's requirements. For more information about defining the Summary Template in the Administration Platform, click here.
Note
To use a customized Summary Template from the Administration Platform for your account, please contact your Uniphore Support representative.
An Account Admin or Business Analyst can map a specific version of a Summary Template from the Administration Platform to an Experience. This mapped Template is considered as the default and automatically assigned at the beginning of a call. They can also assign specific versions of Summary Templates to Intents, allowing the system to dynamically apply the relevant template each time a new Intent is detected as the call progresses. For more information on viewing a customized GenAI Call Summary, click here.
A Flow Designer or Developer can optionally use the Summary Builder API to change the Summary Template while a call is still active, based on logic that has been defined in the Flow during the design phase. For example, the Flow design can call this API to switch to a different Summary Template whenever a specific Alert notification is received during the call. For more information on using the Summary Builder API, click here.
From the Real-Time Guidance Agent menu section in the X-Console, select Experiences. The Experiences page will be displayed.
Locate and click the name of the Experience for which you want to assign the customized Summary Template. The activity cards for that Experience will be displayed.
Click GenAI Summary. The Call Summarization page for the current Experience will be displayed.
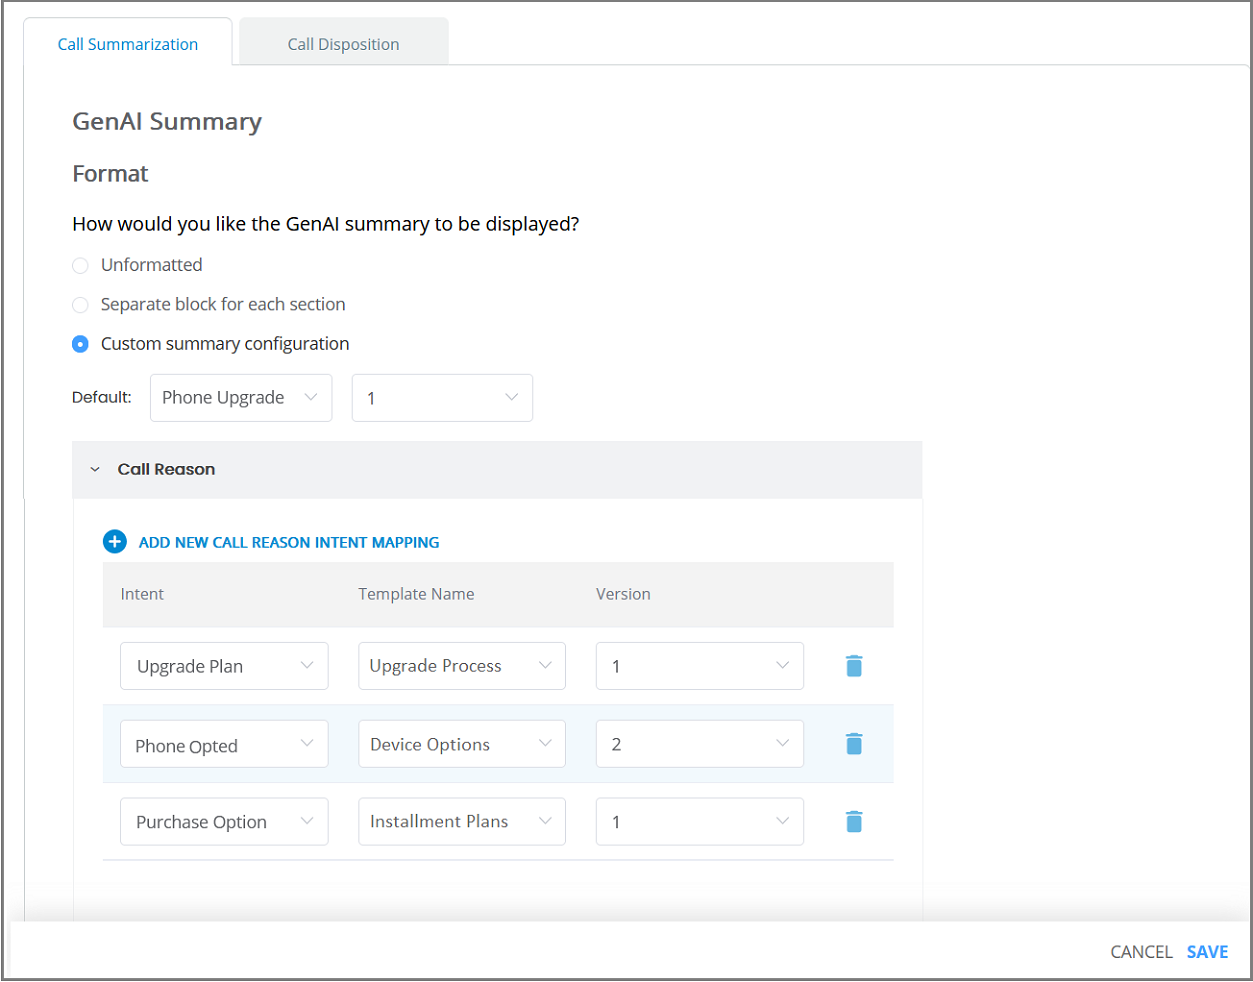
From the radio buttons in the Format section, choose Custom Summary Configuration to display a customized GenAI Summary to an Agent.
Select the Default Summary Template and Version from the respective dropdown list. This default template will be automatically applied at the start of each call.
In the Call Reason section, map a call reason type Intent to the relevant Summary Template and Version. Whenever a new Intent is detected at run time, the relevant Template is dynamically applied as the call progresses.
The Intent dropdown displays all Intents created for the current Experience. The Template Name and Version dropdowns display all Summary Templates published to the current account and their available versions.
Assigning a Disposition to an Experience
Real-Time Guidance Agent offers an advanced generative AI-based Call Disposition capability to automatically categorize calls using LLM zero-shot classification. Disposition categorization values can be set for an account in the Administration Platform based on the customer's requirements. Typically, this is a four-level category that describes the resolution of the call. For complete information about defining the Disposition Configuration in the Platform, click here.
The Call Disposition enables Real-Time Guidance Agent to present an automated and structured Disposition categorization to an Agent using a predefined Disposition Hierarchy in the Platform based on the call reason, call outcome, and/or customer's requirements.
Note
The LLM-based Call Disposition is only available in the GenAI Call Summary.
A key benefit of the Real-Time Guidance Agent LLM-based Call Disposition is that it potentially eliminates the need for manual call categorization, saving an Agent's After Call Work (ACW) time and preventing call classification inconsistencies. It also helps to indicate next steps and provide information for processing and analysis downstream, improving insights into how the call reason was handled.
Disposition display is enabled on the Client Settings page for the AI Agent Application. The Agent can manually change the auto-generated Call Disposition values in the GenAI Call Summary, depending on the Call Disposition settings under the Client Settings page. For more details about setting Call Disposition on the Client Settings page Client Settings, click here.
A Business Analyst can map the relevant Disposition to an Experience, based on business needs. The Disposition categorization list appears in the GenAI Call Summary component of the AI Agent Assist application during runtime.
Note
If any Experience is mapped to a Disposition created prior to the release (2025.08), it must be remapped to the newly recreated Disposition in the Administration Platform.
From the GenAI Summary configuration page, click the Call Disposition tab. The Call Disposition panel for the current Experience is displayed.
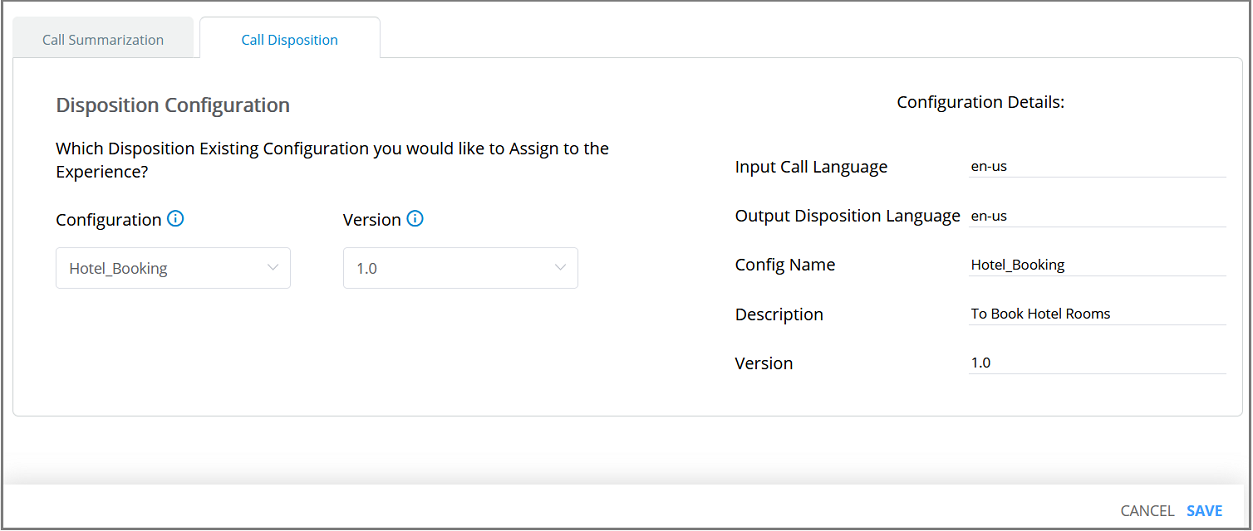
From the Configuration dropdown list, select the relevant Disposition Configuration that uses this Experience. The list displays all available Configurations for the selected account.
Based on the selected Disposition Configuration, the Configuration Details, including Input Call Language, Output Disposition Language, Configuration Name, and Description, are displayed on the left side of the panel.
From the Version dropdown list, select the desired Configuration version for Call Disposition. The list displays all available versions for the selected Configuration.
The selected version is displayed on the left side of the panel.
Click Save to save the Disposition Configuration mapping to the selected Experience. A confirmation message is displayed. To exit at anytime without saving changes, click Cancel.
Error Handling in Call Summary Submission
An Account Admin or Analyst can recover a failed Call Summary submission through a retry without data loss. To enable this, the system variable 'SummarySubmitServiceFlowStatus' must be used in both the Service Flow and Data Flow, and assigned to the Call Summary and Retry actions in the specific AI Agent Assist client application.
For more information on defining Service Flows to identify Summary submission failures, click here.
For more information on defining Data Flows for returning Summary submission retry results, click here.