Summary Builder
The Summary Builder facility enables businesses to design, test, and deploy AI-based Call Summary Templates tailored to their unique operational and industry-specific needs. It empowers Business Users to customize Summaries using Large Language Models (LLMs) without requiring technical expertise, giving them full control over Summary structure, language, tone, and focus. This reduces manual effort, improves insight extraction, and enhances downstream automation.
A key benefit of the Summary Builder is that it allows Business Users to define what information should be extracted from conversations and how it should be presented, ensuring that summaries are useful, actionable, and aligned with business goals.
The Summary Builder can be used by many functions across the customer's organization, including:
Business Analysts – Define summary fields and structure based on operational KPIs.
Product Owners – Integrate summary templates with customer-facing applications.
Operations Teams – Monitor and improve agent workflows using customized outputs.
Quality Assurance (QA) – Tailor summaries to capture audit-relevant information.
About the Summary Template
A Summary Template defines the blueprint for how an AI-generated Call Summary should be structured. It includes:
Summary Components, i.e., a list of fields such as Customer Issue, Resolution, and Next Steps
Instructions to the LLM
Language preferences
Optional semantic tags and placeholders
Selection of the LLM model
Templates can be created from scratch, cloned and modified from existing templates, and then assigned to specific products or tenants for runtime use.
Custom GenAI Summary Components
A Summary Component is a modular element of the Summary that targets a specific type of information or insight from the call. Examples include:
Call Reason – The purpose of the call (typically one or more detected Intents), along with any secondary issues or customer requests raised during the call.
Customer Issue – A Summary of the customer’s problem or concern.
Call Sentiment – The overall sentiment of the customer in the call – positive, negative, or neutral.
Agent Steps – Actions taken by the Agent in the call toward resolution, observations, or remarks.
Call Outcome – A description of the final resolution of the customer’s issue(s).
Key Components of the Summary Template
A Business User can use the following components to design a unique, industry-specific Summary Template:
Prompt - A Prompt is a set of natural language instructions provided to the LLM to guide how it interprets and summarizes the transcript.
Prompts help control:
What information is prioritized (e.g., Focus on issue resolution and escalation status.)
How it is phrased (e.g., Write in a professional and empathetic tone.)
What should be excluded (e.g., Ignore greetings and small talk.)
The facility assist with prompt engineering, enabling users to create Summaries that are accurate, relevant, and aligned with the organization’s tone and voice, regardless of their experience with LLMs.
LLM Model - The LLM is the underlying AI engine that interprets the call transcript and generates the Summary based on the Template configuration and prompt. The platform supports a selection of LLMs optimized for different needs:
Performance-optimized: Fast and cost-effective for high-volume use
Quality-optimized: High accuracy for complex or sensitive conversations
Multilingual support: Capable of processing transcripts in various languages
A Business User can select the appropriate model at the template level to balance cost, latency, and accuracy.
Input/Output Language - This setting defines the input language for the call transcript and the output language for the generated Summary.
For example, a customer service call in Spanish can be summarized in English, or vice versa. Multilingual support ensures accessibility and consistency across geographies.
Entities - Allows users to define specific business terms or values that should be identified and highlighted within the Summary. These can include:
Customer-specific terms: names, account types, loyalty tiers
Domain-specific terms: products, service plans, geographic locations
Operational metadata: ticket IDs, escalation flags, complaint types
Entities improve the precision of Summaries and enable richer automation or analytics when summaries are consumed downstream.
Note
In the current release, adding Entities using the Summary Template is not supported.
About the Summary Builder Page
The Summary Builder page provides high-level details of all Summary Templates defined for the current Account, and enables a Business User to add a new Summary Template, edit the details of an existing Template, or delete existing Templates. The following is the Summary Builder page for the Account Admin/Business Analyst user:
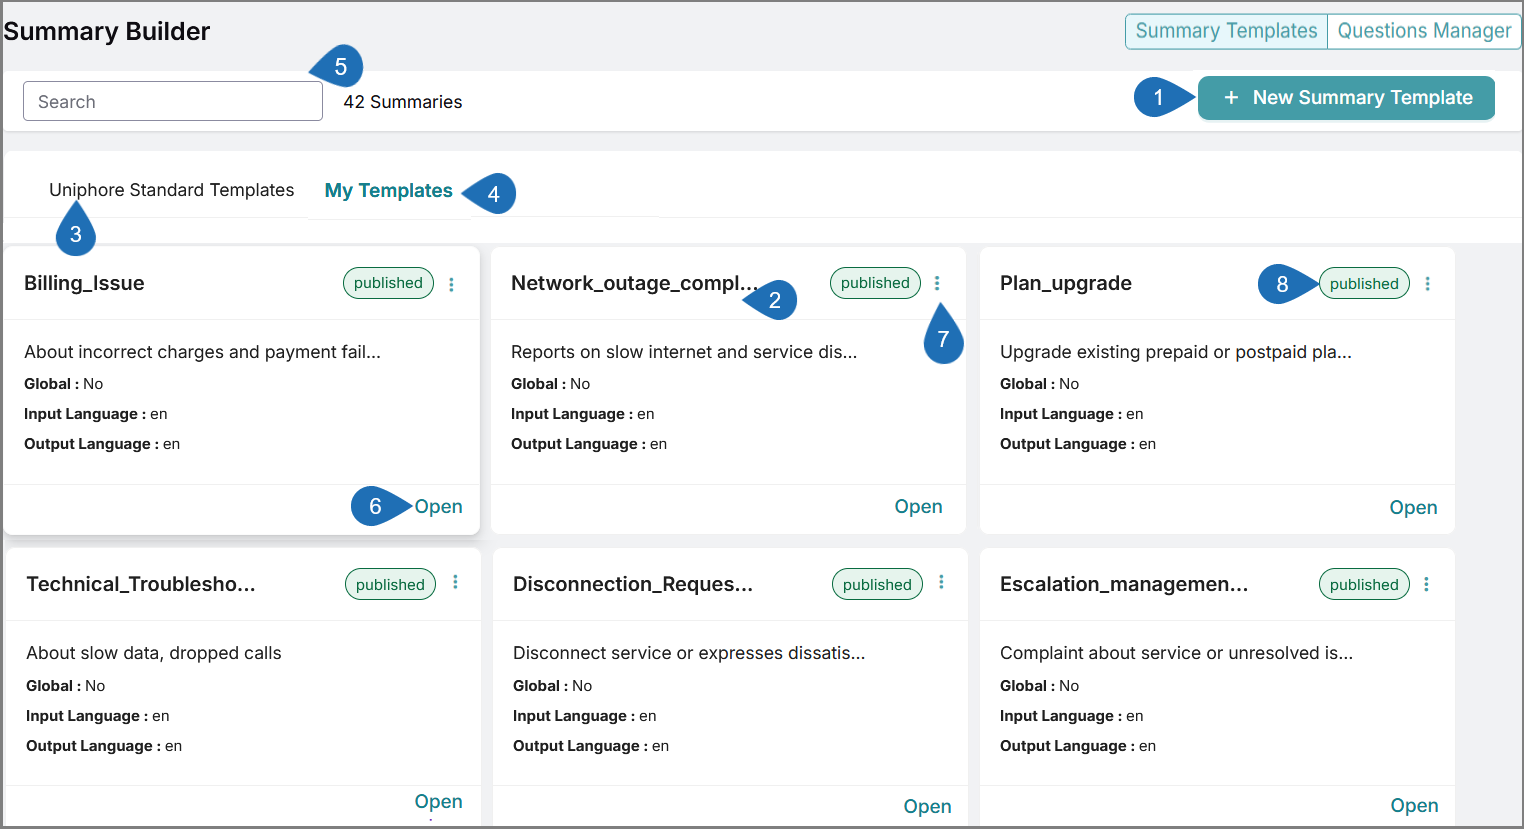
Item | Feature | Description |
|---|---|---|
1 | New Summary Template | Enables creation of a new Summary Template for the current account. NoteOnly a Super Admin user can create the Summary Template globally across Uniphore. |
2 | Summary Cards | Displays all Summary Templates that are defined for the current account. For each Summary Template, the card provides high-level details, including:
|
3 | Uniphore Standard Templates | Allows an Account Admin or Business Analyst to only view all global Templates created by a Super Admin or Partner Admin. |
4 | My Templates | Allows an Account Admin or Business Analyst to view, create, edit, and clone Summary Templates for the selected account. |
5 | Search Box | Enables searching the list for any Template that matches the details you provide. |
6 | Open Summary | Click Open and select the desired Version to view and update the Summary details. |
7 | Clone | Click Ellipsis ( NoteOnly Summary Templates in the Published state can be cloned. |
8 | Status | The current status of the Summary Template:
|
The Summary Builder is the design time facility used to define how summaries should be generated. The Summary Service is the run-time engine that generates the Summary after a call.
The following is a typical workflow for building a Summary Template and using it across products or third-party applications:
Summary Template Creation on Administration Platform |
|
Assign the Summary Template to Products or Third-Party Applications: |
|
AI-Powered Call Summary at Run Time Using Summary Service |
|
Summary Builder Roles and Permissions
The Business User is typically a Uniphore Super Admin, Partner Admin, Account Admin, or Business Analyst who is responsible for creating, managing, and publishing multiple versions of Summary Templates. Each user has different levels of access and permissions based on their assigned role. Detailed information about role-level access and permissions is provided below.
An Application Developer integrates the relevant published Summary Templates with Real-Time Guidance Agent, Conversation Insights Agent, or any other third-party applications based on business needs.
The matrix below outlines the visibility and access privileges for Super Admins, Partner Admins, Account Admins, and Business Analysts:
Feature | Account Admin / Business Analyst | Partner Admin | Super Admin |
|---|---|---|---|
View Templates |
|
|
|
Create Templates |
|
|
|
Edit Templates |
|
|
|
Delete Templates |
|
|
|
Clone Templates |
|
|
|
Create New Questions |
|
|
|
Add/edit custom questions |
|
|
|
Choose summary format (Paragraph/Bullet/ Numeric) |
|
|
|


Create a New Summary Template
A user with the Uniphore Super Admin, Partner Admin, Account Admin, or Business Analyst role can create and manage Summary Templates.
Note
Account Admin users can only create the Summary Template for the selected account.
Only Super Admin and Partner Admin users can create Summary Templates for all accounts. For more information on global access for Super Admin and Partner Admin users, click here.
Go to Administration > Measurements > Summary and click + New Summary Template. The Build Summary page is displayed:
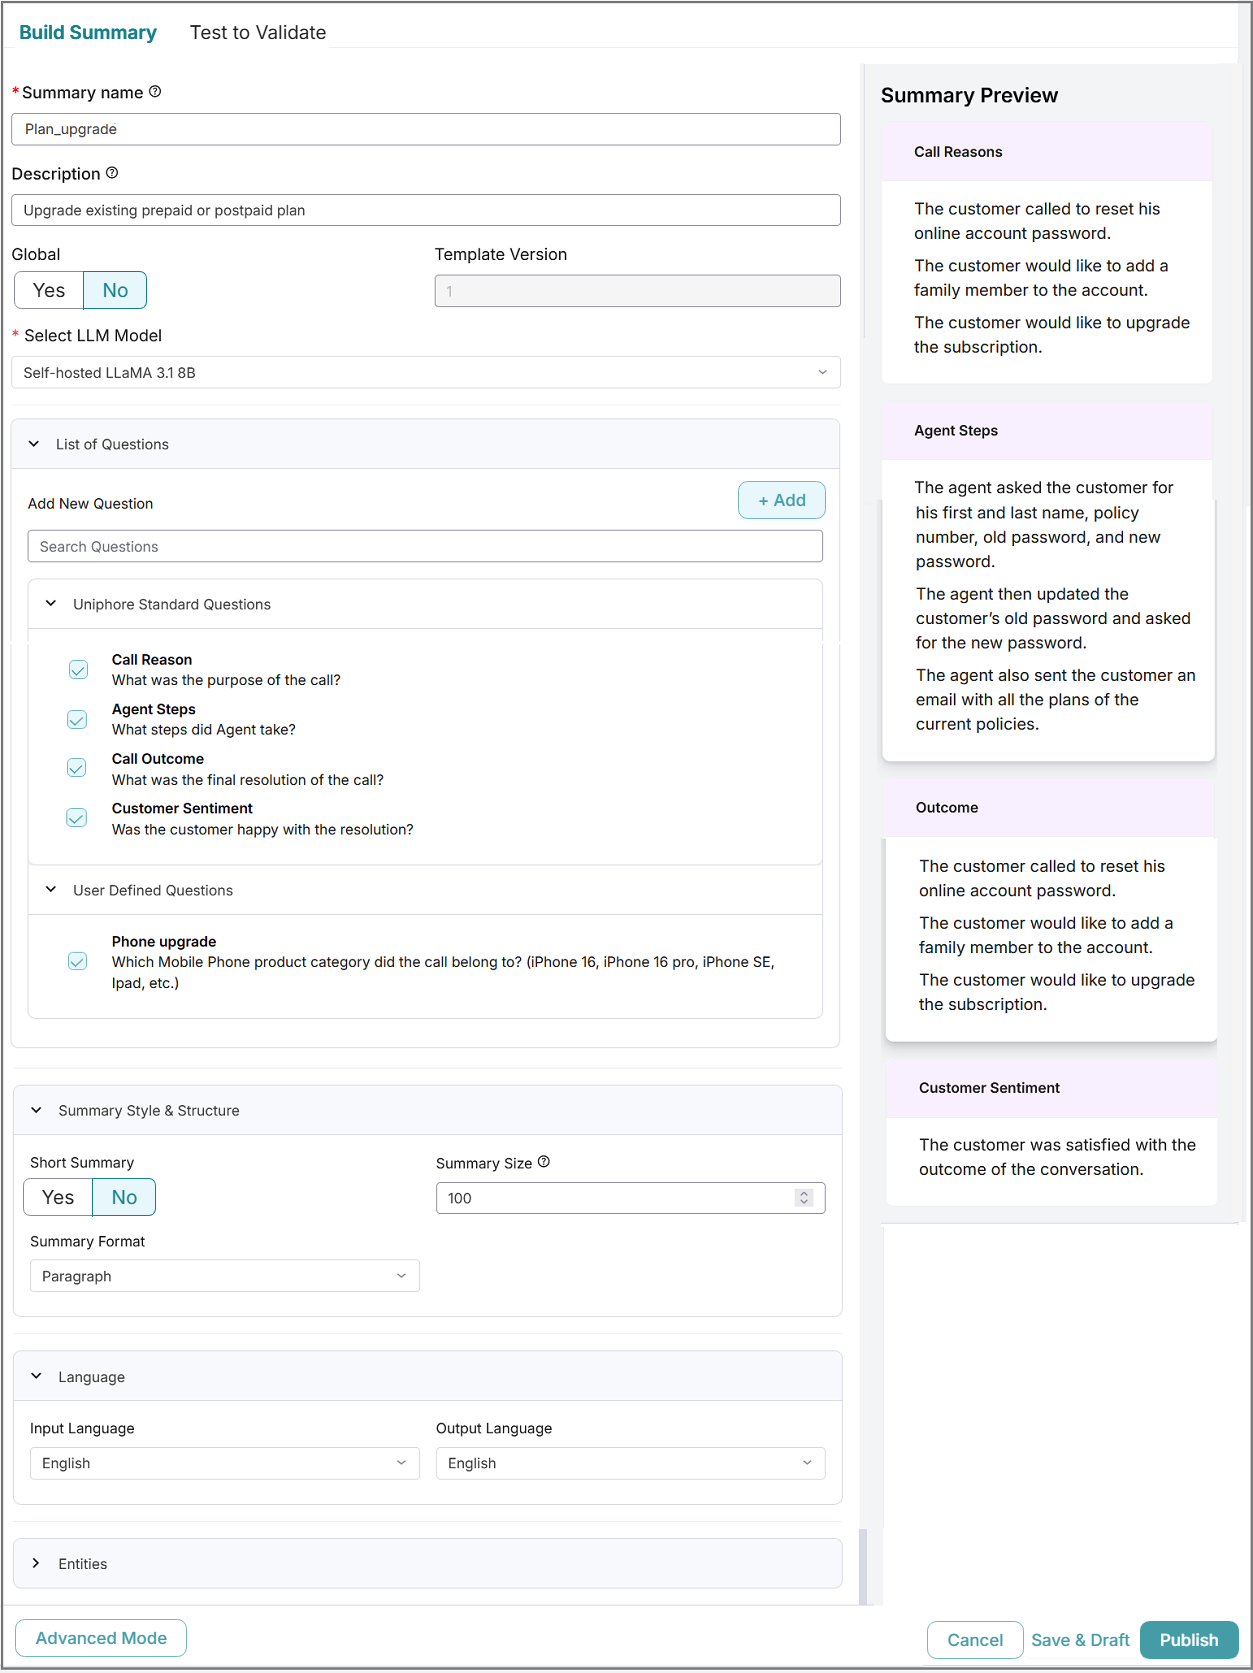
In the Summary Name field, enter a unique name for the new Summary Template. If the Summary name already exists in the Account, an error message is displayed.
Note
Only alphanumeric characters and underscores (_) are allowed in the Summary Name field. No spaces or special characters are allowed.
In the Description field, optionally provide information about this Summary that helps to explain what the Summary Template represents.
In the Global field, the option 'No' is selected by default. This field is not editable.
In the Template Version field, the value is shown as '1' by default. This field is not editable.
From the LLM Model dropdown list, select the LLM model and version you want to use for generating Summaries. The list displays all available LLM models.
In the List of Questions section, select questions to include in the Summary from the available out-of-the-box options. These questions are displayed as Summary Components (e.g., Call Reason, Customer Issue, Call Sentiment, Agent Steps, Call Outcome) in the generated Summary. Two types of question lists are available:
Uniphore Standard Questions
User-Defined Questions
You can also add new questions and edit existing questions, if required.
For more information on adding a new question, click here.
For more information on editing a question, click here.
In the Summary Style & Structure section, customize the formatting and structure of the generated Summary. The following style options are available:
Short Summary - Allows you to select Yes or No. When Yes is selected, only a concise summary containing key information will be generated in real time.
Example of a Short Summary:
Call Reason: Billing issue
Agent Actions: Verified customer data, submitted hotspot extension
Call Outcome: Resolved
Customer Sentiment: Satisfied
When the Short Summary is selected, the Summary Size and Summary Format fields are disabled.
Note
By default, the Short Summary option is set to No.
Summary Size - Allows you to mention the maximum number of characters that the generated summary can contain.
Summary Format - Allows you to select how the Summary will appear to the Agent:
Paragraph - Combine all questions into a concise, single-paragraph summary.
Sectional - Paragraph - Display each answer within a section as a paragraph.
To insert line breaks within a section, follow these steps:
Include the appropriate line tag in the LLM Instructions and Sample One-Shot Answer fields when adding questions. For more information on adding line tags, refer to the Add Questions section.
Enable advanced features and settings, and configure the model parameter values. For more information on configuring advanced settings and model parameters, refer to the Add Advanced Settings section.
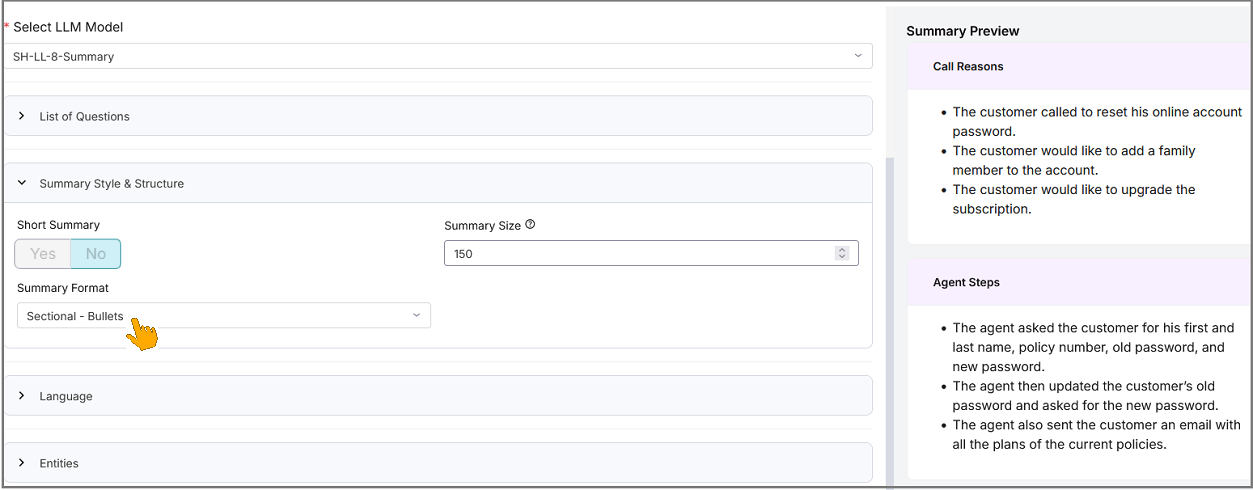
Sectional - Bullets - Display each answer within a section as bullet points.
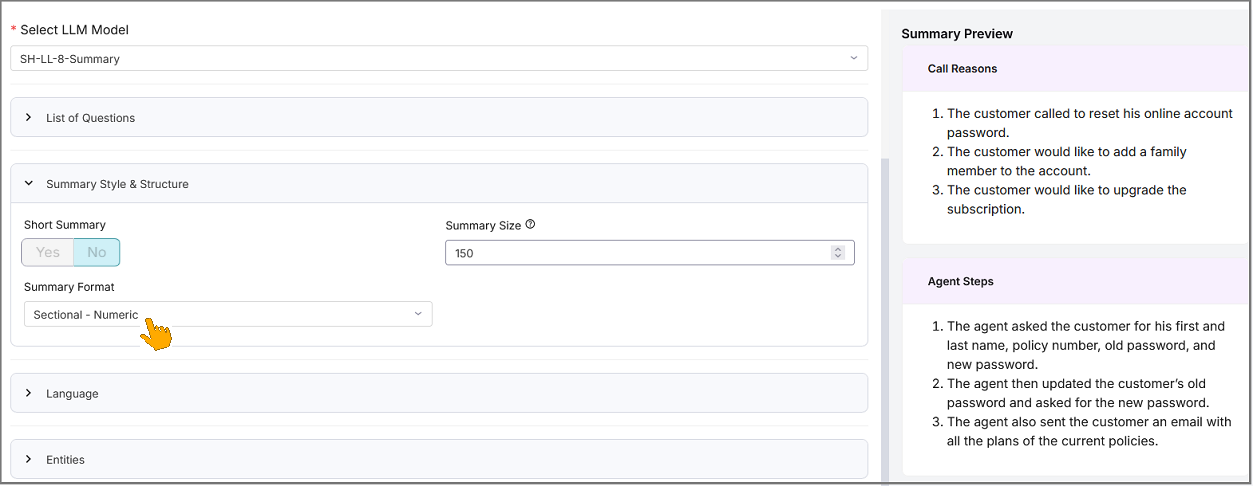
Sectional - Numeric - Display each answer within a section as a numbered list.
In the Language section, select the Input Language for Transcript and the Output Language for the generated Summary in their respective fields.
Optionally select an Advanced Mode to enable users with expertise in prompt engineering to overwrite or add custom prompts. For more information on Advanced Mode settings, click here.
Click Save & Draft to save the Summary as a draft. Once saved, the Publish button will be enabled. Your selected format will be reflected in the simulated design preview, helping you visualize how it will appear to an Agent. For more information on viewing a simulated Summary design preview, click here.
Click Publish to publish the Summary Template to the current account. Only the published Template can be used to generate more insightful Summaries. For more information on publishing a Summary Template, click here.
Note
To cancel your activity at any time without saving, click Cancel.
Super Admin User:
While creating a new Summary Template, a Super Admin can select whether it is available to all partners and accounts or only to a specific partner and account.
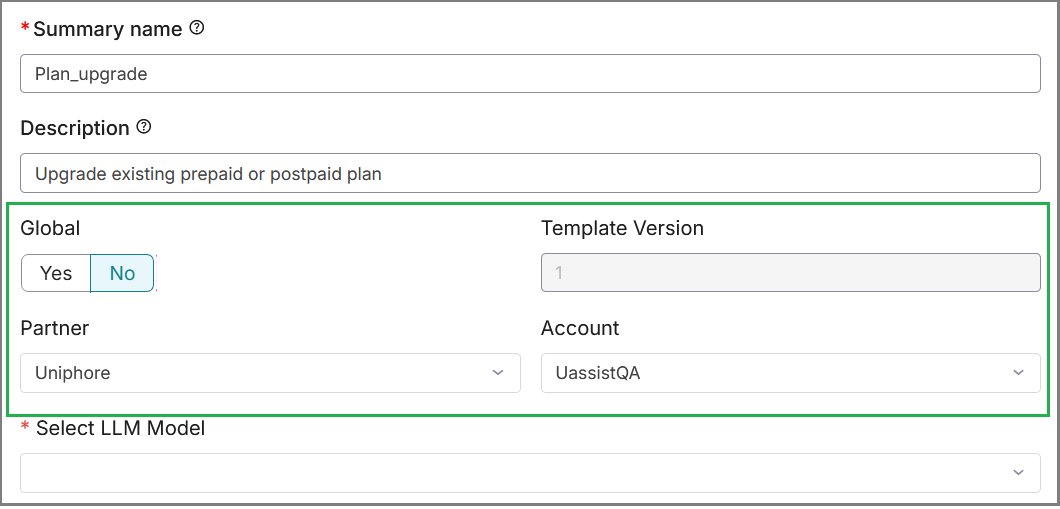
Yes - The newly added Summary Template will be available to all partners and accounts by default. If you select 'Yes', the Partner and Account fields will be disabled.
No - Allows you to select the partner and account for which the newly added Summary Template will be available.
Partner Admin User:
While creating a new Summary Template, a Partner Admin can select whether it is available to all accounts managed by the partner or only to a specific account. The selected Partner is shown in the Partner field by default, and it is disabled.
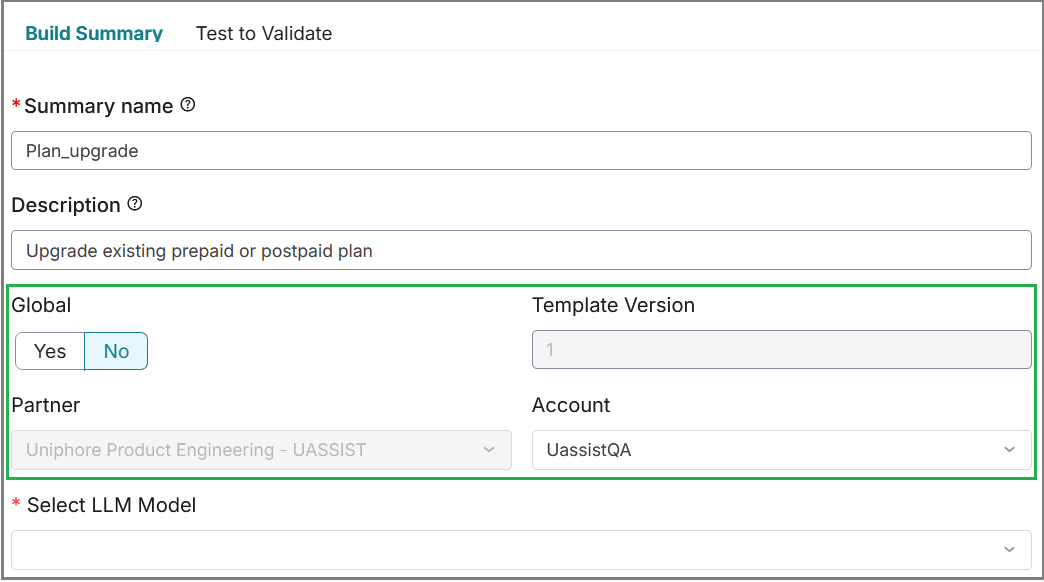
Yes - The newly added Summary Template will be available to all accounts managed by the partner. If you select 'Yes', the Account field will be disabled.
No - Allows you to select the specific partner's account for which the newly added Summary Template will be available.
You can optionally add new user-defined questions to a Summary Template, allowing you to define which insights the Summary should extract.
Click + Add to add a new question. The Add New Question window is displayed.
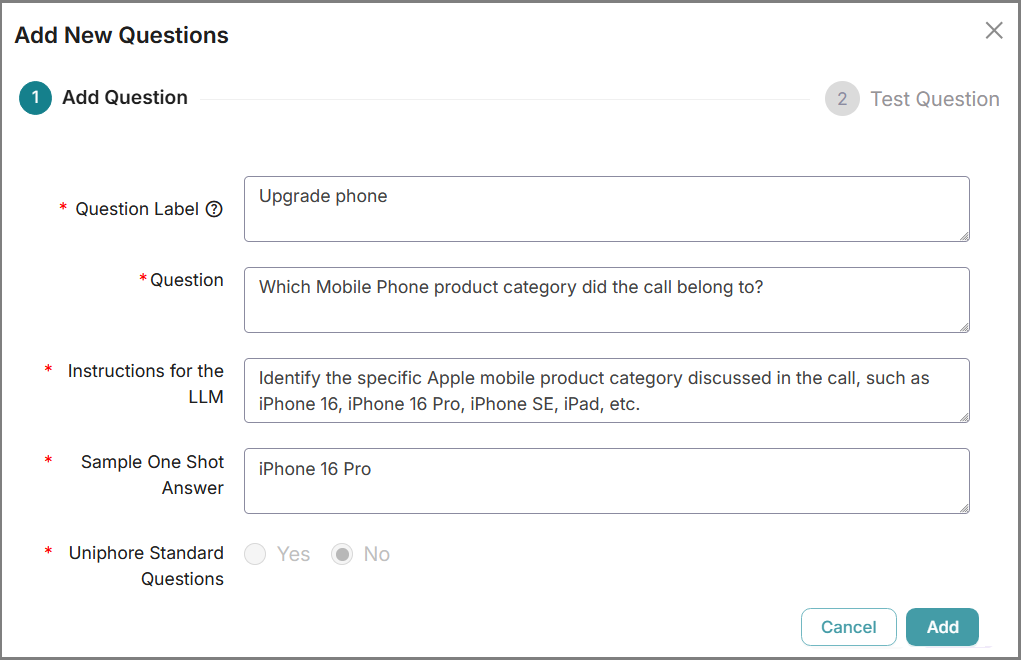
In the Question Label field, enter a unique label name for the new question.
In the Question field, enter the question to be part of the Summary.
In the Instructions for the LLM field, add a few sentences describing the tasks the selected LLM Model should perform whenever it is run. These instructions should be specific to the activities of the currently selected Summary Template. At runtime, the instructions are processed based on the LLM model you have selected.
To insert line breaks within a response to a question added to the Summary, include the line tag 'Be sure to separate each line with <n>' in the instructions.
In the Sample One Shot Answer field, provide an example of the expected output for a specific question added to the Summary. This helps guide the LLM in understanding the format and type of response it should generate for that question.
To insert line breaks within a response, include the line tag in the Sample One Shot Answer. For example:
Name: Jose Ramon Garcia <n>
Number: 555121202 <n>
In the Uniphore Standard Questions field, the option No is selected by default. This field is non-editable.
Note
Only a Super Admin user can add questions to the Uniphore Standard list.
Click Add to navigate to the Test Question window. To cancel your activity at any time without saving, click Cancel.
After adding a question, you can test it to validate the LLM instructions added for the Summary Template. This ensures the expected answer is being generated before using the Template in real time.
In the Add Transcript text box, provide a test transcript.
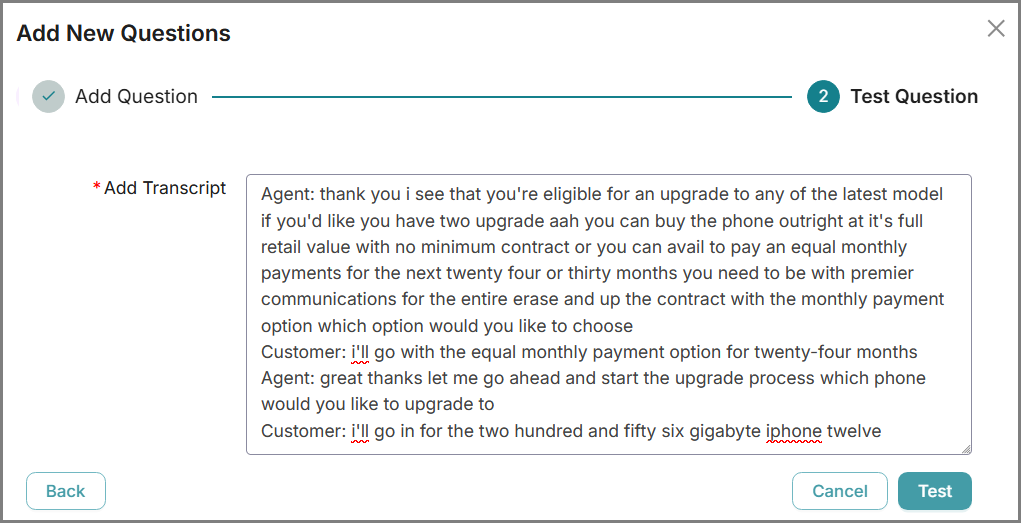
Click Test to generate the test output along with the processing time for the transcript.
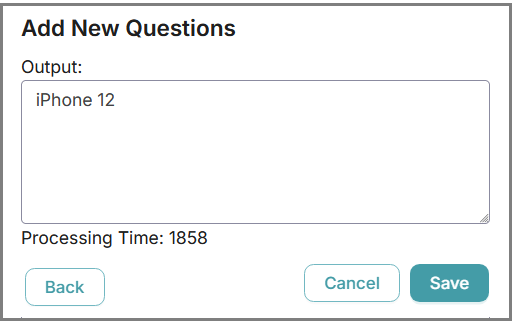
If you are not satisfied with the output, click Back to tweak the Transcript or LLM instructions, and then test the Transcript again.
Once you are satisfied with the output results, click Save to save the newly added question.
You can optionally edit user-defined questions already used in a Summary Template.
Click the Edit
 icon in the corresponding question to edit the question based on insights that the Summary should extract.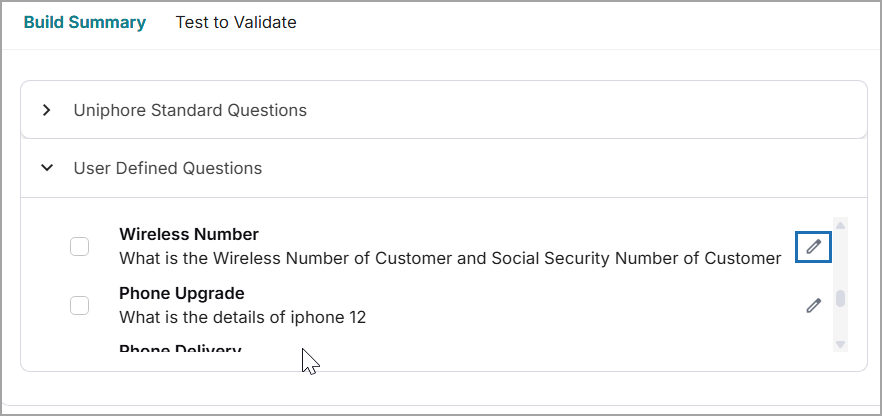
If the selected question is already used in any other Template, a warning message is displayed.
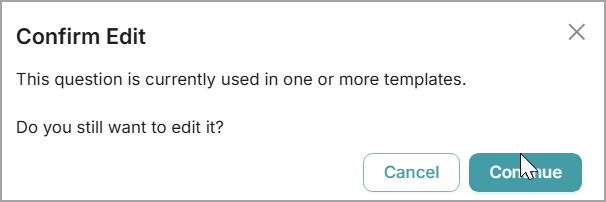
Click Continue to continue editing the question. The Edit Question window is displayed. If you make any changes, the
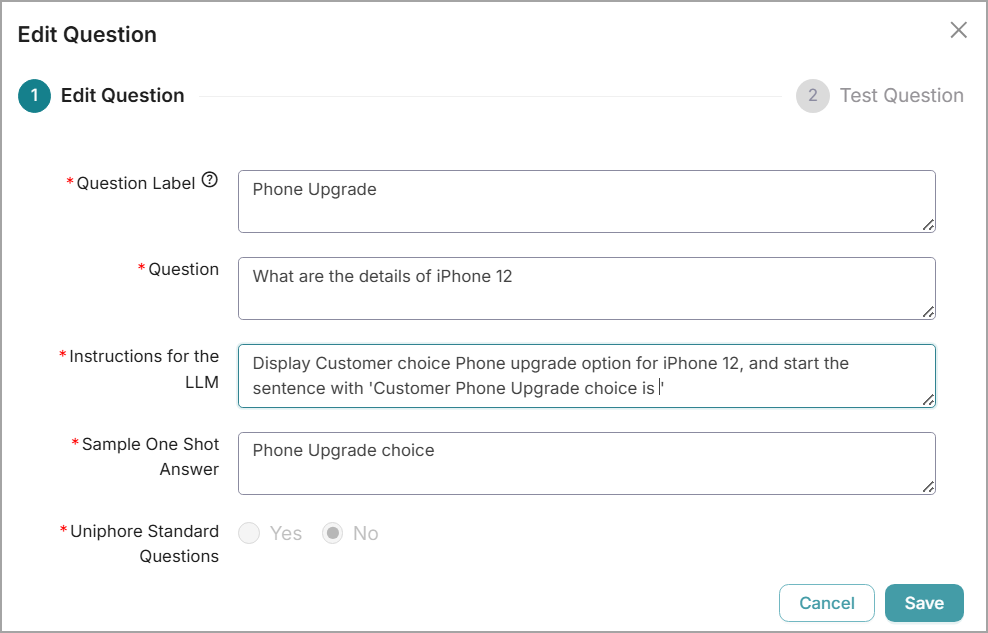
Update user-defined question details and their associated LLM instructions, as needed. For details, see Step 2 through Step 6 above.
Note
Only a Super Admin user can edit Uniphore Standard questions.
Click Save to navigate to the Test Question window. To cancel your activity at any time without saving, click Cancel.
After editing a question, you can test it to validate the LLM instructions added for the Summary Template. For details, see Step 1 through Step 4 above. If the modified question is already used in any other Template, a warning message is displayed.
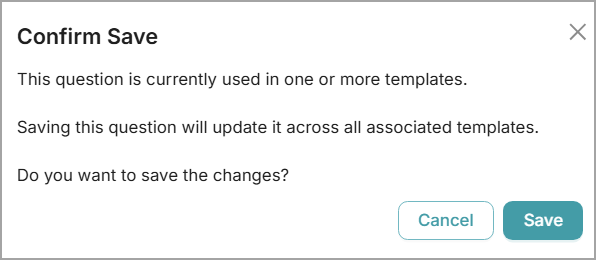
Clicking Save allows you to save the modified question, and the same changes are automatically reflected across all associated templates. To cancel your activity at any time without saving, click Cancel.
Advanced Mode in Summary Builder is designed for expert users (e.g., enterprise users or prompt engineers) who require more flexibility than the standard template fields can provide. While standard templates use predefined inputs such as Questions, Language, and Style to generate summaries, enterprise customers often need greater control, such as enforcing mandatory keywords, applying domain-specific terminology, or customizing tone and instructions beyond what templates allow.
Advanced Mode provides a prompt-based configuration interface that gives users full control over the instructions used to generate summaries. It allows users to edit or override default prompts (system and user prompts) and model parameters to fine-tune the model’s behavior for specific use cases.
Within each Advanced Setting under Prompt Configuration, users can also see color-coded variable icons, such as Transcript, Target Language, Questions, and Answers. These variables can be inserted directly into prompts to define actions and further customize the output.
Optionally, click Advanced Mode on the Build Summary page to set Advanced Settings for the Summary.
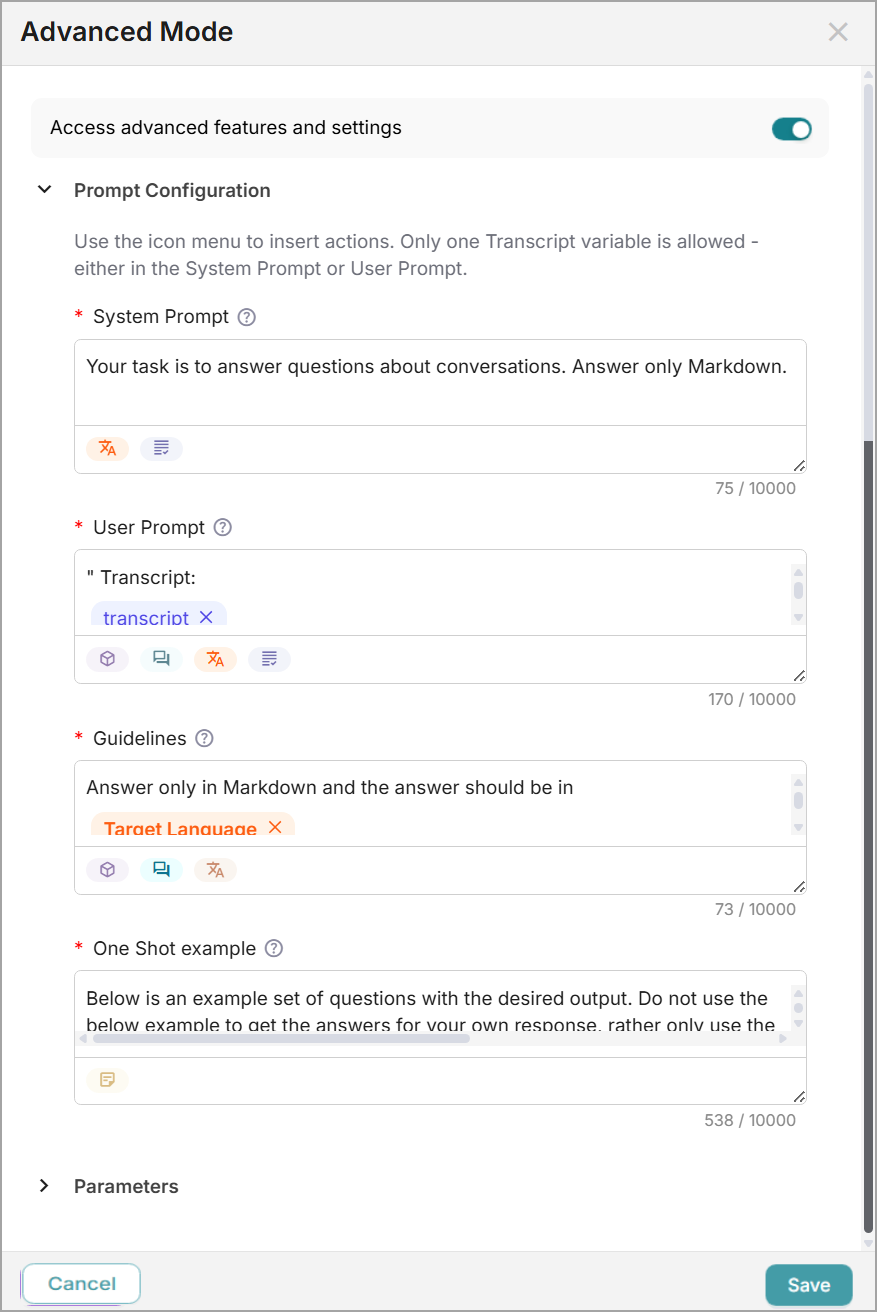
Switch the Toggle On to access Advanced features and settings. The prompts in the Advanced Mode window are pre-filled with configurations from the template.
Enter the custom instructions to guide the LLM to focus on specific details, tone, structure, or business-specific language not captured by standard configurations, and add actions by clicking the relevant variable icons. The Prompt Configuration typically includes:
System Prompt - Sets the AI’s general behavior and tone. You can define up to 10000 characters.
You can add Target Language and Transcript variables by clicking respective icons.
Note
The Transcript variable can be added in either the System Prompt or the User Prompt.
If you want to add the Transcript variable to the System Prompt, you must first remove it from the User Prompt.
User Prompt - Provides direct instructions to the LLM about what to extract or how to format the output. You can define up to 10000 characters.
By default, the Transcript variable and the Questions selected for the Summary Template are included. You can also add the Target Language variable. To remove a variable, click Close.
Guidelines - Provide instructions for the AI's general behavior during a call. You can define up to 10000 characters. It is recommended to use a concise and formal tone, focusing on the customer issue, agent actions, and call resolution.
By default, the Target Language variable is added. You can also add the Questions variable.
One Shot Example - A sample Question and Answer to help the LLM understand the expected output structure. You can define up to 10000 characters. By default, the Answers for the selected Questions are included.
Enter the model parameters that control the determinism and creativity of the model's response generation:
Temperature (0.0 – 2.0) - Controls the creativity and variability of responses.
Lower - Generates more focused and deterministic results.
Higher - Produces more diverse and creative outputs.
Top-p (0.0 – 1.0) - Applies nucleus sampling. The model selects tokens from the smallest probability set whose cumulative probability exceeds the specified threshold (p).
Top-k (1 – 100) - Restricts the model to choosing from the top k most likely tokens at each step.
Seed - Enables consistent, reproducible responses across multiple requests when using the same input and parameters.
Max tokens - Defines the maximum length of the response. This setting is linked to Summary Size.
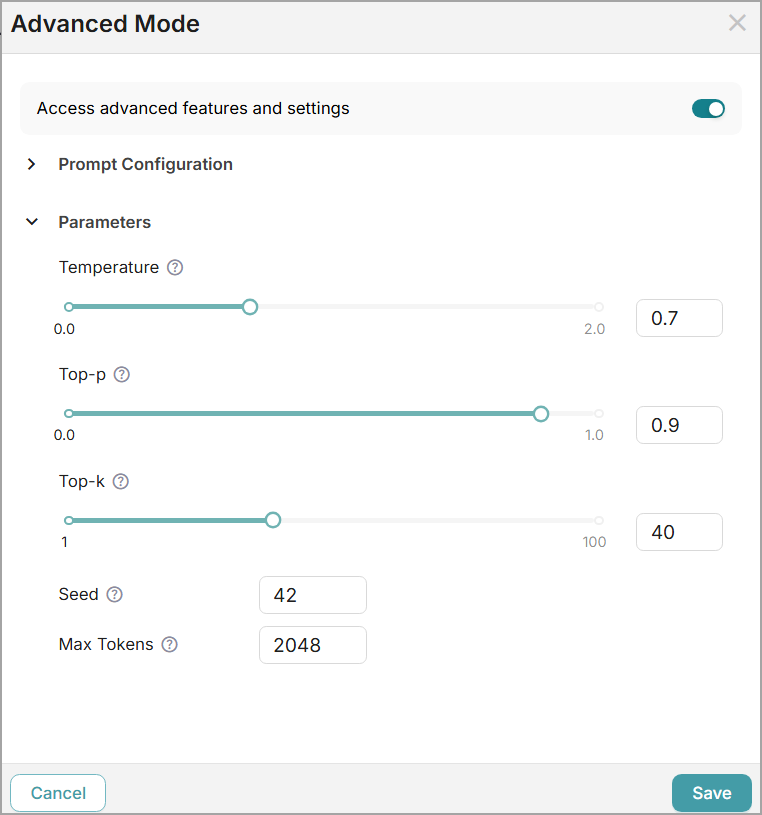
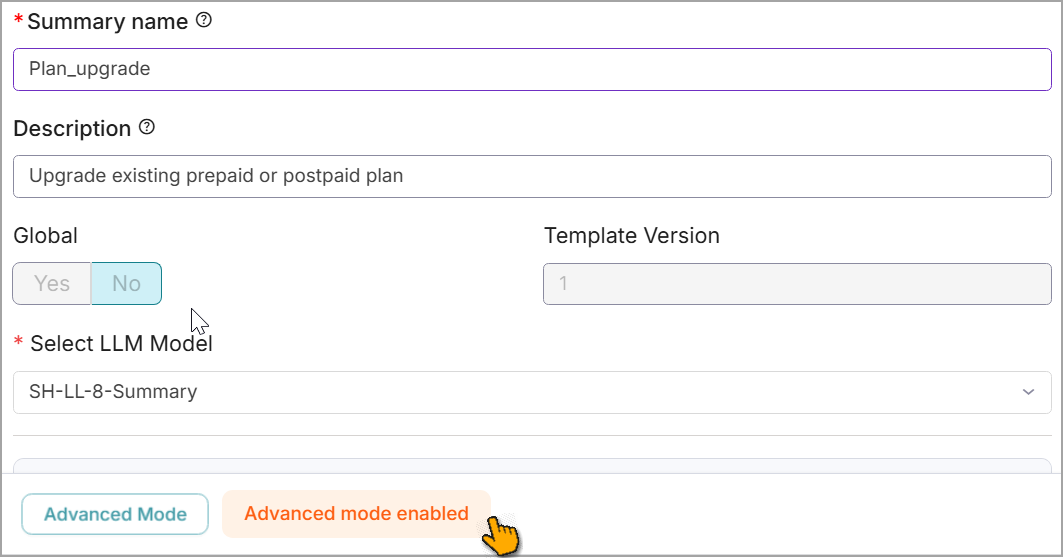
Click Save to add the advanced settings to the Summary Template. After saving, a toggle indicator will appear, indicating that Advanced Mode is enabled and that the current template is using Advanced Mode. To cancel your activity at any time without saving, click Cancel.
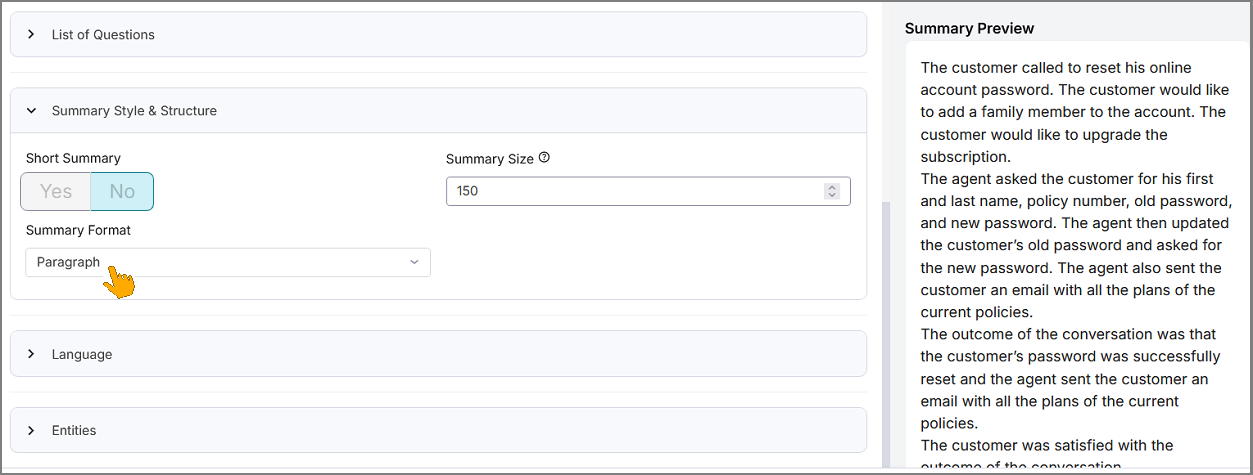
During configuration, you can experiment with different format selections. Your selected format will be reflected in the simulated design preview on the right side of the page, allowing you to better visualize how it will appear to an agent.
Paragraph: Combine all questions into a concise, single-paragraph summary.
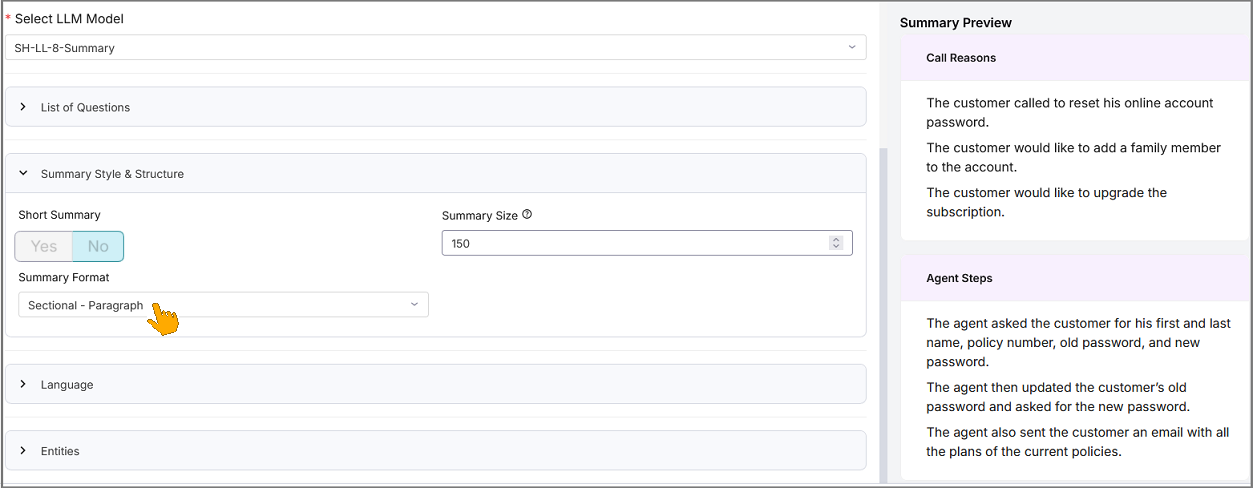
Sectional - Paragraph: Display each answer within a section as a paragraph.
Sectional - Bullets: Display each answer within a section as bullet points.
Sectional - Numeric - Display each answer within a section as a numbered list.
After creating the Summary Template, you can publish it to your account.
Important
Only the Summary Template with a published state can be used in Real-Time Guidance Agent and Conversation Insights Agent.
To publish the current version of a template:
Click Publish in the Build Summary page. The Publish window is displayed:
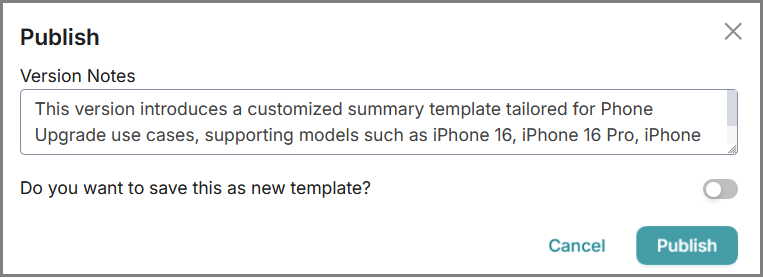
In the Version Notes field, optionally add a description of a specific version of the Summary Template and click Publish.
To publish the current version as a new template:
If you want to save this version as a new template, switch the toggle. Once enabled, the Template Name field is available.
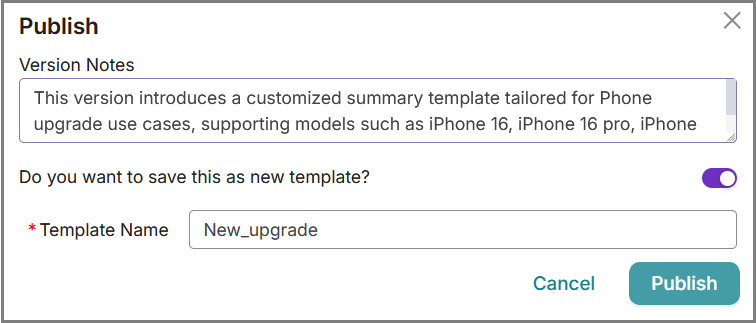
Enter the name of the Template and click Publish.
You can change the Summary details if required.
Click Open from the specific Summary Card and then select Version to view the Summary details.
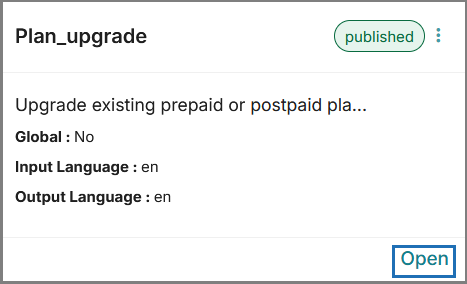
Update the Summary Name or Description to enable Edit & Update at the top right side of the page. Modify the required Summary information as needed, then click Edit & Update to save the current version of the Template with the updated information.
To cancel your activity at any time without saving, click Cancel.
If you want to save and publish the updated Template as a new version, follow the steps 1 to 2 provided in the Publish Summary section.
If you want to save and publish the updated Templates as a new Template, follow the steps 1 to 2 provided in the Publish Summary section.
You can duplicate an existing Template and save it as a new one.
Important
Only Summary Templates in the Published state can be cloned.
Click Ellipsis (
 ) and select Clone to duplicate an existing template and save it as a new one.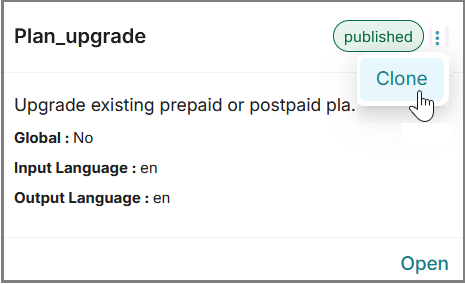
The Clone Summary window is displayed:
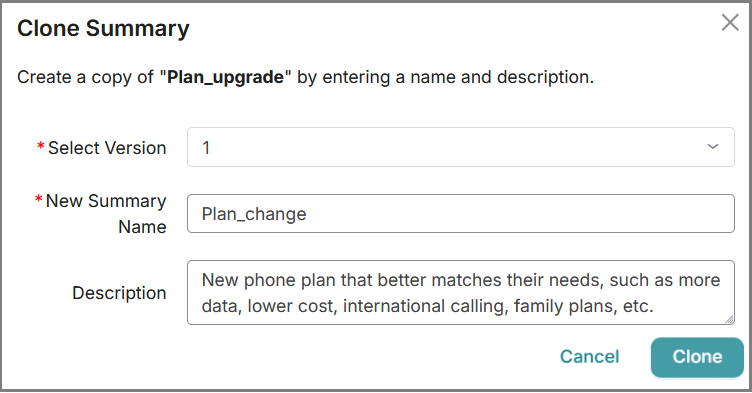
From the Version dropdown, select the Template version that is to be cloned.
In the New Summary Name field, enter a unique name for the new Summary Template.
In the Description field, optionally provide information about this Summary that helps to explain what the Summary Template represents.
Click Clone. A new Template with the default version '1' is created, and a confirmation message is displayed. To cancel your activity at any time without saving, click Cancel.
Important
A cloned Summary Template will be in the Published state by default. You can open the cloned template and make the necessary modifications.
Test Summary Templates
Summary Builder includes a built-in feature that allows users to test in a sandbox environment. It enables them to run tests on templates using call transcript datasets to validate how summaries are generated in real time before deployment. This helps identify gaps, fine-tune the Summary Template, and export results for team review.
It also allows users to track test history, filter and sort test results, and download the results in an Excel (.xlsx) format for validation, ensuring that the Templates meet specific requirements and references.
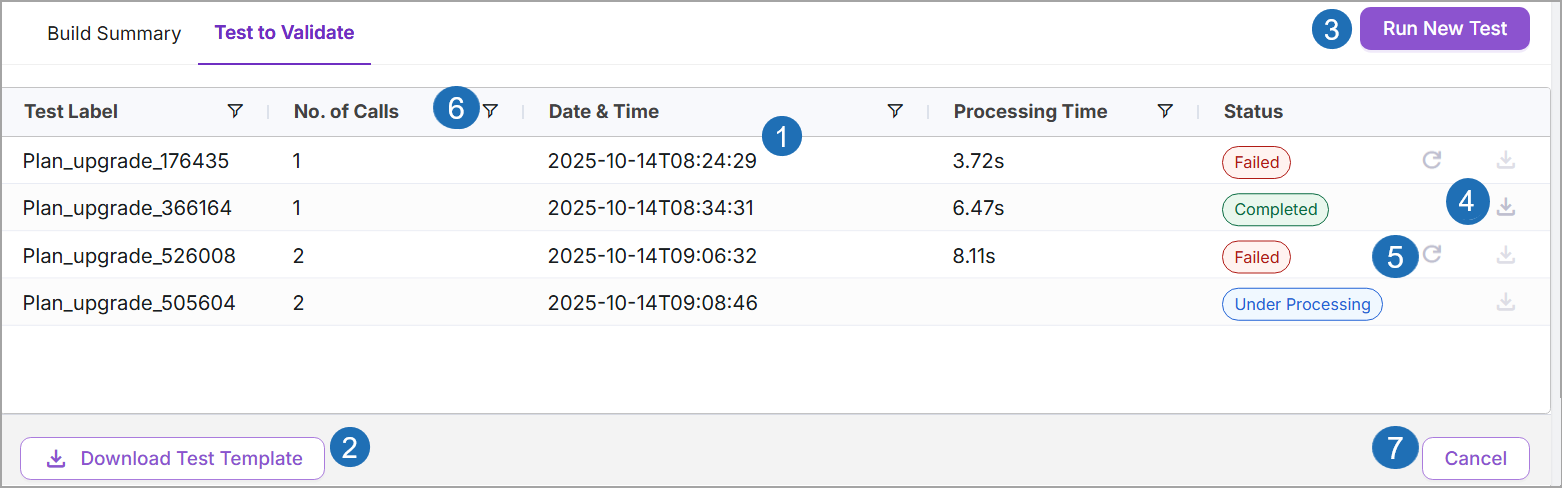
The Test to Validate page provides high-level test history details and testing status updates for a specific Summary Template. It enables users to download a test template (.xlsx) and perform tests using sample transcripts, allowing easy iteration for template optimization.
Item | Feature | Description |
|---|---|---|
1 | Test Results List | Displays the list of test results performed for the current Summary Template. Each test result includes the following details:
|
2 | Download Test Template | Click Download Test Template to download the Summary Test Template (.xlsx). |
3 | Run New Test | Click Run New Test to run a test with sample call transcripts. For more information on testing call transcripts, click here. |
4 | Download | For completed tests - Click Download to retrieve and validate the auto-generated Summary results. For failed tests - Click Download to view the error details and identify the reasons for failure. |
5 | Retry | Click Retry to rerun tests for Summary Templates only for the test records that resulted in a Failed status. This icon is available only for test records with a Failed status. |
6 | Filter | Click Filter ( For more information on filtering test results, click here. |
7 | Cancel | Click Cancel to navigate to the Summary Builder page. |
A user with the Uniphore Super Admin, Partner Admin, Account Admin, or Business Analyst roles can upload and test sample transcript files (.xlsx) using the Summary Template for an account.
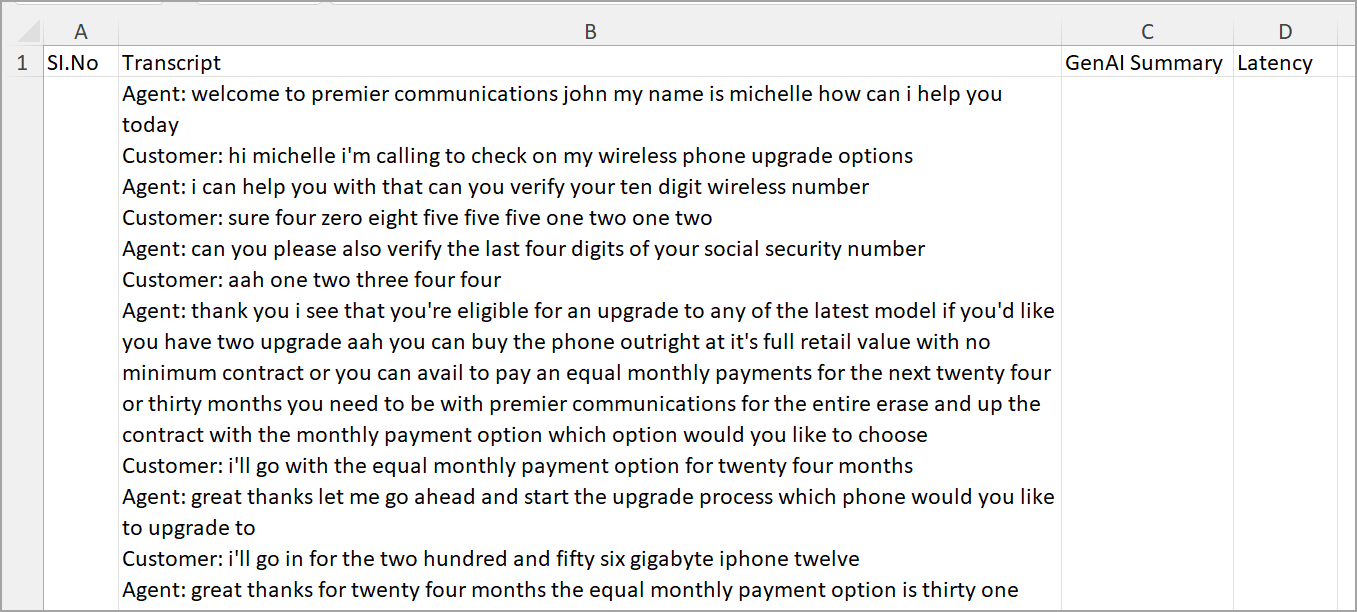
Click Download Test Template to download the Summary Test Template (.xlsx).
In the downloaded template, enter the sample call transcripts and save the file in your desired location.
You can add any number of call transcripts.
Sample Test Template
Click Run New Test in the top right corner of the page. The Run Test window appears.
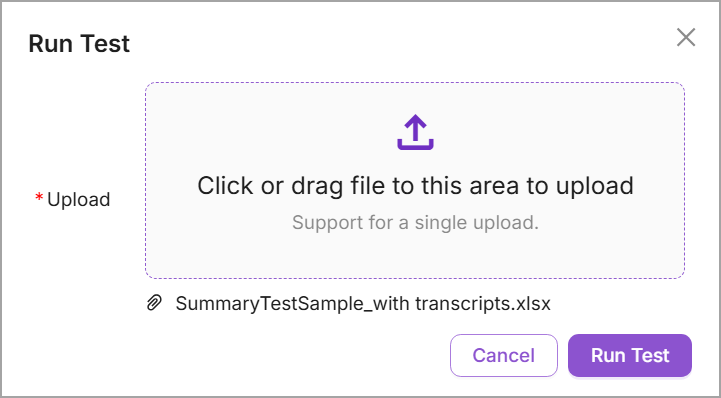
To upload a Summary test file in the Upload section:
Click Upload (
 ). The window to select a file will open. Select and upload the Summary test file, or
Drag and drop the test file into the designated upload area.
After successful uploading, the name of the uploaded Summary test file appears.
Note
If the test file is invalid or contains empty rows, the upload will fail, and an error message will be displayed.
Click Run Test to validate how Summaries are generated using the selected Summary Template. During execution, the status is displayed as 'Under Processing ' in the Status column.
Refresh the page or navigate away and return to the Test to Validate page to view the updated status (Completed or Failed). When the test is completed, the Summary results file is available for download.
Click Download (
 ) in the respective rows where the test is completed to validate the Summary results and refine the Summary Template, if required.
Sample Summary Results:
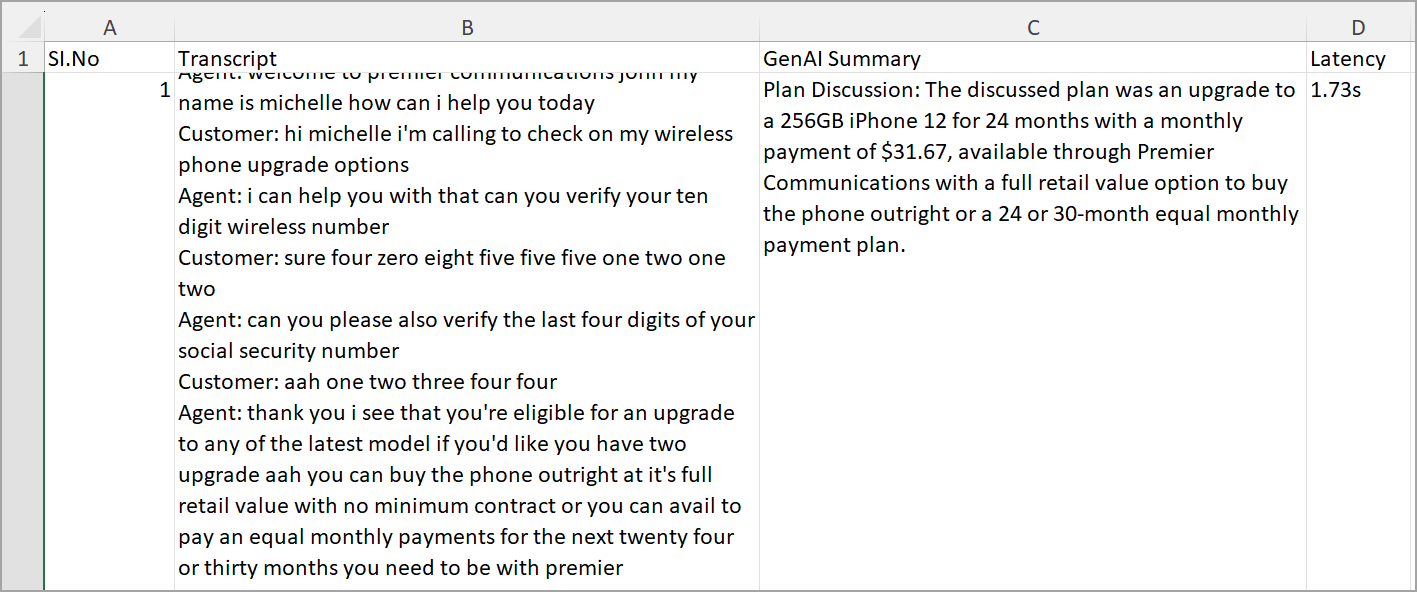
In the GenAI Summary column, you can view the AI-generated Summary results.
In the Latency column, you can view the total time taken to process the test transcript file.
Note
You can re-run a test with a refined template to validate how summaries are generated using the updated Summary Template.
To help users focus on test results that meet specific criteria, the columns in the Test to Validate page can be filtered or sorted.
Click Filter (
 ) in any of the columns (Test Label, No. of Calls, Date & Time, or Processing Time) to display a pop-up with the relevant filter options for that column. To filter the list, select a specific condition, enter the desired characters or values, and then click Apply. To remove a filter, click Reset.
You can also use the AND or OR operator to combine two conditions.
Filter Test Label column:
The following options are available to filter the Test Label column:
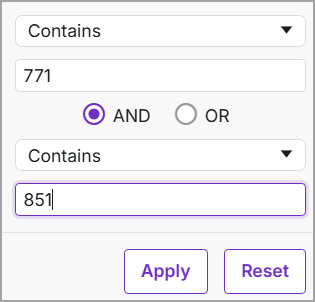
Contains - Displays labels that contain the mentioned characters.
Does not contain - Displays labels that do not contain the mentioned characters.
Equals - Displays labels that exactly match the mentioned characters.
Does not equal - Displays labels that do not match the mentioned characters.
Begins with - Displays labels that begin with the mentioned characters.
Ends with - Displays labels that end with the mentioned characters.
Blank - Displays records with no label value.
Not blank - Displays records that contain a label value.
Filter Number of Calls and Processing Time columns:
The following options are available to filter the Number of Calls and Processing Time columns:
Equals - Displays values that exactly match the specified number.
Does not equal - Displays values that do not match the specified number.
Greater than - Displays values greater than the specified number.
Greater than or equal to - Displays values greater than or equal to the specified number.
Less than - Displays values less than the specified number.
Less than or equal to - Displays values less than or equal to the specified number.
Between - Displays values that fall within a specified range.
Blank - Displays records with no value.
Not Blank - Displays records that contain a value.
Filter Date & Time column:
Date & Time
Equals - Displays records that match the specified date exactly.
Does not equal - Displays records that do not match the specified date.
Before - Displays records with a date earlier than the specified date.
After - Displays records with a date later than the specified date.
Between - Displays records that fall within a specified date range.
Blank - Displays records with no date value.
Not Blank - Displays records that contain a date value.
Click any of the column headers (Test Label, No. of Calls, Date & Time, or Processing Time) to cycle the list order between ascending, descending, and unsorted. Only one column can be sorted at a time.
Questions Manager
The centralized Question Manager serves as a single hub for all Uniphore standard and user-defined questions, making it easy to review and curate them. It helps maintain and refine the questions the AI uses to gather information from conversations, reduce duplication, and enforce consistency in how Summary questions are framed and utilized across the organization.
A key benefit of the Question Manager is that it allows a user with Super Admin, Partner Admin, Account Admin, or Business Analyst roles to monitor and update questions used across the organization and Summary Templates, ensuring that they meet specific requirements and preferences.
The Questions Manager page provides high-level details of all questions across the organization, and enables you to monitor question usage, edit, categorize, and delete questions:
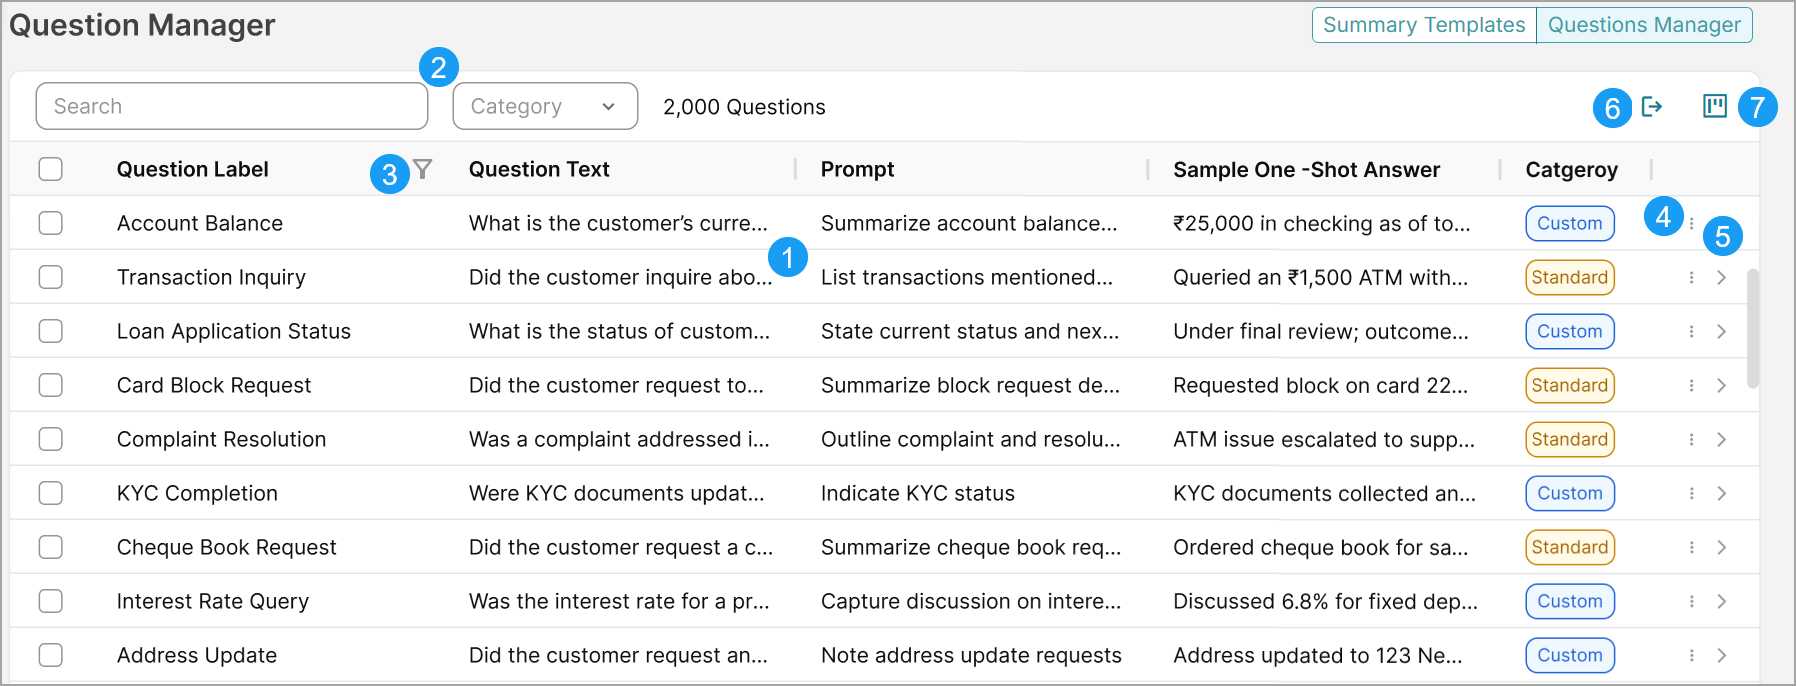
Item | Feature | Description |
|---|---|---|
1 | Question List | Displays all questions that are defined for the current account. For each Experience, the list provides high-level details, including:
|
2 | Search Box | Enables searching the list for any Question that matches the details you provide. You can further refine the search by selecting the question type (All, Standard, or Custom) from the dropdown list. |
3 | Filter | Click the Filter
|
4 | Ellipsis | This Ellipsis For more details on converting question types, click here. For more details on deleting a specific question type, click here. |
5 | Question Details | Click the Right Arrow For more details on viewing question details, click here. For more details on viewing associated templates, click here. |
6 | Export | Click the Export |
7 | Column Reorder | Click the Column Reorder For more details on column reordering, click here. |


Only a Uniphore Super Admin can convert a question type from standard to custom, and vice versa.
Click Ellipsis
 in the respective row to change the question type:
For Custom Question types:
Select Set as Standard to promote them to Uniphore Standard Questions.
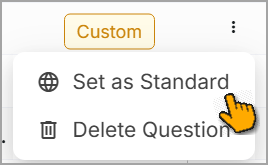
A confirmation message appears. Once promoted, the question becomes available to all users with the Partner Admin, Account Admin, and Business Analyst roles across all accounts.
For Standard Question types:
Select Convert to Custom to demote them to Custom Questions. A confirmation message appears.
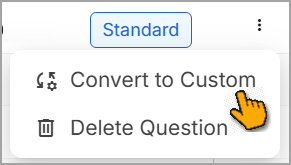
Once demoted, the question becomes available only to users with the Partner Admin, Account Admin, and Business Analyst roles in the User-Defined Questions list for a specific account.
If a Standard Question is used in any Summary Templates, a pop-up message appears, prompting you to remove the question from all associated templates before proceeding.
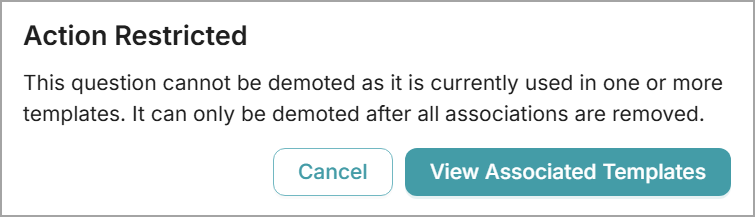
For more information on viewing associated templates, click here.
A user with the Super Admin, Partner Admin, Account Admin, or Business Analyst roles can view question details along with metadata and the list of templates in which the question is used, and can update them as required.
Click the Right Arrow
 icon in the respective question row to view the question details window. This window displays the question name, category, description, LLM instruction, and a sample answer showing the expected output for the selected question.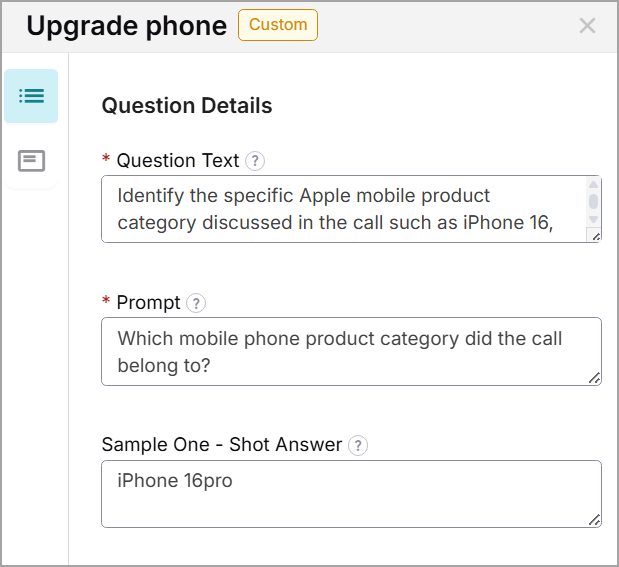
Place the cursor in the respective fields and edit the question details as required.
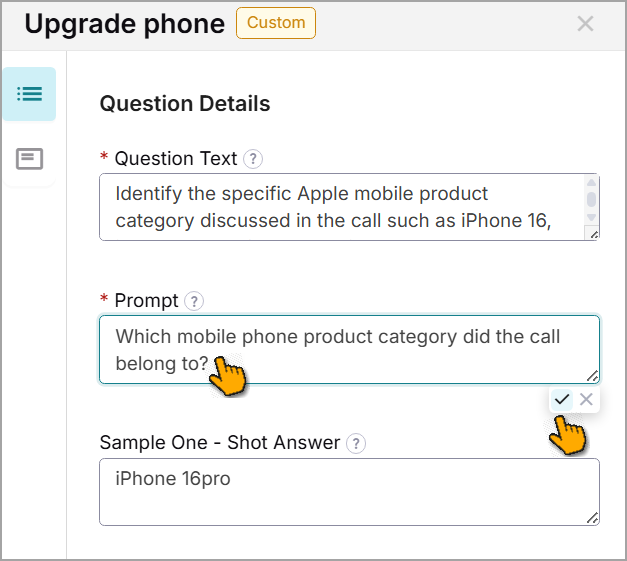
After updating, click Tick on the right side to save the updates. To cancel your activity at any time without saving, click Close.
Note
Only Super Admin users can see the Actions button in the top-right corner of the selected question details window, which allows them to convert the question type or delete the question if required.
Click
 in the left pane of the Question Details window to view the list of templates associated with a selected question.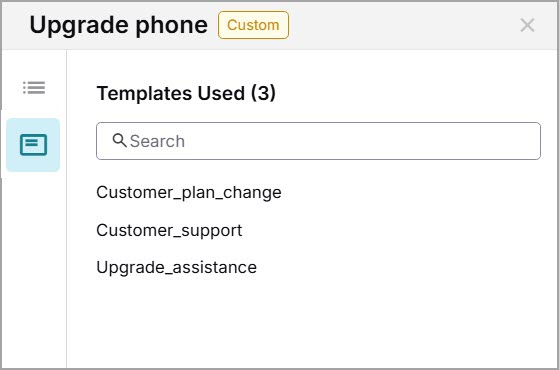
Note
To remove the association between a question and a template, you must delete the existing template and create a new one.
Only a Uniphore Super Admin can delete the question.
Click the Ellipsis
icon in the respective row and select Delete Question.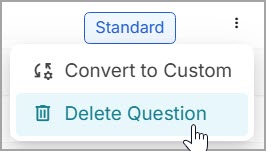
If the question is not used in any templates, a confirmation message appears, asking you to permanently delete it. Click Delete Question to confirm.
If the question is used in any templates, a pop-up message appears, prompting you to remove it from all associated templates before proceeding.
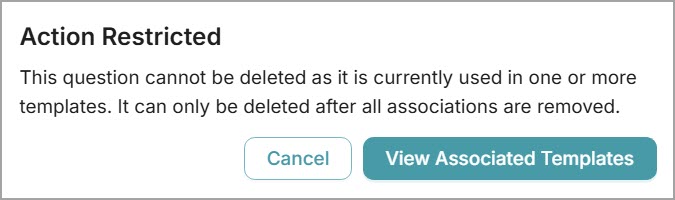
For more information on viewing associated templates, click here.
Click the Column Reorder
 icon at the top right corner of the page. A Table Settings window is displayed.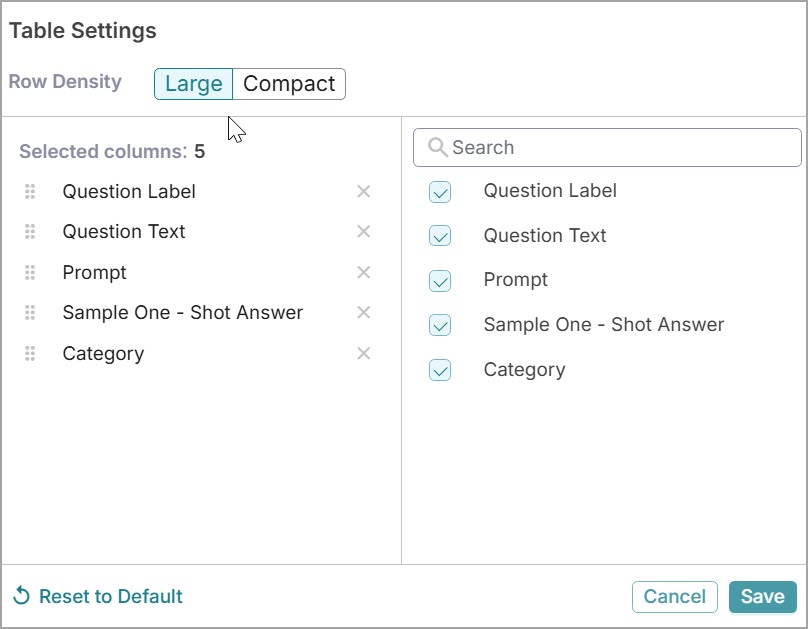
In the right pane, select the checkboxes for the columns you want to display in the Questions Manager page. The selected columns appear in the left pane. By default, all five columns are selected.
Hover over the column name and drag it to the desired position in the left pane. The columns in the Questions Manager page are updated based on the reordered columns.
If you want to reset the table columns to their default order, click Reset to Default.
Click Close next to the selected column to optionally remove a column from the table.
Click Save to save the table settings. To cancel your activity at any time without saving, click Cancel.
Only a Uniphore Super Admin can perform bulk delete operations.
To delete multiple questions simultaneously, select the checkboxes corresponding to the desired questions in the Questions Manager page. Once multiple questions are selected, the Bulk Actions dropdown becomes available at the top right side of the page.

From the dropdown, select Delete Questions.
If the selected questions are not used in any templates, a confirmation message appears asking you to permanently delete them. Click Delete All to confirm.
If any of the questions are used in templates, a pop-up message appears, prompting you to remove them from all associated templates before proceeding.
Assign the Summary Template to Uniphore or Third-Party Applications
After creating and validating the Summary Template, an Account Admin or Business Analyst can assign it to a Uniphore Experience in Real-Time Guidance Agent or a Business Process in Conversation Insights Agent, as well as to any third-party applications.
Note
Only the Summary Template with a Published state can be assigned to products or third-party applications.
For more information on assigning a Summary Template to an Experience in Real-Time Guidance Agent, click here.
View AI-Powered Call Summary at Run Time
In real-time, the AI-powered, contextualized, and customized Summary is displayed to an Agent using the assigned Summary Template.
For more information on viewing the Summary at run time in the AI Agent Assist Application, click here.
Best Practices for Building Summary Templates
Start with Clear Objectives
Define the “why” before the “what.”
Before selecting questions or entities, clarify:
Who will consume the summary (e.g., Agent, Supervisor, QA)?
What decisions or actions will the summary drive (e.g., compliance, escalation, follow-up)?
What information is critical versus nice-to-have?
Tip
Focus on 3 to 6 key insights unless there is a strong operational need for more.
Be Selective with Questions (Insights)
Focus on questions that are directly supported by the call transcript. The LLM summarizes what is in the transcript and does not include external informaion or CRM data.
Good examples:
What was the customer's issue?
What action did the agent take?
Risky examples:
What is the customer’s lifetime value? (Not in transcript)
Was this a repeat caller? (Requires cross-call context)
Note
It is recommended to include a minimum number of questions.
Tip
Too many insights result in longer prompts, which can increase latency and cost. Each Summary should contain 3 to 5 insights. Use 'Short Summary' configuration for low-latency environments.
Optimize Prompt Logic (Advanced Mode)
Only use Advanced Mode if you understand how to tune LLM prompts. This mode allows you to:
Edit prefilled prompts
Add conditional logic
Insert fallback instructions
Note
Best suited for expert users or Admins looking to extend summary capabilities beyond what is available in the UI (e.g., include a disclaimer if escalation is detected.)
Use Advanced Mode sparingly and only if you understand LLM prompt tuning.
Language & Tone Configuration
Align the Summary output language with user expectations.
The call transcript language does not have to match the Summary output language (e.g., for a Spanish call, output language 'English' is acceptable).
Avoid tone mismatches (e.g., use a professional and empathetic tone for support-related use cases).
Tip
Keep tone guidance simple. Complex tone instructions can confuse the model or reduce the quality of the Summary.
Template Design Guidelines
Give templates meaningful names and use consistent naming conventions such as: [Business Unit]_[Use Case]_[Lang]_[Version] (e.g., Support_US_English_v1.2)
Always provide a description so that other users can understand what the template is about.
Always Test Before You Deploy
Use “Test to Validate” with real-world call transcripts to ensure:
Fields are populated correctly
Latency is acceptable
Prompt logic behaves as expected
Review the generated Summary before publishing templates. This helps catch issues such as:
Irrelevant or hallucinated data
Missing or misinterpreted fields
Tone mismatches
Performance & Risk Tips
Concern
Best Practice
High Latency
Use short summaries, limit the number of questions, and avoid verbose prompts
Inaccuracy
Avoid asking for information not present in the transcript, and keep questions simple
Hallucinations
Use clear prompts, test with real calls, and avoid ambiguity
Summary Bloat
Use a structured format and avoid asking similar or redundant questions
When to Use Advanced Mode
Use Advanced Mode when you need to:
Control the prompt structure line by line
Inject fallback logic (e.g., “If agent action is not found, skip the field”)
Ensure the summary always starts with a specific keyword
Note
Advanced Mode is intended for trained users or those with experience in LLM prompt engineering.
Maintenance & Governance
Review templates monthly – Based on latency, accuracy, and overall usefulness
Engage QA teams for feedback – Allow them to validate the Summary's usefulness
Document prompt logic (particularly in Advanced Mode) for future understanding and enhancement.
Summary Builder Frequently Asked Questions (FAQs)
Can you clone Summary Templates that are in draft state?
No. Only summary templates that are in the Published state can be cloned.
What should be the state of a cloned Summary Template?
A cloned Summary Template should always be in the Published state by default. The user can open the cloned template and make any necessary modifications.
What happens after a user saves a template as a new version/new template?
When saving as a new version, a toast message should appear confirming the creation of the new version. The UI should remain on the current screen.
When saving as a new template, the UI should automatically navigate to the primary landing page, which displays the list of available templates.
How many versions are supported for a template?
Currently, there is no limit to the number of versions a template can have. This is managed on the backend and may be restricted in future releases.
How should the primary Design Configuration UI behave if Advanced Mode is used?
The primary design UI should remain unchanged. However, a toggle indicator will be visible, showing that Advanced Mode is enabled, to inform the user that the current template uses Advanced Mode.
How will Entities be supported on the Summary?
In the initial release of the Summary Builder, Entity support will not be available, and the toggle for the Entities section will remain permanently disabled.
What is the accessibility of the cloned Summary template?
For a global summary, the access level of the cloned summary will be restricted to the access permissions of the user who cloned it.
For a non-global summary, the access level of the original summary will be retained in the cloned version.
What will be the version of the cloned Summary Template?
The cloned Summary Template will default to version 1.0, regardless of which version is cloned.
Is there a limit to the number of questions that can be selected for the Summary Template?
There is no limit to the number of questions that can be included in a single template. However, a template cannot be saved without any questions; at least one question must be included. A warning message should be displayed if no questions are selected.
How does Advanced-Mode work?
Advanced Mode is intended to be pre-filled with all the changes made in the original configuration screen. Please note that the latest version will only be pre-filled if the summary has been saved.
What should be the time zone for any date/time Entities in the application?
All date-time Entities across the application should be in UTC.
Who can edit or publish Standard templates?
Only the Uniphore Super Admin can edit Standard templates.
Other users can only clone a template created for the selected account, which will create a new template under the My Templates section.
Summary Builder Glossary
Term | Definition |
|---|---|
Summary Template | A structured configuration that defines how the LLM model should generate a summary, including the layout, questions, tone, and output language. |
GenAI Call Summary | An AI-generated Call Summary based on the rules defined in the Summary Template. |
Intent | The underlying reason or topic of a customer call (for example: Billing Inquiry, Plan Upgrade). Used to dynamically assign relevant summary templates during runtime. |
Entities | Custom-defined business terms (for example: product names, locations) that the AI should recognize and prioritize when generating summaries. |
Draft Template | A Template that is being created or modified and has not yet been reviewed or published. |
Published Template | A finalized and approved Summary Template that can be assigned to applications and used at runtime. |
Template Version | Each time a template is updated and saved, a new version is created to maintain traceability and rollback options. |
Summary Service | The backend GenAI engine applies the appropriate Summary Templates during run time and generates structured summaries using large language models (LLMs). |
Design-Time | The phase in which Business Users configure and test Summary Templates before they are used in production. |
Run-Time | The phase during which the Summary Service generates a Summary at the end of each call, using the assigned template. |
Business User | A user (Super Admin, Partner Admin, and Account Admin) who creates and configures Summary Templates with minimal technical skills. |
Application Developer | A technical user who integrates published Templates into Real-Time Guidance Agent, Conversation Insights Agent, or any other third-party applications. |
Reviewer/Approver | A role responsible for reviewing and approving Templates to ensure they meet business, compliance, or quality standards before publishing. |
Prompt | Instruction text embedded in a Template that guides the AI model on how to interpret the transcript and generate relevant results. |
No-Code Interface | A user-friendly interface that allows Template creation and customization without requiring programming or scripting knowledge. |
Multi-language Support | The ability to generate Summaries in multiple languages, including cross-lingual support, to accommodate different markets, customer types, and internal workflows. |
Template Assignment | The action of mapping a published Summary Template to a specific Experience or Business Process for use in runtime. |