Agent AI Assist Application Settings
You can use the following settings tabs to edit or update settings for the Agent AI Assist Application.
Note
For complete details about using the Uniphore AI Agent Assist application client, click here.
Details Tab
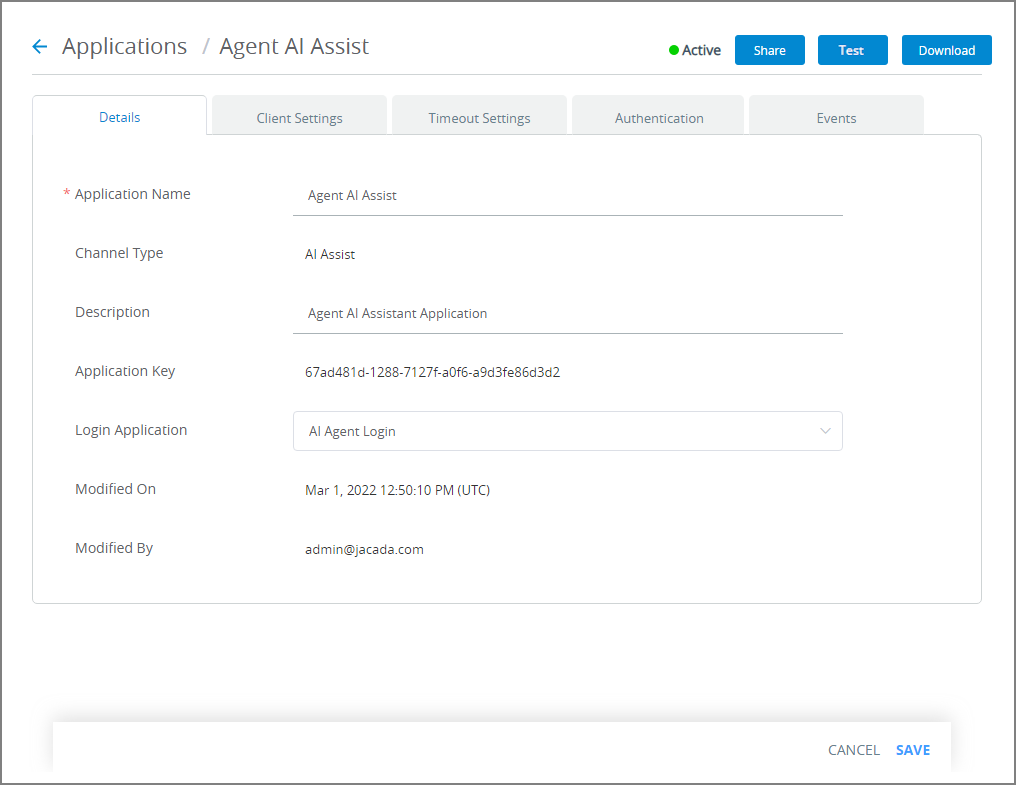 |
Setting | Description |
|---|---|
Application Name | The name of the application. |
Channel Type | The channel that will be used to run the application. |
Description | A brief description of the application. |
Application Key | A unique identifier that is defined in the X-Console and used for access to the server. The application key is generated automatically when an application is added. For details about changing the Application Key, click here. |
Login Application | Clicking on the dropdown menu lists all Login applications that are available to the account. By default, the Agent AI Assist application uses the AI Agent Login, which is provided out-of-the-box. You can optionally create and assign a custom AI Agent Login application. |
Modified On | The last date and time that changes were made to this Application. |
Modified By | The last Admin who made changes to this Application. |
Client Settings Tab
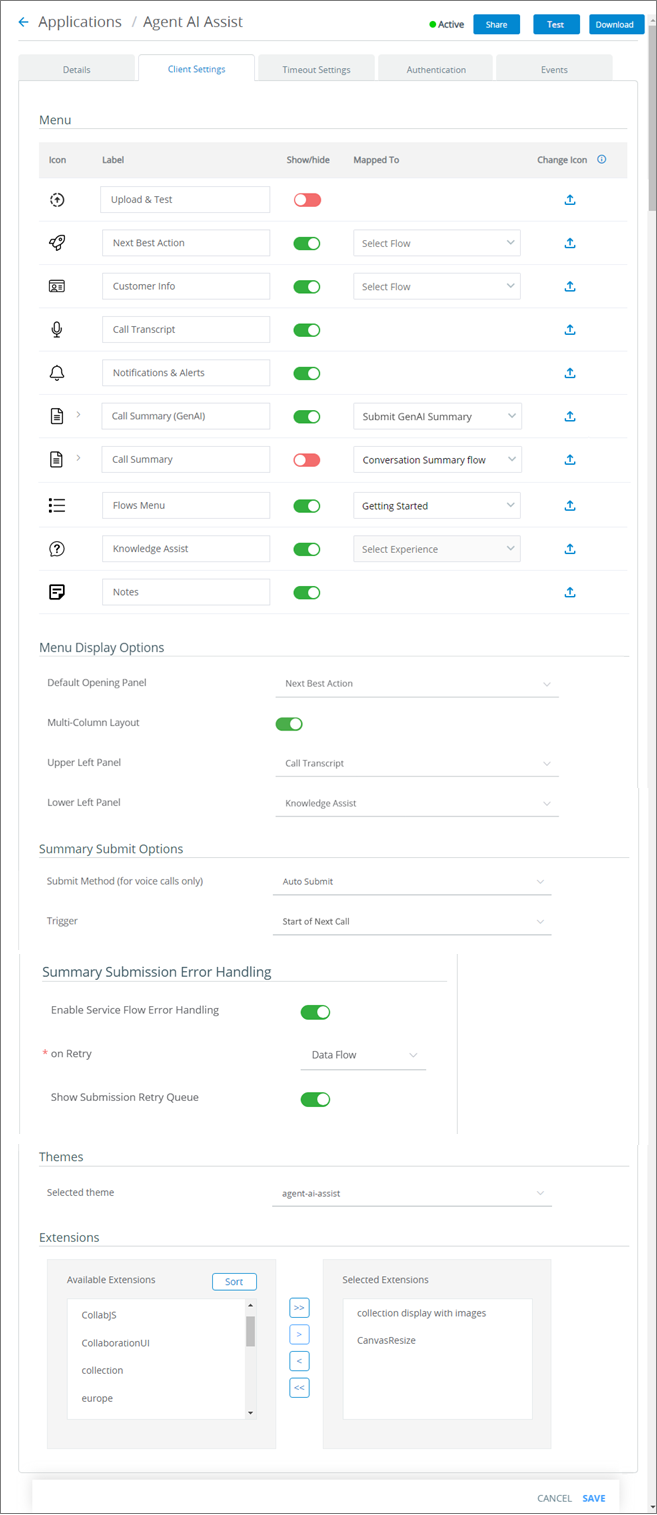
This panel enables you to configure the presentation, layout, and functionality of the Agent AI Assist Application. It also provides a link to download a local desktop client for the current Uniphore Agent AI Assist application version.
Setting | Description |
|---|---|
Menu | |
Component and Toolbar Settings | Enables customization of the components and Toolbar elements that are displayed in the Agent AI Assist application. You can toggle application component visibility, change icons and tooltip labels, map X-Designer Flows that will execute, as well as set other parameters used when the component is activated during runtime. For complete details about customizing the Agent AI Assist application components and menu, click here. |
Menu Display Options | |
Default Opening Panel | Enables you to select the Toolbar component that will be displayed as the default panel to an Agent at the beginning of a call. The dropdown lists all applicable components that are toggled On (green) in the Menu section. When the multi-column layout is being used for the runtime display, the selected component's panel will be displayed at the top of the right column (by default) in the AI Agent Application at the beginning of a call. NoteThe Upload and Test component is not available in the AI Agent Assist Application when running in a Production environment, hence it is not shown in the dropdown. The Notes component is not available as the default opening panel since the Agent will always access it from a separate panel during a call while also accessing other runtime panels. |
Multi-Column Layout | Enables you to activate an alternative, wider layout that uses two columns. This layout assigns two selected panels (upper and lower) in the left column, displayed side-by-side with the right column panels. For more information on how the AI Agent Assist Application displays a multi-column layout, click here. Activating the toggle (green) enables the selection of Upper and Lower Left Panels, detailed below. |
Upper Left Panel | If the Multi-Column Layout switch is toggled On (green), this dropdown enables the selection of the Upper Left Panel to be displayed to an Agent. The dropdown lists all enabled Toolbar components that are available for wide display at the beginning of a call. |
Lower Left Panel | If the Multi-Column Layout switch is toggled On (green), this dropdown enables the selection of the Lower Left Panel to be displayed to an Agent. The dropdown lists all enabled Toolbar components that are available for wide display at the beginning of a call. |
Submit Summary Options | |
Submit Method (For voice calls only) | Enables selection of options for after-call handling by the Call Summary and GenAI Summary capabilities.
|
Submit Summary Label | If Manual is chosen as the Submit Method, this text box specifies the text that will be displayed on the Submit Summary button in the Agent AI Assist application. The default value for this label is 'Submit Summary'. This button impacts both the Call Summary and GenAI Summary components, configured here. |
Trigger | If Auto Submit is chosen as the Submit Method, this dropdown enables selection of when to perform the submission.
|
Summary Submission Error Handling | |
Enable Submission Recovery | Enables you to activate Summary submission failure recovery settings. Before activating it, you must map the specific Service Flow to the Summary. Activating the toggle (green) enables the retry submission configurations detailed below. |
on Retry | If the Enable Submission Recovery switch is toggled On (green), this dropdown enables selection of a Data Flow that will be triggered when retrying a failed Summary submission. The dropdown lists all Data Flows created for the specific account. |
Show Submission Retry Queue | Enables you to grant Agent access to view the Summary Submission Retry Queue list in the AI Agent Assist application. |
Themes | |
Selected Theme | Determines the look and feel of the Application. For more details about Themes, refer to Managing Application Themes. |
Extensions | |
Selected Extensions | This frame lists the Extensions that are applied to the Application. For more information about applying Extensions, see Working with Extensions in the X-Console. |
Customizing Agent AI Assist Components and Toolbar
Agent AI Assist component icons and runtime mappings can be changed to suit your workflow and branding requirements. You also can control which Toolbar components are displayed to the Agent during runtime.
You perform customization in the Menu section of the Client Settings panel:
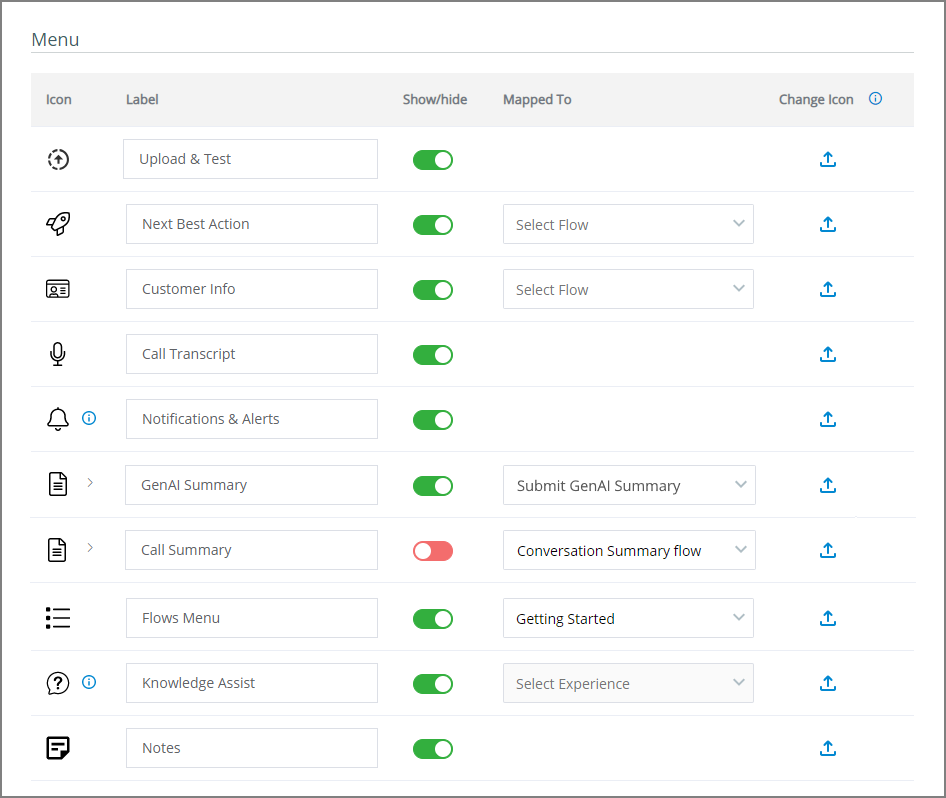 |
For each Agent AI application component, the details of the settings that can be customized are provided below:
Icon. Change any out-of-the-box component icon to make it relevant for your organization's workflow or branding.
Label. Enter text that will be displayed as the page title for this component in the toolbar. The label text will also appear as a tooltip when hovering over the icon.
Show/Hide. Switch the toggle On or Off to configure component visibility in the Application.
Mapped To. From the dropdown list, select the associated X-Designer Flow or Experience that will execute when this component is activated during runtime. Note that Call Summary component settings vary slight from other components. For details, click here.
Change Icon. Click the Upload
 icon to open a local file browser and select the image that will be used for the icon. Only SVG file types are accepted.
Important
Be sure that the color of your SVG icon is set to Black. This ensures that the icon will work as expected with your Theme colors.
Customizing Agent AI Assist GenAI Summary Components
Using the Client Settings tab, you can control whether the Promises, Call Disposition, and Call Type Summary (i.e., Call Reason) sub-components are displayed to the Agent when the GenAI-based Call Summary is used during runtime:
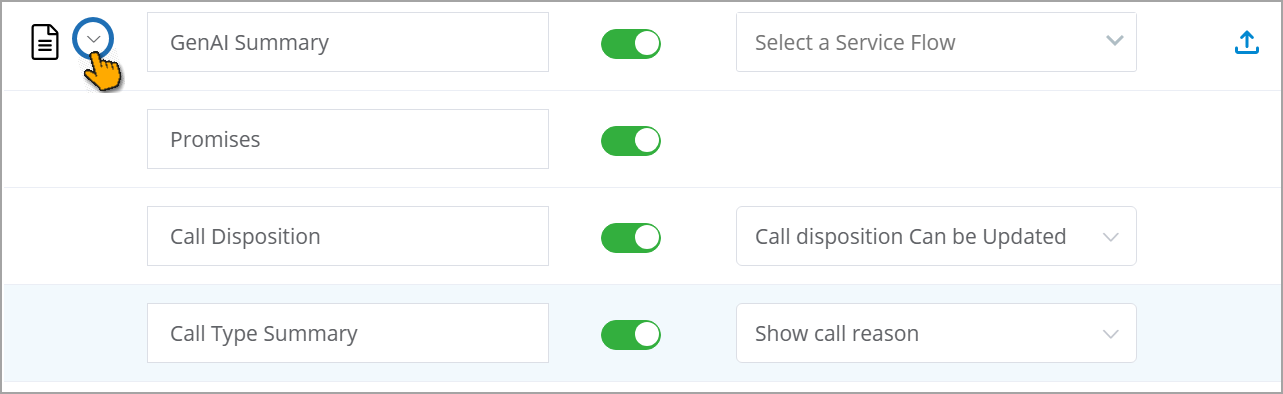
When the GenAI-based Call Summary is enabled, you can optionally select the associated X-Designer Service Flow that will be executed when the summary is submitted at the end of the call.
To reveal available sub-components, to the left of the GenAI Summary label, click the arrow icon, as shown above. The following sub-components will be displayed:
Promises. Switch the Show/Hide toggle On or Off to configure Promises component visibility in the Application. When shown, Agent Promises will be displayed on the Call Summary (GenAI) page as they are detected in real time.
Call Disposition. Switch the Show/Hide toggle On or Off to configure Call Disposition component visibility in the Application. When shown, the automated/structured Disposition categorization will be displayed on the Call Summary (GenAI) page in real time.
When Call Disposition is visible, choose how the Call Summary Disposition dropdown list will be displayed to the Agent during runtime. The Application supports the following settings:
Call Disposition cannot be updated - The Agent cannot edit the automated Call Disposition Hierarchy during runtime.
Call Disposition can be updated - The Agent can modify the automated Call Disposition values by selecting the relevant option from the available list.
Call Type Summary. Switch the Show/Hide toggle On or Off to configure Call Reason component visibility in the Application. When shown, the Call Reason dropdown will be displayed on the Call Summary (GenAI) page in real time.
When the Call Reason is visible, choose how the Call Reason dropdown list will be displayed to the Agent during runtime. The Application supports the following settings:
Show call reason - The Agent can view the Call Reason dropdown, which is dynamically updated each time a new Intent is detected. The Agent can also manually change the auto-detected Intent as the call progresses.
Do not show call reason - The Agent cannot view the Call Reason dropdown during runtime.
Customizing Agent AI Assist Call Summary Components
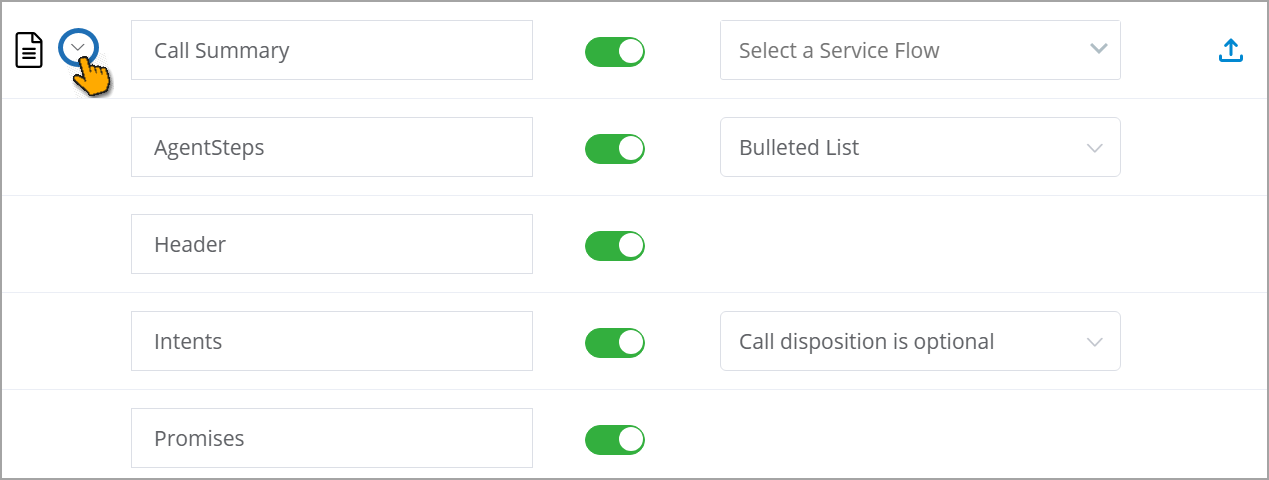
The Agent AI Assist Call Summary consists of several sub-components. Using the Client Settings tab, you can control which sub-components are displayed to the Agent during runtime, and also assign their key settings.
Note
The main Call Summary component Show/Hide toggle must be set to On (Green) in order to activate and use any of its sub-components.
When the Call Summary is enabled, you can optionally select the associated X-Designer Service Flow that will be executed when the summary is submitted at the end of the call.
To reveal available sub-components, to the left of the Call Summary label, click the arrow icon, as shown above. The following sub-components will be displayed:
Agent Steps. (1) Switch the Show/Hide toggle On or Off to configure Call Summary Agent Steps visibility in the Application. (2) When Agent Steps are visible, select how they will be formatted when displayed to the Agent during runtime. The Application supports the following settings:
Bulleted List
Numbered List
Check List
Header. Switch the Show/Hide toggle On or Off to configure Call Summary Header visibility in the Application.
Intents (Call Reasons). (1) Switch the Show/Hide toggle On or Off to configure the Call Reasons visibility in the Application. (2) When Call Reasons are visible, choose how the Call Summary Disposition dropdown list will be displayed to the Agent during runtime. The Application supports the following settings:
Call disposition is mandatory - The Agent will be required to assign the disposition in order to Submit the Call Summary.
Call disposition is optional - The Agent can assign the disposition, but assignment is not required in order to Submit the Call Summary.
Call disposition is hidden - Disposition choices will not be presented together with the Call Reason during runtime.
Promises. Switch the Show/Hide toggle On or Off to configure Call Summary Promises visibility in the Application.
Editing Agent AI Assist Application Settings
From the Applications page, click the Name link of the relevant Agent AI Assist Application. The Details panel for the Application is displayed.
Update settings in the Details panel, as required. For details, click here.
Update settings in the Client Settings panel, as required. For details, click here.
Update settings in the Timeout Settings panel, as required. For details, click here.
Update the Authentication panel, as required. For more information, click here.
Update the Events panel, as required. For more information, click here.
At the lower right corner of the page, click Save. When all entries are valid, a confirmation message is displayed. To exit editing at anytime without saving changes, click Cancel.