Call Disposition
The Call Disposition is a robust and flexible feature that leverages the LLM-based service to automatically categorize calls based on their purpose, outcome, and/or specific customer requirements, enabling consistent organization and analysis of call data. The LLM-based service uses a zero-shot learning methodology to adapt to new customer-specific Disposition hierarchies without prior training. Instead of reading an entire call transcript, users can quickly see why the customer called and how the call was resolved.
Uniphore's Administration Platform provides a single, browser-based application to configure, maintain, and test different versions of Call Disposition Hierarchies.
In the Administration Platform, a Business User can define a four-level Call Disposition Hierarchy based on the customer's requirements. The Business User is usually a Uniphore Super Admin, Partner Admin, Account Admin, or Business Analyst. Each user has different levels of access and permissions based on their assigned role. For more information about role-level access and permissions, click here.
For example, if a customer calls their travel agent to check hotel room availability, you might create a four-tiered Call Disposition Hierarchy as given below:
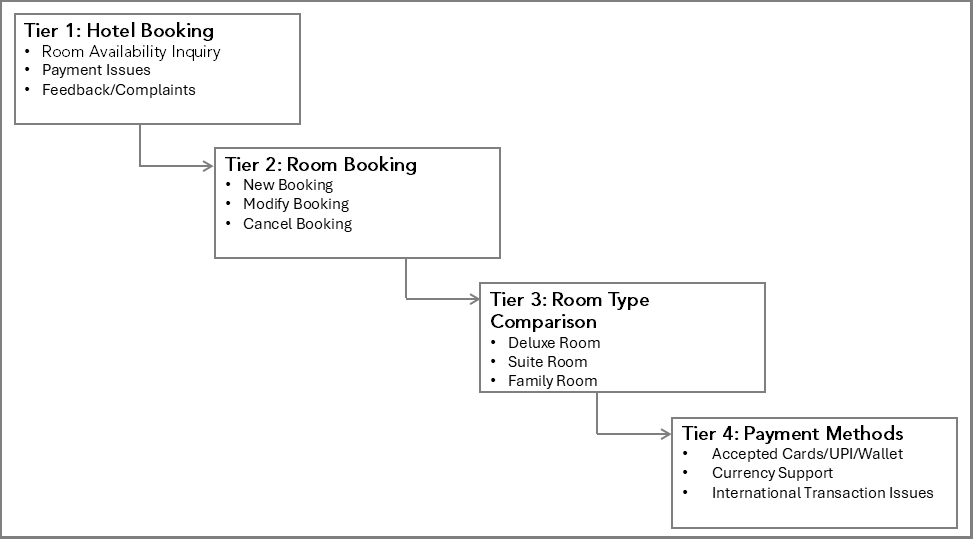
The structured Call Disposition Hierarchy defined in the Administration Platform can be utilized for real-time use cases and post-call analytics. For more information on assigning Call Dispositions to Uniphore products, click here.
About the Disposition Page
The Disposition page provides high-level details of all Disposition Configurations defined for the current Account, and enables a Business User to add a new Disposition Configuration, edit the details of an existing Configuration, or delete existing Configurations. The following is the Disposition page for the Account Admin/Business Analyst user:
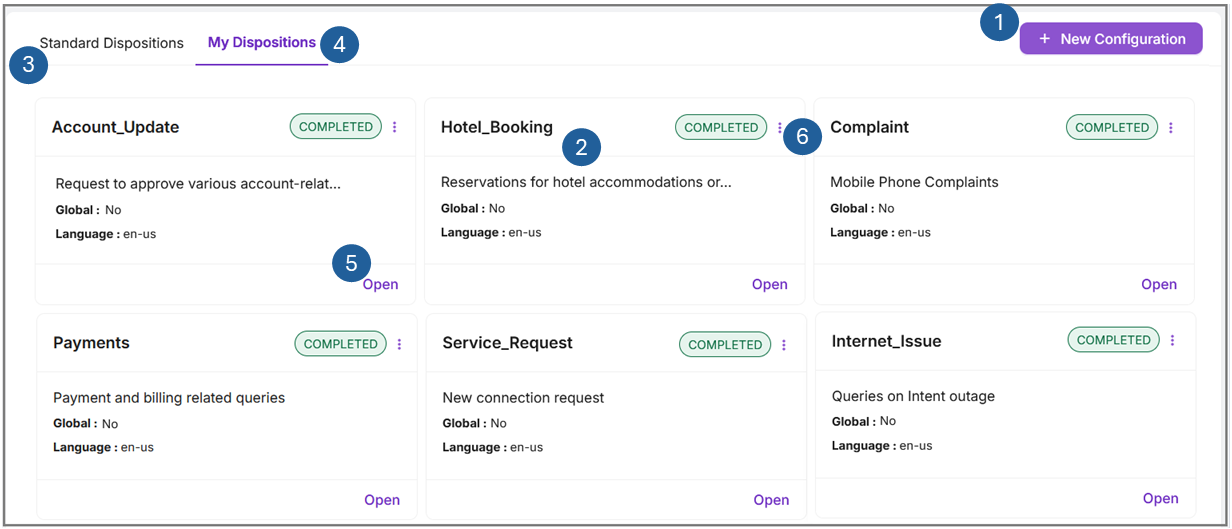
Item | Feature | Description |
|---|---|---|
1 | New Configuration | Enables creation of a new Disposition Configuration for the current account. NoteOnly a Super Admin user can create the Disposition Configuration globally across Uniphore. |
2 | Disposition Cards | Displays all Dispositions that are defined for the current account. For each Disposition, the card provides high-level details, including:
|
3 | Standard Dispositions | Allows an Account Admin or Business Analyst to only view all global Dispositions created by a Super Admin or Partner Admin. |
4 | My Dispositions | Allows an Account Admin or Business Analyst to view, create, edit, and delete Disposition Configurations for the selected account. |
5 | Open Configuration | Click Open and select the desired Version to view and update Disposition details. |
6 | Delete Disposition | Click Ellipsis ( NoteIf the selected version of the Disposition is used in any of the Products (Real-Time Guidance Agent or Conversation Insights Agent), an error message will be displayed. |

Basic Workflow for Dispositions
The typical workflow for Disposition creation and management is as follows:
Create a new Disposition Configuration for the current account.
Download the Configuration Template and update the Hierarchical Dispositions for up to four levels based on the customer's requirements.
Upload the Disposition Configuration file and add it to the current account.
Evaluate and refine the Disposition configuration by uploading Transcripts and testing the generated results.
Save and train the Configuration. A version number and Disposition ID will be assigned to each Configuration automatically.
Retrieve a list of available Disposition Configurations for the selected account in Real-Time Guidance Agent and Conversation Insights Agent.
Assign the desired Disposition Configuration to an Experience in Real-Time Guidance Agent or to an Organization in Conversation Insights Agent.
Create a New Disposition
A user with the Uniphore Super Admin, Partner Admin, Account Admin, or Business Analyst role can create and manage Dispositions.
Note
Account Admin and Business Analyst users can only create the Disposition Configuration for the selected account.
Only Super Admin and Partner Admin users can create Dispositions for all accounts. For more information on global access for Super Admin and Partner Admin users, click here.
Go to Administration > Measurements > Dispositions and click + New Configuration. The Create New Disposition window is displayed:
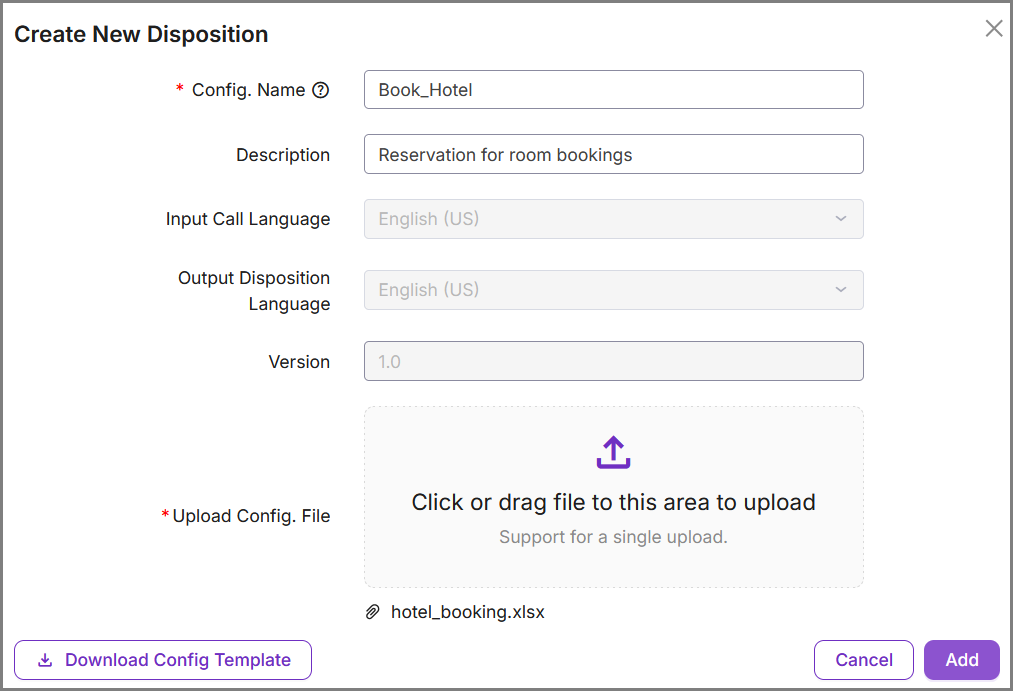
In the Config Name field, enter a unique name for the new Disposition Configuration. If the Disposition Configuration name already exists in the Account, an error message is displayed.
Note
Only alphanumeric characters and underscores (_) are allowed in the Config Name field. No spaces or special characters are allowed.
In the Description field, optionally provide information about this Disposition Configuration that helps to explain what the Disposition represents.
In the Input Call Language and Output Disposition Language dropdowns, 'English (US)' is shown by default.
Note
The Disposition Configuration supports multiple languages; however, the current release includes only English and Spanish.
In the Version field, the value is shown as 1.0 by default. This field is not editable.
In the Upload Config File section, upload the Disposition Configuration file. For more information on uploading the Configuration file, click here.
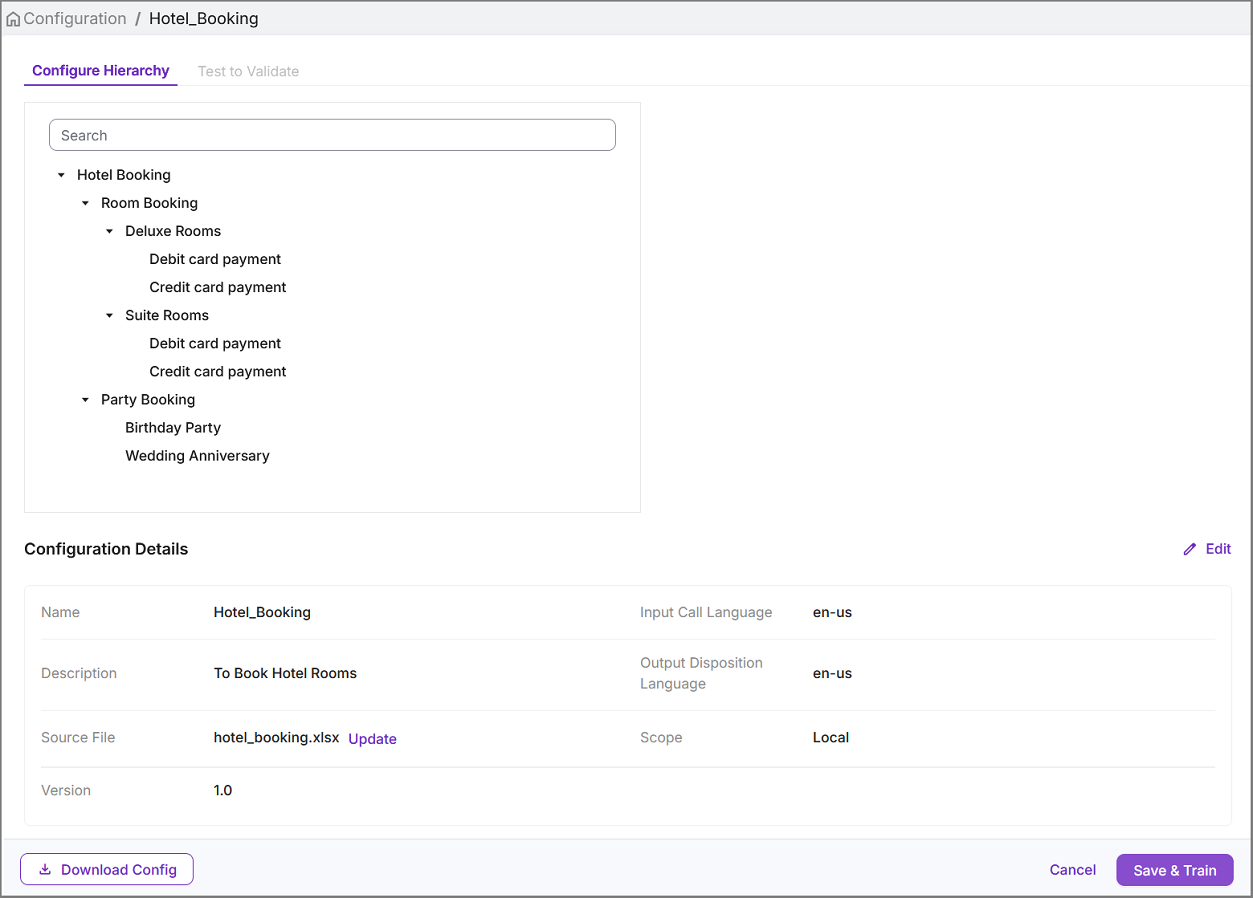
After successful uploading, click Add to view the Disposition categorization levels and Configuration details. The Configure Hierarchy page is displayed:
Note
To cancel your activity at any time without saving, click Cancel.
Click Save & Train to add the Disposition Configuration globally or to a specific account.
Note
The Global field is only available to Super Admin and Partner Admin users.
Super Admin User:
While creating a new Disposition Configuration, a Super Admin can select whether it is available to all partners and accounts or only to a specific partner and account.
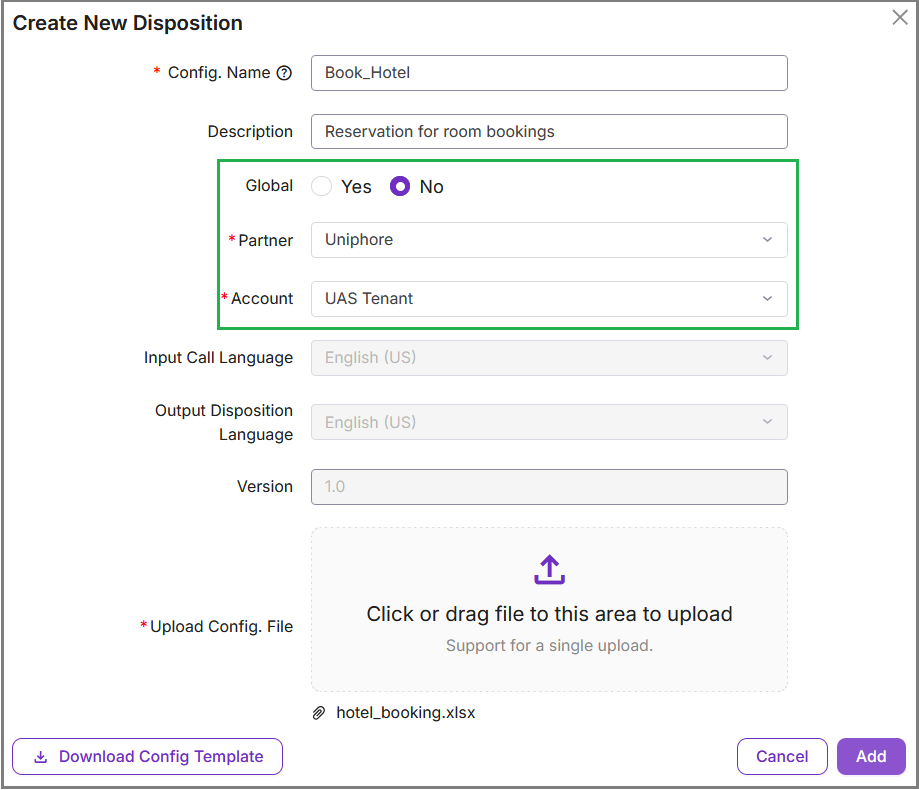
Yes - The newly added Disposition will be available to all partners and accounts by default. If you select 'Yes', the Partner and Account fields will be disabled.
No - Allows you to select the partner and account for which the newly added Disposition will be available.
Partner Admin User:
While creating a new Disposition Configuration, a Partner Admin can select whether it is available to all accounts managed by the partner or only to a specific account. The selected Partner is shown in the Partner field by default, and it is disabled.
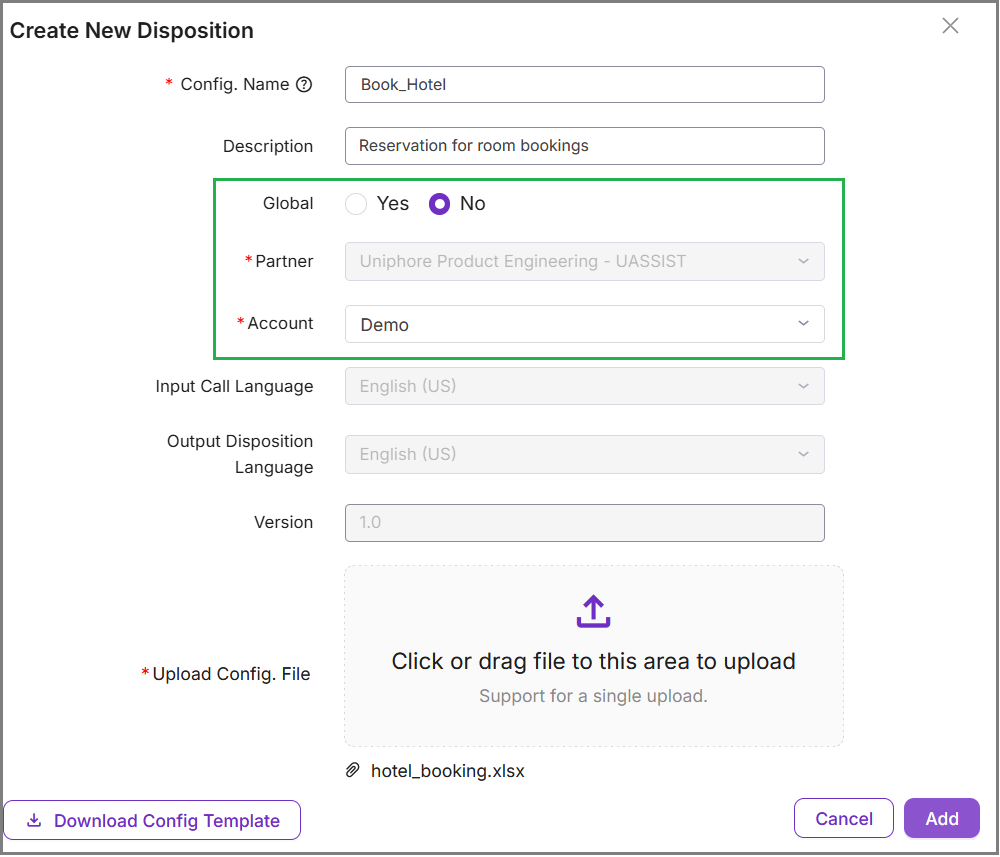
Yes - The newly added Disposition will be available to all accounts managed by the partner. If you select 'Yes', the Account field will be disabled.
No - Allows you to select the specific partner's account for which the newly added Disposition will be available.
For Dispositions created before the 2025.08 release, follow the steps below to use them globally across Real-Time Guidance Agent, Conversation Insights Agent, and other third-party applications.
Click Open from the specific Disposition Card and then select Version to view the Disposition Hierarchy.
Click Download Config to download the Disposition file (.xlsx).
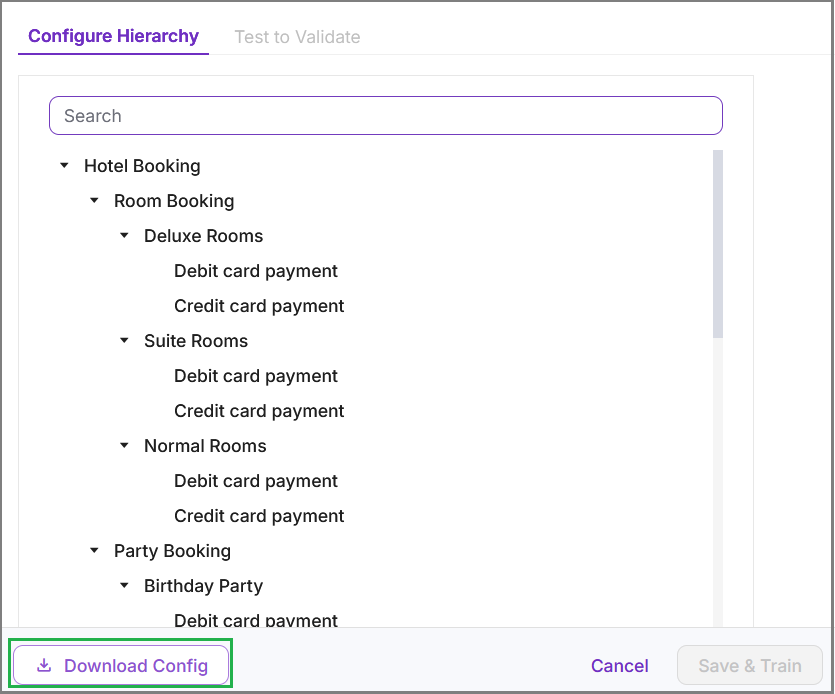
Click Cancel to navigate to the Disposition page. Then, click + New Configuration to recreate the Disposition with the same Disposition Hierarchy. The Create New Disposition window is displayed.
Follow Steps 2 through 5 above. In the Upload Config File section, upload the downloaded Disposition file.
Complete Steps 7 and 8 to add the Disposition for global use across Real-Time Guidance Agent, Conversation Insights Agent, and other third-party applications.
If any Disposition created before the 2025.08 release is already mapped to an Experience in Real-Time Guidance Agent, remap the same Experience to the newly recreated Disposition. For mapping a Disposition to an Experience, click here.
Upload the Disposition Configuration File
A user with the Uniphore Super Admin, Partner Admin, Account Admin, or Business Analyst roles can upload the predefined Disposition Configuration file (.xlsx) for an account.
Click Download Configuration Template to download the Disposition Configuration Template (.xlsx). In the template, fill in the Disposition categorization levels based on the requirement and save it in the desired path. You can define Disposition categories for up to four levels.
Note
Each level can contain up to ten dispositions.
Sample Configuration File:

In the Upload Config File section, upload a Disposition Configuration file using any of the available methods.
Click Upload (
 ). The window to select file will open. Select and upload the Configuration file.
Drag and drop the Configuration file into an empty space.
Note that the Configuration file must meet the following conditions:
The file should not be empty.
The file containing Disposition categories must be in the .xlsx format.
Every row with a Disposition value contains a description that cannot be blank.
There are no duplicate Disposition entries within the same hierarchy.
The file contains correct column headers and structure, with no missing or additional columns.
The file must not contain any special characters.
The related fields must have consistent data. For example, if a parent category is missing, subcategories should not exist.
After successful uploading, the name of the uploaded Configuration file is displayed. If any of the conditions listed above fail, a warning message is displayed.
Click Add to view the Configure Hierarchy page:
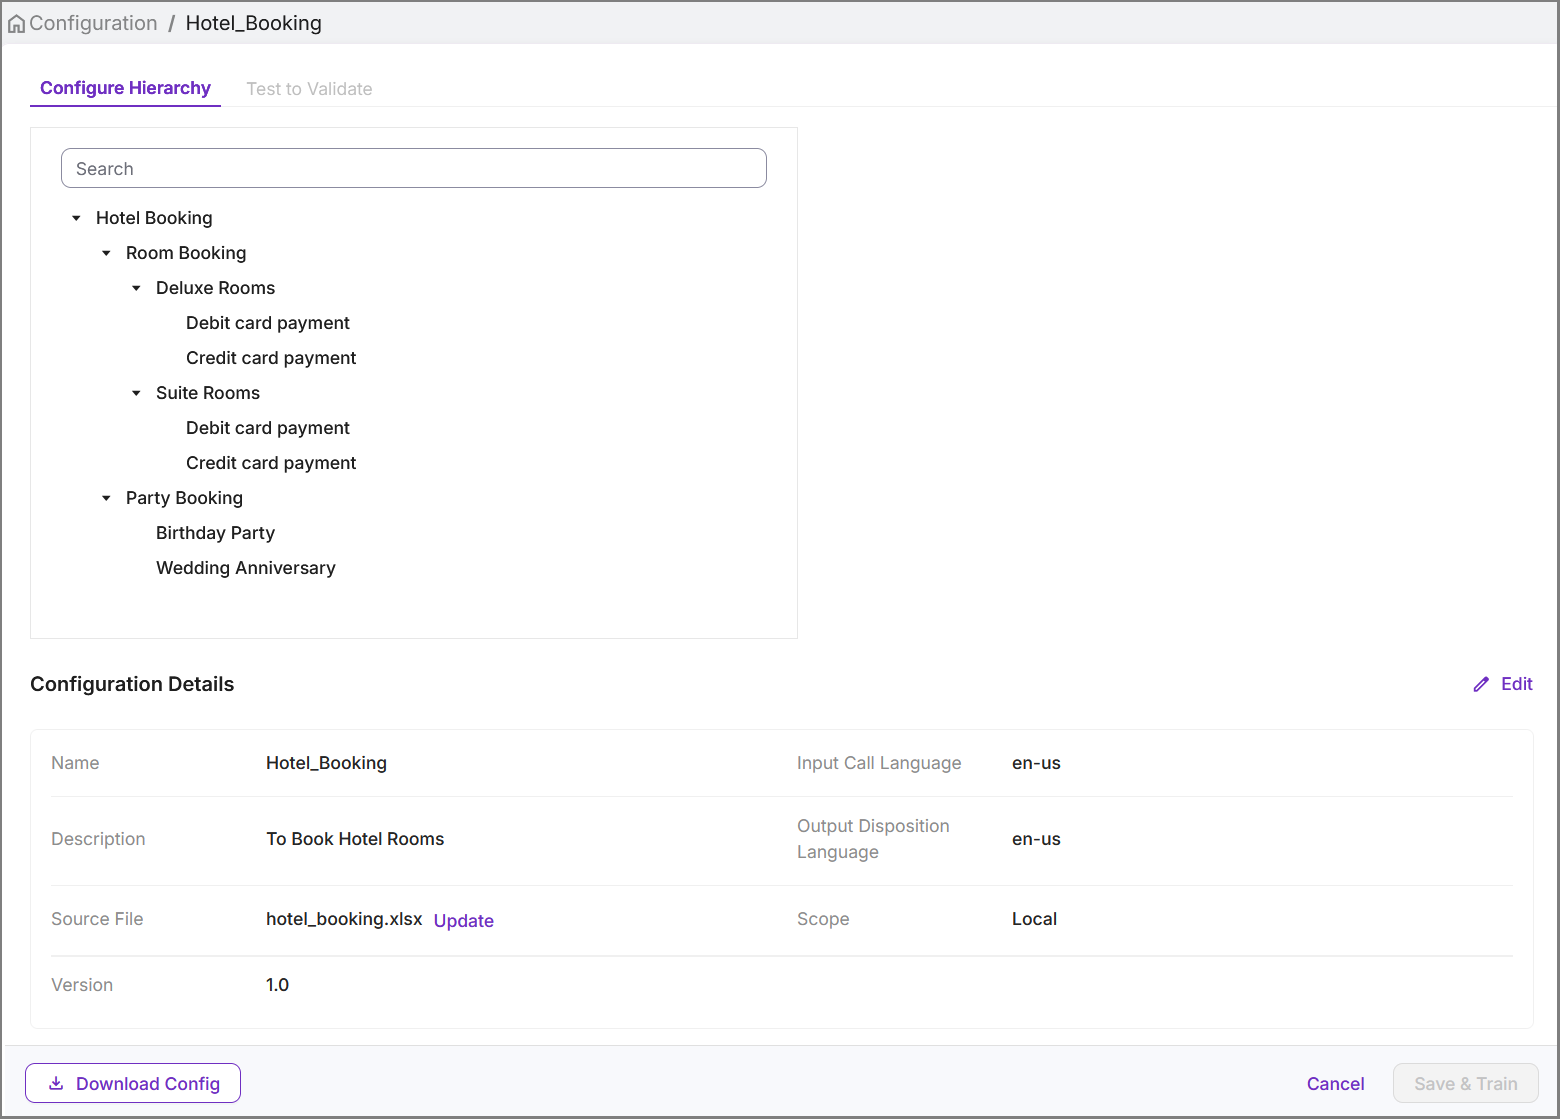
While the Disposition categorization levels are displayed, you can manually change any level details.
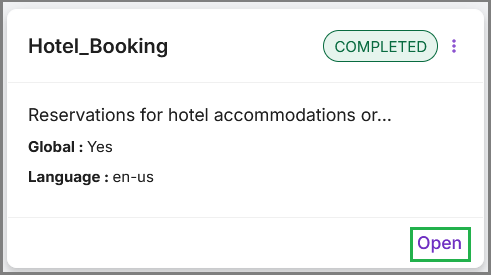
Click Open from the specific Disposition Card and then select Version to view the Configuration Hierarchy.
Click on each level to view and update categorization level details. The Disposition Details are displayed at the left side of the page.
Tip
Clicking Minimize (
 ) in any level displays only the parent category name.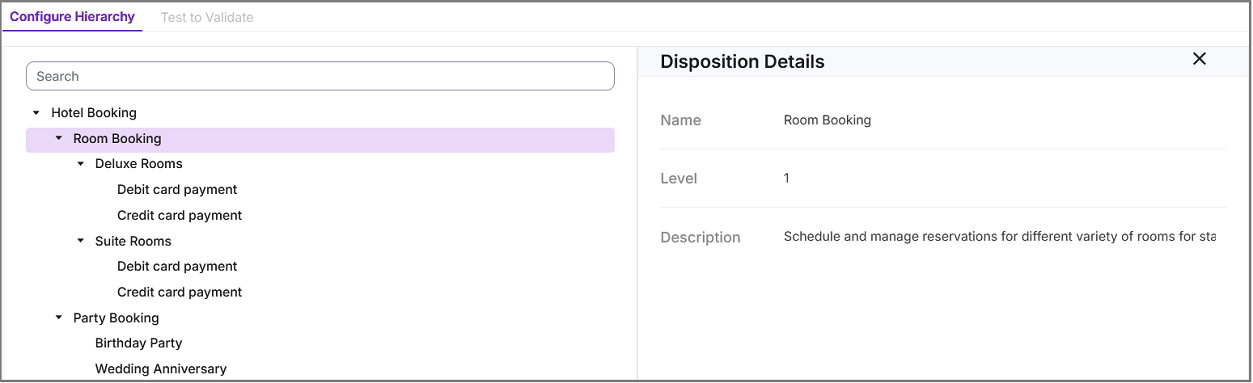
Hover over the Configuration Name and Description, and then click Edit (
 ) to update them.
Note
The Disposition Level value cannot be edited.
Click Tick (
 ) to approve the modified Disposition categorization details. The modified value is displayed in the Disposition Hierarchy on the left side of the page.
To cancel any changes, click Cross (
 ). The most recent approved values will be restored in the Disposition Hierarchy.
Click Save & Train to save the updated Disposition details. A new version of the Disposition Configuration will be created. To cancel your activity at any time without saving, click Cancel.
If you want to make any changes in the source Configuration file, click Download Config at the bottom of the page to download the current Configuration file.
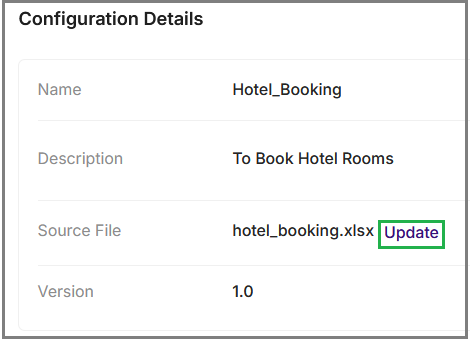
Make necessary changes in the file and click Update in the Source File field in the Configuration Details section to upload the latest file. The revised categorization level details are displayed at the top of the page.
Click Save & Train to save the updated Configuration details. To cancel your activity at any time without saving, click Cancel.
Access Levels Matrix for Disposition
The matrix below outlines the visibility and access privileges for Super Admins, Partner Admins, Account Admins, and Business Analysts:
Feature | Account Admin / Business Analyst | Partner Admin | Super Admin |
|---|---|---|---|
View Disposition Configurations |
|
|
|
Create Disposition Configurations |
|
|
|
Edit Disposition Configurations |
|
|
|
Assign Disposition Configurations |
|
|
|
Test Dispositions |
|
|
|
Create Global Configurations |
|
|
|
Upload Configuration and Test Templates |
|
|
|


Test Disposition Configurations
The Disposition feature includes a built-in facility that allows users to perform testing in a sandbox environment. It enables them to test disposition configurations on a single or a batch of transcripts to validate how Dispositions are predicted in real-time before deployment. This helps identify gaps, fine-tune the Disposition Configuration, and export results for team review.
It also allows users to track test history, filter and sort test results, and download the results in an Excel (.xlsx) for validation, ensuring that the configured Disposition Categorization meets specific requirements and references.
The Test to Validate page provides high-level test history details and testing status updates for a specific Disposition Configuration. It enables users to download a test template (.xlsx) and perform tests using sample transcripts, allowing for easy iteration and optimization of the Disposition configuration.
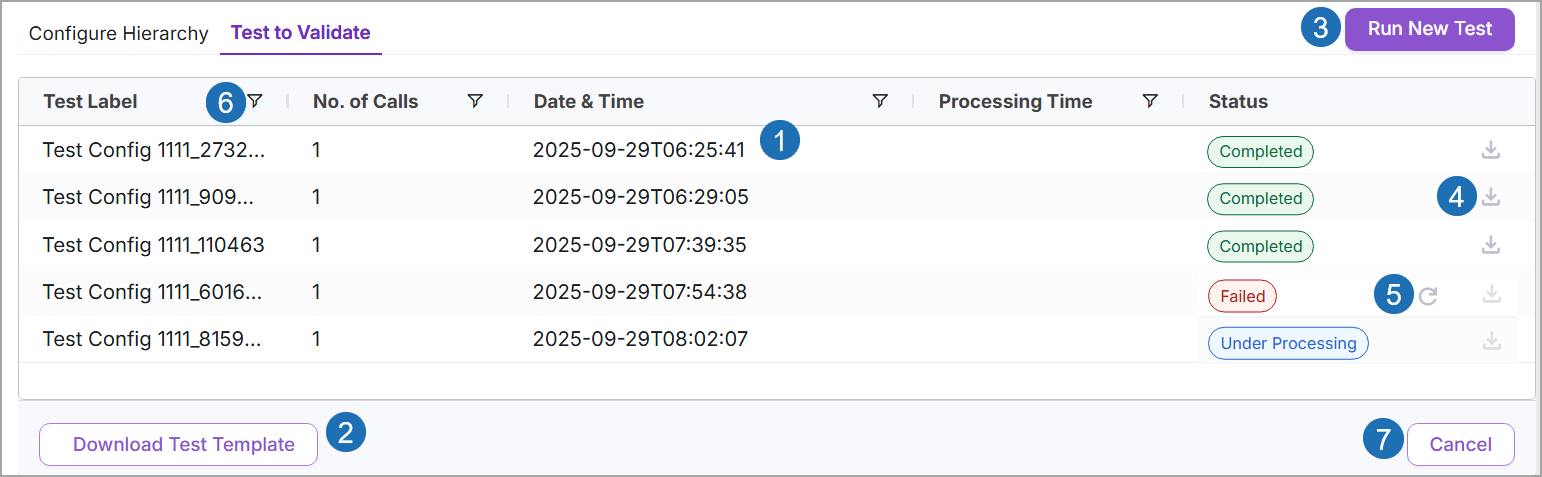
Item | Feature | Description |
|---|---|---|
1 | Test Results List | Displays the list of test results performed for the current Disposition Configuration. Each test result includes the following details:
|
2 | Download Test Template | Click Download Test Template to download the Disposition Test Template (.xlsx). |
3 | Run New Test | Click Run New Test to run a test with sample call transcripts. For more information on testing call transcripts, click here. |
4 | Download | For completed tests - Click Download to retrieve and validate the auto-generated Disposition prediction results. For failed tests - Click Download to view the error details and identify the reasons for failure. |
5 | Retry | Click Retry to rerun tests for Disposition configurations only for the test records that resulted in a Failed status. This icon is available only for test records with a Failed status. |
6 | Filter | Click Filter ( For more information on filtering test results, click here. |
7 | Cancel | Click Cancel to navigate to the Disposition page. |
A user with the Uniphore Super Admin, Partner Admin, Account Admin, or Business Analyst roles can upload and test sample transcript files (.xlsx) using the Disposition Configuration for an account.
Click Download Test Template to download the Disposition Test Template (.xlsx).
In the downloaded template, enter the sample call transcripts and save the file in your desired location.
You can add any number of call transcripts.
Sample Test Template
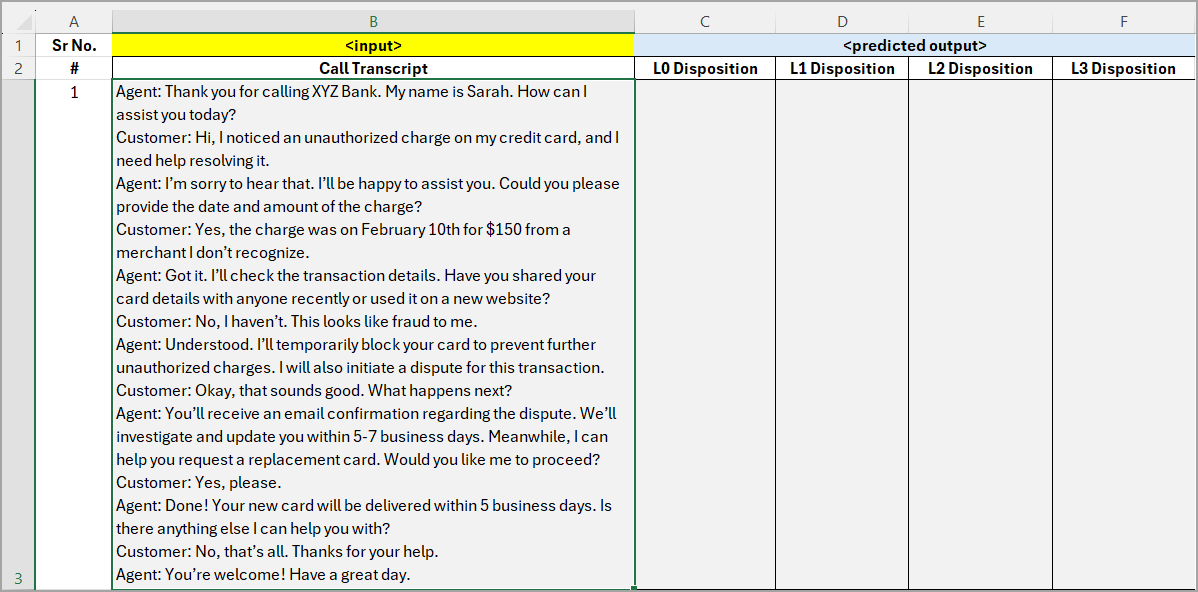
Click Run New Test in the top right corner of the page. The Run Test window appears.
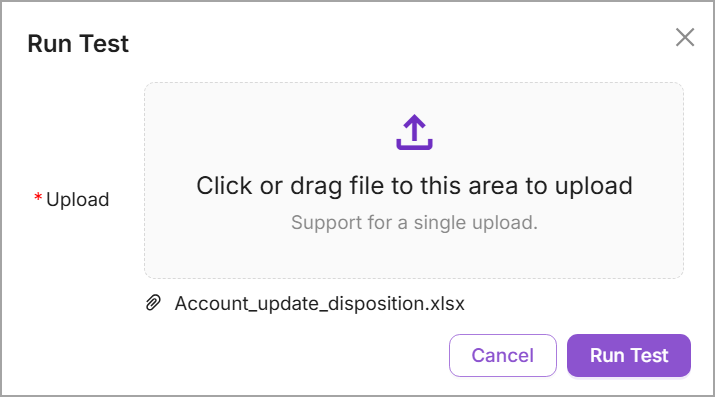
To upload a Disposition test file in the Upload section:
Click Upload (
 ). The window to select a file will open. Select and upload the test file, or
Drag and drop the test file into the designated upload area.
After successful uploading, the name of the uploaded Disposition test file appears.
Click Run Test to validate how Dispositions are predicted using the selected Disposition Configuration. During the execution, the status is shown as Under Processing in the Status column.
Refresh the page or navigate away and return to the Test to Validate page to view the updated status (Completed or Failed). When the test is completed, the Disposition prediction results file is available for download.
Click Download (
 ) in the respective rows where the test is completed to validate the Disposition prediction results and refine the Disposition categorization, if required.
Sample Disposition Prediction Results
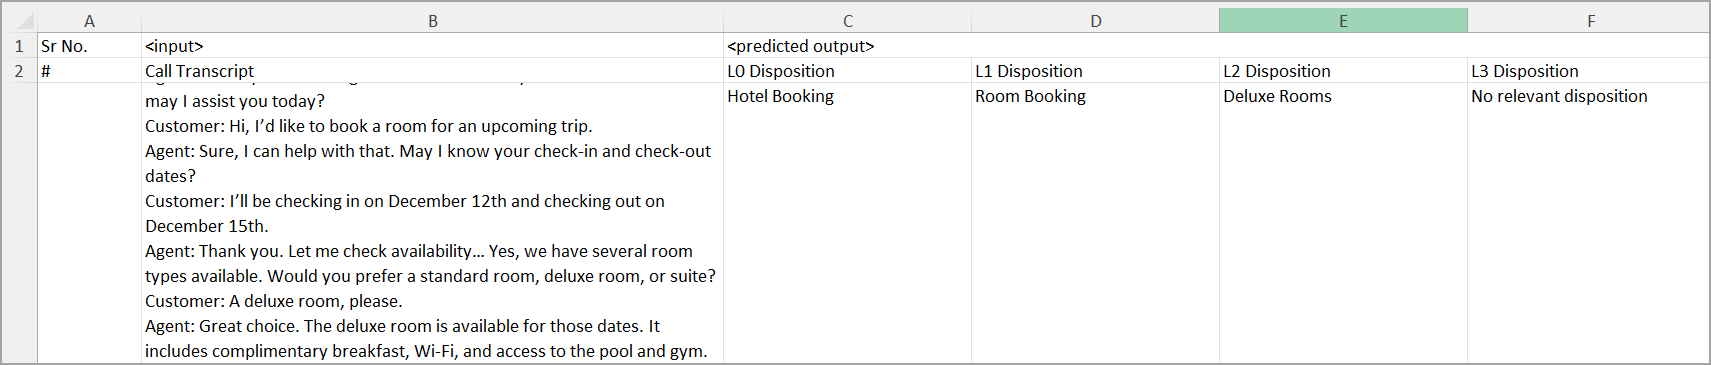
In the test results file, you can view the AI-predicted Disposition values across four levels.
Note
You can re-run a test with a refined Disposition categorization to validate how Dispositions are predicted using the updated Disposition configuration.
To help users focus on test results that meet specific criteria, the columns in the Test to Validate page can be filtered or sorted.
Click Filter (
 ) in any of the columns (Test Label, No. of Calls, Date & Time, or Processing Time) to display a pop-up with the relevant filter options for that column. To filter the list, select a specific condition, enter the desired characters or values, and then click Apply. To remove a filter, click Reset.
You can also use the AND or OR operator to combine two conditions.
Filter Test Label column:
The following options are available to filter the Test Label column:
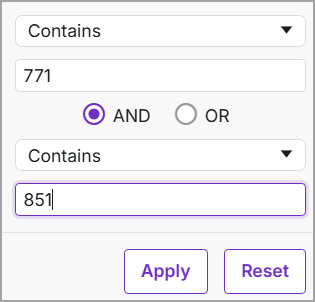
Contains - Displays labels that contain the mentioned characters.
Does not contain - Displays labels that do not contain the mentioned characters.
Equals - Displays labels that exactly match the mentioned characters.
Does not equal - Displays labels that do not match the mentioned characters.
Begins with - Displays labels that begin with the mentioned characters.
Ends with - Displays labels that end with the mentioned characters.
Blank - Displays records with no label value.
Not blank - Displays records that contain a label value.
Filter Number of Calls and Processing Time columns:
The following options are available to filter the Number of Calls and Processing Time columns:
Equals - Displays values that exactly match the specified number.
Does not equal - Displays values that do not match the specified number.
Greater than - Displays values greater than the specified number.
Greater than or equal to - Displays values greater than or equal to the specified number.
Less than - Displays values less than the specified number.
Less than or equal to - Displays values less than or equal to the specified number.
Between - Displays values that fall within a specified range.
Blank - Displays records with no value.
Not Blank - Displays records that contain a value.
Filter Date & Time column:
Date & Time
Equals - Displays records that match the specified date exactly.
Does not equal - Displays records that do not match the specified date.
Before - Displays records with a date earlier than the specified date.
After - Displays records with a date later than the specified date.
Between - Displays records that fall within a specified date range.
Blank - Displays records with no date value.
Not Blank - Displays records that contain a date value.
Click any of the column headers (Test Label, No. of Calls, Date & Time, or Processing Time) to cycle the list order between ascending, descending, and unsorted. Only one column can be sorted at a time.
Assign the Call Disposition to Uniphore Products
After creating and validating the Disposition, an Account Admin or Business Analyst can assign it to Uniphore Products. Refer to the use cases below:
For customers using only Real-Time Guidance Agent, the predefined Call Disposition is assigned to the relevant Experience in Real-Time Guidance Agent. This enables automatic categorization of calls up to four levels from transcription at the end of each call in the AI Agent Assist Application.
For more information on assigning a Call Disposition to an Experience in the Real-Time Guidance Agent, click here.
For more information on viewing Call Dispositions in the AI Agent Assist application, click here.
For customers using only Conversation Insights Agent, the Call Disposition can be created and assigned to an Organization within Conversation Insights Agent to perform post-call analysis on conversations from customers. This transforms raw conversation data into actionable insights.
For more information on assigning the Call Disposition to an Organization, click here.
For more information on viewing Call Disposition in the Conversation Details page, click here.
For Customers using both Real-Time Guidance Agent and Conversation Insights Agent, Business Users can map (assign) an Organization to a specific Experience using the Organization Hierarchy page in Administration Platform. This mapping establishes a continuous data flow between real-time interactions and post-call analytics. Calls handled under the mapped Experience appear on the Conversation Details page in Conversation Insights Agent after the call ends.
For more information on mapping an Organization to the Experience, click here.
For more information on viewing the Conversation Details page, click here.