Working with Experiences
An Experience is a customizable AI domain used to assign the languages that will be used by Uniphore's Natural Language Understanding (NLU) server and manage different sets of AI sub-components for different Business Processes (BPs) during a conversation.
For example, you might create an Experience called Hotel Booking and add all Intents that will be used by BPs to perform activities like creating, changing, or canceling a hotel room reservation.
Note
Real-Time Guidance Agent Experience functionality is available starting with Release 2023.3.
About the Experiences Page
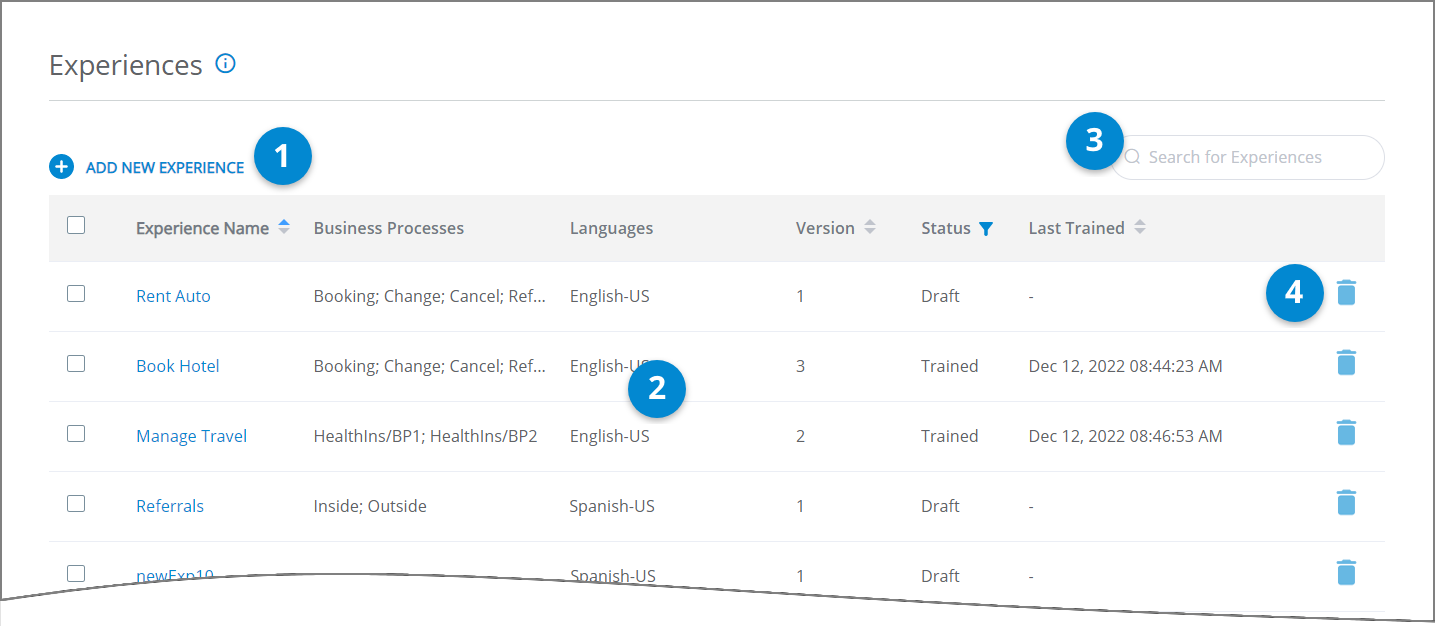
The Experiences page provides high-level details of all Experiences in the current account, and enables you to add new Experiences or edit the details of existing Experiences:
 |
Item | Feature | Description |
|---|---|---|
1 | Add New Experience | Enables creation of a new Experience for the current account. Only users with Flow Admin Role or higher can create a new Experience. |
2 | Experience List | Displays all Experiences that are defined for the current account. For each Experience, the list provides high-level details, including:
The list is sorted by Experience Name in order of creation, by default. You can also sort the list by Version and Last Trained date, in ascending or descending order, by clicking on the relevant column heading. |
3 | Search Box | Enables searching the list for any Experience that matches the details you provide. |
4 | Delete Experience | Click the Trashcan NoteIt is possible to delete an Experience only while working in DEV or TEST environments of an account. You must unassign any associated BPs from the Experience before it can be deleted. |
Filtering and Sorting Experiences
To make it easy for users to focus on Experiences that meet specific criteria, the columns in the Experience page can be filtered or sorted.
Clicking the Filter  icon in a column displays a popup of all current values available for that column. To filter the list, enable the checkboxes for the values you want to include and click Confirm. To remove a filter, click Reset.
Clicking the Sort icon in a column cycles the list order between ascending  , descending
  and unsorted
  lists. Only one column can be sorted at a time.
Basic Workflow for Experiences
The typical workflow for Experience creation and management is as follows:
Add the new Experience domain, assigning its NLU languages, associated Business Processes and detection thresholds.
Add Experience sub-components, such as Intents (together with their phrase examples for NLU) and Alerts.
Map the Intents to their relevant Flows and Steps in the Business Process.
Define the content and format of the Call Summary or the GenAI Summary that will be viewed and approved by the Agent when the call ends.
Train the Experience with the new Intent phrases on the NLU server, making it available for use by its assigned Business Processes at runtime.
Synchronize the trained Experience for its parent LOB.
When required, change or update the Experience to reflect additional Business Process functionality, or perform Assisted Training to analyze and include new AI-based data.
Adding an Experience
A user with Flow Admin role (or higher) can create and manage Experiences.
From the Real-Time Guidance Agent menu section in the Admin Console, select Experiences. The Experiences page is displayed.
At the top left of the Experiences page, click Add New Experience. The Add New Experience dialog is displayed:
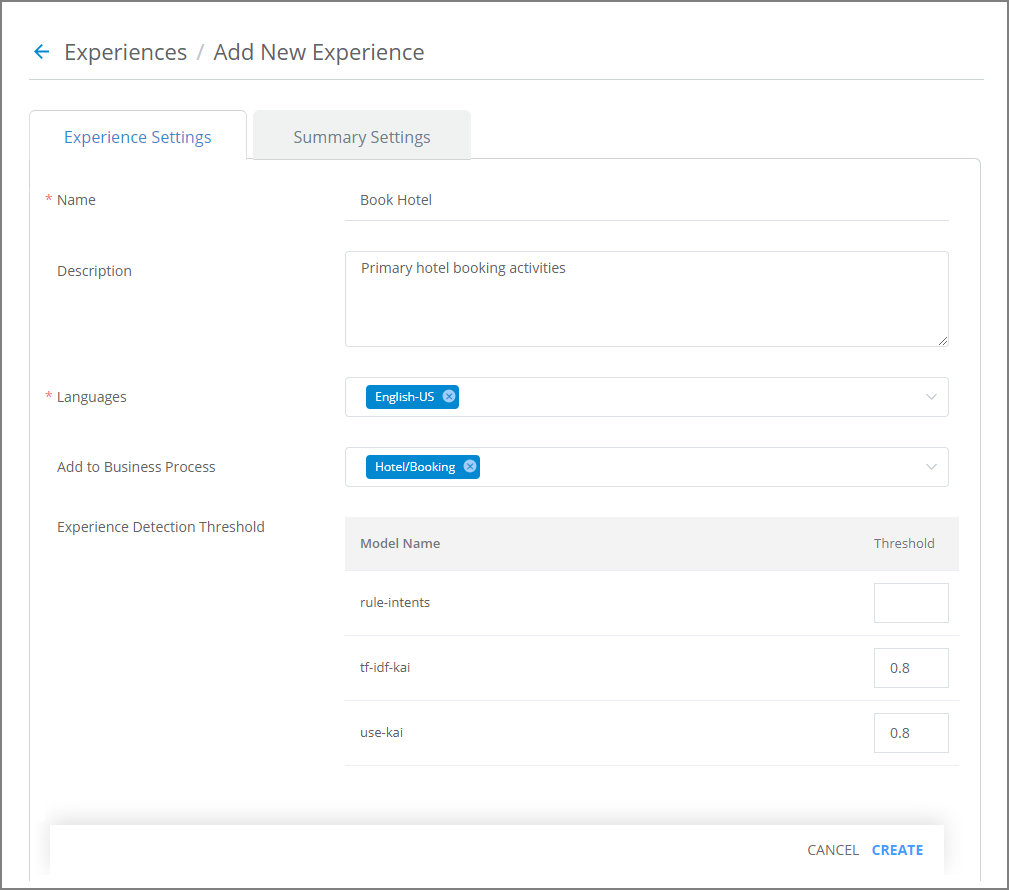
In the Name field, enter a unique name for the new Experience.
In the Description field, enter helpful details about for the new Experience. This information can assist a user to differentiate between this Experience and other, similar Experiences.
From the Languages dropdown list, select a language that will be used by this Experience.
From the Add to Business Process dropdown list, select the Business Processes (BP) that use this Experience.
The list displays all available BPs according to their parent LOBs. Be sure to select the BP from the relevant LOB.
Optionally, in the Experience Detection Threshold section, per Model Name, enter a value in the Threshold field. When defined here, Real-Time Guidance Agent will use this threshold (instead of the default NLU server model threshold) to determine whether to assign a spoken phrase to any Intent in this Experience.
Only a value between 0.8 and 1.0 is valid. In order to be effective, the value entered must be higher than the default value that is defined in the NLU server model. For complete information about Real-Time Guidance Agent detection thresholds, click here.
At the lower right corner of the page, click Create. The new Experience will be saved immediately. To cancel your activity at any time without saving, click Cancel.
After you create an Experience, you need to add Intents and Alerts, as well as define the Call Summary template, to continue its preparation for use by Real-Time Guidance Agent.
Add Intents in Experiences
An Intent is the customer's desired goal for contacting an Agent (e.g., Change an Address, Open a Claim, Order a Flight, Install a Router). In Real-Time Guidance Agent, an Intent is derived from a customer's spoken or written expression using AI-based natural language processing.
A Real-Time Guidance Agent Business Process can support an unlimited number of Intents. To perform runtime activities, each Intent can be mapped to a specific Flow and Step.
A user with the Flow Admin role (or higher) can create and manage an Intent.
Note
Real-Time Guidance Agent Intents are available starting with Release 2023.3.
From the Real-Time Guidance Agent menu section in the Admin Console, select Experiences. The Experiences page will be displayed.
Locate and click the name of the Experience that will contain the Intent you wish to add. The activity cards for that Experience will be displayed:
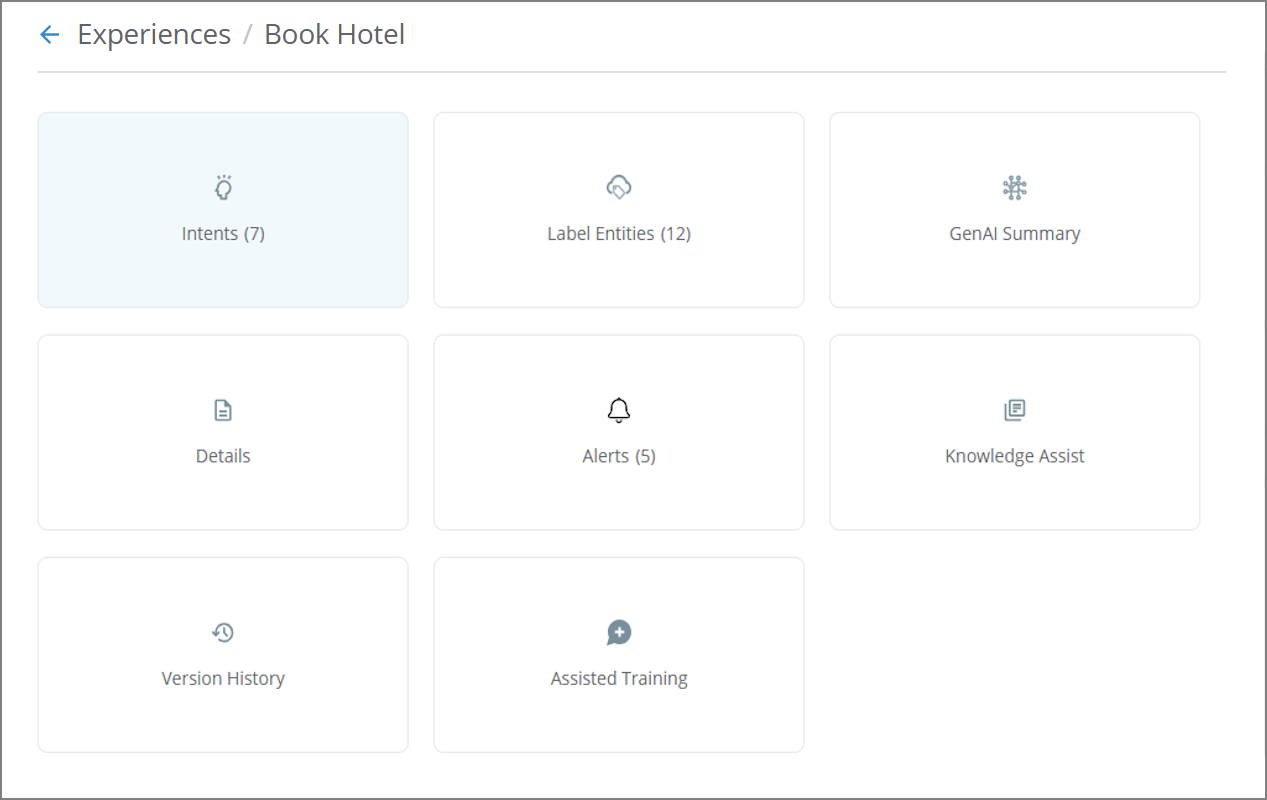
Click Intents. The Intents page for the current Experience will be displayed:
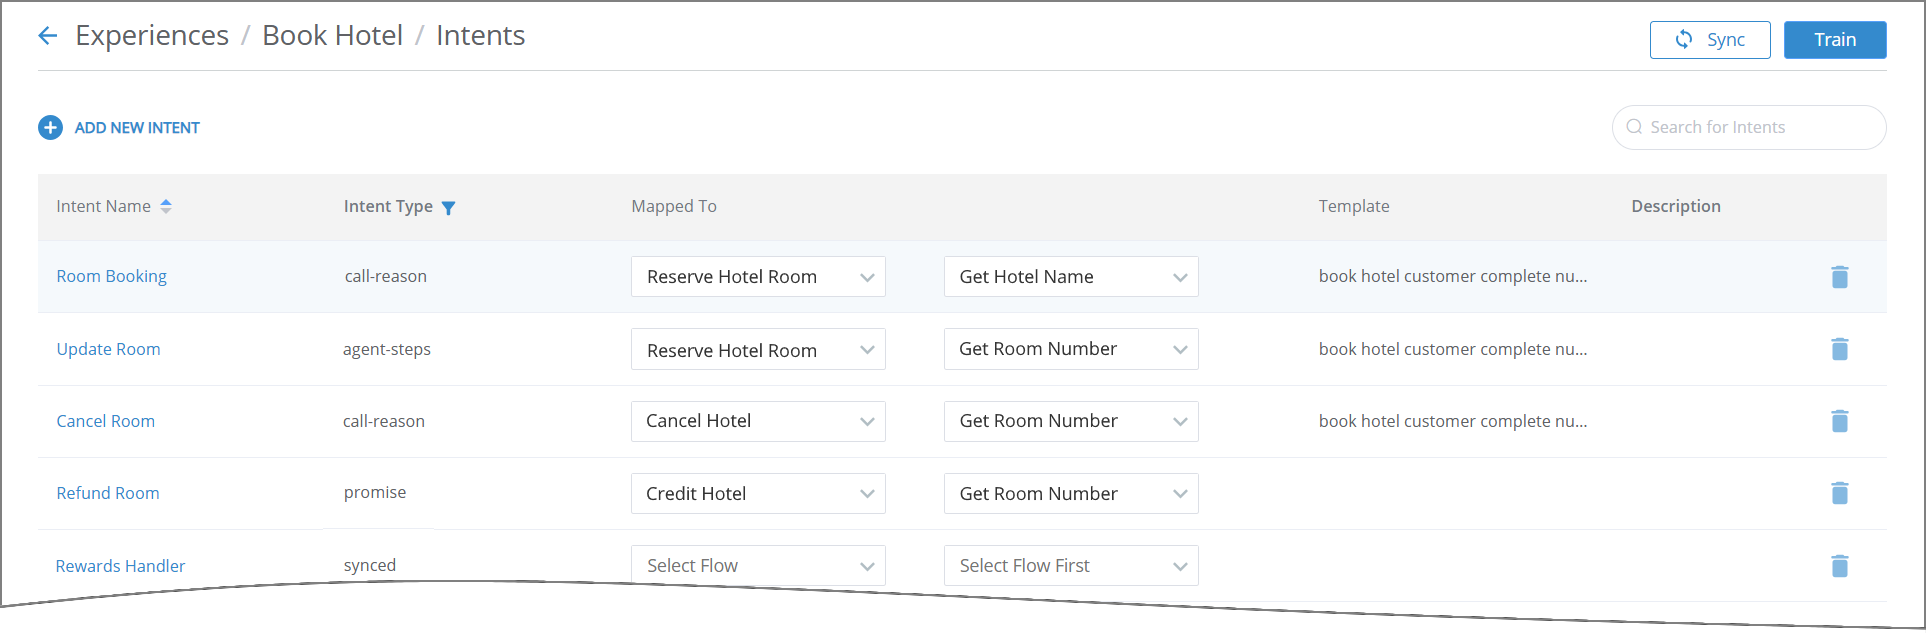
Click Add New Intent. The Create New Intent popup dialog will be displayed:
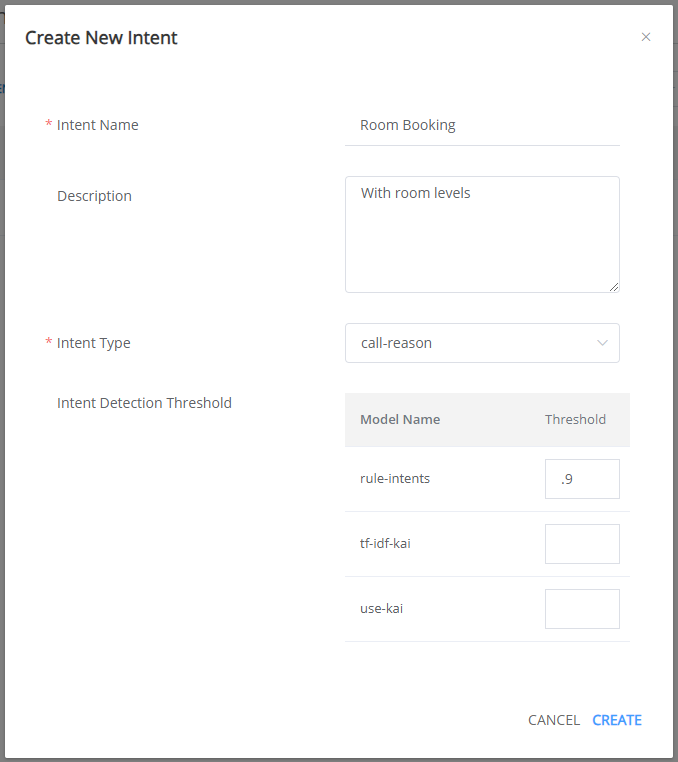
In the Intent Name field, enter a unique name for the new Intent.
In the Description field, optionally provide helpful information about the Intent.
From the Intent Type dropdown list, select one of the following values:
Agent Steps - The Intent is associated with recommendation or troubleshooting steps spoken by an Agent during the call. For details about adding an Agent Step, click here.
Call Reason - The Intent is associated with a specific call reason.
Promise - The Intent is associated with a Promise. When this type is chosen, an additional Promise Type dropdown list is displayed. For details about adding a Promise, click here.
Optionally, in the Intent Detection Threshold section, per Model Name, enter a value in the Threshold field. When defined here, Real-Time Guidance Agent will use this threshold (instead of the default NLU server model threshold) to determine whether to assign a spoken phrase to an Intent during a call.
Only a value between 0.8 and 1.0 is valid. In order to be effective, the value entered must be higher than the default value that is defined in the NLU server model. For complete information about Real-Time Guidance Agent detection thresholds, click here.
At the lower right corner of the popup, click Create. The new Intent will be saved. To cancel your activity at anytime without saving, click Cancel.
Tip
You can update the field values for the saved Intent at anytime, using the Details panel found on the Intent Training page.
After you create an Intent, you need to map it to a specific Flow and add positive and (optionally) negative Phrases that will help the NLU server to identify it during a conversation.
From the Intents page, click the name of the Intent you want to update.
If there are many Intents, you can filter and sort the list to make it easier to find the desired Intent. The Intent Training page for the selected Intent will be displayed.
Add or update the Intent Phrases as needed. For more details click here.
Change the Flow mapping for the Intent as needed. For more details click here.
Update the Details tab as needed. For details, see Step 4 through Step 8 above. Note that after an Intent has been created, its Intent Type field is not editable.
Update the Summary Template tab for the Intent, as needed. For more details, click here.
After making the changes, click Save. To cancel your activity at anytime without saving, click Cancel.
After saving, Train and Sync the current Experience so that it will reflect your updates in the relevant Business Process.
To make it easy for users to focus on Intents that meet specific criteria, the columns in the Intent page can be filtered or sorted.
Clicking the Filter  icon in a column displays a popup of all current values available for that column. To filter the list, enable the checkboxes for the values you want to include and click Confirm. To remove a filter, click Reset.
Clicking the Sort icon in a column cycles the list order between ascending, descending and unsorted lists.
Click the Trash icon of a specific Intent to delete it from the list of available Intents.
After deleting an Intent with any of the Intent Types (Agent Steps, Call Reason, or Promise), you will need to click Sync button to permanently remove the Intent.
Note
The Synced Intents from the U-Assist ACW application cannot be deleted.
Map Intents to Flows
After creating an Intent, it can be mapped to a specific X-Designer Flow to provide the connections that are needed to achieve the goal of a Business Process. When the Intent is detected at run time, the respective Flow will be triggered for the Agent.
Tip
Before mapping, click Sync button to view the approved X-Designer Flows in the Mapped To field.
In the Intents page, all Intents that were created for the selected Business Process are listed, along with the rule-based Intents that were created with the type 'Call reason'.
The Synced Intent types (i.e., Rule-based Intents) are defined and maintained using the U-Assist ACW application.
Important
If the Experience is not mapped with any Business Process, the Sync button will be disabled, and the Synced Intents will not be listed in the Intents page.
For each Intent name:
From the Select Flow dropdown list, choose the X-Designer Flow that will be triggered when that Intent is specified at runtime by Real-Time Guidance Agent. Only approved Flows will be listed.
Optionally, from the Select Step dropdown list, choose the specific Flow Step where execution will begin.
Selecting an Intent Prediction Service
Real-Time Guidance Agent provides the following two Intent Prediction Services as part of its product suite:
Cold Start Model (Knowledge Assist AI (KAI) algorithms)
'Cold Start' is Uniphore’s legacy Intent Prediction Service, built on a semantic clustering mechanism. It is lightweight, quick to set up, and ideal for simpler use cases that require minimal training time. Cold Start performs effectively when the Intent set is small or clearly distinguishable.
Unified Framework for Text Classification (UniFit) Model
UniFit is an advanced Intent Prediction Framework, designed to handle a broad range of text classification tasks. It integrates multiple proven classification techniques into a modular, unified service, allowing for flexible pipeline configurations. UniFit is particularly suited for complex scenarios with:
High Intent cardinality
Overlapping or semantically similar Intents
A need for deeper contextual understanding
Unifit architecture enables better scalability and semantic accuracy across enterprise-scale deployments.
For more information on configuring Intents to use the UniFit Model, click here.
Tip
It is recommended to use the UniFit model for highest accuracy. To use the UniFit model for your account, please contact your Uniphore Support representative.
You select the Intent Prediction Service at the Tenant and Language levels. For example, you can configure 'UniFit for English' and 'Cold Start for Spanish' within the same Tenant.
Caution
The Cold Start and UniFit Intent Prediction Services cannot be simultaneously configured for the same language within a single Tenant, even if they are used for different Experiences.
Add Intent Phrases
Adding Phrases for each Intent supplies the NLU server with the critical AI data it needs to accurately identify each Intent expressed during a conversation.
Tip
You can add Intent Phrases either manually as described here, or by using the Generative AI training feature for Cold Start and UniFit Intent Prediction Services.
You can add Intent Phrases in multiple languages for identification by the NLU server.
For the Cold Start Intent Prediction Service, Real-Time Guidance Agent can use both positive and negative phrases to improve the accuracy and speed of an NLU runtime response.
Note
The UniFit Intent Prediction Service does not require both positive phrases and negative examples for each intent. Instead, you can define an additional Intent class called "OTHERS", to represent utterances that do not belong to any of the defined Intents.
From the Intents page, click the name of the desired Intent where you will add the new Phrases. The Intent Training page will be displayed:
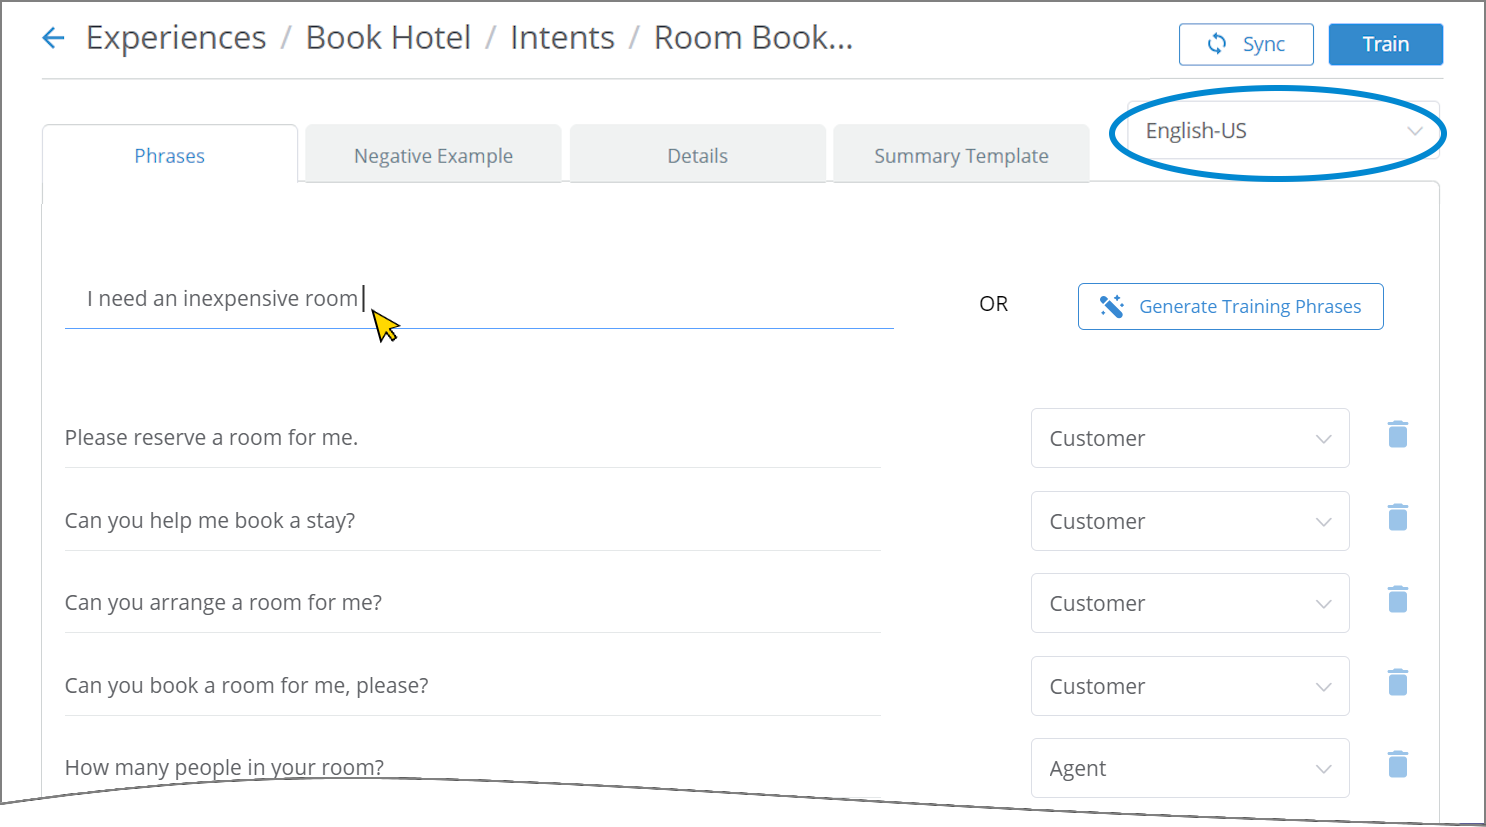
From the Languages dropdown list near the top right corner of the page, select the language to be used by the NLU server for the current set of Intent Phrases and Negative Examples.
From the Phrases panel, in the empty Phrase field at the top, enter the new Intent Phrase as a sentence or portion of a sentence and press Enter. The Phrase will be saved and a confirmation message will be displayed. The Phrase will appear at the top of the Phrase list below the entry field.
For best performance, the Phrase should be an expression that helps to indicate the specific goal of the current Intent.
To delete a saved Phrase, at the right side of the desired Phrase, click the Trash
icon.At right side of the newly-saved Phrase, from the dropdown list, assign the Channel (the typical role) of the person who will use the Phrase during a conversation:
Customer
Agent
Both (Customer and Agent)
Repeat Step 3 to Step 4 for each new Phrase you want to add.
You can provide Negative Examples of an Intent Phrase. A negative phrase tells the NLU server not to use the Intent if its words are detected. This information helps to make the Intent identification process faster and more accurate.
Near the top of the Intent Training page, select the Negative Example tab. The Negative Example panel will be displayed:
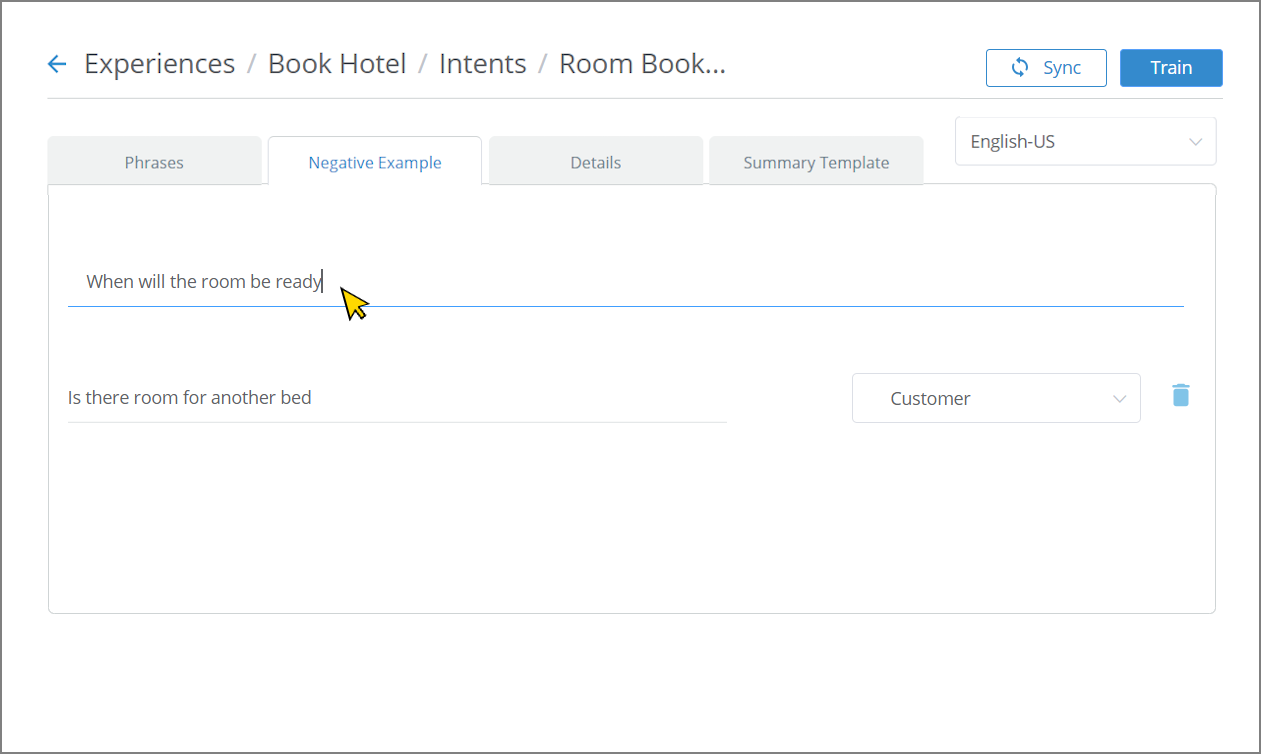
In the Phrase field, enter the new negative phrase as a sentence or portion of a sentence and press Enter. The Phrase will be saved immediately and displayed at the top of the Phrase list below the entry field.
Caution
If any negative Phrase exactly matches an existing Intent Phrase, the NLU server will ignore the entire Intent during a conversation.
To delete a saved Phrase, at the right side of the desired Phrase, click the Trash
icon.At right side of the newly-saved Phrase, from the dropdown list, assign the Channel (the typical role) of the person who will use the Phrase during a conversation:
Customer
Agent
Both (Customer and Agent)
Repeat Step 2 to Step 3 for each new Negative Example phrase you want to add.
When you are finished adding Intent Phrases, you must train the current Experience in order to make the new Intent data available to the NLU server.
Tip
Another way to add Intent Phrases is by importing conversation transcripts with the built-in Test AI Model facility. For more details, click here.
Guidelines for Configuring Intents for the UniFit Model
The current Cold Start Intent Detection Model (i.e., Knowledge Assist AI (KAI) algorithms) uses pre-trained models to identify Intents in real time based on the semantic match of configured keyphrases. This model struggles to differentiate between utterences that are syntactically similar but semantically different. For example, it may mistakenly trigger the "Change Address" Intent when an agent simply requests address authentication.
To address the problems mentioned above, Uniphore added the UniFit model for all accounts to more accurately identify Intents in real time. This model uses a text classification method to fine tune a sentence transformer with a few sample positive and negative turns.
Note
To use the UniFit model for your account, please contact your Uniphore Support representative.
To switch from the Cold Start model to the UniFIt model, you must follow a new methodology to configure Intents within the Experience:
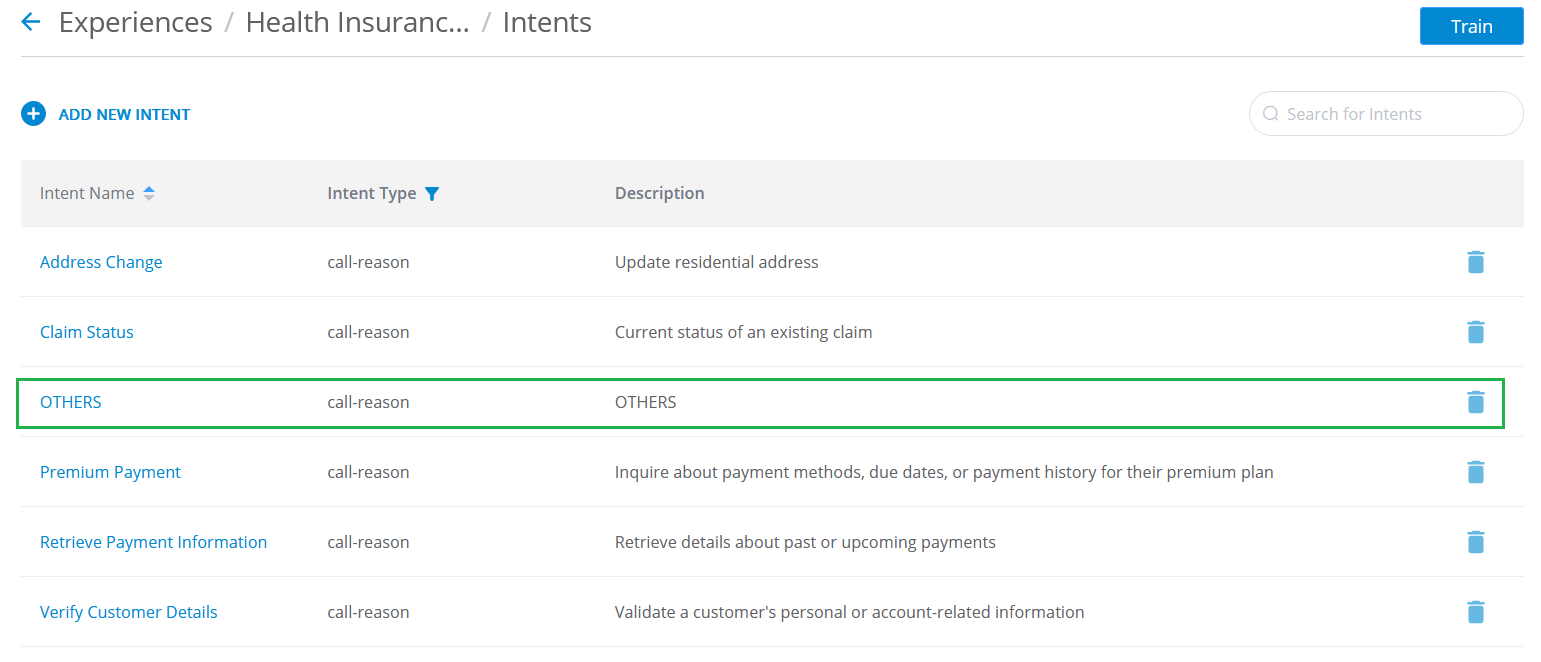
You must create an Intent with the name 'OTHERS' inside the Experience and add at least five Intent phrases outside the scope of your defined use case. This allows the UniFit model to correctly classify out-of-scope inputs.
For example, you can add the below out-of-scope Intent Phrases for an Intent "Address Change".
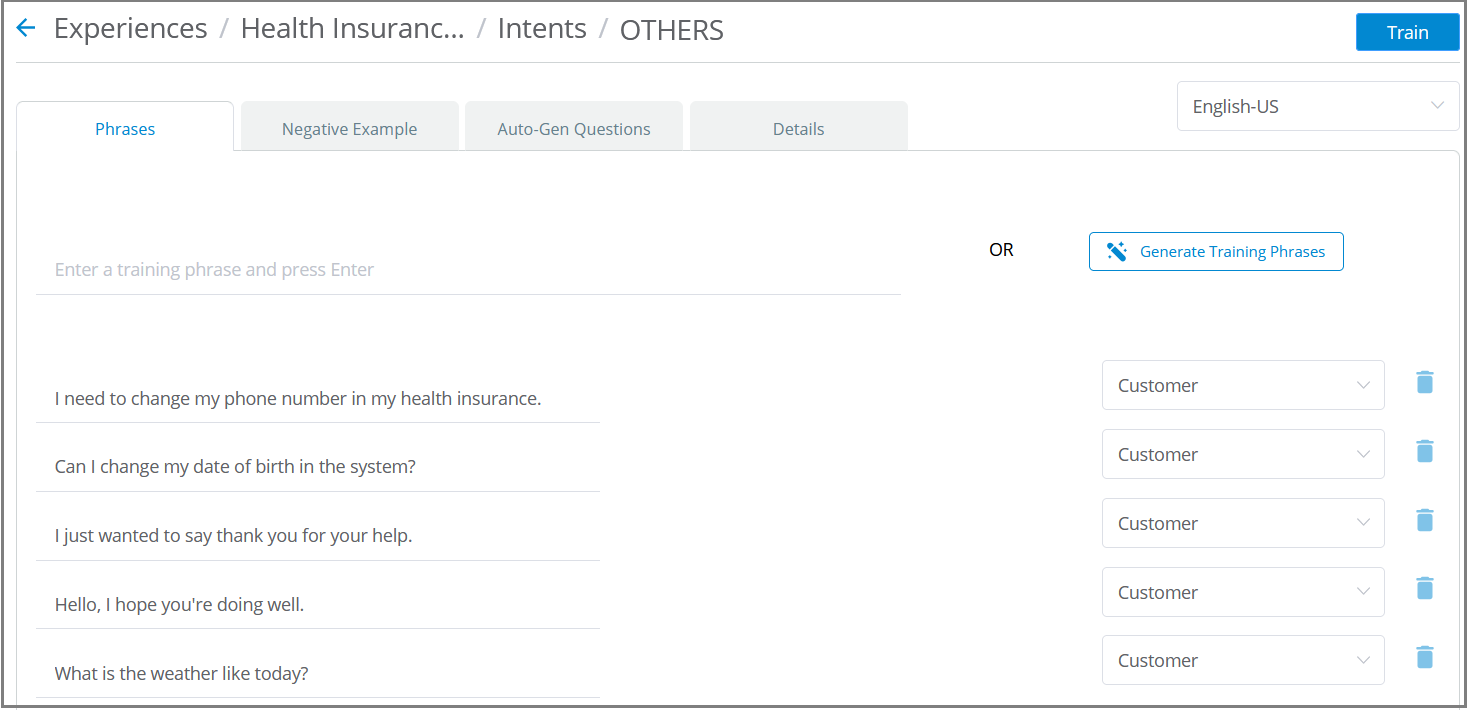
The Intent 'OTHERS' will not be triggered in real time. This Intent only instructs the UniFit model to classify all out-of-scope inputs under 'OTHERS'.
Tip
The phrases added to the Intent 'OTHERS' will be considered globally for all Intents created within an Experience, irrespective of Intent Type.
You must ensure that all Intents, except 'OTHERS', contain at least five positive Intent Phrases for the UniFit model to recognize them.
Note
It is recommended to add the entire turn as an Intent Phrase for better accuracy.
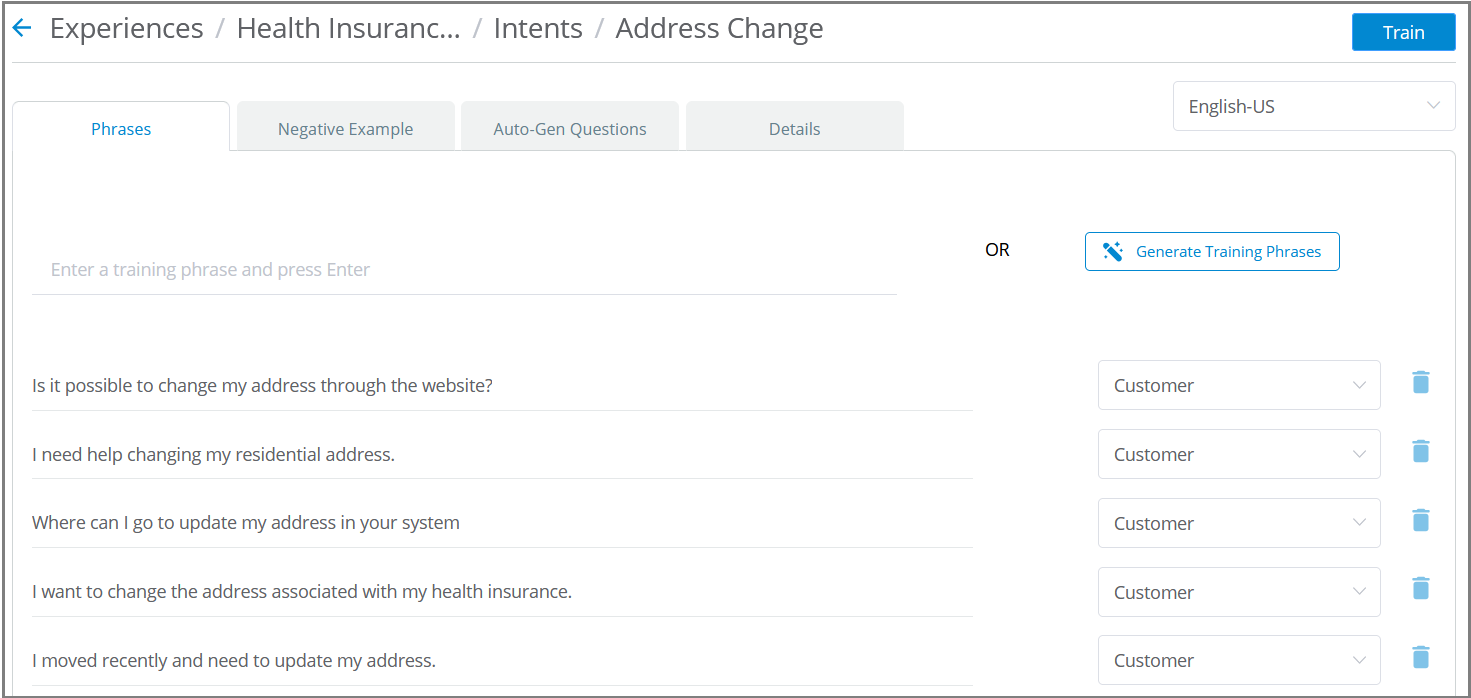
For example, you can add the entire turn "I want to change the address associated with my health insurance" as an Intent Phrase instead of adding a portion of a sentence "Update my address".
You must ensure that the positive phrase of one Intent is not be used as a negative example for any other Intents inside the Experience.
For example, you might add the positive phrase 'I want to change my E-mail address' for the Intent "E-mail Address Update". This positive phrase should not be a negative example for the Intent "Address Change".
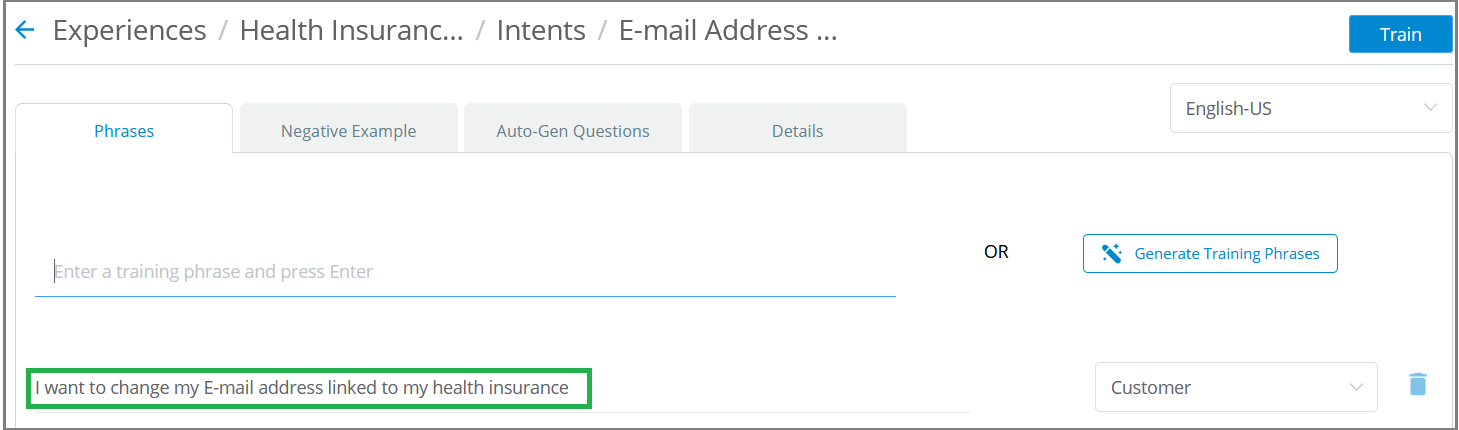
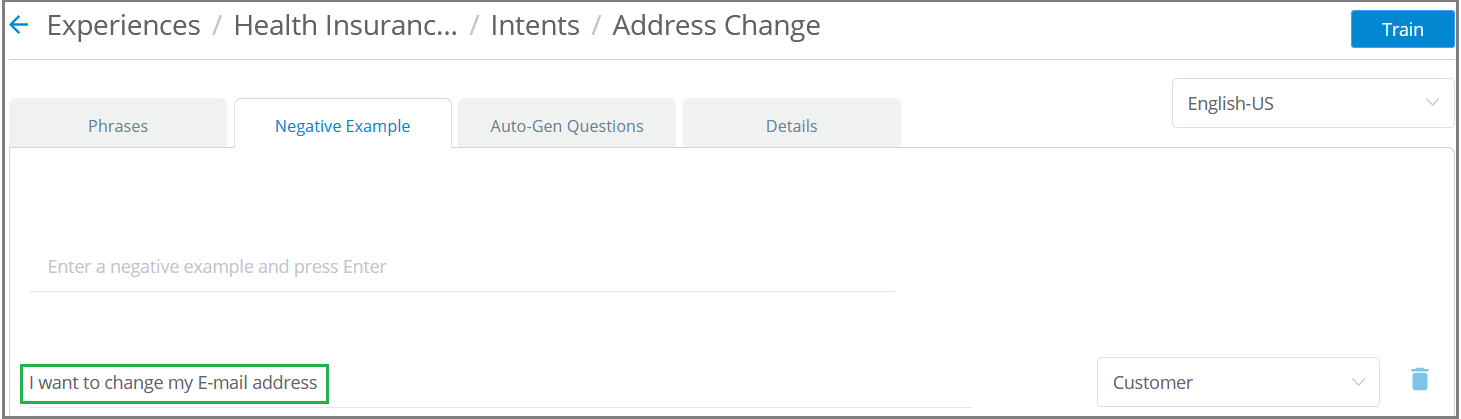
In this case, the Intent "E-mail Address Update" will not be triggered at run time, even if the configured keyphrase 'I want to change my E-mail address' is detected.
Note
It is not required to add negative examples for 'OTHERS' Intent.
Tip
Training time for an Experience depends on the number of Intent phrases configured.
Use Real Data: Whenever possible, train your model using real production transcripts. These transcripts accurately represent how users actually speak and interact.
Ground Synthetic Data in Reality: When using UniFit’s Generative AI to create synthetic phrases, base them on real transcript examples. This ensures that training data reflects real-life usage patterns and reduces model drift.
Minimize Iterations, Maximize Quality: High-quality, realistic training data results in better model performance after fewer iterations, allowing you to achieve faster time-to-value.
Adding Phrases with Generative AI
Real-Time Guidance Agent provides a built-in generative AI facility that can suggest and add a quantity of Intent phrases automatically, greatly reducing the need for an Analyst to add phrases to an Intent manually.
The Generate Training Phrases facility uses Uniphore's advanced AI capabilities to analyze one or more sample phrases and then display a comprehensive list of similar phrases that the Analyst can instantly add to the set of training phrases for an Intent.
Generating Training Phrases with AI
You access and use the Generate Training Phrases facility directly from any Intent in a selected Experience.
From the Real-Time Guidance Agent menu section in the X-Console, locate and click the name of the Experience for which you want to generate phrases. The Experiences page will be displayed.
Click Intents. The Intents page for the current Experience will be displayed.
On the right side of the page, click Generate Training Phrases. The Generate Training Phrases panel will be displayed:
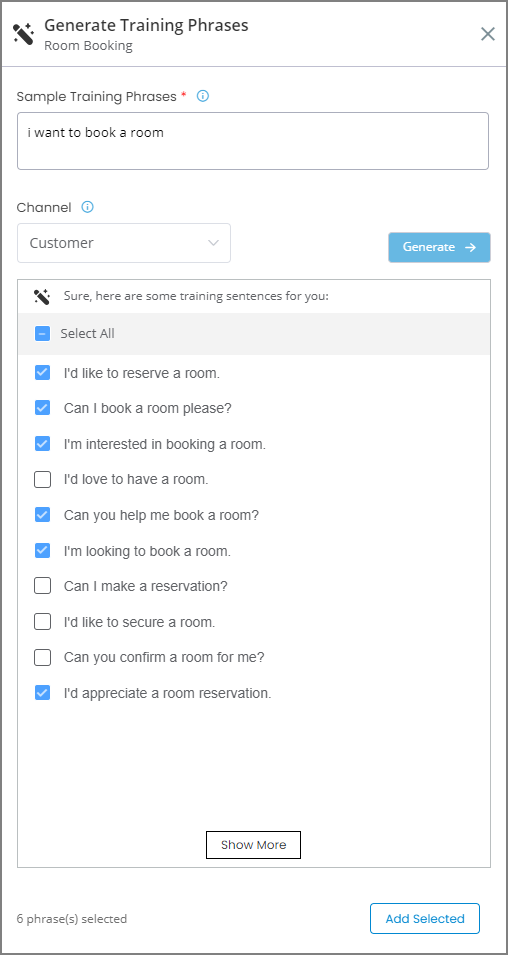
In the Sample Training Phrases textbox, enter or paste one or more phrases that will invoke the current Intent during the call. If providing more than one phrase, press 'Enter' to separate each phrase.
From the Channel dropdown list, select the speaker of the sample phrase(s) you have entered.
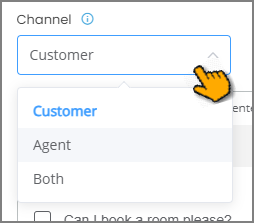
Your selection will focus the current phrase generation for that speaker. Choose from Customer, Agent, or Both.
Click Generate. The facility will analyze the sample phrases and display a list of up to 25 similar phrases, using Uniphore's generative AI algorithms. Phrases which have already been added and trained in the current Intent will not be displayed.
When more than 10 similar phrases are available, you can view them by clicking Show More at the bottom of the panel.
If required, change your sample and click Generate again to produce new phrases that are more closely associated with the current Intent.
Note
Changing the Channel selection value will also enable you to click Generate once again and to display similar phrases by the new speaker.
Examine the phrase list carefully and select the checkbox next to each phrase that closely matches your sample phrase. Select the phrases that are most likely to trigger the current Intent during a call.
The total number of phrases selected is displayed at the lower right corner of the panel.
If needed, click the Edit
 icon next to any phrase in the list and change it to better match your current Intent:
When you finish selecting phrases, click Add Selected. The selected phrases will be immediately added to the training phrases that are listed on the current Intents page, and a success message will be displayed.
To the right of each phrase that is added on the Intents page, the specified speaker channel will be shown as well.
Optionally, repeat Step 4 to Step 8 above as many times as required to generate more phrases for the current Intent.
Important
Whenever you add new training phrases to an Intent, remember to click Train at the top right corner of the Experience in order to update the AI Model data for that Intent.
Add Proactive Questions
When integrated with Uniphore's Knowledge-as-a-Service (KaaS) platform, Real-Time Guidance Agent supports powerful AI capabilities in AI Agent Assist, providing answers to relevant questions for an Agent in real time, based on the current Intent. You can pre-define up to three questions for any Intent. During a call, LLM-based answers to pre-defined questions will be displayed to the Agent as soon as an Intent is recognized. An Agent can always input questions manually to receive real-time answers, as needed.
Using KaaS generative AI to pre-define and respond to frequently-asked questions makes it possible for an Agent to focus on the end user during a conversation, and can also greatly improve the answers that are available to the Agent.
Note
Currently, to enable this feature for your account, please contact your Uniphore Support representative.
Pre-Defining Proactive Questions for an Intent
You access and edit the questions for an Intent directly from the Intents page in the selected Experience.
Before you can add pre-defined questions, you must map the relevant Experience to your AI Agent application in the AI Agent Assist Application settings. KaaS will only generate answers for Agent questions that have been mapped. For more details on mapping, click here.
From the Real-Time Guidance Agent menu section in the X-Console, locate and click the name of the Experience for which you want to pre-define questions. The Experiences page will be displayed.
Click Intents. The Intents page for the current Experience will be displayed.
Click the Proactive Questions tab. The Proactive Questions panel will be displayed:
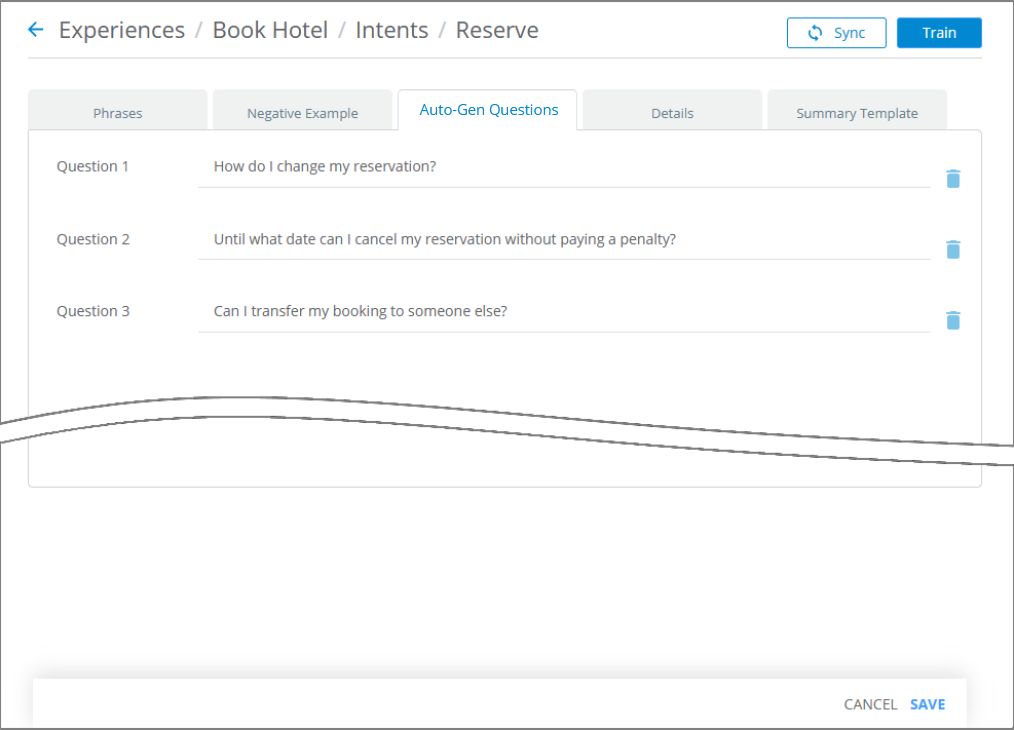
Optionally, for each Question text box, enter the complete question to associate with this Intent during the call. Questions should only relate to the current Intent.
By default, you can pre-define a maximum of three questions for each Intent. To change the maximum number of pre-defined questions, contact your Uniphore Support representative.
When finished, at the lower right corner of the panel, click Save. The new question will be saved. To cancel your activity at anytime without saving, click Cancel.
After pre-defining questions for an Experience, there is no need to Train the Experience.
Tip
An Analyst can also add a large number of pre-defined questions that are relevant for the entire Experience. For complete details, click here.
From the Intents page, locate the question you want to update and edit its text.
After making your changes, at the lower right corner of the panel, click Save. To cancel your activity at anytime without saving, click Cancel.
Click the Trash icon to the right of the relevant question text to delete it from the list of questions.
After deleting a question, at the top right corner of the page, click Sync to permanently remove the question from the relevant Business Process.
How Pre-Defined Questions Are Managed
When configuring an Experience, the Analyst can create up to three questions to associate with each Intent. These questions, together with their answers generated from the specific Knowledge Base assigned to the Experience, are managed using a cache in order to make them available quickly whenever a specific Intent is recognized during a conversation. When a cache is cleared periodically, it may result in a short delay when displaying an answer.
Note
During a conversation, if the same question is asked by an Agent across different environments or even different Experiences, the cached answer will appear instantly in the Knowledge Assist Questions & Answers panel of the AI Agent Assist application.
Intent Detection Thresholds
Real-Time Guidance Agent enables a user with the Flow Admin role (or higher) to set an optional detection threshold for associating customer phrases with an Intent during a call.
An Intent detection threshold provides a method of fine-tuning how Real-Time Guidance Agent recognizes and assigns phrases to Intents during a call (in addition to the built-in threshold logic used by the NLU server or UniFit model), helping to improve runtime sensitivity and performance.
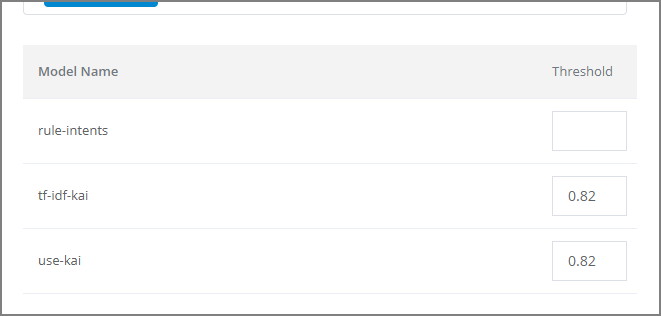
Custom thresholds can be created both at the Experience level as well as for specific Intents. These thresholds are set in the Details panel for each component at the time it is created, or by adding them later.
Caution
We strongly recommend that Intent Detection Thresholds be configured by your Account Admin, who is responsible for calculating (and testing) the ideal thresholds to achieve optimum accuracy and efficiency for your account.
Detection Threshold Models
The custom threshold is designed to impact detection performance by default NLU server models and UniFit model which are available 'out-of-the-box' to all accounts:
rule-intents - A model based on Intents that use Rule-based Entities.
tf-idf-kai - A model based on a built-in Knowledge Assist AI (KAI) algorithms.
use-kai - A model based on a built-in Knowledge Assist AI (KAI) algorithms.
ds-nlp-unifit-ensemble - A model based on Intents that use UniFit.
The UniFit model is recommended for improved Intent detection accuracy. For more information on configuring Intents for the UniFit model, click here.
Tip
Additional NLU server models are available for account-level customizations. For more details, contact Uniphore Support.
Each NLU server model uses a unique combination of algorithms and settings to recognize phrases and determine the probability that a specific phrase can be associated with one or more specific Intents.
The optional detection threshold for Experience and Intent levels enables threshold customization to improve detection accuracy for a specific customer or use case.
Detection Threshold Hierarchy
Real-Time Guidance Agent Intent detection thresholds will be applied to customer phrases in the following order:
Built-in detection thresholds, using settings defined in the relevant NLU server model.
Intent detection thresholds, using the settings entered for one or more a specific Intents in the Experience.
Experience detection threshold, using the settings entered for the Experience.
Defining the Call Summary Templates
Every AI Agent Assist conversation is summarized using the Call Summary, available for viewing and editing in real time.
Note
Because the AI Agent Assist Call Summary is updated automatically while the call is still in progress, unlike the Agent Desktop Disposition and Summary, an Agent does not have to wait until the end of the call to view it.
Call Summary content, formatting, and display settings can be customized to suit the exact needs of its associated Business Process and Intents. Any user with the Flow Admin role or higher can define and update the Call Summary template directly from the AI Model in their account.
The Call Summary is built from the following components:
a Header Summary template, maintained with each Business Process;
an Intent Summary template, maintained with each Intent; and
a Call Disposition selector, maintained with each Business Process.
The elements and information that an Agent sees are determined by the Call Summary component design.
During a call, the Agent AI Assist application updates the Call Summary content in real time, and the Agent can view and edit it on demand. The Call Summary is an excellent way to see live information and get a conversation overview of the conversation with a single click.
At the end of a call, the Call Summary is presented to the Agent for a final review, enabling the Agent to make corrections and updates as required. When the review is completed, the Agent submits the Call Summary to the X‑Platform server, together with all other details of the conversation.
Creating and Updating the Header Summary Template
The Header Summary template can be used to configure high level, customer and general information about a call, for example, Customer Name, Customer ID, Email, Account Type, Call Duration, etc. The template design can include free text as well as dynamic content, such as variables and links.
Because the configuration is common to its parent Business Process, information presented in the Header Summary is meant to be generic, and not based on call Intents or Entities.
A Flow Admin configures the Header Summary template for each Business Process from the Experience page for an account using the built-in X‑Console rich text editor.
The Rich Text Editor enables you to format the template according to your needs, as well as add available Session Variables and U-Assist ACW Entities for an account (by entering the '@' symbol), insert hyperlinks and more. For complete details on using the X‑Console Rich Text Editor, click here.
The Header Summary is accessed in the AI Agent Assist Application, as a component in the Call Summary. All of its values are populated dynamically while the call is in progress, based on the defined template.
Creating a New Header Summary Template
Important
Before creating the Header Summary template, you should map the Experience to its associated Business Process.
From the Real-Time Guidance Agent Experience page, click the name of the desired Experience where you want to add a new Header Summary template. The activity cards for that Experience will be displayed.
Click Details. The Experience Details page is displayed.
Click the Summary Settings tab. The Settings panel for the selected Business Process is displayed.
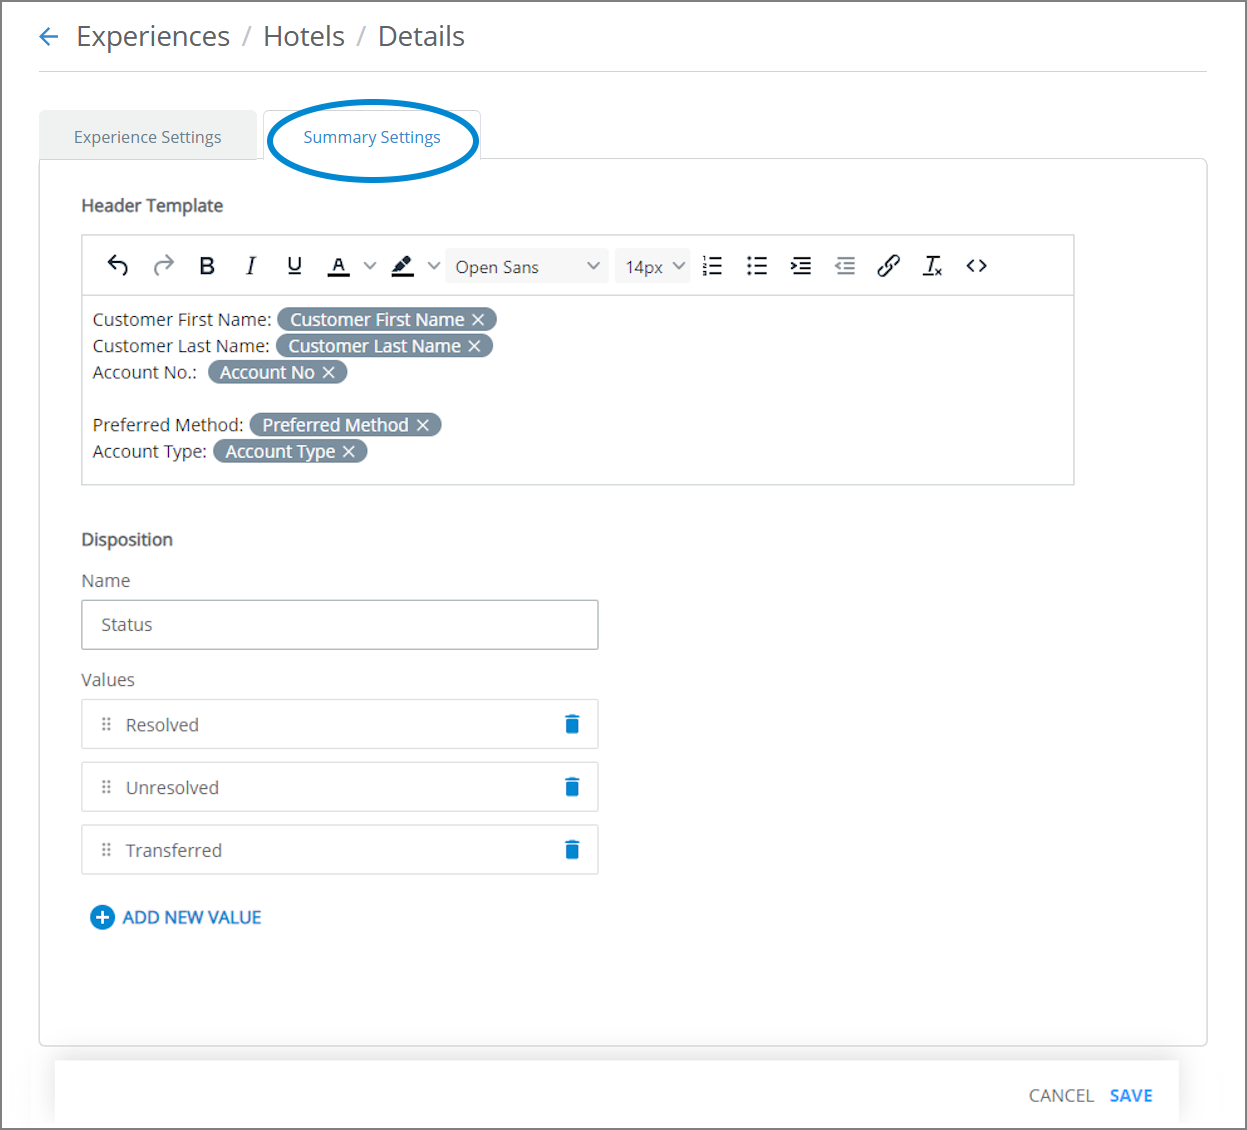
In the Header Template section, provide template content by entering free text and adding other elements. Use the rich text editor to customize the formatting, add hyperlinks, and more. For complete details about using the rich text editor, click here.
To add one or more Session Variables or U-Assist ACW Entities, enter the '@' symbol at the cursor. An autocomplete dropdown list will appear with all relevant components that are available to the current Business Process:
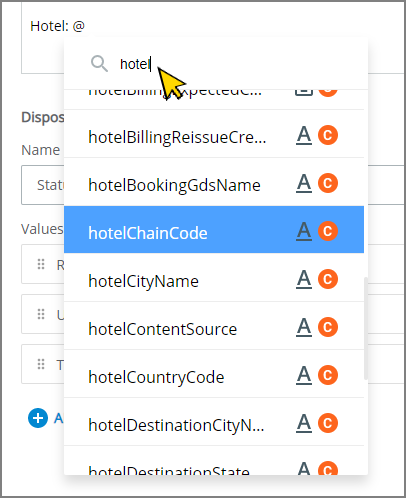
Locate and select the item that you want to insert. When needed, you can insert multiple instances of the same Variable in the template.
When the autocomplete list is long, you can locate a specific Variable or U-Assist ACW Entity by entering a few letters from its name in the Search field, located at the top of the list.
Click the selected item. A variable field representing your selection will be inserted at the cursor in the editor.
You can remove an inserted Variable by clicking the X on the right side of the field. Alternatively, you can use the delete or backspace keys in the editor.
When you finish adding content to the Header Summary Template, click Save at the lower right corner of the page. A confirmation message appears, and changes are saved. To exit at anytime without saving changes, click Cancel.
Updating a Header Summary Template
From the Real-Time Guidance Agent Experience page, click the name of the desired Experience where you want to edit a Header Summary template. The activity cards for that Experience will be displayed.
Click Details. The Experience Details page is displayed.
Click the Summary Settings tab. The Settings panel for the selected Business Process is displayed. In the Header Template section, change the template content as required using the rich text editor and other functions described above.
Click Save at the lower right corner of the page. A confirmation message appears, and changes are saved.
Defining Disposition Values
Dispositions provide a way for Agents to record the outcome of each call reason. They can help to indicate next steps and also provide information for processing and analysis downstream, to improve insights on how a call reason was handled.
Multiple dispositions can be captured in a call based on the Intents, actions and resolutions detected on the call.
A Flow Admin can define custom Intent disposition choice values for each Business Process, based on business needs. The disposition choice list is shown in the AI Agent Assist Application during runtime, as a component in the Call Summary. The Agent can select the appropriate disposition value for each intent or call reason from the list.
One example might be a hospitality client taking calls to reserve rooms as well as cancel reservations. A Flow Admin might configure the Disposition choices as below:
If a call was identified to be of the category "Reservation / Booking", then the Disposition choices can be defined as "Booking confirmed" and "Booking rejected".
If a call was identified to be of the category "Reservation / Cancel", then the Disposition choices can be defined as "Initiate refund" and "Alternate Booking".
From the Real-Time Guidance Agent Experience page, click the name of the desired Experience where you want to add a new Header Summary template. The activity cards for that Experience will be displayed.
Click Details. The Experience Details page is displayed.
Click the Summary Settings tab. The Settings panel for the selected Business Process is displayed.
In the Disposition section, in the Name field, optionally enter a descriptive name for the Disposition you want to define.
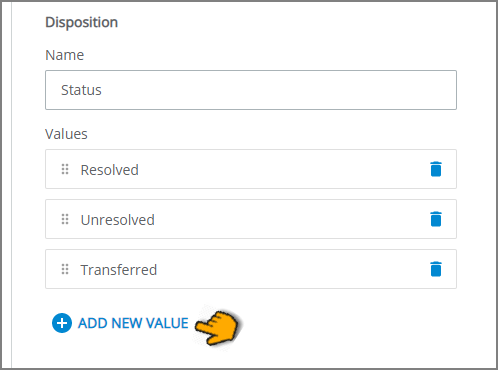
By default, in the Name field, the Business Process name is displayed, followed by the word 'name'.
To add a new disposition value based on your own Business Process requirements, click Add New Value . An empty Value choice field will be displayed.
Enter a new choice value by clicking inside the empty field. (The new value will be confirmed when the cursor leaves the field.) Continuing adding more choice values, as needed.
To delete an existing choice, click the Delete (
 ) icon at the right side of a disposition value.
Note
Once a disposition choice value is added, you cannot modify the added value. If you want to change it, remove the value by clicking the Delete icon, and then add a new, modified value.
After adding all Call Disposition values, click Save at the lower right corner of the page. A confirmation message appears, and changes are saved.
Creating and Updating the Intent Summary Template
The Intent Summary template provides real time information that relates to a specific Intent during a call. A Flow Admin can configure intent-specific templates to be displayed in real time to an agent during a call, using the built-in X‑Console rich text editor. The template design can include free text as well as dynamic content, such as Variables, U-Assist ACW Entities, and links.
The rich text editor enables you to format the template according to your needs, as well as add available Session Variables and U-Assist ACW Entities for an account (by entering the '@' symbol), insert hyperlinks and more. For complete details on using the X‑Console rich text editor, click here.
The Intent Summary is accessed in the AI Agent Assist Application, as a component in the Call Summary. All of its values are populated dynamically while the call is in progress, based on the defined template.
During the call, an Agent can view the real time summary generated for each Intent as soon as Real-Time Guidance Agent identifies that a selected Intent has started. If Real-Time Guidance Agent sees that the current Intent has ended and the conversation has moved to a different Intent, a new Intent Summary is generated and displayed in Call Summary.
Creating a New Intent Summary Template
Important
Before creating the Intent Summary template, you should map the Experience to its associated Business Process.
From the Experience page, click the name of the desired Experience. The activity cards for that Experience will be displayed.
Click Intents. The Intents page is displayed, showing all of its current Intents. Click the name of the desired Intent where you want to add a new Intent Summary template.
Click the Summary Template tab. The Intent Details page appears.
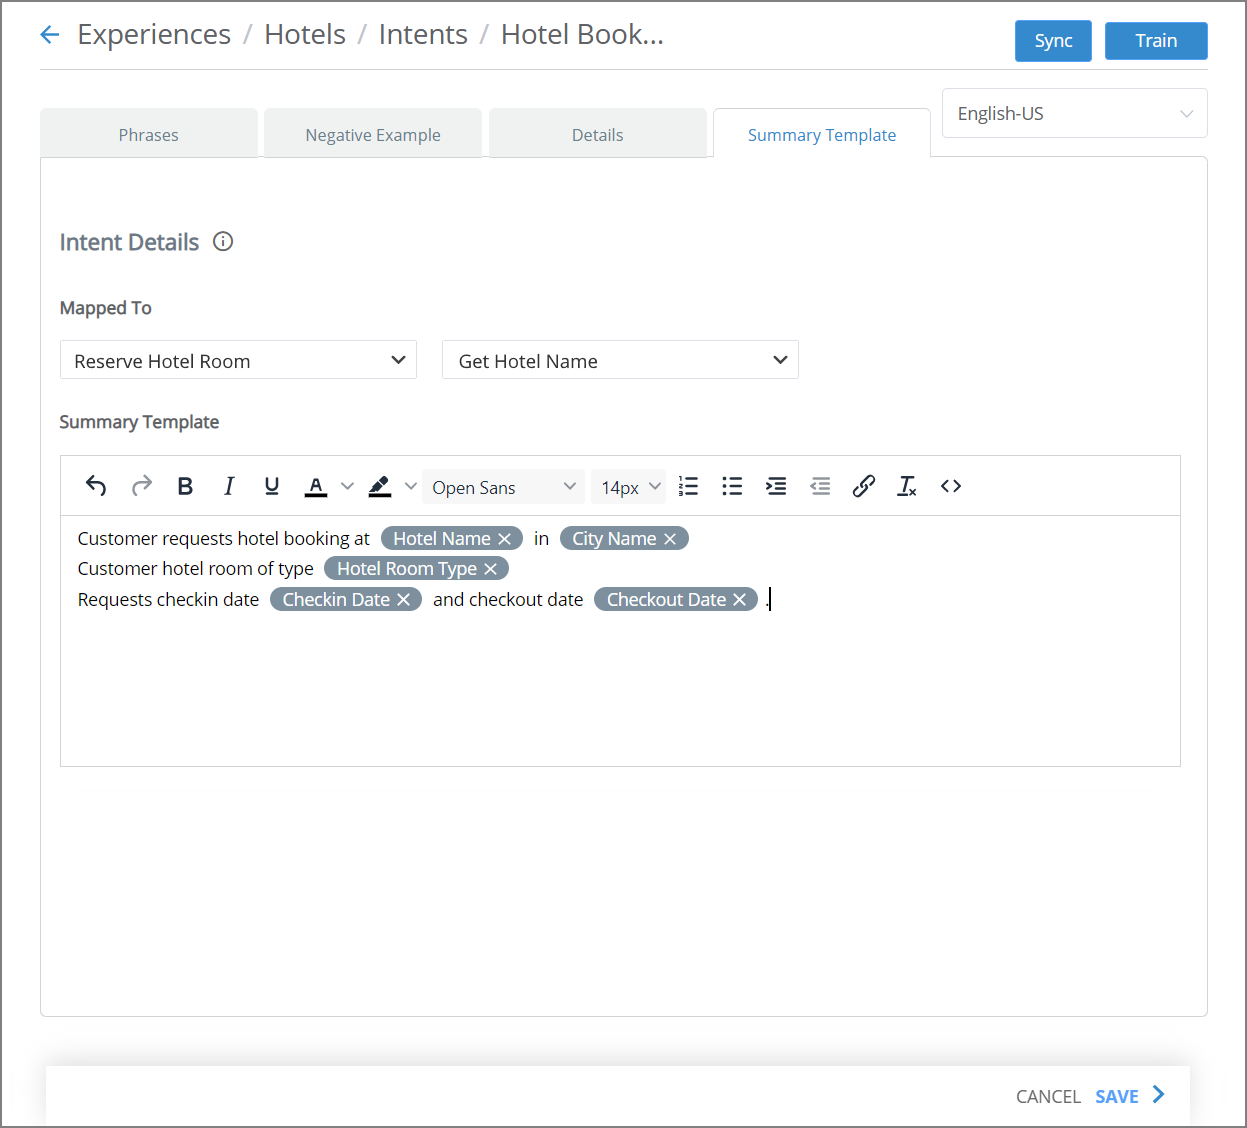
In the Mapped To section, from the dropdown menus, select the X‑Designer Flow and then (optionally) the specific Flow Step that will be triggered when the Intent is identified by Real-Time Guidance Agent. You must select the Flow before you can select any of its Steps.
Note that mapping selections will be saved immediately.
Note
The Intent Summary Template can also be created without this mapping action.
In the Summary Template section, provide template content by entering free text and adding other elements. Use the rich text editor to customize the formatting, add hyperlinks, and more. For complete details about using the rich text editor, click here.
To add one or more Session Variables or U-Assist ACW Entities, enter the '@' symbol at the cursor. An autocomplete dropdown list will appear with all relevant components that are available to the current Business Process.
Locate and select the item that you want to insert. When needed, you can insert multiple instances of the same Variable in the template.
When the autocomplete list is long, you can locate a specific Variable or U-Assist ACW Entity by entering a few letters from its name in the Search field, located at the top of the list.
Click the selected item. A variable field representing your selection will be inserted at the cursor in the editor.
You can remove an inserted Variable by clicking the X on the right side of the field. Alternatively, you can use the delete or backspace keys in the editor.
When you finish adding content to the Intent Summary template, click Save at the lower right corner of the page. A confirmation message appears, and changes are saved. To exit at any time without saving changes, click Cancel.
After creation, a brief preview of the Intent Template is displayed alongside its respective Intent.
Updating an Intent Summary Template
From the Real-Time Guidance Agent Experience page, click the name of the desired Experience. The activity cards for that Experience will be displayed.
Click Intents. The Intents page is displayed, showing all of its current Intents. Click the name of the desired Intent where you want to edit the Intent Summary.
Click the Summary Template tab. The Intent Details page appears.
Change the Intent Details template content as required using the rich text editor and other functions described above.
Click Save at the lower right corner of the page. A confirmation message appears, and changes are saved.
Error Handling in GenAI Call Summary Submission
An Account Admin or Analyst can recover a failed GenAI Call Summary submission through a retry without data loss. To enable this, the system variable 'SummarySubmitServiceFlowStatus' must be used in both the Service Flow and Data Flow, and assigned to the Call Summary and Retry actions in the specific AI Agent Assist client application.
For more information on defining Service Flows to identify Summary submission failures, click here.
For more information on defining Data Flows for returning Summary submission retry results, click here.
Training the Experience
In order to make all data that is stored with an Experience available to the Uniphore NLU server, you perform training. Typically, a user with the Flow Admin role (or higher) should train an Experience after adding or updating its Intent phrases.
When an Experience is trained, all essential AI information is passed along to the NLU server. The server uses the information to quickly and accurately identify what is happening in a conversation, and return the most suitable Agent response or X-Designer Flow to execute.
From the Real-Time Guidance Agent menu section in the Admin Console, select Experiences. The Experiences page will be displayed.
Locate and click the name of the Experience that you wish to train. The activity cards for that Experience will be displayed.
Click Intents. The Intents page for the current Experience will be displayed.
At the top right corner of the Intents page, click Train:
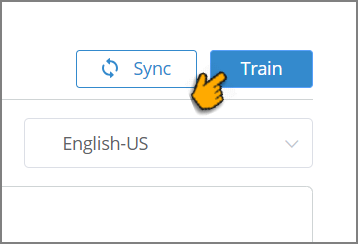
A message will be displayed and the training process will begin.
Tip
You can continue working on any Admin Console page while training is in process. However, if you add or change any data for the current Experience during training, you will need to invoke the training process again after it finishes.
When the training process finishes successfully, a confirmation message will be displayed. The Status field of the current Experience on the Experiences page will display Trained.
If the training process does not finish successfully, a failure message will be displayed providing information about the failure. The Status field of the current Experience on the Experiences page will display Training Failed.
Making any changes to an Experience after it has been successfully Trained will automatically update its Status field on the Experiences page to Draft,
Synchronization After Training
After you have successfully trained an Experience, you'll need to perform an LOB-level synchronization in order for it to be recognized and used at runtime:
At the top right corner of the Intents page, click Sync  :
:
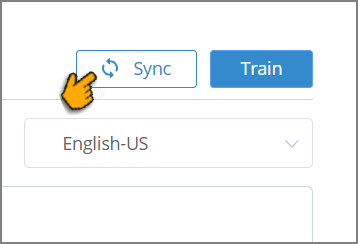
The selected Experience, together with all other sub-components in the same LOB, will be synchronized to recognize the new Intent.
Tip
Alternatively, you can synchronize the associated LOB directly from the AI Model. In the X-Console, click the AI Model menu section. On the AI Model page, click the Sync icon on the right side of the relevant LOB:
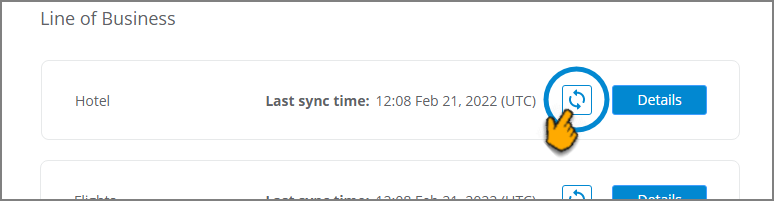 |
The LOB and its sub-components will be synchronized to recognize the new or updated Experience.
Using Assisted Training
Real-Time Guidance Agent provides a built-in Assisted Training facility for each Experience. The facility analyzes all received customer phrases that have not been mapped to an Intent and enables an Analyst to match (or exclude) selected phrases with an existing or new Intent. Streamlining the ability to detect and assign unmapped phrases can greatly improve the robustness and overall performance of an Experience.
Based on the initial Real-Time Guidance Agent analysis, the Assisted Training facility displays:
Existing Intents - A list of all received phrases that have a very high probability of being mapped to an existing Intent.
Suggested Intents - A list of all received phrases for which the facility can suggest a new Intent with a moderate probability of being mapped.
Excluded Phrases - A list of phrases that have been manually removed from analysis, since they are not relevant for any Intent in the current Experience. This typically starts as an empty panel, and the Analyst chooses which phrases to exclude as the review progresses.
The Analyst's main objective with Assisted Training is to review all unmapped customer phrases that have a realistic mapping potential, and when possible, assign the relevant phrases to an Intent as Training Phrases or as Negative Examples for the Experience. Note that the actual training mechanism is performed in the Experience after all Analyst assignments are applied.
Working with the Assisted Training Facility
Assisted Training is always performed on the currently selected Real-Time Guidance Agent Experience using the DEV environment.
Note
An Experience must already have been deployed to the PROD environment before the Assisted Training facility will be available for use. By default, the Assisted Training facility displays customer phrases that have been collected in PROD during the last 14 days.
From the Real-Time Guidance Agent menu section in the X-Console, select Experiences. The Experiences page is displayed.
Locate and click the name of the Experience for which you want to perform Assisted Training. The activity cards for that Experience will be displayed.
When the Experience list is long, you can locate a specific Experience by entering a few letters from its name in the Search field at the top right corner of the page.
Click Assisted Training. The Assisted Training page for the current Experience will be displayed:
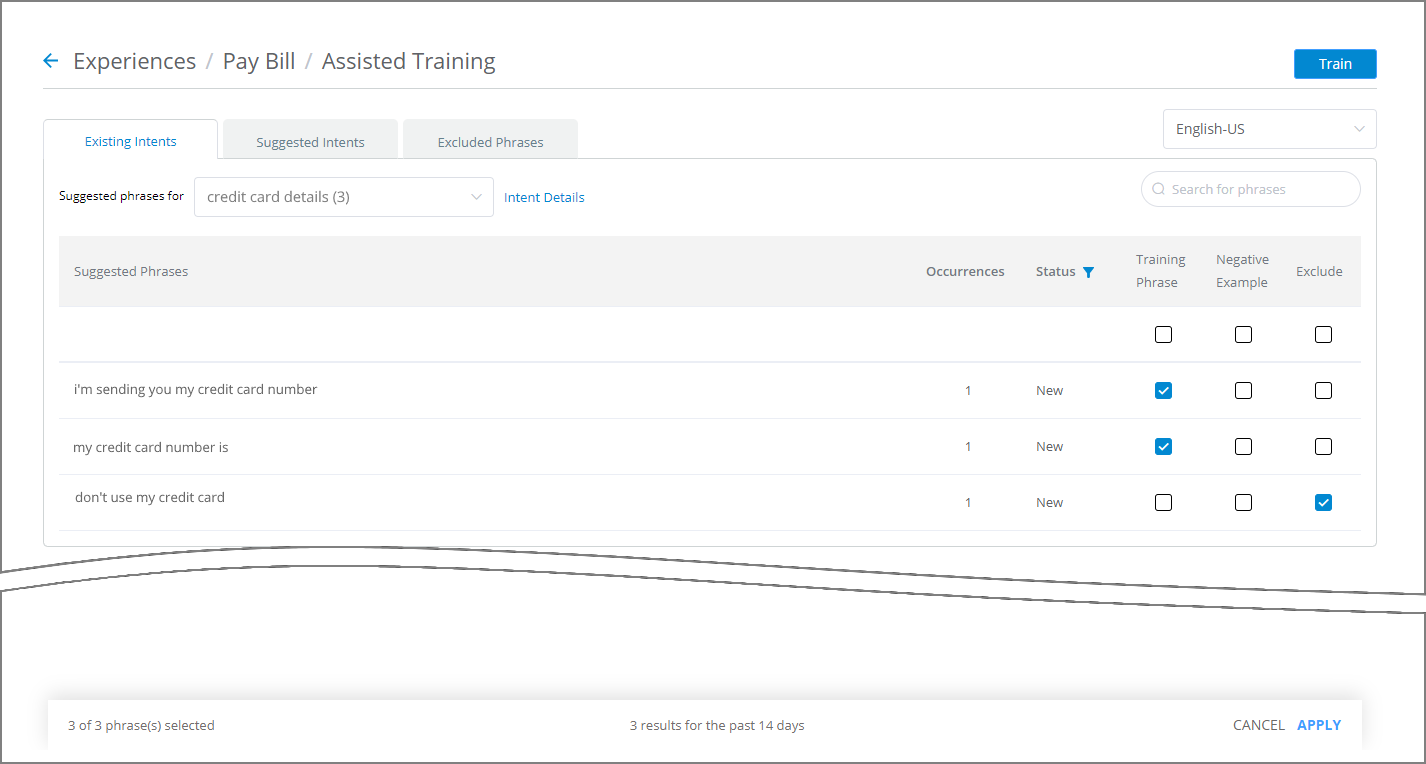
From the Language dropdown list near the top right corner, choose the language to be used for the current training session.
All received customer phrases in the selected language which are not mapped to an Intent will be displayed.
Each received customer phrase is displayed along with the following information:
Occurrences - The number of times this (or a similar) phrase was detected for this Experience.
Status - Indicates whether the phrase is New to the list or if it has already been Added for the next AI Model training activity.
Training Phrase - A checkbox to assign the phrase to a selected Intent for this Experience.
Negative Example - A checkbox to designate the phrase as a negative phrase example (i.e., an explicitly unwanted phrase) for this Experience.
Exclude - A checkbox to mark the phrase for exclusion from this and future Assisted Training analysis for this Experience.
Caution
While working on the Assisted Training page, you can search and filter for different phrases anytime, as detailed below. If there are unsaved phrase assignments when these actions are requested, a warning popup will be displayed, asking if you want to Apply your existing assignments before performing the action.
Mapping Phrases to Existing Intents
The list of phrases displayed will always be related to the Intent that is currently selected on the page. Only those customer phrases which are likely to match the selected Intent will be displayed.
You map each relevant phrase to the existing Intent using the checkboxes on the right side of the panel.
Go to the Existing Intents panel of the Assisted Training page.
At the top left of the panel, from the Suggested Phrases for dropdown list, select the Intent to which you want to map phrases:
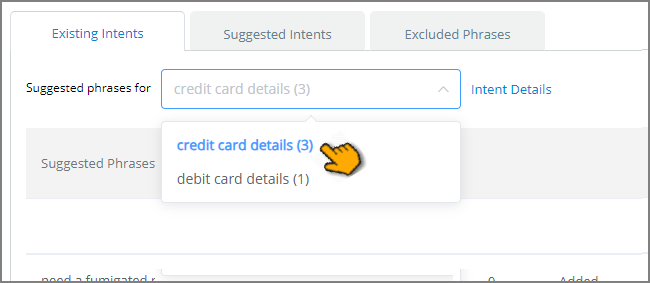
Only the existing Intents which are associated with the current Experience will be displayed.
In the dropdown list, to the right of each Intent is the count of potentially-correlated phrases detected in the received conversations. The top listed Intent has the highest number of potential phrase occurrences, with lower correlation probability for lower listed Intents.
You can locate a specific Intent by entering one or more of its letters or words in the Search Intent field at the top of the dropdown list. Only the Intents that match your search phrase will be displayed for selection.
To see additional information about a selected Intent, click View Intent Details, to the right of the dropdown box. The Phrases panel of the selected Intent will be displayed.
Optionally, at the top of the Status column, click the filter
 icon to choose which phrases are displayed in the panel: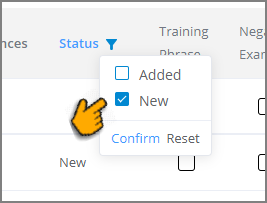
Selecting Added displays all phrases received for the current Assisted Training session that have already been mapped to an Intent. Selecting New displays only phrases that have not yet been mapped to an Intent. To activate the filter, click Confirm. To deactivate the filter, click Reset
For each relevant phrase displayed in the list, activate one of checkboxes at the right side of the panel:
Training Phrase - A checkbox to assign the phrase to a selected Intent for this Experience.
Negative Example - A checkbox to designate the phrase as a negative phrase example (i.e., an explicitly unwanted phrase) for this Experience.
Exclude - A checkbox to mark the phrase for exclusion from this and future Assisted Training analysis for this Experience.
You can only select one checkbox for each phrase.
Tip
You can optionally filter for specific phrases in the list by entering related words in the Search for phrases field at the top right corner of the list. To search for a specific phrase, add quotation marks before and after. Only phrases that match will be displayed.
When finished assigning relevant phrases for each desired Intent, click Apply. A confirmation message will show the number of phrases assigned by you, and save them for training on the AI Model.
You can cancel your current assignments and editing at any time by clicking Cancel.
After clicking Apply, the Status of each newly-assigned phrase will be changed to Added. In addition, the phrase and its assignment options will no longer be editable.
Mapping New Intents
The Assisted Training facility can also recognize a customer phrase that does not map to any existing Intent. When this occurs, the facility will attempt to group the phrase together with similar customer phrases for possible mapping to one or more suggested Intents. These Intents are accessed on the Suggested Intents panel.
You can review the phrase lists and choose to create one or more new Intents which cover the unmapped phrases.
You map each relevant phrase to the suggested Intent using the checkboxes on the right side of the panel.
Go to the Suggested Intents panel of the Assisted Training page. Customer phrases that have a possible mapping to one or more non-existing Intents will be displayed.
Examine these phrases and their suggested Intents. The Suggested Phrases for dropdown list will show sequentially-numbered Intent names in suggested cluster groups (instead of existing Intent names):
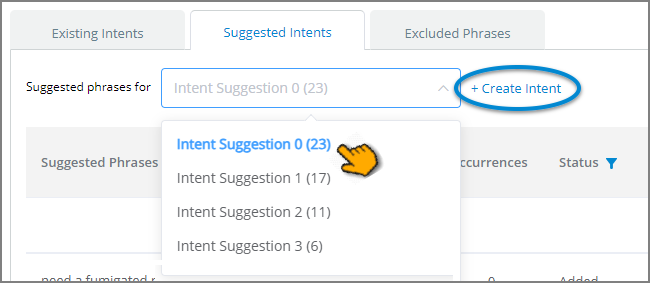
To the right of each suggested Intent is the count of potentially-correlated phrases detected in the received conversations. Intents are sorted in the dropdown according to the number of potentially-correlated phrases, i.e., the top listed Intent has the highest number of potential phrase occurrences, with lower correlation probability for lower listed Intents.
Optionally, at the top of the Status column, click the filter
icon to choose which phrases are displayed in the panel:Selecting Added displays all phrases received for the current Assisted Training session that have already been mapped to an Intent. Selecting New displays only phrases that have not yet been mapped to an Intent. To activate the filter, click Confirm. To deactivate the filter, click Reset
To create a new Intent based on a cluster group suggested by the Assisted Training facility, select the relevant Intent Suggestion and then click Create Intent. The Create Intent popup dialog will be displayed:
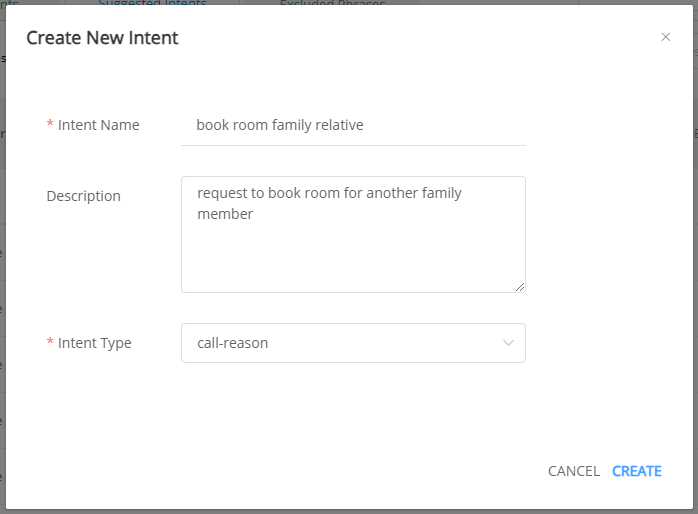
In the Intent Name text box, enter a unique name for the new Intent.
In the Description text box, optionally provide brief, helpful information about the new Intent.
From the Intent Type dropdown list, select the Intent Type for the new Intent.
Click Create. The newly created Intent will be displayed in the Suggested Phrases for dropdown list.
Important
You must create a new Intent before the Apply button (step Step 5) will enabled to allow assignment of suggested phrases.
For each newly-created Intent, review each relevant phrase displayed in the list and activate one of checkboxes at the right side of the panel:
Training Phrase - A checkbox to assign the phrase to a selected Intent for this Experience.
Negative Example - A checkbox to designate the phrase as a negative phrase example (i.e., an explicitly unwanted phrase) for this Experience.
Exclude - A checkbox to mark the phrase for exclusion from this and future Assisted Training analysis for this Experience.
You can only select one checkbox for each phrase.
Tip
You can optionally filter for specific phrases in the list by entering related words in the Search for phrases field at the top right corner of the list. To search for a specific phrase, add quotation marks before and after. Only phrases that match will be displayed.
When finished creating Intents and assigning relevant phrases to them, click Apply. A confirmation message will be displayed. The new Intents will be added to the current Experience and your selected phrase assignments will saved for training on the AI Model.
You can cancel your current assignments and editing at any time by clicking Cancel.
After clicking Apply, the Status of each newly-assigned phrase will be changed to Added. In addition, the phrase and its assignment options will no longer be editable.
Editing Phrases
There are times when changing the wording of a received phrase will make it fit more use cases. The Assisted Training page enables you to easily edit any customer phrase displayed.
Tip
You can optionally filter for specific phrases in the list by entering related words in the Search for phrases field at the top right corner of the list. To search for a specific phrase, add quotation marks before and after. Only phrases that match will be displayed.
Locate and hover over the phrase you wish to change. The Edit
icon will be displayed.Click the Edit icon. The selected phrase will be displayed in a text box for editing:

Make the desired changes to the phrase.
When finished editing, click anywhere outside the text box. Your changes will be stored. The edited phrase will appear in an italics typestyle to indicate that the original source phrase was changed.
Excluding Phrases from Future Analysis
Sometimes, a suggested phrase has no relevance for the current Experience (e.g., it represents only an unrelated request or a partially-transcribed sentence). The Assisted Training facility enables you to exclude such phrases from further analysis.
After applying training assignments, phrases that you exclude during the current session will be displayed only in the Excluded Phrases panel in the future. Excluded phrases will be ignored the next time the Assisted Training facility collects newly received customer phrases.
Go to the Excluded Phrases panel of the Assisted Training page. All phrases that were excluded from Assisted Training analysis during previous Assisted Training sessions will be displayed:
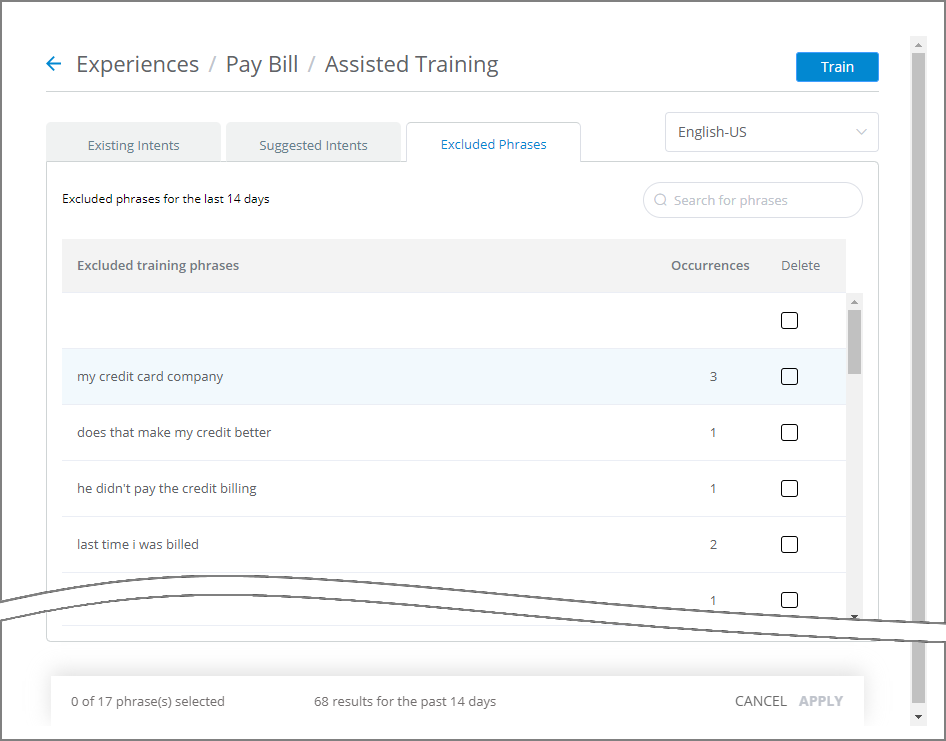
At the top left of the panel, the indicator Excluded phrases for the last X days is displayed, where X indicates the timeframe for the current list of excluded phrases.
The Occurrences column displays the total number of times a particular phrase was detected in conversations associated with the current Experience.
To optionally delete one or more phrases from the Excluded Phrases panel when needed, and enable them to be reappear for assignment in the future:
Activate the Delete checkbox to the right of the desired phrase(s).
Tip
To delete all Excluded phrases at once, activate the Select All checkbox in the top row of the Delete column.
Click Apply. A confirmation message will be displayed.
Click Confirm & Delete. The selected phrase(s) will be available once again for future analysis.
Training the Experience
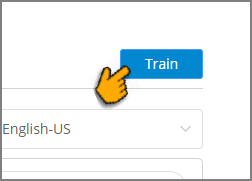
After you have completed and applied all new customer phrase assignments for the current Assisted Training session, in the upper right corner of the page click Train. The Experience training process is the final step for mapping newly-assigned phrases to the AI Model.
Export and Import of Experience Configuration
The Export and Import feature is ideal for quickly sharing one or more selected configurations of Experience sub-components, such as NLP Entities, Intents, Alerts, and Summary, from one account in any environment (Dev, Test, or Prod) to another account.
Note
Export and import of Summaries are supported only for template-based Call Summaries and GenAI-based Call Summaries configured in X-Console.
By utilizing this feature, Delivery and Customer Success Teams can:
Export or import selected Experience sub-component configurations to or from a portable .zip file;
Migrate complete Experience configurations between accounts; and
View rollback details when an import fails.
This capability enables seamless migration or replication of the customer configuration across accounts, allowing Delivery and Customer Success Teams to test and validate live customer setups on new releases before deploying them to production.
A Delivery or Customer Success team member with the Business Analyst role can export live customer setups from the PROD environment to the TEST environment across accounts to test new release features.
From the Real-Time Guidance Agent menu section in the X-Console, select Experiences. The Experiences page is displayed.
Locate and click the name of the Experience from which you want to export the Experience configuration. The activity cards for that Experience are displayed.
Click Import & Export. The Export page for the current Experience is displayed:
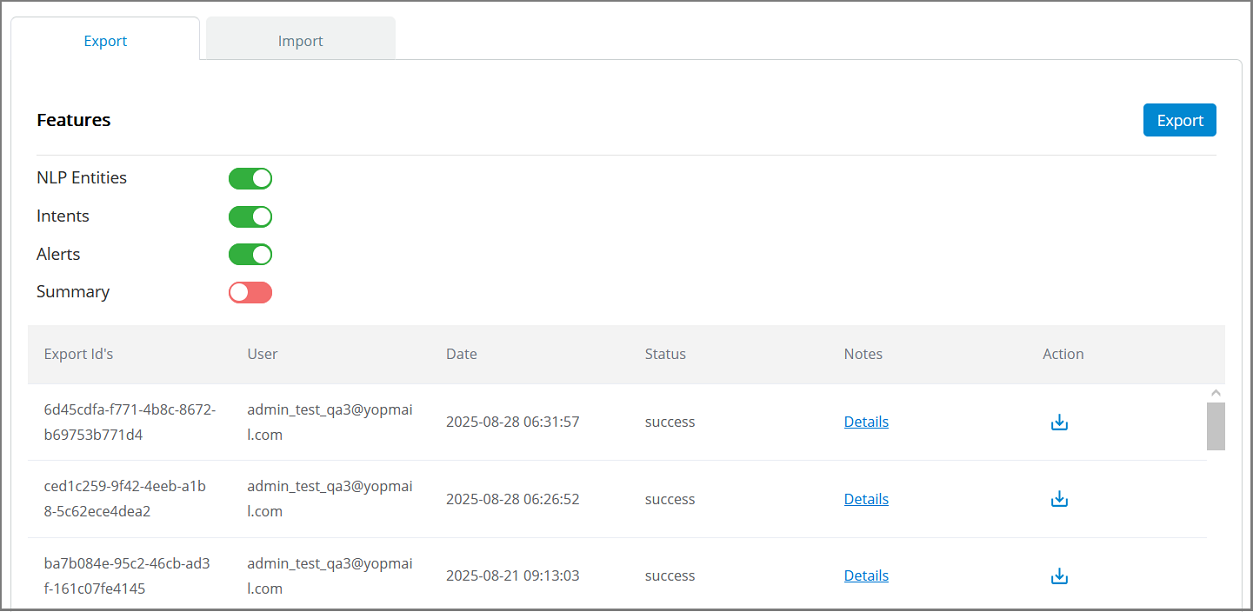
In the Features section, switch the toggle on for any Experience sub-component (NLP entities, Intents, Alerts, or Summary) that you want to export.
Note
If you want to export the rule-based Intent configuration, you must also select Summary and Entities for export.
Click Export. As the export may take a few minutes, Real-Time Guidance Agent enables you to continue working while the process runs. The status is shown as In Progress in the Status column during the export.
Click Refresh (
 ) next to In Progress to update the status to Success. The exported file is now ready for download.
Note
All variables used within Call Summaries and Alerts are automatically exported along with their mapped Entities.
Click Download (
 ) in the Actions column. The exported .zip file will be saved to your Downloads folder. This file can be used to replicate customer setups in the TEST environment, for backup purposes, or for sharing as needed.
Note
If the export of Intents or Entities fails, Summaries and Alerts will not be exported.
When the export fails, the status is shown as Failed, and the Download icon is disabled in the Actions column.
Optionally, click the Details link in the Notes column to view the export status, export time, duration, and any error messages explaining why the export failed. To view the export details, click here.
After validating live customer setups in the Test environment, a Delivery or Customer Success team member with the Business Analyst role can import the exported configuration file (.zip) into a specific Experience in the PROD environment for the selected account.
From the Real-Time Guidance Agent menu section in the X-Console, select Experiences. The Experiences page is displayed.
Locate and click the name of the Experience where you want to import the Experience configuration. The activity cards for that Experience are displayed.
Click Import & Export and then click the Import tab. The Import Audit page for the current Experience is displayed:
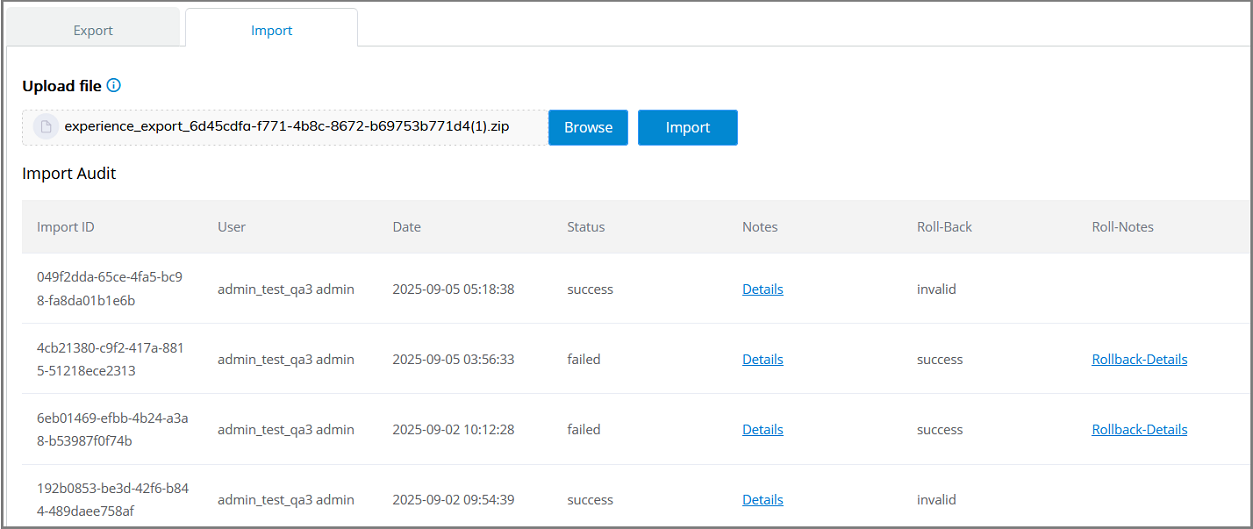
In the Upload file section, click Browse to locate the .zip file that you wish to import to the Experience. From the file browser, select the file and click Open.
Click Import to begin the import process. This process will delete the existing Experience configuration in the selected environment and replace it with the imported configuration.
A confirmation message is displayed. Click OK to proceed with the import. To cancel your import activity, click Cancel.
Note
If a variable in the imported file has the same name as one in the destination account, a new variable is automatically created with a different name.
During the import, the status is shown as In Progress in the Status column. Click Refresh (
) next to In Progress to update the status to Success.If an import fails, the configuration of all Experience sub-components is automatically restored to the previous configuration version. A Rollback Details link is available in the Roll Notes column only when the import fails. To view the Rollback Details, click here.
Optionally, click the Details link in the Notes column to view the import status, import time, duration, and any error messages explaining why the import failed. To view the import details, click here.
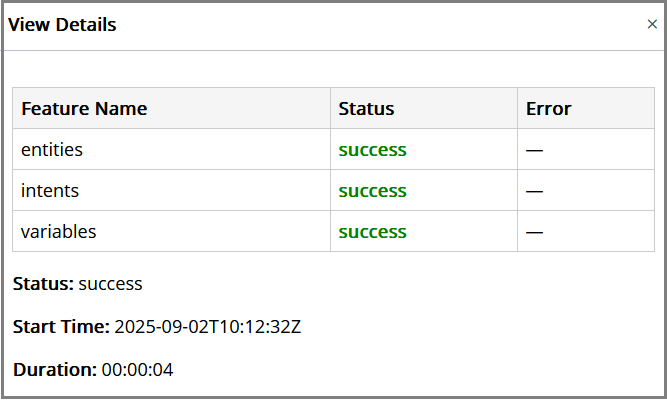
In the Export or Import page, click the Details link in the Notes column to view the export or import process details:
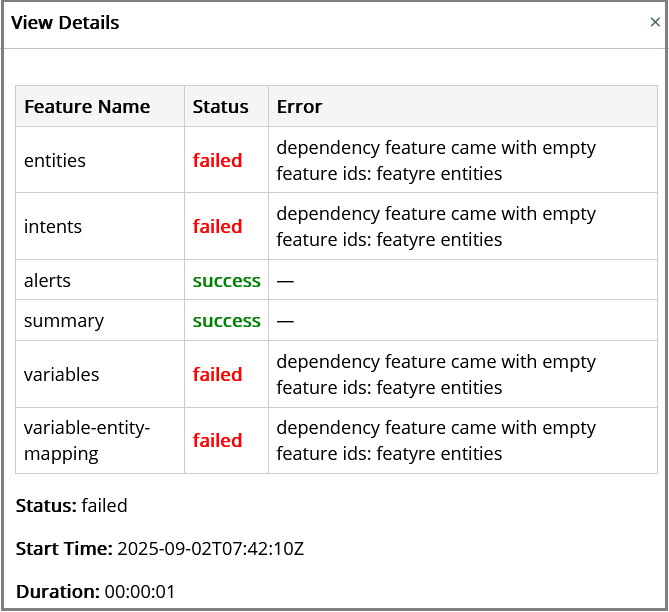
Feature Name - Name of the Experience sub-components whose configuration was exported/imported.
Status - Import or export status (Success or Failed).
Error - Error message explaining why the import or export failed.
Start Time - Time when the export or import started.
Duration - Time taken to complete the export or import.
If an import fails, the configuration of all Experience sub-components is automatically restored to the previous version. The Rollback column displays Success when the import fails and Invalid when the import succeeds.
In the Import Audit page, click the Rollback Details link in the Roll Notes column to view the list of Experience sub-components whose configurations were successfully restored to the previous version.