Manage Policies
Manage Policies Overview
Manage Communication Recording Agent Policies for automated actions – see Policy Engine and Summary for general information.
For information on specific policy types, follow the relevant references below. For an introduction to basic policy management, see Policy Basics. For specific use case examples of each policy type with varied examples of Calls Filters, see Policy Examples.
Policy Category | Reference | Description |
|---|---|---|
Recording Control | Control which call recordings are discarded and retained. | |
Storage | Delete, move or archive stored data across your storage locations. | |
Transcription | Control which call recordings are sent for transcription (voice to text). | |
Export | Specify recordings to export to your defined endpoints and trigger the export automatically, as needed. | |
Access Control | Assign granular access permissions for your Users. | |
Locks | Automatically lock calls (prevent calls from deletion) where captured metadata matches the specified Calls Filters. |
Policy Basics
To manage Communication Recording Agent policies, go to Configurations > Configure (under Communication Recording Agent) > Policies and select the Policy category you want to manage.
To review and configure policies:
|
Manage Recording Control Policies
Use Recording Control Policies to control which call recordings are discarded and retained. Technically, once a device is enabled for recording, all calls are recorded, even blocklisted ones. The Recording Control policies are not used to determine which calls are recorded in the first place. Instead, the Recording Control policies are used to discard the recorded data for specified calls, once those calls have ended. Therefore, Recording Control policies do not impact live calls, so they can continue to be monitored.
There are two types of Recording Control policy: Blocklist and Allowlist. Blocklist policies can be used to provide fine control of what recordings are discarded (all calls outside the scope of the Blocklist will be retained). Whereas Allowlist policies are the reverse of a Blocklist, an Allowlist can be used to specify calls to be retained that would otherwise be discarded (all calls outside the scope of the Allowlist will be discarded).
To view Recording Control policies, go to Configurations > Configure (under Communication Recording Agent) > Policies > Recording. From here, you can see the list of existing Recording Control policies, along with the Name, Type (Allowlist or Blocklist), Priority, and Status of each policy. To view a policy in more detail, click on the arrow to the right of the policy to open it.
Once a policy has been created, it can be Enabled and Disabled using the Status column.
Existing policies can't be edited but can be duplicated by opening the policy and clicking Duplicate.
To delete a policy, click the three dots icon and click delete. You will be prompted for confirmation before the policy is deleted.
To review what recordings a policy applies to, open the policy and click either the Filters tab to see the filters for the policy, or click the Call Records tab to view the related calls.
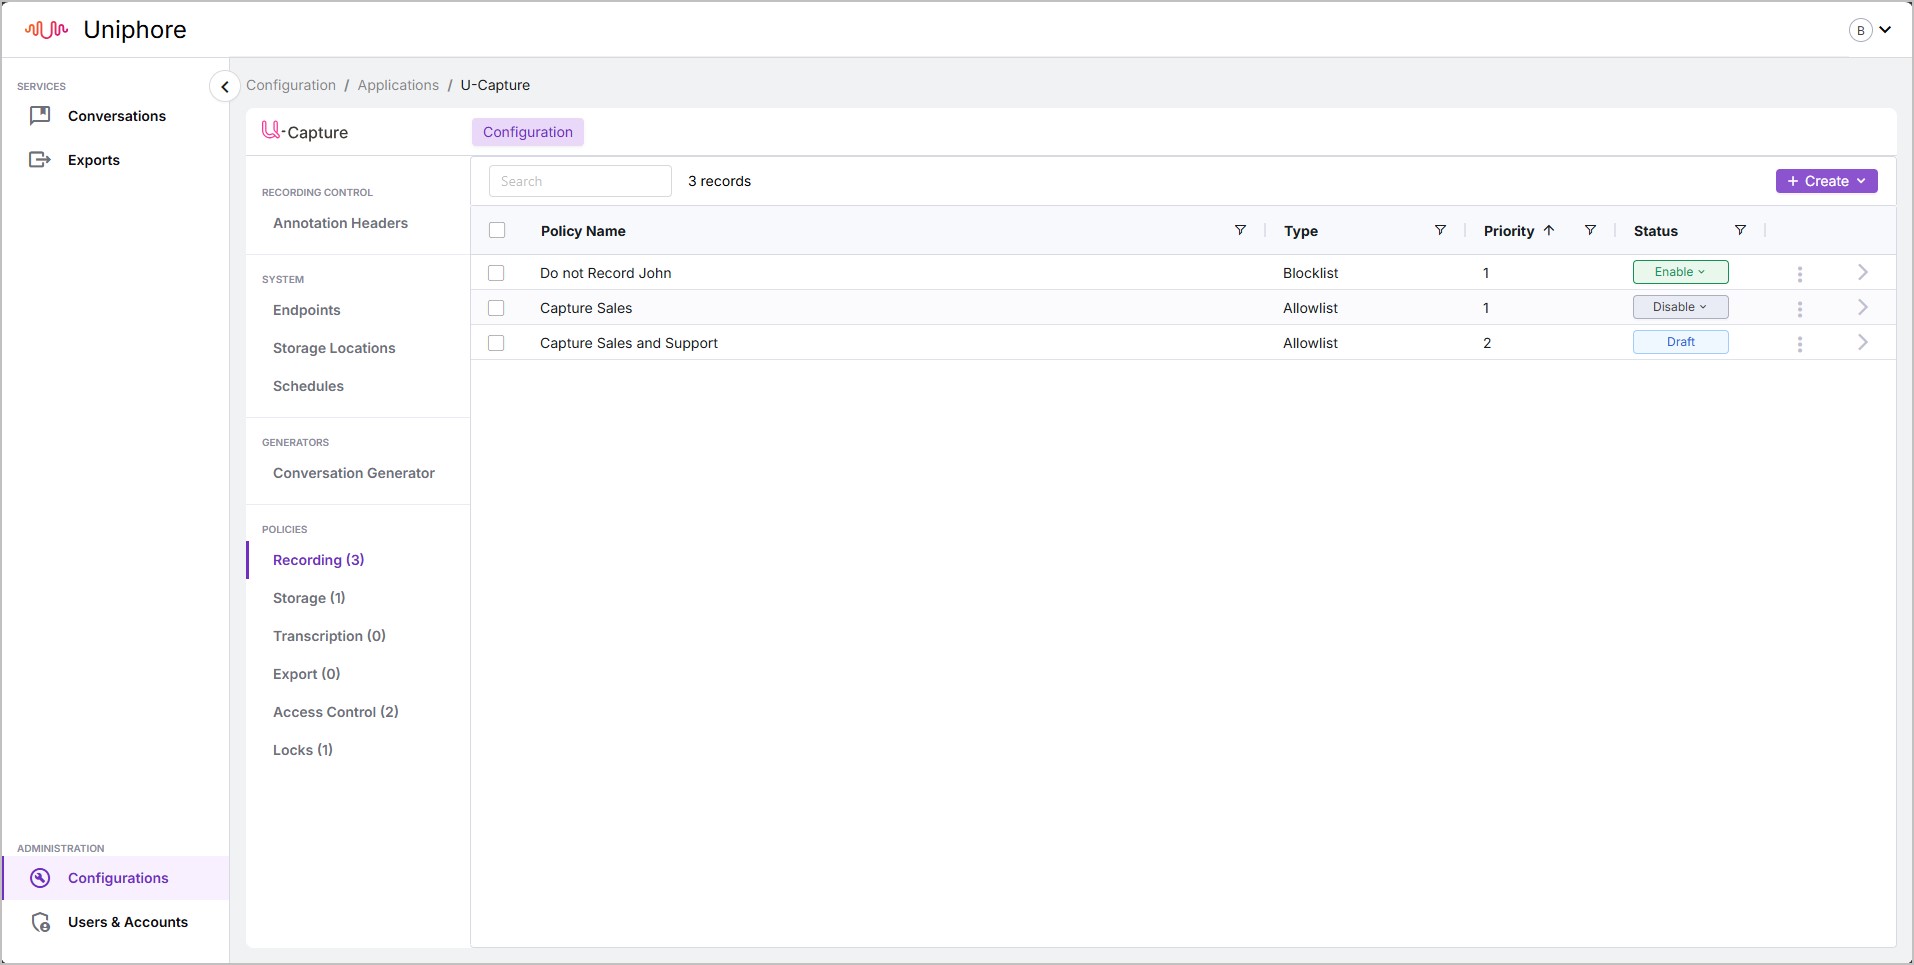
To Add a New Recording Control Policy:
Tip
Use Save as Draft at any point when adding a new policy to save your progress. The draft policy will then be listed with the other policies with the status "Draft". Resume your progress by simply opening the policy.
Go to Configurations > Configure (under Communication Recording Agent) > Policies > Recording and click + Create.
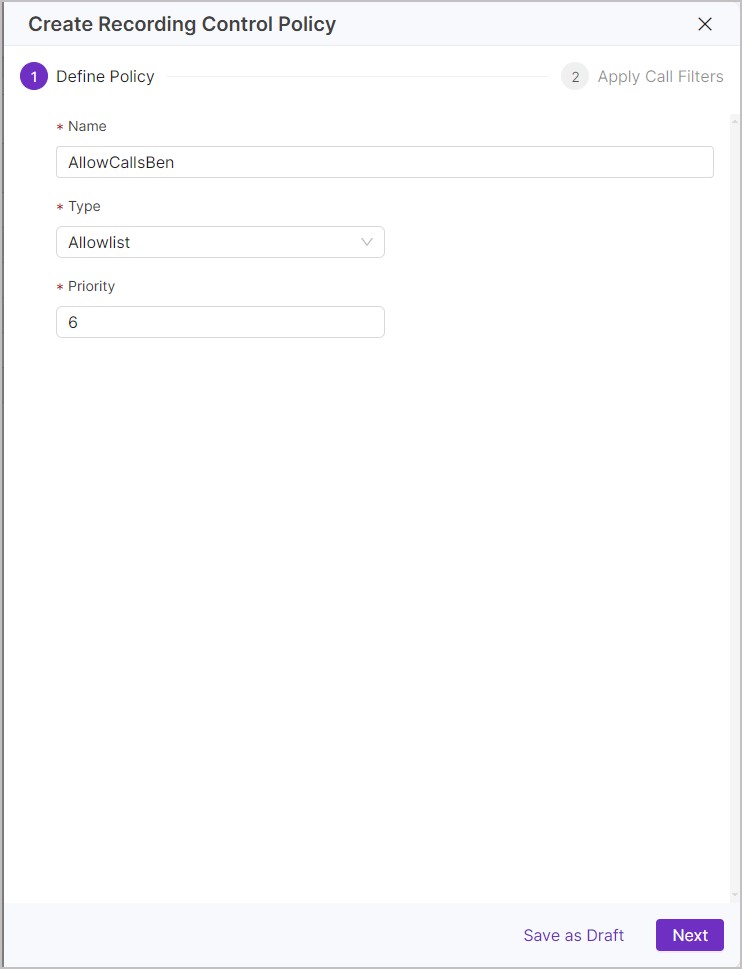
Enter a useful Name for the policy.
Choose a policy Type, either Blocklist (discard related calls, retain all calls outside the scope of the filter) or Allowlist (retain related calls, discard all calls outside the scope of the filter).
Choose the Priority of the policy (the order in which the policies are run), 0 being priority and 1 being second priority, and so on.
When ready, click Next to move to the Filters page.
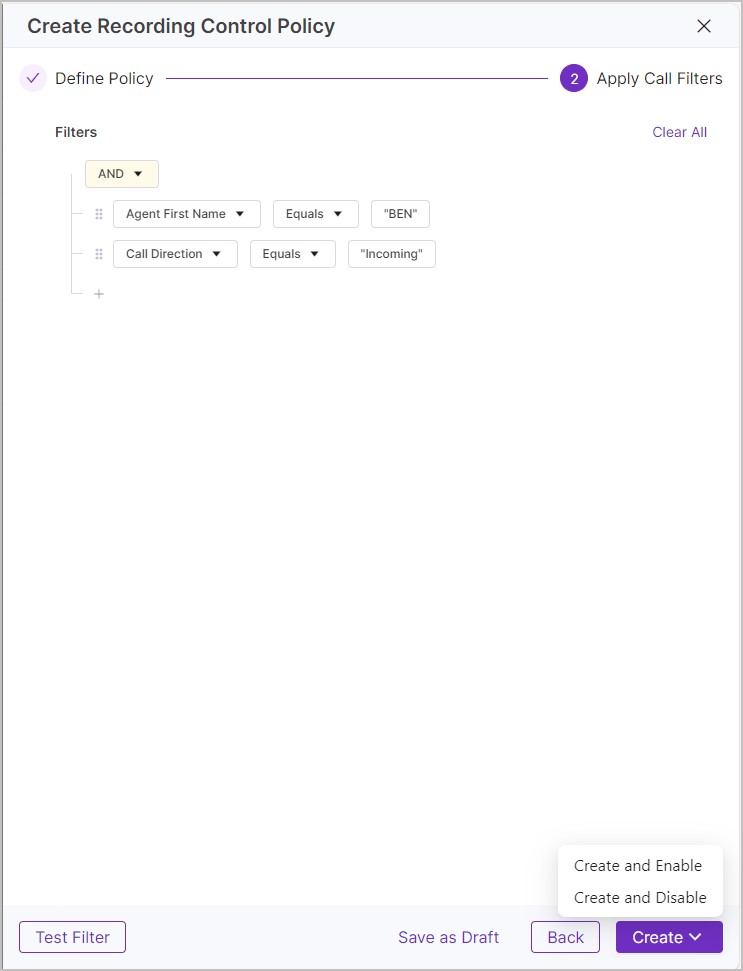
Create a Calls Filter – Add one or more metadata filters. These are used to define which recordings the policy will be applied to. Click Test Filter to check that the policy applies to the correct calls. See Create a Calls Filter for more information on Calls Filters.
When you're ready, click Create and select if you want the policy to be enabled (Create and Enable) or disabled (Create and Disable). You can enable or disable it later if needed.
Note
These policies are applied to calls as they come in and will not be applied retrospectively. To remove calls already stored, see Manage Storage Policies.
 |  |
Manage Storage Policies
Use Storage Policies to manage (purge, move, archive) stored data across your storage locations.
To view Storage policies, go to Configurations > Configure (under Communication Recording Agent) > Policies > Storage. Here you can see the list of existing Storage policies, along with the Name, Type, Priority, and Status of each policy. To view a policy in more detail, click the arrow to the right of the policy to open the Update Storage Policy panel.
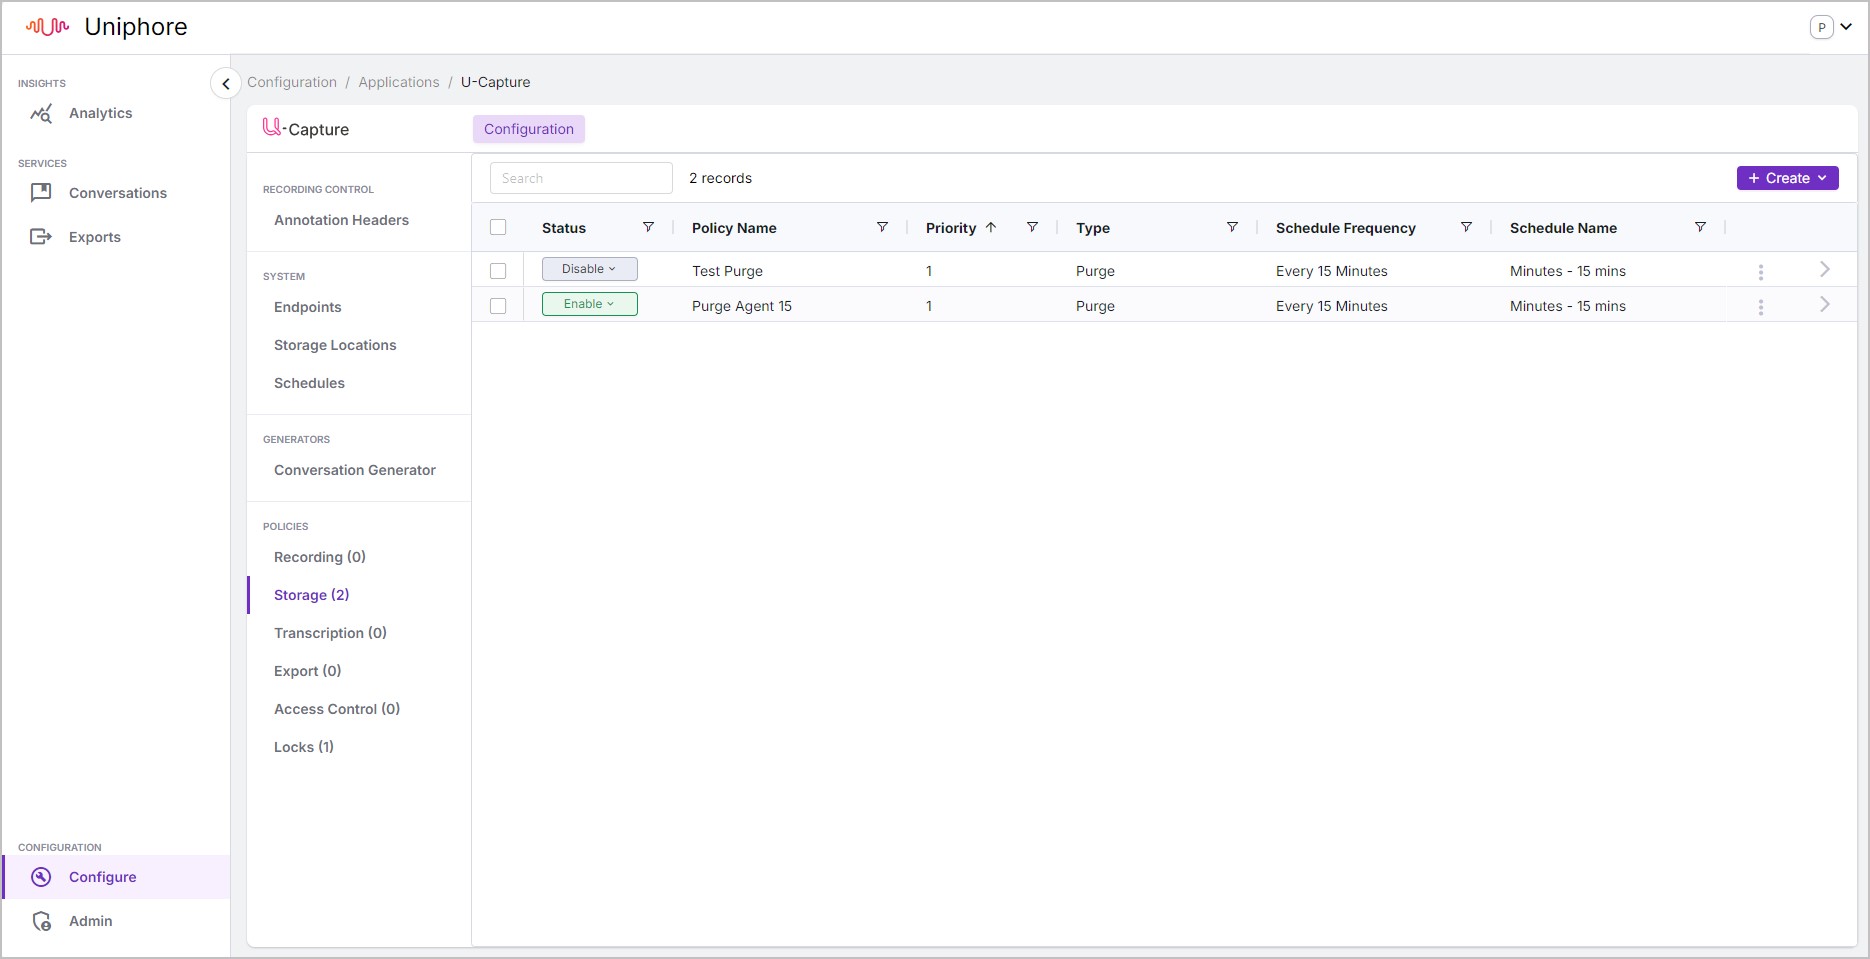
Once a policy has been created, it can be Enabled and Disabled using the Status column.
Existing policies can't be edited but can be duplicated by opening the policy and clicking Duplicate.
To delete a policy, click the three dots icon
 and click delete. you will be prompted for confirmation before the policy is deleted.
To review what recordings a policy applies to, open the policy and click either the Filters tab to see the filters for the policy, or click the Call Records tab to view the related calls.
Purge Policies
The Purge policy type can be used to delete recordings (media, metadata, and transcriptions) from Communication Recording Agent accessible storage.
Note
The purge process will not delete locked recordings and will not remove associated records such as audit logs.
Move Media and Archive Metadata Policies
To provide for flexible storage options, Archive Policies can be created to move media/archive metadata to External Storage Locations (additional “hot, warm, cool, or cold storage” facilities). External storage will have been set up during install (please refer to your Solution Design Document from Uniphore for details), and additional facilities can be defined during the creation of these policies or in Configurations > Configure (under Communication Recording Agent) > Storage Locations.
Media and metadata policies are separated to provide further flexibility. For example, you may want to retain metadata and transcriptions (generally smaller file sizes) for faster search, but move the media (generally larger file sizes) to external cold storage, providing for more cost-efficient occasional access.
Data can be moved from any Communication Recording Agent accessible storage to your defined External Storage Location. This means data can be moved multiple times using separate policies to allow for changing requirements – for example, you may want to move media to warm storage after a year, but then move it again to cold storage after two years to provide for a more cost-effective long-term archive.
Retention Policies
Most organizations have one or more retention policies, defined by internal processes and/or regulatory requirements, that directly impact the duration for which recorded media and associated metadata should be retained. The Communication Recording Agent Retention policy type automatically locks captured conversations for a specific duration where metadata matches specified Filters. The policy is also configured to perform a chosen action against the conversations once the retention period has expired. Actions include moving the conversations to a specific storage location, purging the conversations (deleting them), or leaving the conversations unchanged.
This topic details the steps required to add policies to your system. However, to see specific examples of each policy type and how they can be used for a specific use case, see Policy Examples. Each example also includes steps to create a unique Calls Filter to demonstrate how Calls Filters can be set up to apply policies to specific calls.
When you define a Purge Policy, decide whether to delete the entire recording (media and metadata), or just the media. In general, you’ll likely just remove all data for the recording, but Uniphore provides a flexible approach to allow you to delete data in isolation. However, this can clearly impact your ability to retrieve data from the Communication Recording Agent:
Removing just the media would allow the conversation record to be searched and retrieved and allow you to view the transcription, but the media (audio) would no longer be available. This may be useful in circumstances where you need to retain the record, but the media is no longer required in the Communication Recording Agent.
Removing the media and metadata would mean that you could no longer search for or replay the call from the Communication Recording Agent. This may be useful where external systems are being used to retrieve and replay calls from Communication Recording Agent managed storage.
Once a policy has been created, it can’t be edited, only disabled, duplicated, or deleted. If you replace an existing Purge Policy with a new one, here are a few things you may want to consider:
If you set a Purge policy that deletes conversations sooner than your current one, additional recordings may be deleted from your system (depending on your settings). Before making the change, ensure older recordings are not being deleted that are required for legal or regulatory purposes. You can safeguard (lock) these recordings using the Lock features to prevent some or all of them from being deleted.
If you set a Purge policy that deletes conversations later than your current one, you’ll store more data. Review your storage needs and provision additional storage as needed.
If you change the scope of the policy (applying it to more, fewer, or simply different recordings), consider which recordings could be impacted and lock those you want to retain, and consider the impact on your storage needs.
This one is obvious, but is stated here for clarity. Any recordings deleted by previous versions of a purge policy will not be recovered if those recordings are subsequently removed from the scope of the policy.
Here are a few things you should consider when replacing existing Archive/Storage policies:
If you change the scope of your policies, consider the impact on your storage needs.
Again, this one is obvious, but is stated here for clarity. Any data moved by previous versions of an archive/storage policy will not be moved back to the previous storage location if those recordings are subsequently removed from the policy scope.
Before adding a new Storage Policy, understand the impacts of the different types of Storage policies by reading the topics above. if you are unsure of anything, please review the following before proceeding:
When you understand the impacts of the different storage policies, see the following processes to add new storage policies:
Tip
Use Save as Draft at any point when adding a new policy to save your progress. The draft policy will then be listed with the status "Draft" alongside your other storage policies. You can resume your progress by opening the policy.
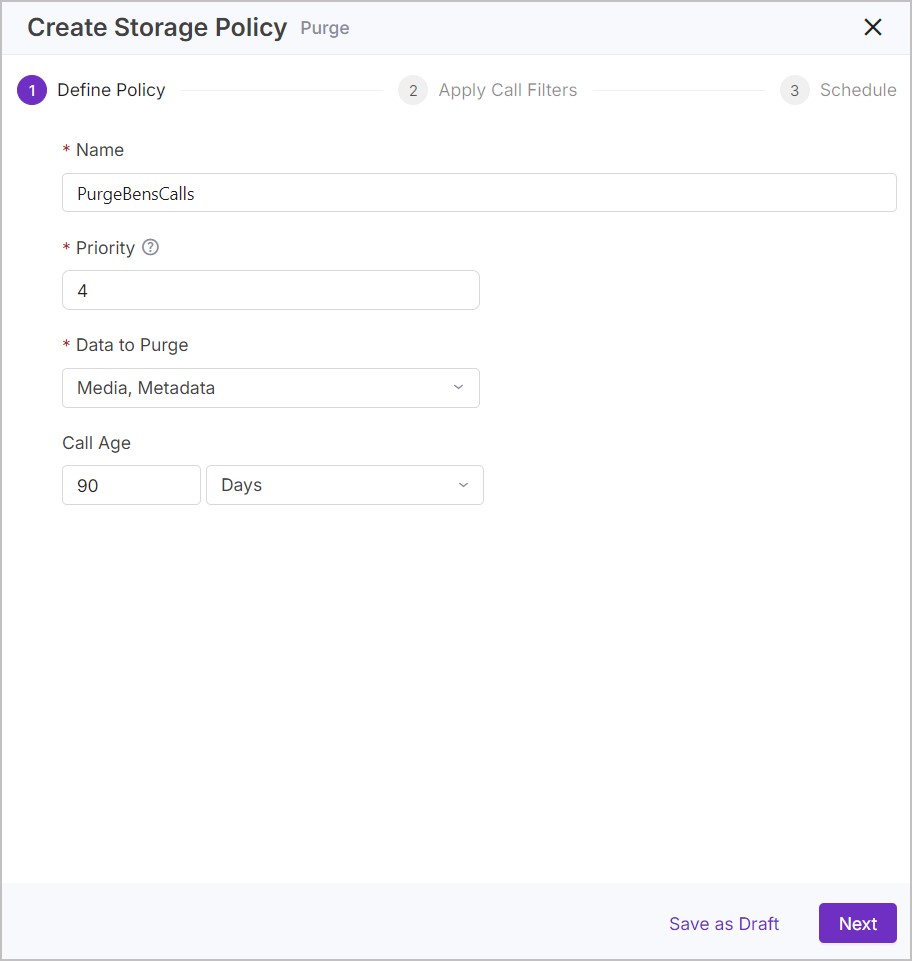
Go to the Configurations > Configure (under Communication Recording Agent) > Policies > Storage and click + Create, then Purge Storage Policy. If you want to create a Move Media or Archive Media Policy instead, see Add a new Move Media or Archive Metadata Policy.
Enter a useful Name for your policy.
Choose the Priority of the policy (the order in which the policies are run), 1 being priority, then 2 being second priority, and so on.
Under Data to Purge, select if you want to purge just the media/audio (Media) or the media and metadata (Media, Metadata).
Optional – Use Call Age to Determine how old the calls should be before the purge policy is applied by entering an amount of either Days, Weeks, or Years.
When ready, click Next to move to the Apply Calls Filters page.
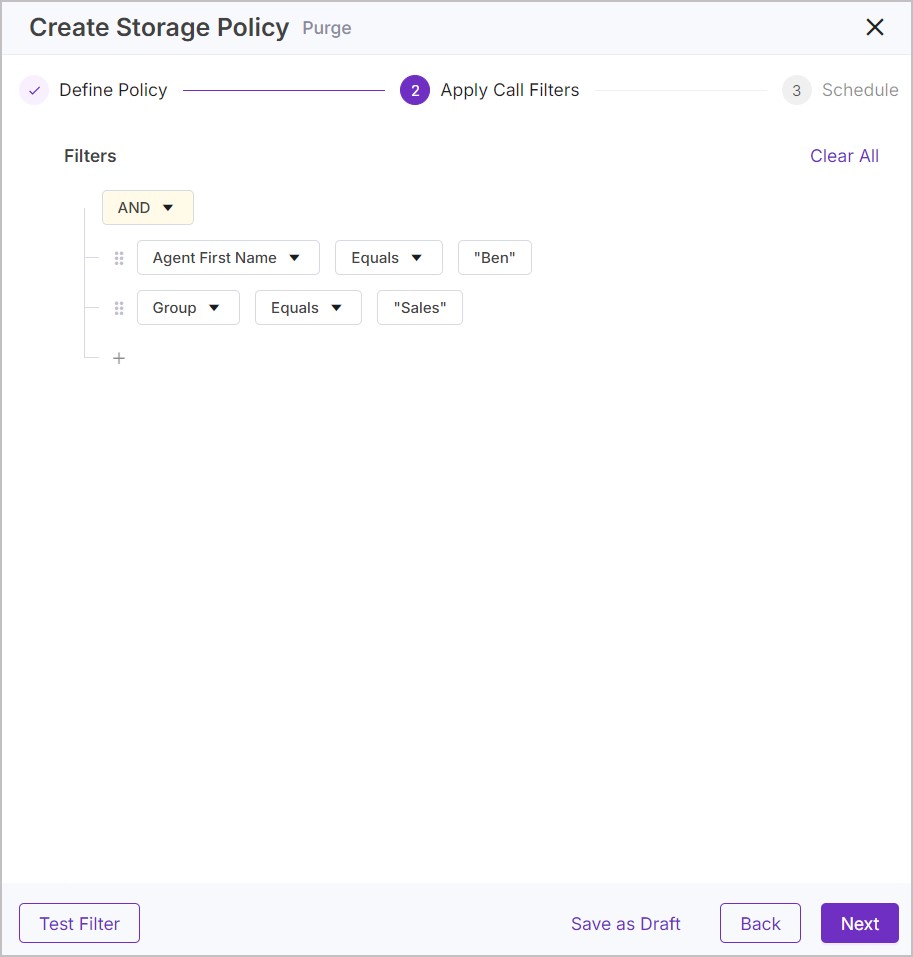
Create a Calls Filter – Add one or more metadata filters. These are used to define which recordings the policy applies to. Click Test Filter to confirm that the policy will apply to the correct calls. See Create a Calls Filter for more information on Calls Filters.
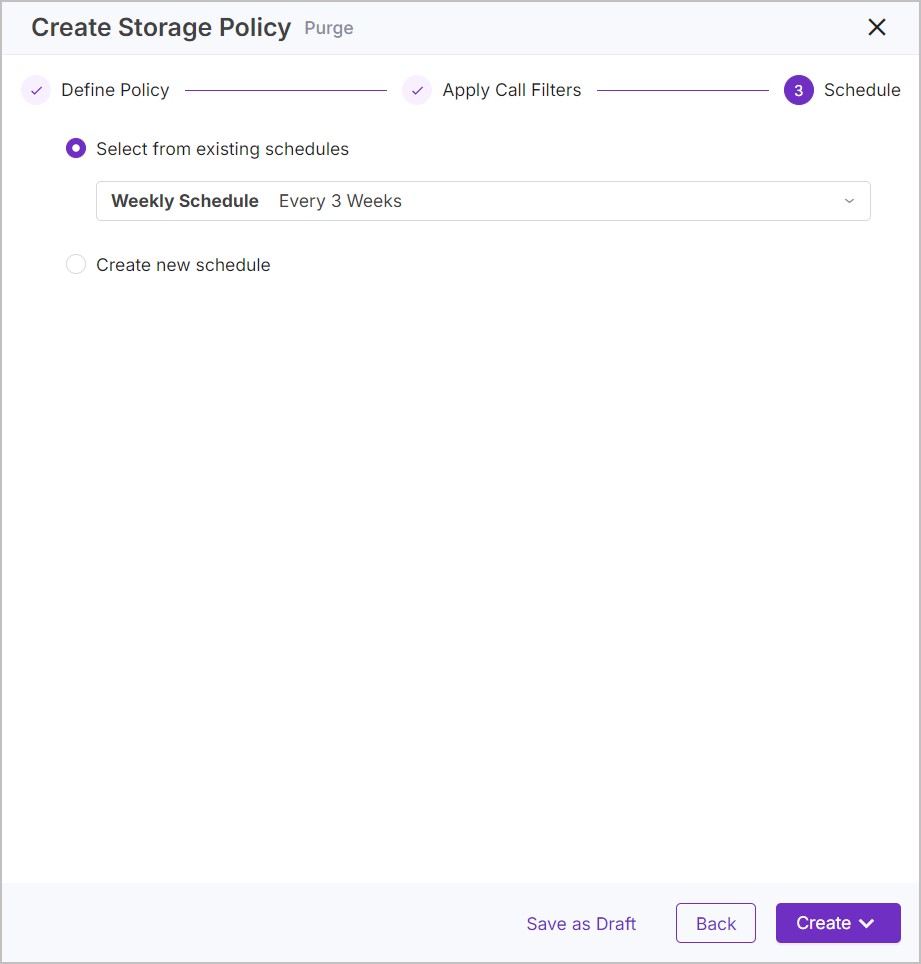
Determine when and how often the policy is applied, either choose an existing schedule from the Select from existing schedules drop-down menu or select Create new schedule and set up a new schedule for the policy to use (for more information on schedules, see Manage Schedules).
When you're ready, click Create and select if you want the policy to be enabled (Create and Enable) or disabled (Create and Disable). You can enable or disable it later if needed.
Caution
If you set a Purge policy that deletes conversations sooner than your current one, additional recordings may be deleted from your system (depending on your settings). See Replace Existing Purge Policies.
 |  |  |
Tip
Use Save as Draft at any point when adding a new policy to save your progress. The draft policy will then be listed with the status "Draft" alongside your other storage policies. You can resume your progress by opening the policy.
Go to Configurations > Configure (under Communication Recording Agent) > Policies > Storage and click + Create, then select either:
Move Media (retain metadata and transcriptions (generally smaller file sizes) for faster search, but move the media (generally larger file sizes) to external cold storage, providing for more cost-efficient occasional access).
OR
Archive Metadata Policy (move metadata and transcriptions, this could be useful to free up space in your Metadata Store by removing calls that are older than a specified date/age).
If you want to create a Purge Policy instead, see Add a new Purge Policy.
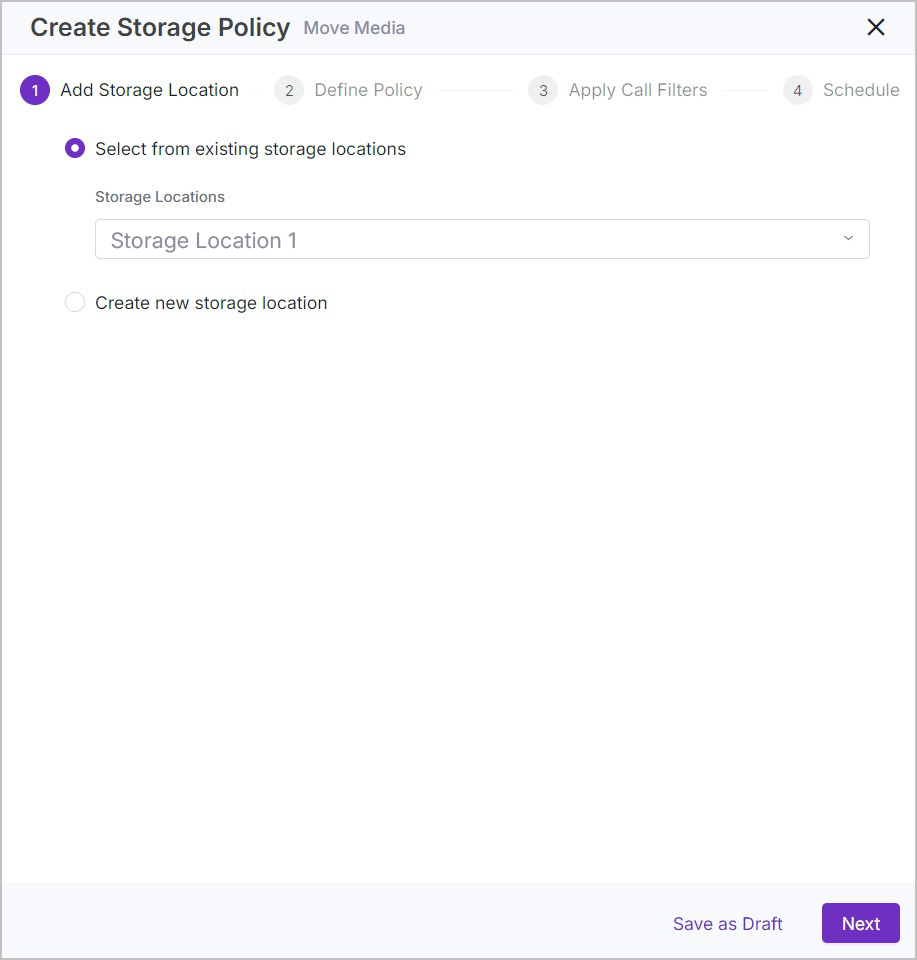
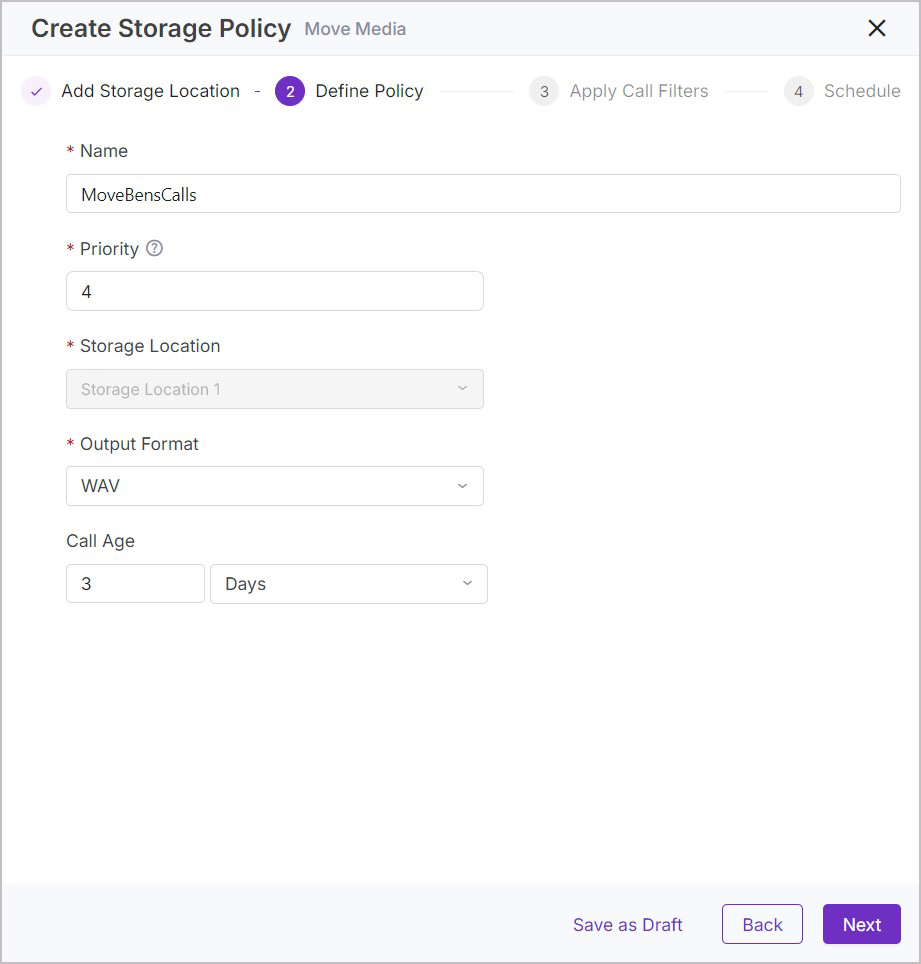
Select what Storage Location to move/archive your data to, either select from existing storage locations or create a new storage location. For more information on storage locations, see Manage Endpoints and Storage Locations. Click Next when you're ready.
Enter a useful Name for your policy.
Choose the Priority of the policy (the order in which the policies are run), 1 being first priority, then 2 being second priority, and so on.
Select the Output format to determine the format of the data once it’s been moved/archived.
Optional – Use Call Age to Determine how old the calls should be before the purge policy is applied by entering an amount of either Days, Weeks, or Years.
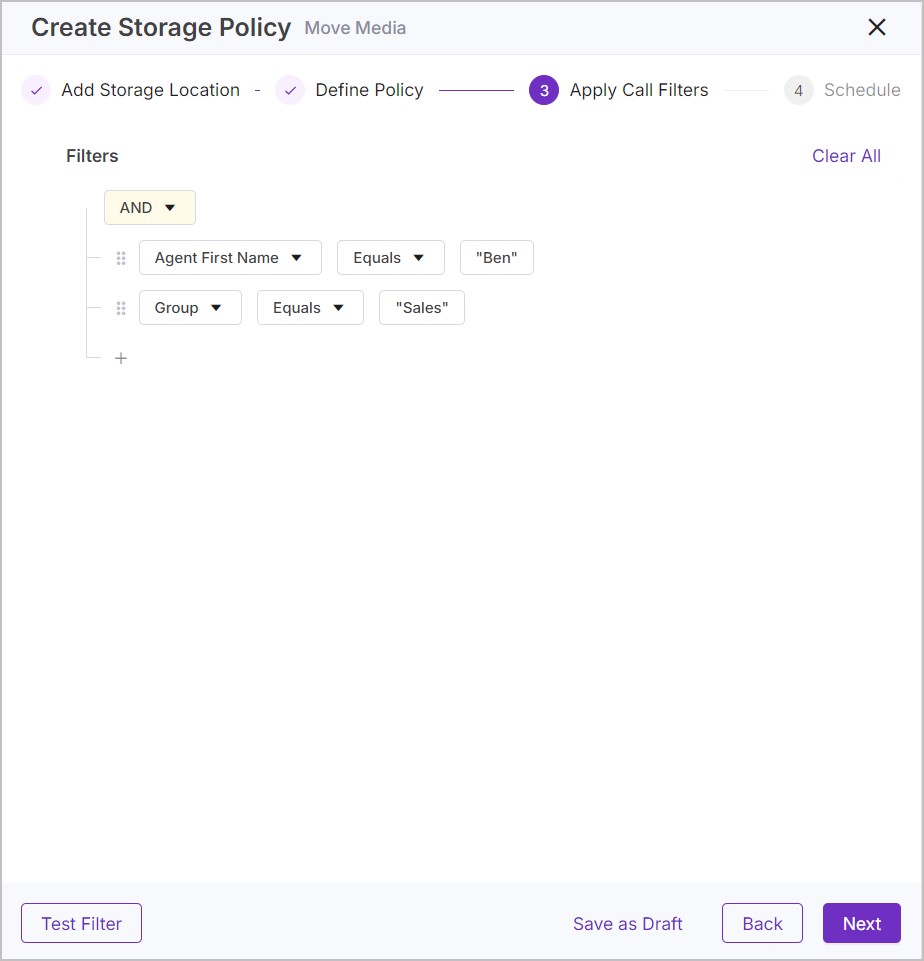
When ready, click Next to move to the Apply Calls Filters page.
Create a Calls Filter – Add one or more metadata filters. These are used to define which recordings the policy applies to. Click Test Filter to confirm that the filters apply to the correct calls. See Create a Calls Filter for more information on Calls Filters.
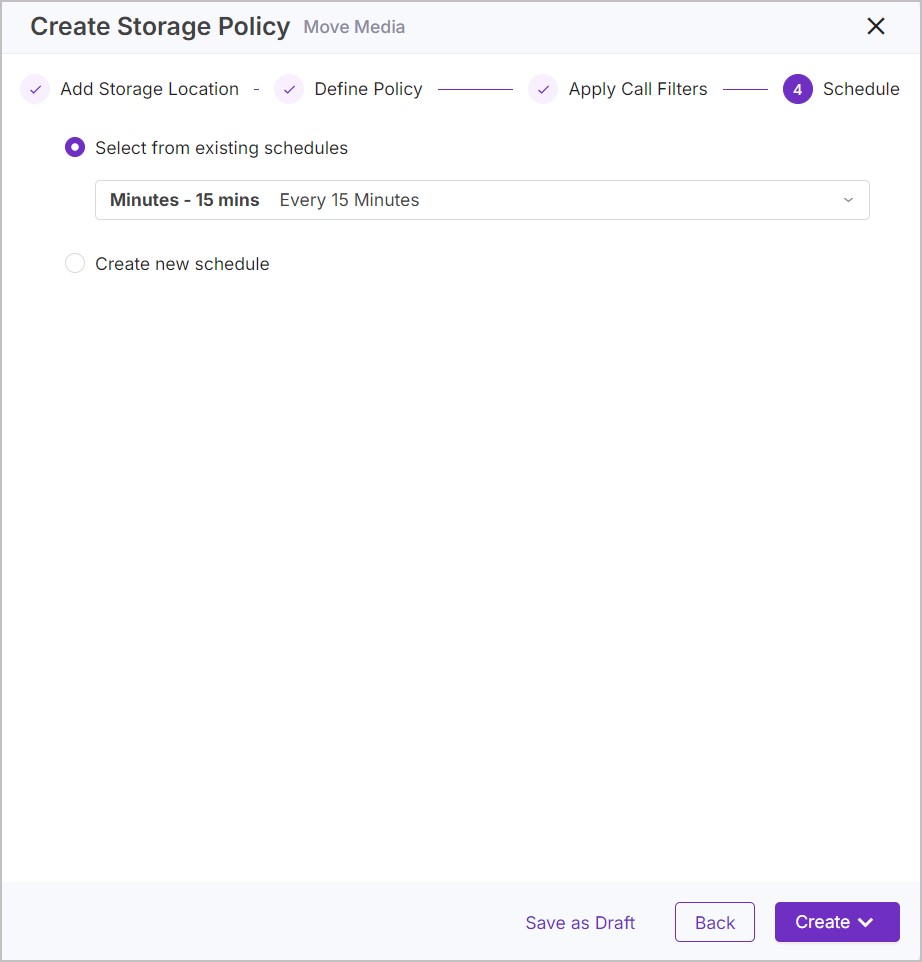
Determine when and how often the policy will be applied, either choose an existing schedule from the Select from existing schedules drop-down menu, or select Create new schedule and set up a new schedule for the policy to use. For more information on schedules, see Manage Schedules.
When you're ready, click Create and select if you want the policy to be enabled (Create and Enable) or disabled (Create and Disable). You can enable or disable it later if needed.
 |  |
 |  |
Tip
Use Save as Draft at any point when adding a new policy to save your progress. The draft policy will then be listed with the status "Draft" alongside your other storage policies. You can resume your progress by opening the policy.
Go to Configurations > Configure (under Communication Recording Agent) > Policies > Storage and click + Create, then select Retention Policy.
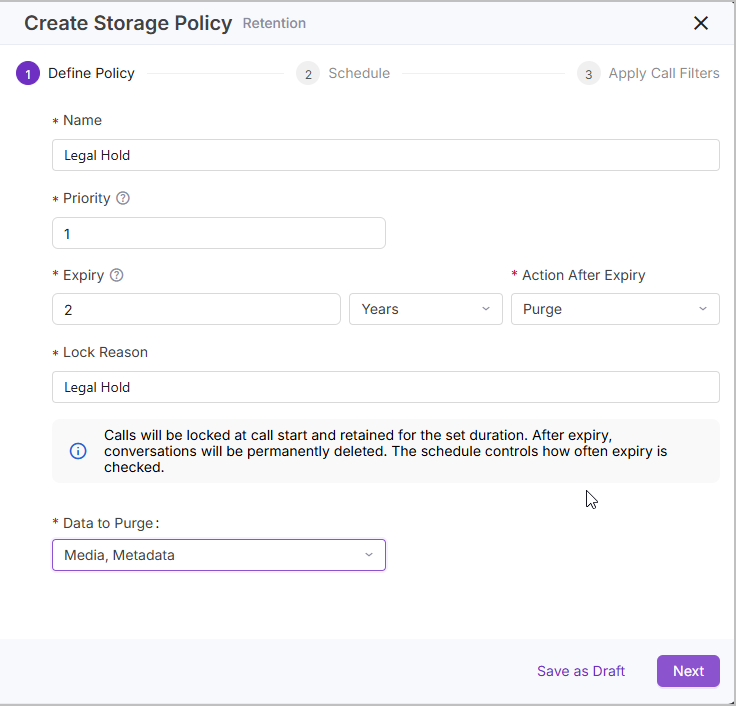
Enter a useful Name for your policy.
Choose the Priority of the policy (the order in which the policies are run), 1 being first priority, then 2 being second priority, and so on.
Set the Expiry for the policy (conversations matching the filter are retention-locked until the expiry period has passed). Enter a value in the expiry dialog box and select a unit of time from the expiry dropdown.
Determine the action to perform on the conversations once the expiry time is reached using the Action After Expiry dropdown. Options include:
No Action - The conversations locked by the retention policy are unlocked, and no further action is processed. These conversations can now be deleted with a Purge policy or manually via the UI.
Purge - The conversations are unlocked and purged (deleted) from the system. Deleted conversations can not be recovered. If selected, choose the Data to Purge below.
Move - The conversations are unlocked and moved to a specified storage location. If selected, choose the Data to Move and then use the Move to Storage options. Use the Storage Locations dropdown to choose an existing storage location, or select Create new storage location and enter the details for a new storage location. For more information on storage locations, see Manage Endpoints and Storage Locations
Enter a Lock Reason so that anyone viewing the locked call can see why the call is locked.
Click Next.
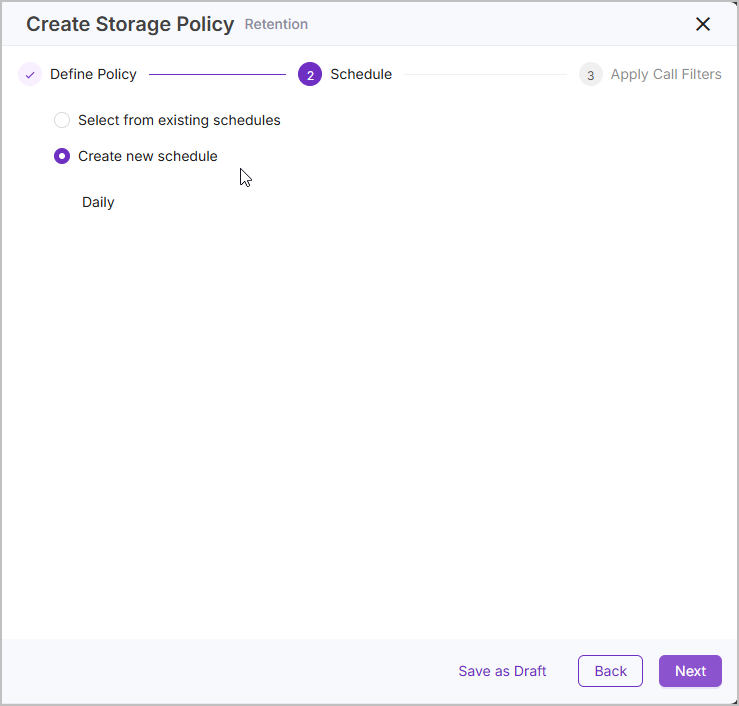
Determine when and how often the policy is applied. Choose either an existing schedule from the Select from existing schedules dropdown, or select Create new schedule and set up a new schedule for the policy to use. For more information on schedules, see Manage Schedules. Then click Next.
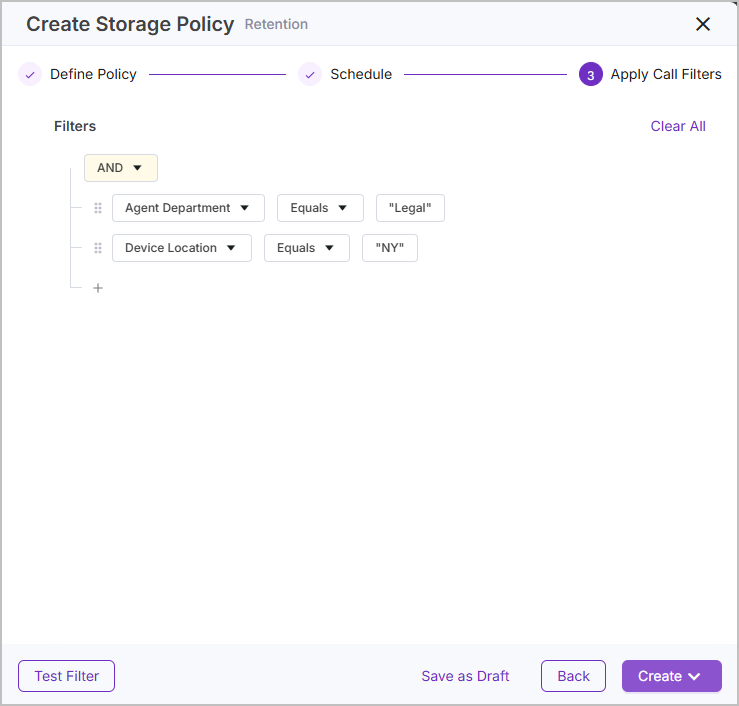
Create a Calls Filter – Add one or more metadata filters. These are used to define which recordings the policy applies to. Click Test Filter to confirm that the filters apply to the correct calls. See Create a Calls Filter for more information on Calls Filters.
When you're ready, click Create and select if you want the policy to be enabled (Create and Enable) or disabled (Create and Disable). You can enable or disable it later if needed.
Manage Transcription Policies
Use Transcription Policies to automatically control which call recordings (stored or live audio) are sent for transcription (voice to text) once a transcription service is configured. You can define exactly which recordings to send for transcription, which can be useful in restricting the utilization of transcription services to provide efficient cost and capacity models.
Transcribe
Optional transcription services can be deployed with the Communication Recording Agent to provide voice-to-text services. The Transcribe Policy can be used to define exactly which calls will be transcribed. This can provide for efficient utilization of transcription services both in terms of cost and capacity.
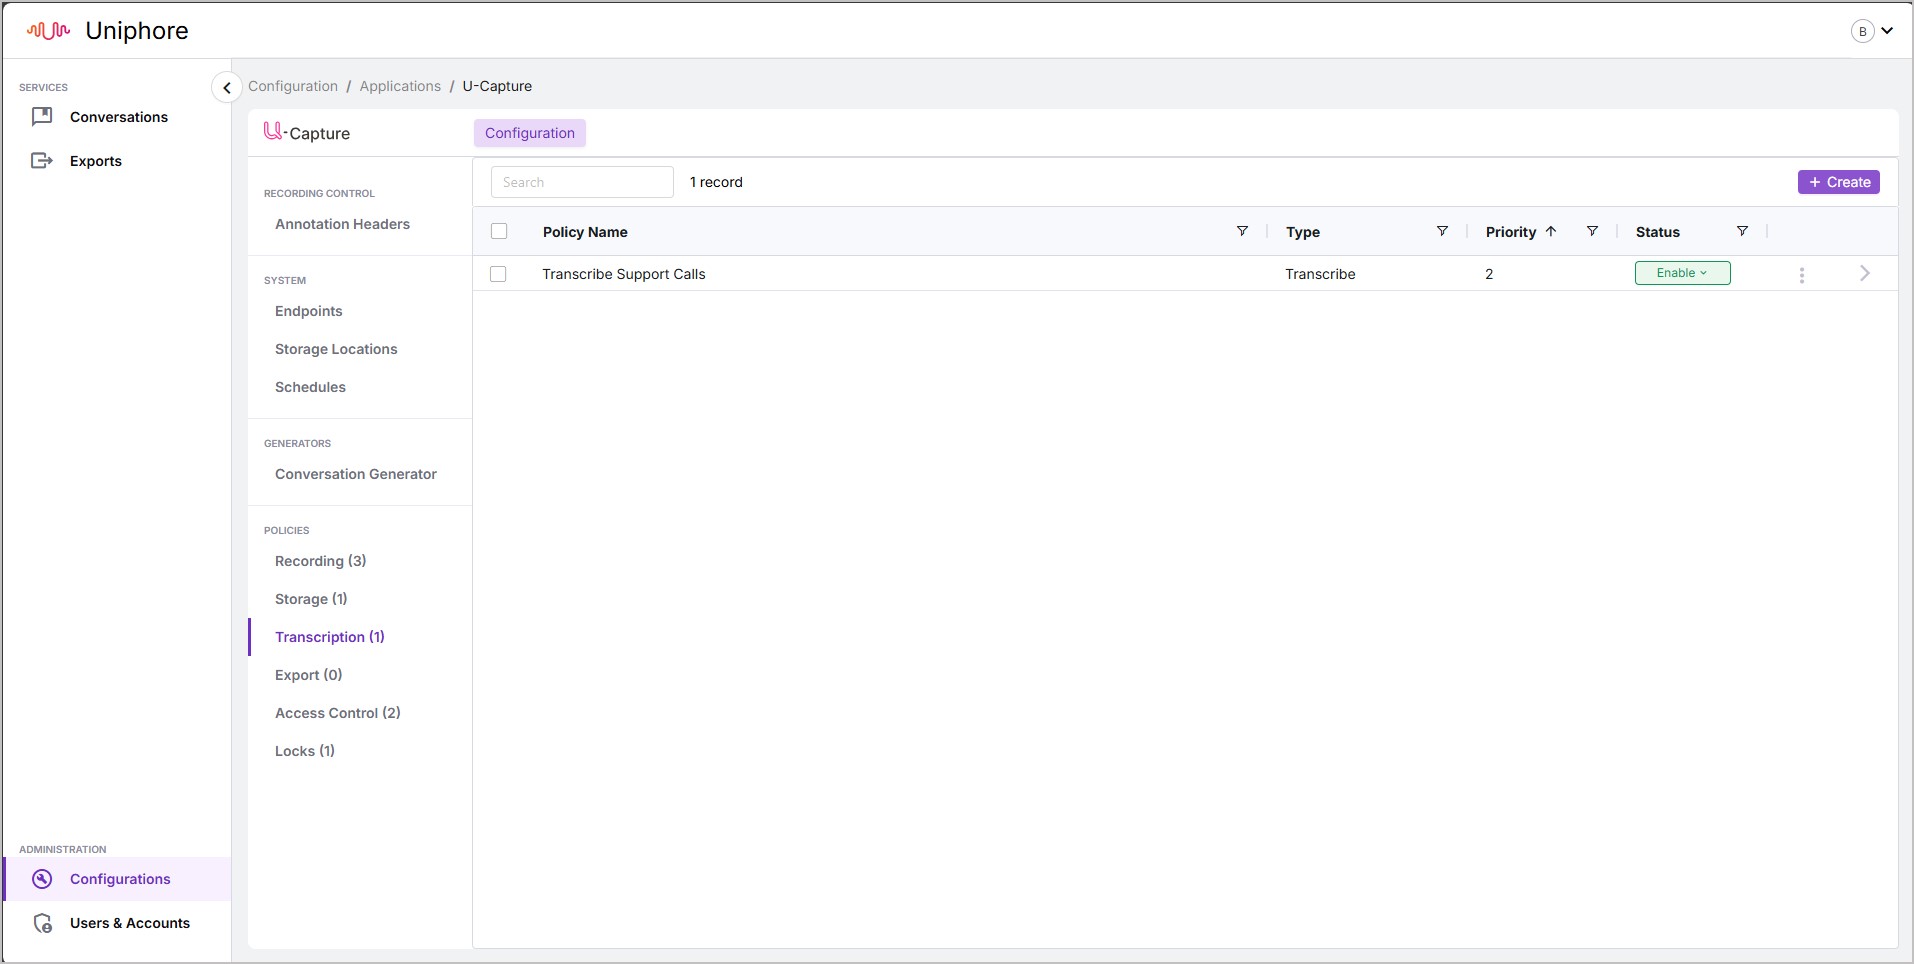
To view transcription policies, go to Configurations > Configure (under Communication Recording Agent) > Policies > Transcription Policies. From here, you can see the list of existing transcription policies, along with the Name, Type, Priority, and Status of each policy. To view a policy in more detail, click the arrow to the right of the policy to open the Update Transcription Policy panel.
Once a policy has been created, it can be Enabled and Disabled using the Status column.
Existing policies can't be edited, but can be duplicated by opening the policy and clicking Duplicate.
To delete a policy, click the three dots icon and click delete. You will be prompted for confirmation before the policy is deleted.
To review what recordings a policy applies to, open the policy and click either the Filters tab to see the filters for the policy, or click the Call Records tab to view the related calls.
To Add a New Transcription Policy:
Tip
Use Save as Draft at any point when adding a new policy to save your progress. The draft policy will then be listed with the other policies with the status "Draft". Resume your progress by simply opening the policy.
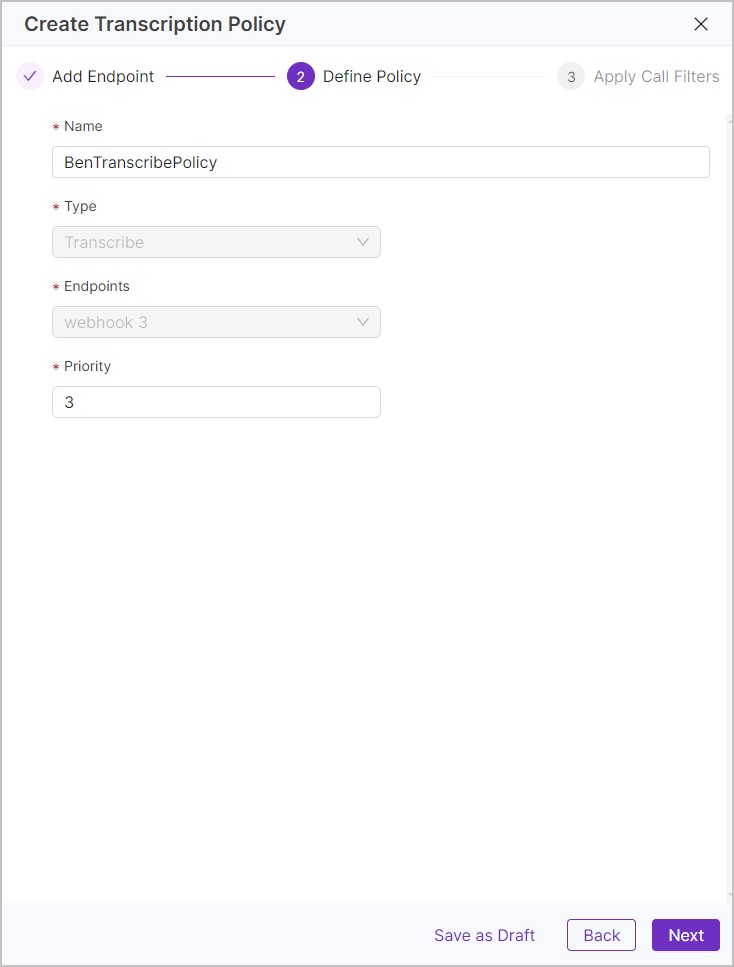
Go to Configurations > Configure (under Communication Recording Agent) > Policies > Transcription and click + Create.
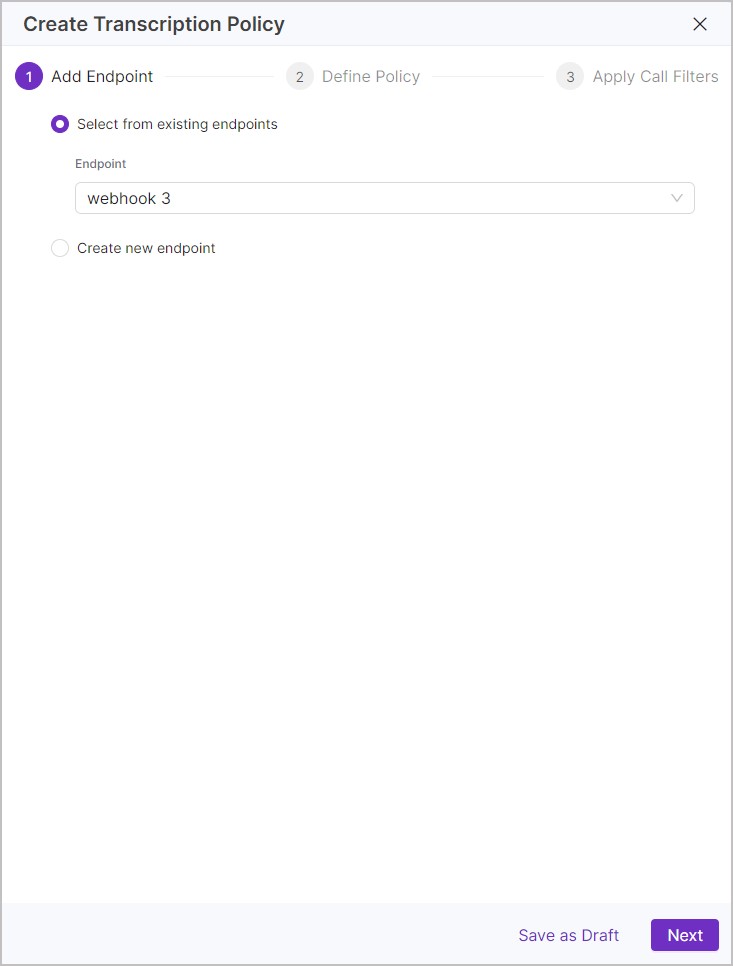
Add an Endpoint to the policy, select from an existing list of configured endpoints, or add a new one. If you plan on transcribing post-call, use a post-call endpoint. Similarly, if you plan on transcribing live calls, use a real-time endpoint. When ready, click Next.
Enter a useful Name for the policy.
Choose the Priority of the policy (the order in which the policies are run), 1 being priority and 2 being second priority, and so on. When ready, click Next.
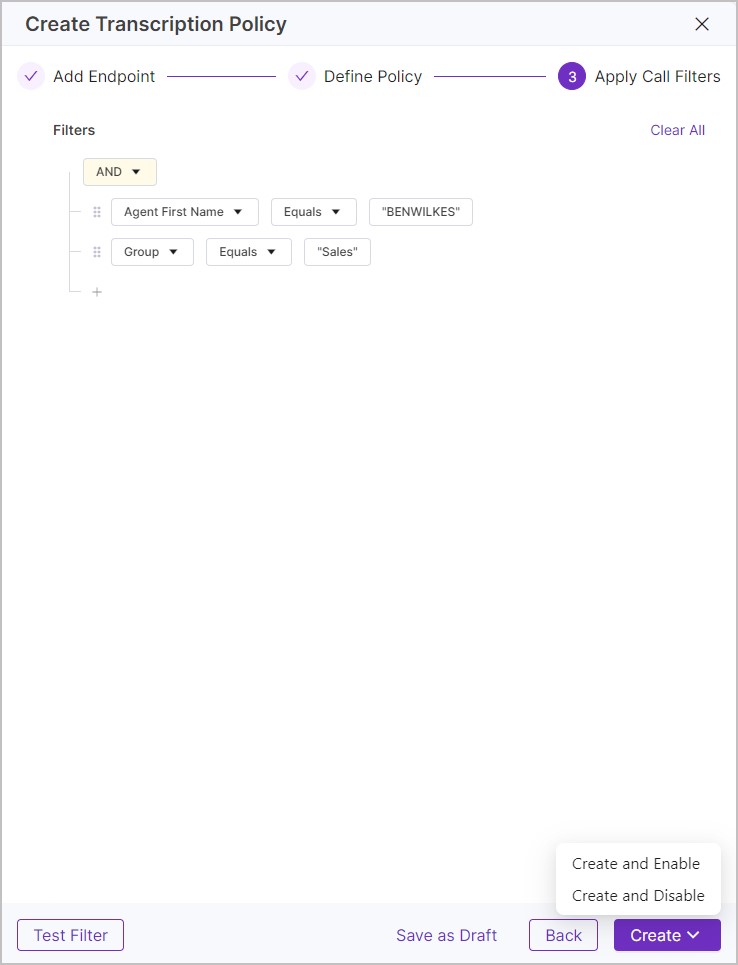
Create a Calls Filter – Add one or more metadata filters. These are used to define which recordings the policy will be applied to. Click Test Filter to check the policy applies to the correct calls. See Create a Calls Filter for more information on Calls Filters.
Caution
The Transcription Policy will be applied to all calls in scope of the filters, including older calls (not just new calls as they come in). Creating Transcription Policies to transcribe older calls should be done with care in order to avoid a large backlog of calls waiting to be transcribed.
When you're ready, click Create and select if you want the policy to be enabled (Create and Enable) or disabled (Create and Disable). You can enable or disable it later if needed.
 |  |  |
Manage Export Policies
Use export policies to define specific recordings to export to your defined endpoints and trigger the export automatically, as needed. External endpoints can be defined when you set up an Export policy or by going to Configuration > configure (under Communication Recording Agent) > System > Endpoints.
The Communication Recording Agent provides two export policy types - Call Push (post-call export) and Real-Time Audio (real-time export). These provide additional automated call export features, over and above the manual post-call Communication Recording Agent Export features available in Conversations > Recorded.
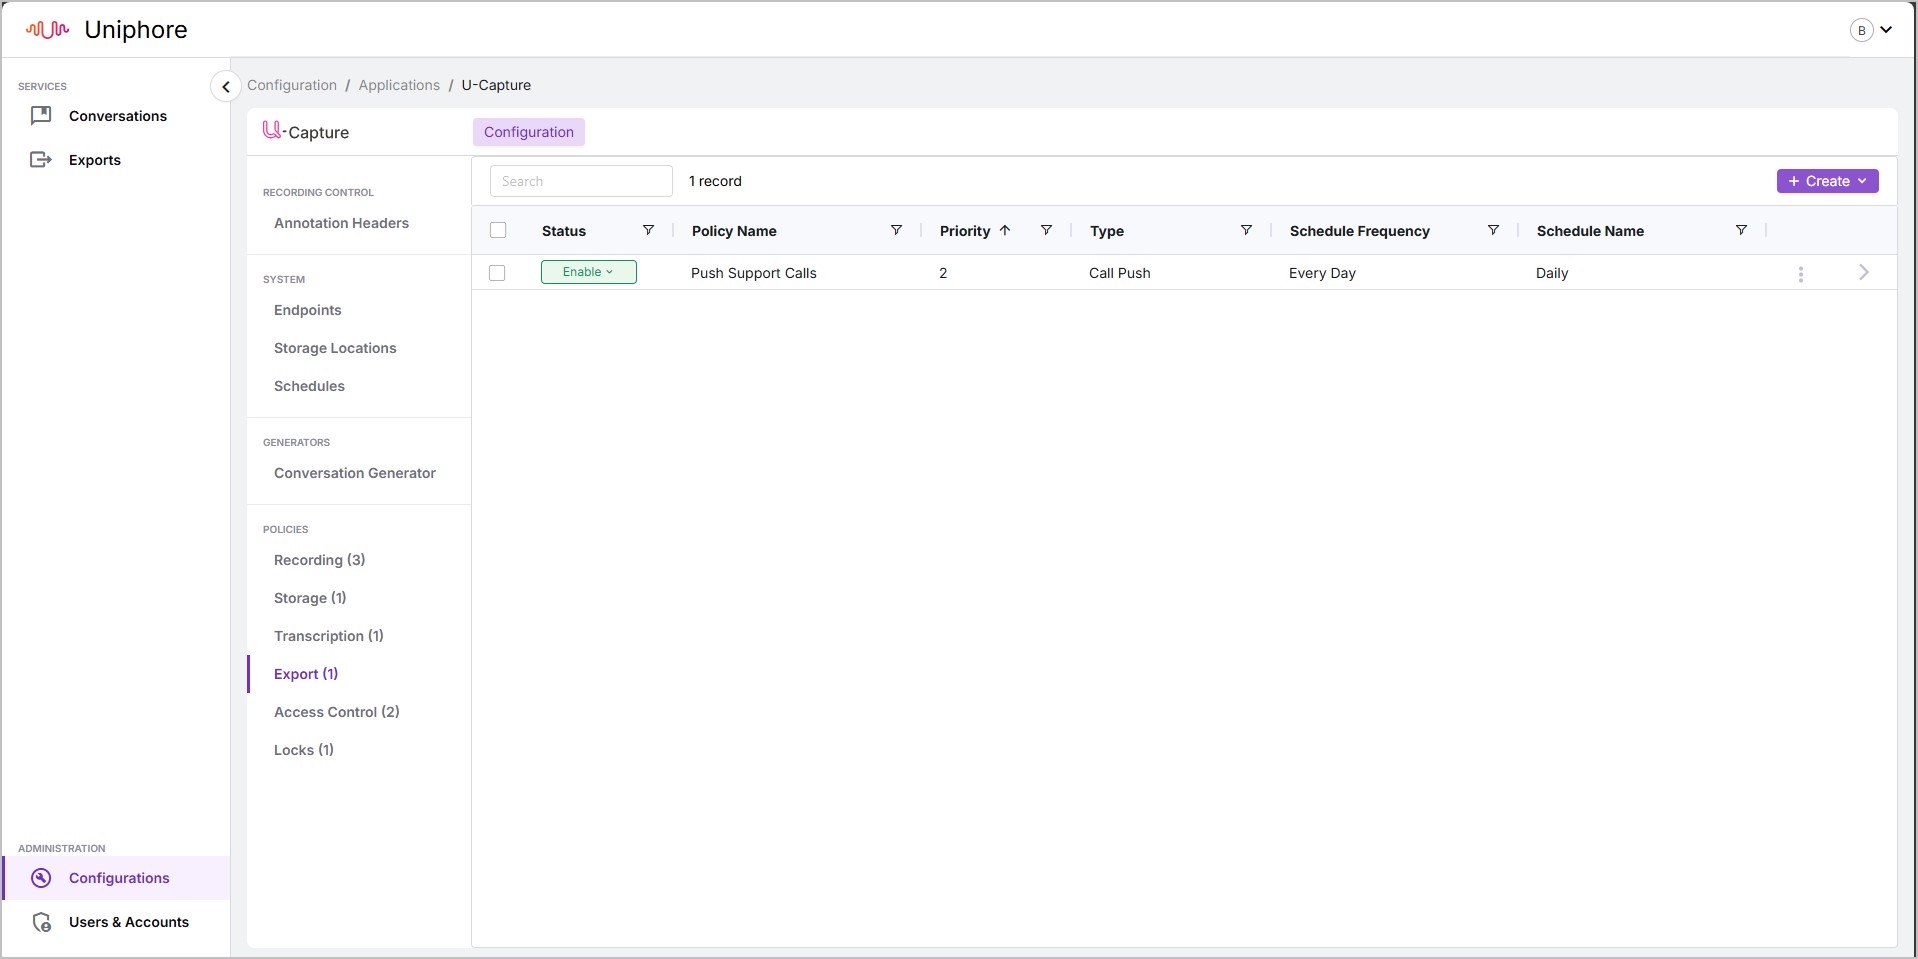
To view export policies, go to Configurations > Configure (under Communication Recording Agent) > Policies > Export. From here, you can see the list of existing export policies, along with the Name, Type, Priority, and Status of each policy. To view a policy in more detail, click on the arrow to the right of the policy to open the policy properties panel.
Once a policy has been created, it can be Enabled and Disabled using the Status column.
Existing policies can't be edited, but can be duplicated by opening the policy and clicking Duplicate.
To delete a policy, click the three dots
icon and click delete. You will be prompted for confirmation before the policy is deleted.To review what recordings a policy applies to, open the policy and click either the Filters tab to see the filters for the policy, or click the Call Records tab to view the related calls.
To Add a New Export Policy:
Tip
Use Save as Draft at any point when adding a new policy to save your progress. The draft policy will then be listed with the other policies with the status "Draft". You can resume your progress by simply opening the policy.
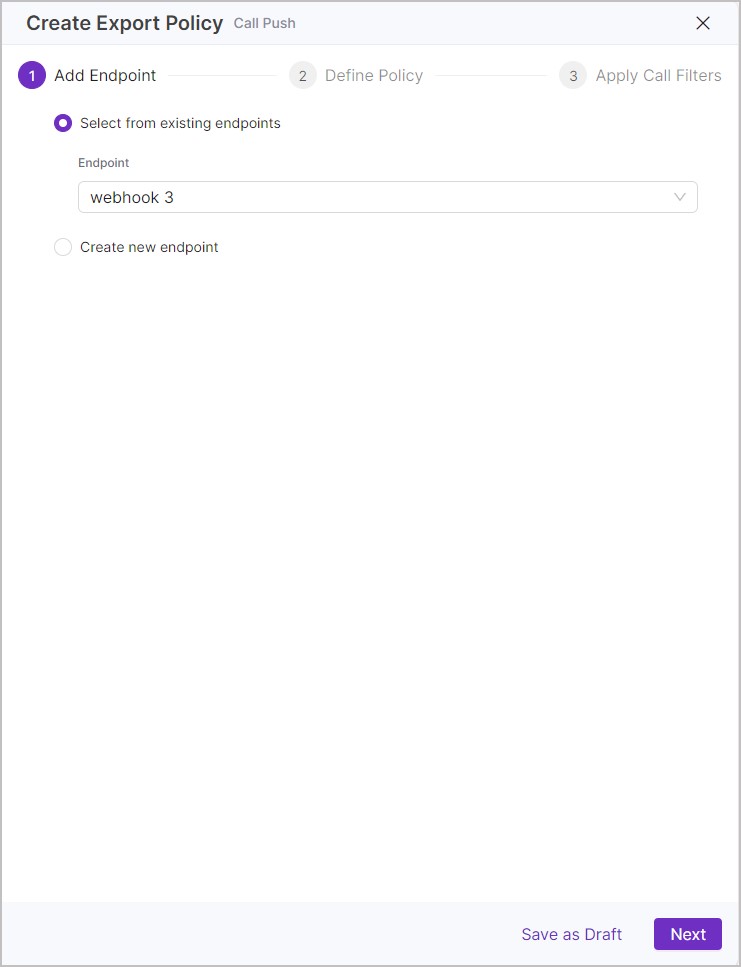
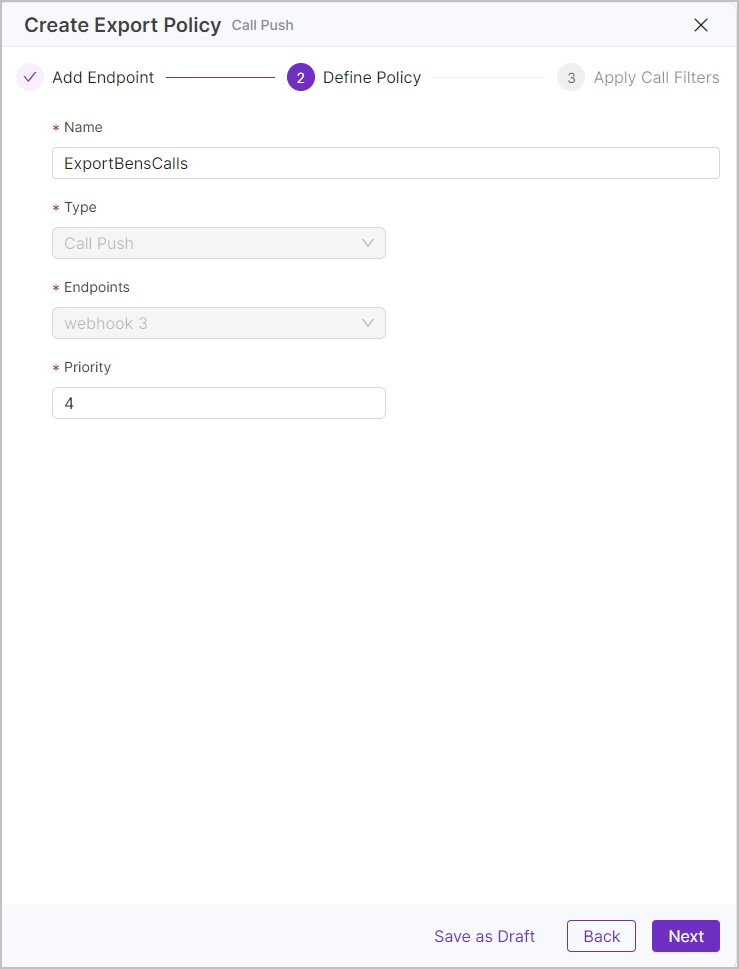
Go to Configurations > Configure (under Communication Recording Agent) > Policies > Export and click + Create and select the type of export policy you'd like to add, either Call Push (post-call export) or Real-Time Audio (real-time export).
Add an Endpoint to the policy (this is the location to send the captured data to), select from an existing list of configured endpoints, or add a new one. If you plan on exporting post-call, use a post-call endpoint. Similarly. if you plan on exporting live calls, use a real-time endpoint. When ready, click Next.
Enter a useful Name for the policy.
Choose the Priority of the policy (the order in which the policies are run), 1 being priority and 2 being second priority, and so on. When ready, click Next.
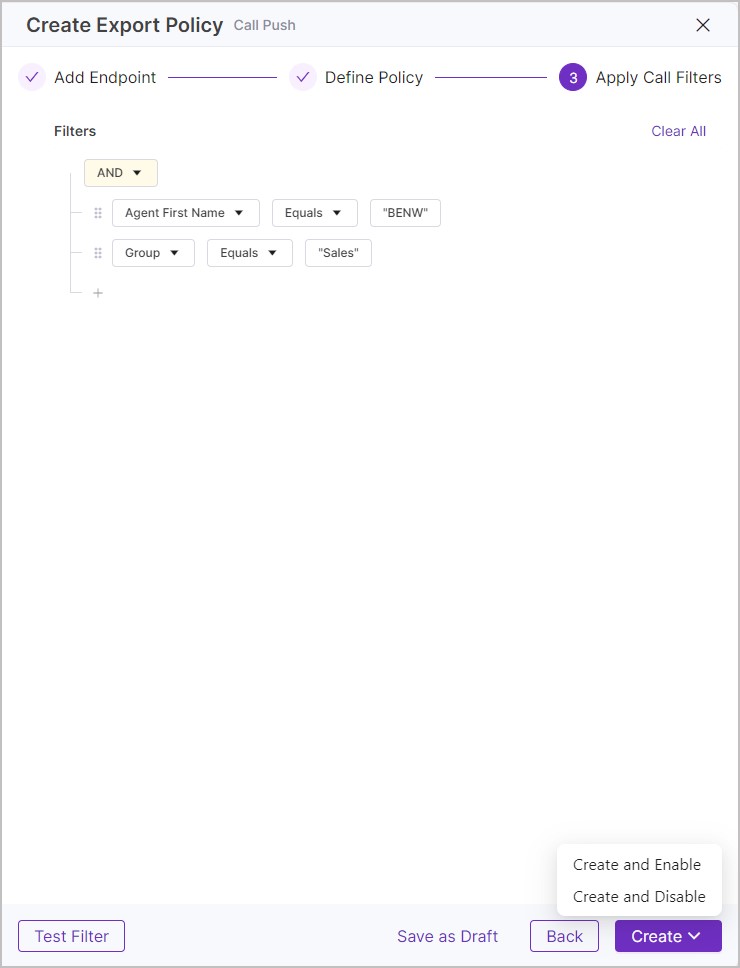
Create a Calls Filter – Add one or more metadata filters. These are used to define which recordings the policy applies to. Click Test Filter to check that the policy applies to the correct calls. See Create a Calls Filter for more information on Calls Filters.
Note
The Export Policy will be applied to all calls in the scope of the filters, including older calls (not just new calls as they come in).
When you're ready, click Create and then select if you want the policy to be enabled (Create and Enable) or disabled (Create and Disable). You can enable or disable it later if needed.
Note
Exports can also be performed manually (Conversations > Recorded > Export) and made available for download (go to Exports to see the manual exports available for download.)
 |  |  |
Manage Access Policies
Use Communication Recording Agent access control policies to assign granular access permissions for your Users.
Metadata and Media Playback Access: Combines the below policies to allow access to the media and metadata of your defined recordings.
To view Access Control policies, go to Configurations > Configure (under Communication Recording Agent) > Policies > Access Control. From here, you can see the list of existing Access Control policies, along with the Name, Type, Priority, and Status of each policy. To view a policy in more detail, click on the arrow to the right of the policy to open the policy properties panel.
Once a policy has been created, it can be Enabled and Disabled using the Status column.
Existing policies can't be edited, but can be duplicated by opening the policy and clicking Duplicate.
To delete a policy, click the Ellipsis
menu and click delete. You are prompted for confirmation before the policy is deleted.To review what recordings a policy applies to, open the policy and click either the Filters tab to see the filters for the policy, or click the Call Records tab to view the related calls.
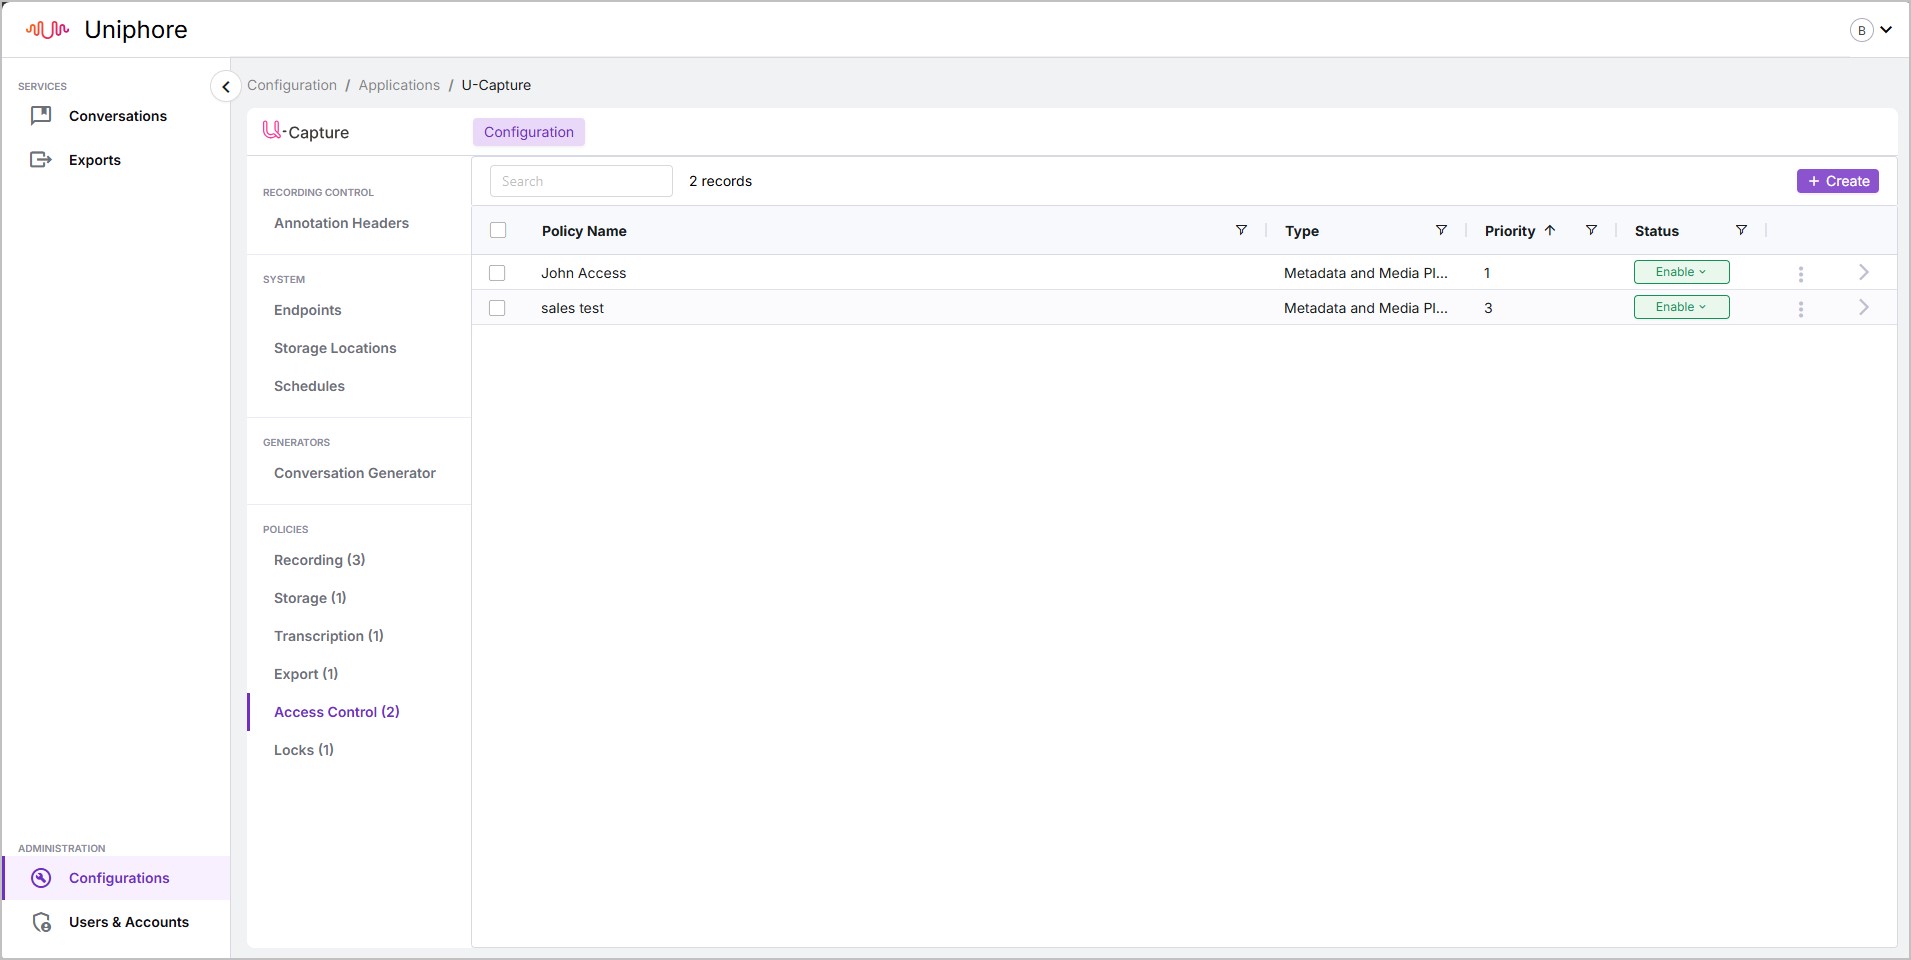
Go to Configurations > Configure (under Communication Recording Agent) > Policies > Access Control and click + Create.
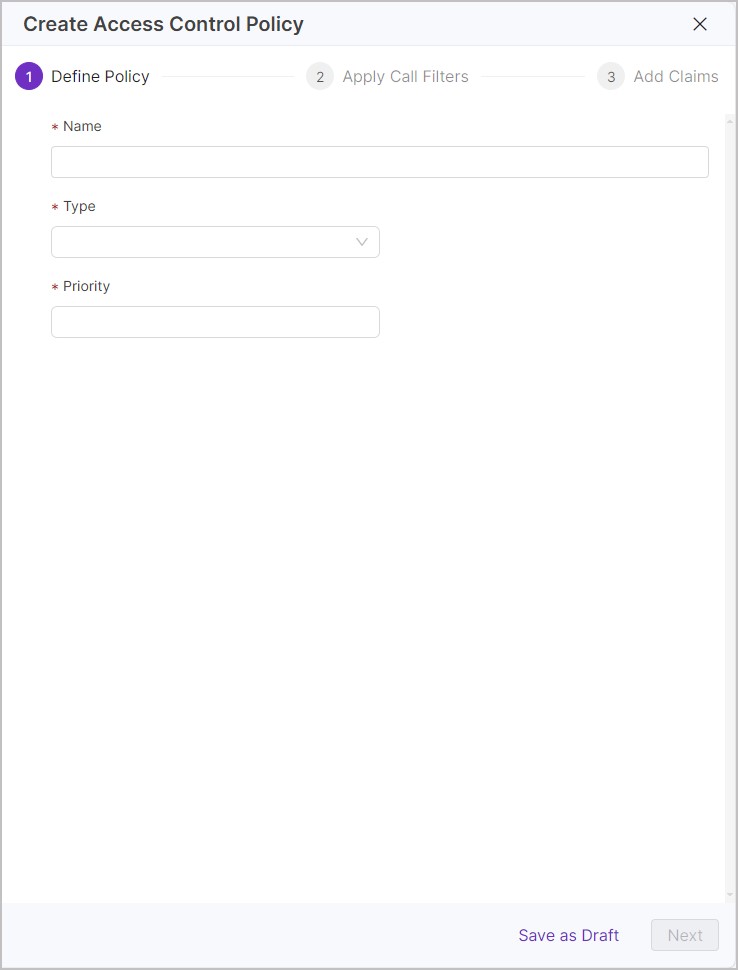
Enter a useful Name for the policy.
Choose the Priority of the policy (the order in which the policies are run), 1 being priority and 2 being second priority, and so on. When ready, click Next.
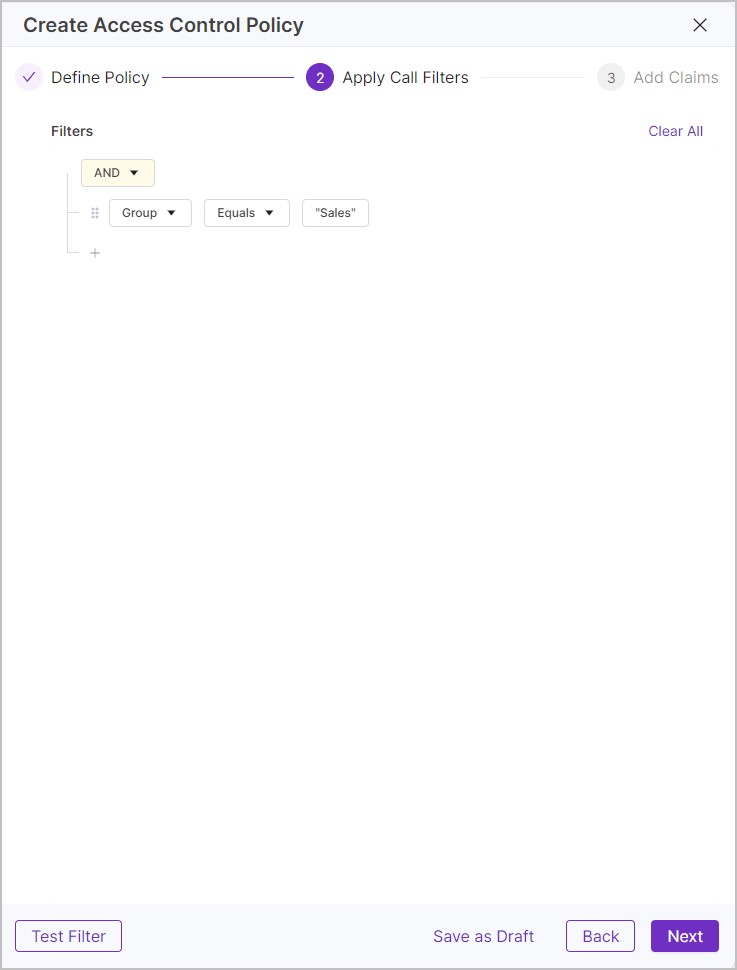
Create a Calls Filter – Add one or more metadata filters. The Calls Filter is used to define what recordings the policy applies to. Confirm that the policy applies to the correct calls, click Test Filter, then click Next. See Create a Calls Filter for more information on Calls Filters.
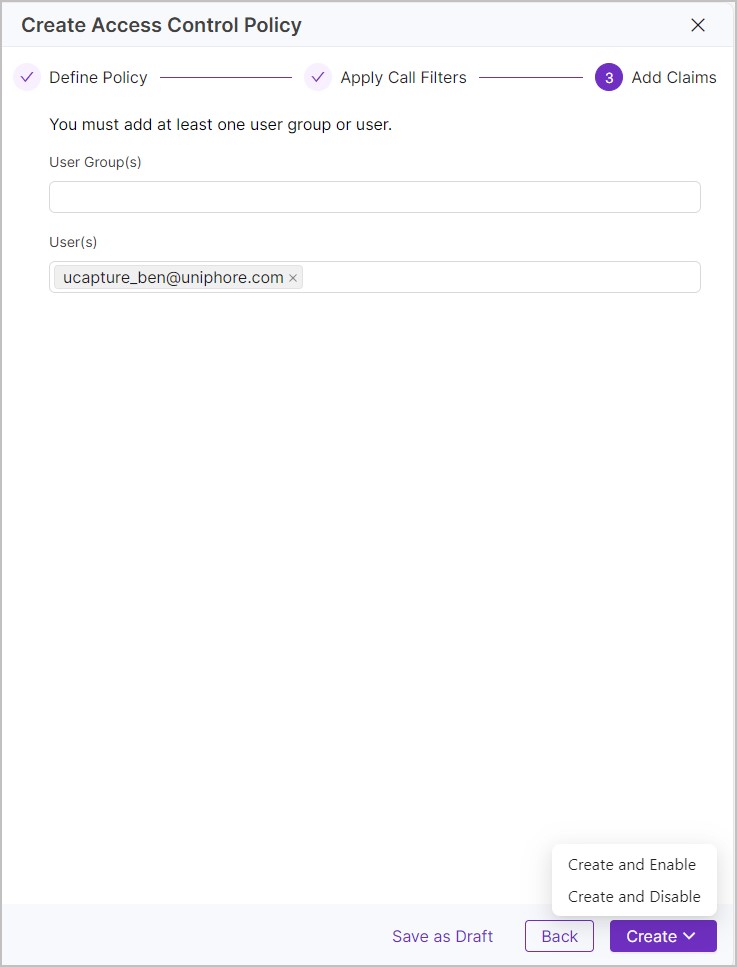
Decide what User Group(s) and/or User(s) to add a claim to. User groups and users listed here gain the level of access specified by the Type to the calls specified by the Call Filters.
Note
To view and edit your Users, go to Admin > Users.
To view and edit your User Groups, go to Admin > Organization Hierarchy.
Click Create and then select if you want the policy to be enabled (Create and Enable) or disabled (Create and Disable). You can enable or disable it later if needed.
 |  |  |
Manage Locks Policies
UseCommunication Recording Agent locks policies to automatically lock calls where captured metadata matches specified filters, ensuring that specific calls can not be deleted from the system.
Note
Calls can also be locked manually, either live or post-call. See Listen to Live Calls - Actions for information on manually locking calls as they are taking place, or see Search and Replay Recordings - Actions for information on manually locking calls after they have finished.
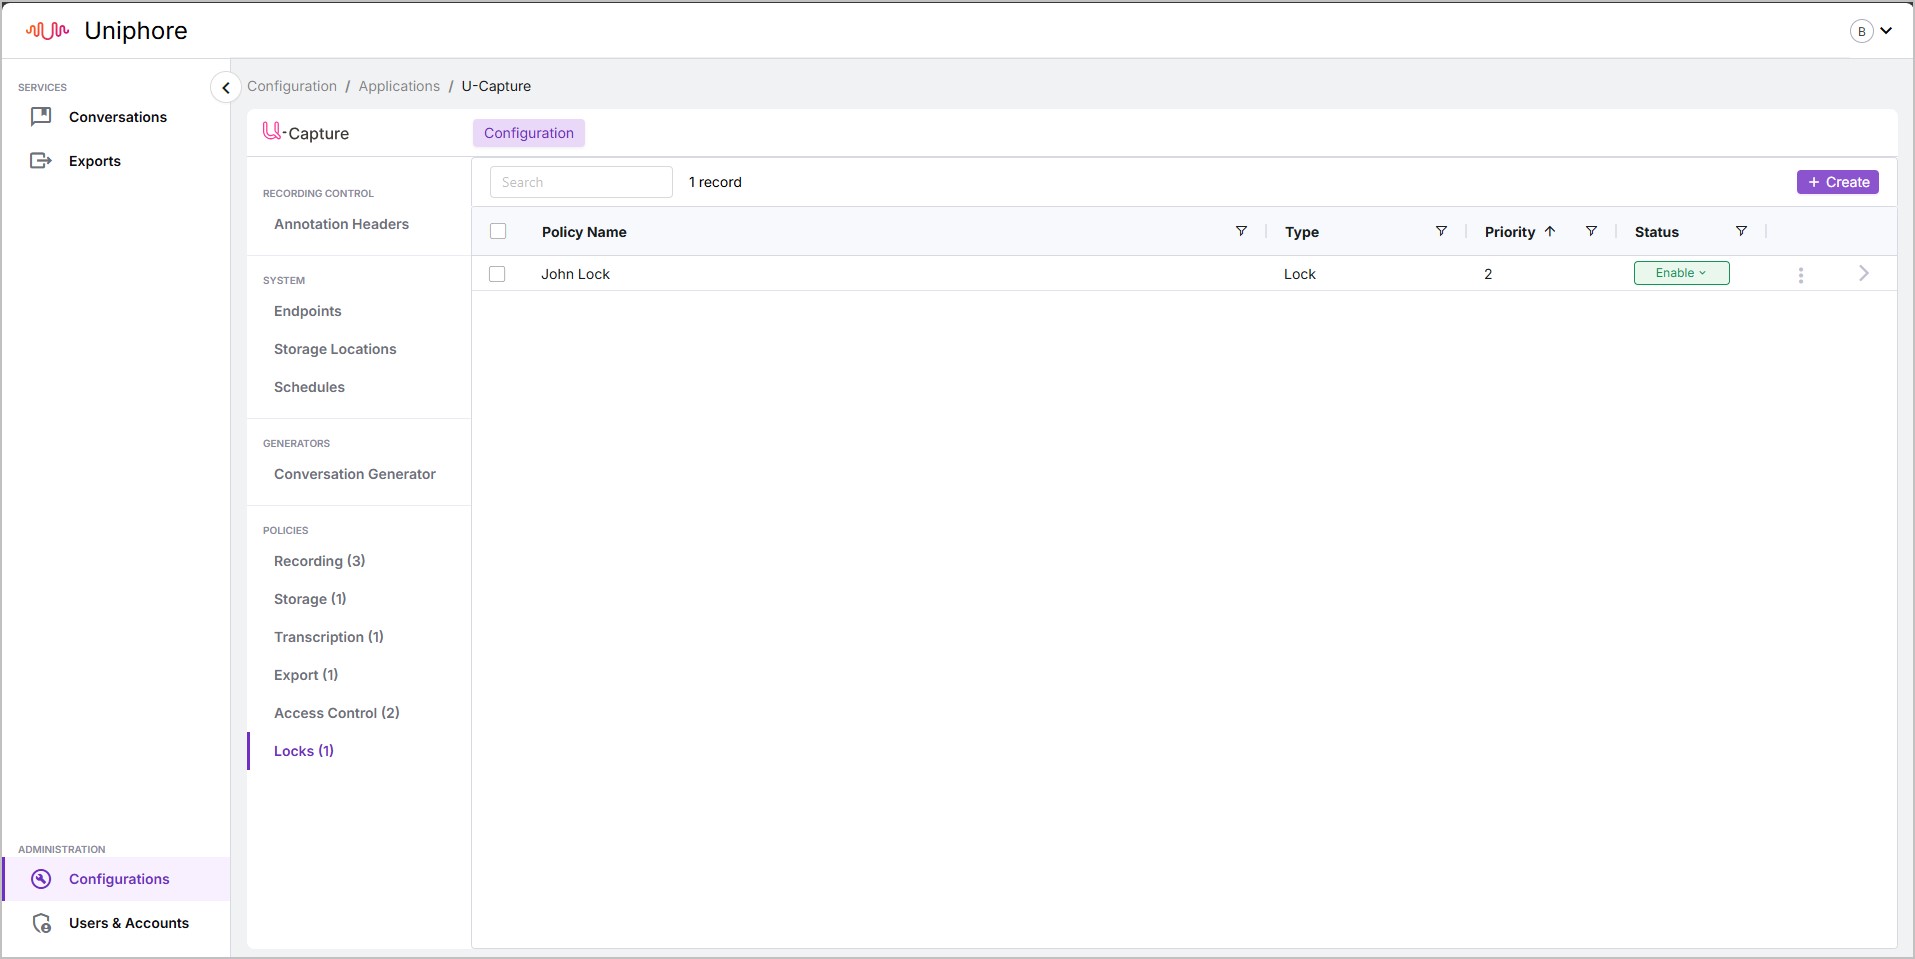
To view Locks policies, go to Configurations > Configure (under Communication Recording Agent) > Policies > Access Control. From here, you can see the list of existing Locks policies, along with the Name, Type, Priority, and Status of each policy. To view a policy in more detail, click on the arrow to the right of the policy to open the policy properties panel.
Once a policy has been created, it can be Enabled and Disabled using the Status column.
Existing policies can't be edited, but can be duplicated by opening the policy and clicking Duplicate.
To delete a policy, click the three dots icon and click delete. You will be prompted for confirmation before the policy is deleted.
To review what recordings a policy applies to, open the policy and click either the Filters tab to see the filters for the policy, or click the Call Records tab to view the related calls.
To Add a Locks Policy:
Go to Configurations > Configure (under Communication Recording Agent) > Policies > Locks and click + Create.
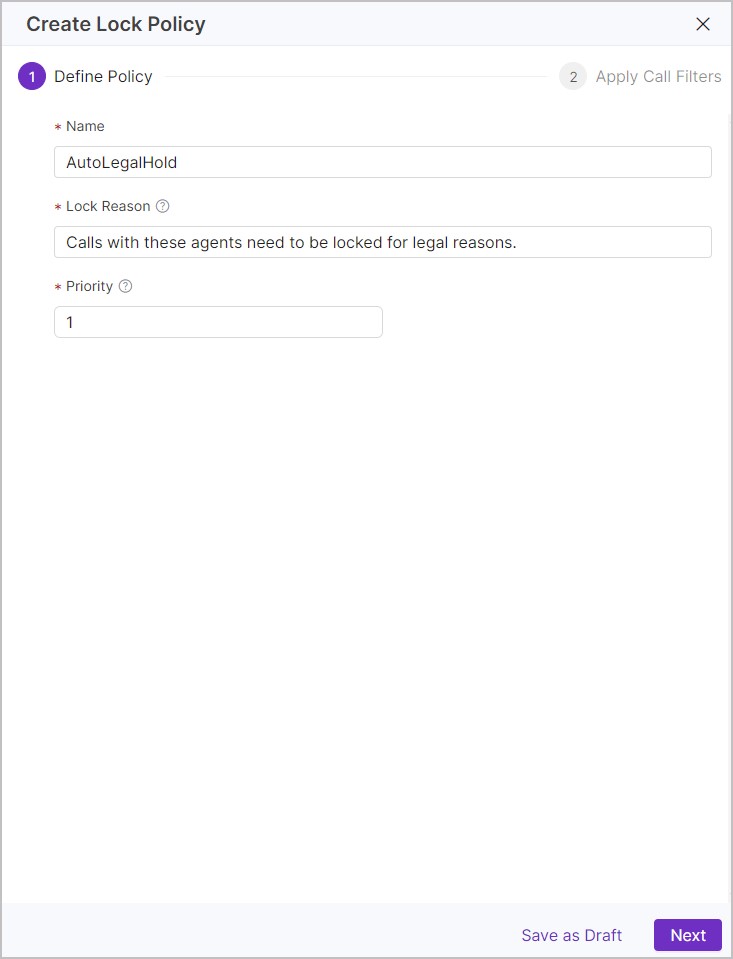
Enter a useful Name for the policy.
Enter a unique Lock Reason that explains why the calls matching the Filters need to be locked.
Choose the Priority of the policy (the order in which the policies are run), 1 being priority and 2 being second priority, and so on. When ready, click Next.
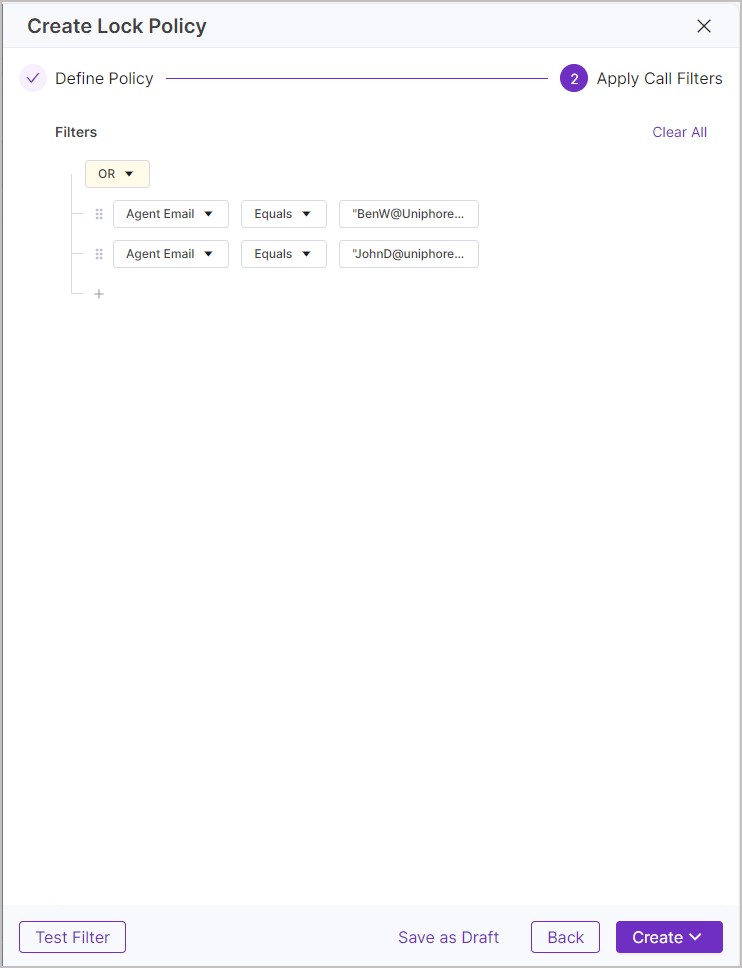
Create a Calls Filter – Add one or more metadata filters. These are used to define which recordings the policy applies to. Click Test Filter to check that the policy applies to the correct calls. See Create a Calls Filter for more information on Calls Filters.
When you're ready, click Create and then select if you want the policy to be enabled (Create and Enable) or disabled (Create and Disable). You can enable or disable it later if needed.
Create a Calls Filter
Calls Filters are used to apply your policies to specific calls. You can add multiple filters (using any metadata field), multiple conditions, and group and structure your filters. If you’d like a reminder of general search logic, see Filter Rules. More examples of Filters are available in Policy Examples.
Note
Calls Filters follow a similar logic to advanced search, but instead of searching for calls, you're deciding what calls are impacted by your policies. If you're familiar with using the advanced search filters, understanding Calls Filters should be quite simple.
Create a Calls Filter:
Click + to add a new filter or filter group. You can add as many as you need.
Filters and Groups can be rearranged by clicking and dragging the dots to the left of the filters/groups.
Click the remove icon to the right of the filter or filter group to remove as needed.
Filters – Select a metadata field to filter with, select a condition, and finally select or enter what the value the call's metadata must match for the policy to be applied to it.
Filter Groups – Select whether you want to apply filters on an AND basis (must match all) or an OR basis (only needs to match one).
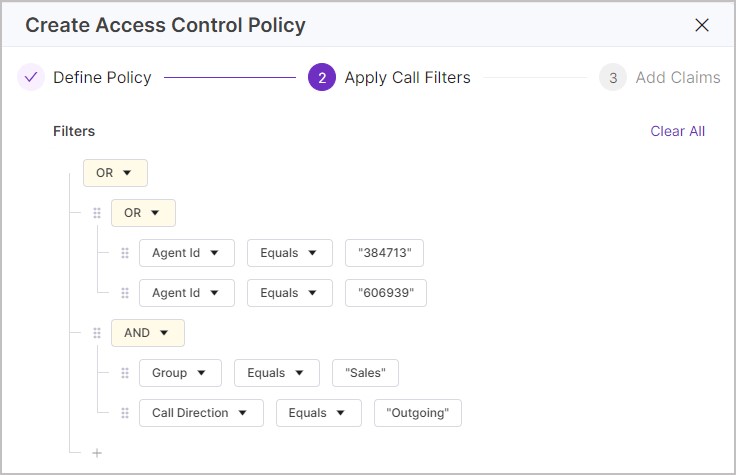
For example, in my Calls Filter below, the policy would be applied to all calls to/from any agent that has 384713 or 606939 as part of their Agent Id, but also apply to all Outgoing calls from agents who are part of the Sales team.
Tip
Click Test Filter to check that the policy applies to the correct calls.
Filter logic is pretty straightforward, but at the same time allows you to set up very complex filters. Here are the rules/guidelines to help you create your filters:
Filter: A filter defines what type of data you want to search, what data to search for, and what condition the search should be regarded as a match.
Condition: Defines what condition should be regarded as a match. For example, contains the number 384 anywhere in a data field, or exactly matches (equals) the number 384.
Group: AND/OR work as search operators.
The simple graphic below illustrates how each of them works. In this example, you have three searches – A, B, and C.
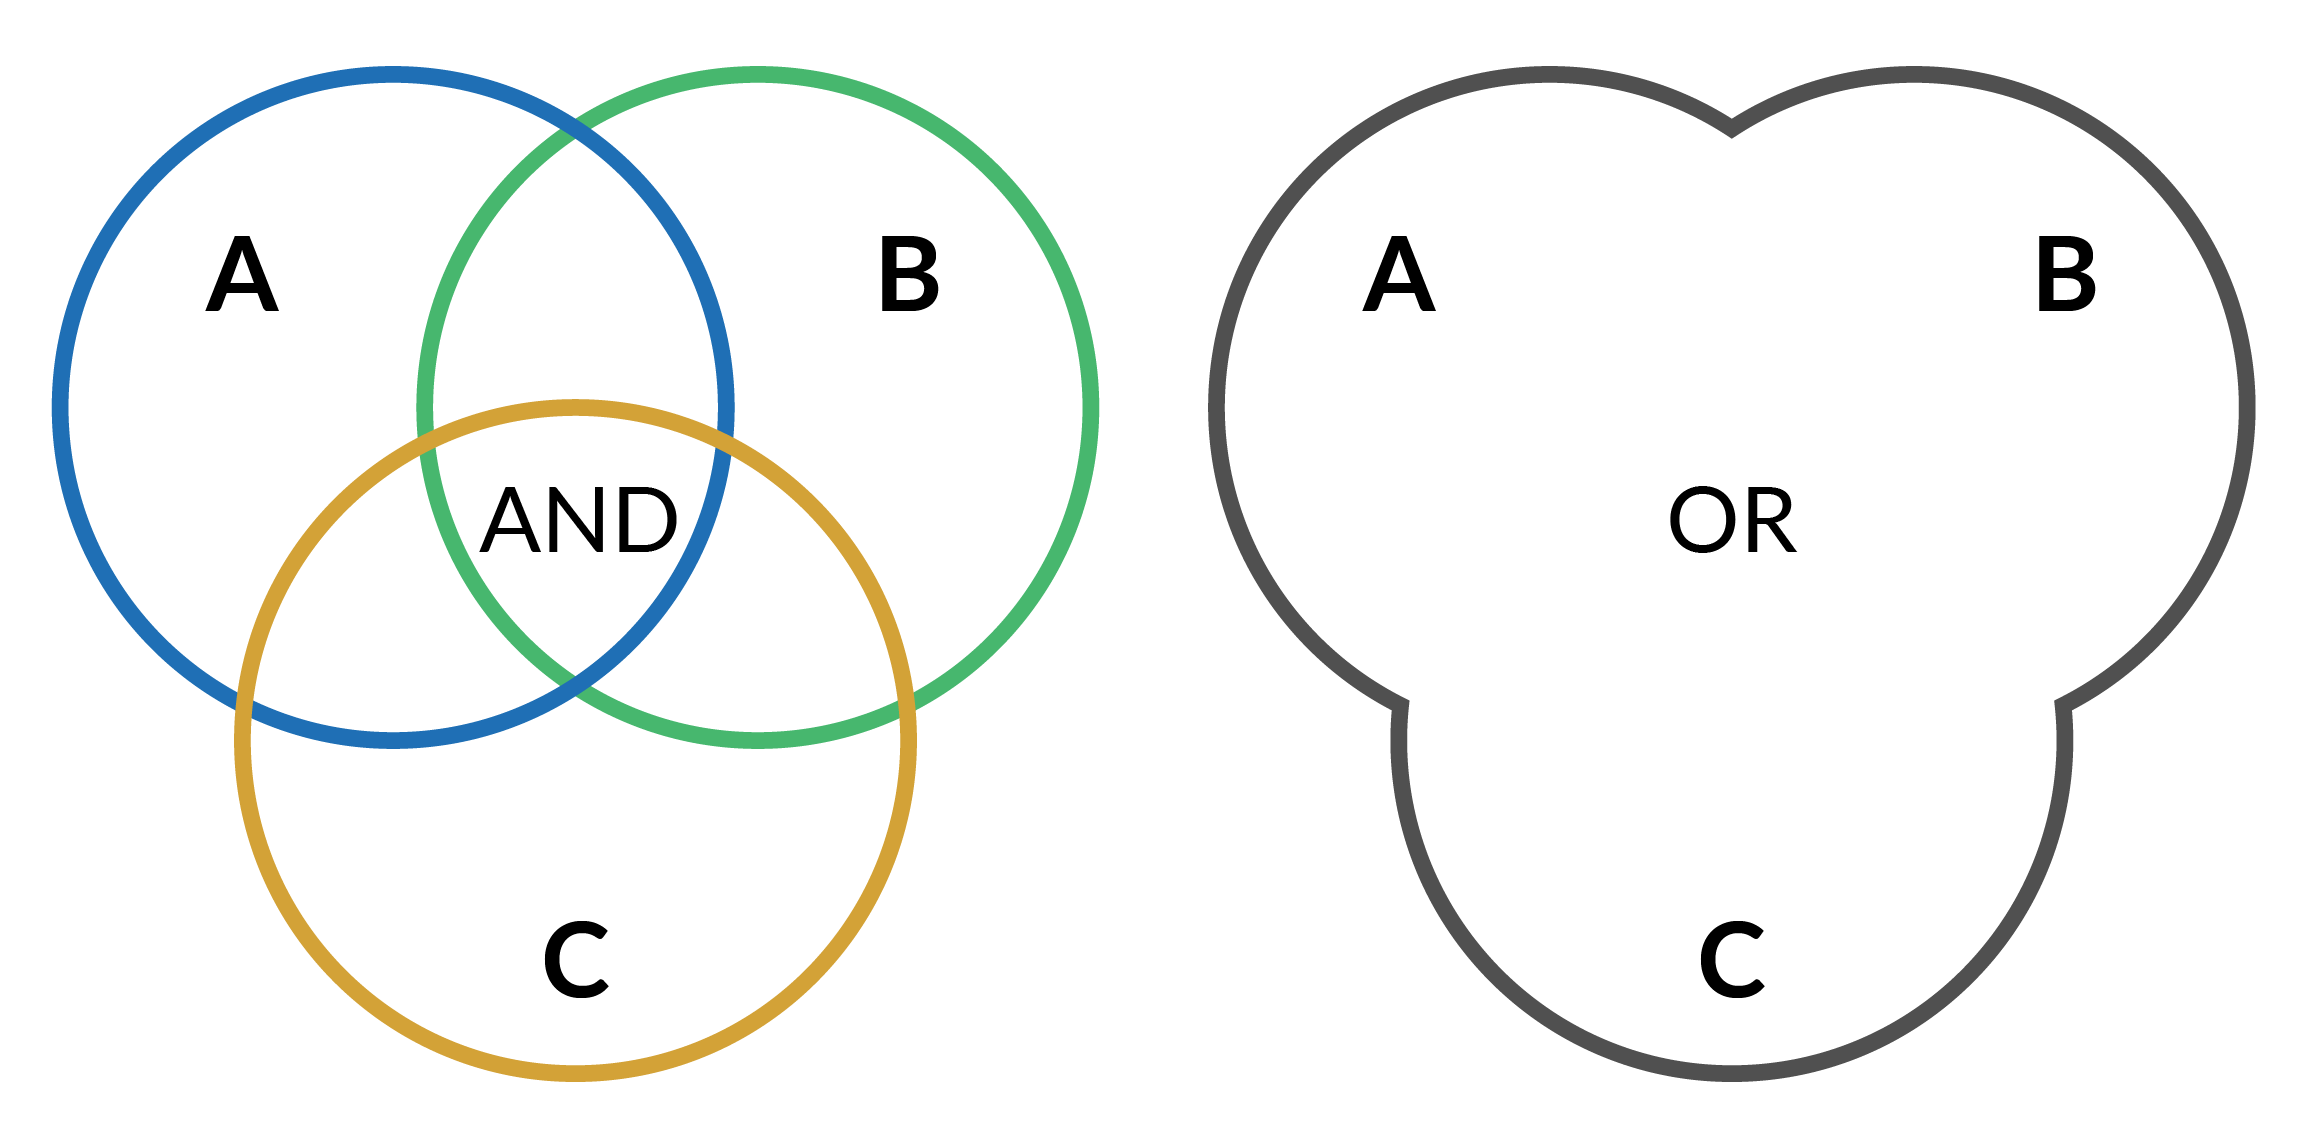
When you apply an AND to the searches, you’re saying the recording must match everything you’re searching for in A AND B AND C (the piece in the middle where all three circles overlap).
When you apply an OR to the searches, you’re saying the recording can match anything you’re searching for in A OR B OR C (anywhere, in any circle).
You can apply the AND and OR operators to multiple conditions as well as filters.
For example, you could search for recordings to/from the Sales Team AND Pre-Sales Team.
Group (Nest) Filters: A little bit more complex, but still pretty straightforward. Whenever you group a set of filters using AND/OR, you’re saying search for all these things first and provide the result, then combine the result with any other filters you’ve defined. So in the example below, I grouped all calls from two agents using OR, then grouped a call Group filter (Sales) and a Call Direction filter (Outgoing) with AND to give me all Outgoing calls from the Sales team, using OR at the top means my results would provide all calls by either agent (Agent 384713 OR Agent 606939) as well as any outgoing sales calls.