Policy Examples
This topic covers a use case example for each policy type, and includes step-by-step instructions for each example for system administrators to follow in order to become more familiar with Communication Recording Agent Policies. Each example covers the process to create a Calls Filter unique to that example.
Use the following table to jump to the example specific to each policy type. See the Example Details column for a description of the policy aim, along with a summary of the type of Calls Filter created in the example.
Policy Category | Policy Type | Reference | Example Details |
|---|---|---|---|
Recording Control | Blocklist | Create a Blocklist policy that ensures John's calls are discarded, and all other calls are retained. | |
Recording Control | Allowlist | Create an Allowlist policy that ensures the Sales team's calls are recorded, and all other calls are discarded. | |
Storage | Purge | Create a Purge policy to delete outgoing calls after 5 years, and run this policy every day. | |
Storage | Move Media | Create a Move Media policy to move audio from the Support team's calls to cold storage after 90 days, and run this policy every 12 hours. | |
Storage | Archive Metadata | Create an Archive Metadata policy to automatically archive the metadata of the calls for two specific people in the Sales team to cold storage, 2 years after the calls took place, and run this policy every first Friday of the month, at a specific time. | |
Storage | Retention | Create a Retention Policy that automatically locks Darren in the legal team's calls for three years, then automatically unlocks and deletes them from the system. | |
Transcription | Transcribe | Create a Transcription policy to automatically transcribe all the calls for the Sales team, and all the incoming calls for the Support Team, and have the transcriptions sent to a new endpoint after each call. | |
Export | Call Push (post call) | Create a Call Push policy to automatically export all of Barry from the Finance team's outgoing calls to a new endpoint post-call. | |
Export | Real-Time Audio (real-time) | Create a Real-time Audio policy to automatically export incoming Support calls and incoming Sales calls to a new endpoint in real-time. | |
Access Control | Media Playback and Metadata Access | Create a Media Playback and Metadata Access policy to grant John access to the media and metadata for all Support calls in the system, allowing him to freely search and replay Support calls as required. | |
Access Control | Media Playback and Metadata Access | Create a Media Playback and Metadata Access policy to grant Gene access to the media and metadata of all calls made by anyone on a specified list, allowing him to freely search and replay those calls as required. | |
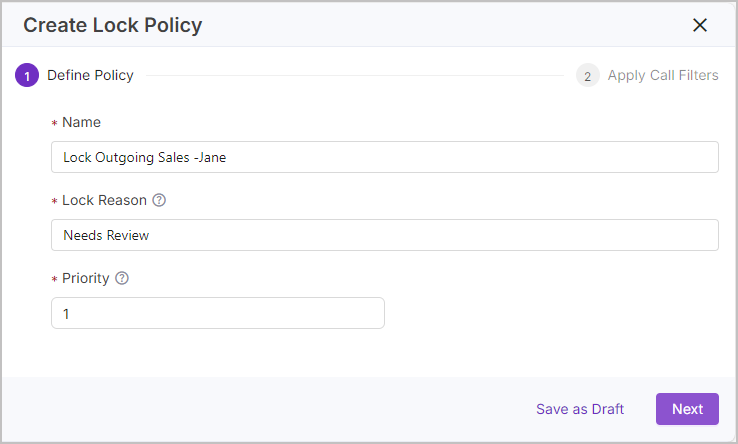
Locks | Locks | Create a Locks policy to ensure that all new outgoing Sales calls, apart from Jane's calls, can not be automatically deleted by a Purge policy. |
Blocklist Policy Example
The below demonstrates how to create a Blocklist policy. Unlike the steps detailed in Manage Policies, these steps detail a specific use case intended to ensure calls for the user with the email "john.doe@writerexample.com" are discarded and therefore not made available. As this is a Blocklist, all other calls are retained.
Tip
The example uses the Agent Email metadata field to filter calls against. However, Filters can use all kinds of metadata fields and can be as complex as needed. Policy Examples provides various examples of Filters, but to understand the mechanics behind the Filters feature, see Create a Calls Filter.
Discard John's Calls
Go to Configurations > Configure (under Communication Recording Agent) > Policies > Recording.
Click +Create and select Blocklist Policy.
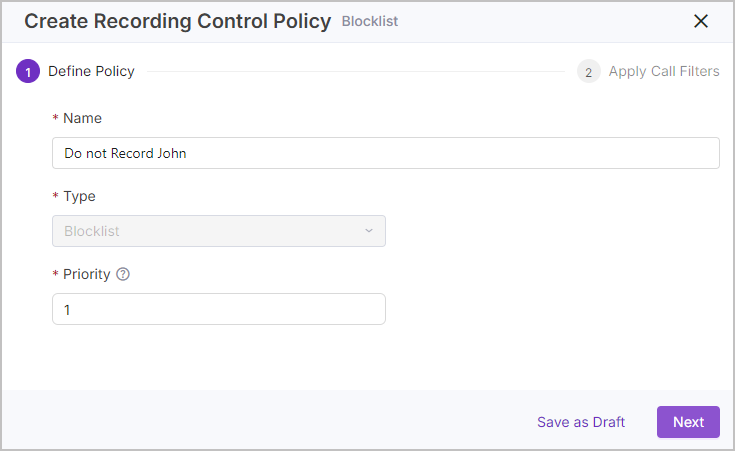
Enter a useful Name for the policy. We're using "Do Not Record John" as the Name.
Set the Priority of the policy. We're going with "1" so that the policy is the priority.
Click Next.
Now apply a filter to the policy. To add John to the filter, we need to use something unique to him. We could use his extension, agent ID, first and last name, or his email. In this example, we use his email.
As mentioned above, complex filters can be set up to match the exact calls you want the policy to apply to.
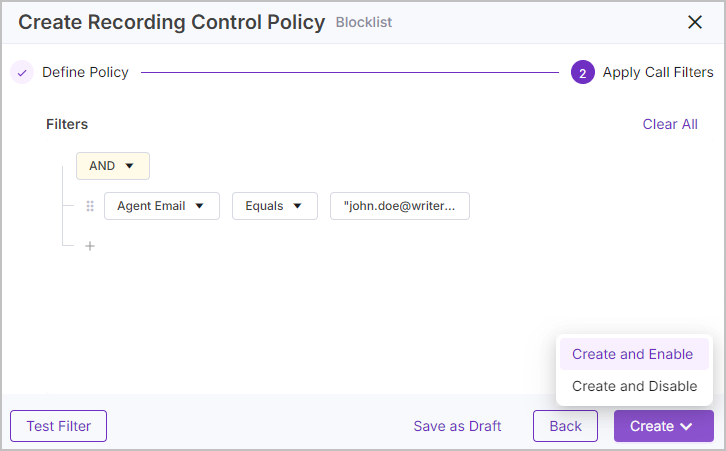
Under Filters, click + and select Add Filter.
Click the Select a Column dropdown and click Agent Email from the metadata field list.
Click the Select an Option dropdown and click Equals.
Under Enter a Value, enter the email address john.doe@writerexample.com and press Enter.
Click Test Filter to see which calls this filter would apply to. In this example, you would see a list of John's calls.
When you've confirmed the Policy and Filter, click Create and select Create and Enable. You can click Create and Disable to create the policy, but not enable the policy (you can always enable the policy later).
Now that the policy is created, you can find it in Configurations > Configure (under Communication Recording Agent) > Policies > Recording.
Allowlist Policy Example
The below demonstrates how to create an Allowlist policy. Unlike the steps detailed in Manage Policies, these steps detail a specific use case intended of ensure calls for the Sales team are captured and therefore made available. As this is an Allowlist, all other calls are discarded.
Tip
The example uses the Department metadata field to filter calls against. However, Filters can use all kinds of metadata fields and can be as complex as needed. Policy Examples provides various examples of Filters, but to understand the mechanics behind the Filters feature, see Create a Calls Filter.
Capture Sales Calls
Go to Configurations > Configure (under Communication Recording Agent) > Policies > Recording.
Click +Create and select Allowlist Policy.
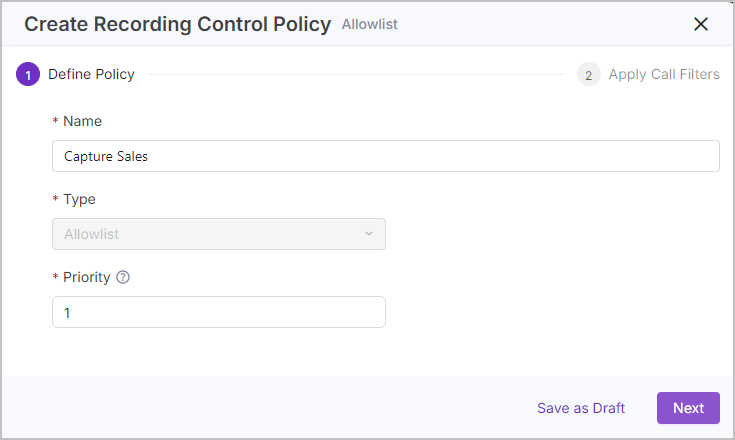
Enter a useful Name for the policy. We're using "Capture Sales" as the Name.
Set the Priority of the policy, we're going with "1" so that the policy is the priority.
Click Next.
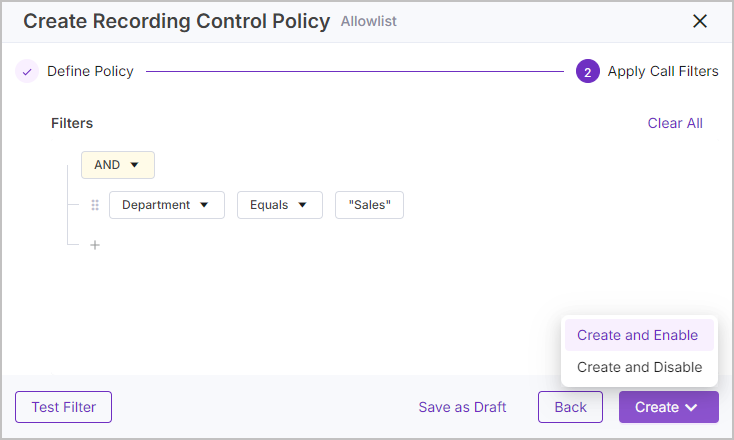
Now apply a filter to the policy. To add the Sales team to the filter, we need to use a metadata field that all Sales calls have matching values for and is unique to that team. Our captured calls from the Sales team all have the metadata field "Department" with the value "Sales".
Other instances may have the metadata field "Group" populated. You can test your filter using Test Filter to make sure the policy applies to the desired calls, or review your recorded calls in Conversations > Recorded to see exactly what metadata fields are populated for each call.
As mentioned above, complex filters can be set up to match the exact calls that you want the policy to apply.
Under Filters, click the + and select Add Filter.
Click the Select a Column dropdown and click Department from the metadata field list.
Click the Select an Option dropdown and click Equals.
Under Enter a Value, enter the Department metadata field value of the Sales team's calls, "Sales", and press Enter.
Click Test Filter to see which calls this filter would apply to. In this example, you would see a list of sales calls.
When you've confirmed the Policy and Filter, click Create and select Create and Enable. You can click Create and Disable to create the policy, but not enable the policy (you can always enable the policy later on).
Now that the policy is created, you can find it in Configurations > Configure (under Communication Recording Agent) > Policies > Recording.
Purge Policy Example
The below demonstrates how to create a Purge policy. Unlike the steps detailed in Manage Policies these steps detail a specific use case intended to automatically delete outgoing calls five years after they were recorded, and have this policy run every day.
Tip
The below uses the Call Direction metadata field to filter calls against. However, Filters can use all kinds of metadata fields and can be as complex as needed. Policy Examples provides various examples of Filters, but to understand the mechanics behind the Filters feature, see Create a Calls Filter.
Delete 5 Year Old Outgoing Calls
Go to Configurations > Configure (under Communication Recording Agent) > Policies > Storage.
Click +Create and select Purge Storage Policy.
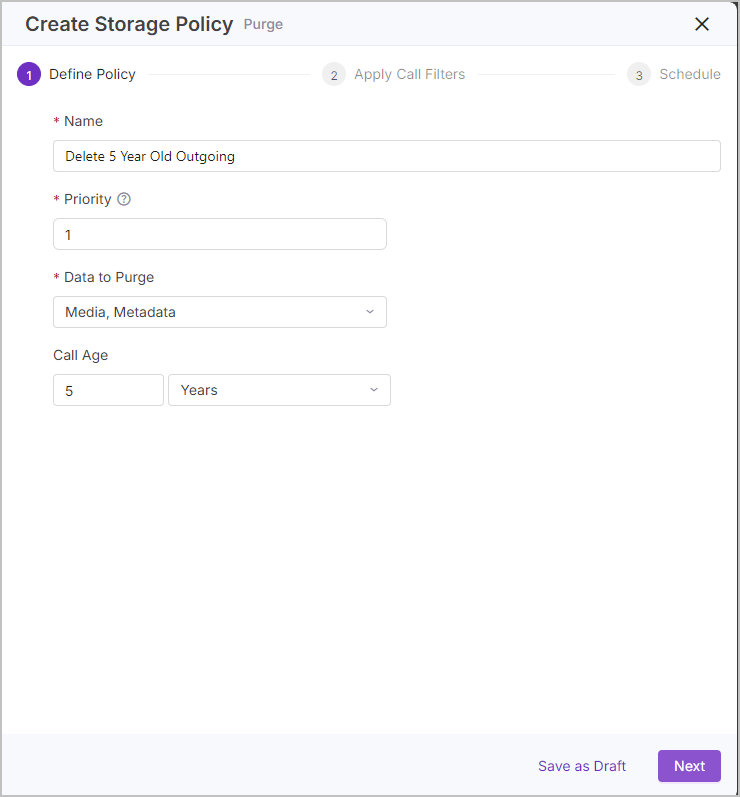
Enter a useful Name for the policy. We're using "Delete 5yr Outgoing" as the Name.
Set the Priority of the policy. We're going with "1" so that the policy is the priority.
Under Data to Purge, select if the media and the metadata of the call should be deleted, or just the media. We're selecting media, metadata from the dropdown to remove all data associated with the calls.
Under Call Age, determine how old the calls should be before the policy is applied to them. Set a value and a unit. We're using "5" and selecting Years from the dropdown.
Click Next.
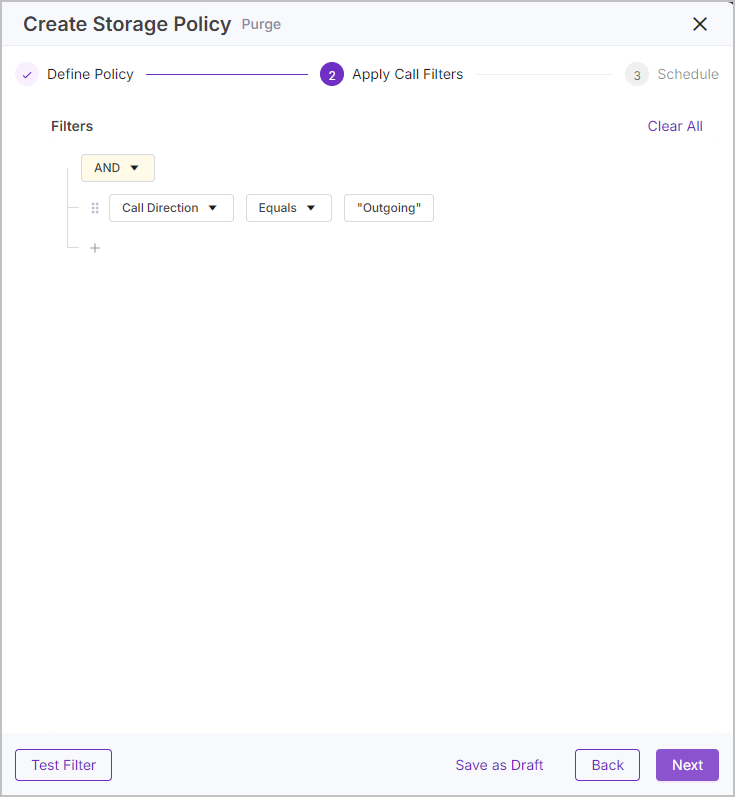
Now apply a filter to the policy. To make sure only outgoing calls are deleted, we're using the Call Direction metadata field. However, as mentioned above, Filters can be as complex as needed so that the policy is applied to the exact calls you want it to.
Click the Select a Column dropdown and click Call Direction from the metadata field list.
Click the Select an Option dropdown and click Equals.
Under Enter a Value, enter the direction of the calls to delete after 5 years, "Outgoing", and press Enter.
Click Test Filter to see which calls this filter would apply to. In this example, you would see a list of outgoing calls.
Click Next.
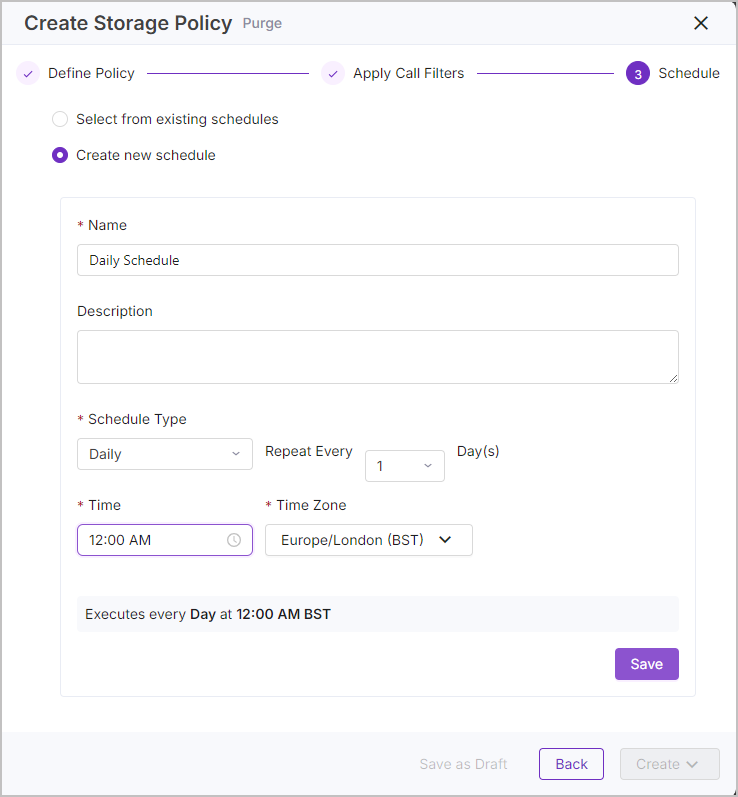
Now choose a Schedule to determine how often the policy is run. In this example, we want the policy to run every day to make sure outgoing calls aren't retained for longer than 5 years. As we don't yet have a daily schedule, we want to create a new one when we create the policy:
Select Create new schedule.
Enter a useful Name for the schedule, we're using "Daily Schedule".
Enter a useful Description for the Schedule. Our schedule is pretty simple, so we're leaving it blank.
Select the Schedule Type from the dropdown to determine the units of time for the schedule. We're using Daily.
Use Repeat Every to determine how often the schedule triggers. In our case, how many days the schedule repeats and activates the purge policy, we're going with the default "1".
Select the Time and Time Zone to determine the exact time the schedule triggers the policy. We're selecting "12:00 AM" and "Europe/London (BST)".
Click Save to create the new Schedule.
When you've confirmed the Policy, Filter, and Schedule, click Create and select Create and Enable. You can click Create and Disable to create the policy, but not enable the policy (you can always enable the policy later on).
Now that the policy is created, you can find it in Configurations > Configure (under Communication Recording Agent) > Policies > Storage.
Move Media Policy Example
The below demonstrates how to create a Move Media Policy. Unlike the steps detailed in Manage Policies, these steps detail a specific use case intended to automatically move the media of the Support team's calls 90 days after they were recorded, and run this policy every 12 hours.
Tip
The below uses the Department metadata field to filter calls against. However, Filters can use all kinds of metadata fields and can be as complex as needed. Policy Examples provides various examples of Filters, but to understand the mechanics behind the Filters feature, see Create a Calls Filter.
Move Support Call Media After 90 Days
Go to Configurations > Configure (under Communication Recording Agent) > Policies > Storage.
Click +Create and select Move Media Storage Policy.
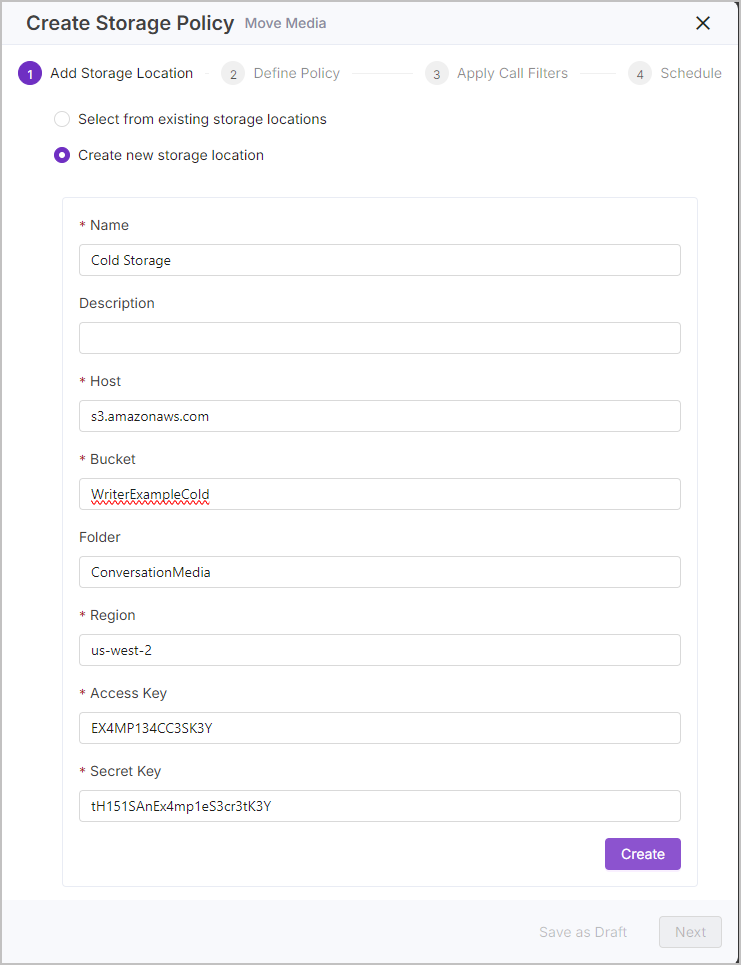
Add a Storage Location to move the call media to. As we don't have a cold storage location added yet, we're creating one in the Create Storage Policy page:
Select Create new storage location.
Enter a useful Name for the storage location. As we're creating a storage location for cold storage, we're calling it "Cold Storage".
Enter a useful Description for the storage location. We're leaving this blank.
Enter the Host address for the storage location. We're using "s3.amazonaws.com".
Enter the Bucket for your storage location. We're using "WriterExampleCold".
Enter a Folder name for inside the storage location where you want the call media to be stored. We're using "ConversationMedia".
Enter the Region of your storage location. set to the Regional endpoint of the AWS instance (for a list of valid entries, see Amazon’s documentation on Regional endpoints). We're using "us-west-2".
Enter your Access Key and Secret Key for accessing the S3 bucket.
Confirm the storage location details and click Create.
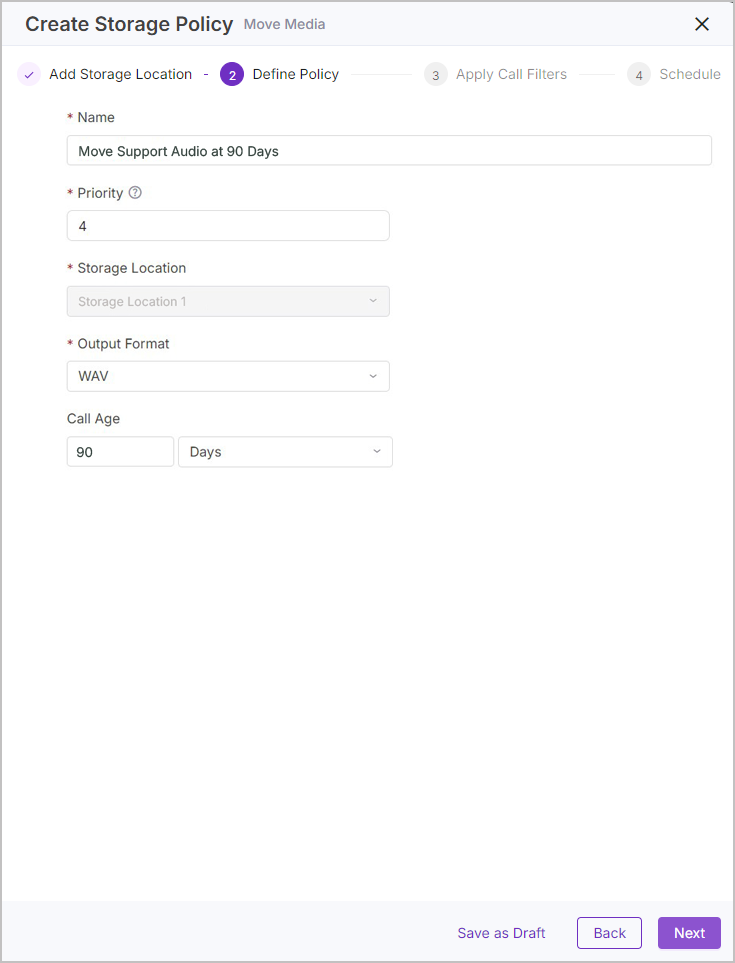
In the Define Policy step, set details for the policy and how the policy works:
Enter a useful Name for the policy. We're using "Move Support Audio at 90 Days".
Set the Priority of the policy, we're going with priority "4".
Select which format you would like the media to be in when it reaches the storage location using the Output Format dropdown. We're selecting "WAV".
Use Call Age to determine how old the calls should be before the policy is applied by entering an amount of either Days, Weeks, or Years. We're setting the value to "90" and the unit to "Days".
When ready, click Next to move to the Filters page.
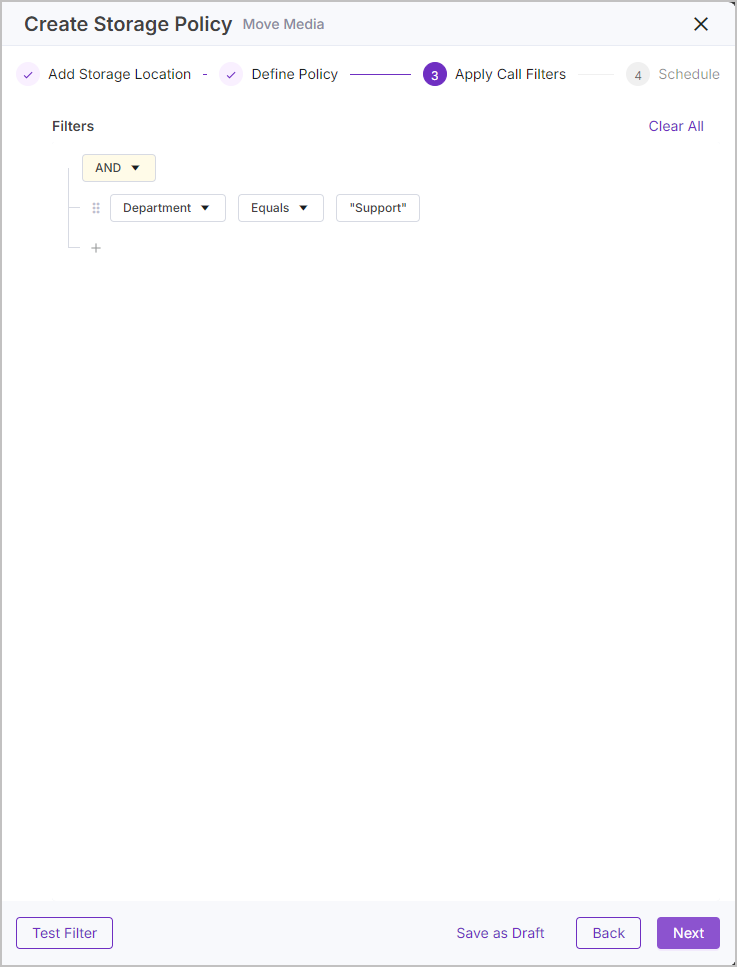
Now apply a calls filter to the policy, to add the Support team to the filter we need to use a metadata field that all the support calls have matching values for and is unique to that team, our captured calls from the Support team all have the metadata field "Department" with the value "Support".
Other instances may have the metadata field "Group" populated. You test your filter using Test Filter to make sure the policy applies to the desired calls, or review your recorded calls in Conversations > Recorded to see exactly what metadata fields are populated for each call.
The Call Age set in the previous step determines that the policy only applies to calls once they reach an age of 90 days.
As mentioned above, complex filters can be set up to match the exact calls you want the policy to apply to.
Under Filters, click the + and select Add Filter.
Click the Select a Column dropdown and click Department from the metadata field list.
Click the Select an Option dropdown and click Equals.
Under Enter a Value, enter the Department metadata field value of the Support team's calls, "Support", and press Enter.
Click Test Filter to see which calls this filter would apply to. In this example, you would see a list of Support calls.
Click Next.
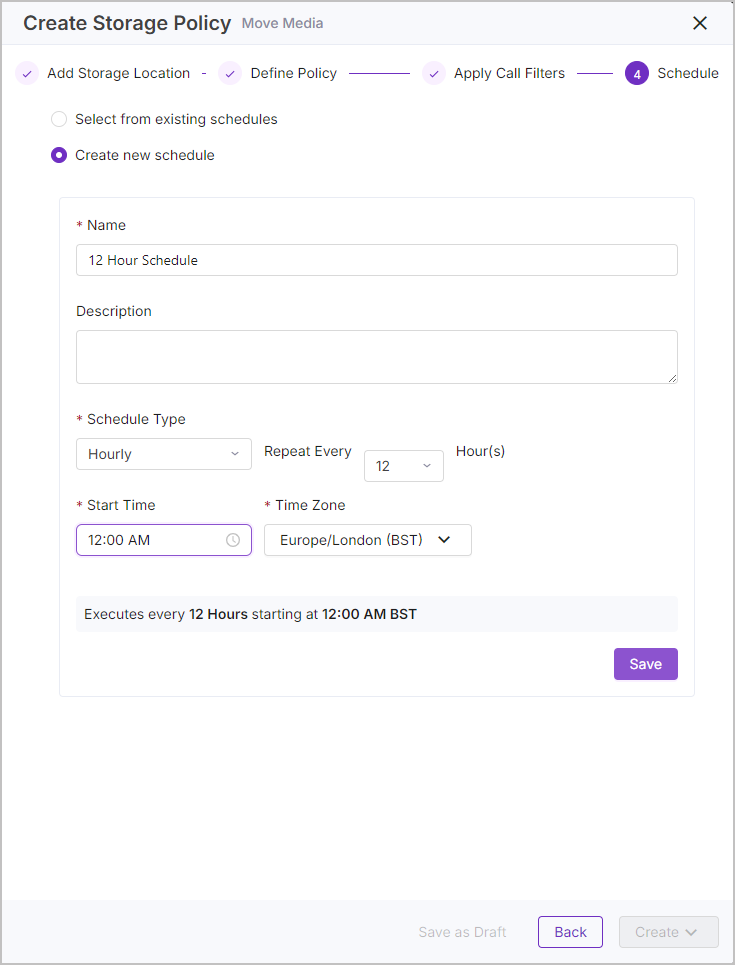
Now choose a Schedule to determine how often the policy is run. In this example, we want the policy to run every 12 hours, as we don't yet have a suitable schedule, we want to create a new one when we create the policy:
Select Create new schedule.
Enter a useful Name for the schedule. We're using "12 Hour Schedule".
Enter a useful Description for the Schedule. Our schedule is pretty simple, so we're leaving it blank.
Select the Schedule Type from the dropdown to determine the units of time for the schedule. We're using Hourly.
Use Repeat Every to determine how often the schedule triggers. In our case, how many hours the schedule repeats and activates the Move Media policy, we're going with "12".
Select the Time and Time Zone to determine the exact time the schedule triggers the policy. We're selecting "12:00 AM" and "Europe/London (BST)".
Click Save to create the new Schedule.
When you've confirmed the Policy, Filter, and Schedule, click Create and select Create and Enable. You can click Create and Disable to create the policy, but not enable the policy (you can always enable the policy later on).
Now that the policy is created, you can find it in Configurations > Configure (under Communication Recording Agent) > Policies > Storage.
Archive Metadata Policy Example
The below demonstrates how to create an Archive Metadata Policy. Unlike the steps detailed in Manage Policies, these steps detail a specific use case intended to automatically archive the metadata of the calls for two specific people in the Sales team (Jane and Tom) to cold storage, 2 years after the calls took place, and run this policy every first Friday of the month, in the evening when the system is under the least load.
Tip
The below uses the Department metadata field as well as Agent First Name to filter calls against. However, Filters can use all kinds of metadata fields and can be as complex as needed. Policy Examples provides various examples of Filters, but to understand the mechanics behind the Filters feature, see Create a Calls Filter.
Archive Call Metadata for Jane and Tom (From Sales) After 2 Years, on the First Friday Evening of every Month
Go to Configurations > Configure (under Communication Recording Agent) > Policies > Storage.
Click +Create and select Archive Metadata Storage Policy.
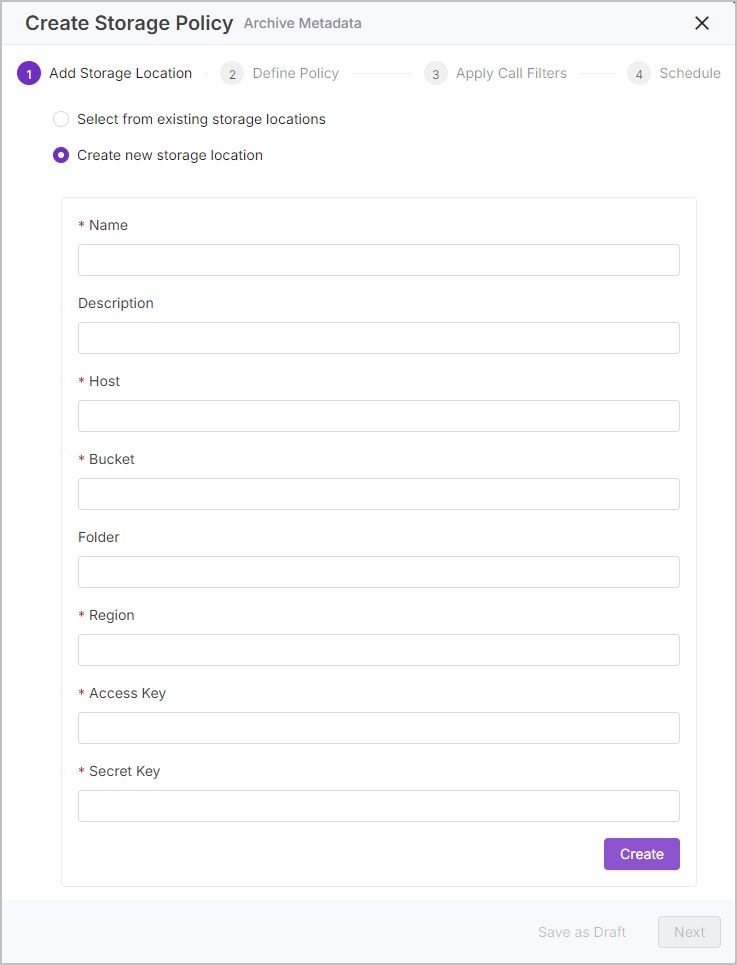
Add a Storage Location to move the call metadata to. As we don't have a cold storage location for metadata added yet, we're creating one in the Create Storage Policy page:
Select Create new storage location.
Enter a useful Name for the storage location. As we're creating a storage location for cold storage, we're calling it "Cold Storage Metadata".
Enter a useful Description for the storage location. We're leaving this blank.
Enter the Host address for the storage location. We're using "s3.amazonaws.com".
Enter the Bucket for your storage location. We're using "WriterExampleCold".
Enter a Folder name for inside the storage location where you want the call media to be stored. We're using "ConversationMetadata".
Enter the Region of your storage location. Set to the Regional endpoint of the AWS instance (for a list of valid entries, see Amazon’s documentation on Regional endpoints). We're using "us-west-2".
Enter your Access Key and Secret Key for accessing the S3 bucket.
Confirm the storage location details and click Create.
In the Define Policy step, set details for the policy and how the policy works:
Enter a useful Name for the policy. We're using "Archive Jane and Tom Sales at 2yrs".
Set the Priority of the policy. We're going with priority "4".
Select which format you would like the metadata to be in when it reaches the storage location using the Output Format dropdown. We're selecting "CSV".
Use Call Age to determine how old the calls should be before the policy is applied by entering an amount of either Days, Weeks, or Years. We're setting the value to "2" and the unit to "Years".
When ready, click Next to move to the Filters page.
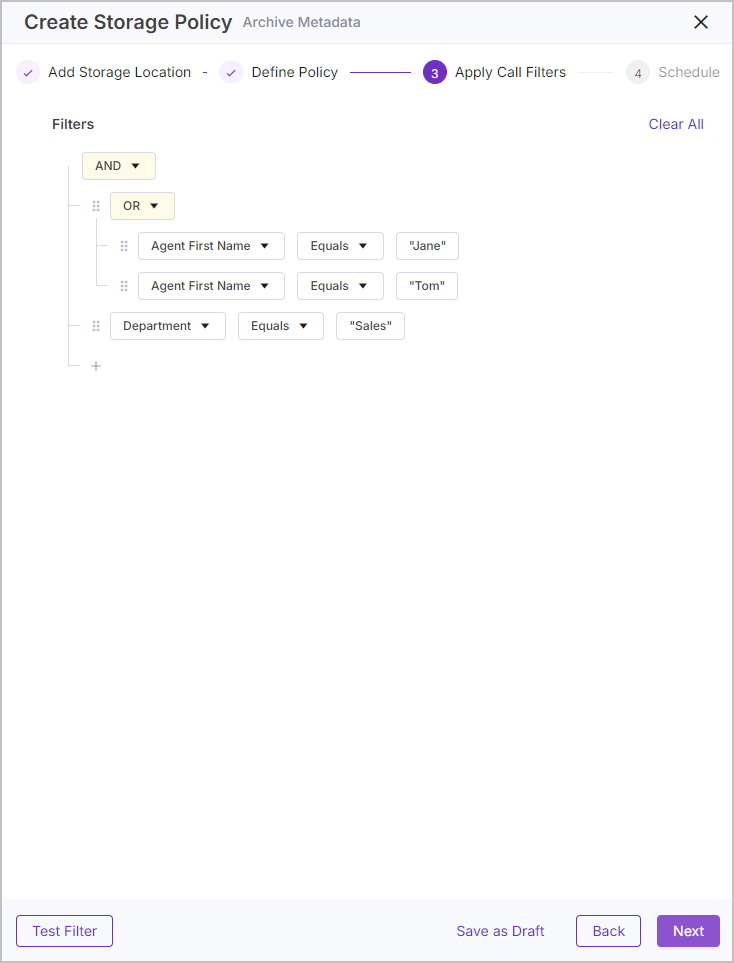
Apply a Filter to the policy. We need the filter to find calls for either Jane or Tom in the Sales team. To do this, we can use the default AND group to specify the Sales team, and the OR group to specify either Jane's or Tom's calls:
The below uses the Department metadata field to identify the Sales team however other instances may have the metadata field "Group" populated, you can test your filter using Test Filter to make sure the policy applies to the desired calls, or review your recorded calls in Conversations > Recorded to see exactly what metadata fields are populated for each call.
As mentioned above, complex filters can be set up to match the exact calls you want the policy to apply.
Under Filters, click + and select Add Group. This will automatically add a new AND group. Click the new AND group dropdown and select OR. This is where we add Jane and Tom, as the filter wants to find calls for both people.
Hover over the OR dropdown, the + icon will show on the right. Click + and select Add Filter.
Click the Select a Column dropdown and click Agent First Name from the metadata field list.
Click the Select an Option dropdown and click Equals.
Under Enter a Value, enter the Agent's First Name metadata field value for Jane's calls, "Jane", and press Enter. All agents with the first name" Jane" are now added to the filter.
Again, hover over the OR dropdown and the + icon will show on the right. Click + and select Add Filter.
Again, click the Select a Column dropdown and click Agent First Name from the metadata field list.
Again, click the Select an Option dropdown and click Equals.
Under Enter a Value, enter the Agent's First Name metadata field value for Tom's calls, "Tom", and press Enter. All agents with the first name "Tom" are now added to the filter.
Click + at the bottom of the filter and click Add Filter. This will flow under the AND group at the top of the filter. We're ensuring that only Jane and Tom from the Sales team are found with the filter and not all agents called Jane or Tom.
Click the Select a Column dropdown and click Department from the metadata field list.
Click the Select an Option dropdown and click Equals.
Under Enter a Value, enter the Department metadata field value of the Sales team's calls, "Sales", and press Enter.
Click Test Filter to see which calls this filter would apply. In this example, you would see a list of Sales calls for Jane and Tom.
When you've confirmed the Filter, click Next.
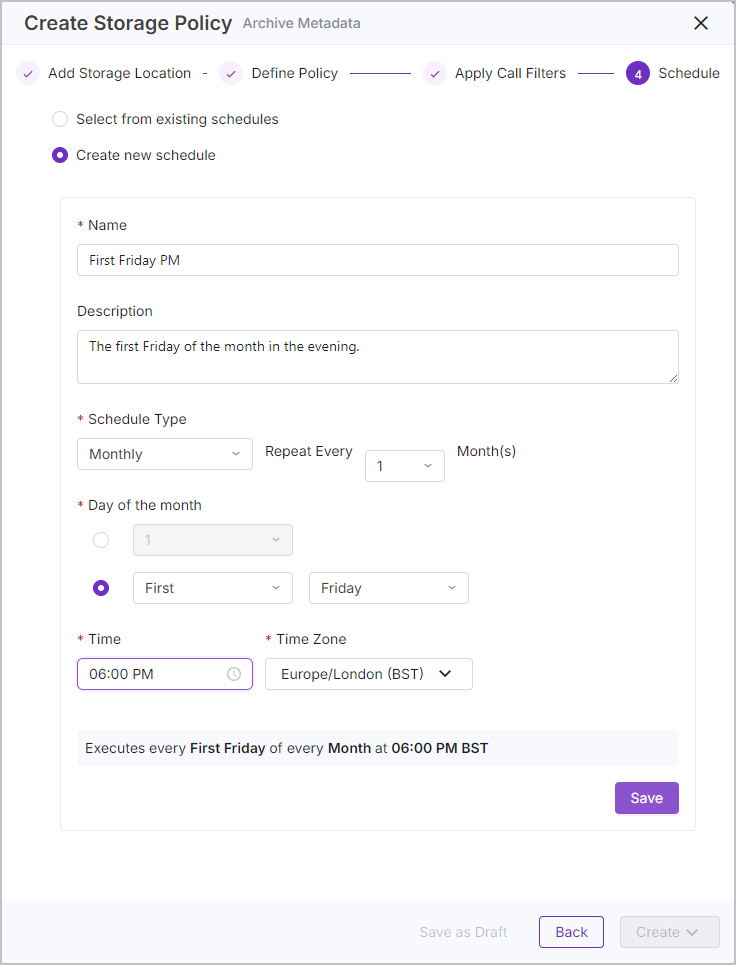
Now choose a Schedule to determine how often the policy is run. In this example, we want the policy to run on the first Friday evening of every month. As we don't yet have a suitable schedule, we want to create a new one when we create the policy:
Select Create new schedule.
Enter a useful Name for the schedule. We're using "First Friday PM".
Enter a useful Description for the Schedule. We're using "The first Friday of the month in the evening".
Select the Schedule Type from the dropdown to determine the units of time for the schedule. We're using Monthly, this adds some extra options to select the Day of the Month:
Use Repeat Every to determine how often the schedule will trigger. In our case, how many Months the schedule will repeat and activate the Archive Metadata policy, we're going with "1" for every month.
Under Day of the Month, select either a specific date or choose a day of the month using weekdays. As we want the policy to run on the first Friday of the month, select the second option. Then select First from the Left dropdown, and select Friday from the right dropdown.
Select the Time and Time Zone to determine the exact time the schedule will trigger the policy. We're selecting "06:00" and PM, clicking OK, and then selecting"Europe/London (BST)".
Click Save to create the new Schedule.
When you've confirmed the Policy, Filter, and Schedule, click Create and select Create and Enable. You can click Create and Disable to create the policy, but not enable the policy (you can always enable the policy later on).
Now that the policy is created, you can find it in Configurations > Configure (under Communication Recording Agent) > Policies > Storage.
Retention Policy Example
The below demonstrates how to create a Retention Policy. Unlike the steps detailed in Manage Policies, these steps are specific to a use case that automatically locks Darren from the legal team's calls for three years, then automatically unlocks and deletes them from the system.
A video has been created to demonstrate the steps to create a new Retention Policy, see Retention Policy Demo below.
Tip
The example below:
Uses the Department metadata field as well as Agent First Name to filter calls against. However, Filters can use different metadata fields and can be as complex as needed. Policy Examples provides various examples of Filters, but to understand the mechanics behind the Filters feature, see Create a Calls Filter.
Performs a Purge at the end of the set retention period, meaning that calls locked by this example policy are unlocked and then deleted from the system. Retention Policies can instead be configured to Move impacted calls or unlock them and then perform No Action. For more information, see Manage Storage Policies.
Retain Darren from the Legal Team's Calls for Three Years, then Purge them from the system.
Go to Configurations > Configure (under Communication Recording Agent) > Policies > Storage.
Click + Create and select Retention Policy.
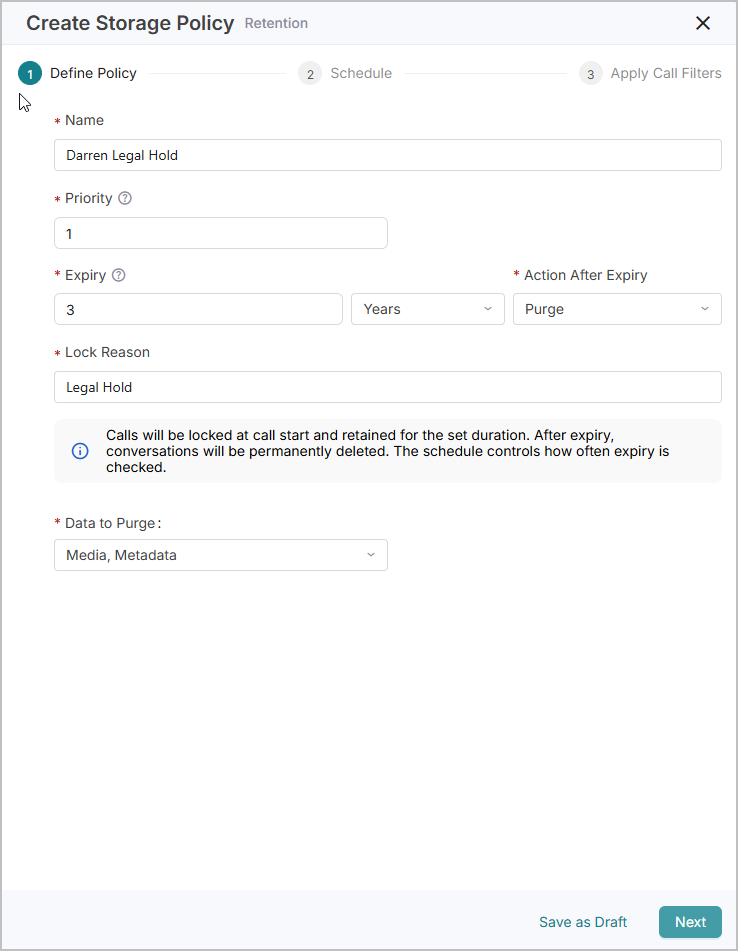
Enter a useful Name for your policy. We're naming the policy "Darren Legal Hold".
Choose the Priority of the policy (the order in which the policies are run), 1 being first priority, then 2 being second priority, and so on. We're going with "1".
Set the Expiry for the policy (conversations matching the filter are retention-locked until the expiry period has passed). Enter a value in the expiry dialog box and select a unit of time from the expiry dropdown. We're entering "3" and selecting "Years". So that the conversations are locked for three years.
Determine the action to perform on the conversations once the expiry time is reached using the Action After Expiry dropdown. We're selecting "Purge" where the conversations are unlocked and then purged (deleted) from the system. Deleted conversations can not be recovered. Selecting Purge enables the "Data to Purge" setting, which we'll set later.
Enter a Lock Reason so that anyone viewing the locked call can see why the call is locked. We're entering "Legal Hold".
Select which data to remove from the system using the Data to Purge dropdown. We're selecting "Media, Metadata" to fully remove the conversation from the system.
Click Next.
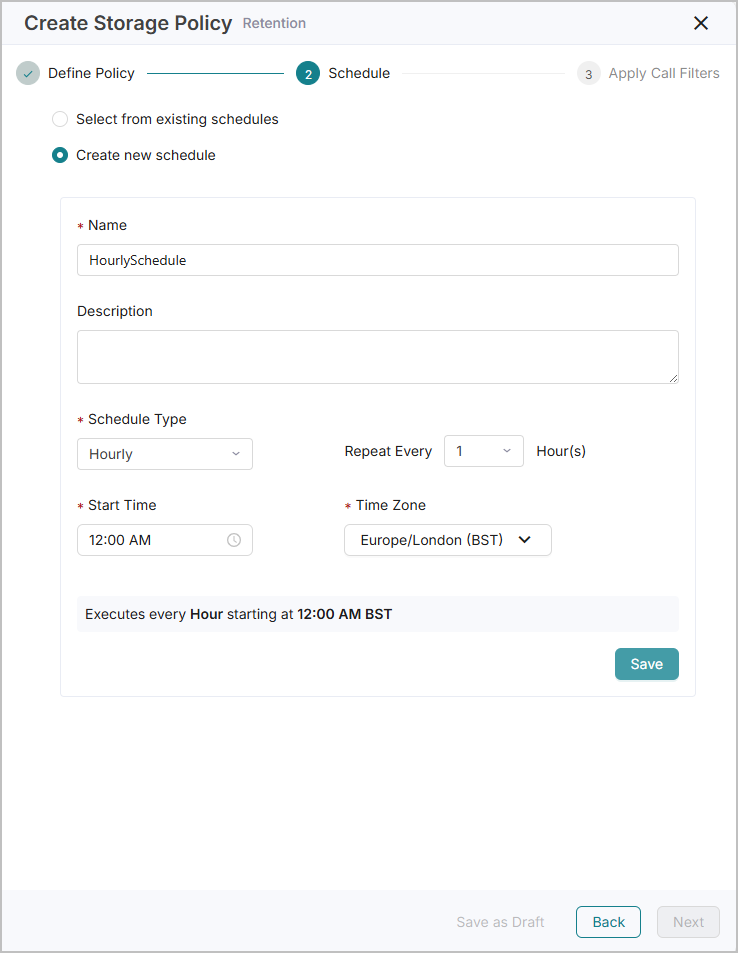
Determine when and how often the policy is applied. Choose either an existing schedule from the Select from existing schedules dropdown, or select Create new schedule and set up a new schedule for the policy to use. For more information on schedules, see Manage Schedules. We're going to create a new Schedule:
Select Create new schedule.
Enter a useful Name for the schedule. We're using "HourlySchedule".
Enter a useful Description for the Schedule. Our schedule is pretty simple, so we're leaving it blank.
Select the Schedule Type from the dropdown to determine the units of time for the schedule. We're using Hourly.
Use Repeat Every to determine how often the schedule triggers. In our case, how many hours the schedule repeats and activates the Move Media policy, we're going with "1".
Select the Time and Time Zone to determine the exact time the schedule triggers the policy. We're selecting "12:00 AM" and "Europe/London (BST)".
Click Save to create the new Schedule.
Click Next.
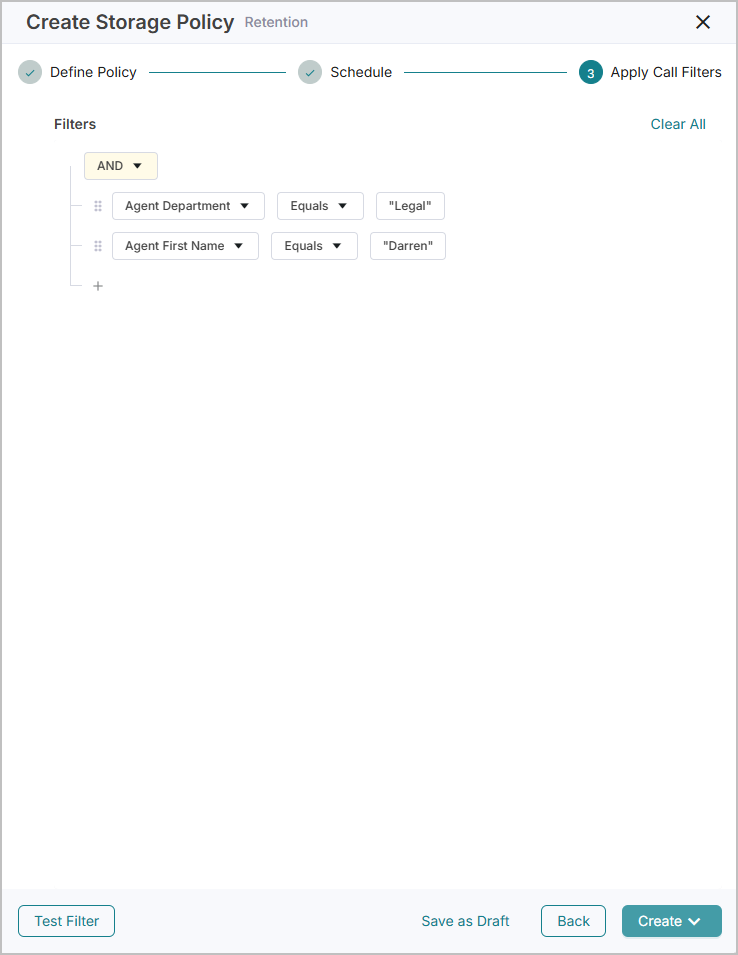
Create a Calls Filter – Add one or more metadata filters. These are used to define which recordings the policy applies to. See Create a Calls Filter for more information on Calls Filters. We're creating a filter to apply to Darren from the Legal team's calls:
Note that the AND dropdown is the default filter type. This is suitable for our requirements because we want the calls to be from the legal team and by an agent called Darren.
Click the + and select Add Filter.
Click on the Select a Column dropdown and click Department from the metadata field list. Depending on the metadata populated by your integration, the required metadata field may differ.
Click on the Select an Option dropdown and click Equals.
Under Enter a Value, enter the department metadata field value of the agents from the legal team, in your case "Legal", and press Enter.
Click the + and select Add Filter.
Click on the Select a Column dropdown and click Agent First Name from the metadata field list.
Click on the Select an Option dropdown and click Equals.
Under Enter a Value, enter the agent's name, in our case, "Darren".
Click Test Filter to confirm that the filters apply to the correct calls. Using the filter we've set, we should see a list of Darren from the legal team's calls.
When you're ready, click Create and select if you want the policy enabled (Create and Enable) or disabled (Create and Disable), where you can enable or disable it later if needed. We're choosing "Create and Enable".
Now that the policy is created, you can find it in Configurations > Configure (under Communication Recording Agent) > Policies > Storage.
The following video demonstrates how to add a new Retention Policy:
Transcription Policy Example
The below demonstrates how to create a Transcription Policy. Unlike the steps detailed in Manage Policies, these steps detail a specific use intended to automatically transcribe all Sales team calls, all incoming Support team calls, and have the transcriptions sent to a new endpoint post-call.
Tip
The below uses the Department metadata field as well as Call Direction to filter calls against. However, Filters can be made using all kinds of metadata fields and can be as complex as needed. Policy Examples provides various examples of Filters, but to understand the mechanics behind the Filters feature, see Create a Calls Filter.
Transcribe All Sales and All Incoming Support Calls
Go to Configurations > Configure (under Communication Recording Agent) > Policies > Transcription.
Click +Create.
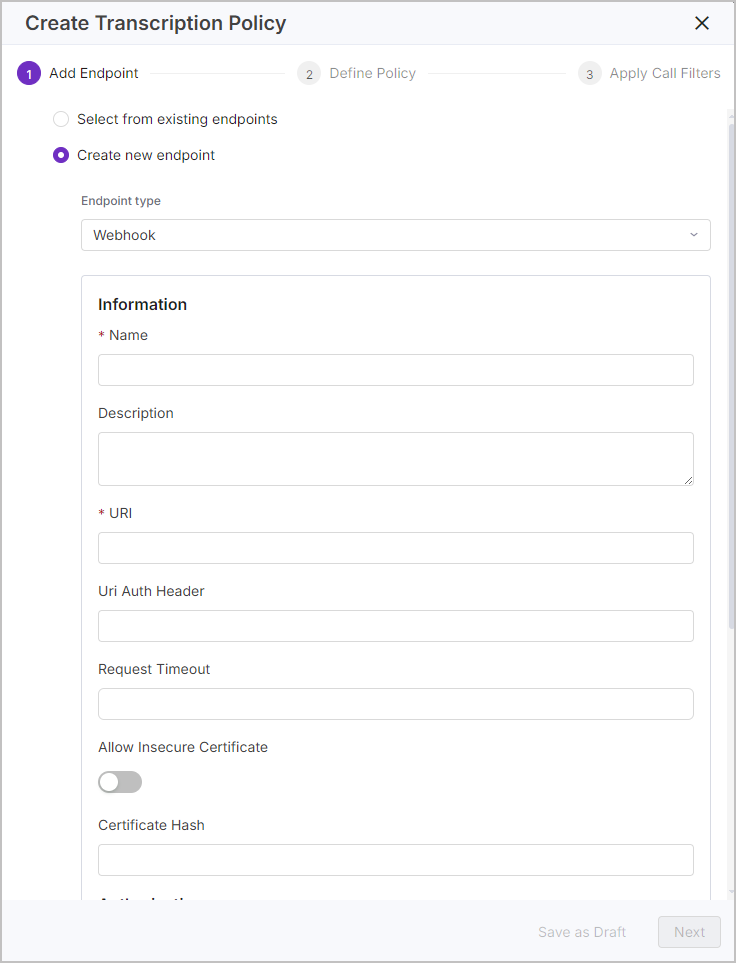
Add an Endpoint to send the call transcriptions to. As we don't have an Endpoint for transcriptions set up yet, we're creating one in the Create Transcription Policy page:
Select Create new endpoint.
Under Information, enter a useful Name for the Endpoint, we're going with "Post-Call Transcriptions Endpoint".
Enter a useful Description if needed. We're leaving it blank.
Under URI, enter the address of the Webhook to export the transcriptions to.
Under Uri Auth Header, enter the authorization header to use during the export.
Under Request Timeout, enter the number of seconds allowed for exporting content, after which the export will fail. This is only taken into account after an initial export fails. The default is 100 seconds if not set. The default works for our purposes, so we're not entering a value here.
Under Allow Insecure Certification, determine the required certificate security during exports to this Endpoint. We want to ensure certification is secure, so we're leaving this toggle off (meaning "do not allow insecure certification").
Under Certificate Hash, enter the hash of the certificate that allows exports to this Endpoint.
Under Authorization, determine if Authorization is enabled or disabled using the toggle. We want to enable Authorization, so we need to set the toggle to enabled and then configure the subsequent settings to obtain an access token for exporting to the Endpoint.
Choose the Grant Type for the authorization. We're using Bearer Token.
Enter the Client ID used to obtain an access token for the export.
As we're using a Bearer Token as the Grant Type, under Token, enter the token for the authorization.
When you've confirmed Endpoint settings, click Create.
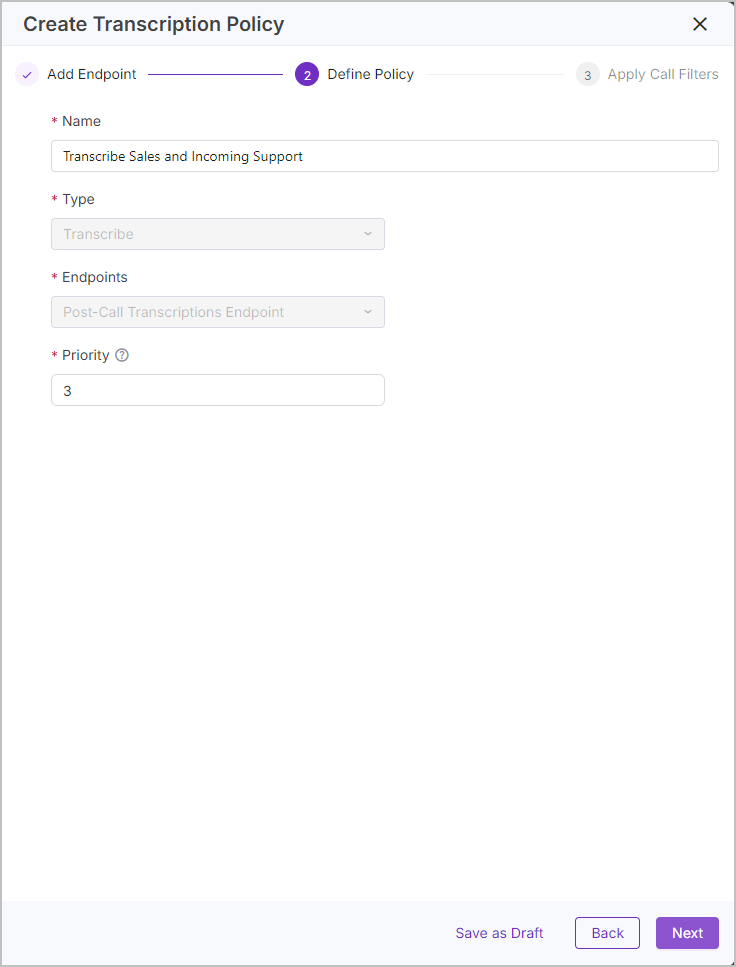
In the Define Policy step, enter a useful Name for the policy. We're calling the policy "Transcribe Sales and Incoming Support".
Set the Priority for the policy. We're setting Priority to "3".
Click Next.
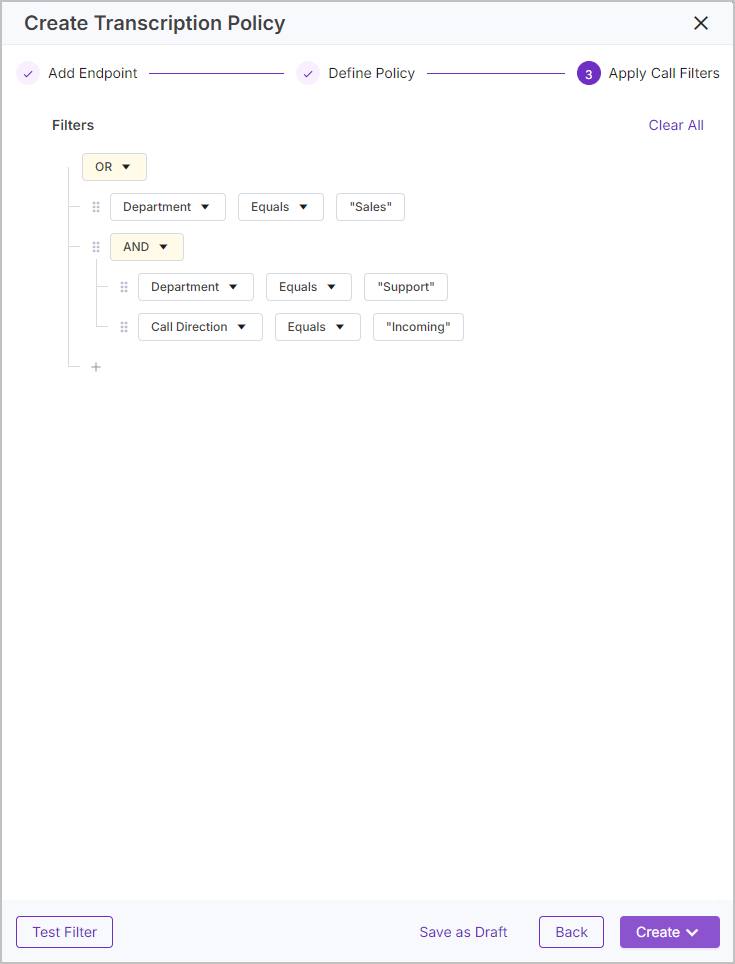
Apply a filter to the policy, we need the policy to transcribe all sales calls and all incoming support calls:
The below uses the Department metadata field to identify the Sales and support teams however other instances may have the metadata field "Group" populated, you can test your filter using Test Filter to make sure the policy will apply to the desired calls, or review your recorded calls in Conversations > Recorded to see exactly what metadata fields are populated for each call.
As mentioned above, complex filters can be set up to match the exact calls you want the policy to apply.
As we want to transcribe both sales calls and incoming support calls, we need to use the OR group. Click the AND dropdown and select OR.
Click the + and select Add Filter.
Click on the Select a Column dropdown and click Department from the metadata field list.
Click on the Select an Option dropdown and click Equals.
Under Enter a Value, enter the Department metadata field value of the Sales team's calls, "Sales", and press Enter.
Click the + and select Add Group. We want to keep this group as AND because under this group, we want to filter for calls that are both Support calls and Incoming calls (incoming calls for the Support team).
Hover over the AND dropdown to show the + icon. Click + and select Add Filter.
Click on the Select a Column dropdown and click Department from the metadata field list.
Click on the Select an Option dropdown and click Equals.
Under Enter a Value, enter the Department metadata field value of the Support team's calls, "Support", and press Enter.
Again, hover over the AND dropdown and the + icon will show on the right, click the + and select Add Filter.
Click on the Select a Column dropdown and click Call Direction from the metadata field list.
Click on the Select an Option dropdown and click Equals.
Under Enter a Value, enter the Call Direction metadata field value of the incoming calls, "Incoming", and press Enter.
Click Test Filter to see which calls this filter would apply to. In this example, you would see a list of Sales calls, as well as incoming Support calls.
Click Next.
When you've confirmed the Policy and Filter, click Create and select Create and Enable. You can click Create and Disable to create the policy, but not enable the policy (you can enable the policy later on).
Now that the policy is created, you can find it in Configurations > Configure (under Communication Recording Agent) > Policies > Transcription.
Call Push Export Policy Example
The below demonstrates how to create a Call Push Export Policy. Unlike the steps detailed in Manage Policies these steps detail a specific use case intended to automatically export all of Barry from Finance's outgoing calls to a new endpoint post-call.
Tip
The below uses the Agent First Name, Department, and Call Direction metadata fields to filter calls against. However, Filters can use all kinds of metadata fields and can be as complex as needed. Policy Examples provides various examples of Filters, but to understand the mechanics behind the Filters feature, see Create a Calls Filter.
Automatically Export Barry from Finance's Outgoing Calls
Go to > Configurations > Configure (under Communication Recording Agent) > Policies > Export.
Click +Create and choose Call Push Export Policy.
Add an Endpoint to send the calls to, as we don't have an Endpoint for finance calls set up yet. We're creating one in the Create Export Policy page:
Select Create new endpoint.
Under Endpoint type, select Webhook from the dropdown menu.
Under Information, enter a useful Name for the Endpoint. We're going with "Finance Calls Endpoint".
Enter a useful Description if needed. We're leaving it blank.
Under URI, enter the address of the Webhook to export the calls to.
Under Uri Auth Header, enter the authorization header to use during the export.
Under Request Timeout, enter the number of seconds allowed for exporting content, after which the export will fail. This is only taken into account after an initial export fails. The default is 100 seconds if not set. The default works for our purposes, so we're not entering a value here.
Under Allow Insecure Certification, determine the required certificate security during exports to this Endpoint. We want to ensure certification is secure, so we're leaving this toggle off (meaning "do not allow insecure certification").
Under Certificate Hash, enter the hash of the certificate that allows exports to this Endpoint.
Under Authorization, determine if Authorization is enabled or disabled using the toggle. We want to enable Authorization, so we need to set the toggle to enabled and use the subsequent settings to obtain an access token for exporting to the Endpoint.
Choose the Grant Type for the authorization. We're using Credentials Grant.
Enter the Client ID - The client ID to use to obtain access to the export location.
As we're using a Credentials Grant as the Grant Type, we need to set Scope, Authorization Endpoint, and Client Secret:
Enter the Scope value - The scope used to obtain access to the export location.
Enter the Authorization Endpoint - The address or IP of the Authorization Endpoint to use to obtain access to the export location.
Enter the Client Secret - The client secret to use to obtain access to the export location.
When you've confirmed the Endpoint settings, click Create, and then click Next.
In the Define Policy step:
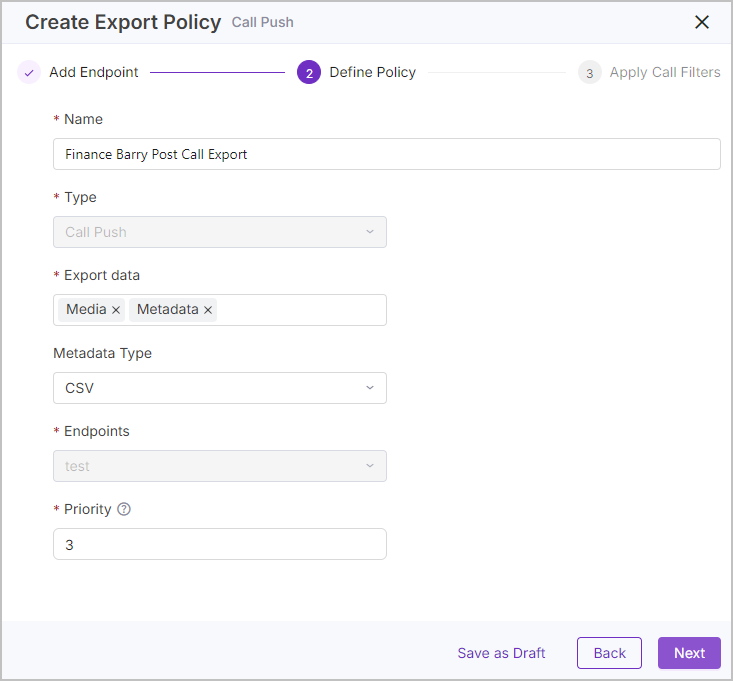
Enter a useful Name for the policy. We're calling the policy "Finance Barry Post Call Export".
Choose the data to send in the export under Export data. Click the dropdown and choose either Media or Metadata, or select both. We're selecting both.
As we plan to include metadata in the export, we're also selecting the format for the metadata under Metadata Type. We're going with CSV, but JSON is also available.
Set the Priority for the policy. We're setting Priority to "3".
When you've confirmed the Policy settings, click Next.
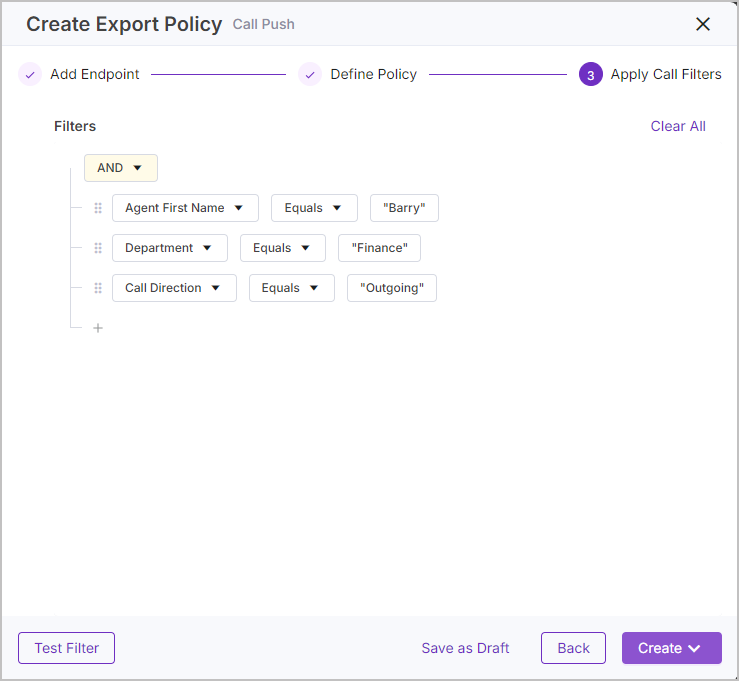
Now apply a filter to the policy. We need the policy to export all of Barry from the Finance team's outgoing calls:
As we want the calls to match three criteria (Name = Barry, department = Finance, and direction = outgoing) we're going to keep the AND at the top of the calls filter and add filters to that AND group.
Click the + and select Add Filter.
Click on the Select a Column dropdown and click Agent First Name from the metadata field list.
Click on the Select an Option dropdown and click Equals.
Under Enter a Value, enter the name of the agent, "Barry", and press Enter.
Click the + and select Add filter.
Click on the Select a Column dropdown and click Department from the metadata field list.
Click on the Select an Option dropdown and click Equals.
Under Enter a Value, enter the department metadata field value that is captured for the finance team's calls, "Finance", and press Enter.
Click the + and select Add filter.
Click on the Select a Column dropdown and click Call Direction from the metadata field list.
Click on the Select an Option dropdown and click Equals.
Under Enter a Value, enter the Call Direction metadata field value that is captured for the outgoing calls, "Outgoing", and press Enter.
Click the Test Filter button to see which calls this filter would apply to. In this example, you would see a list of Barry from the Finance team's outgoing calls.
The above uses the Department metadata field to identify the Finance team however other instances may have the metadata field "Group" populated, you can test your filter using Test Filter to make sure the policy applies to the desired calls, or review your recorded calls in Conversations > Recorded to see exactly what metadata fields are populated for each call.
As mentioned, complex filters can be set up to match the exact calls you want the policy to apply.
When you've confirmed the Policy and Filter, click Create and select Create and Enable. You can click Create and Disable to create the policy but enable the policy active (you can always enable the policy later on).
Now that the policy is created, you can find it in Configurations > Configure (under Communication Recording Agent) > Policies > Export.
Real-Time Audio Export Policy Example
The below demonstrates how to create a Real-Time Audio Export Policy. Unlike the steps detailed in Manage Policies, these steps detail a specific use case intended to automatically export incoming Support calls and incoming Sales calls to a new endpoint in real-time.
Tip
The below uses the Department and Call Direction metadata fields to filter calls against. However, Filters can use all kinds of metadata fields and can be as complex as needed. Policy Examples provides various examples of Filters, but to understand the mechanics behind the Filters feature, see Create a Calls Filter.
Automatically Export Incoming Support and Sales Calls in Realtime
Go to Configurations > Configure (under Communication Recording Agent) > Policies > Export.
Click +Create and choose Real-Time Audio Export Policy.
Add an Endpoint to send the calls to, as we don't have a real-time Endpoint for Sales and Support calls set up yet, we're going to create one in the Create Export Policy page:
Select Create new endpoint.
Under Endpoint type, select Realtime Stream from the dropdown menu.
Under Information, enter a useful Name for the Endpoint, we're going with "Incoming Support and Sales Endpoint".
Enter a useful Description if needed. We're leaving it blank.
Under URI, enter the address of the Realtime Stream location to export the calls to.
Under Uri Auth Header, enter the authorization header to use during the export.
Under Request Timeout, enter the number of seconds allowed for exporting content, after which the export will fail. This is only taken into account after an initial export fails. The default is 100 seconds if not set. The default works for our purposes, so we're not entering a value here.
Under Allow Insecure Certification, determine the required certificate security during exports to this Endpoint. We want to ensure certification is secure, so we're leaving this toggle off (meaning "do not allow insecure certification").
Under Certificate Hash, enter the hash of the certificate that allows exports to this Endpoint.
Under Authorization, determine if Authorization is enabled or disabled using the toggle. We want to enable Authorization, so we need to set the toggle to enabled and then use the subsequent settings to obtain an access token for exporting to the Endpoint.
Choose the Grant Type for the authorization. We're using Credentials Grant.
Enter the Client ID - The client ID to use to obtain access to the export location.
As we're using a Credentials Grant as the Grant Type, we need to set Scope, Authorization Endpoint, and Client Secret:
Enter the Scope value - The scope used to obtain access to the export location.
Enter the Authorization Endpoint - The address or IP of the Authorization Endpoint to use to obtain access to the export location.
Enter the Client Secret - The client secret to use to obtain access to the export location.
When you've confirmed the Endpoint settings, click Create, and then click Next.
In the Define Policy step:
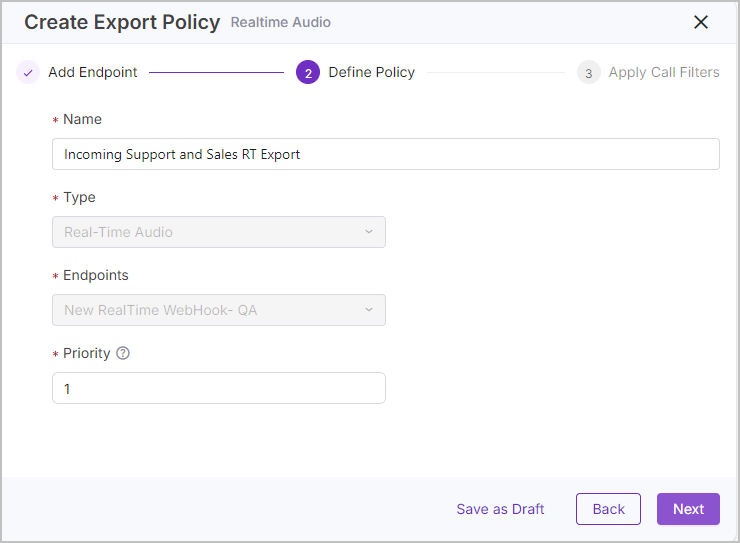
Enter a useful Name for the policy. We're calling the policy "Incoming Support and Sales RT Export".
Set the Priority for the policy. We're setting Priority to "1".
When you've confirmed the policy settings, click Next.
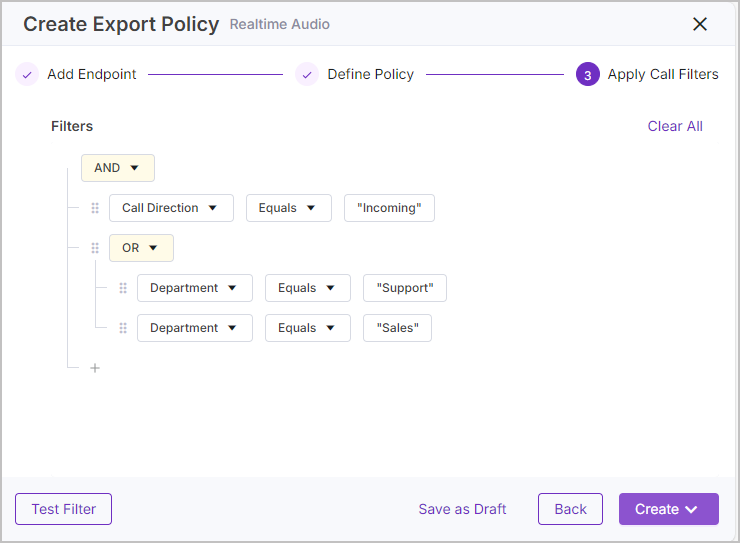
Apply a filter to the policy, we need the policy to export all incoming calls for the Support and Sales teams:
Note
There are two ways to achieve this filter, which can be described with the following expressions:
(Sales AND Incoming) OR (Support AND Incoming)
Incoming AND (Sales OR Support)
The steps below detail how to create a filter using option b above.
As we want to filter for incoming calls for both the Sales and Support teams, we're keeping the AND at the top of the filter.
Click the + and select Add Filter.
Click on the Select a Column dropdown and click Call Direction from the metadata field list.
Click on the Select an Option dropdown and click Equals.
Under Enter a Value, enter the value for the Call Direction metadata field for incoming calls, "Incoming", and press Enter.
Click the + and select Add Group, click on the new group dropdown and select OR.
Hover over the OR dropdown to see the + icon, click +, and select Add Filter.
Click on the Select a Column dropdown and click Department from the metadata field list.
Click on the Select an Option dropdown and click Equals.
Under Enter a Value, enter the Department metadata field value of the Support team's calls, "Support", and press Enter.
Again, hover over the OR dropdown to show the + icon, click the +, and select Add Filter.
Click on the Select a Column dropdown and click Department from the metadata field list.
Click on the Select an Option dropdown and click Equals.
Under Enter a Value, enter the Department metadata field value of the Sales team's calls, "Sales", and press Enter.
Click Test Filter to see which calls this filter applies to. In this example, you would see a list of incoming Sales and incoming Support calls.
When you've confirmed the Policy and Filter, click Create and select Create and Enable. You can click Create and Disable to create the policy but enable the policy (you can always enable the policy later on).
Now that the policy is created, you can find it in Configurations > Configure (under Communication Recording Agent) > Policies > Export.
Media and Metadata Access Policy Example - Department
The below demonstrates how to create a Media and Metadata Access Policy. Unlike the steps detailed in Manage Policies, these steps detail a specific use case intended to provide John access to the media and metadata of all Support calls in the system, allowing him to search and replay Support calls as required.
Tip
The below uses the Department metadata field to filter calls against. However, Filters can use all kinds of metadata fields and can be as complex as you need them. Policy Examples provides various examples of Filters, but to understand the mechanics behind the Filters feature, see Create a Calls Filter.
Provide John Media and Metadata Access to Support Calls
Go to Configurations > Configure (under Communication Recording Agent) > Policies > Access Control.
Click +Create.
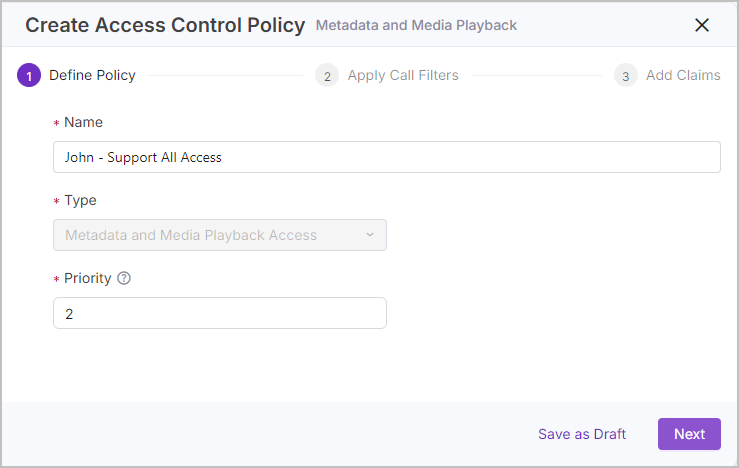
Enter a useful Name for the policy. We're going with "John - Support All Access".
Set the Priority for the policy. We're setting Priority to "2".
When you've confirmed the policy settings, click Next.
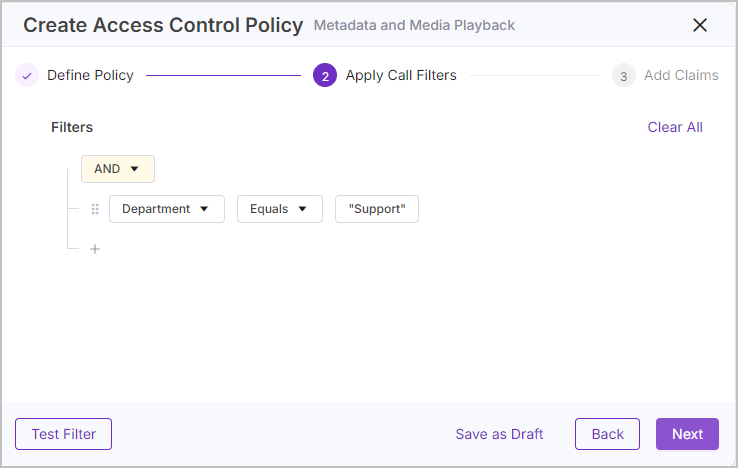
Apply a filter to the policy. This is where we determine which calls the users in the policy get access to. We need the policy to provide access to all of the Support calls in the system:
The below uses the Department metadata field to identify the Support team. However, other instances may have the metadata field "Group" populated. You can test your filter using Test Filter to make sure the policy will apply to the desired calls, or review your recorded calls in Conversations > Recorded to see exactly what metadata fields are populated for each call.
As mentioned above, complex filters can be set up to match the exact calls you want the policy to apply to.
Click the + and select Add Filter.
Click on the Select a Column dropdown and click Department from the metadata field list.
Click on the Select an Option dropdown and click Equals.
Under Enter a Value, enter the Department metadata field value of the Support team's calls, "Support", and press Enter.
Click Test Filter to see which calls this filter applies to. In this example, you would see a list of Support calls.
When you've confirmed the filter, click Next.
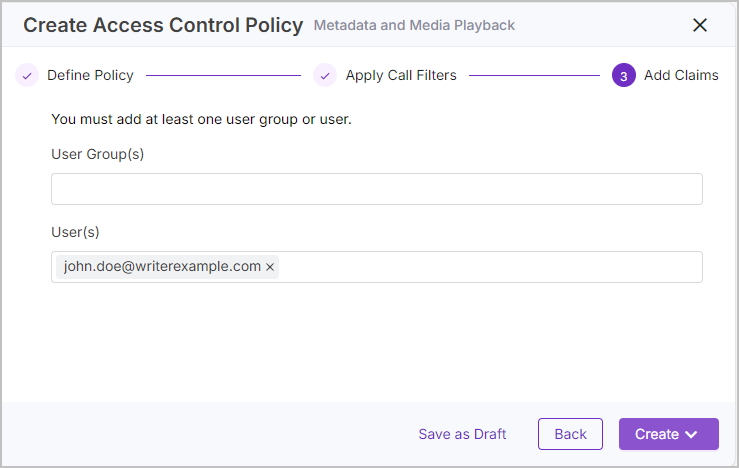
Add Claims to the policy. This is where we set who gets access to the calls specified in the filter. We can add users using User Group(s) (from the Organization Hierarchy) or using User(s) for adding users on a user-by-user basis:
Click into the User(s) box to see a list of users in the system.
Find John's email in the list by either scrolling to John's email or typing John's email to reduce the list to matching users.
Click on John's email to add him to the claim.
When you've confirmed the Policy, Filter, and Claims, click Create and select Create and Enable. You can click Create and Disable to create the policy, but not enable the policy (you can always enable the policy later on).
Now that the policy is created, you can find it in Configurations > Configure (under Communication Recording Agent) > Policies > Access Control.
Media and Metadata Access Policy Example - List
The below demonstrates how to create a Media and Metadata Access Policy. Unlike the steps detailed in Manage Policies, these steps outline a specific use case intended to provide our manager, Gene, with access to the media and metadata of all calls made by his team using a specified list of agents. This allows him to search and replay his team's calls as needed.
Tip
Access Policy Claims can be updated to provide the same access to another user. For example, if a temporary manager needs access while Gene is on holiday, then that manager can be added to the Claims. Find the policy in your Access Policies list, click  and select Manage Claims, click into the User(s) list, select which user to add to the claims, then click the check to save.
The following uses the Agent Email metadata field to filter calls against. However, Filters can use all metadata fields and can be as complex as needes. Policy Examples provides various examples of Filters, but to understand the mechanics behind the Filters feature, see Create a Calls Filter.
Provide Gene with Media and Metadata Access to Certain Agents' Calls
Go to Configurations > Configure (under Communication Recording Agent) > Policies > Access Control.
Click +Create.
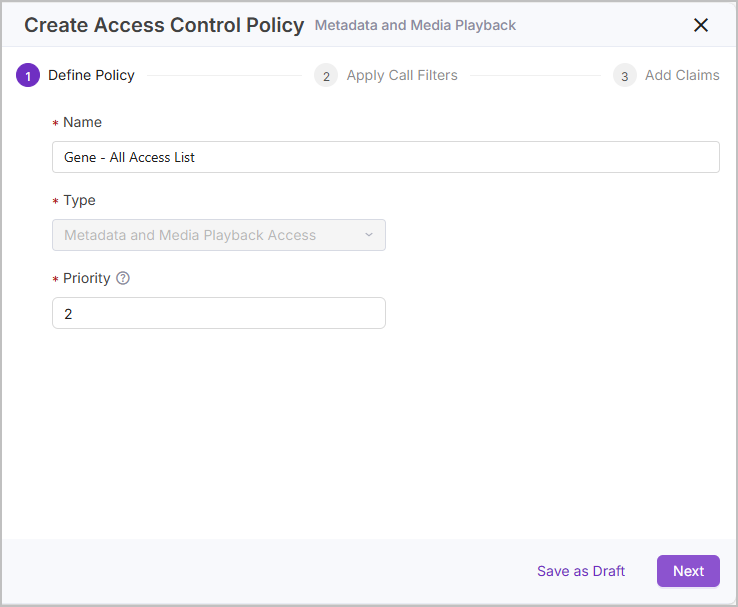
Enter a useful Name for the policy. We're going with "Gene - All Access List".
Set the Priority for the policy. We're setting Priority to "2".
When you've confirmed the policy settings, click Next.
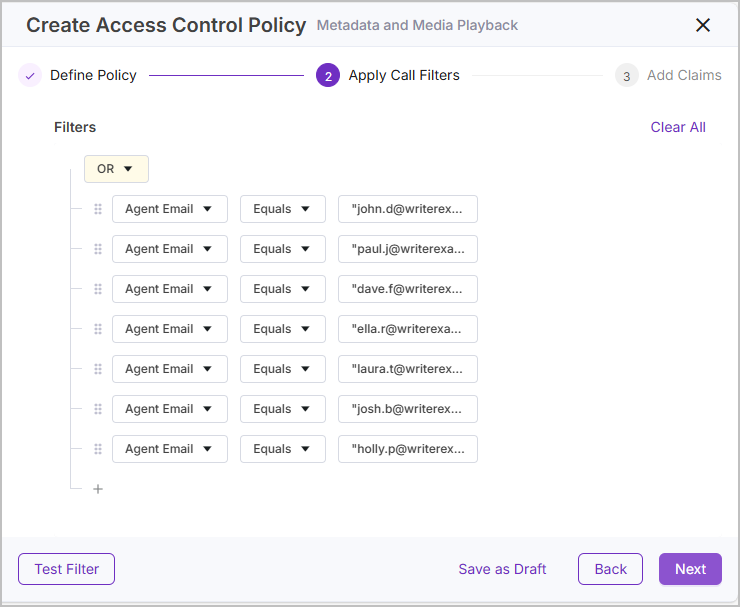
Apply a filter to the policy. This is where we determine which calls the users in the policy get access to. We need the policy to provide access to all the calls of a specific list of agents.
The steps below use the "Agent Email" metadata field to identify each agent. However, your call metadata may have a more suitable metadata field that matches all of the agents that you want to filter for. For example, if all of the agents you want to filter for are in the same department and your integration supports the capture of the Department metadata field, then you could use Department to filter for those calls. This would simplify the filter and would avoid the need to manually add new agents to your filter when they're added to your telephony system.
You can test your filter using Test Filter to make sure the policy applies to the desired calls, or review your recorded calls in Conversations > Recorded to see exactly what metadata fields are populated for each call.
As mentioned above, complex filters can be set up to match the exact calls you want the policy to apply to.
Click the AND dropdown and select OR. This means that any of the filters in this OR filter group count as a match.
Click the + and select Add Filter.
Click on the Select a Column dropdown and click Agent Email from the metadata field list.
Click on the Select an Option dropdown and click Equals.
Under Enter a Value, enter the Agent Email metadata field value of one of the agents to include in the filter (the agent whose calls Gene should get access to), and press Enter.
Repeat steps b to e until you have a complete list of agent emails.
Click Test Filter to see which calls this filter applies to. In this example, you would see a list of calls for the listed agents.
When you've confirmed the filter, click Next.
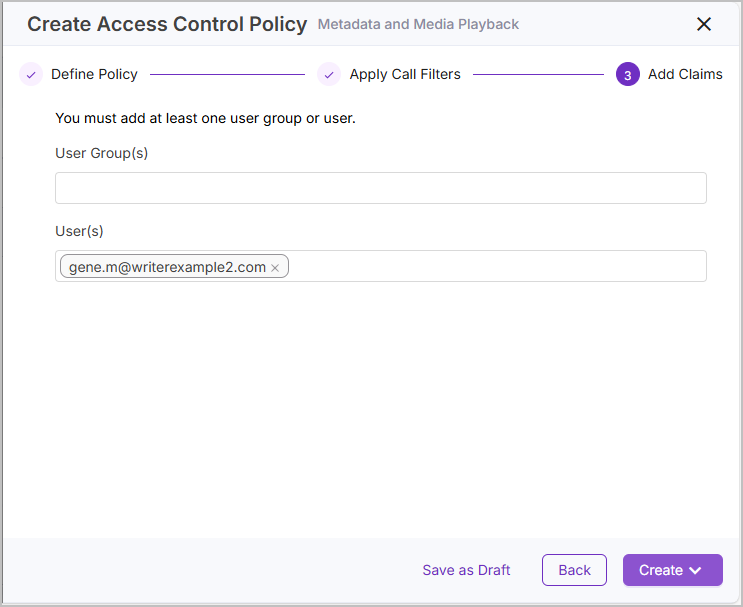
Add Claims to the policy. This is where we set who gets access to the calls specified in the filter. We can add users using User Group(s) (from the Organization Hierarchy) or using User(s) for adding users on a user-by-user basis:
Click into the User(s) box to see a list of users in the system.
Find Gene's email in the list by either scrolling to Gene's email or typing Gene's email to reduce the list to matching users.
Click on Gene's email to add him to the claim.
When you've confirmed the Policy, Filter, and Claims, click Create and select Create and Enable. You can click Create and Disable to create the policy, but not enable the policy (you can always enable the policy later on).
Now that the policy is created, you can find it in Configurations > Configure (under Communication Recording Agent) > Policies > Access Control.
Note
To edit a policy's filters, find the policy in your Access Policies list, click > to open the policy's properties panel, click Clone to duplicate the policy, rename the new policy if needed, click next, then edit the filters, click next, set the claims as required, then click Create, and select Create and Enable. Disable the old policy and test that the new one works as intended, then delete the old policy.
Locks Policy Example
The below demonstrates how to create a Locks Policy. Unlike the steps detailed in Manage Policies these steps detail a specific use case intended to ensure that all new outgoing Sales calls, excluding Jane's calls, can not be automatically deleted by a Purge policy.
Tip
The below uses the Department, Call Direction, and Agent Email metadata fields to filter calls against. However, Filters can use all kinds of metadata fields and can be as complex as needed. Policy Examples provides various examples of Filters, but to understand the mechanics behind the Filters feature, see Create a Calls Filter.
Lock All Outgoing Sales Calls apart from Jane's Calls
Go to Configurations > Configure (under Communication Recording Agent) > Policies > Locks.
Click +Create.
Enter a useful Name for the policy. We're going with "Lock Outgoing Sales -Jane".
Under Lock Reason, briefly explain why the calls are being locked. This is viewable when viewing the calls under Conversations > Recorded. We're going with "Needs Review".
Set the Priority for the policy. We're setting Priority to "1".
When you've confirmed the policy settings, click Next.
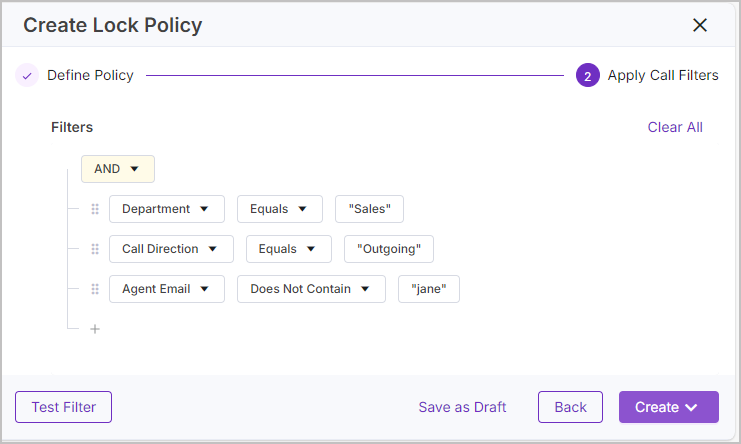
Apply a filter to the policy. This is where we set which new calls the policy locks. We need the policy to apply to outgoing sales calls, but we need to make sure Jane's calls are not locked:
Click the + and select Add Filter.
Click the Select a Column dropdown and click Department from the metadata field list.
Click the Select an Option dropdown and click Equals.
Under Enter a Value, enter the Department metadata field value of the Sales team's calls, "Sales", and press Enter.
Click the + and select Add Filter.
Click the Select a Column dropdown and click Call Direction from the metadata field list.
Click the Select an Option dropdown and click Equals.
Under Enter a Value, enter the Call direction metadata field value for outgoing calls, "Outgoing", and press Enter.
Click the + and select Add Filter.
Click the Select a Column dropdown and click Agent Email from the metadata field list.
Click the Select an Option dropdown and click Does Not Equal.
Under Enter a Value, enter Jane's email address, "jane.doe@writerexample.com", and press Enter.
Click Test Filter to see which calls this filter applies to. In this example, you would see a list of all of the outgoing calls for the Sales team, excluding any of Jane's calls.
The above uses the Department metadata field to identify the Sales team. However, other instances may have the metadata field "Group" populated. You can test your filter using Test Filter to make sure the policy applies to the desired calls, or review your recorded calls in Communication Recording Agent> Conversations > Recorded to see exactly what metadata fields are populated for each call.
As mentioned, complex filters can be set up to match the exact calls you want the policy to apply.
When you've confirmed the Policy and Filter, click Create and select Create and Enable. You can click Create and Disable to create the policy, but not enable the policy (you can always enable the policy later on).
Now that the policy is created, you can find it in Configurations > Configure (under Communication Recording Agent) > Policies > Locks.