Data Engineering Agent
The Data Engineering Agent automates the end-to-end creation, management, and execution of data pipelines across multiple sources. It integrates with the platform’s Data Discovery Agent to automatically crawl metadata, identify relevant data sources in your Knowledge Cluster, and use those insights to orchestrate data extraction, transformation, and pipeline creation, delivering accurate, query-specific solutions.
The platform provides full visibility into the pipeline development process, enabling data engineers to review auto-generated pipelines and adjust configurations to refine outputs and achieve their desired outcomes. The resulting data outputs integrate seamlessly with the platform's AI agents, equipping them with the precise information needed to answer queries and execute sophisticated, agentic actions.
Key Capabilities
Pipeline Management - Build, configure, and manage reusable data pipelines tied to your connected data sources.
Metadata Discovery via Data Discovery Agent - When you initiate pipeline creation, the Data Engineering Agent calls the Data Discovery Agent to locate relevant tables, crawl connected data sources, and automatically extract metadata.
Association with Knowledge Cluster - Link each pipeline to a Knowledge Cluster to keep your data assets organized, governed, and easily accessible.
Automatic Data Catalog Update - When a pipeline run creates a new table in your environment, the metadata for that table is extracted and written directly to the Data Catalog. No manual entry is required.
Important
Pipeline creation is currently supported for SQL-based Snowflake and Databricks Knowledge Base types, with support for additional Knowledge Base types planned for future releases.
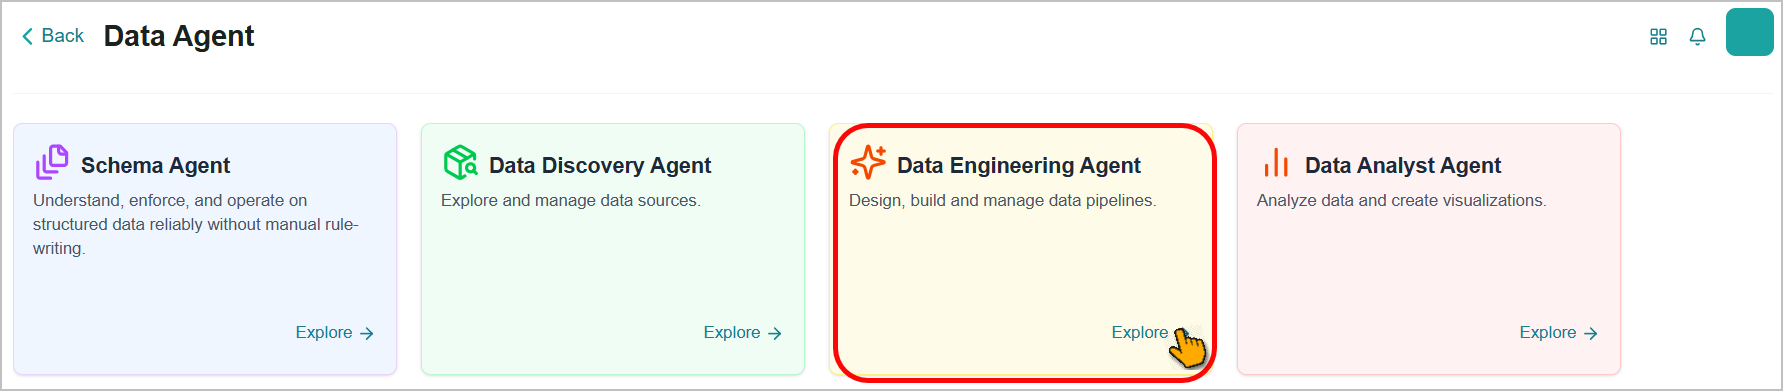
To access this feature, go to the Home page > Data Agents > Data Engineering Agent.
Creating a Data Pipeline
You can create a pipeline to organize existing data, clean up datasets, or generate new data outputs to accurately and efficiently answer specific user queries.
Go to the Home page > Data Agents > Data Engineering Agent.
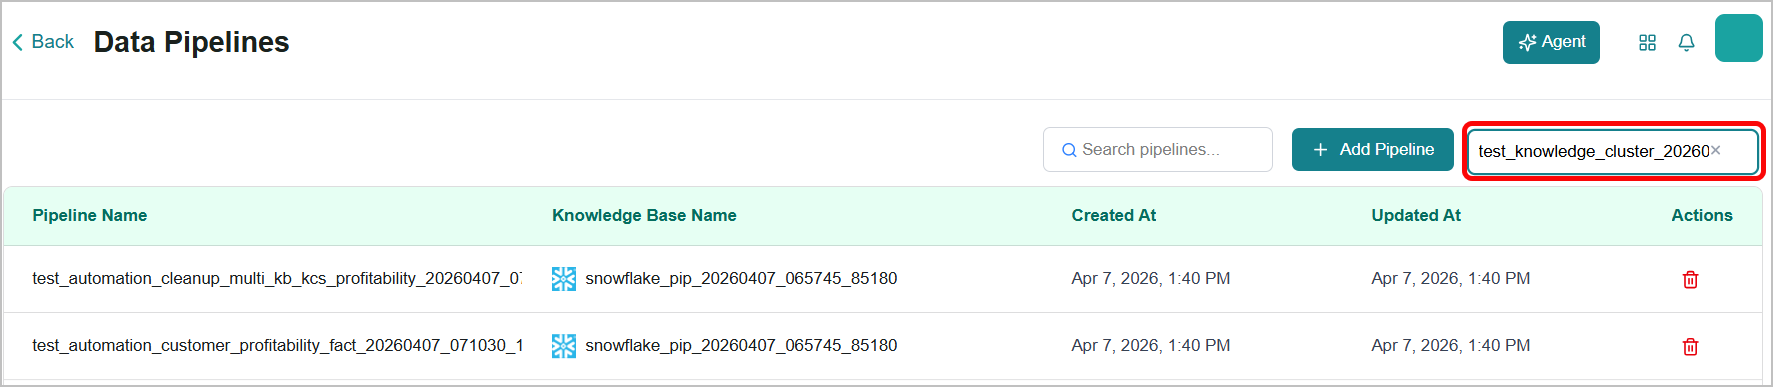
The Data Pipelines page opens.
Select a Knowledge Cluster from the dropdown.
Any existing pipelines associated with the selected cluster are displayed.
Pipelines can be created using one of two methods:
Automatic - Use the platform agent to agentically generate a pipeline based on your natural language input. Refer to Creating a Pipeline with an Agent more information.
Manual - Create a pipeline manually with the platform interface.
To create a pipeline manually, click Add Pipeline.

The Add Pipeline panel opens from the right.
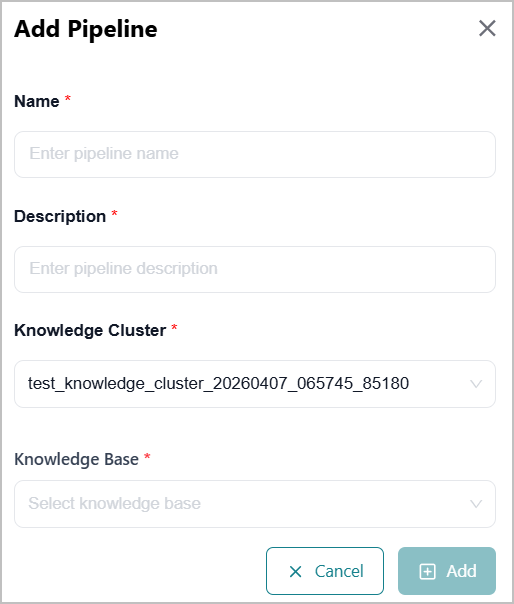
Enter a pipeline Name and Description.
The Knowledge Cluster is pre-selected based on your earlier selection. To use a different cluster, select one from the dropdown.
Select the destination Knowledge Base from the dropdown to store data from the pipeline.
Note
The dropdown lists only Knowledge Bases associated with the selected Knowledge Cluster.
Click Add.
A success message is displayed, and the newly created pipeline appears on the Data Pipelines page.
Tip
You need to add SQL to the pipeline before executing it. Refer to Adding SQL Queries for more information.
Creating a Pipeline with an Agent
The platform's agent-assisted pipeline creation lets you create and manage pipeline configurations through natural-language interaction. Simply describe your requirements in plain language. The agent analyzes your input, requests clarification when needed, and automatically generates the pipeline and corresponding SQL configuration.
You can also review and manually edit the generated SQL at runtime, giving you full control over pipeline behavior and output.
To access the feature:
Select a Knowledge Cluster from the dropdown.
Click Agent.
The agent interaction panel opens on the left side of the screen.
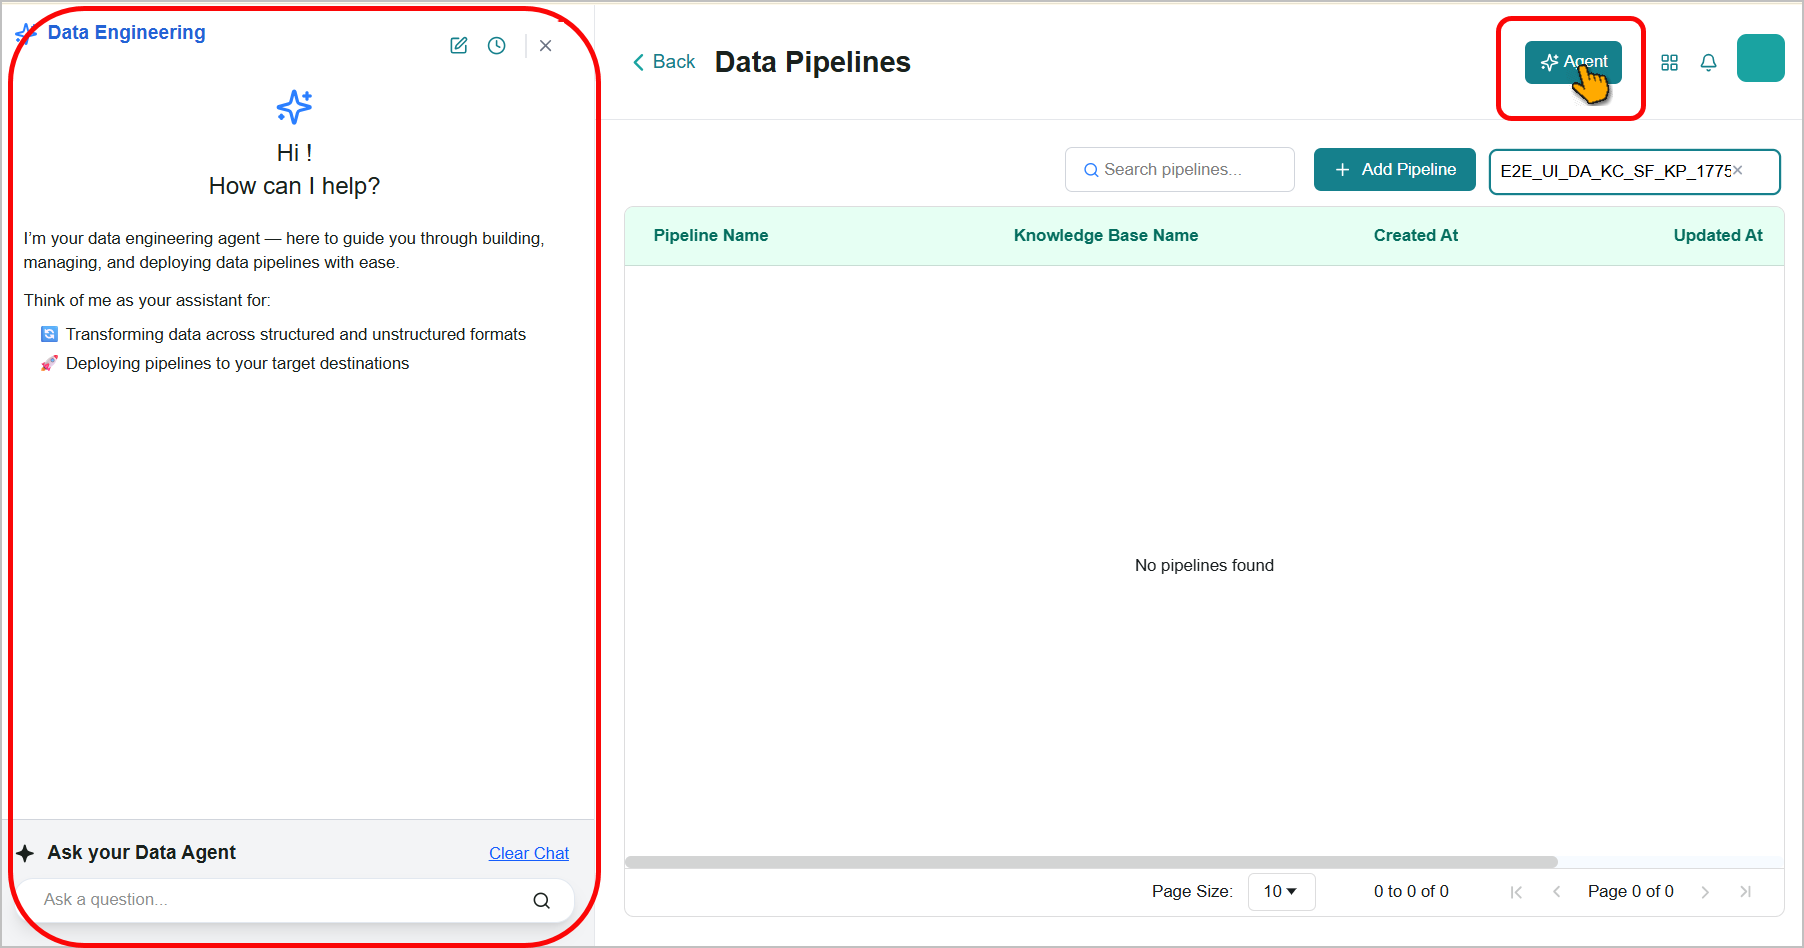
Describe your requirements in plain language, what data you want to use, and what the pipeline should achieve, then press Enter.
Example: I need a pipeline that pulls all customer orders from last quarter and filters them by region.
The agent processes your input and, if needed, asks clarifying questions to ensure it fully understands your intent. Once the agent has sufficient context, it will automatically identify the most relevant KB within the selected Knowledge Cluster by running a similarity search across all available KBs.
Lists all source tables and the target table for your review. You can edit, approve, or reject the mapping tables:
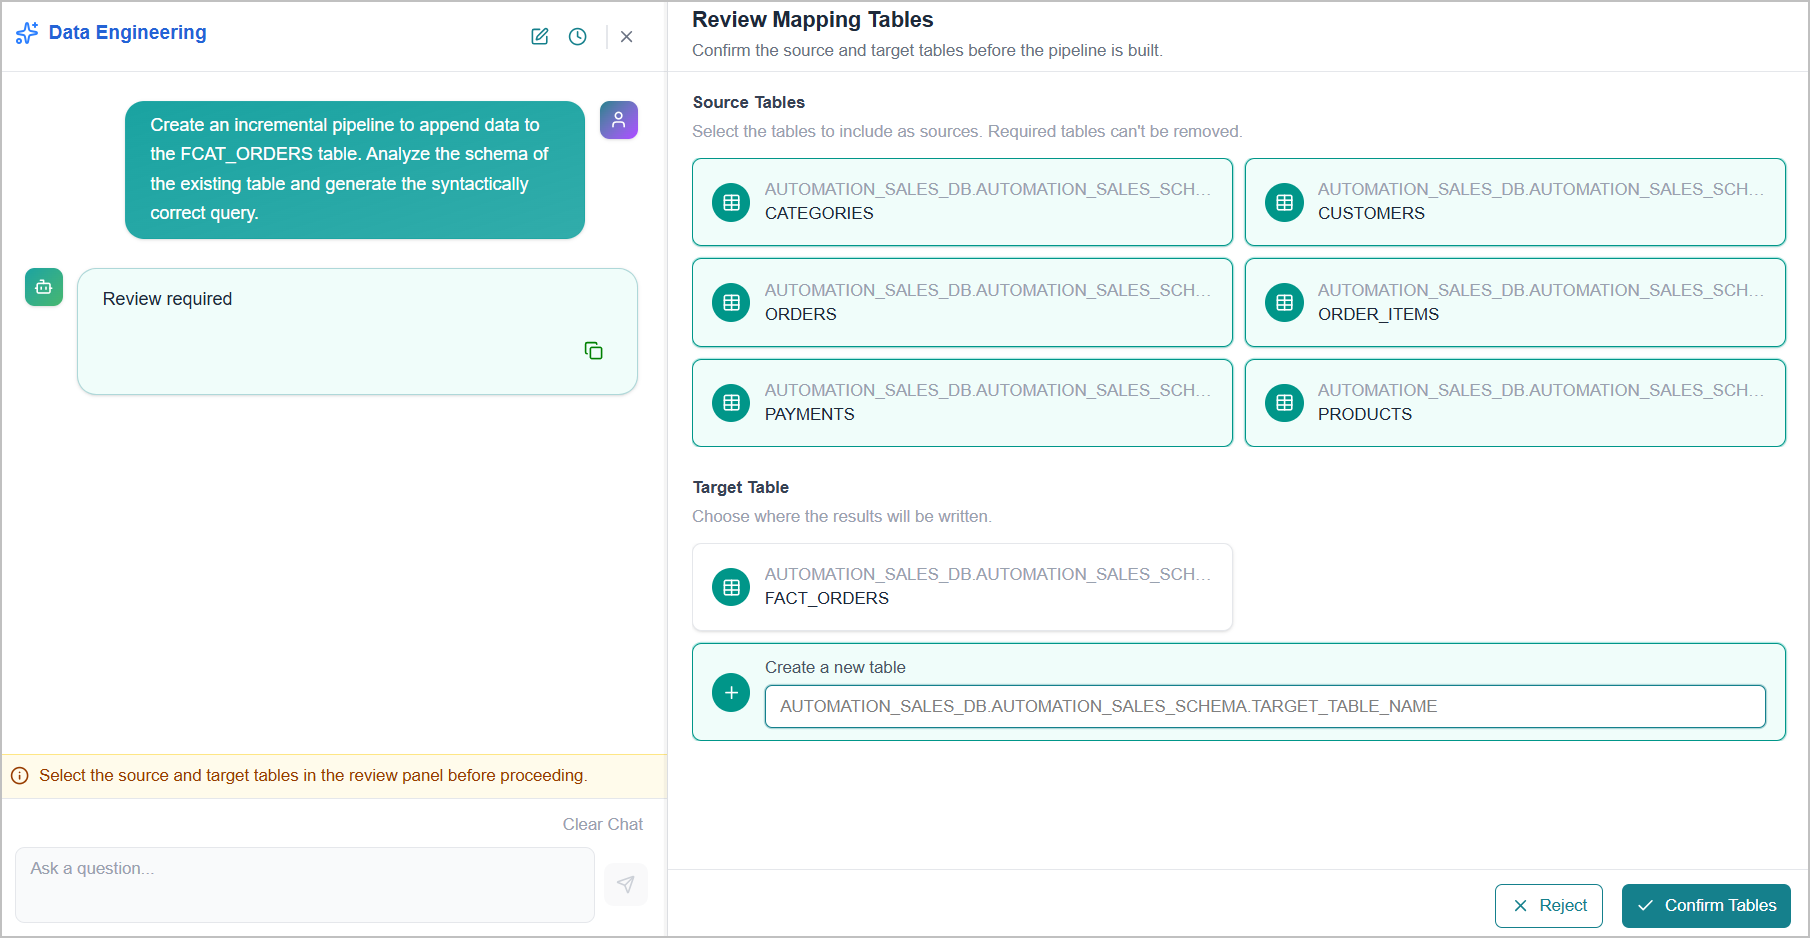
Select only the source tables you actually need. By default, the agent selects all matching source tables. Clear any tables you don't want to include.
Note
Mandatory sources are marked as Required; modifications are not allowed.
Check the target table. By default, the agent selects a target table for you. If the agent didn't identify one, or the one shown is incorrect, create your own: Enter a name in the Create a new table box.
Click Confirm Table to approve the configuration and continue.
Click Reject if the configuration isn't correct. You can then continue the conversation with the agent and provide more details about your requirements.
After your approval, the agent lists load behavior details for your review. You can edit, approve, or reject the details:
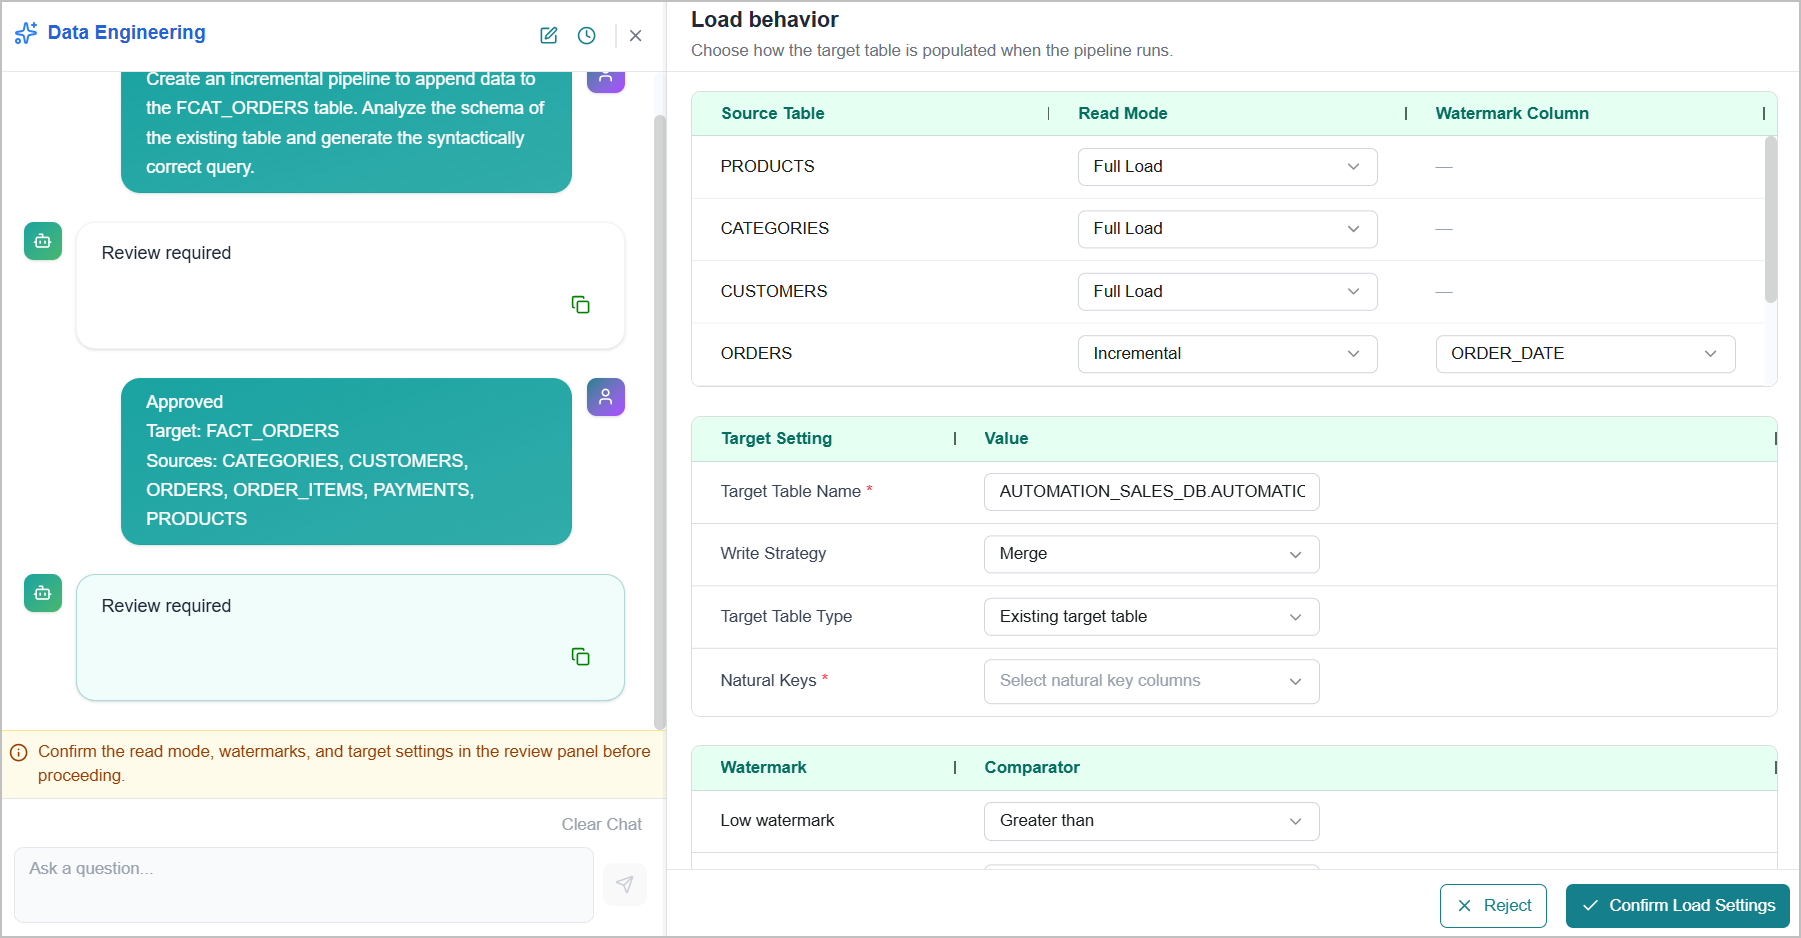
In the source table settings, select the reading mode from the dropdown:
Full Load - Select this option to read the entire table every time the pipeline runs.
Incremental Load - Select this option to read only the rows that changed since the last run.
If you select Incremental Load, select a Watermark Column from the dropdown. The Watermark Column indicates which rows are new or have been updated since the last run.
Note
The Watermark Column dropdown shows only columns that are already marked as watermark columns, either by you in the source configuration or automatically by the agent.
In the target table settings, select the values from the dropdown:
Update the target table name if required.
Select a Write Strategy from the dropdown. This determines how the pipeline writes data to the target table on each run.
Select the Target Table Type:
Existing Target Table - Agent uses an existing table with the same name.
New Table - Agent creates a new table with a defined name.
Select one or more Natural Key columns from the dropdown.
The platform uses these columns to identify each record and detect duplicates or changes during data processing.
Define the Lower Watermark and Higher Watermark comparator values. These values define the bounded range applied to the Watermark Column during the incremental read.
Click Confirm Load Settings to approve the configuration and continue.
Click Reject if the settings aren't correct. You can then continue the conversation with the agent and provide more details about your requirements.
After your approval, the agent lists the auto-suggested source and target column mappings for your review. You can edit, approve, or reject the details:
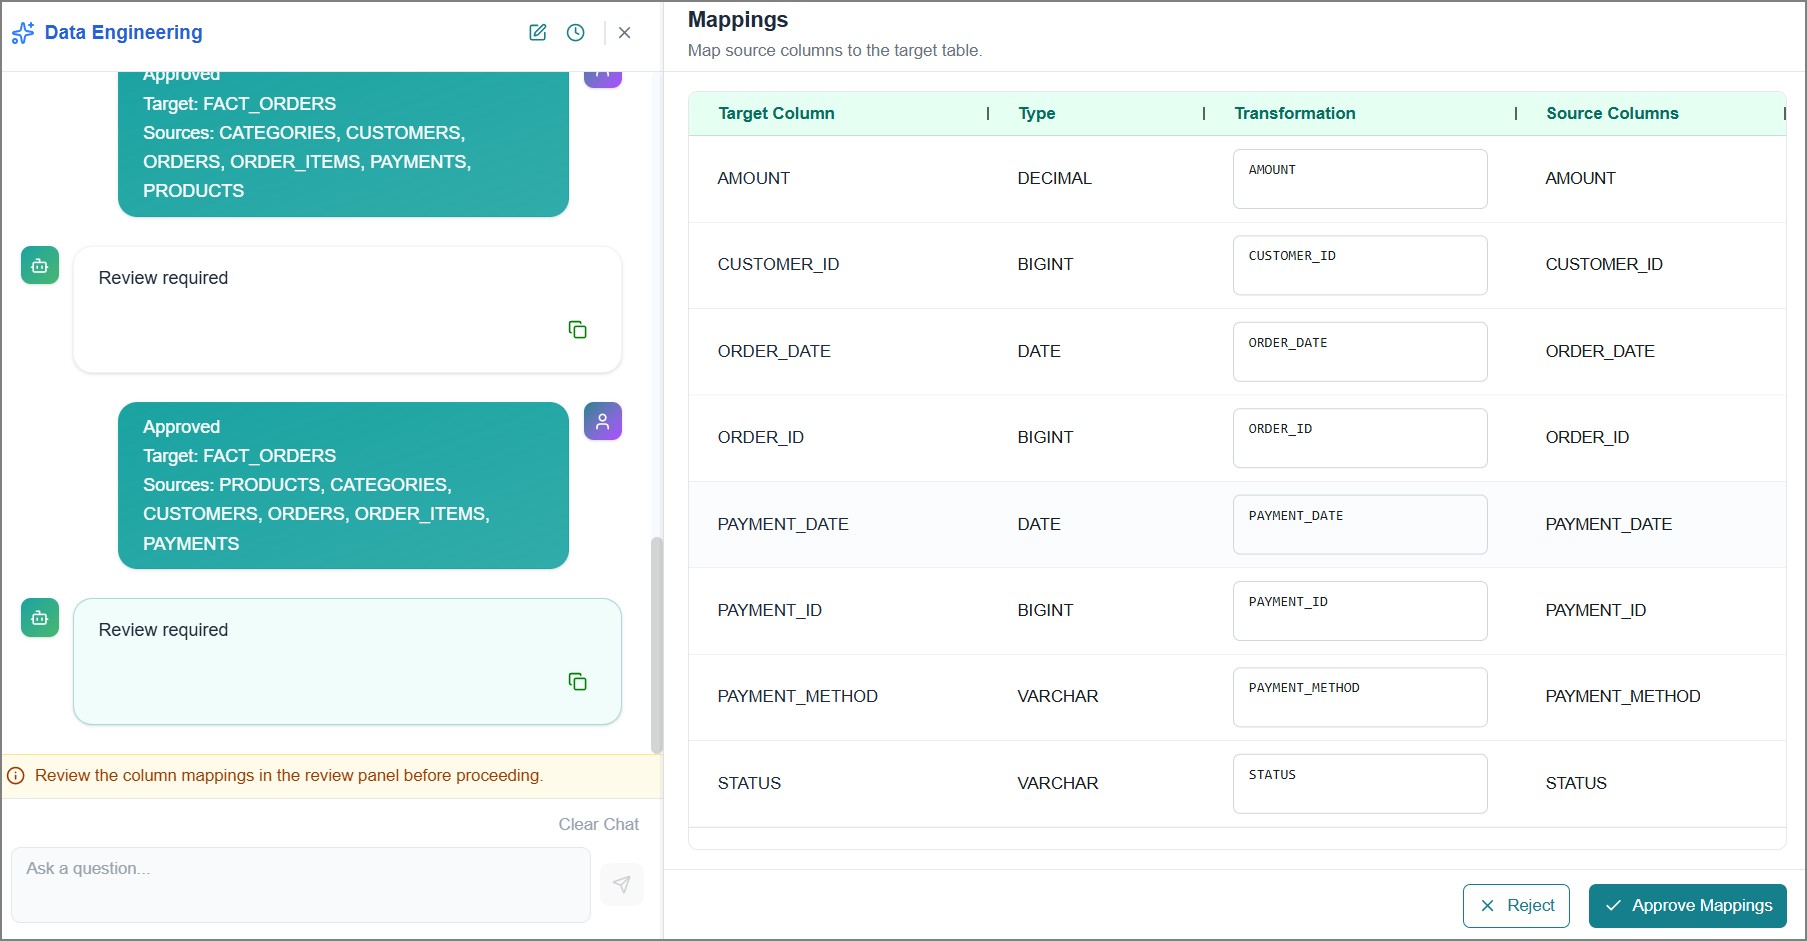
Update the Transformation field as needed.
Click Approve Mapping to confirm the column mapping.
Click Reject if the settings aren't correct. You can then continue the conversation with the agent and provide more details about your requirements.
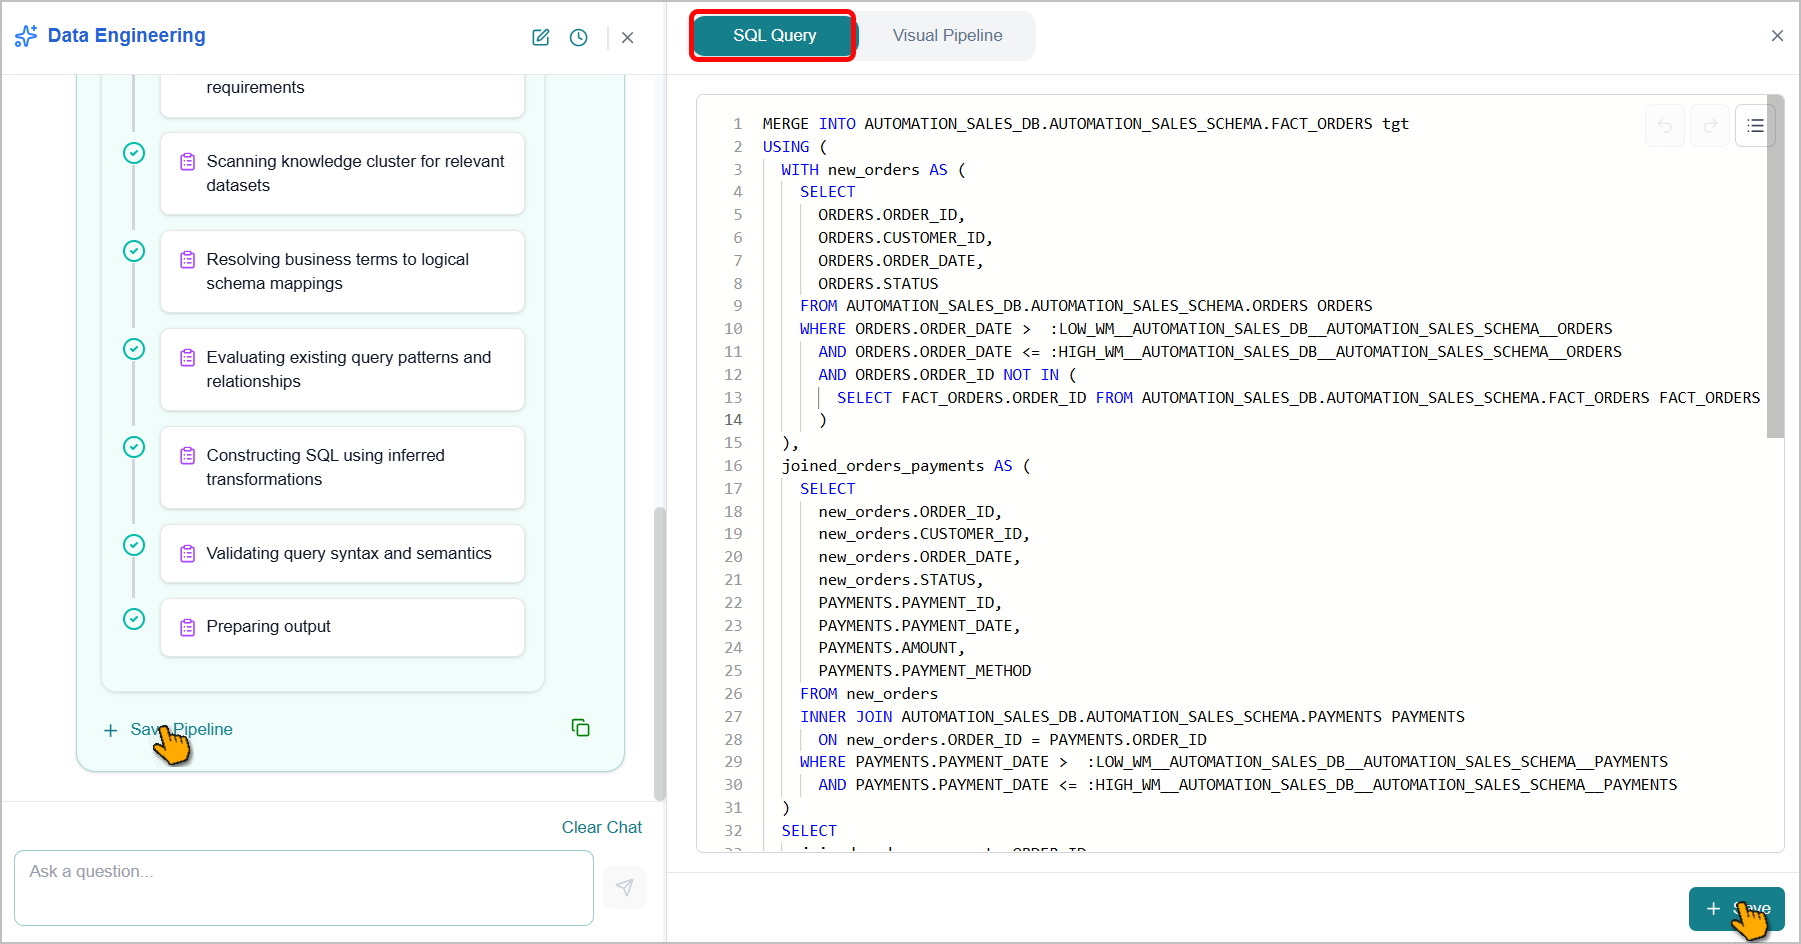
After your approval, it generates the SQL queries needed to fulfill your pipeline requirements. Display the generated SQL and pipeline details in the right panel so you can review and edit them immediately or use agents.
Note
By default, the agent runs an explain check on the query's syntax without executing it. You can view either of the statuses:
If the query validation is complete, a Validation Succeeded message appears.
If the query contains a syntax error, a Validation Failed message appears.
If there is a connection issue, a Validation Unverified message appears.
Switch to the Visual Pipeline tab to see the pipeline in a graphical format for a quick review. Refer to Viewing Pipeline Visual for more information.
Once the pipeline SQL is finalized, click Save Pipeline in the agent chat interface or Save in the right-side panel.
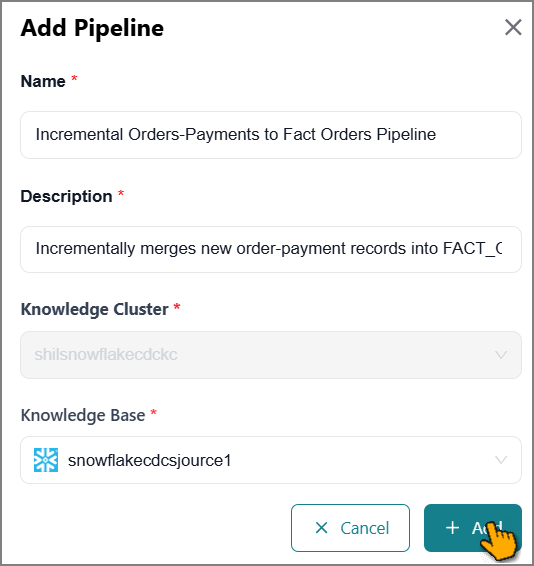
The Add Pipeline panel opens.
Update the pipeline Name and Description.
The Knowledge Cluster is pre-selected based on your earlier choice.
The destination Knowledge Base is pre-selected by your agent. To use a different KB, select one from the dropdown.
Click Add.
A success message is displayed, and the new pipeline is created with SQL Version 1. This version is active by default.
You can execute the pipeline to generate the data. Refer to Running a Pipeline for more information.
Use the available agent controls to manage your session:
New Conversation
 icon - Begins a new, separate chat session with the agent.
Session History
 icon - Lets you view and resume past conversations.
+ New Chat - Begins a new, separate chat session with the agent.
Delete Session
 icon - Lets you remove a session history from the list.
Clear Chat - Clears the current conversation for a fresh start.
Copy
 icon - Copies the generated agent response to the clipboard.
Adding SQL Queries
SQL queries define how your pipeline finds, filters, and transforms data before it reaches your Knowledge Base. Once your pipeline is created, you need to add at least one SQL query to make it work.
You can manage multiple versions of your SQL queries, switch between them at any time, and control which version is active. Only the active version runs when you execute the pipeline.
Agent-created pipeline - The agent generates SQL queries automatically. You can review and update them before running the pipeline through a natural language conversation.
Manually created pipeline - You add SQL queries yourself. You can write them directly in the editor or use the agent to generate them.
Important
Make sure you have already created at least one pipeline. If you have not, refer to Creating a Data Pipeline.
To add SQL queries for a pipeline:
Select a Knowledge Cluster from the dropdown.
All pipelines associated with the selected cluster are displayed.
Select the pipeline for which you want to create SQL queries.
The pipeline details page opens, with the Pipeline Version tab > SQL Editor tab selected by default.
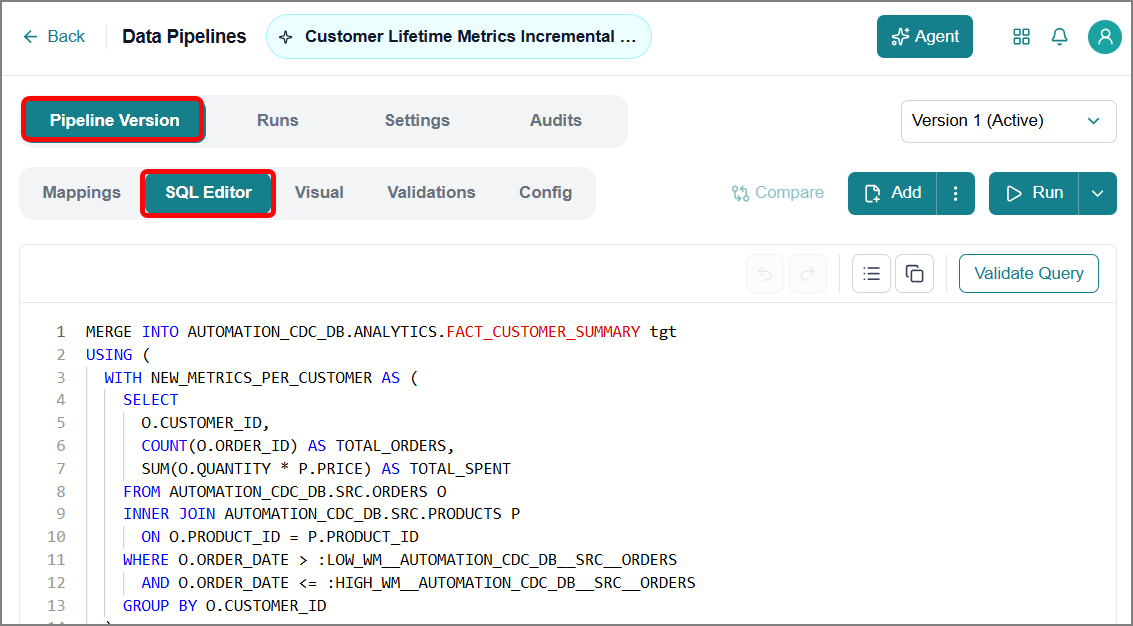
Add your SQL queries directly in the editor, or connect with the agent to generate SQL:
Write directly: Type your SQL query in the editor. It will be included in the base SQL Version 1.
Use the agent: Click Agent to open the agent panel and describe what you need in plain language. The agent generates the SQL for you. Refer to Creating a Pipeline with an Agent for more information.
Note
If your query does not specify a schema or database, the system automatically uses the schema and database configured in the target KB.
If your query specifies a schema or database that differs from the configuration in the target KB, the pipeline run will fail, and the error will be logged.
Use the editor toolbar to work more efficiently:
Undo icon - Reverses your last change.
Redo icon - Reapplies a change you undid.
Format SQL Query icon - Automatically formats and cleans up your SQL code for better readability.
Copy Query icon - Copies the query text to the clipboard.
Validate Query - Runs an explain check on the query's syntax, without executing the query.
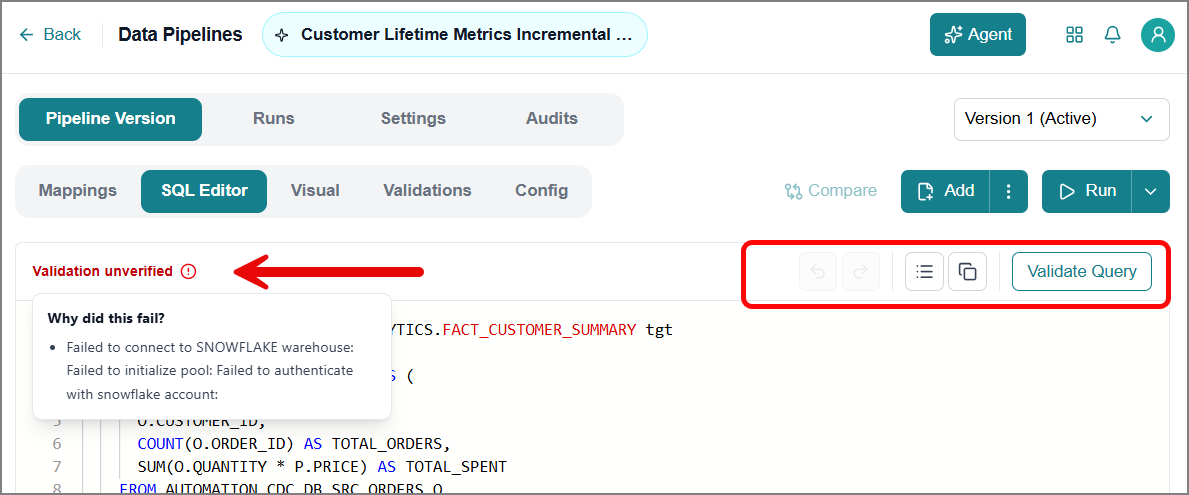
If the query validation is complete, a Validation Succeeded message appears.
If the query contains a syntax error, a Validation Failed message appears.
Tip
Click the info
 icon to view the details about the status.
If there is a connection issue, a Validation Unverified message appears.
After adding the SQL, you can start the execution. Refer to Running a Pipeline for more information.
Create a SQL Version
You can create additional SQL versions based on any existing version.
Important
Make sure you have already created at least one base SQL version.
To create a new SQL version:
Click Add.
The Create New Version window opens.
From the dropdown, select the base version you want to copy from.
To make this new version the active SQL, enable the Make Active option.
Click Create.
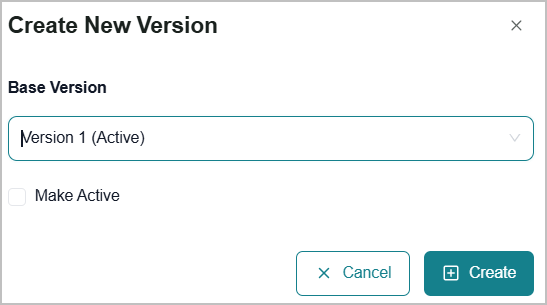
The new version is created from the base version you selected.
Edit the SQL in the text box as needed; changes are auto-saved.
Set a SQL Version as Active
Only one SQL version can be active at a time. To change the active version:
From the version dropdown, select the SQL version you want to activate.
Click the Ellipsis
 icon next to Add.
Note
The dropdown options are disabled for the active SQL version.
From the dropdown, select Mark this Version Active.
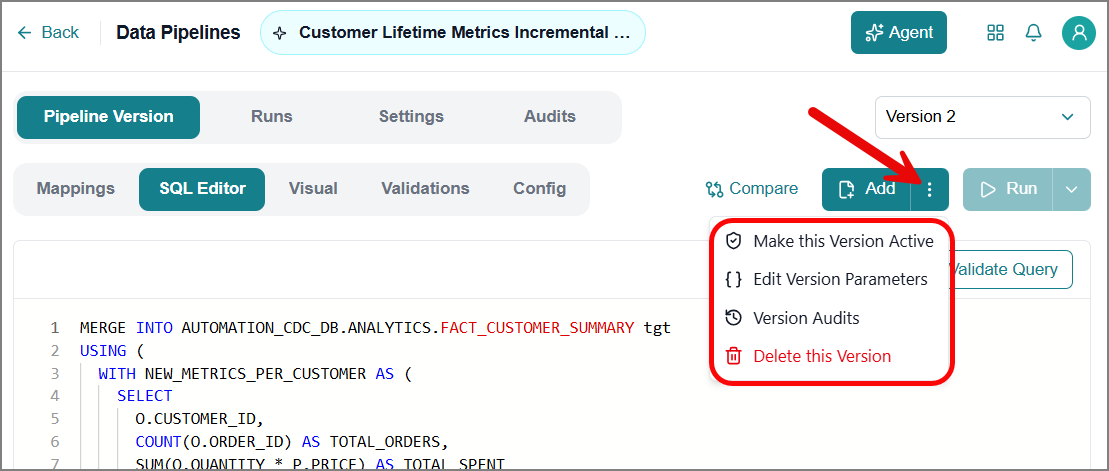
The selected version is now set as the active SQL version.
Compare SQL Versions
The platform lets you review SQL versions side by side, making it easy to spot differences and confirm which version best meets your needs before you activate one.
To compare SQL versions:
Click Compare.
The Compare Versions window opens, displaying the active version alongside the currently displayed version.
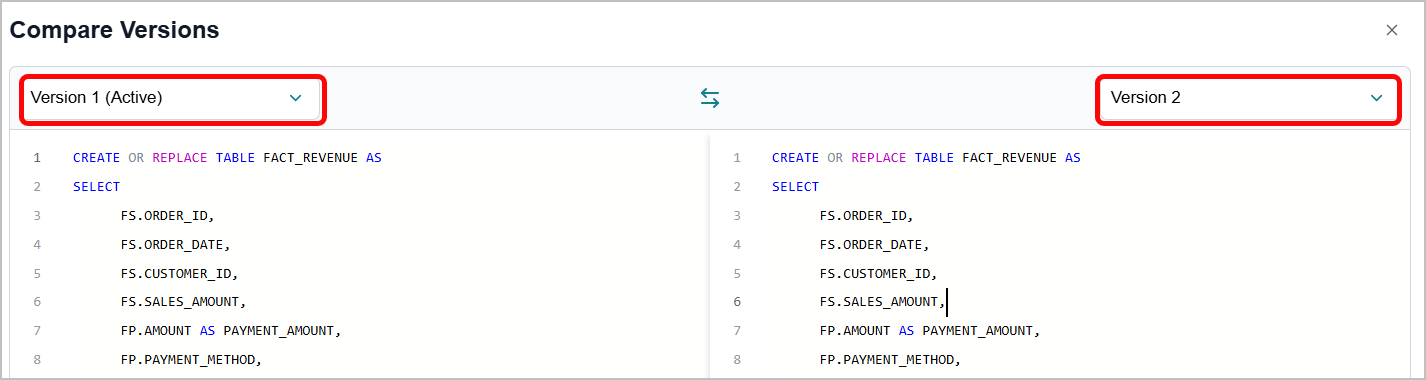
Click the dropdown to switch between versions and compare the SQL.
Click X to close the window.
Adding SQL Version Parameters
SQL Version Parameters let you define reusable values, such as date ranges, thresholds, or filter values, that your SQL queries can reference instead of hardcoded numbers or text. You set these values once per pipeline version, use them in your query, and optionally change them for a single run without editing the saved version.
To add and view SQL parameters:
Click the Ellipsis
icon next to Add.Click Edit Version Parameters.
The Parameters window opens and displays the previously added parameters.
To add a new one, click Add Parameter.
Enter a name in the Key field and the corresponding value in the Value field.
Important
Each key must be unique, and every key must have a value. You won't be able to save until this is true.
Use the Delete
icon next to any row you want to remove.Select Save to save your parameters.
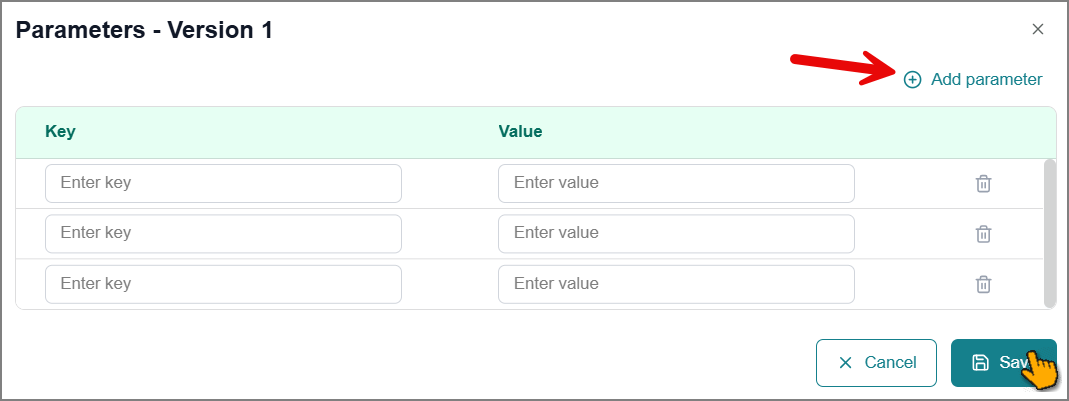
Tip
Once saved, you can reference these keys in your SQL query. Update the values here at any time without changing your query.
View SQL Version Audits
The platform keeps a complete history of every change that happened within versions, including what changed, when it changed, and which events occurred.
To view the SQL version audit:
Click the Ellipsis
icon next to Add.Click Version Audits.
The Pipeline Version Audits window opens.
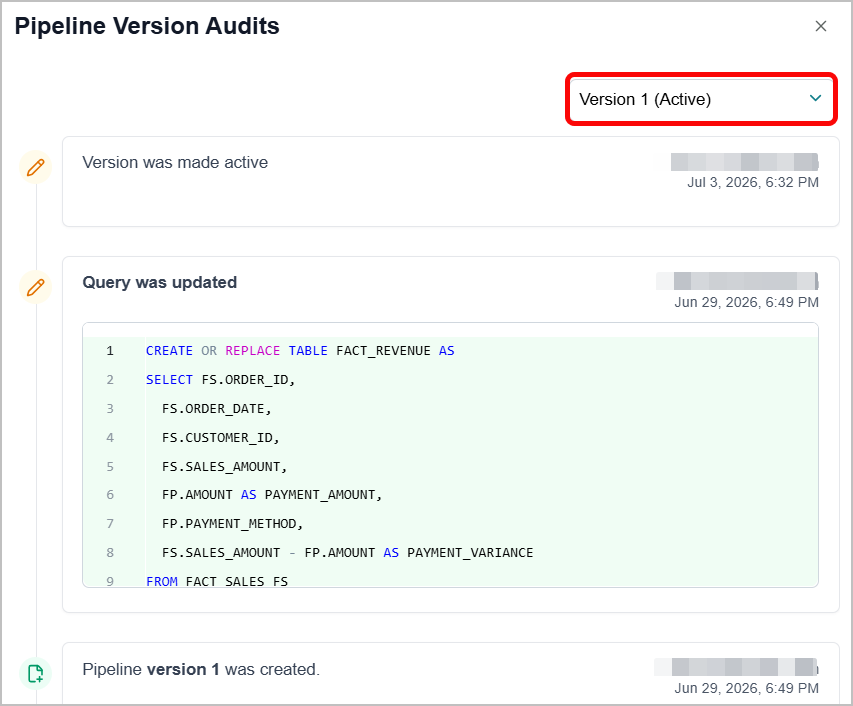
Select a version from the Version dropdown.
The audit log updates to display the change history for the selected version.
Delete a SQL Version
Note
You cannot delete the active version. Set a different version as active before deleting.
From the dropdown, select the version you want to remove.
Click the Ellipsis
icon next to Add.From the dropdown, select Delete this Version.
The confirmation dialog box opens.
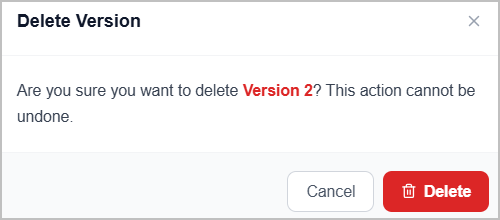
Click Delete.
The selected SQL version is removed.
Running a Pipeline
With your pipeline configured and SQL queries in place, you are ready to execute it and put your data to work.
Select a Knowledge Cluster from the dropdown.
All pipelines associated with the selected cluster are displayed.
Search for and select the pipeline that you want to create SQL queries for.
The pipeline details page opens, with the Pipeline Version tab > SQL Editor tab selected by default.
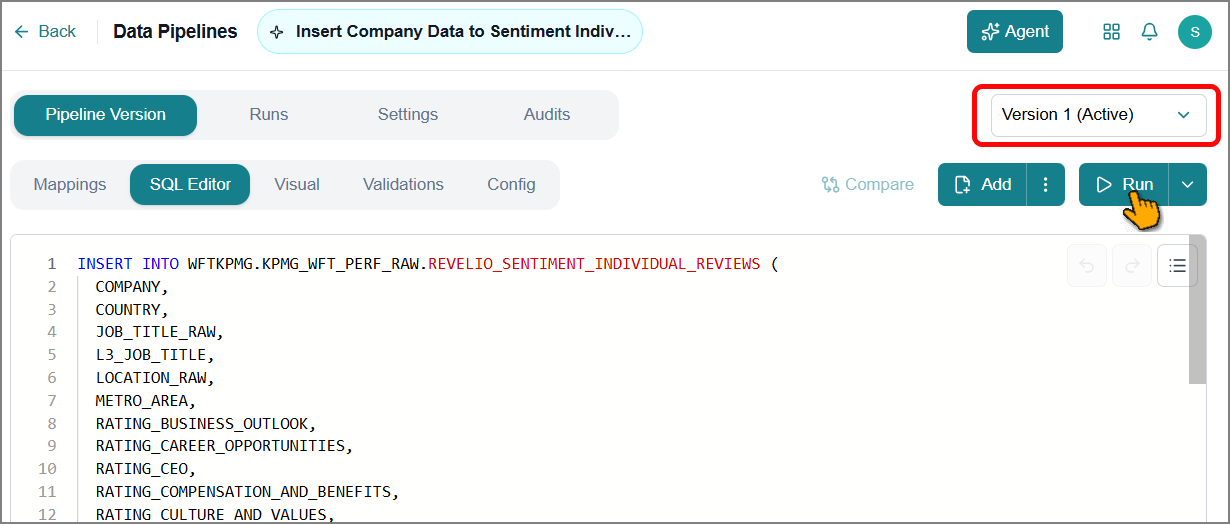
Select the Active version from the dropdown.
Important
The Run button is enabled only for the active SQL version. If you select a version that is not active, Run is disabled. To run a query, first set the version as active.
Click Run.
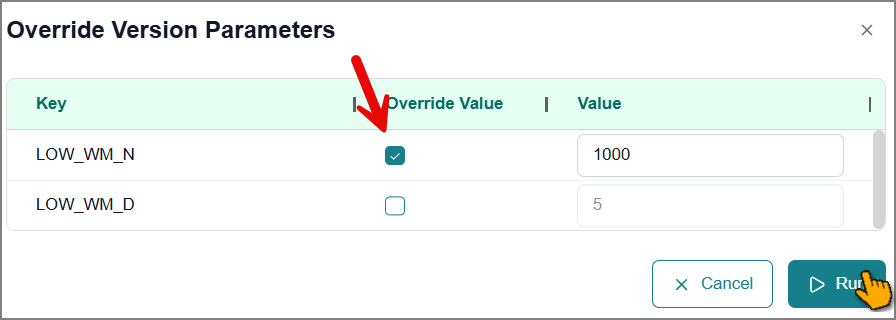
The Override Version Parameters window opens and displays any previously added parameters.
Enable the Override Value checkbox next to the key to enter a new value for that key.
Important
This Override Value applies to this run only.
After you review the parameters, click Run.
The system initiates the execution and displays a confirmation message indicating the run has started.
Note
After submitting the run, switch to the Runs tab to track your pipeline's execution progress and status in real time.
Once the pipeline run completes successfully, the tables generated by your SQL queries are automatically registered in the associated Knowledge Base. Refer to Viewing Metadata in the Data Ingestion section to view the newly registered tables.
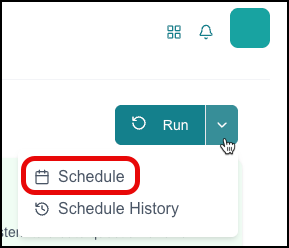
Click the dropdown next to Run.
Tip
Use the Schedules History option to view a complete list of schedulers and their execution details.
Click Schedule.
The Schedule window opens.
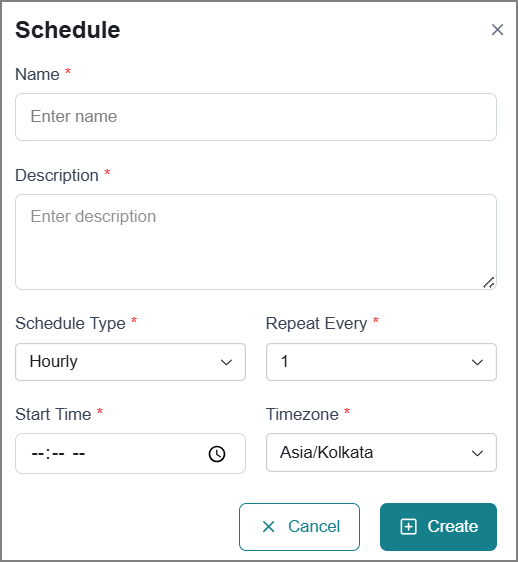
Enter relevant details in the fields.
Field
Description
Name
Enter a name for this schedule.
Description
Enter additional details about the purpose or scope of the schedule.
Schedule Type
Select how frequently the schedule should run:
Hourly
Daily
Weekly
Monthly
Yearly
Repeat Every
Specify the interval for the recurring schedule.
Hourly schedule - 1 to 23
Daily schedule - 1 to 31
Notice
If the scheduler tries to start a new job while a previous one is still running, the system will cancel the new job to avoid overlapping executions.
Days of the week
Select one or more days of the week to run the schedule.
Available for a Weekly schedule only.
Day of the Month
Select the specific date of the month to run the schedule.
Available for Monthly schedules only (1 to 30).
Day and Month
Select the specific month and date to run the schedule.
Available for Yearly schedules only.
Start Time
Set the time when the schedule should begin.
Timezone
Select your timezone to ensure the schedule runs at the correct local time.
Click Create.
The scheduled run is created, and pipeline execution will trigger automatically according to your selected schedule.
Tip
Follow the same procedure to update the existing data pipeline schedule.
Viewing Pipeline Visual
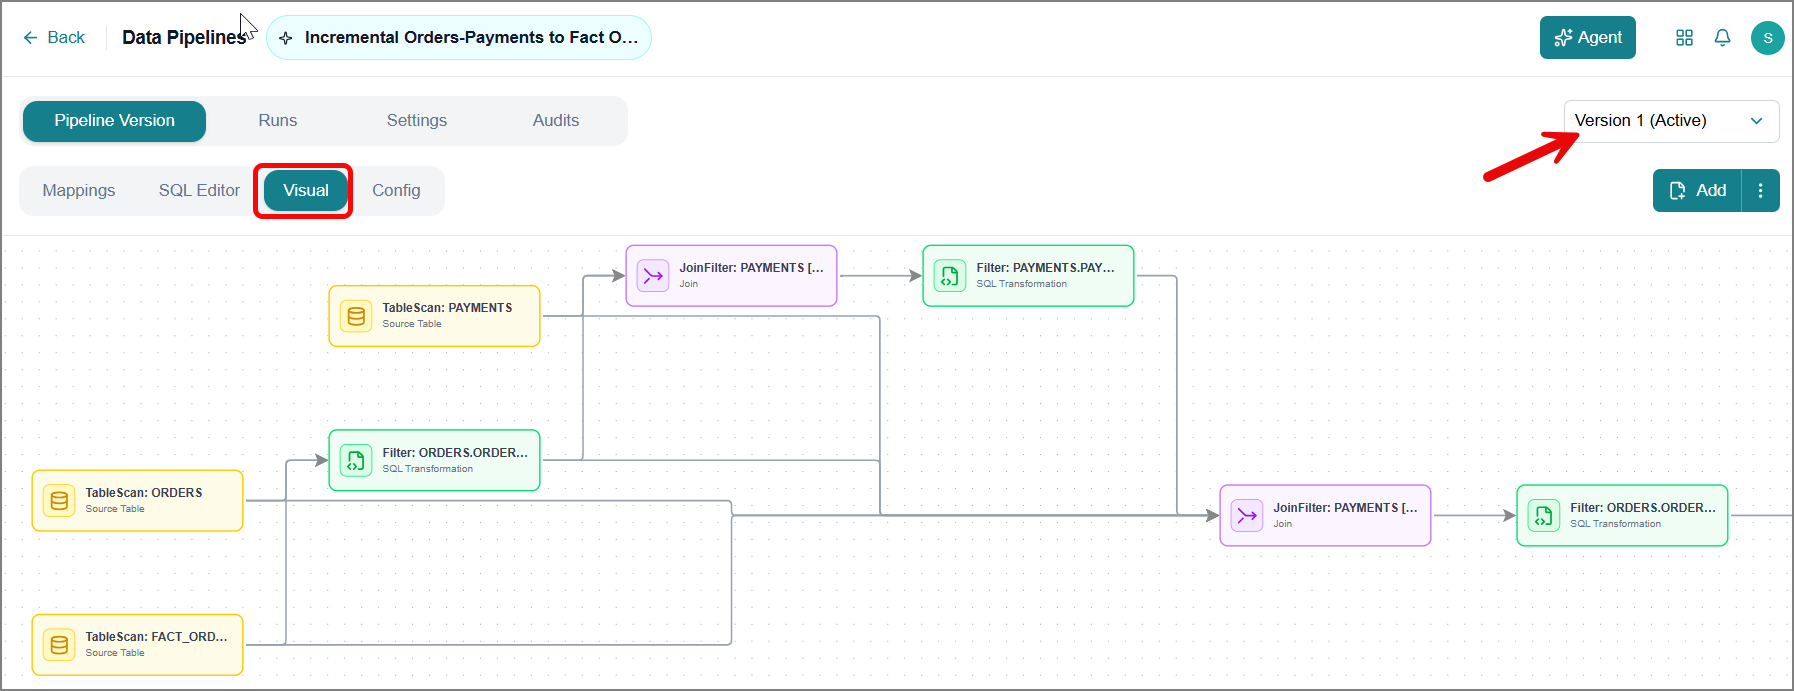
The platform lets you view your pipeline as a visual flowchart for all its versions. Instead of reading SQL code, you can view the full picture of how your data moves, step by step, from its source all the way to your Knowledge Base.
To view the flowchart:
Switch to the Pipeline Version tab > Visual tab on the pipeline details page.
Displays your complete SQL query as a flowchart, mapping out each operation in a clear, connected diagram.
Select the version from the dropdown to view the relevant visual diagram.
Viewing Pipeline Validation
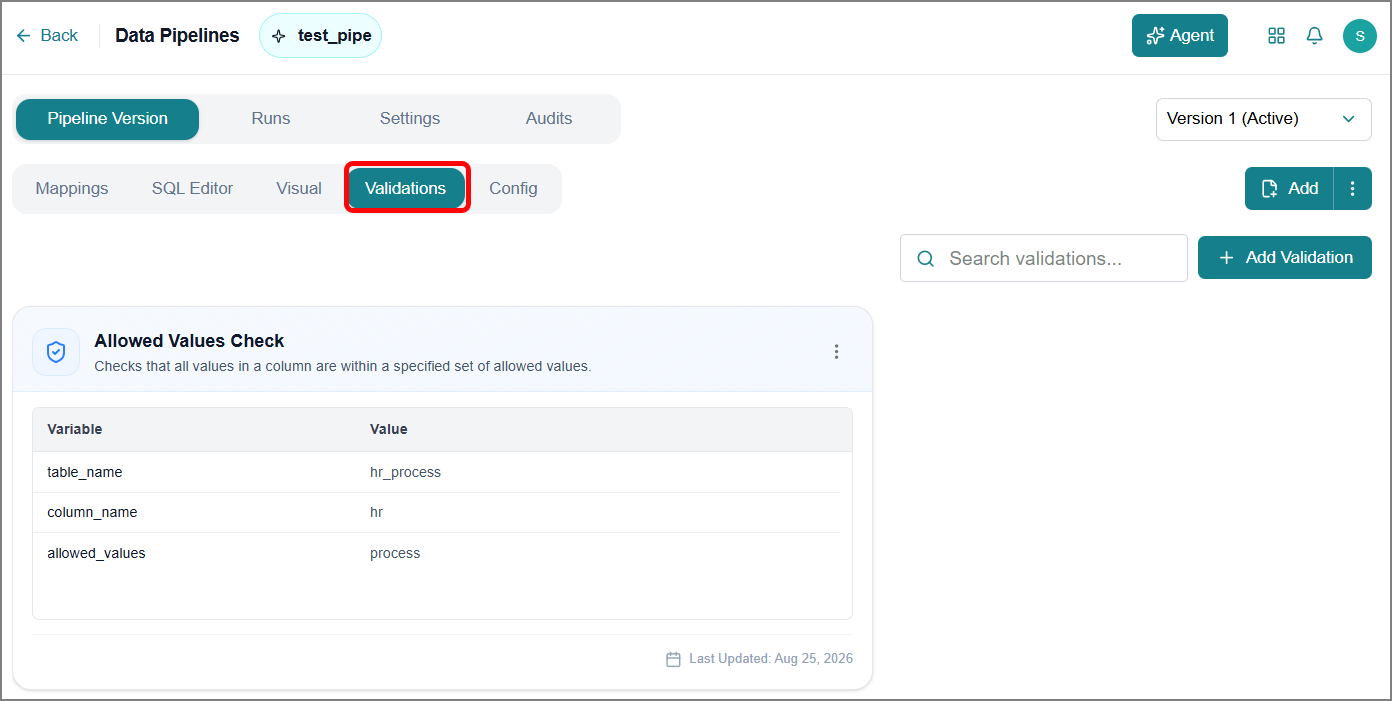
Pipeline validation lets you apply an existing validation template to a specific pipeline version and resolve its parameters with real values, such as table or column names. This confirms that the data produced by that pipeline version meets the checks you've defined before you rely on it downstream.
To view the validation:
Switch to the Pipeline Version tab > Validation tab on the pipeline details page.
The validation details are displayed.
From the dropdown, select the pipeline version you want to view.
The validation details for the selected version appear.
Note
Running a validation doesn't affect the pipeline execution. The validation runs independently to check the data already written to the target, so the pipeline's schedule, run status, and output remain unaffected regardless of whether the validation passes or fails.
Create a Pipeline Validation
Click Add Validation. The Add Validation dialog opens.
From the Validation Template dropdown, select the template you want to apply. Refer to Managing Validation Templates for more information on adding templates.
The variables table populates with the parameter names defined in the template's query.
For each variable listed in the Variables table, select a value from the dropdown.
The dropdown values are populated from the fields available in the pipeline's SQL query.
Note
You can also enter a value manually. A manually entered value takes precedence over the suggested dropdown values.
Click Add.
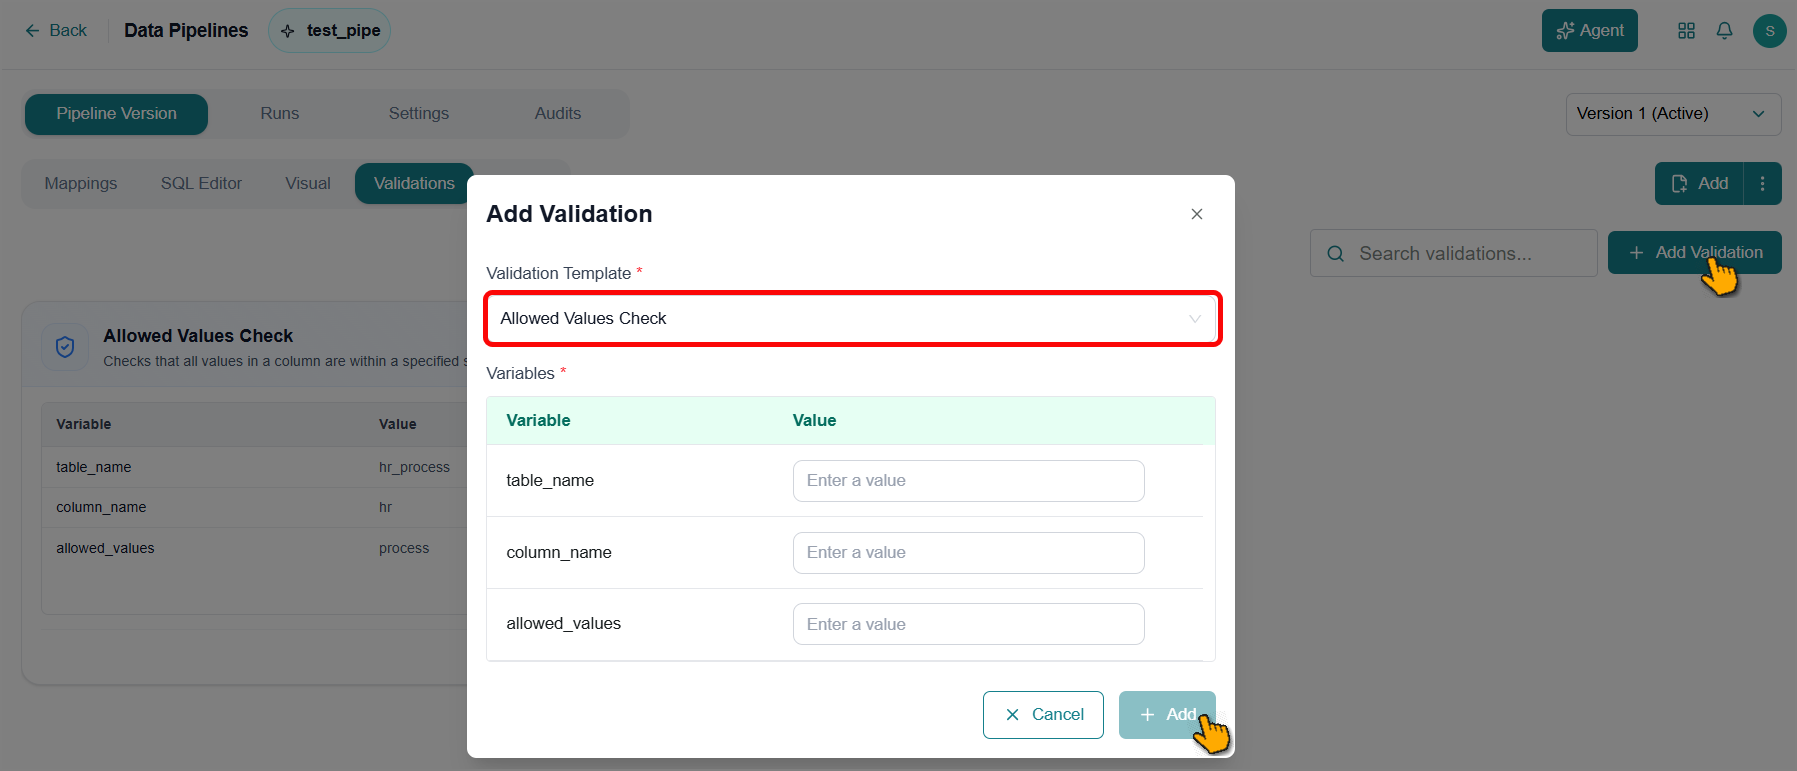
The validation is added to the pipeline version, and the validation card appears on the Validations tab with the resolved variable values.
Important
After creating a new validation, you need to rerun the pipeline for it to take effect.
Modify a Pipeline Validation
You can update an existing validation:
Use the Search box to find the validation you want to update.
Click the Ellipsis
icon on the validation card to view more options.Click Edit.
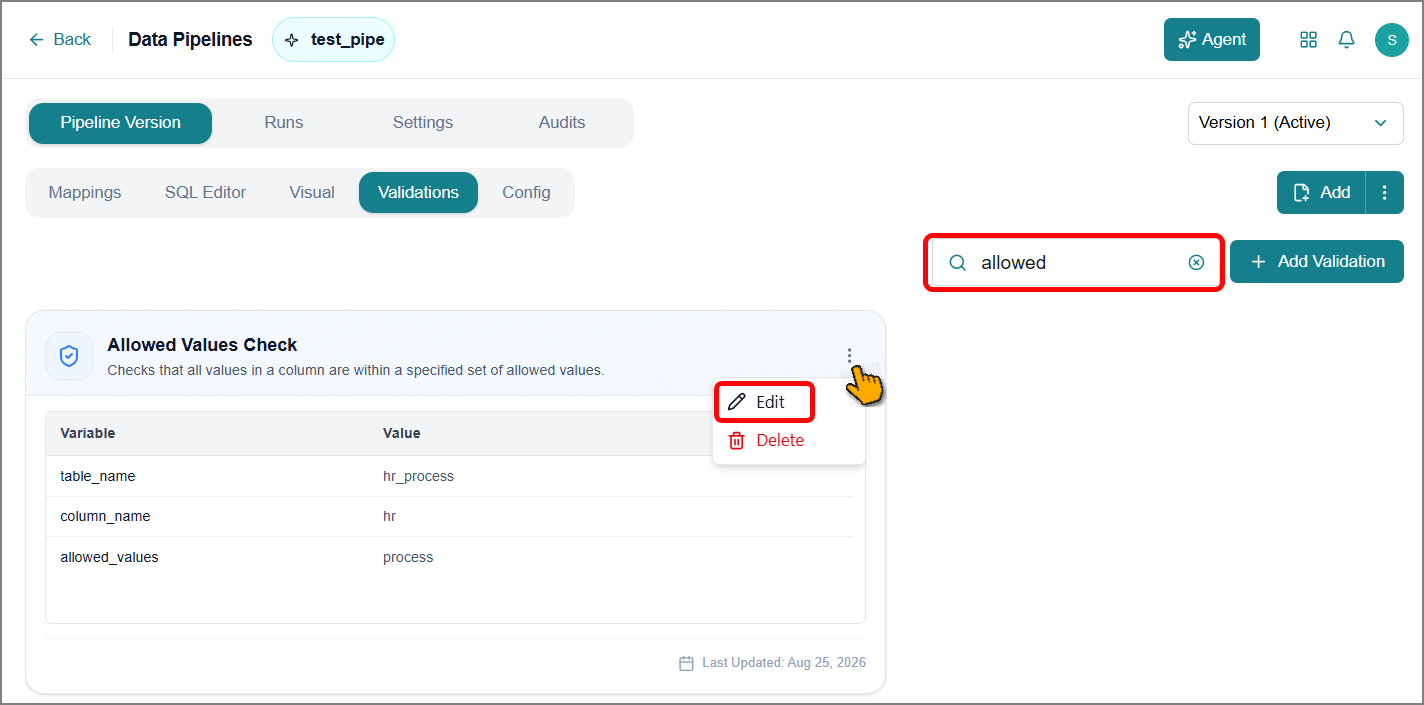
The Edit Validation panel opens.
Update the template or variable values as needed.
Click Save.
A success message confirms the changes are saved.
Delete a Pipeline Validation
You can remove an existing Pipeline Validation:
Use the Search box to find the validation you want to remove.
Click the Ellipsis
icon on the validation card to view more options.Click Delete.
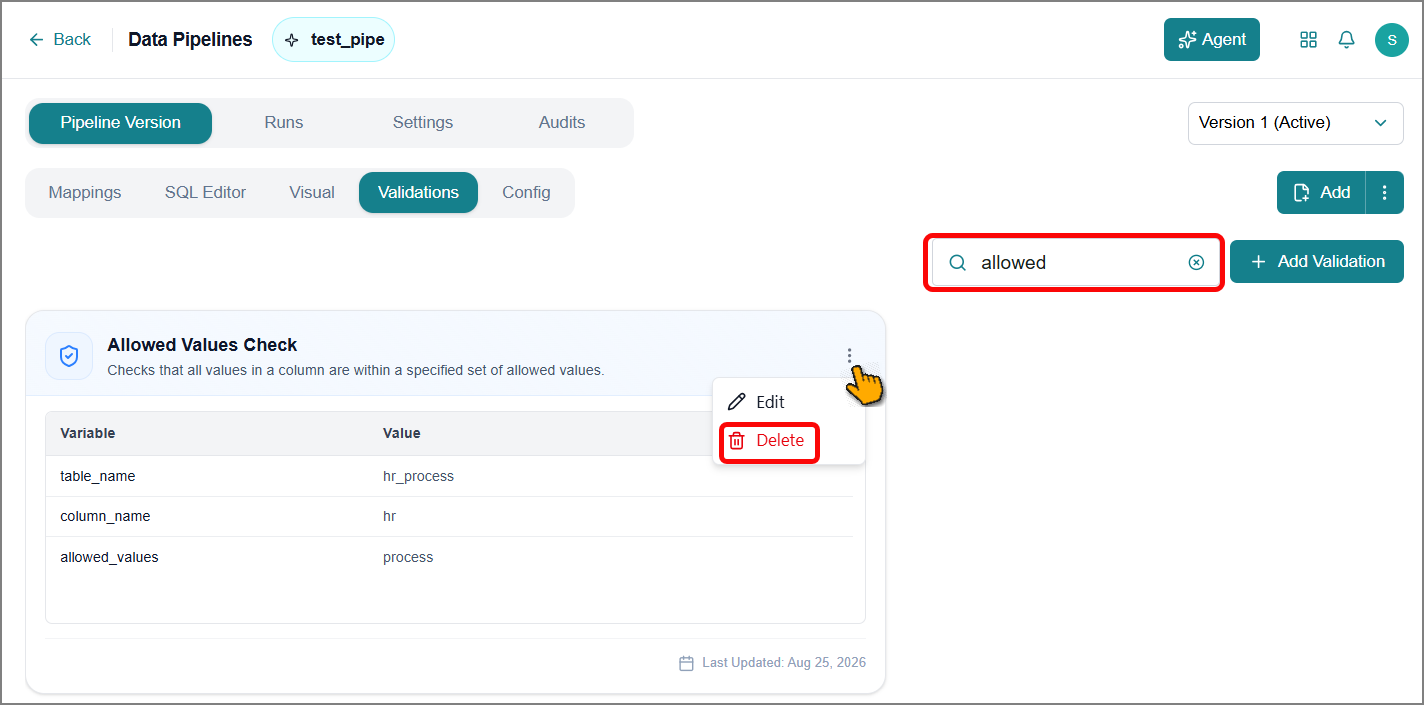
The Delete Validation confirmation dialog box opens.
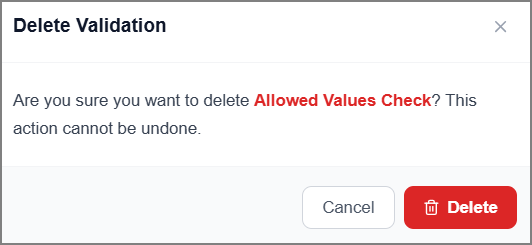
Click Delete.
A success message confirms that the validation is removed from the page.
Viewing Pipeline Configuration
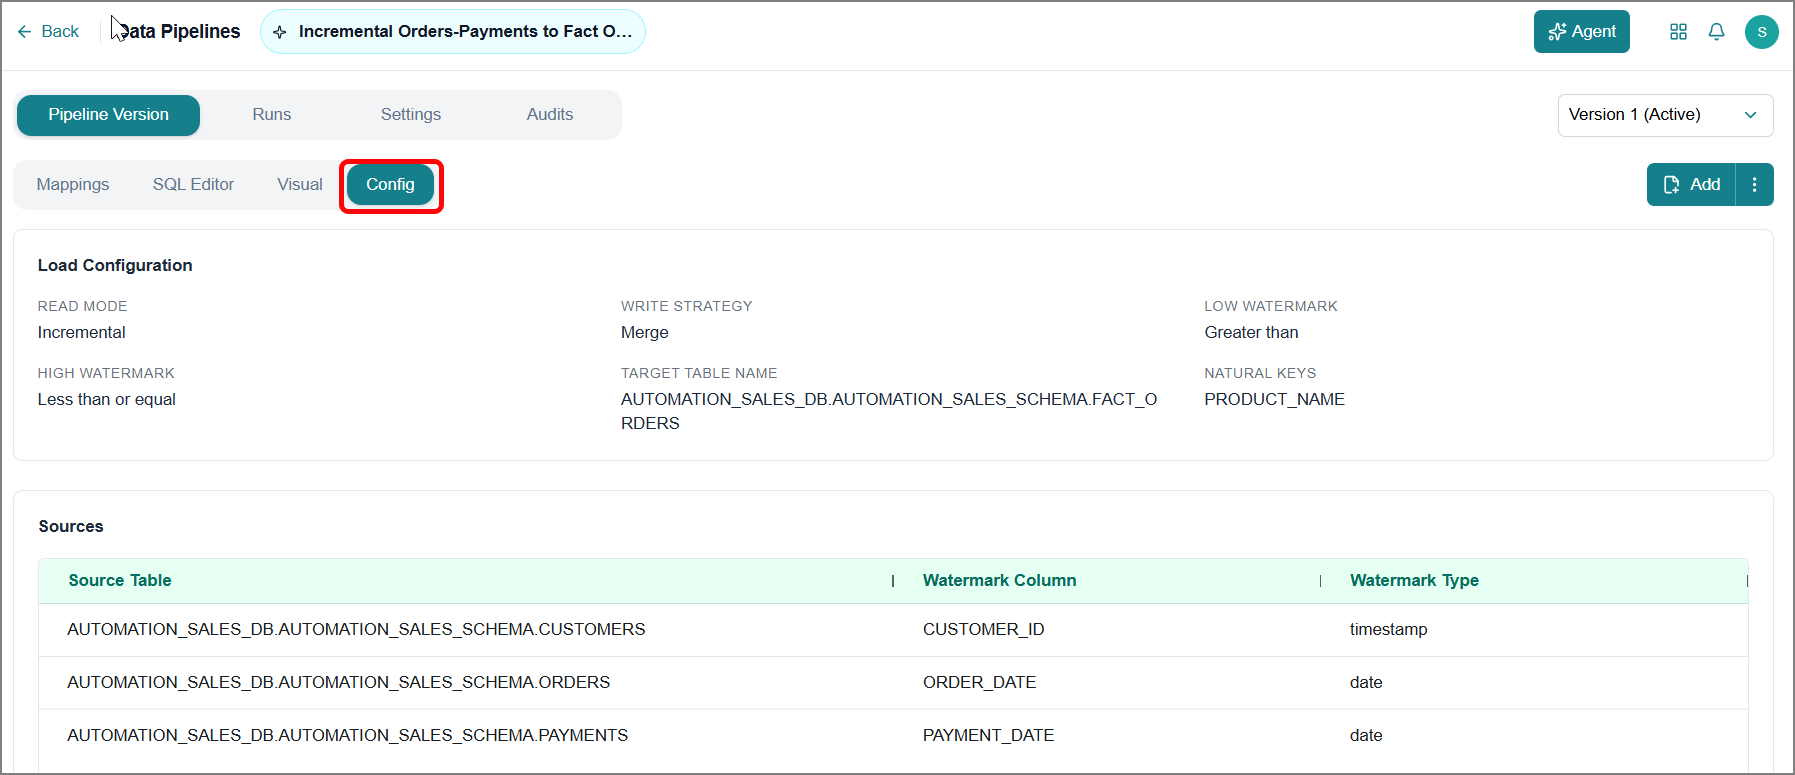
The platform lets you view the table configuration defined in your pipeline SQL query. Use this feature to quickly verify your table setup before running the pipeline.
To view the configuration:
On the pipeline details page, switch to the Pipeline Version tab > Config tab.
The configuration details are displayed.
From the dropdown, select the pipeline version you want to view.
The configuration details for the selected version appear.
Viewing Pipeline Mappings
The platform lets you view and manage the pipeline table mappings defined in your SQL query. Use this feature to quickly manage your table mappings before running the pipeline.
To view the mappings:
On the pipeline details page, switch to the Pipeline Version tab > Mappings tab.
The table mapping details are displayed.
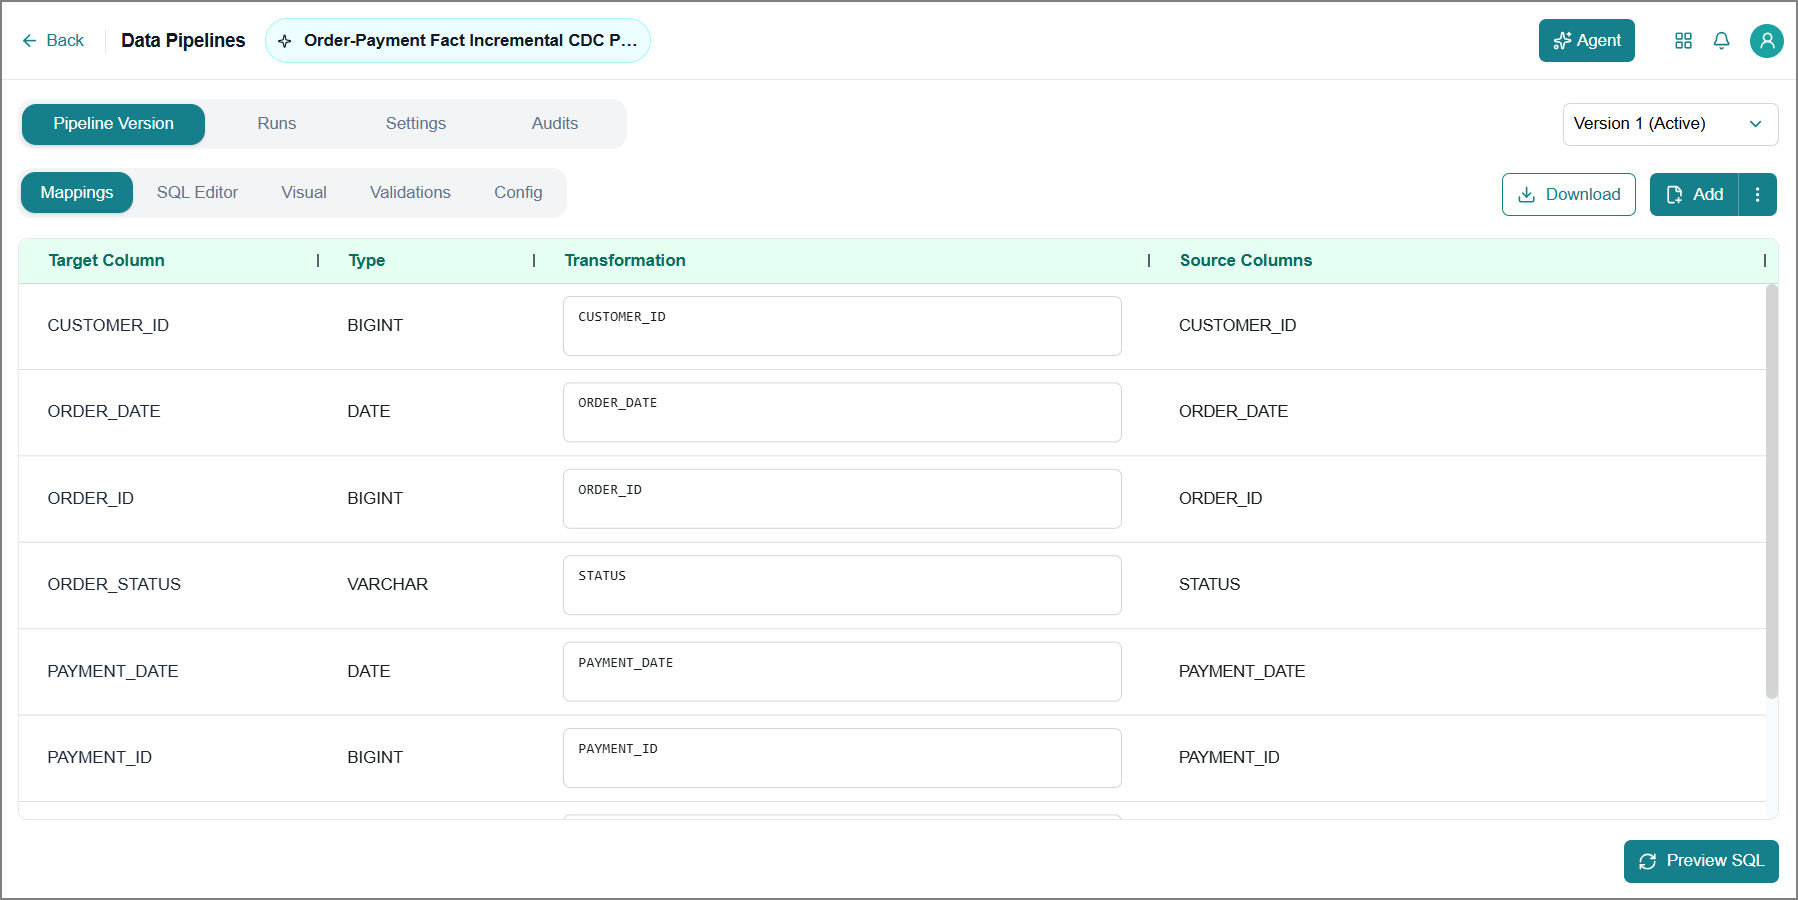
From the dropdown, select the pipeline version you want to view.
The table mapping for the selected version appears.
Update the Transformation field as needed.
Click Preview SQL.
The SQL updates based on your mapping changes and appears in the right panel.
To discard the SQL, click Reject.
Update the SQL in the right panel as needed.
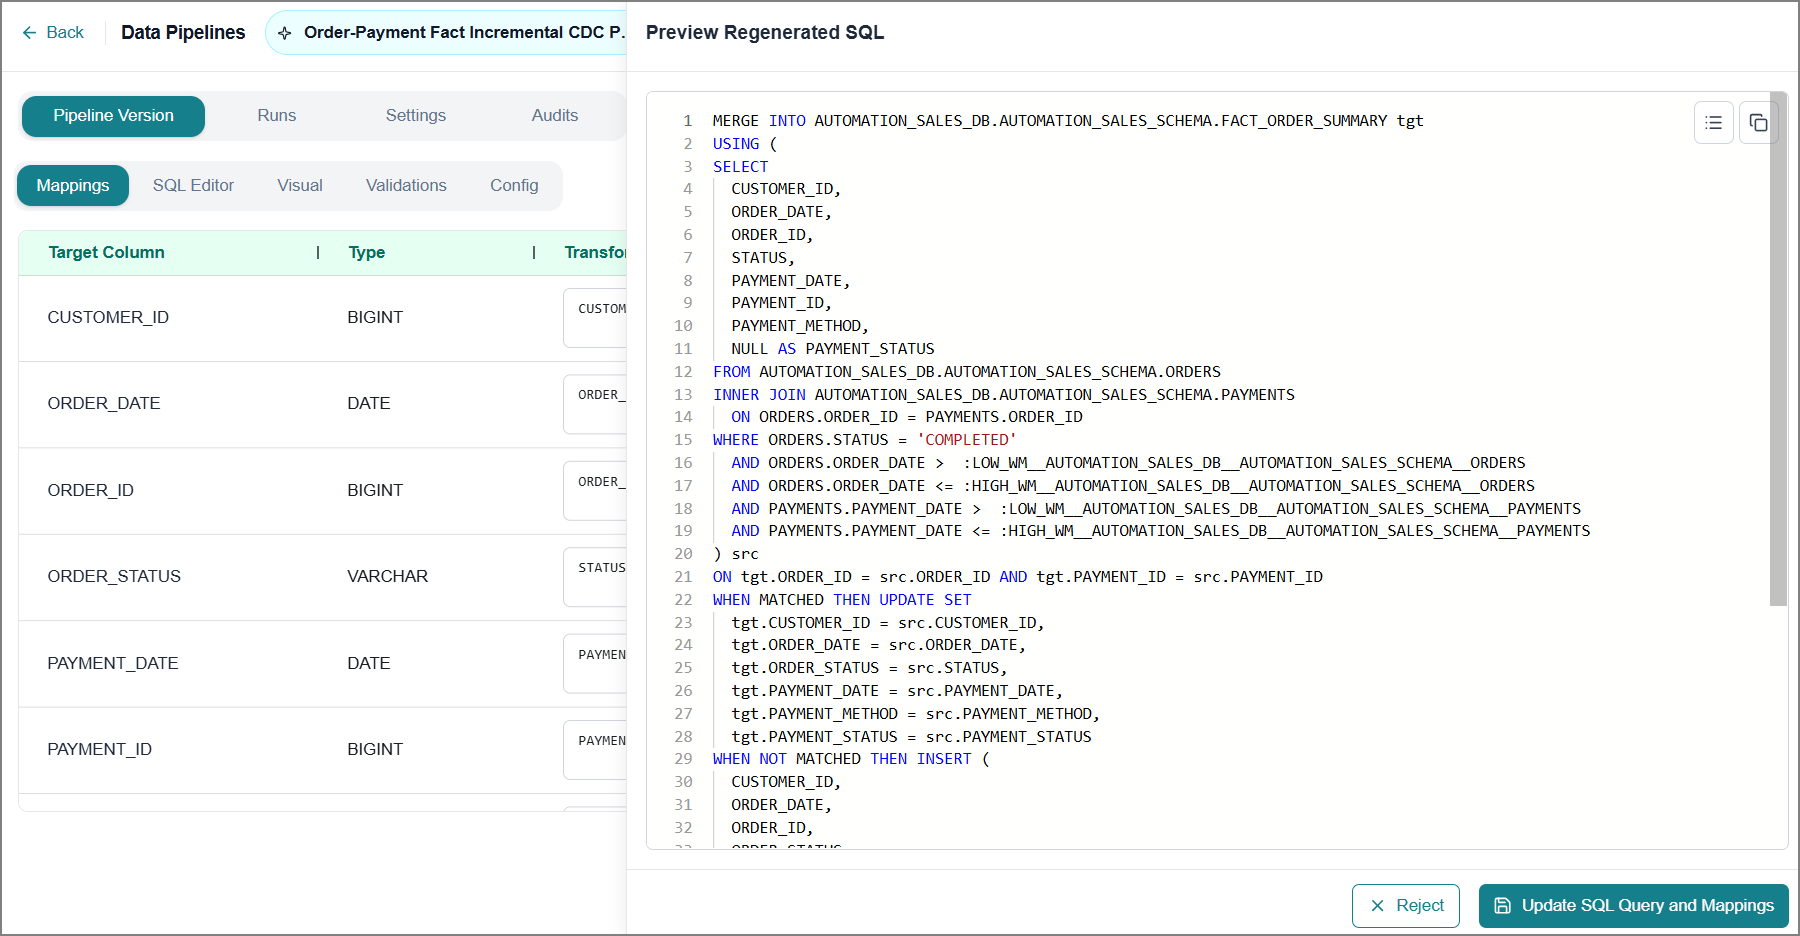
After you finish editing, click Update SQL Query and Mappings.
The platform saves your changes and replaces the existing SQL with the updated version.
In addition, you can download the mappings for quick review:
Click Download.
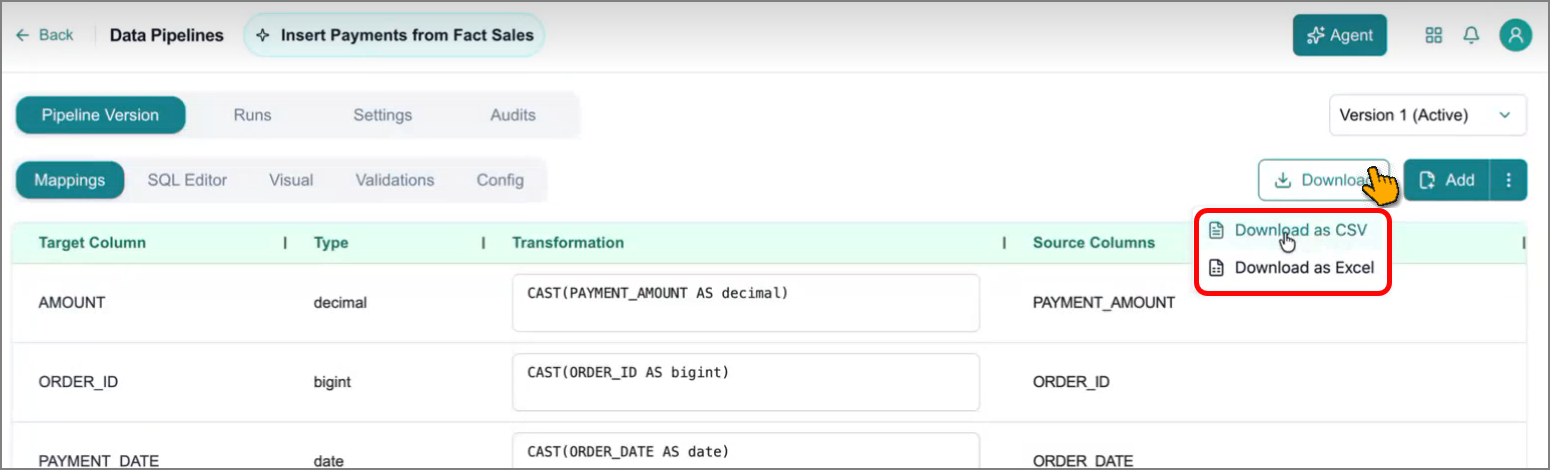
Based on the need, you can choose either of the following options:
Download as CSV - Export the mappings to your local system in CSV format.
Download as Excel - Export the mappings to your local system in Excel format.
Viewing Pipeline Runs
The platform maintains a full execution history for each pipeline, including real-time status updates for active runs and detailed logs for completed or failed executions.
To view all pipeline runs:
On the pipeline details page, switch to the Runs tab.
A list of all Pipeline Runs appears, including each run's status and timestamp. Active runs update in real time, so you can monitor progress as it happens.
Click View Details on any run to access a comprehensive breakdown of that execution.
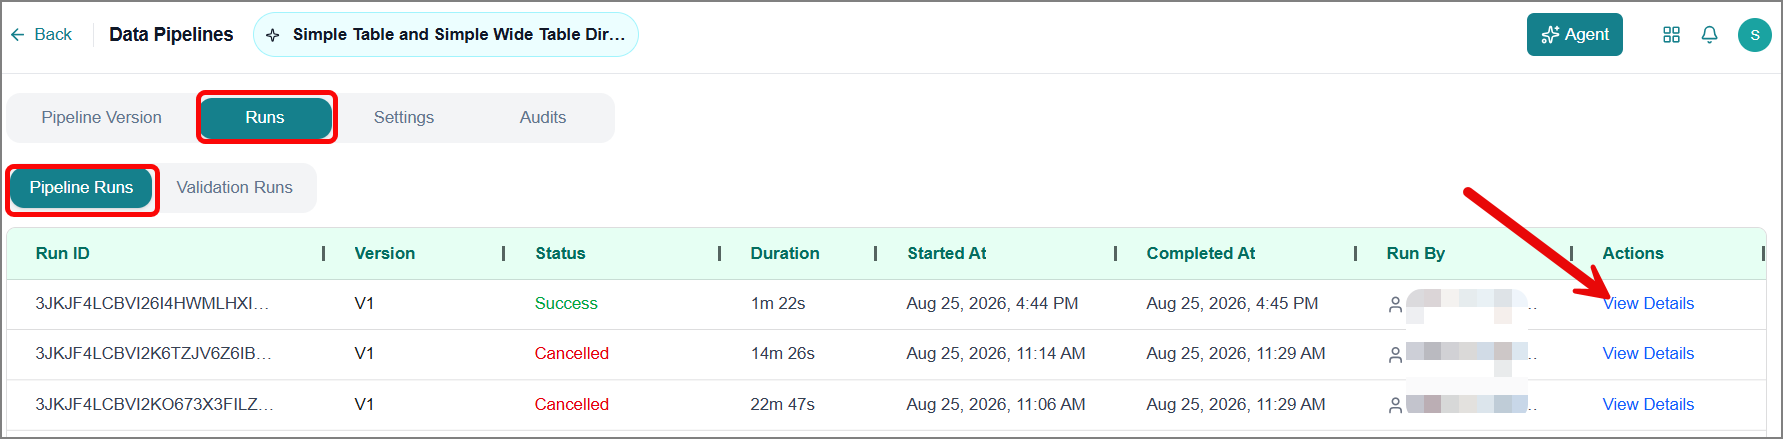
The Run Details panel opens.
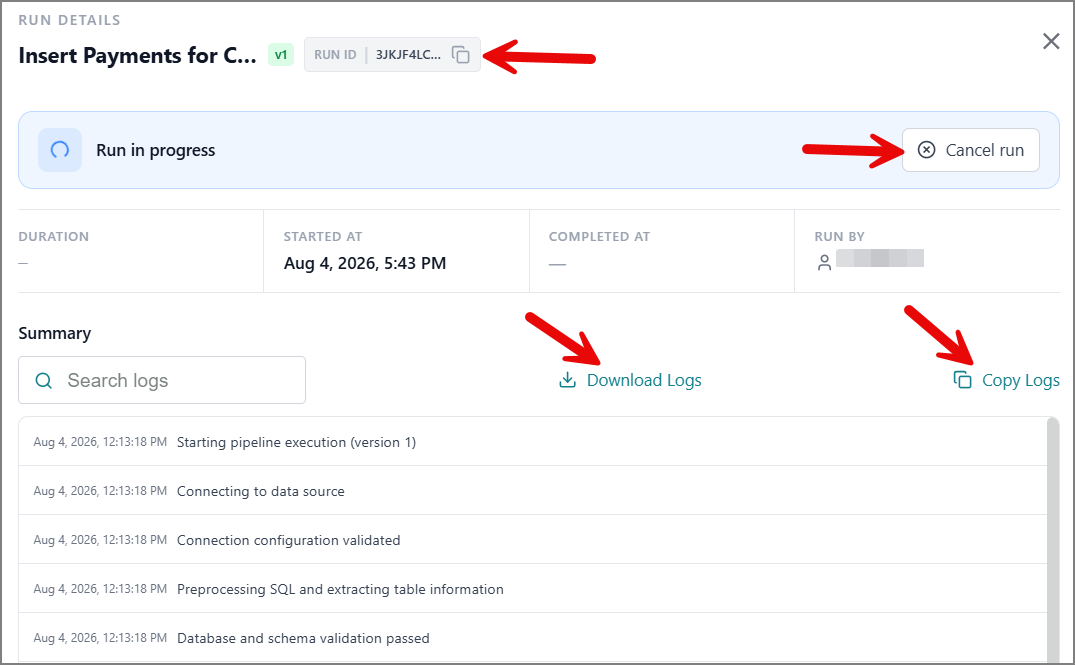
The following actions are available on this panel:
To copy the unique execution identifier to your clipboard, click the Copy
 icon next to Run ID.
To download the run's log to your system, click Download Logs.
To copy the run's log to the clipboard, click Copy Logs.
To stop execution while the run is still in progress, click Cancel Run.
Note
Once the pipeline run completes successfully, the tables generated by your SQL queries are automatically registered in the associated Knowledge Base. Refer to Viewing Metadata in the Data Ingestion section to view the newly registered tables.
Viewing Validation Runs
The platform maintains a full execution history for each pipeline validation, including real-time status updates for active runs and detailed logs for completed or failed validations.
To view all pipeline validation runs:
On the pipeline details page, switch to the Runs tab > Validation Runs tab.
A list of all Validation Runs appears, including each run's status and timestamp. Active runs update in real time, so you can monitor progress as it happens.
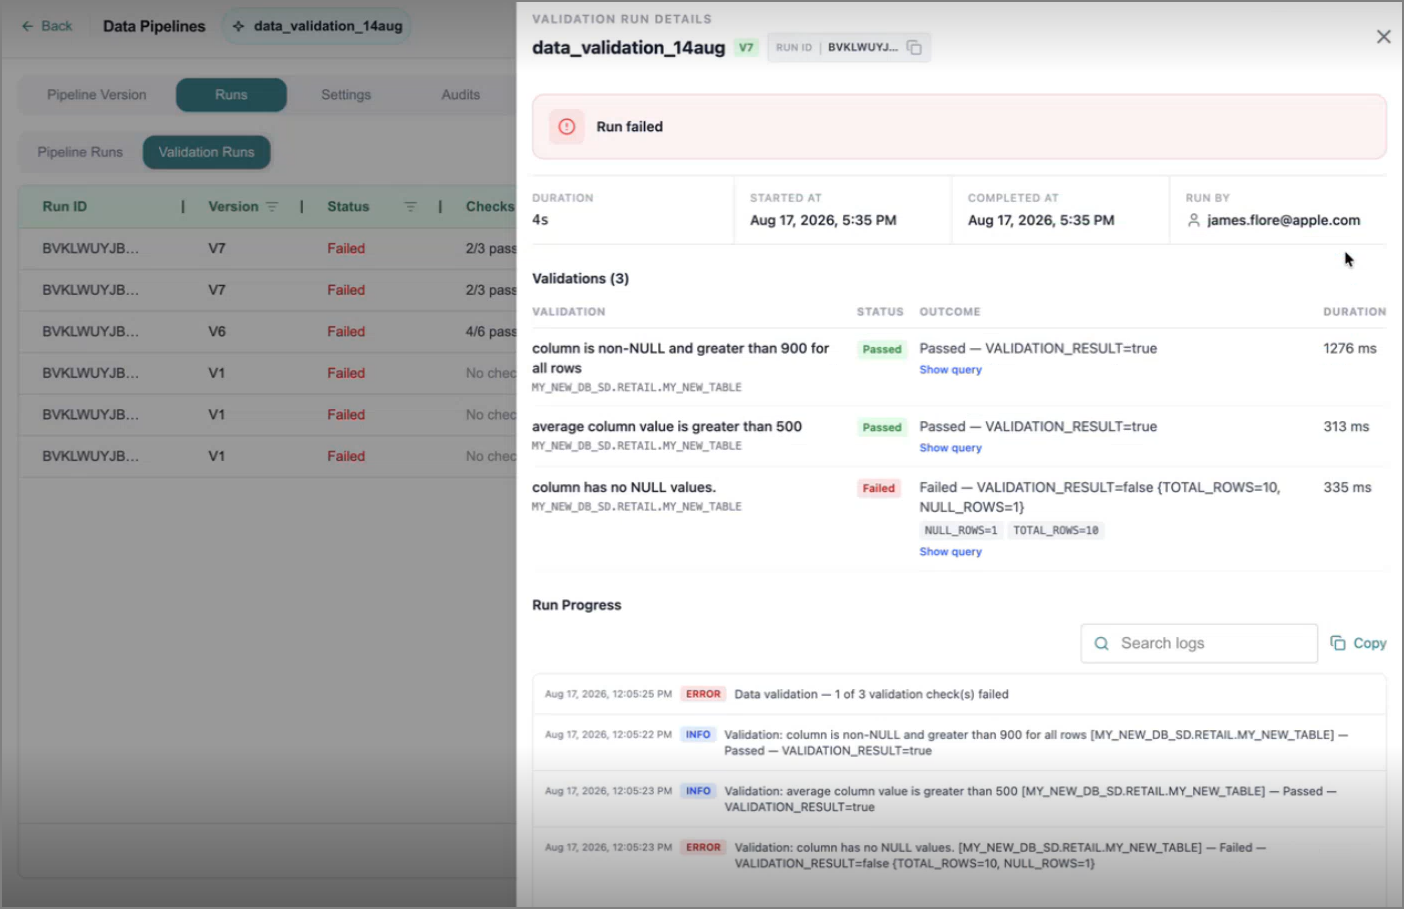
Click View Details on any run to access a comprehensive breakdown of that execution.
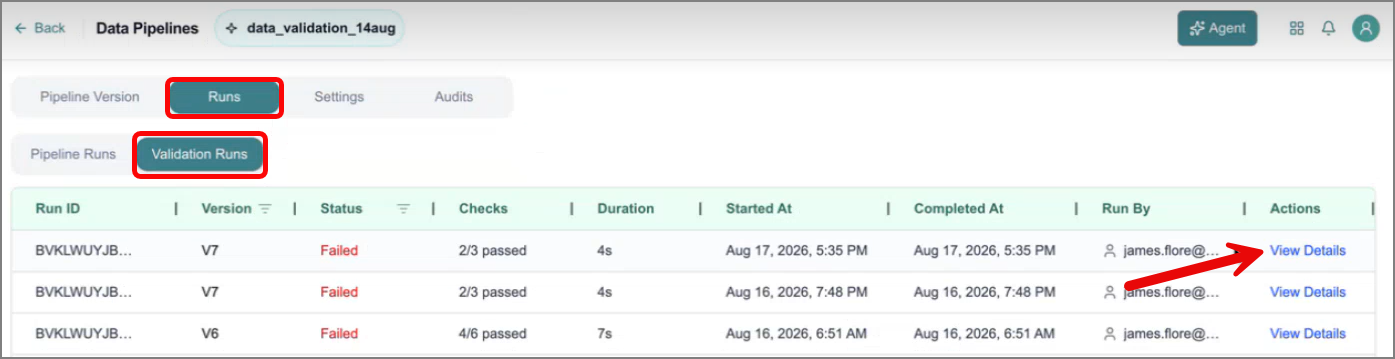
The Run Details panel opens.
Managing Pipeline Settings
The platform helps you update a pipeline's settings at any time without affecting its SQL queries or run history.
To update the pipeline's settings:
On the pipeline details page, switch to the Settings tab.
The current pipeline settings are displayed, including the pipeline name, description, KC, and destination Knowledge Base.
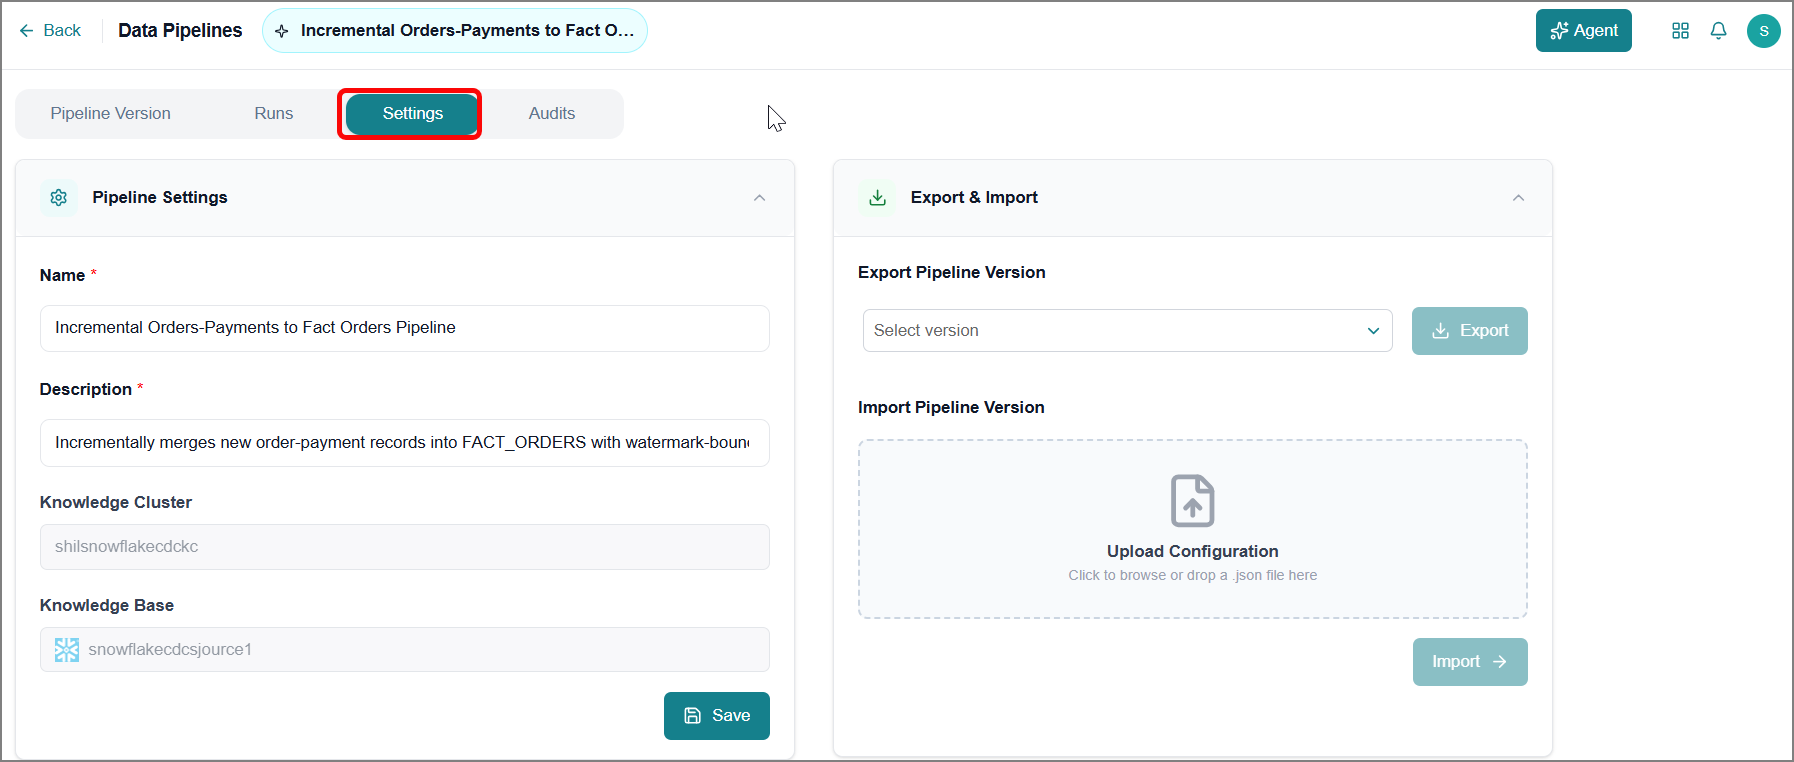
Make the necessary changes to any of the following fields:
Name - Update the pipeline name.
Description - Update the description to reflect the pipeline's purpose.
Knowledge Cluster and Knowledge Base are preselected.
Click Save.
A success message confirms that your changes were saved.
Enabling Job Hooks
Job Hooks let you run an action automatically before or after a data pipeline job runs. Use Job Hooks to prepare your environment before a job starts, or to trigger a follow-up action, such as a notification, after the job finishes.
Important
At least one job hook should be available to select. Refer to Job Hooks Tab for more information.
To enable a job hook for the pipeline:
Go to Data Pipelines and open the pipeline you want to configure.
Click the Settings tab.
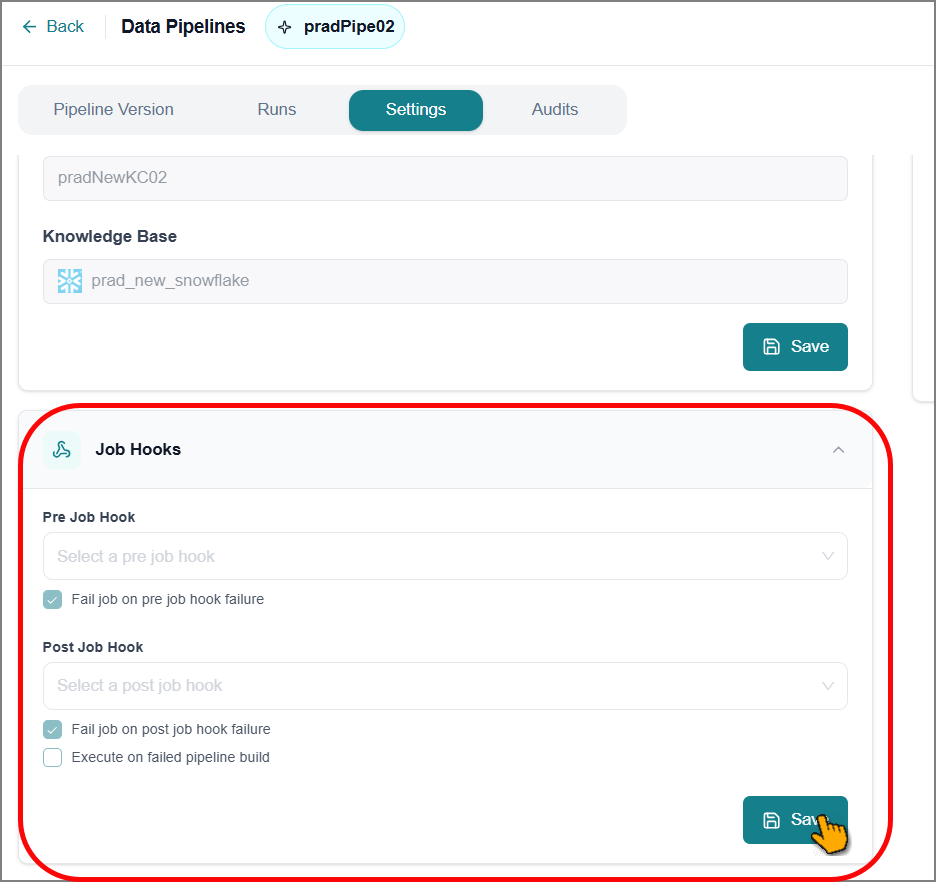
In the Job Hooks section, select Pre Job Hook from the dropdown to choose a hook that runs before the job starts.
Select Fail job on pre job hook failure only if you want the job to stop when the Pre Job Hook fails.
Note
If this checkbox is cleared, the job continues even if the pre-job hook fails.
Select Post Job Hook from the dropdown to choose a hook that runs after the job finishes.
Select Fail job on post job hook failure only if you want the job to be marked as failed when the Post Job Hook fails.
Select Execute on failed pipeline build only if you want the post-job hook to run even when the pipeline build itself fails.
Click Save. A confirmation message appears, and your Job Hooks configuration is applied to future runs of this pipeline.
Note
Changes to Job Hooks apply to runs that start after you select Save. They don't affect a run that's already in progress.
Exporting and Importing a Pipeline
The platform supports exporting a pipeline's SQL configuration to a JSON file and importing that file into a target pipeline. This provides interoperability between pipelines and supports configuration reuse across pipelines and environments.
To access this feature, on the pipeline details page, switch to the Settings tab.
The current pipeline details are displayed, including the pipeline name, description, Knowledge Cluster, and destination Knowledge Base. It also lists the available pipeline versions you can export and shows the option to import a pipeline version.
To export a pipeline SQL version:
From the dropdown list, select the pipeline version you want to export.
Click Export.
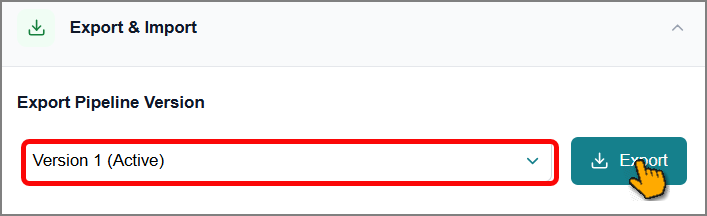
The platform automatically downloads a JSON file to your computer.
To import a pipeline SQL version:
Upload the pipeline JSON file that you exported from the other pipeline version.
Click Import.
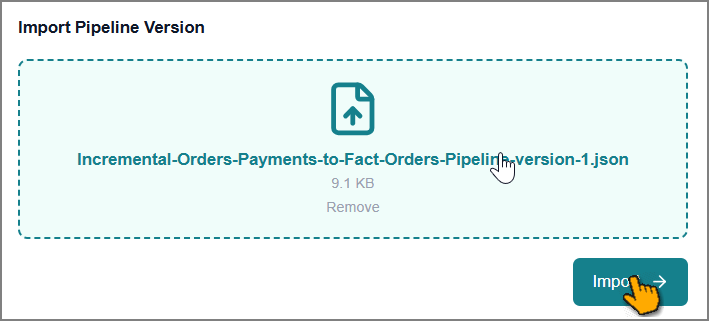
A mapping page opens. It shows the imported configuration and the source mapping that the platform identifies automatically.
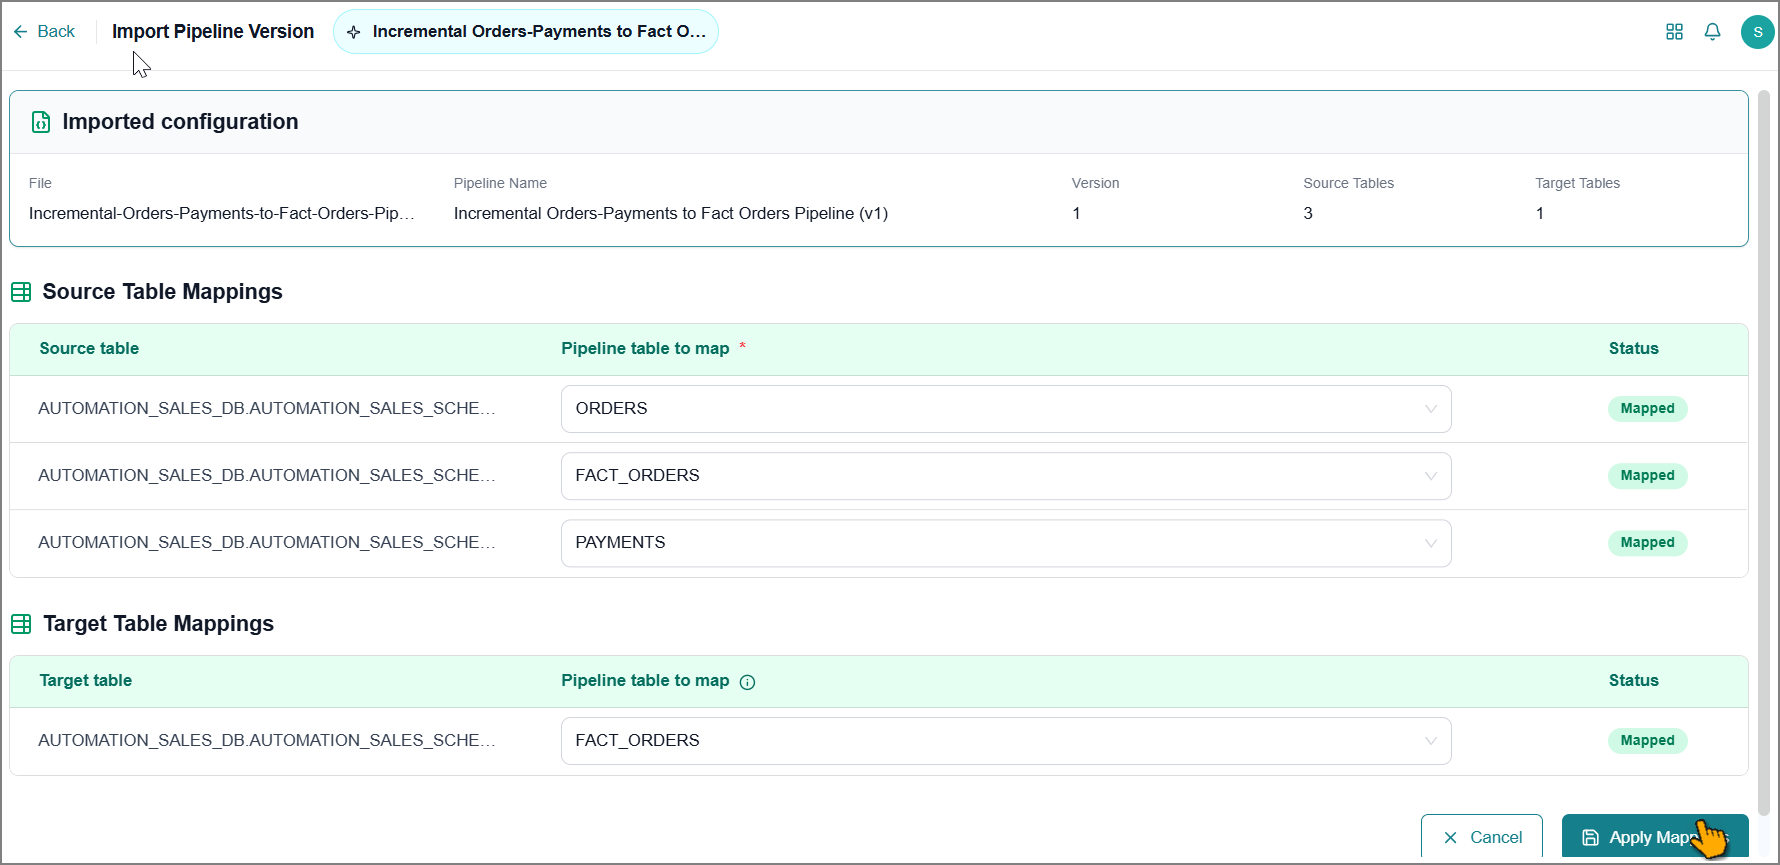
Review and update the mapping as needed.
Source table mapping is required. Import is blocked until a source table is mapped.
Target table mapping is optional. If left unmapped, the platform automatically creates a new table for your data.
After finalizing, select Apply Mapping.
The SQL Editor tab opens. The platform creates a new pipeline version with the imported configuration.
Viewing Pipeline Audits
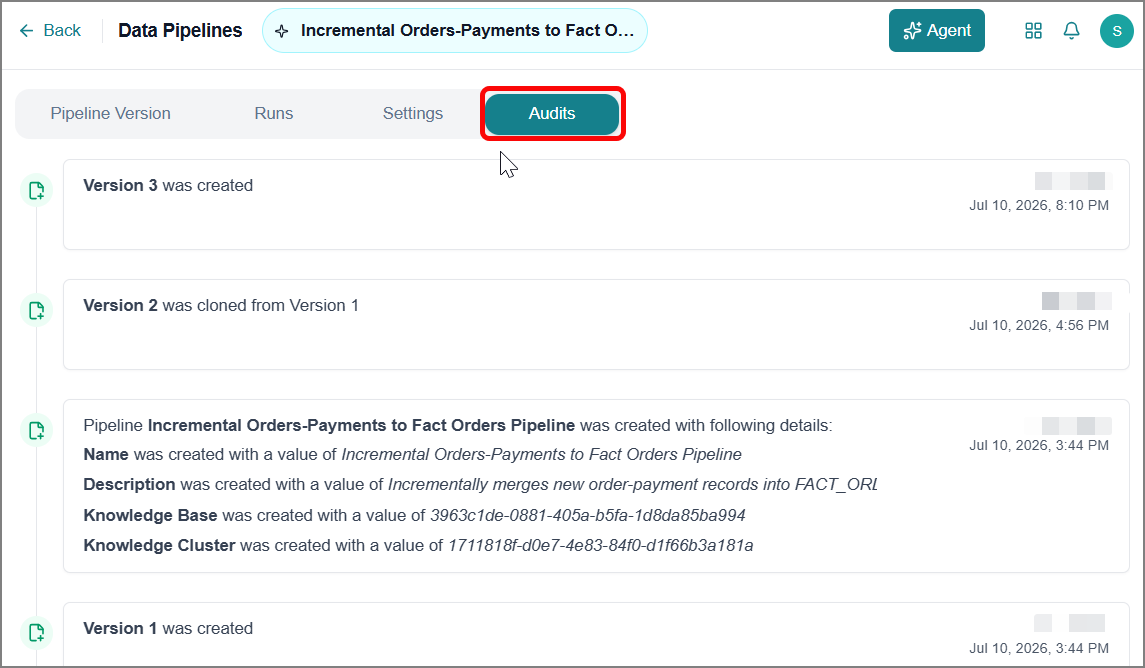
The Audits tab records all changes to the pipeline, allowing you to review and validate pipeline modifications. It supports change tracking and validation for administrators and technical users who maintain the pipeline's integrity across the platform.
Switch to the Audits tab. It displays a list of all the pipeline changes, sorted with the most recent change at the top. Each entry shows the type of change and the date and time it occurred.
Deleting a Pipeline
You can delete a pipeline that is no longer needed without affecting the data it produced. Deleting a pipeline removes it from the platform; any tables created in the target Knowledge Base are preserved and remain fully accessible.
Select a Knowledge Cluster from the dropdown.
All pipelines associated with the selected cluster are displayed.
Use the Search box to filter the pipeline you want to remove.
Click the Delete
icon on the pipeline.The confirmation dialog opens.
Click Delete to confirm.
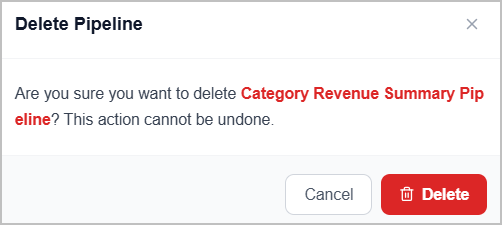
The pipeline is removed from the Data Pipelines page.
Managing Validation Templates
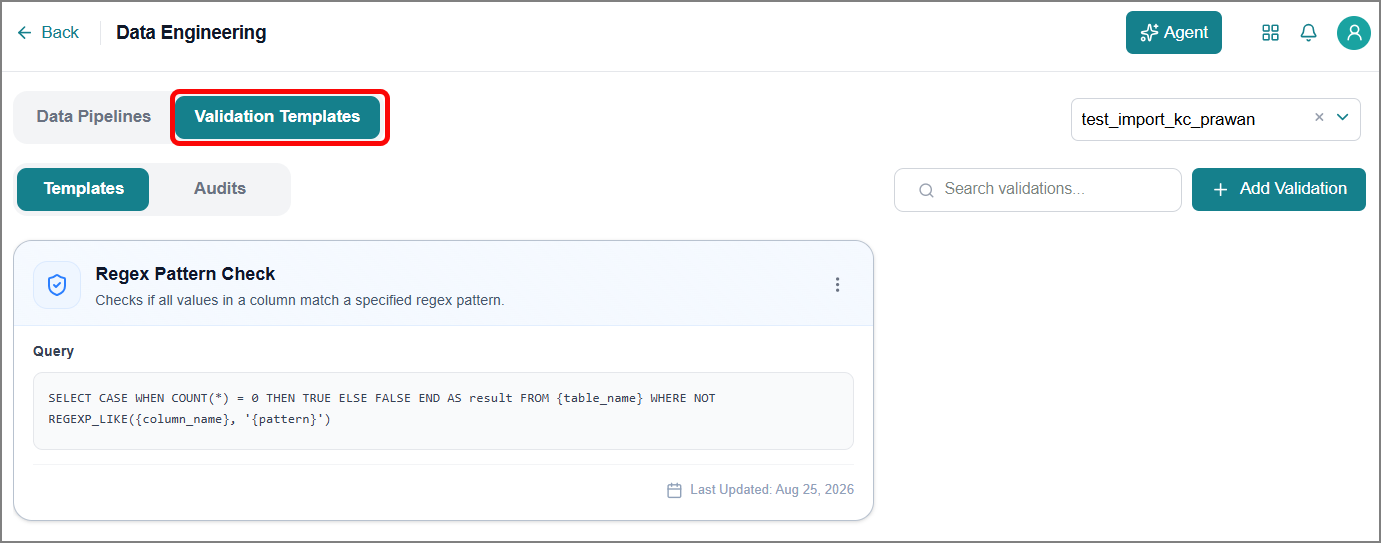
Validation Templates let you check whether the data written to a pipeline's target meets rules you define, such as confirming a column has no missing values or that an average falls within an expected range. Each validation is associated with a specific Knowledge Cluster and its related pipeline, so you can catch data quality issues early, before they affect the agents and reports that rely on that data.
You can manually create a validation template or use the platform agent to create it. You can use the same template in the pipeline to add validations.
To access the validation templates, go to Data Agents > Data Engineering > Validation Templates.
Create a Validation Template with an Agent
You can easily make a Validation Template with the platform agent.
To create:
Select the required KC from the dropdown for which you need a validation template.
On the Validation Templates page, click Agent (top-right corner).
The agent chat panel opens from the left side.
Make sure to select the Data Validation option from the dropdown.
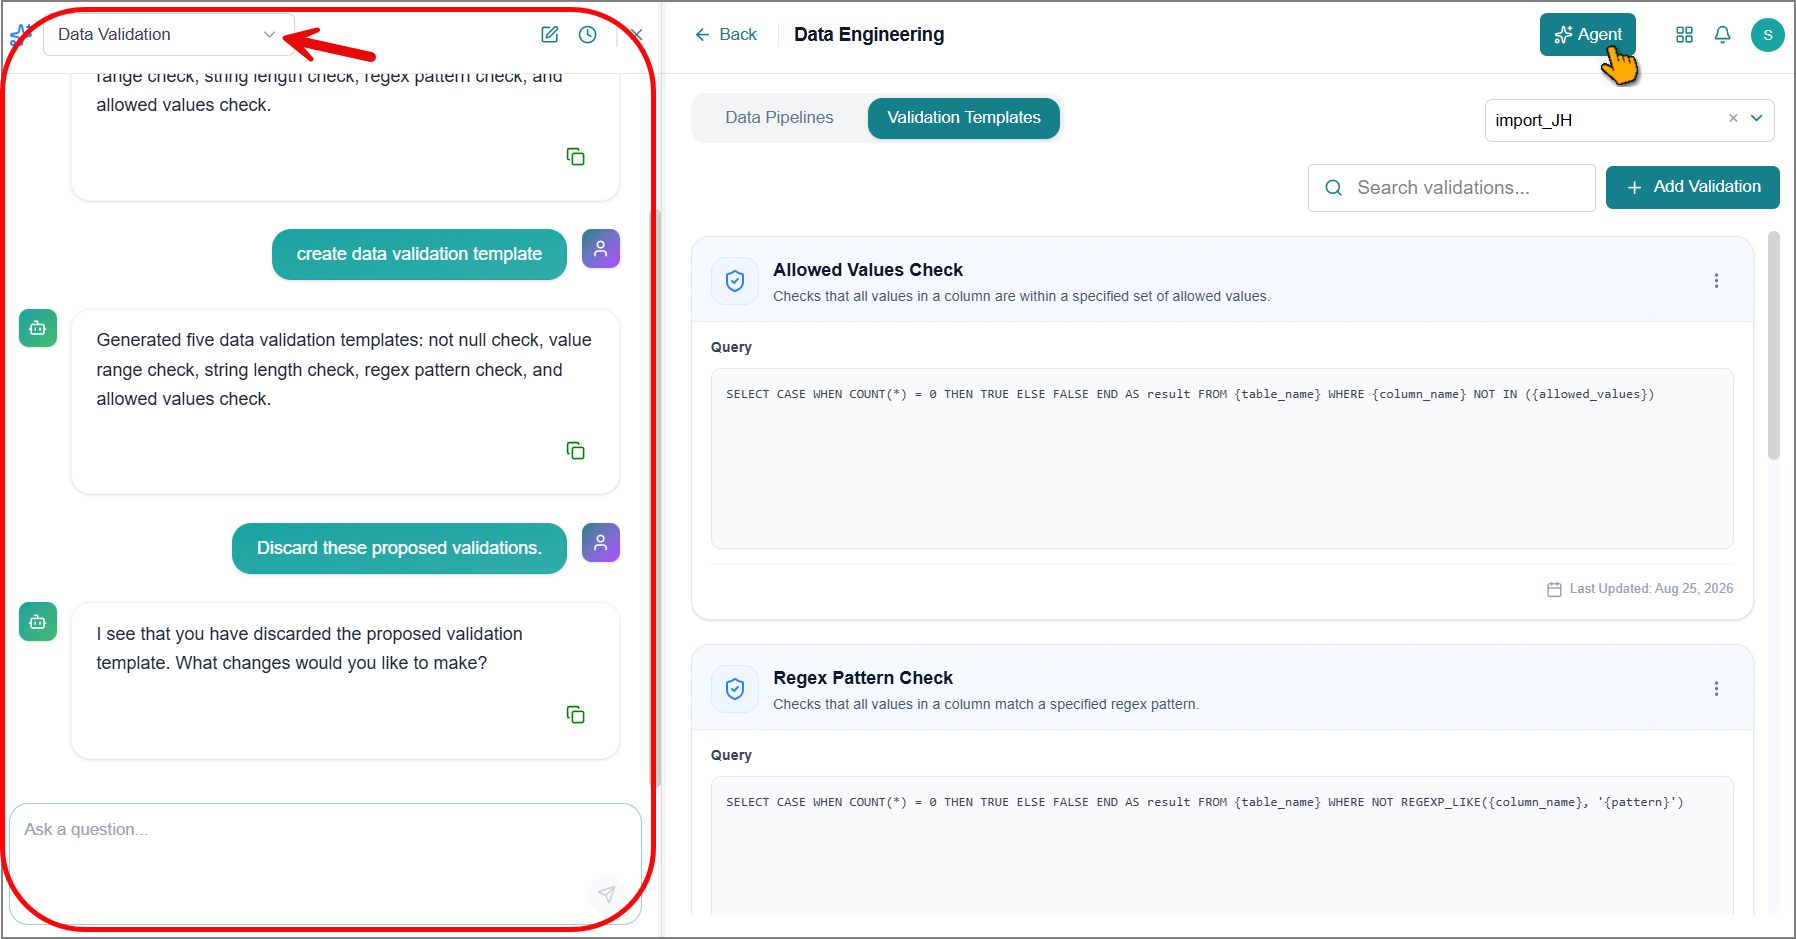
Describe the validation you want in plain language.
The agent generates a parameterized query and description based on your instructions, then displays them for review.
Review the template on the right panel.
You can update the template as needed.
If the agent generates multiple templates based on your requirements, you can remove individual templates rather than discarding them altogether.
Choose one of the following actions:
Click Approve to confirm and create the validation template.
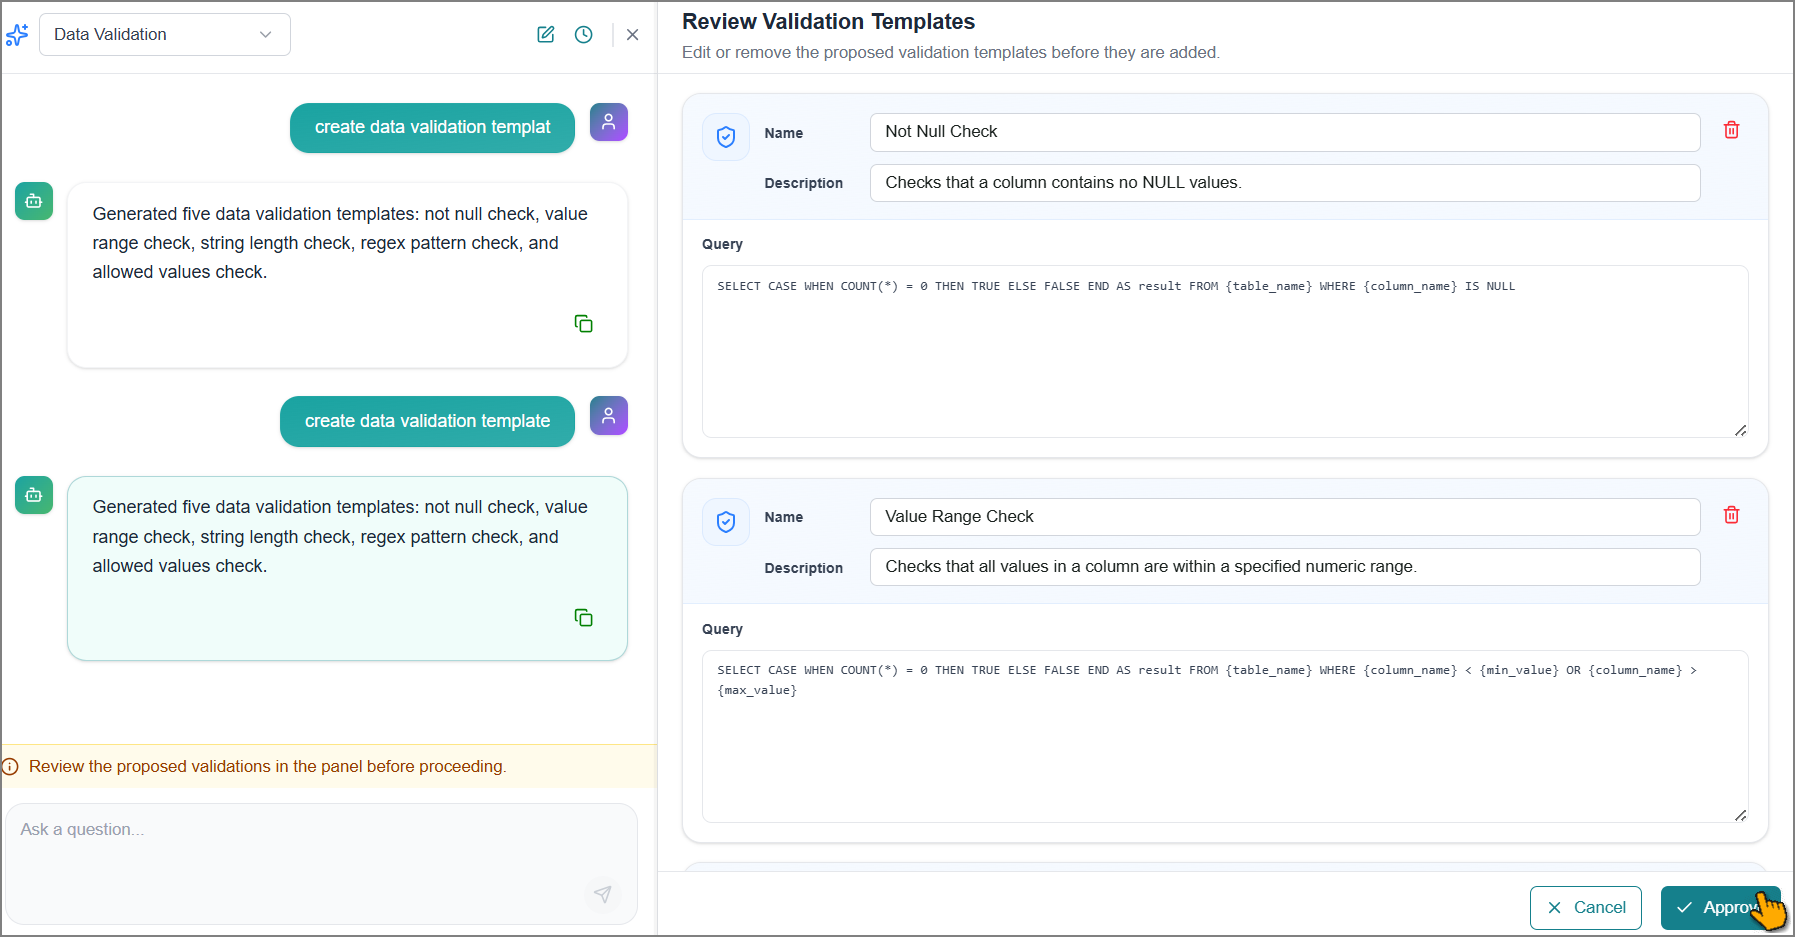
Click Cancel to discard the generated template. Refine your description and describe the validation again to generate a new one.
The template is created and added to the Validation Templates page.
Tip
You can apply the same validation template to multiple pipelines or pipeline versions, resolving the variables differently each time.
Create a Validation Template Manually
Select the required KC from the dropdown for which you need a validation template.
On the Validation Templates page, click Add Validation.
The Add Validation panel opens.
Enter a Name for the validation.
Enter a Description of what the validation checks.
Enter the validation Query.
Click Add.
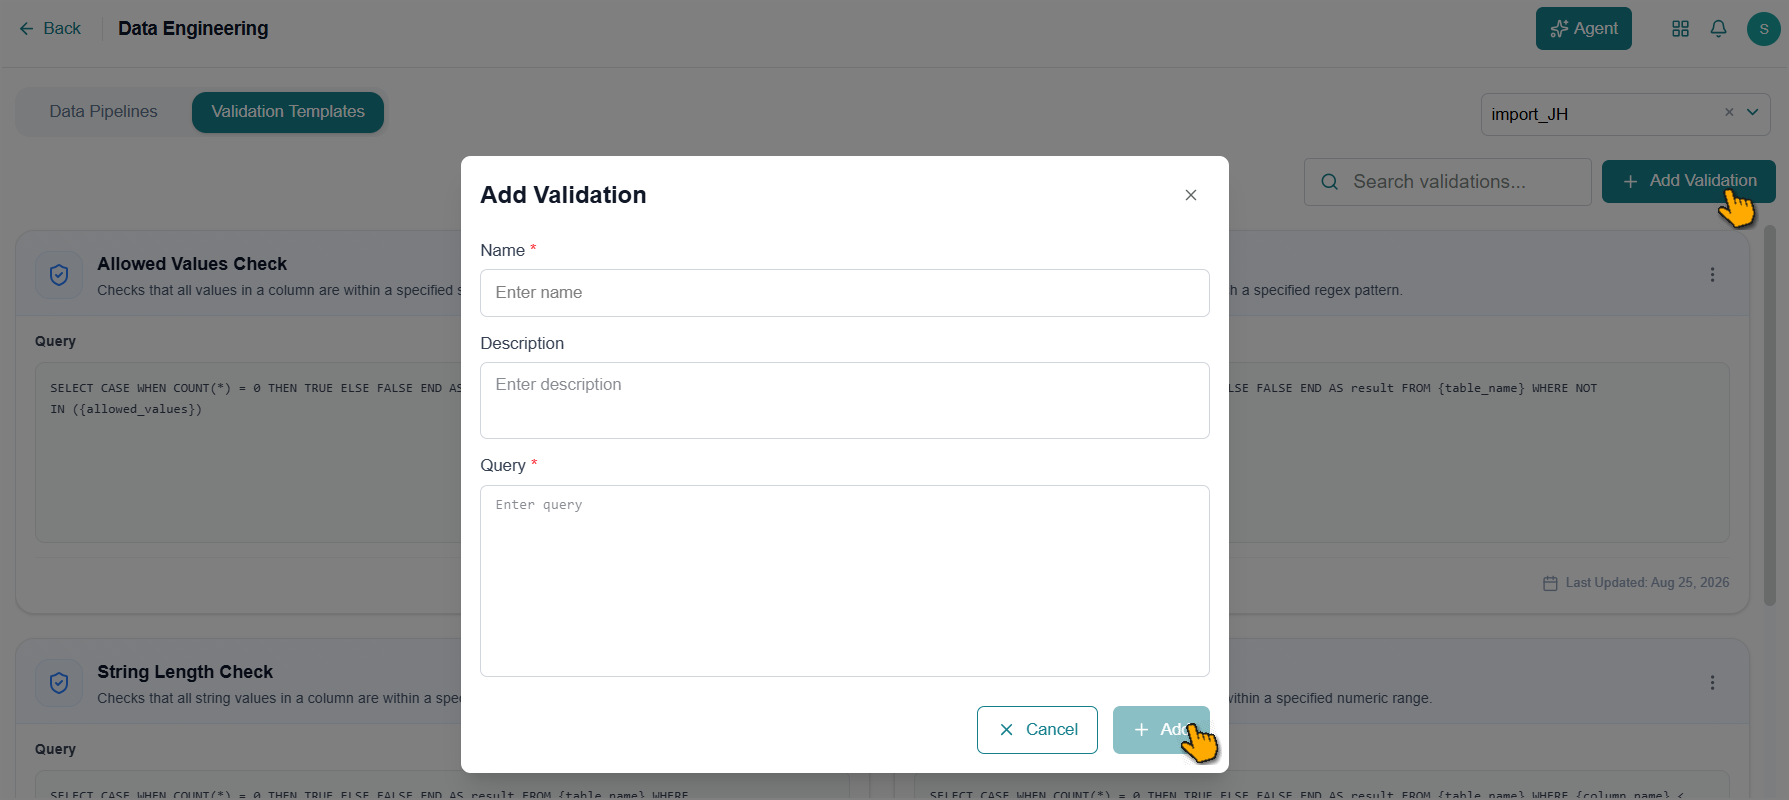
A success message confirms that the validation is saved, and the new template appears on the Validation Templates page.
Modify a Validation Template
You can update an existing template from the Validation Templates page.
Use the Search box to find the template you want to update.
Click the Ellipsis
icon on the template card to view more options.Click Edit.
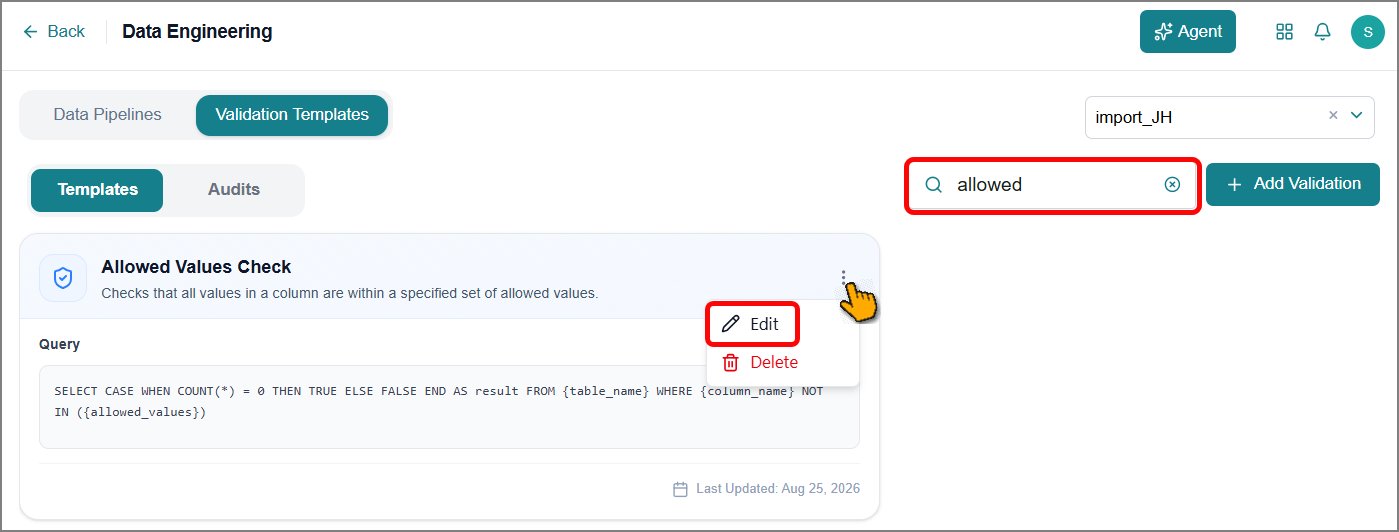
The Edit Validation panel opens.
Update the Name, Description, or Query as needed.
Click Save.
A success message confirms the changes are saved.
Delete a Validation Template
You can remove an existing validation template. If the template is used in a pipeline, remove it from all associated pipelines before deleting it.
Use the Search box to find the template you want to remove.
Click the Ellipsis
icon on the template card to view more options.Click Delete.
The Delete Validation confirmation dialog box opens.
Click Delete.
A success message confirms that the template is removed from the page.
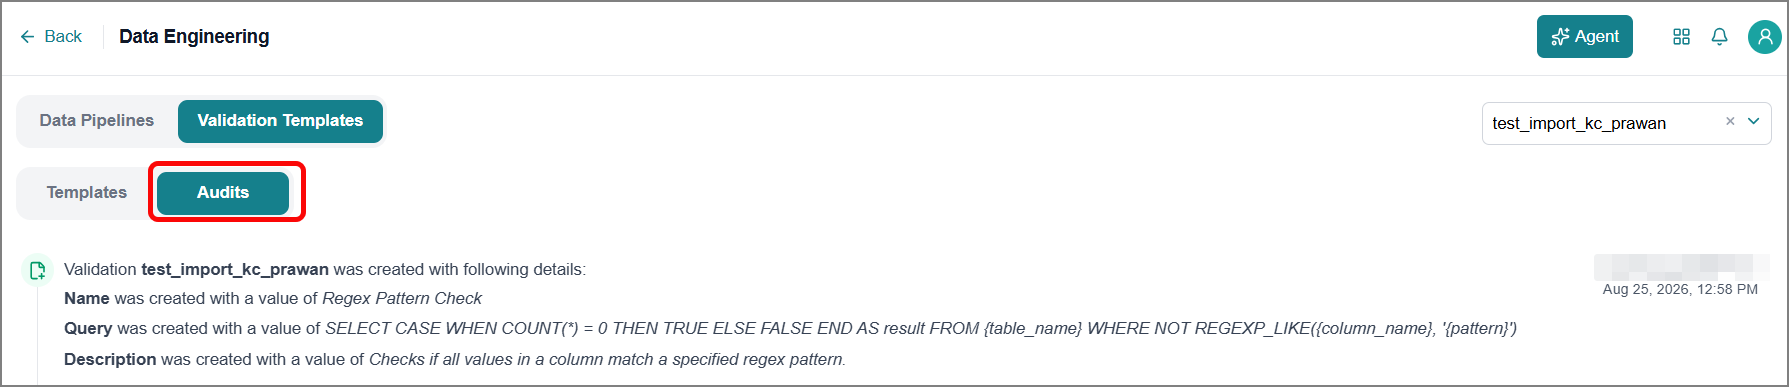
Viewing Validation Template Audits
The Validation Template Audits records all changes made to a validation template, helps maintain accountability, and troubleshoots and verifies template modifications. It displays a list of all changes, sorted with the most recent change at the top, and shows the type of change along with the date and time it occurred. Use this to track who changed a validation template and when, helping you maintain accountability and troubleshoot unexpected validation results.
To access the validation template audits, go to Data Agents > Data Engineering > Validation Templates > Audits.