Data Discovery Agent
The Data Discovery Agent is an AI-powered assistant that helps you find and explore your organization's data using plain-English questions. Instead of navigating complex database structures or writing technical queries, you simply type a question, and the agent finds the relevant data for you.
Key Capabilities
Zero-copy federated access - Data stays secure in its original location across multiple environments with no movement or duplication.
Intelligent knowledge graphs - Maps relationships across your entire data landscape, enabling semantic search that understands query meaning and context.
Complete visibility - Shows what data exists, where it lives, and how it connects while maintaining data sovereignty and security.
Discovery-layer architecture - Provides enterprise-scale data intelligence without compromising data integrity or location.
This topic explains how to use the Data Discovery Agent to query a Knowledge Cluster (KC) and review your results.
Important
The Data Discovery Agent allows you to view the source files used to generate the answers, rather than viewing the answers themselves.
Knowledge Clusters
A Knowledge Cluster (KC) is a named grouping within the Data Layer that combines one or more Knowledge Bases (KBs), whether structured, unstructured, or both, into a single, selectable unit. Instead of manually selecting individual KBs each time, you can assign a KC to an agent, granting it unified query access to all included sources in a single step.
To access this feature, go to the Home page > Data Agent > Data Discovery Agent > Knowledge Clusters tab.
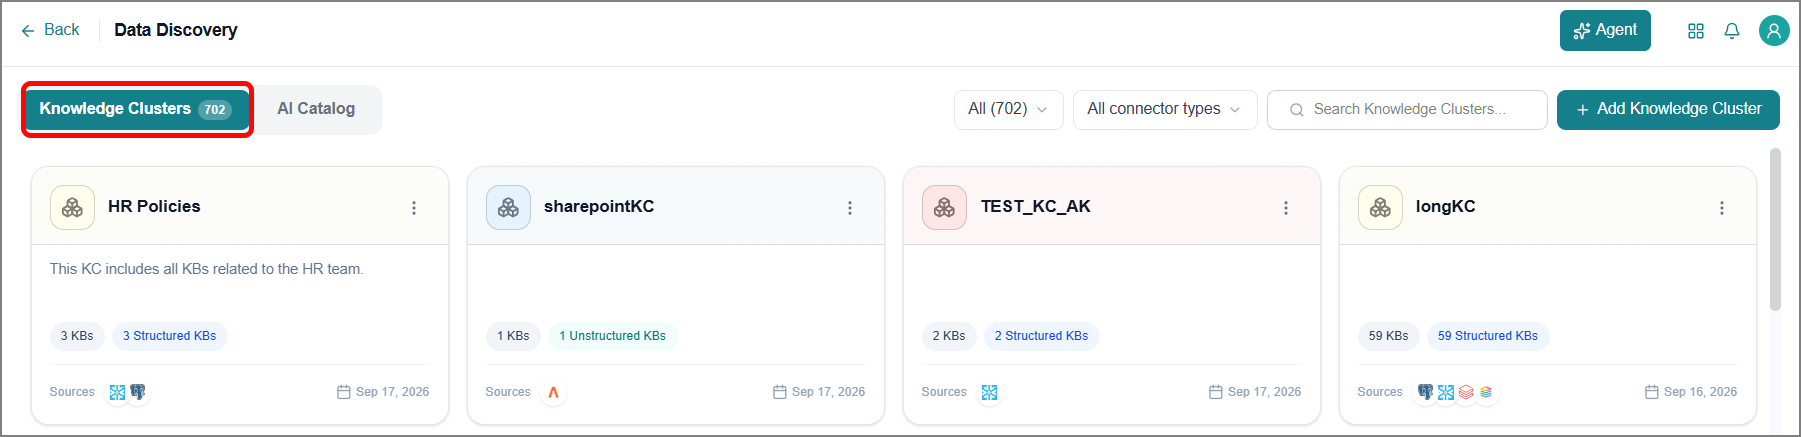
Creating a Knowledge Cluster
Click Add Knowledge Cluster.
The Add Knowledge Cluster panel opens from the right.
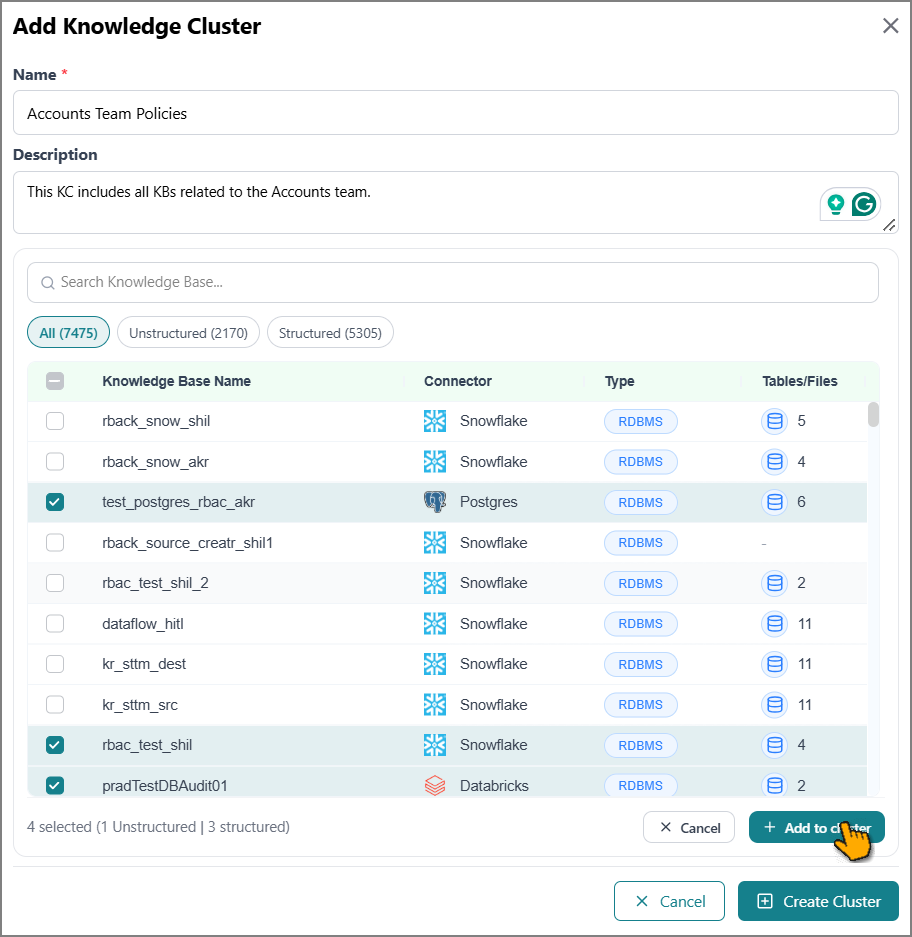
Enter a Name and Description of the KC.
Click Add Knowledge Base.
The available KBs appear for your review.
Search and select the structured and/or unstructured KBs you want to include in the cluster.
The selection count and breakdown appear at the bottom of the panel for quick review.
Click Add to Cluster.
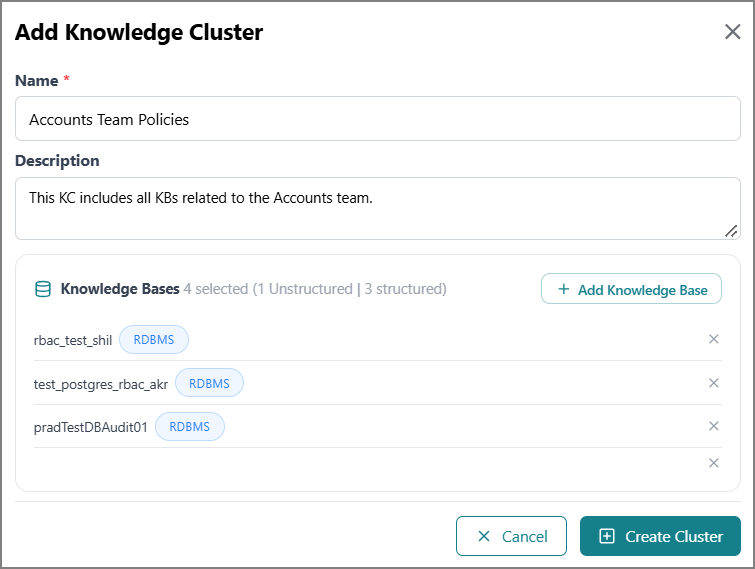
The selected KBs are added to the cluster's KB list.
Note
To remove a KB from the list, click the Delete icon next to it.
Click Create Cluster.
A success message appears. The new KC is created and available on the Knowledge Cluster page.
Managing a Knowledge Cluster
After you create a KC, you can view and manage its details at any time on the Knowledge Cluster page.
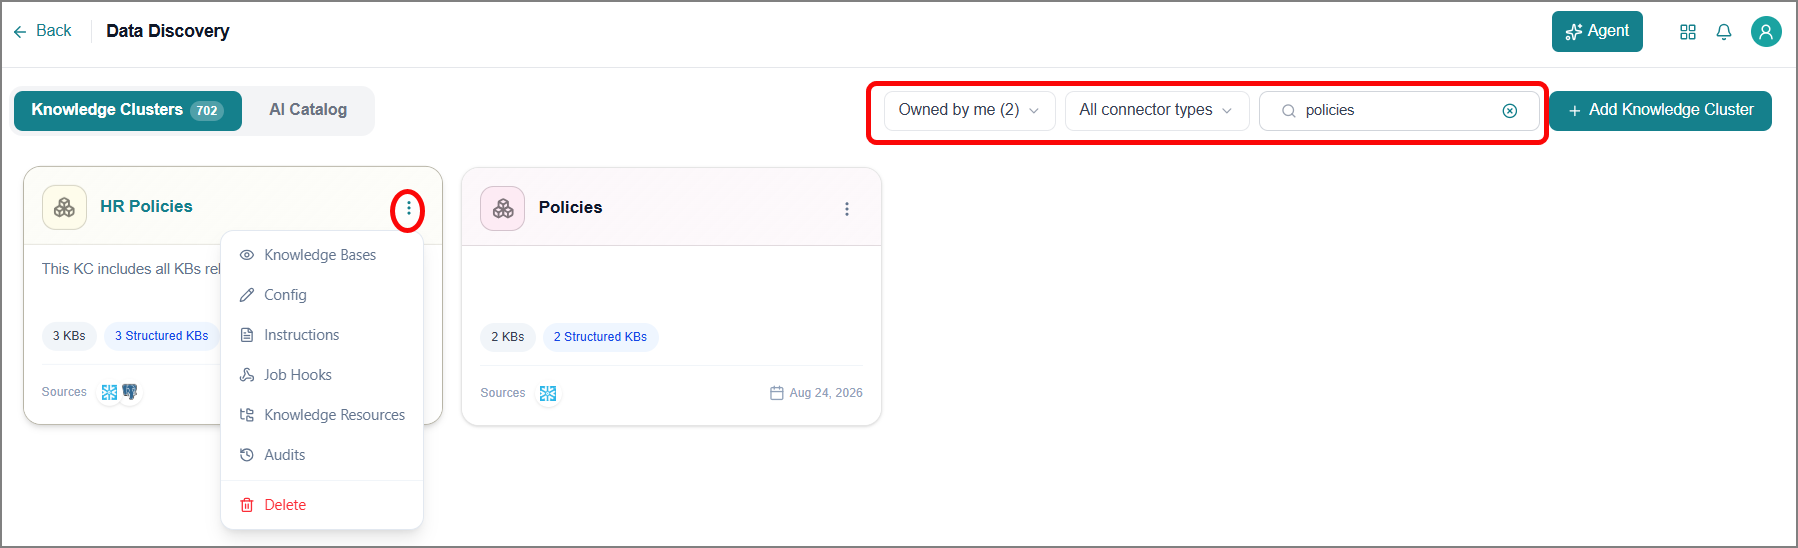
Use the filters to find a specific KC:
Enter a KC name in the Search box to filter the list.
Select one or more DB Type checkboxes to filter by database type.
Choose whether to view KCs owned by you or all KCs.
To manage a KC, you have two options:
Click the KC card to access the full details view and navigate between all available sections.
Click the Ellipsis
 icon on the KC card and select the option to jump to a specific section within the details page without navigating through the full view.
Knowledge Bases Tab
Use the Knowledge Bases tab to view all KBs tagged to a KC and explore their metadata. To access:
Select Knowledge Bases from the Ellipsis menu.
The KBs tagged to the cluster are displayed.
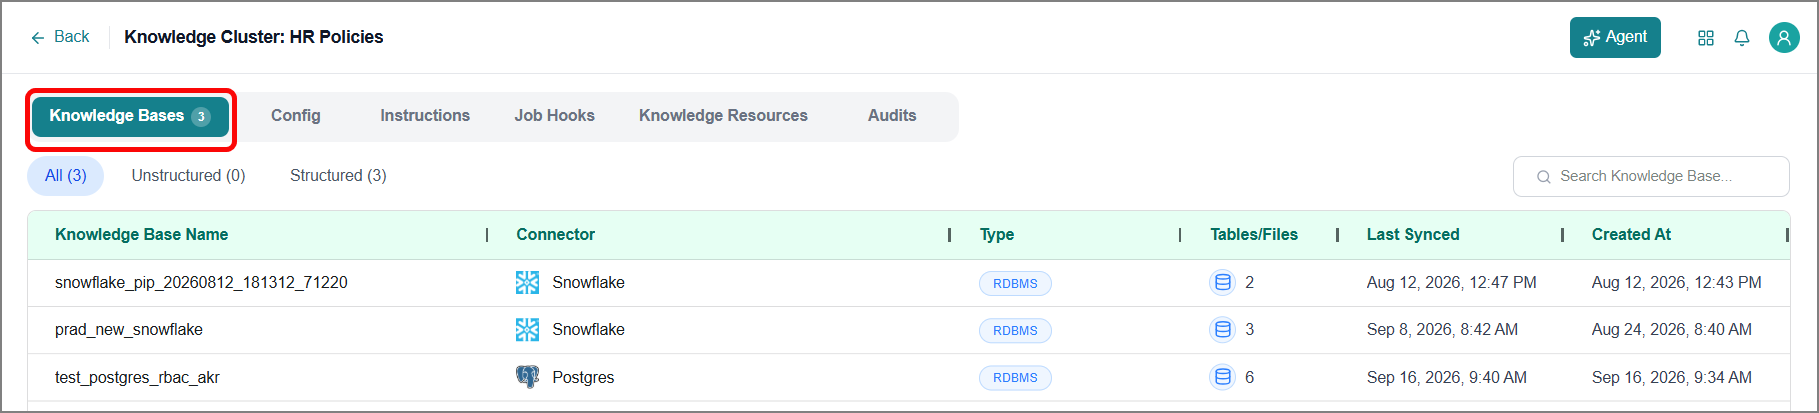
Use the filters to find the required KB.
Select a KB to view its metadata. Refer to Viewing Metadata for more information.
Config Tab
Use the Config tab to view and update KC details. You can also export a KC's configuration to a JSON file and import it into another KC. This makes it easy to reuse the same configuration across clusters or environments, rather than setting it up from scratch.
To update the KC's settings:
Select Config from the Ellipsis menu on the KC card.
The cluster's configuration settings appear.
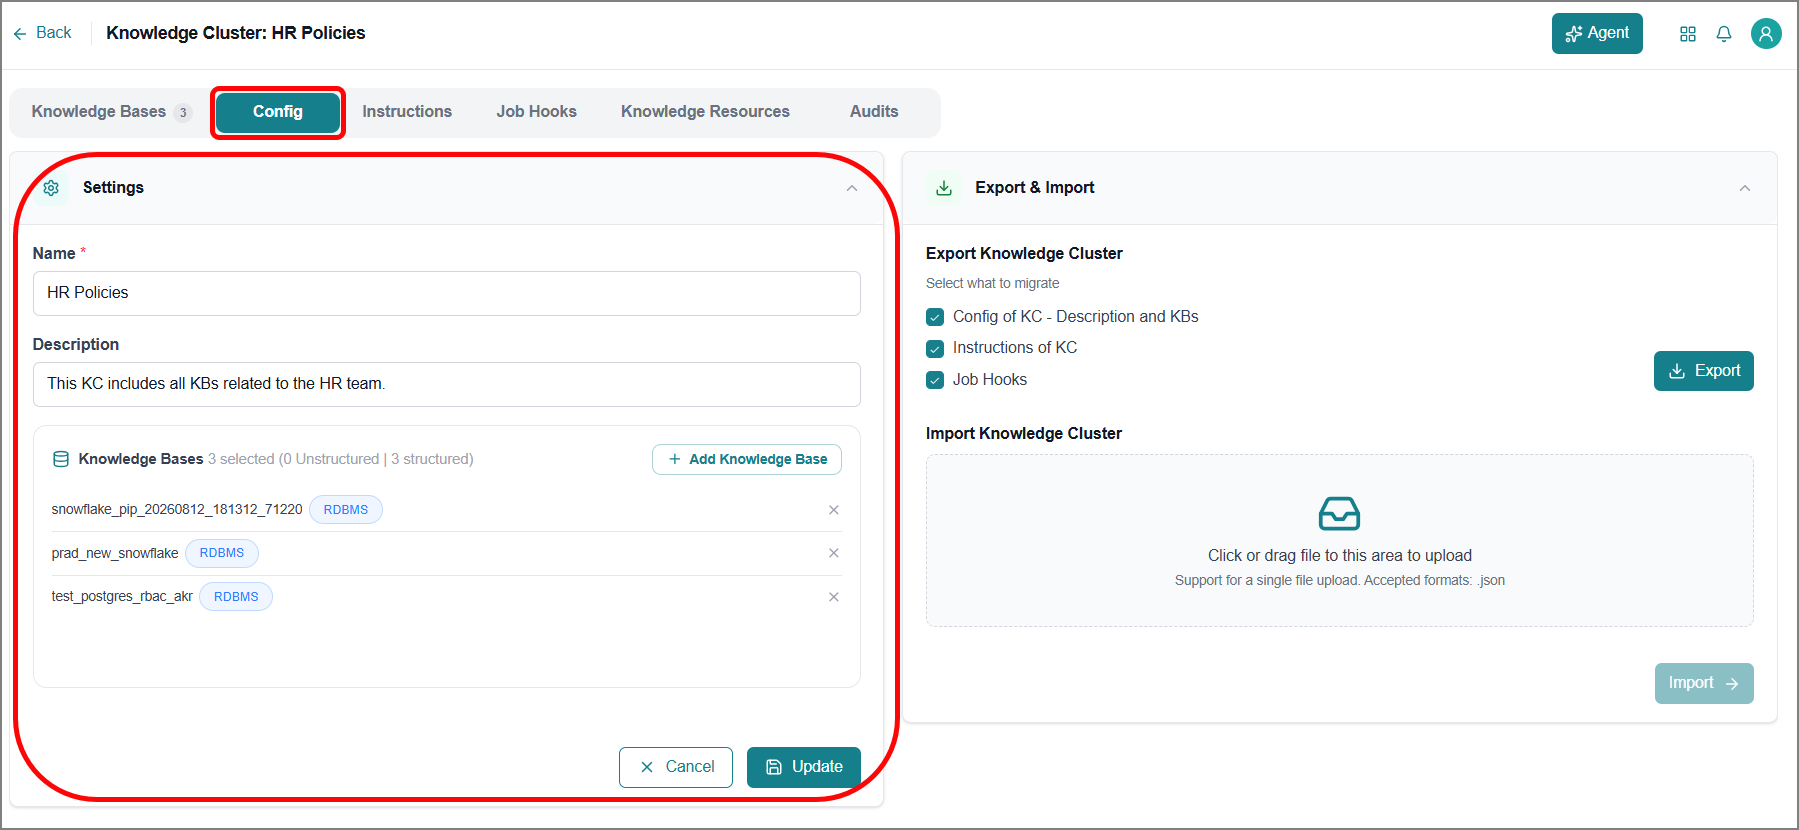
Update the settings as needed. You can change:
KC name
KC description
KBs included in the cluster (add or remove)
Click Update to save the changes.
The KC reflects the updated settings.
Exporting Configuration
To export a KC configuration:
Select Export & Import to expand the panel if it is not already open.
Under Export Knowledge Cluster, select the checkboxes for the items you want to include:
Config of KC - Description and KBs
Instructions of KC
Job Hooks
Select Export.
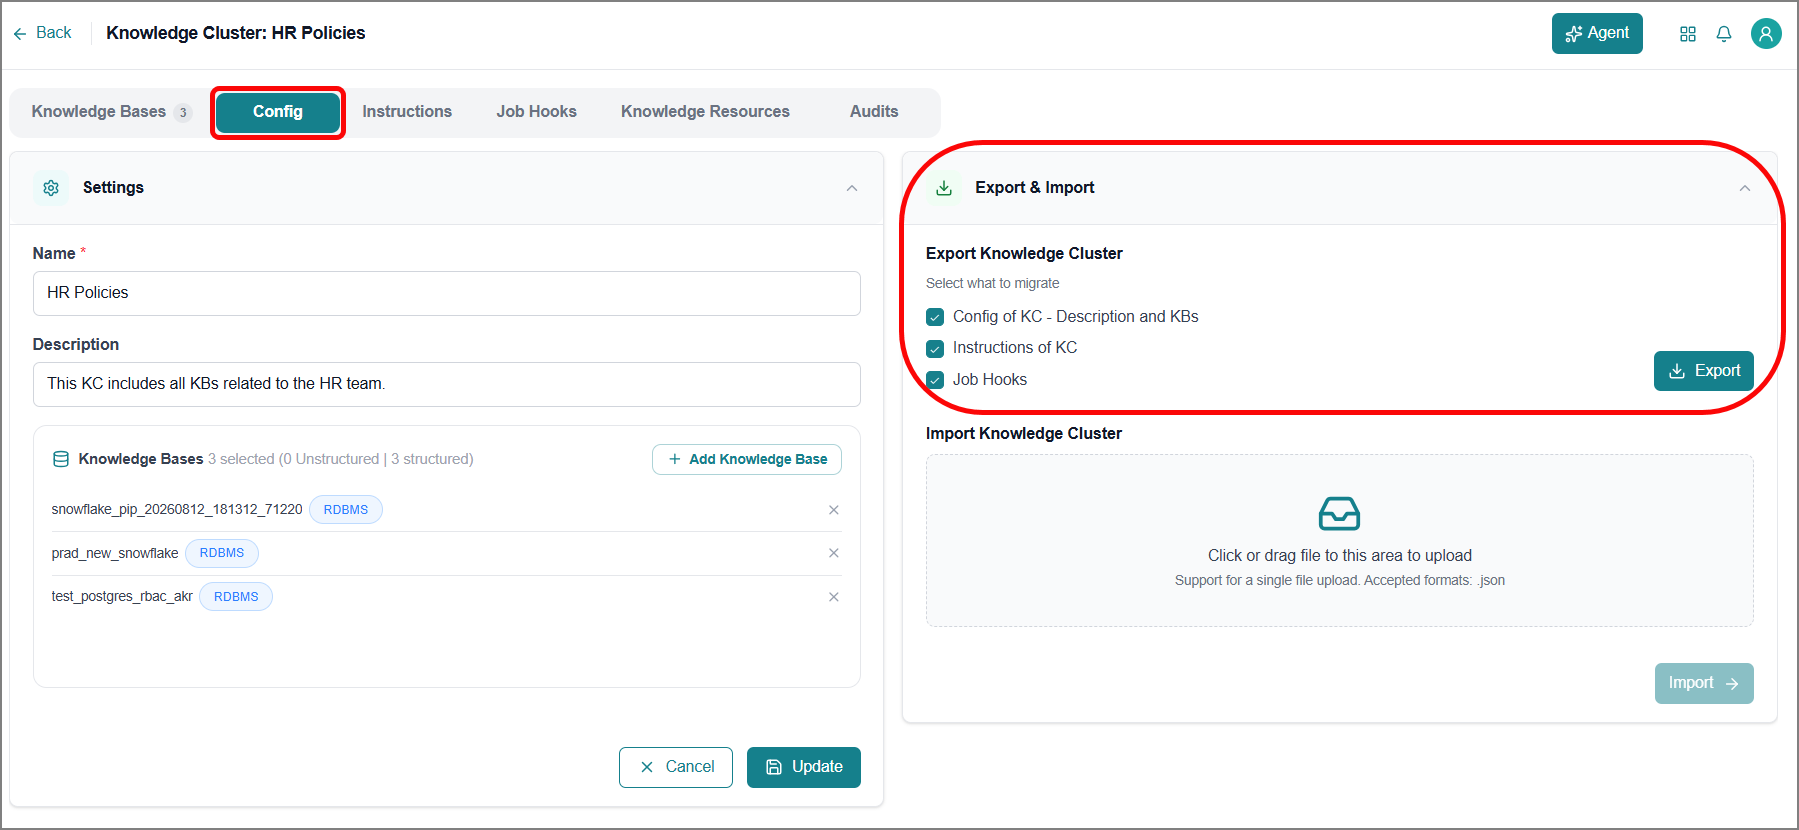
The platform generates a
.jsonfile containing your selected configuration and downloads it to your local system.
Importing Configuration
To import a KC configuration:
Under Import Knowledge Cluster, select the upload area or drag your file into it.
Select the
.jsonfile you want to import.Note
The upload area supports a single file at a time.
Select Import.
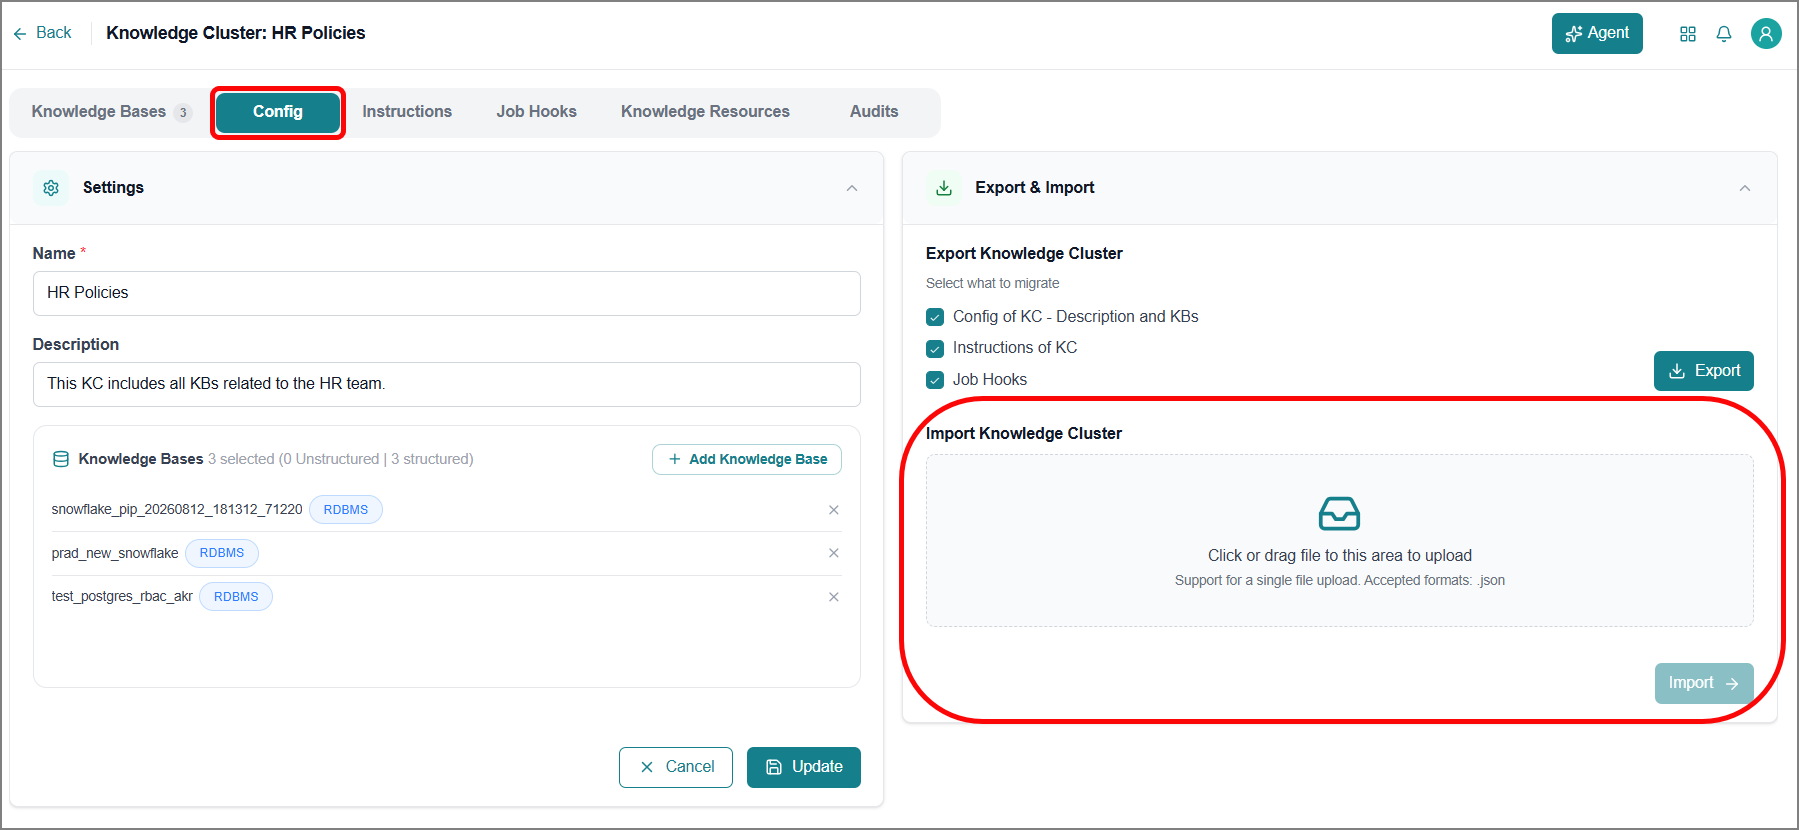
The platform reads the file, automatically matches the imported configuration to the target KB, and displays the results on the Import Knowledge Cluster page.
Select the Info icon to view details about how the mapping works.
Review the mapping results carefully:
Select the KB name from the dropdowns to update any mapping as needed.
Tip
This mapping confirms that your imported data aligns with the correct KBs in your target KC.
If the imported job hook has an associated script file, the platform checks the target KC for a matching file. If found, the platform automatically tags it. If not found, you must add the script file before you continue.
Click Apply Mappings.
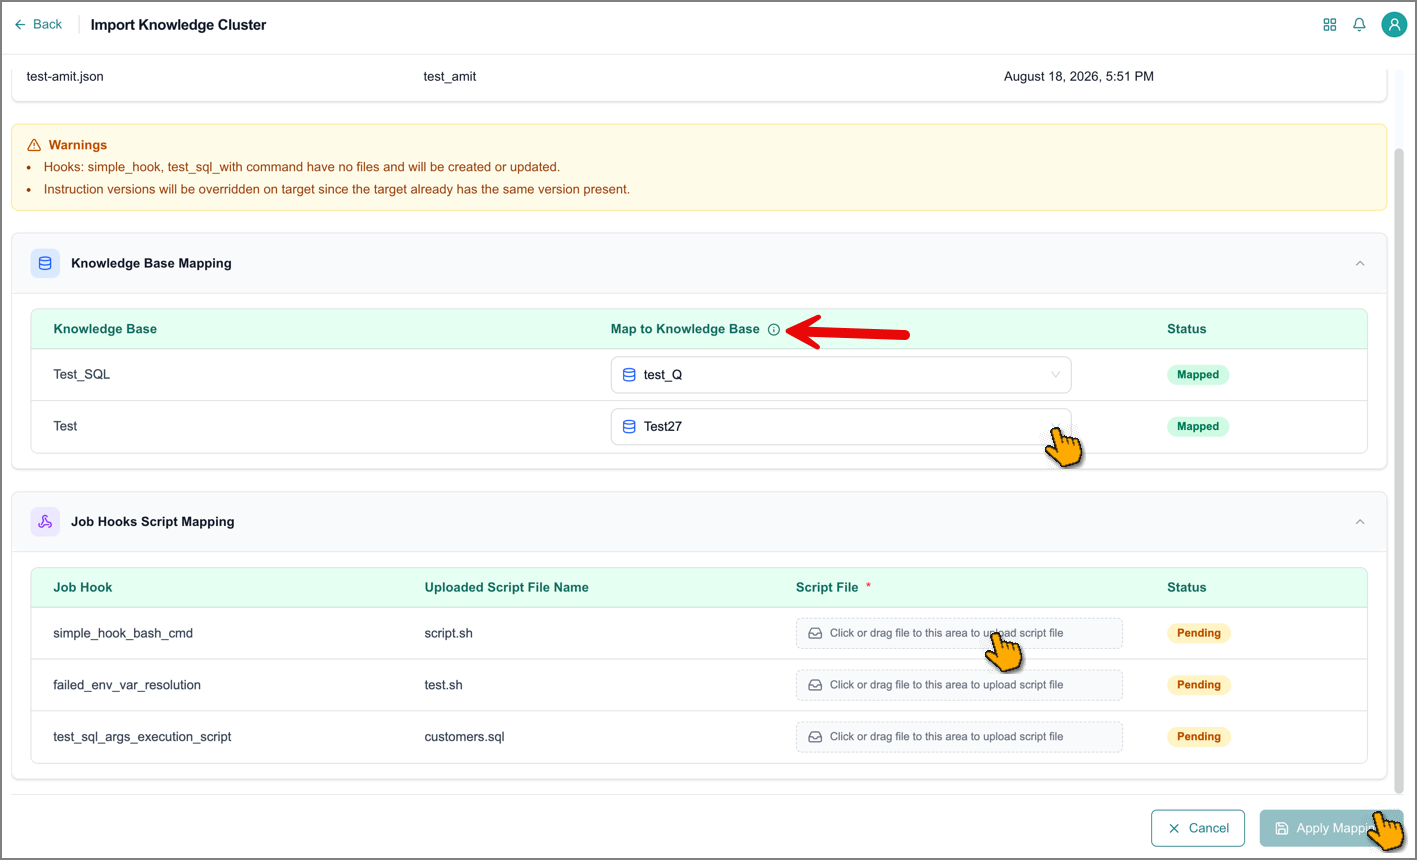
The platform applies the imported configuration to your Knowledge Cluster based on the confirmed mapping and displays a summary on the Import Report page.
Click Go to Knowledge Cluster.
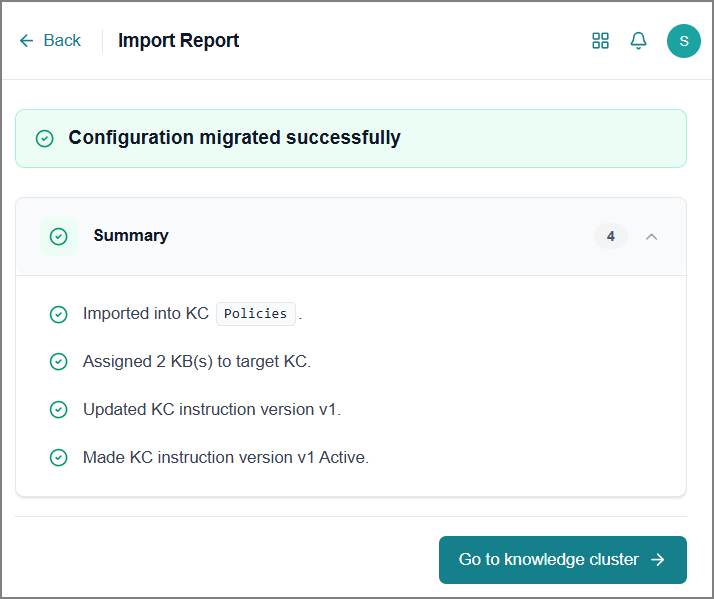
You return to the knowledge cluster, where the imported configuration is now applied.
Instructions Tab
The Instructions tab in a KC lets you create and manage instructions (prompts) specific to that KC. These instructions provide the AI with additional context about the KC, such as its purpose, content scope, or preferred response format.
Whenever an agent references the KC, the platform sends both the agent's master prompt and the KC-level instructions to the AI model together. This combined input helps the model generate responses that are more accurate, relevant, and aligned with the KC's content.
You can maintain multiple instruction versions, switch between them, compare different versions, and control which version is active at any time.
Important
Only the active instruction version is used when the agent processes queries against the KC.
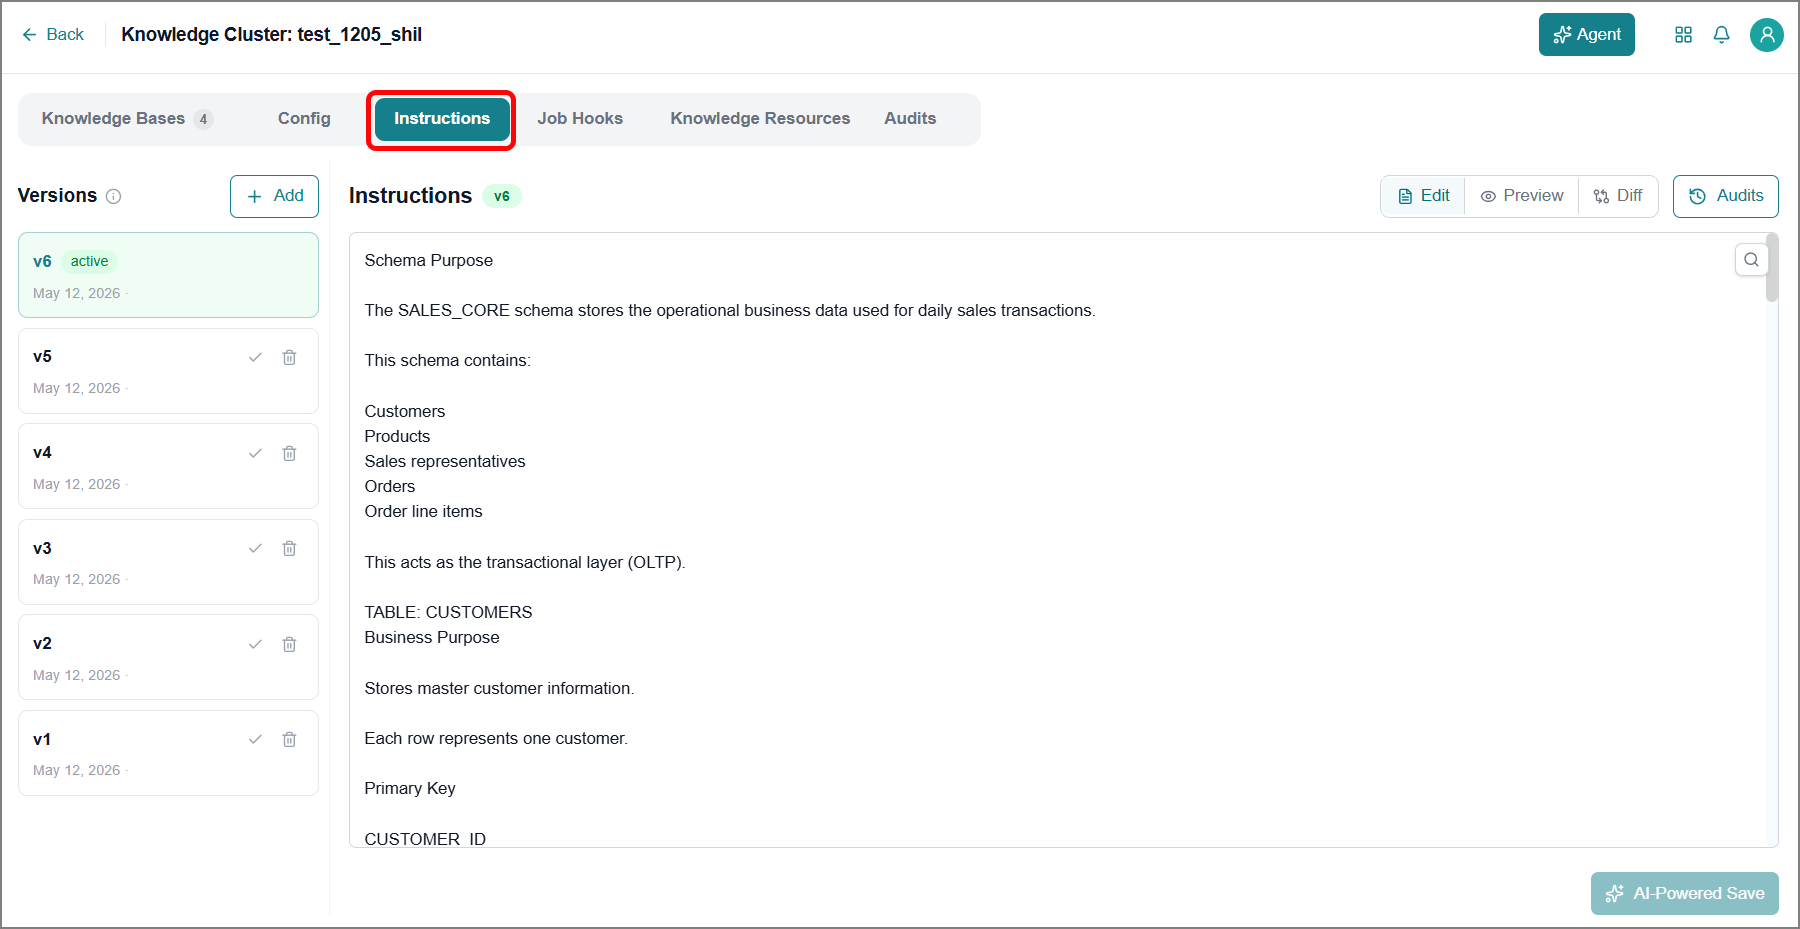
Create an Initial Instruction
When you open the Instructions tab for the first time, the instruction text box is empty. Follow these steps to create your first instruction.
Enter your instruction in the text box, using plain, natural language.
Tip
Use the Search
 icon for assistance.
Click AI-Powered Save.
The Instruction Review window opens. The Data agent reviews the instruction you entered and rewrites it into a clearer, AI-ready version. This step improves the agent's ability to use your instructions effectively.
Review your instruction next to the AI-generated version on the Changes tab.
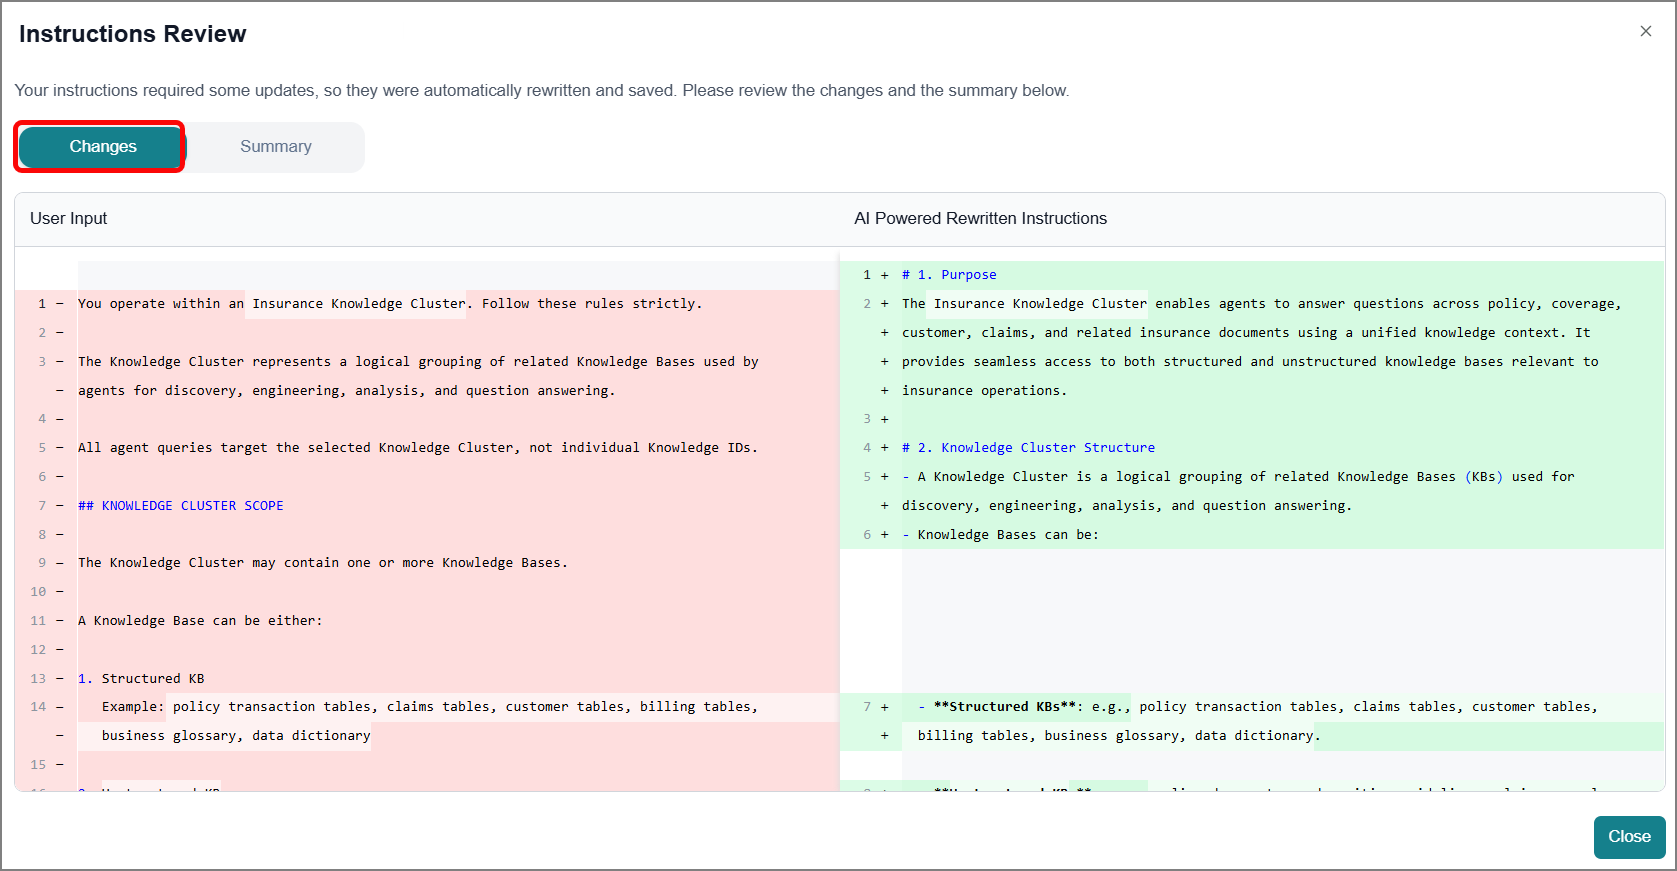
Click the Summary tab to see a summary of the changes the AI made.
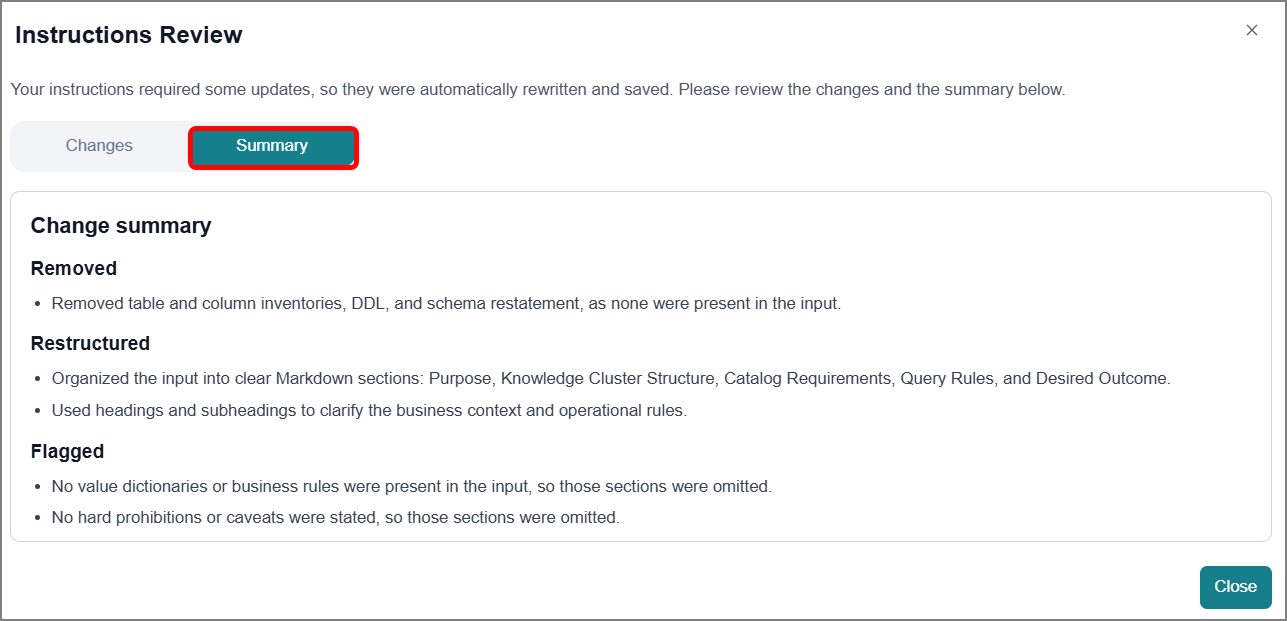
Click Close to close the Instruction Review window.
You can update the AI-generated instruction, if needed.
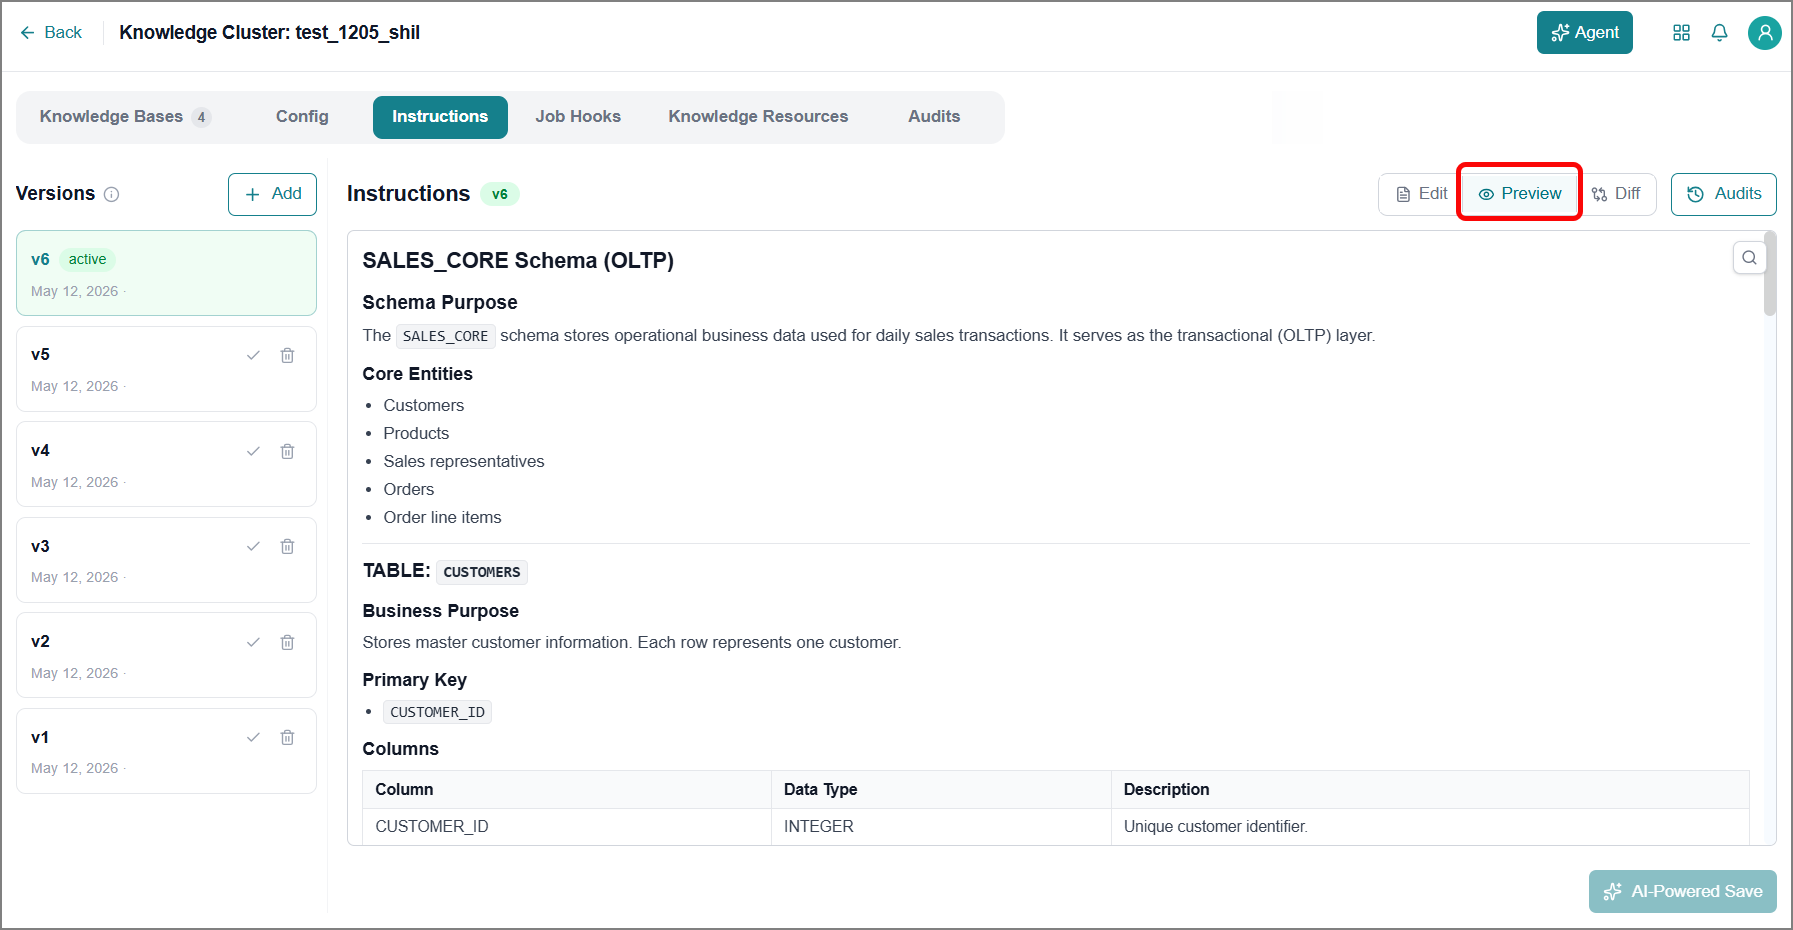
Click Preview to view your instruction formatted in Markdown. Use this view to quickly check that the formatting looks correct.
Tip
Use the Search
icon for assistance.
The instruction is saved as Version 1 and automatically set as the active instruction.
Create an Instruction Version
You can create additional instruction versions based on any existing version. To create a new instruction version:
Click Add next to Variants.
The Create New Version window opens.
From the dropdown, select the base version you want to copy from.
To make this new version the active instruction, enable the Make Active option.
Click Create.
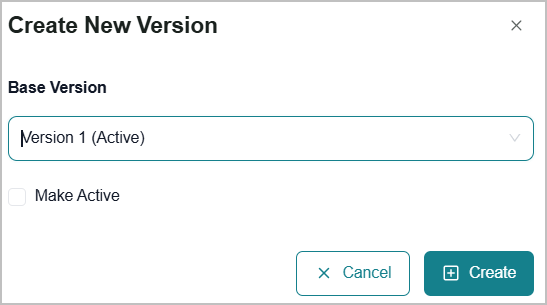
The new version is created from the base version you selected.
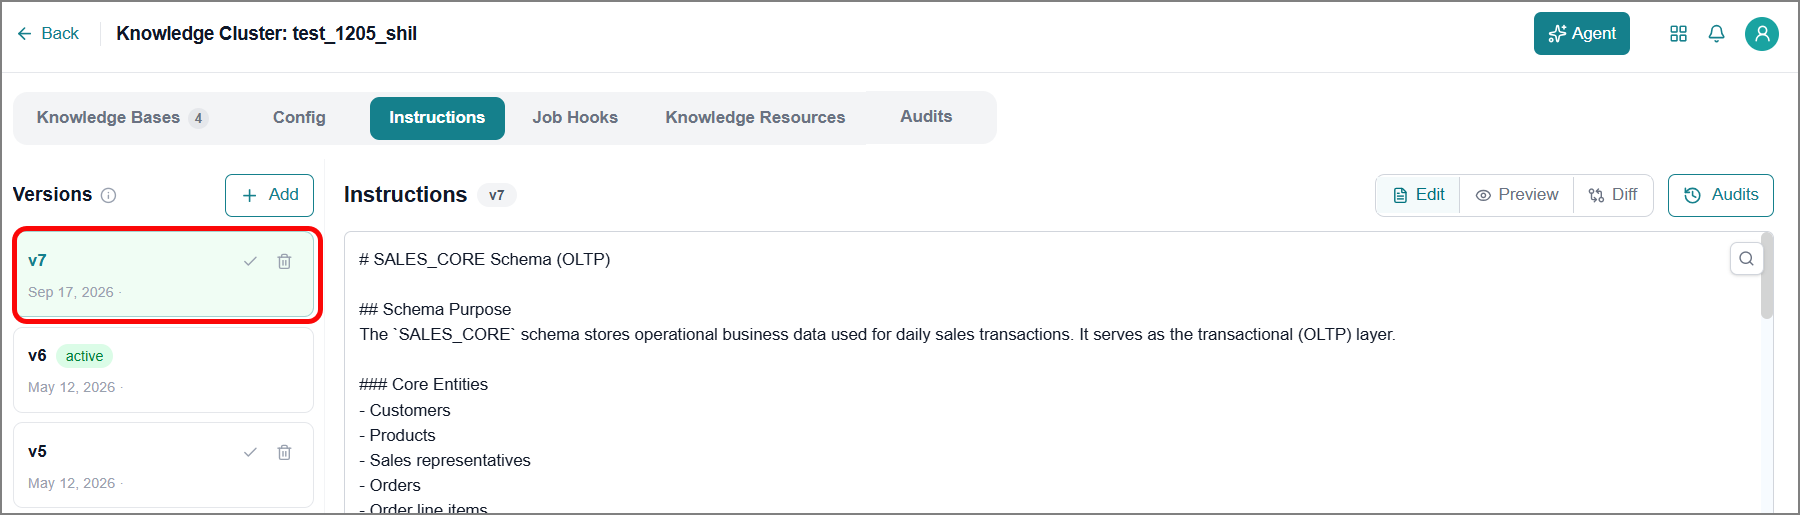
Edit the instruction in the text box as needed.
Click AI-Powered Save.
The Instruction Review window opens to review the instruction alongside its AI-generated version.
Click Close to close the Instruction Review window.
Compare Instruction Versions
The platform lets you review Instruction versions side by side, making it easy to spot differences and confirm which version best meets your needs before you activate one.
To compare Instruction versions:
Click Diff.
The Versions comparison opens, displaying the active version alongside the currently displayed version.
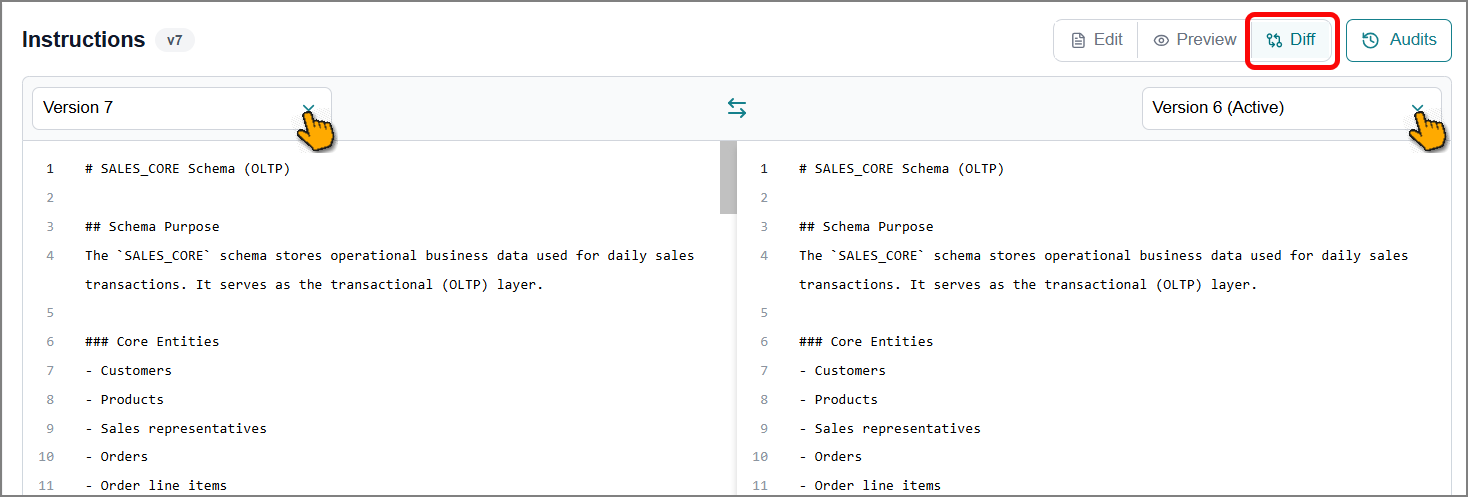
Click the dropdown to switch between versions and compare the instructions.
Set an Instruction Version as Active
Only one instruction version can be active at a time. To change the active version:
From the left side panel, select the instruction version you want to activate.
Click the Make Active
 icon on the version.
The selected version is now set as the active instruction. The success message is displayed for confirmation.
View Instruction Audits
The platform maintains a complete history of every change made to a prompt instruction in the KC, including what changed, when it changed, and the events that occurred.
To view changes made in the instruction:
Click Audits.
The Instruction Audits window opens.
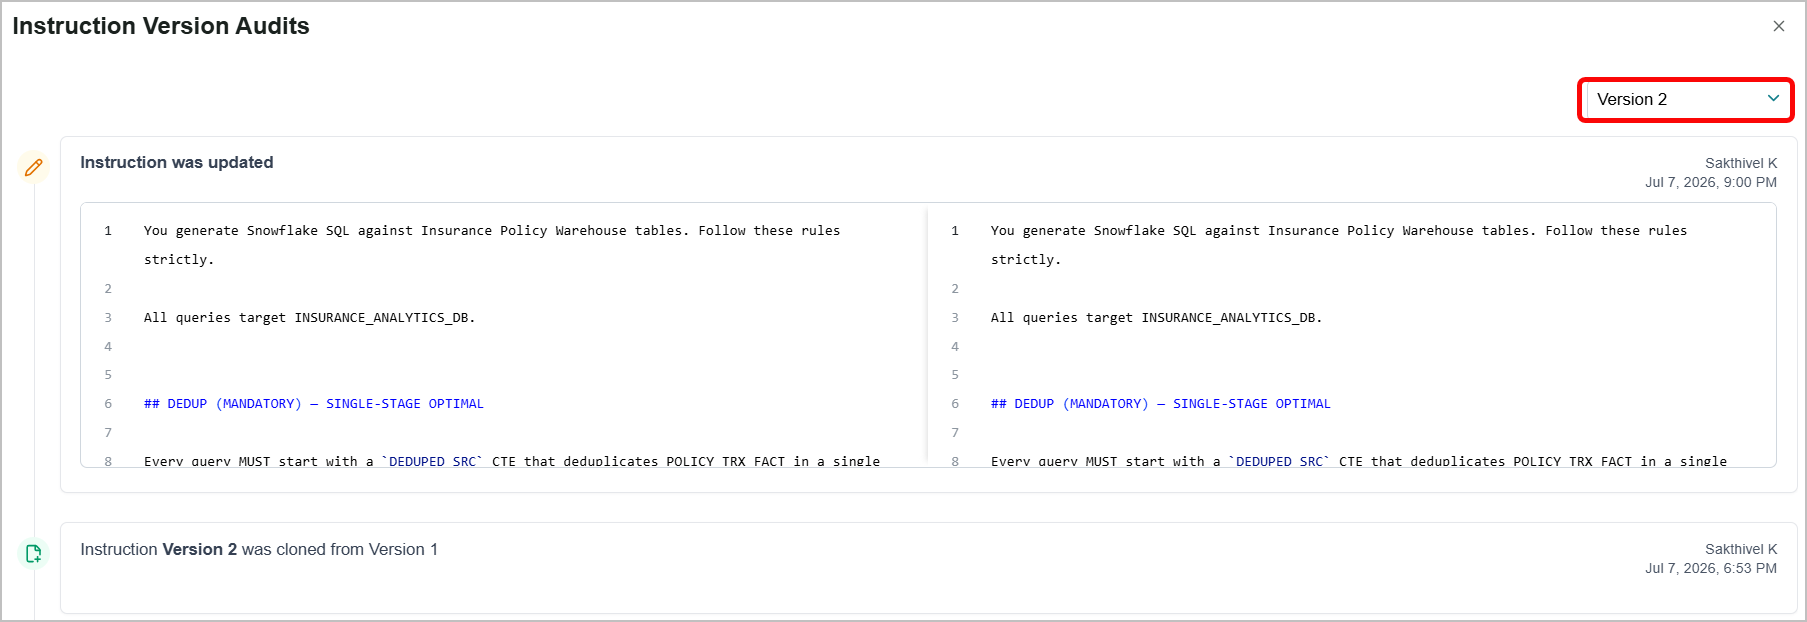
It shows a log of all saved versions of the instruction, along with the changes associated with each.
Select a version from the Version dropdown.
The audit log updates to display the change history for the selected version.
Delete an Instruction Version
Note
You cannot delete the active version. Set a different version as active before deleting.
From the left side panel, select the version you want to remove.
Click the Delete
 icon.
icon.The confirmation dialog box opens.
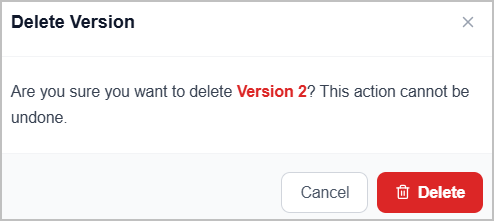
Click Delete.
The selected instruction version is removed.
Job Hooks Tab
Job Hooks let you run a custom script automatically before or after a pipeline job runs in a KC. Use this when you need the platform to do something extra during a pipeline run, such as setting file permissions, sending a notification, or cleaning up data, without having to run the script manually every time.
You define the hook once, at the KC level, then attach it to any pipeline in that cluster as a Pre Job Hook or Post Job Hook. Once attached, the hook runs automatically every time the pipeline runs, and any pipeline built from that KC can reuse the same hook.
Note
All job hook events are recorded in the Audits tab for quality and audit purposes.
Creating a Job Hook
Switch to the Job Hooks tab.
You can view the list of Job hooks that were created before.
Click Add Job Hook.
The New Job Hook form opens.
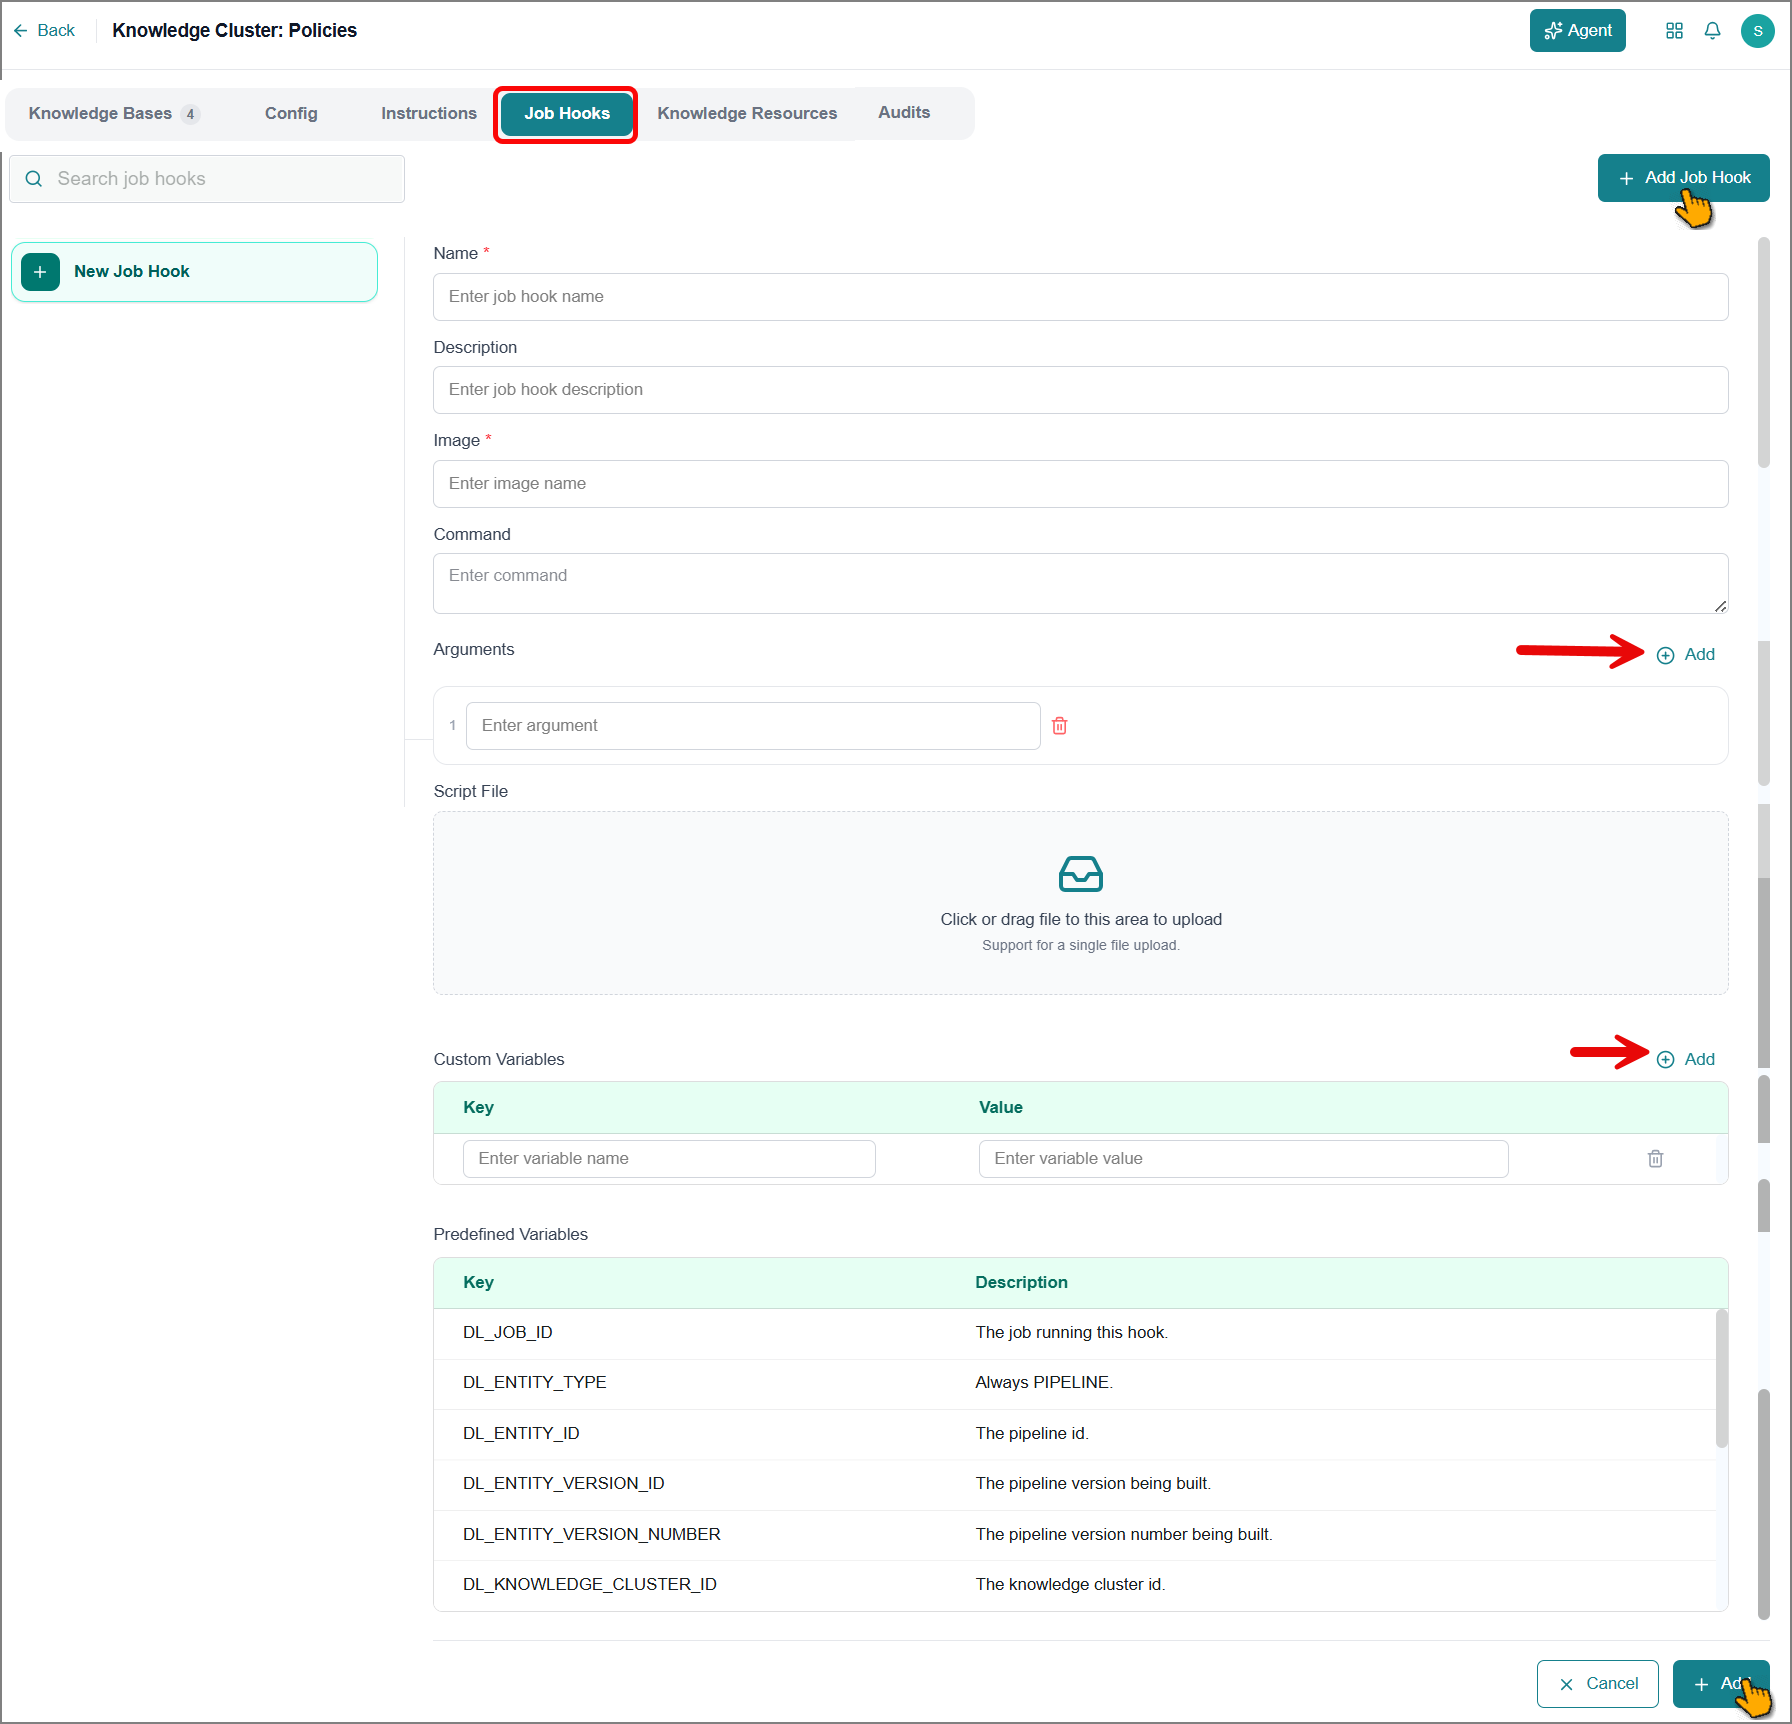
Enter a Name for the job hook.
Enter a Description to explain what the job hook does.
Enter the Image name.
This is the container image that runs the script or command.
Enter a Command.
Tip
Use this field to run the script file, if needed.
Add any Arguments the command needs:
Click Add to add more argument fields.
Click the Delete
icon to remove the argument.
Upload a Script File.
Drag the file into the upload area, or select the area to browse for a file.
Tip
You can add a command to run this file in the Command field.
Add any Custom Variables the script needs.
Click Add to add more rows.
Enter a Key and Value for each variable.
Review the Predefined Variables table.
These are values the platform provides automatically, such as the job ID and pipeline ID. You don't need to set these yourself, but you can reference them in your script.
Click Add to save the job hook.
The job hook appears in the list on the left side of the page.
This example shows how to configure a job hook that runs a Python script.
Field | Value | Description |
|---|---|---|
Image |
| The container image that runs the script. |
Command |
| The executable that runs the script. |
Arguments |
| The path to the script, followed by any arguments the script requires. |
Tip
If your script needs additional Python packages, use a Python image that already has those dependencies installed.
Modifying a Job Hook
You can modify a job hook at any time to adjust its behavior without deleting and recreating it.
To edit job hook:
Switch to the Job Hooks tab.
You can view the list of job hooks created previously on the left panel.
Search and select the job hook you want to update.
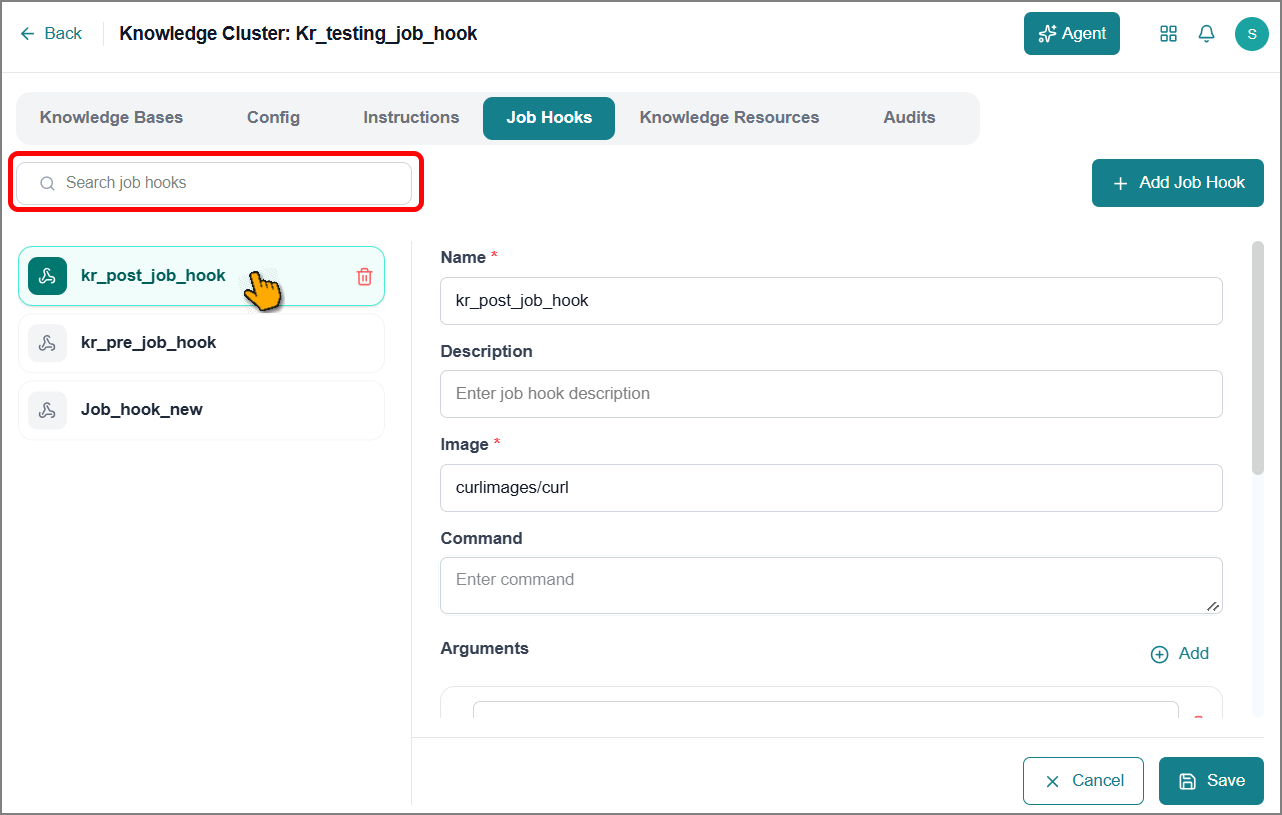
Edit the details on the right panel.
Click Save to apply the changes.
Deleting a Job Hook
You can delete a job hook when it's no longer needed for a pipeline.
To delete a job hook:
Switch to the Job Hooks tab.
You can view the list of job hooks created previously on the left panel.
Search and select the job hook you want to remove.
Click the Delete
icon on the card.The confirmation dialog box opens.
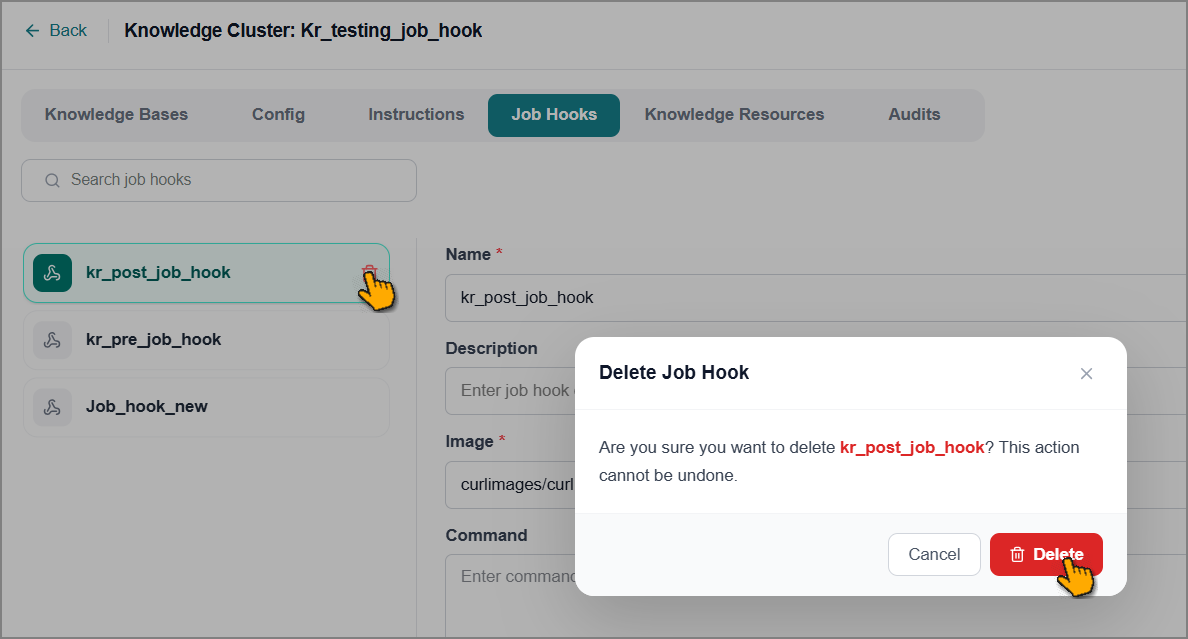
Click Delete to remove the job hook from the list.
Knowledge Resources Tab
Knowledge Resources is where you manage the source material and generated artifacts that fuel your Knowledge Cluster's data mapping and modeling work. Upload reference files, such as glossaries, business rules, or sample mappings, to guide the Data Discovery Agent in generating Source-to-Target Mappings (STTM) and data models. This keeps your reference material, mappings, and models organized in one place, so agents produce more accurate results, and you can track how each version came together.
Knowledge File Tab
You can view and manage knowledge files, such as glossaries, business rules, and sample mappings, in this tab.
To upload a knowledge file:
In the Knowledge Resources tab, switch to the Knowledge Files sub-tab.
It displays all existing knowledge files uploaded previously for this KC.
Click Upload.
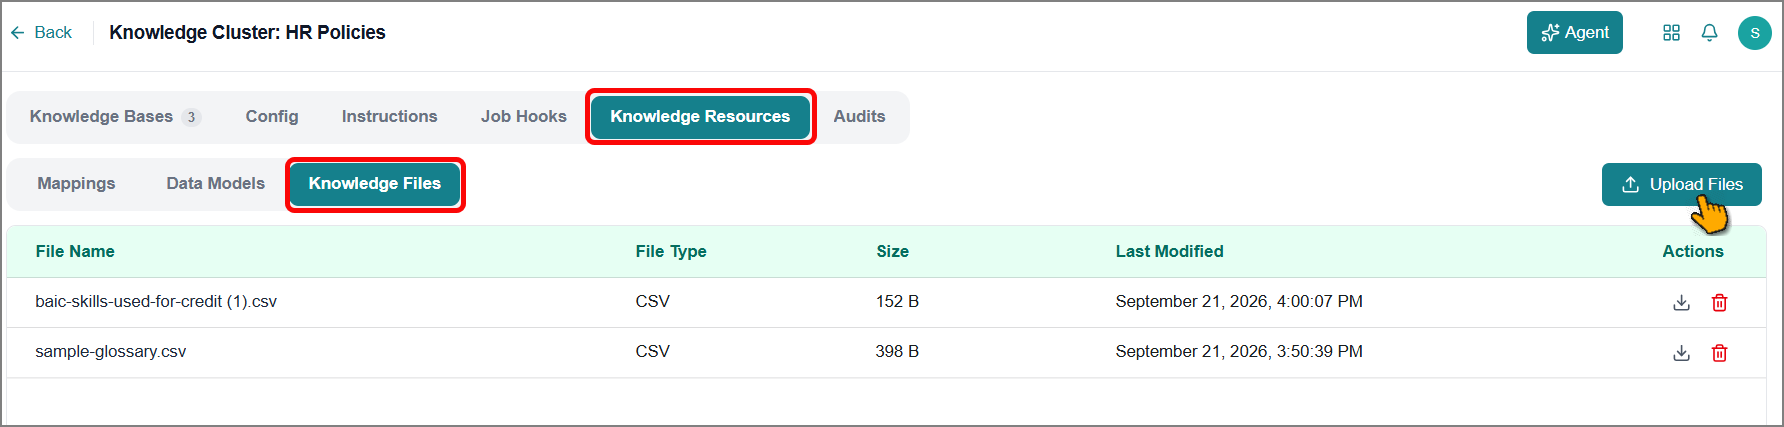
Choose the files from the system.
The file uploads automatically to the platform.
Note
The maximum file size is 10 MB. Supported file types are MD, text, doc, and CSV.
You can use the following options to manage knowledge files:
To save a file copy to your system, click the Download
 icon.
icon.To remove a file:
Click the Delete
icon.A confirmation dialog box opens.
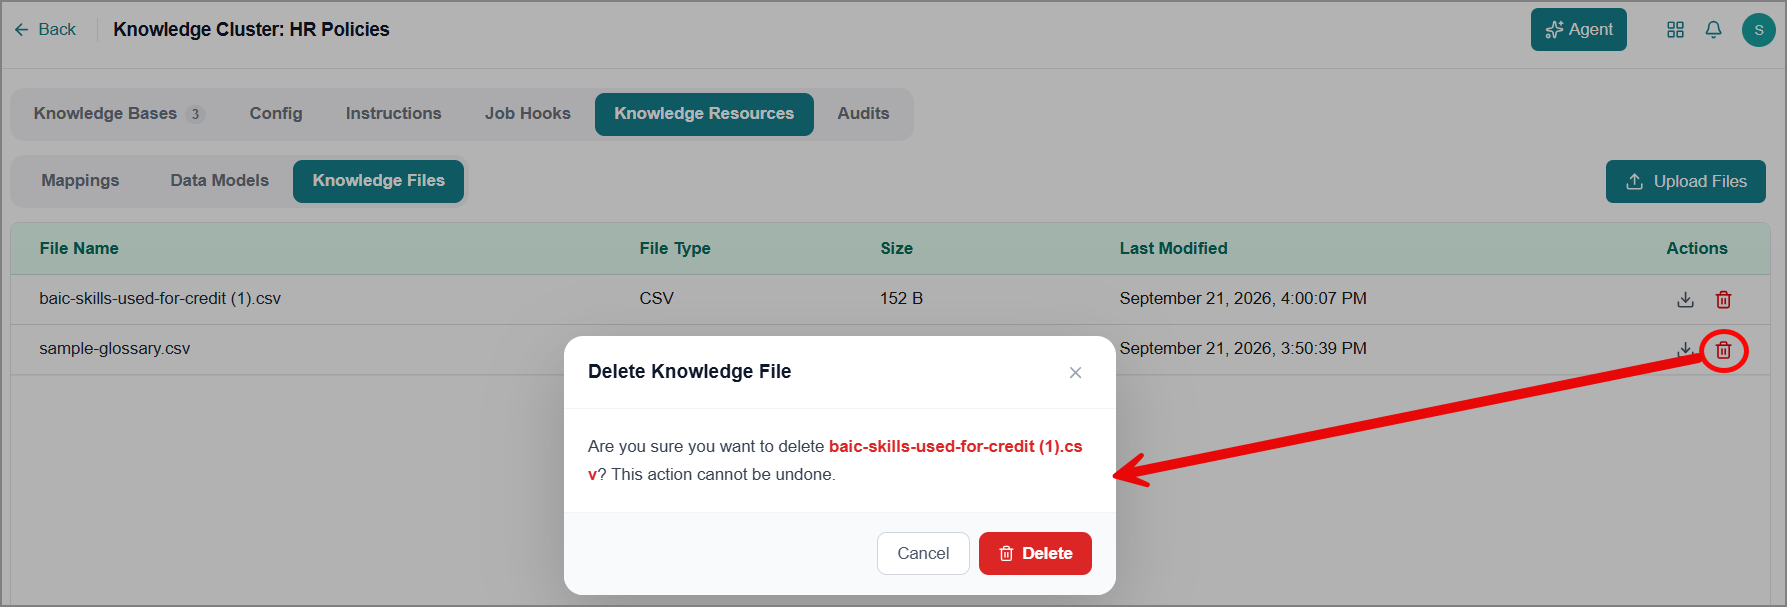
Click Delete to confirm.
Mappings Tab
The Mappings tab shows the source-to-target mappings (STTM) generated for your Knowledge Cluster. Each mapping links source columns to target tables and columns, with details on data type and transformation logic, so you can review and verify how your data is structured before it moves through a pipeline. Version control lets you track changes over time and work from the most current mapping.
Creating STTM with Agents
An agent can generate an STTM for your KC. After you review and approve the mapping, BAIC uses it to determine exactly which data is retrieved for pipeline creation and other downstream tasks.
To create an STTM:
Upload the relevant knowledge files to your KC. Refer to Add Knowledge Files for more information.
Click Agent.
The Agent chat panel opens on the left side of the screen.
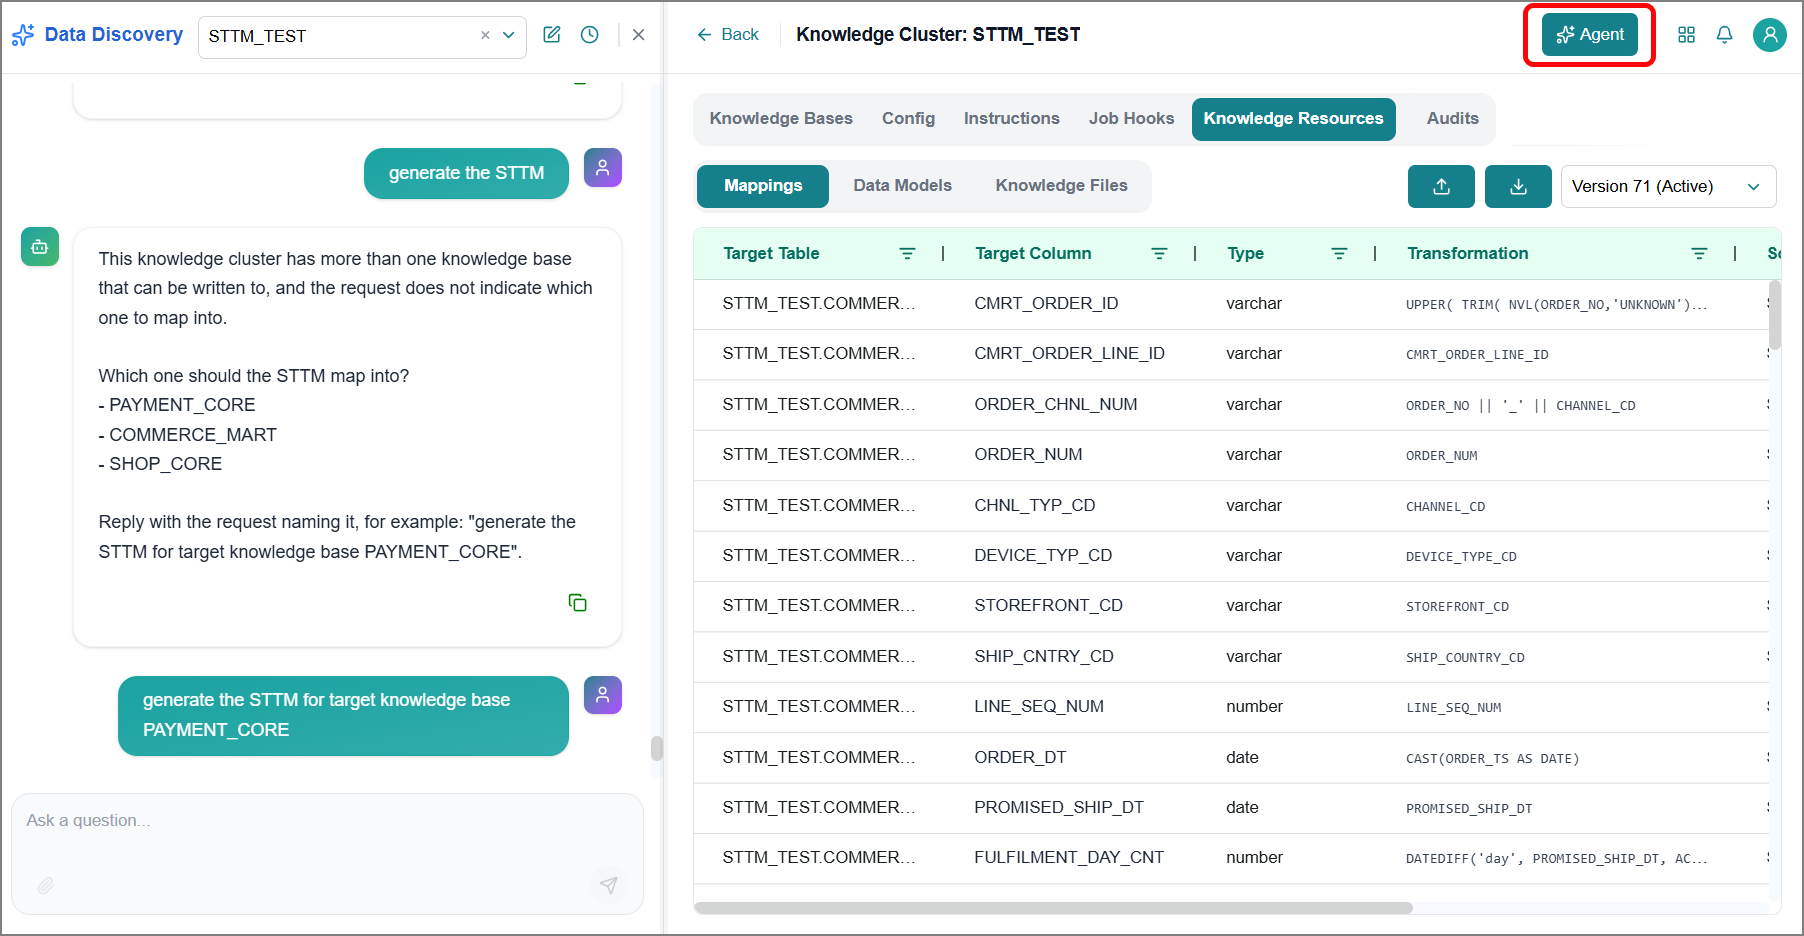
Enter your question in plain language, describing the mapping you need.
The agent analyzes the uploaded files and displays the target entities for your review.
Review the Target Entities.
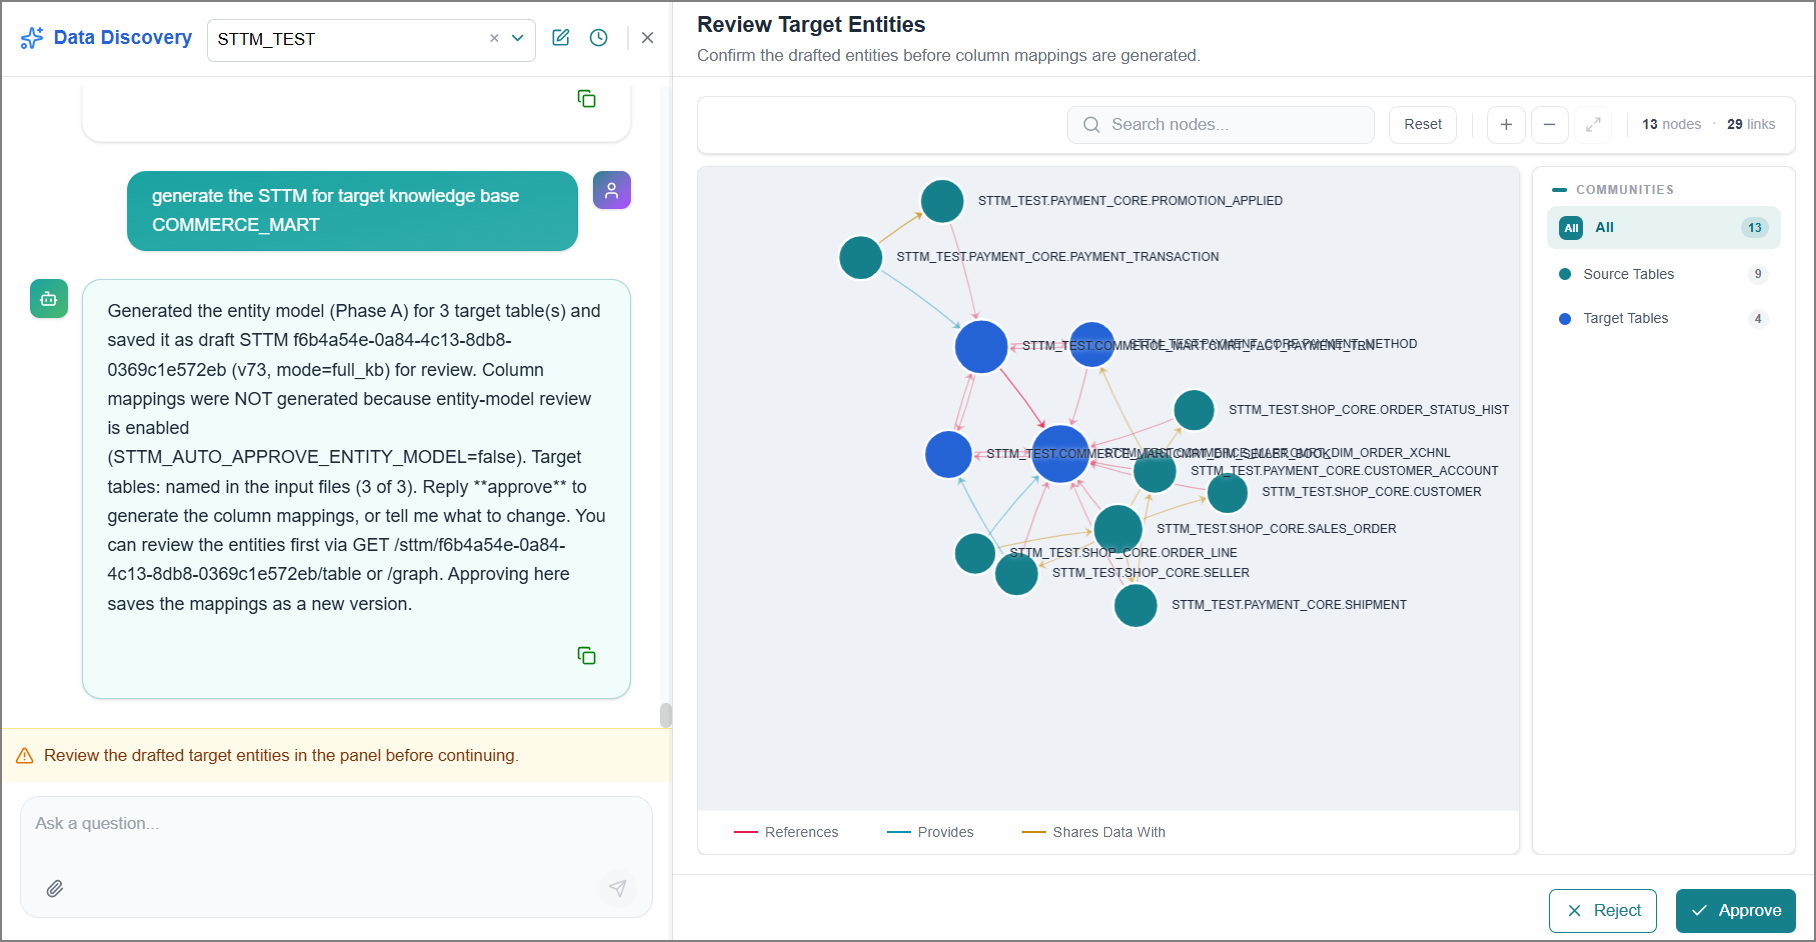
If the mapping is incorrect, click Reject, then continue the conversation to refine it.
If the mapping is correct, click Approve to create a new active version of the STTM.
Note
Only the Active mapping version determines which data is retrieved for downstream tasks.
If required, recreate the STTM using a different knowledge file.
The platform generates a new active version of the STTM without overwriting the previous version.
Tip
Each time you recreate an STTM, the platform saves it as a new version rather than replacing the existing one, so you can compare versions if needed.
Viewing and Managing STTM
In the Knowledge Resources tab, switch to the Mappings sub-tab.
The STTM details are displayed.
Use the version dropdown, right-aligned above the table, to select a mapping version that you want to view.
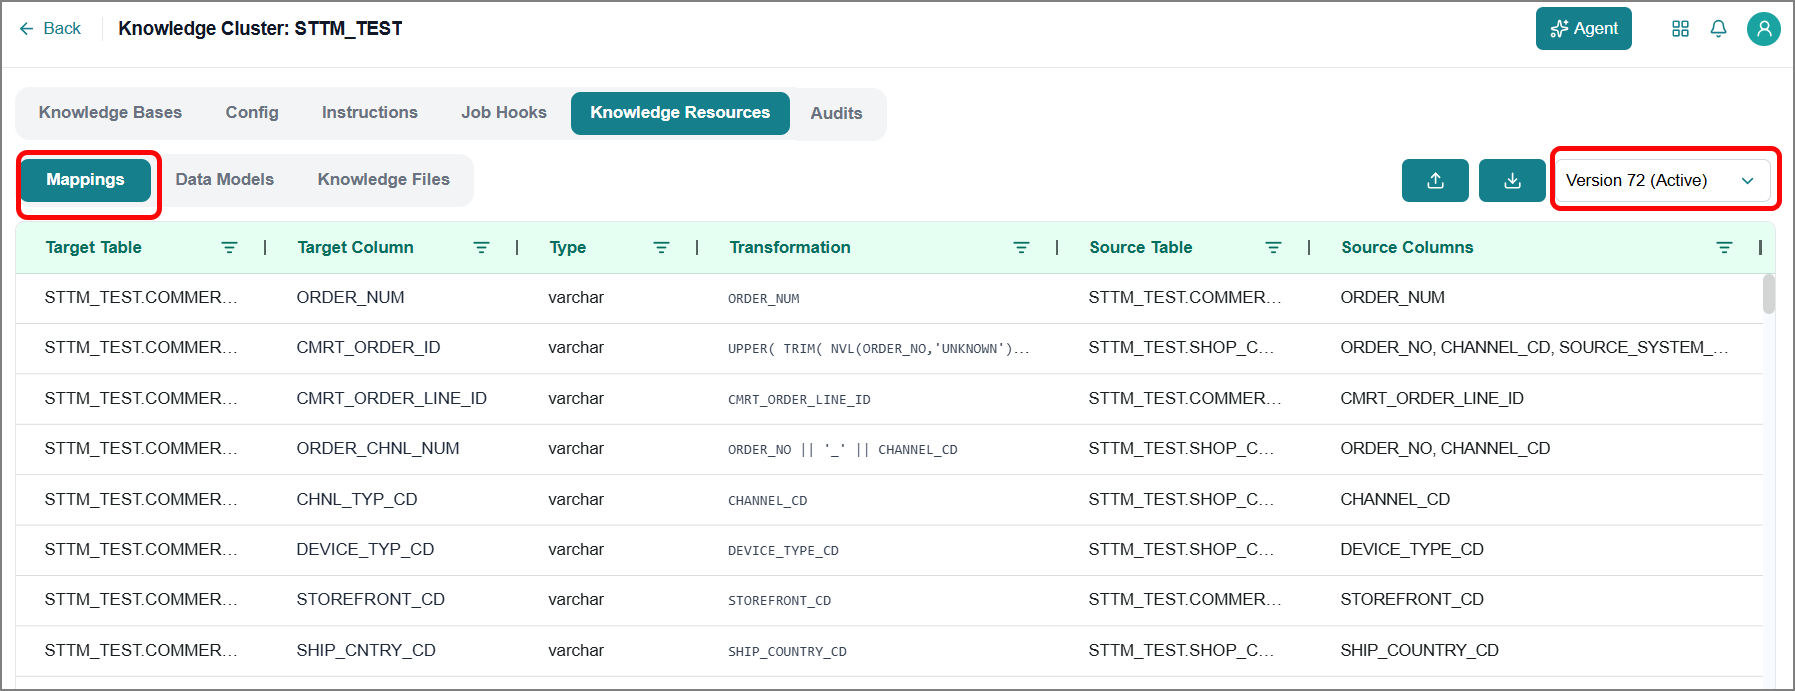
Review the mapping table.
To save a copy and share it for SME review, click the Download Mapping icon next to the version dropdown. The file is downloaded to the system as a CSV file.

To import an external mapping approved by SMEs, click the Upload Mapping icon next to the version dropdown and select a CSV file from your system.
The platform will adjust the mapping based on the upload file.
Data Models Tab
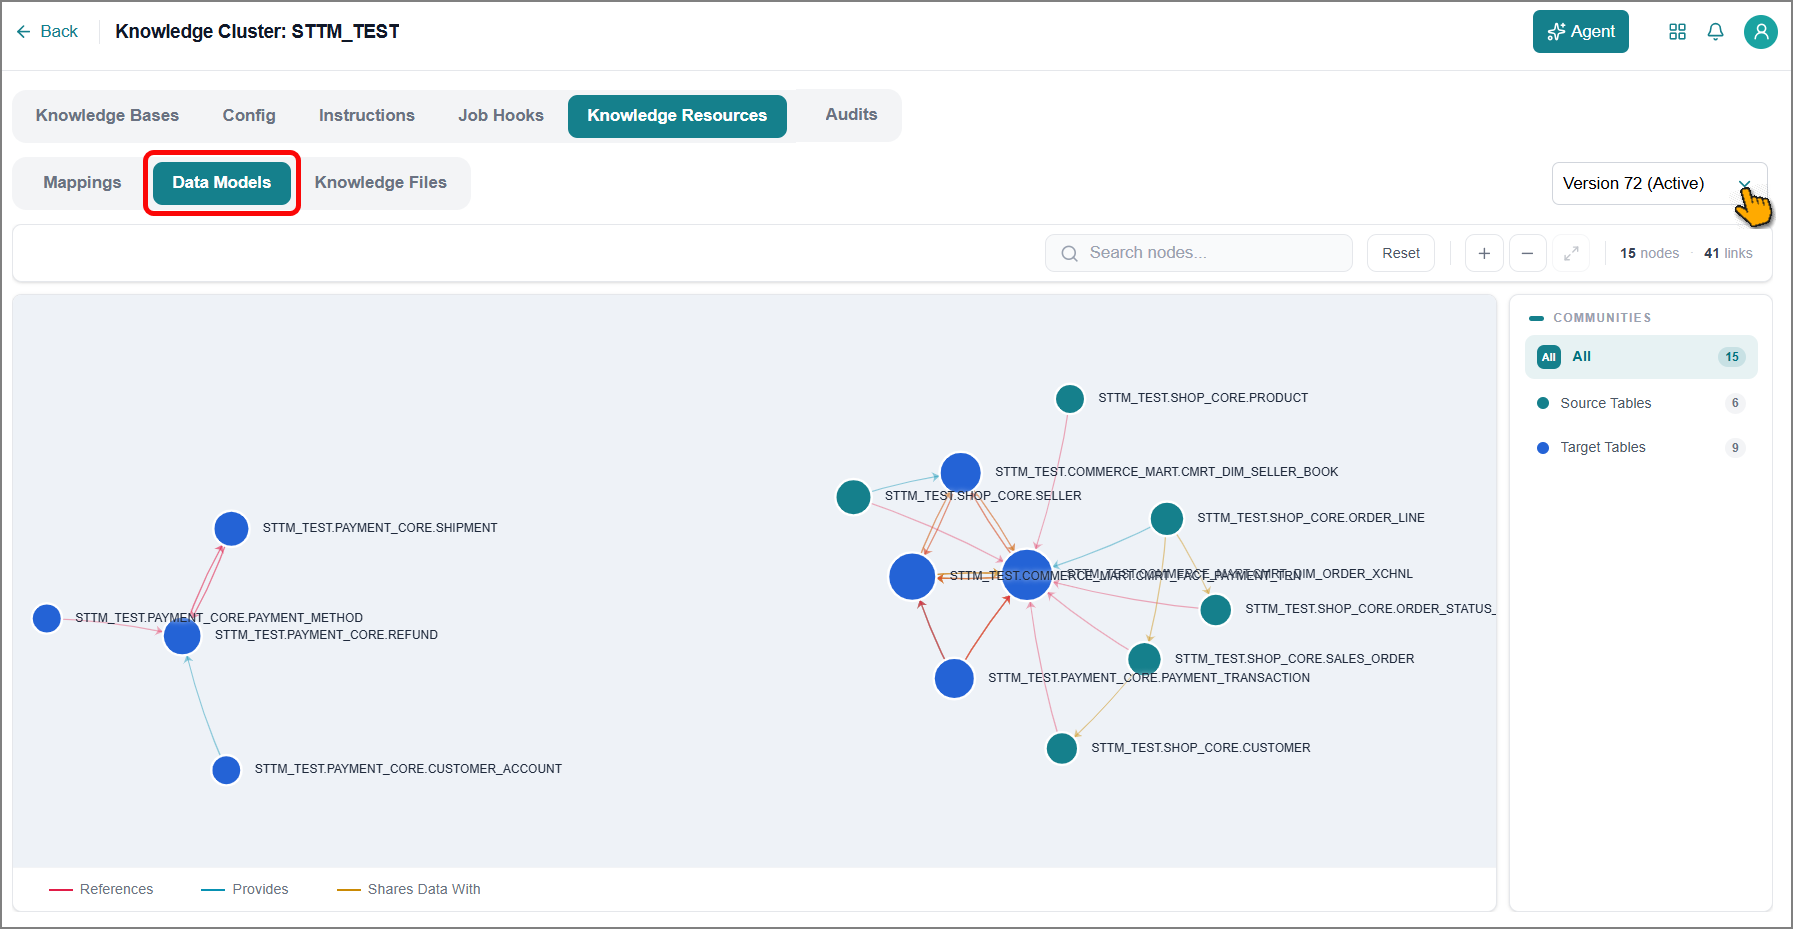
The Data Models tab displays the data model generated for your Knowledge Cluster as a Knowledge Graph. This visual view shows how tables relate to each other, helping you understand your data's structure at a glance. You can switch between versions to view how the model has evolved.
To view data models:
In the Knowledge Resources tab, switch the Data Models sub-tab.
Use the version dropdown to select which data model version to view.
The Knowledge Graph for that version displays the relationships between tables.
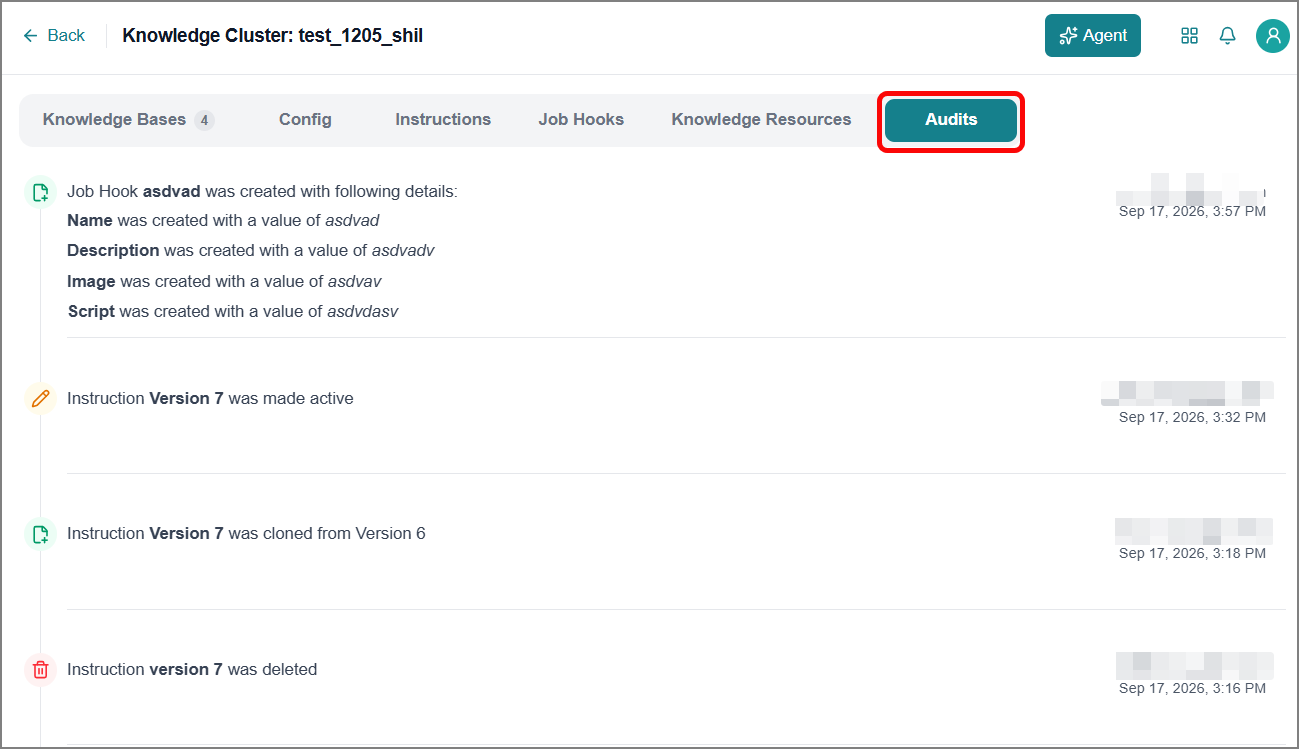
Audits Tab
The Audits tab records all changes to the KC, allowing you to review and validate KC-level modifications. It supports change tracking and validation for administrators and technical users who maintain the integrity of the KC data source across the platform.
Switch to the Audits tab. It displays a list of all KC-level changes, sorted with the most recent change at the top. Each entry shows the type of change and the date and time it occurred.
Deleting a Knowledge Cluster
Use the Delete option to permanently remove a KC from the list. To remove a KC:
Select Delete from the Ellipsis menu on the card.
A confirmation dialog box opens.
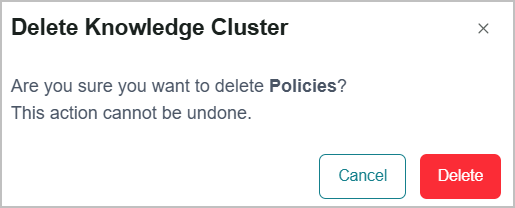
Click Delete.
The KC is removed from the page.
Warning
Deleting a KC is permanent and cannot be undone. Any agents currently using the cluster will lose access to its associated KBs.
AI Catalog
It automatically lists all your organization's Knowledge Bases, grouped by data type, so you can browse what data exists without writing a single query. Instead of hunting through separate systems to find the right table or file, you get one searchable, unified view of your data landscape.
To access this feature:
Go to Home page > Data Agent > Data Discovery Agent.
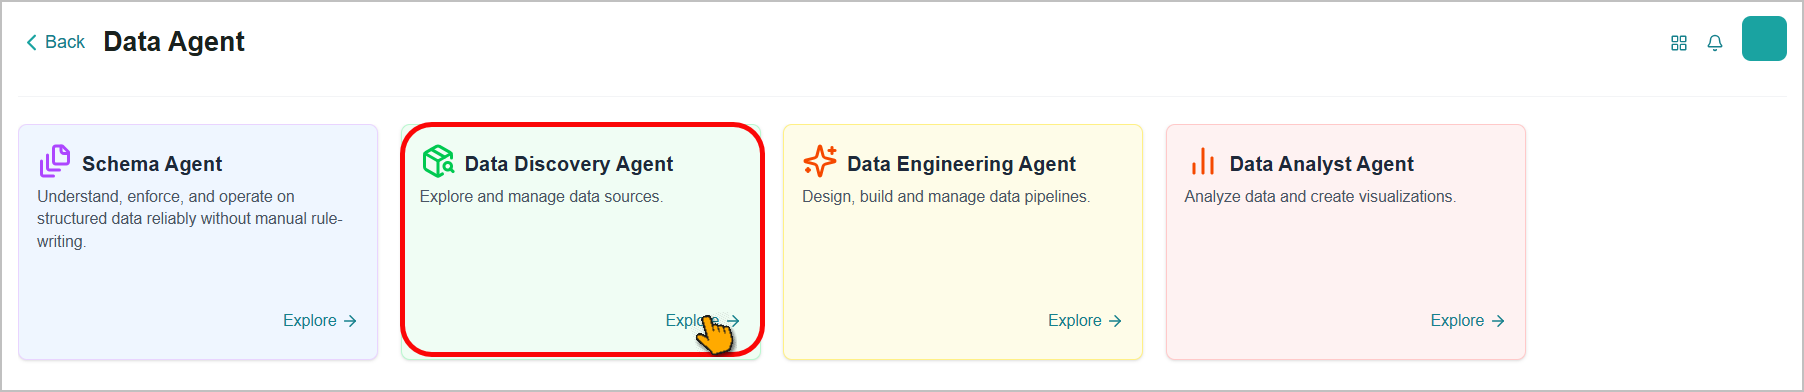
The Data Discovery page opens.
Switch to the AI Catalog tab to view all Knowledge Bases.
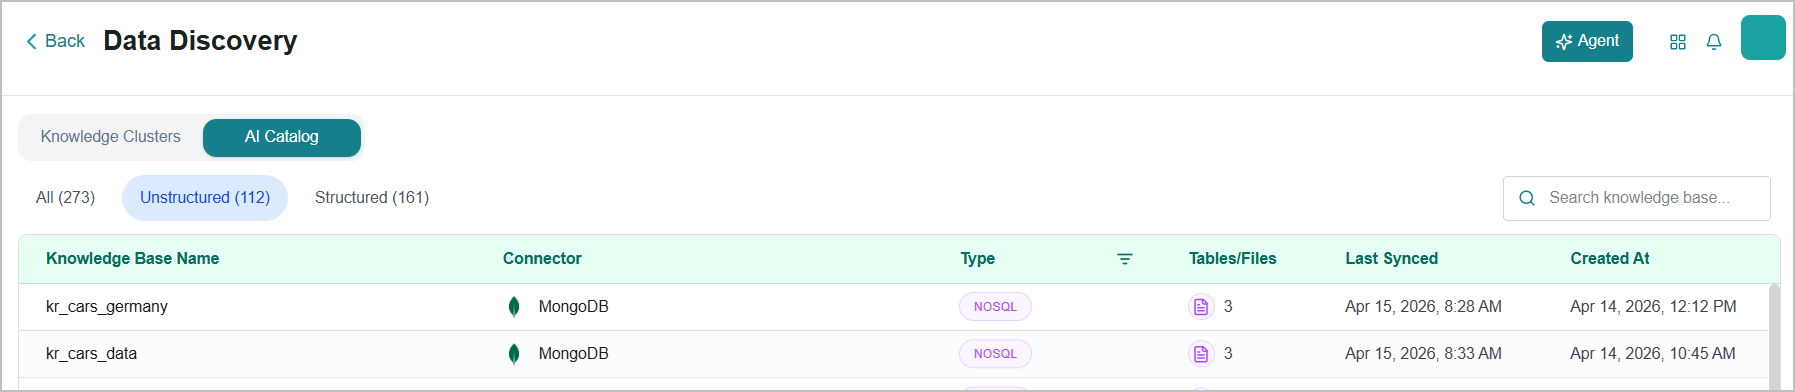
Use the data type tabs and Search Box to quickly filter a specific table or file from the list.
To view the full metadata for any table, select it from the list. The Data Visualization page opens and displays the table's detailed metadata.
Create a KC before using the Data Discovery Agent. Refer to Knowledge Clusters for more information.
Click Agent.
The Data Discovery agent interaction panel opens from the left.
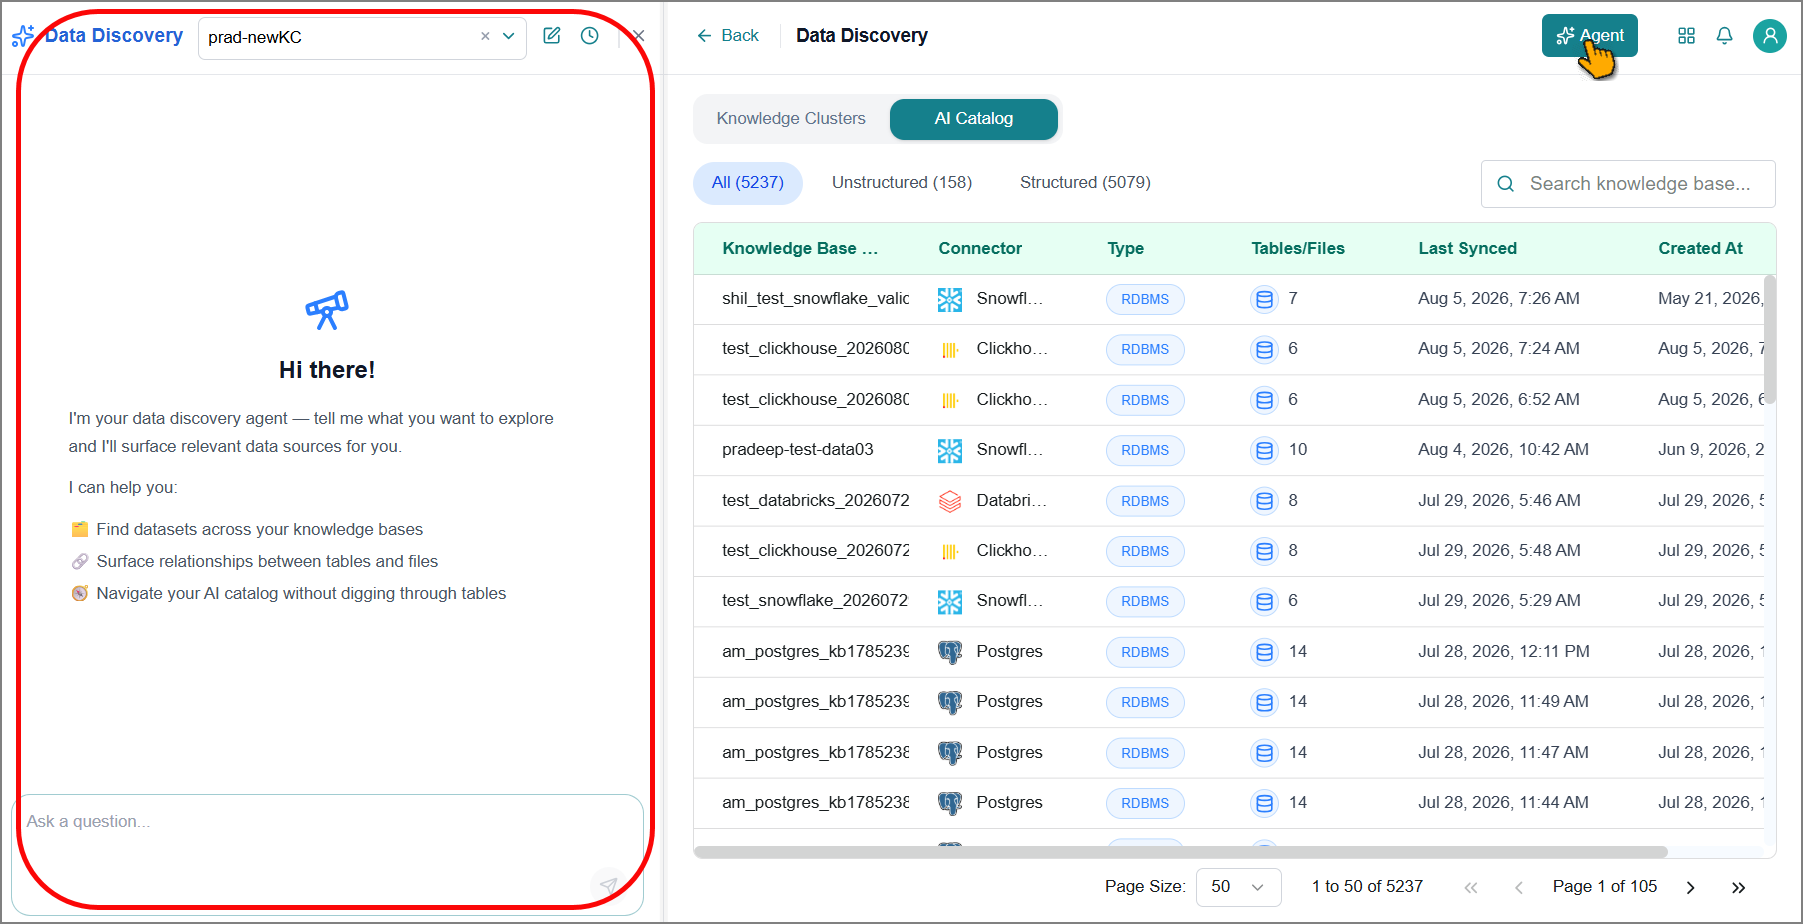
From the dropdown, select the KC you want to query.
Important
Only Knowledge Clusters you have already created appear in the dropdown. If the list is empty, create a Knowledge Cluster first. Refer to Knowledge Clusters for more information.
Type your question in natural language.
Example: "Which tables contain customer transaction data from the last quarter?"
Press Enter or click the submit
 icon to run the search.
The agent searches your selected Knowledge Cluster, retrieves the relevant data, and automatically maps relationships between the matching tables and files.
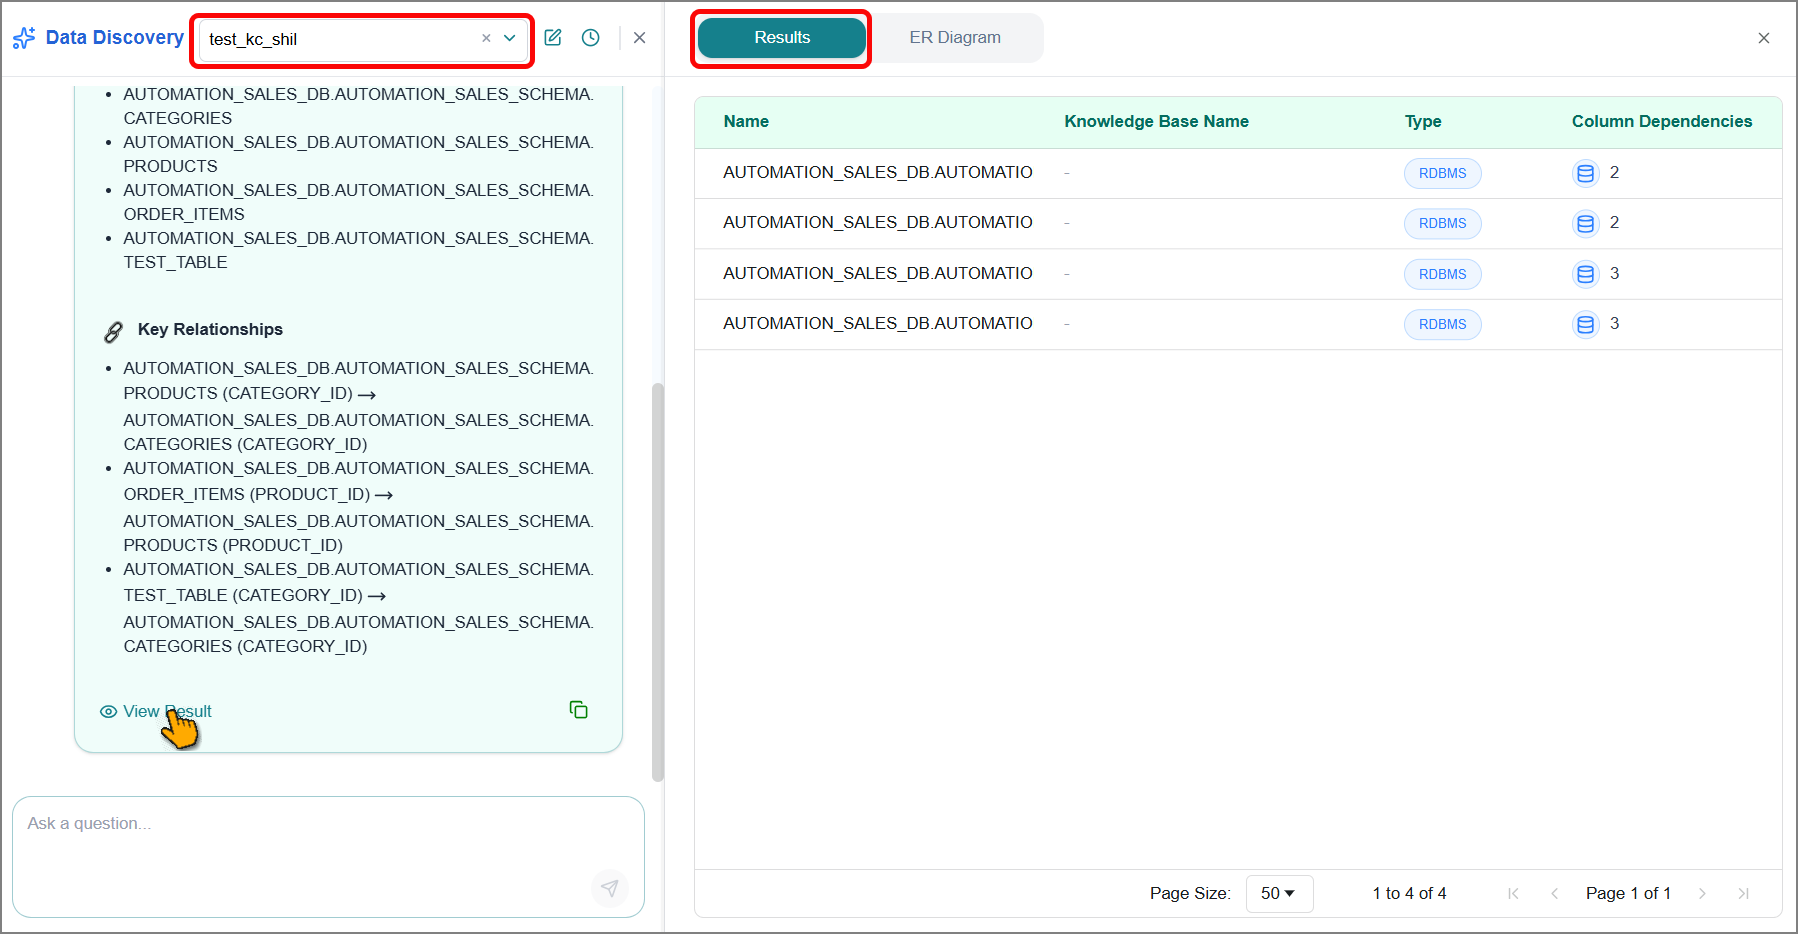
Click View Result.
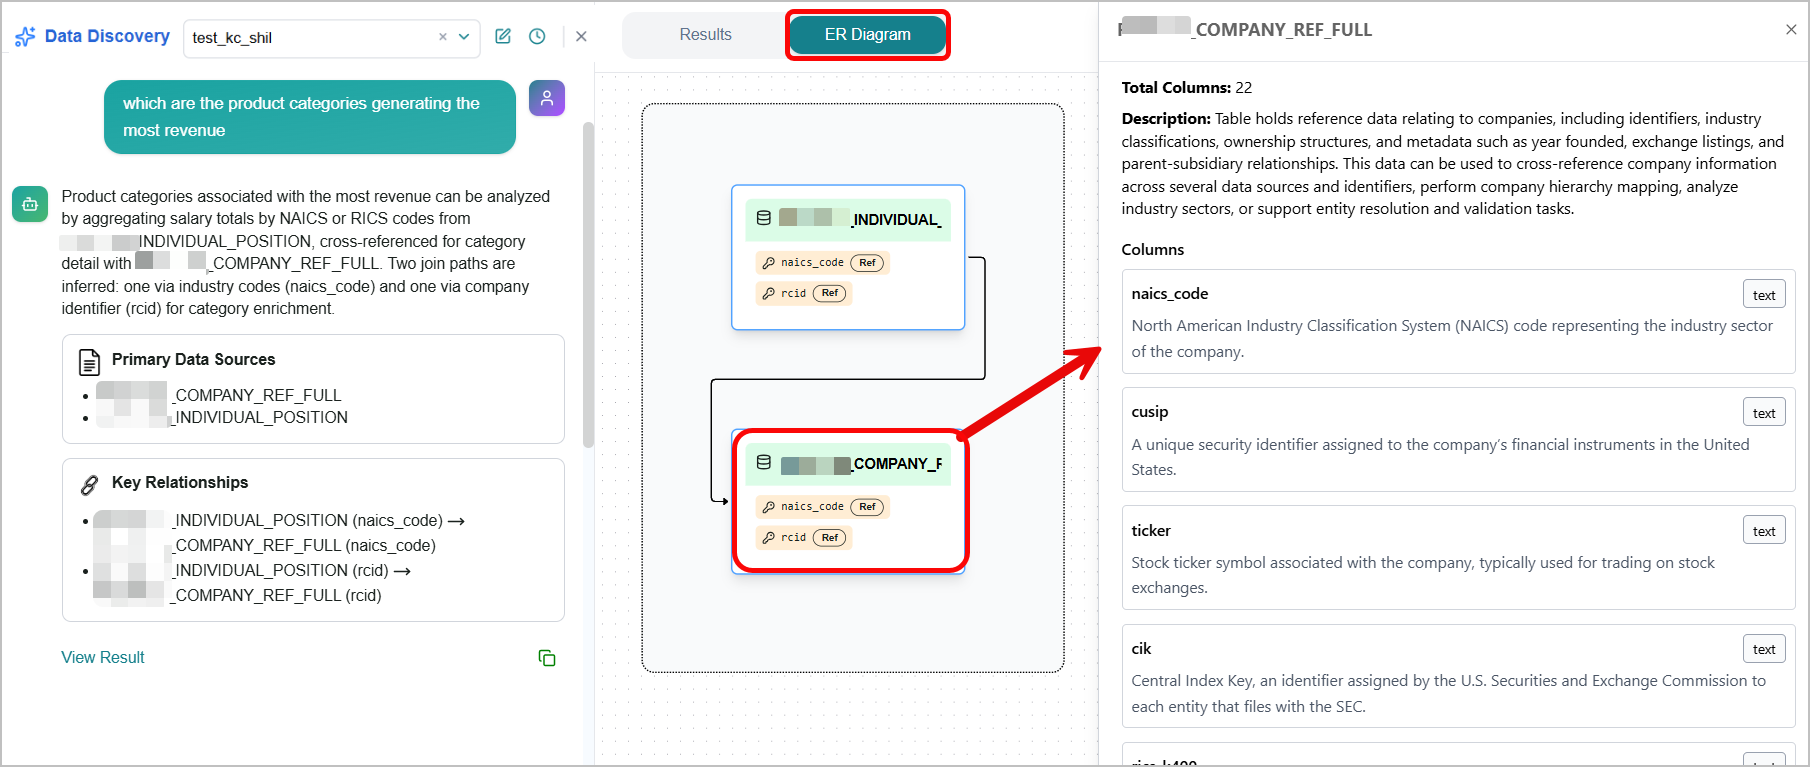
The right panel displays filtered relevant information in two tabs.
Results tab - Only the tables and files from the Knowledge Cluster that match your query.
ER Diagram tab - A visual map of the relationships between those tables and files.
Click any table or file in the diagram to see its detailed metadata in the right panel.
Use the available agent controls to manage your session:
New Conversation
 icon - Begins a new, separate chat session with the agent.
Session History
 icon - Lets you view and resume past conversations.
+ New Chat - Begins a new, separate chat session with the agent.
Delete Session
icon - Lets you remove a session history from the list.
Clear Chat - Clears the current conversation for a fresh start.
Copy
 icon - Copies the generated agent response to the clipboard.