User Onboarding
When an account is set up and ready for users to be added, different approaches are taken for user onboarding, depending on customer systems and needs, including various directory syncing capabilities and import options. This topic aims to help delivery teams and system administrators understand the different ways that users can be added to an account and guides them through each of these processes.
Note
Once the initial user onboarding is set up and completed, users with the Account Administrator role can make changes to users as needed. If directory syncing is set up, it's unlikely that Account Administrators need to edit users in Administration Platform. Instead, users and groups are added to the syncing directory application. For more information on managing users in Administration Platform, click here.
Onboarding Options
Depending on the existing directory, different onboarding options are appropriate. The diagram below should help you determine which option to go for:
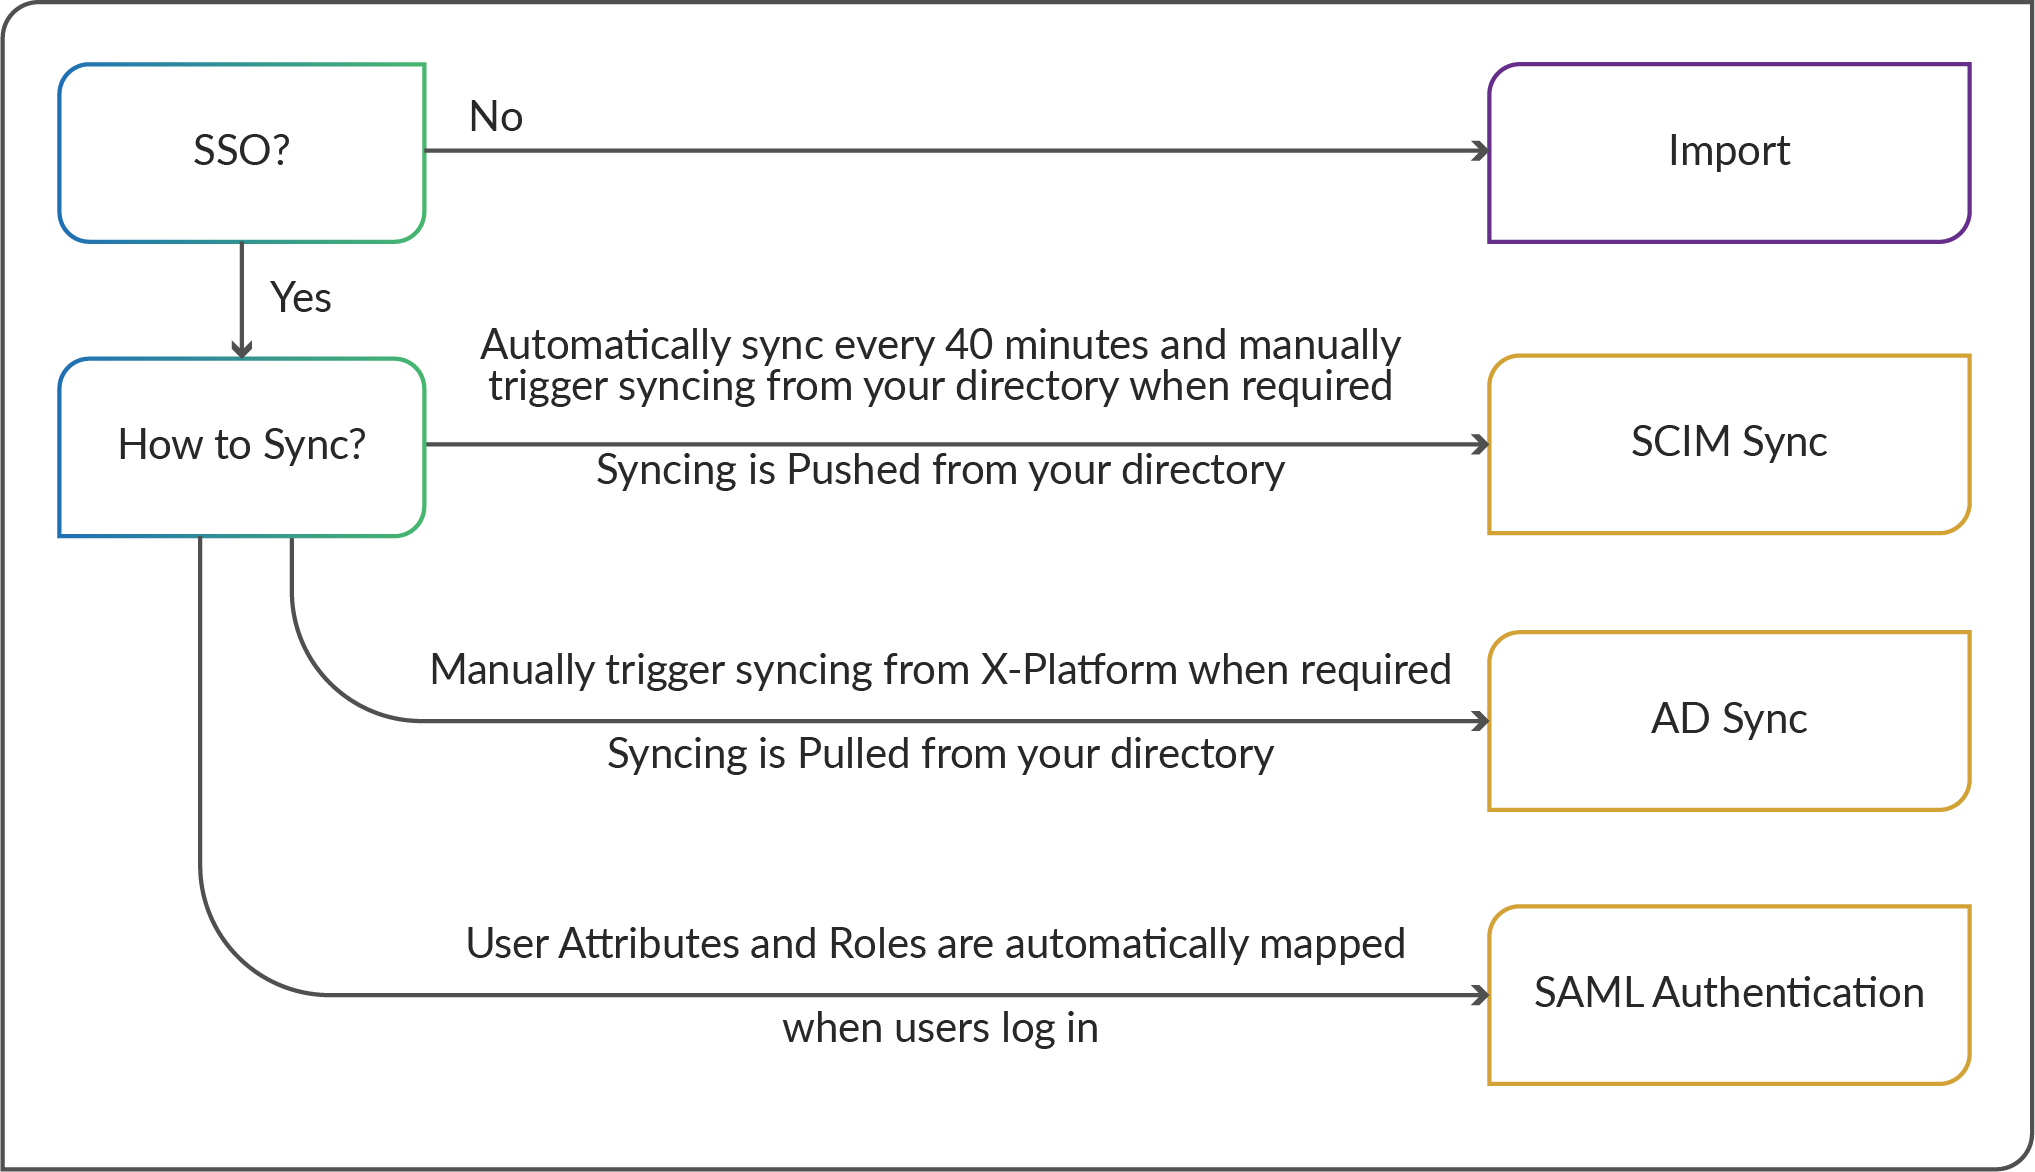
If the directory has SSO through its Identity Provider (IDP), then syncing can be configured between the platform and the directory, using either AD Sync, SCIM Sync, or SAML Authentication. If no SSO is configured, then users can be imported by uploading a CSV file.
Important
Once a sync method is set up, it is not possible to change the method. It is possible to update the method's settings if required. To clarify, if SCIM Sync, AD Sync, or SAML Authentication is set up, it cannot be switched.
If a sync method is set up, users should not be managed manually in Administration Platform.
AD Sync is designed for pull user management in which changes are made on the directory and are pulled to the platform when the system syncs (this sync is triggered manually from Administration Platform). AD sync could include an update to a user's location in the Organization Hierarchy, their Name, Email, Roles etc, or if a user is removed from the syncing directory location (in which the user's access to the platform is removed).
For information on setting up AD Sync, click here.
SCIM Sync is designed for push user management, in which a change in the directory is automatically pushed to the platform when the system syncs periodically (every 40 minutes for Microsoft). SCIM sync also lets you manually trigger the sync from your IDP application on demand. SCIM Sync could include an update to a user's location in the Organization Hierarchy, their Name, Email, Roles, etc., or if a user is removed from the syncing directory location (in which the user's access to the platform is removed).
For information on setting up SCIM Sync, click here.
SAML Authentication is designed not to actively sync your user base into the system, but to sync each user as they log in. Once SAML is configured in the system, users can log in using SAML, and the system queries your IDP for their information. The system uses your SAML configuration to match user metadata from your IDP, which determines their Name, Email, Roles, etc. Changes made to your IDP application are reflected in the system when the impacted user next logs in.
For information on setting up SAML Authentication, click here.
User Import is designed as an option to upload users using a .CSV file, this provides a method to add users in bulk without SSO or a sync to an existing directory, the .CSV template provides options to specify the attributes (name, email etc) and roles of each user - following an initial user onboarding with the Import method, user management handled manually in Administration Platform.
For information on setting up user Import, click here.
For information on managing users in Administration Platform after an initial import, click here.
Set Up AD Sync
This topic outlines the steps required to enable AD sync, which allows your platform users, roles, and groups to be automatically synced with your Active Directory, enabling automated user management. As described in the User Onboarding Introduction, AD Sync is designed for pull user management in which changes are made on the directory and are pulled to the platform on a scheduled sync.
Provision your Directory for AD Sync
Before SSO and directory syncing can be configured in the platform, your directory must be configured with the Uniphore AD Sync application. For detailed information on managing Enterprise applications in Azure AD, see the Microsoft documentation here.
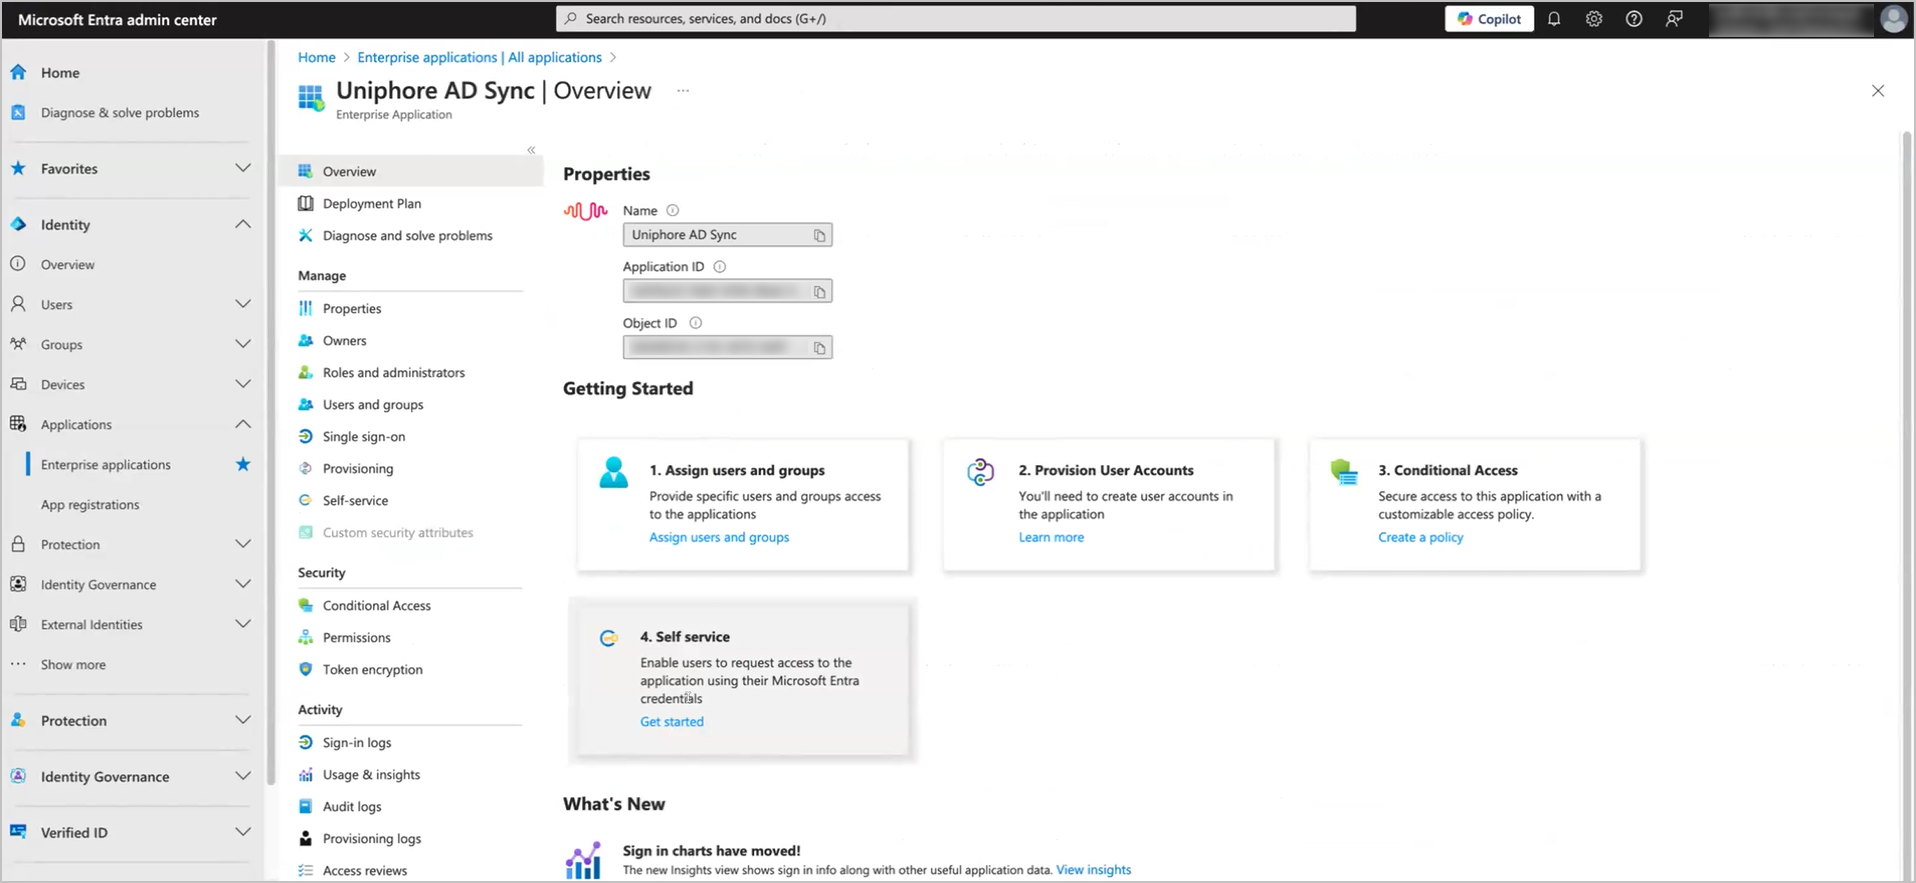
In order to sync groups and users from your directory into the platform, in the Uniphore AD Sync application, go to either Manage > Users and Groups and then select Add user/group, or under Getting Started > 1. Assign users and groups, click Assign users and groups. Then add your users and groups as required, and assign a role to your users to automatically assign platform roles during the sync. Mapping your directory roles to platform roles is part of the AD sync configuration and is editable after your initial onboarding.
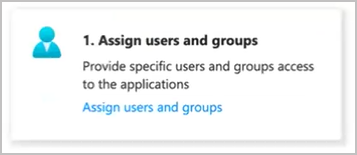
Once your users and groups are ready, complete the steps in the platform Connect SSO and Configure AD Sync
When your users and groups are syncing with the platform, further management of the application is available. You can:
Set up Conditional Access - Secure the application with a customizable access policy, under Getting Started > 3. Conditional Access, click Create a policy.
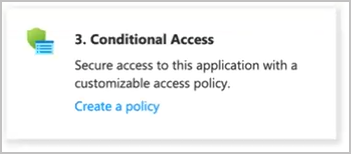
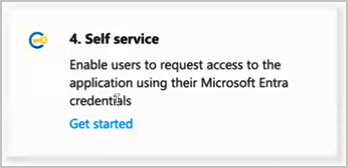
Set up Self service - Enable users to request access to the application using their Microsoft Entra credentials, Getting Started > 4. Self service click Get started.
Connect SSO
If you are enabling sync for your users, connect your Single Sign On (SSO) to the platform, follow the steps below to set up SSO for your platform users.
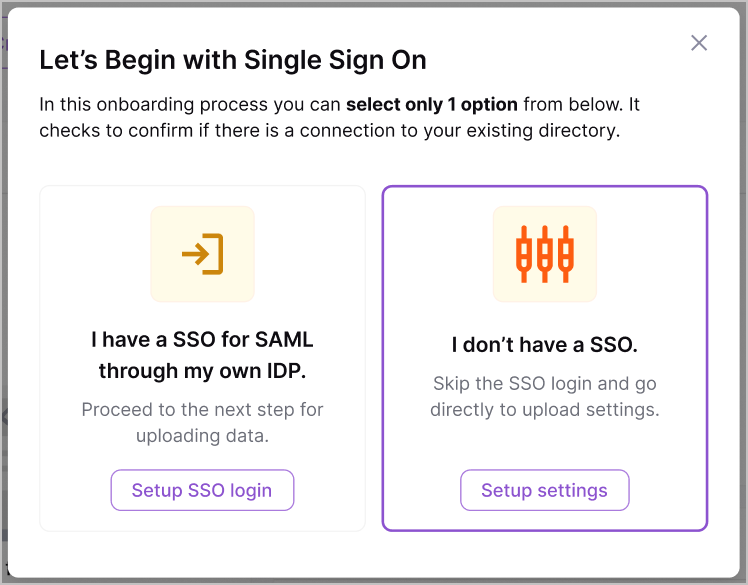
Go to Users & Accounts > Home, and click Upload data to open the Let's Begin with Single Sign On dialog box.
Click Set up SSO login to open the Set Up Single Sign On dialog box.
Under Sign-in URL, enter the URL where users sign in to your identity provider.
To the right of Signing Certificate, click Upload Certificate File and choose the signing certificate to upload.
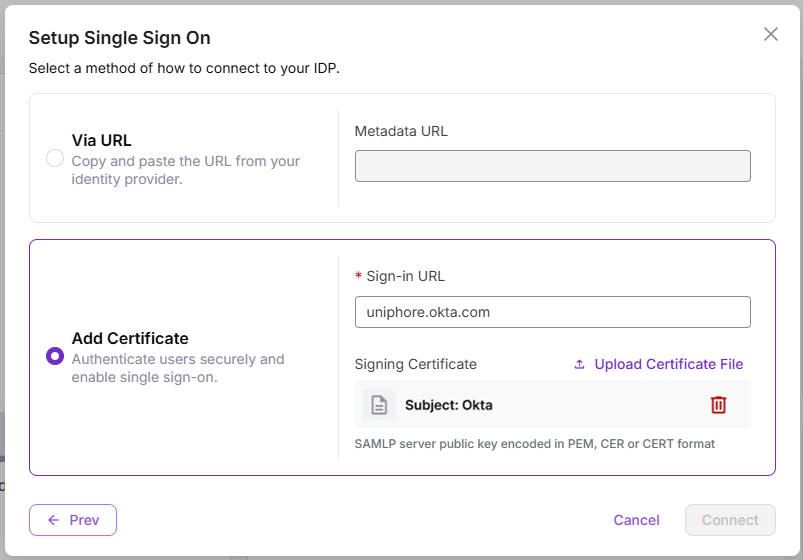
Confirm the details and click Connect to connect SSO to the platform. Following a successful connection, the following SSO has been successfully connected message is displayed at the top of the dialog box:

Click Continue setup to progress to the next step of setting up your user sync. Follow the steps below to complete your sync setup.
Configure AD Sync
Once the SSO is connected (see Connect SSO above), AD Sync can be configured. Aas mentioned previously, AD Sync is used to automatically sync your users, roles, and groups with your existing directory. AD Sync works by pulling information from your directory on a scheduled sync. Follow the steps below to configure AD Sync.
Note
AD Sync works a little differently from SCIM Sync. SCIM Sync works on a push from your directory. When a change is made to your directory, the change is pushed to the platform when the system syncs (every 40 minutes). SCIM sync also lets you manually push the sync from your Azure application on demand. For information on setting up SCIM Sync, click here.
Firstly, connect your Single Sign On, and click Continue setup (as detailed in Connect SSO above) to open the Choose How to Upload Data dialog box.
Click Setup AD sync.
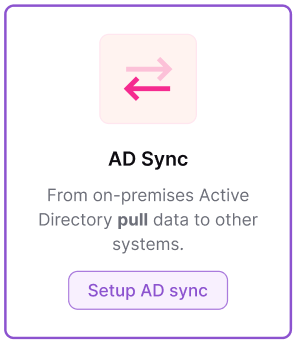
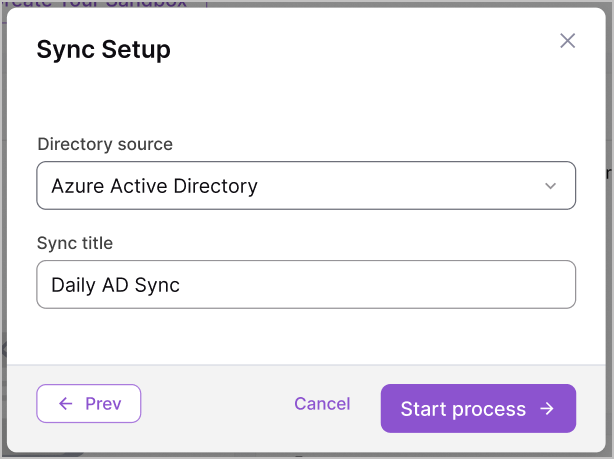
Select a Directory source from the source drop-down menu.
Under Sync title, enter a friendly name for the sync. The Sync title is used to identify your sync throughout the system.
Confirm the details and click Start process >.
The remaining steps to setting up AD Sync are split into stages. Complete the following stages to complete your AD Sync configuration and sync your users, roles, and groups into the platform:
Connect - set up Graph API connection to your directory.
Configurations - map your directory roles to the platform roles, sync your users and validate user properties, sync the user groups, and determine how they are imported into the Organization Hierarchy.
Sync - the system now sync your Groups, Roles, and Users into the platform.
Summary - review the sync summary, see how many roles have been mapped to the platform roles, how many users have been added, how many directories have been uploaded, and how many groups have been imported into your Organization Hierarchy.
Set up Graph API connection to your directory.
Under Tenant ID enter the URL of the directory to connect to (this can be found here).
If required, under Add a prefix enter a prefix for the connection. This is the prefix to your directory groups, a quick way to filter out which groups are available to sync.
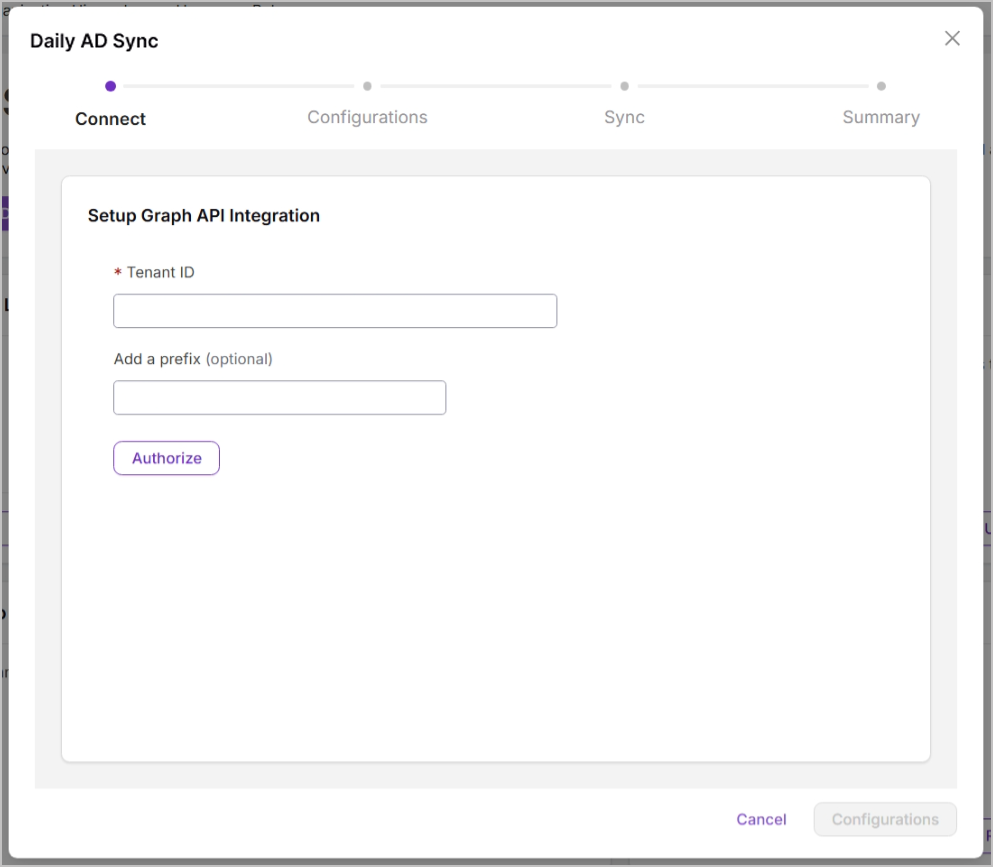
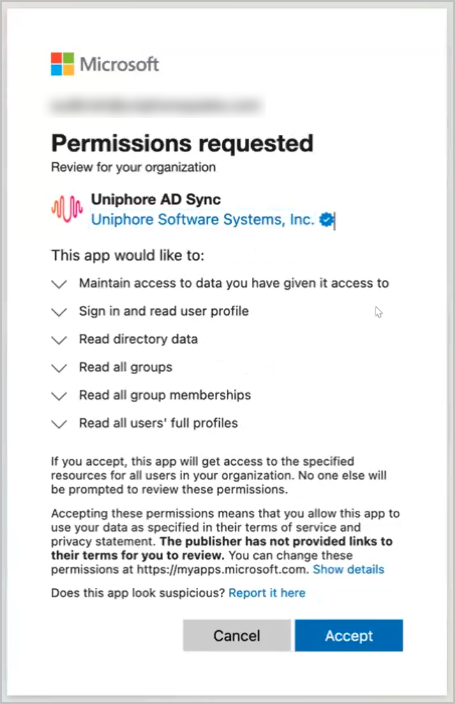
Click Authorize to open your directory. Sign in as an administrator and click Accept to accept the permissions request for the Uniphore AD Sync application. You are then directed back to the platform to see an Authorization successful message.
Back in the AD sync setup dialog box, click Configurations to move to the Settings stage.
The connection is now in progress. The progress of your connection is provided during the initial connection under Connection in progress....
User Groups, Roles, and Users are now be uploaded into the platform. The total amount of Groups, Roles, and Users uploaded are displayed along with any important notices about the sync:
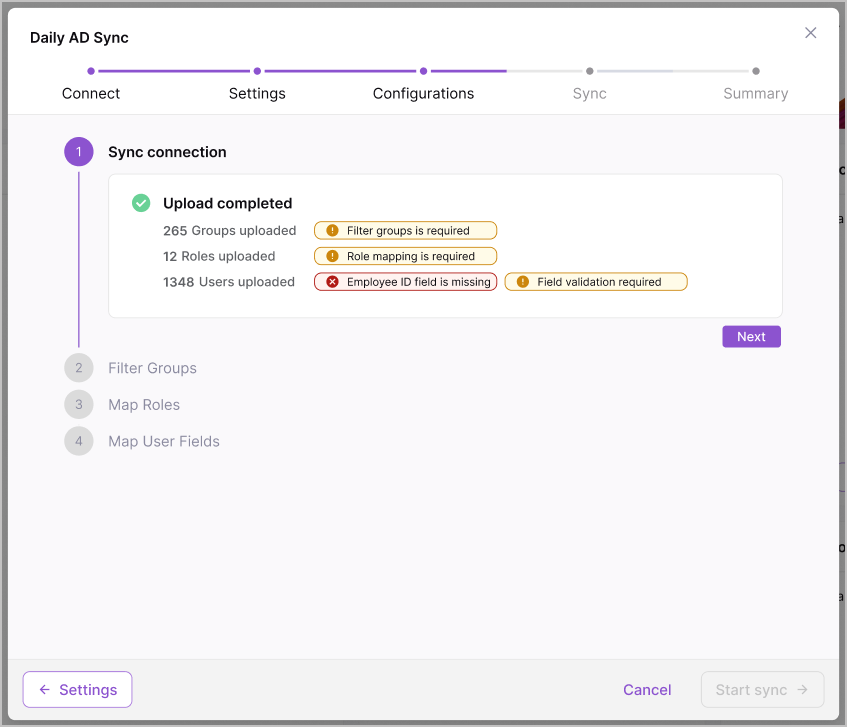
Set the sync configuration, how the synced users appear in the platform, map your directory roles to the platform roles, sync your users and validate user properties, sync the user groups, and determine how they are imported into the Organization Hierarchy.
Review the Upload completed information. This informs you on how many Groups, Roles, and Users can be synced into the platform, and let you know what's needed in the following steps. Click Next.
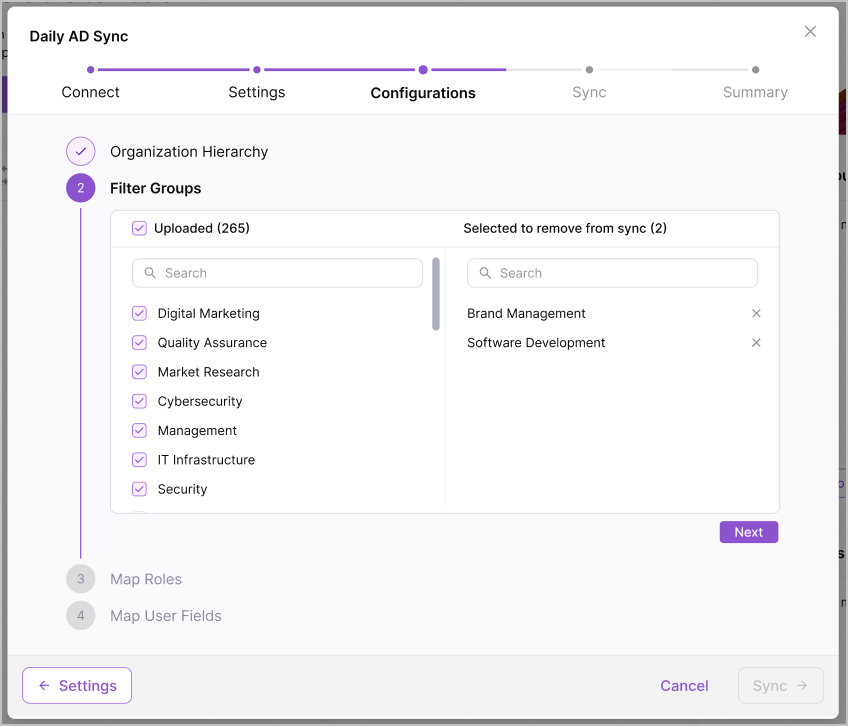
Under Filter Groups, determine which user groups to sync into to the platform, select all the groups that you want to appear in your platform Organization Hierarchy page, any unselected groups are moved to the right hand column, these groups are removed from the sync and the users in these groups are not synced into the platform. At least one group must be selected. When all the required groups are selected, click Next.
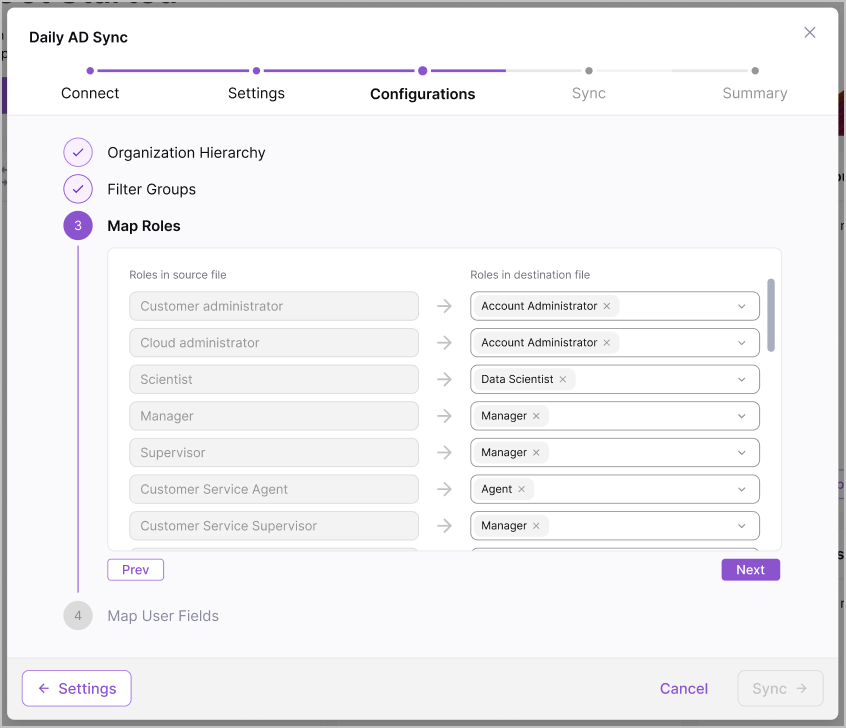
Under Map Roles, map your source roles to the platform roles, roles determine user access permissions. For each source role in the left column, use the roles drop-down menu in the right column to select a platform role to map the source role with. Once all the roles are mapped, click Next. For more information on roles, click here.
Under Map User Fields, review the user metadata fields synced from your directory in the left column and compare the fields to the user properties on the platform in the right column.
Important
The following Uniphore properties are mandatory fields and must be mapped. All other fields are optional:
First Name
Last Name
Email
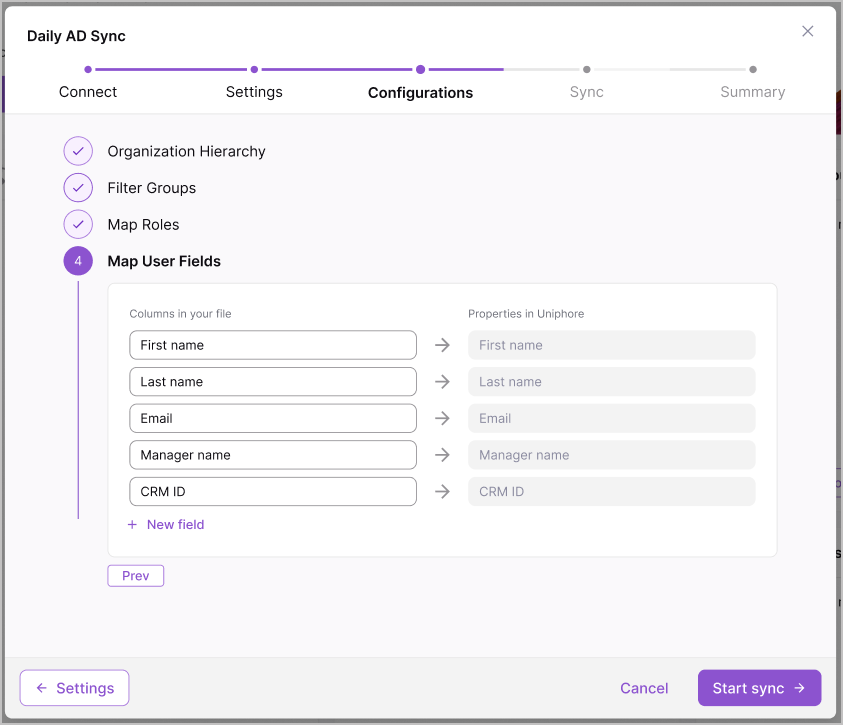
Once you've reviewed and confirmed the details, click Start sync > to begin your sync and progress to the Sync stage.
There are no actions to complete here, the system syncs your Groups, Roles, and Users into the platform.
Once the Sync is completed the Summary page is displayed.
Review the summary cards to see how many roles have been mapped to the platform roles, how many users have been added, how many directories have been uploaded, and how many groups have been imported into your Organization Hierarchy.
Click Finish & close to close the AD Sync dialog box.
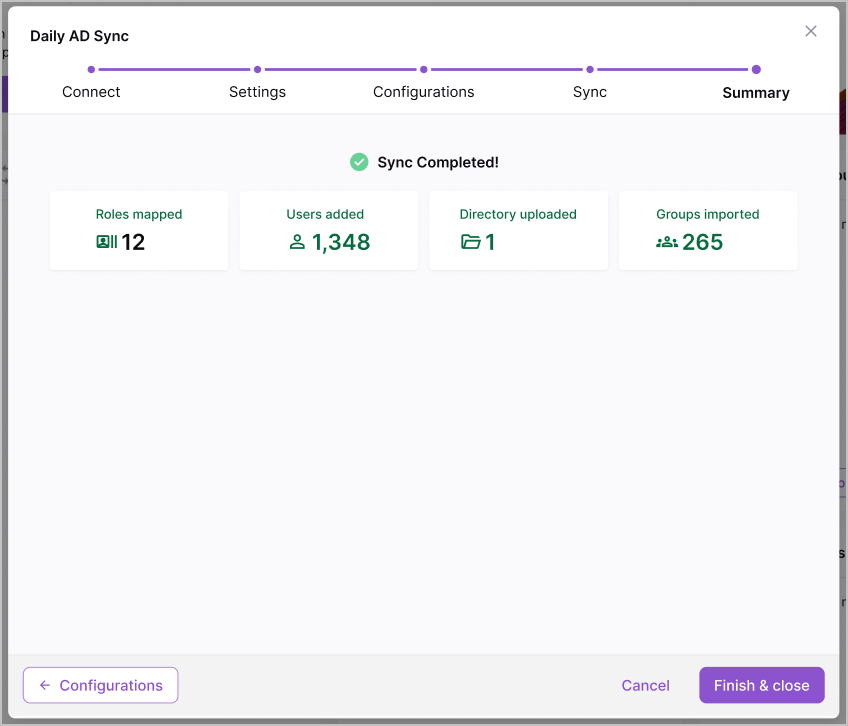
You can now find your users on the Users page and your groups on the Organization Hierarchy page. For information on viewing and managing your users, click here. For information on viewing your Organization Hierarchy, click here.
When your system syncs, logs are created for each sync job. For more information on sync logs, click here.
You can update your sync settings at any time. For more information on how to update your sync settings, click here.
View Sync Logs
When your system syncs, a log for that sync is created in the Sync Log. To view your sync log go to Users & Accounts > Home and see the Log card, in this card you can see a quick list of your sync jobs, when the syncs were ran and their statuses.
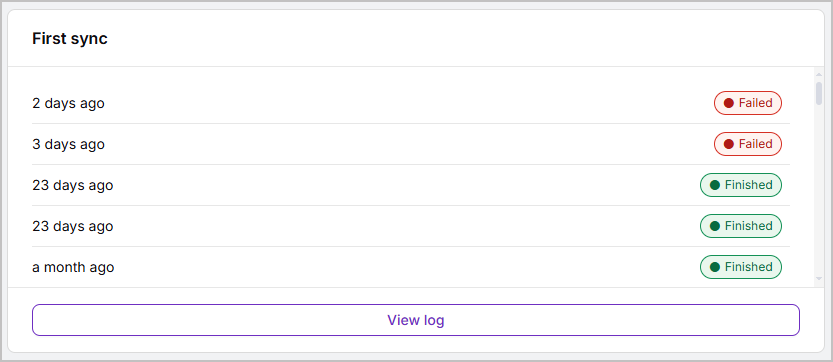
Click View log to see a full list of the sync logs.
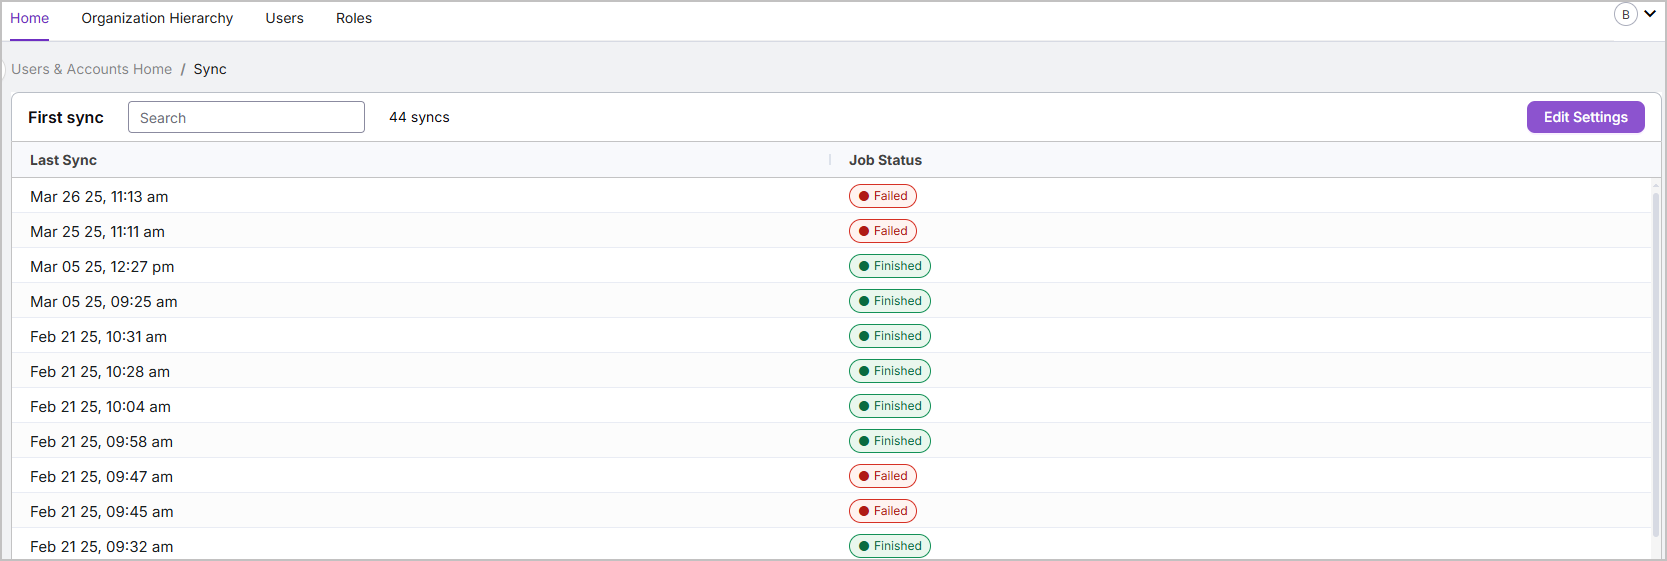
Edit Sync Settings
If you need to make changes to your sync settings after your initial sync, go to Users & Accounts > Home and click View logs, and then click Edit Settings. This opens the Sync dialog box with four stages, Connect, Configurations, Sync, and Summary:
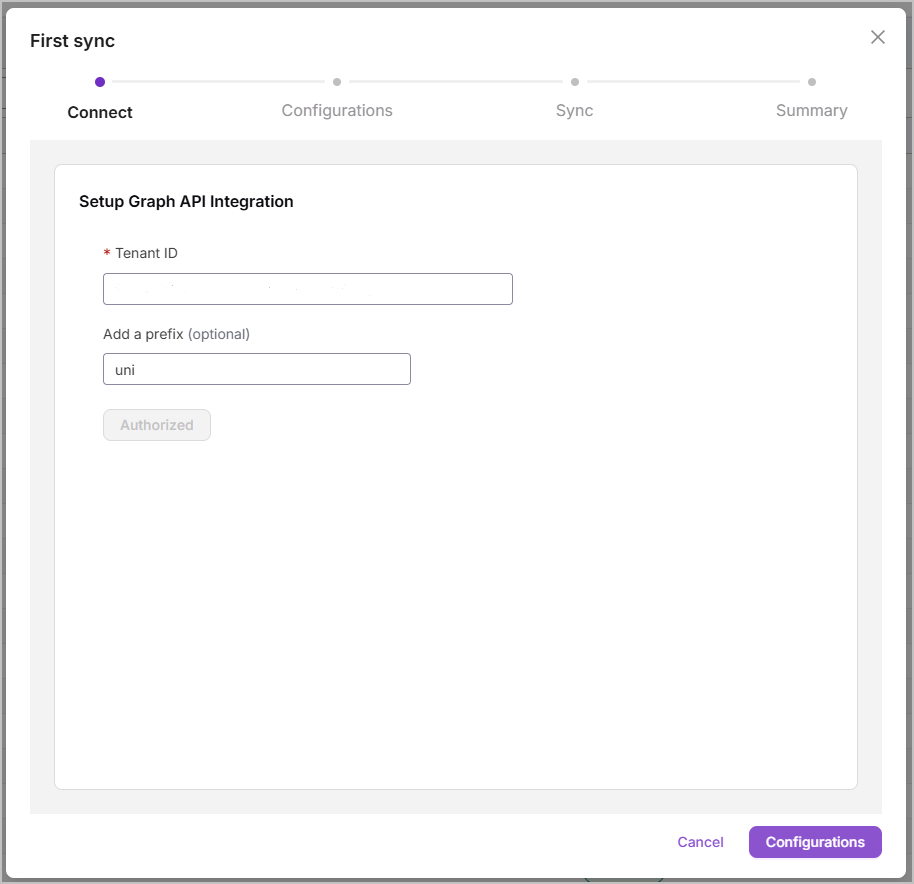
It's unlikely that you need to change your Tenant ID and prefix, but if you do, edit them in the Connect stage, then click Authorize. You are directed to your directory, sign in as an administrator and accept the permissions request for the Uniphore AD Sync application by clicking Accept.
Once authorized, click Configurations.
In the configuration stage, you can edit how the groups, rules, and user metadata fields are synced into the platform, hover over either Filter Groups, Map Roles, or Map User Fields, and click the Edit Pencil
 to make changes:
Filter Groups - determine which user groups to sync into to the platform, select all the groups that you want to appear in your platform Organization Hierarchy page, any unselected groups are moved to the right hand column, these groups are removed from the sync and the users in these groups are not synced into the platform.
Map Roles - map your source roles to the platform roles, roles determine user access permissions. For each source role in the left column, use the roles drop-down menu in the right column to select a platform role to map the source role to. For more information on roles, click here.
Map User Fields - review the user metadata fields synced from your directory in the left column and compare the fields to the user properties on the platform in the right column. As mentioned above, the First Name, Last Name, and Email Uniphore properties are mandatory fields and must be mapped, all other fields are optional.
Confirm your changes and click Start sync to run a new sync with your updated configuration.
There are no actions to complete in the sync stage, the system now syncs your Groups, Roles, and Users into the platform according to your changes.
On the Summary stage, once the sync is complete, review the updated Groups, Roles, and User Metadata fields.
Click Finish & Close to close the dialog box.
Set Up SCIM Sync
This topic outlines the steps required to enable SCIM sync, which allows your platform users, roles, and groups to be automatically synced with your Active Directory, enabling automated user management. As described in the User Onboarding Introduction, SCIM Sync is designed for push user management in which a change in the directory is automatically pushed to the platform when the system syncs (every 40 minutes for Azure). SCIM Sync also lets you manually push the sync from your IDP on demand.
Provision your Directory for SCIM Sync
Before SSO and directory syncing can be configured in the platform, your directory must be configured with a new enterprise application specifically for your SCIM sync with Uniphore. Follow the steps below to create the application for an Azure application.
Go to https://entra.microsoft.com and sign in.
In the left side menu, click Applications, and then Enterprise Applications.
Click + New Application. This opens the Browse Microsoft Entra Gallery page.
Click + Create your own application. This opens a dialog panel on the right.
Enter a useful name for the application, for example Uniphore SCIM Sync.
Select Integrate any other application you don't find in the gallery (Non-gallery).
Click Create.
For detailed information on managing Enterprise applications in Azure AD, see the Microsoft documentation here.
To sync groups and users from your directory into the platform, in the Uniphore SCIM Sync application go Manage > Users and Groups and then select Add user/group and add your users and groups as required, assign a role to your users to automatically assign platform roles to your users during the sync, mapping your directory roles to platform roles is part of the SCIM sync configuration and is editable after your initial onboarding.
Once your users and groups are ready, complete the steps in the platform Connect SSO and Configure SCIM Sync.
Once you have configured the syncing process, further management of the application is available. You can:
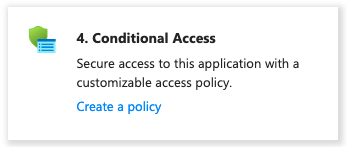
Set up Conditional Access - Secure the application with a customizable access policy, under Getting Started > 3. Conditional Access click Create a policy.
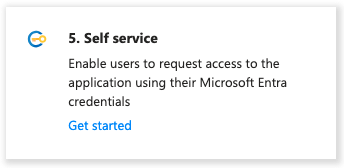
Set up Self service - Enable users to request access to the application using their Microsoft Entra credentials, Getting Started > 4. Self service click Get started.
Connect SSO
If you are enabling sync for your users, connect your Single Sign On (SSO) to the platform. Follow the steps below to set up SSO for your platform users with your Azure Active Directory.
Go to Users & Accounts > Home, and click Upload data to open the Let's Begin with Single Sign On dialog box.
Click Set up SSO login to open the Set Up Single Sign On dialog box.
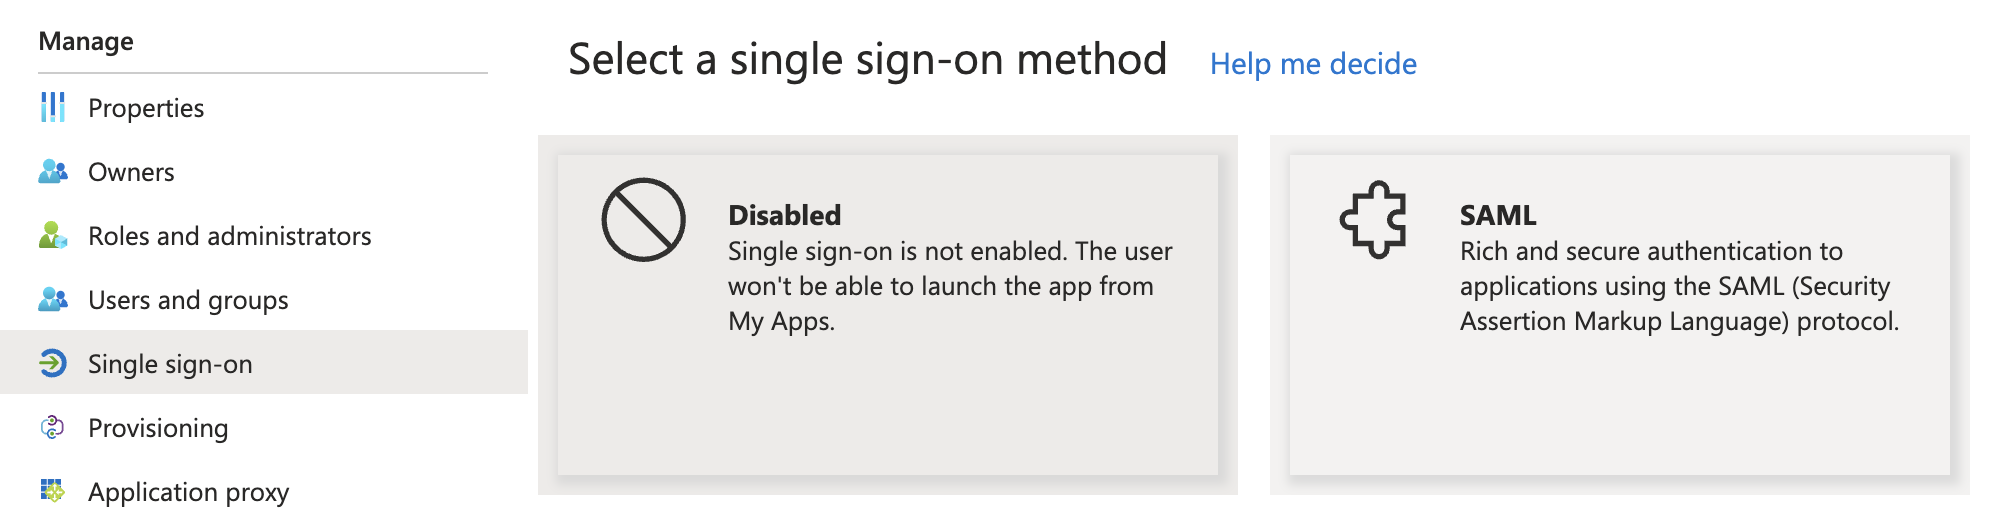
In a new tab, go to Microsoft Entra. Under your Uniphore SCIM Provisioning application, click Single sign-on in the left navigation menu. Then, under Select a single sign on method, select the SAML card.
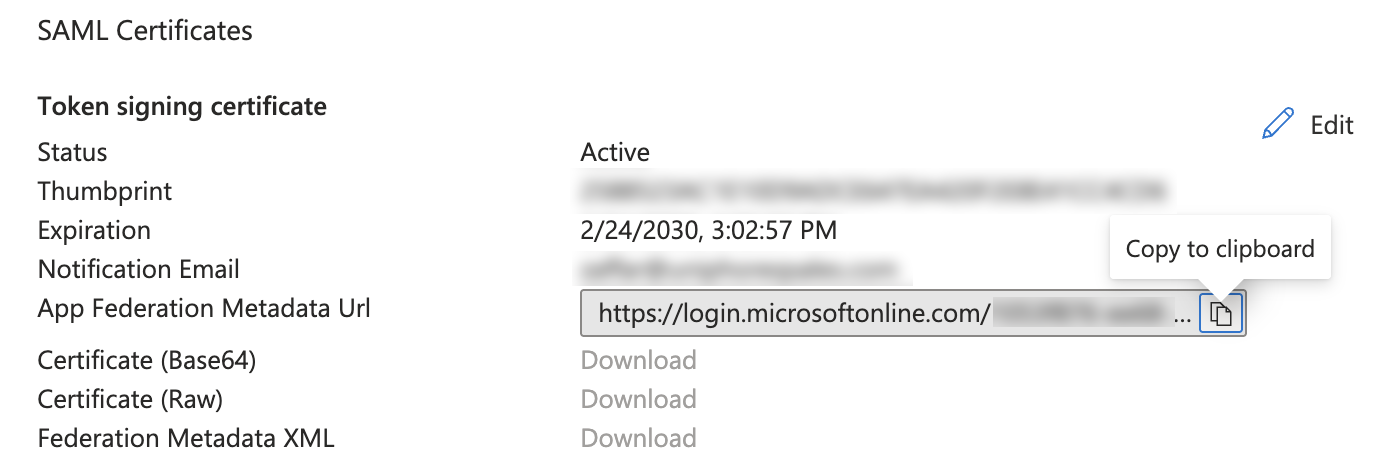
Under SAML Certificates, copy the App Federation Metadata Url. This is the Sign-in URL to use when setting up SSO on the platform.
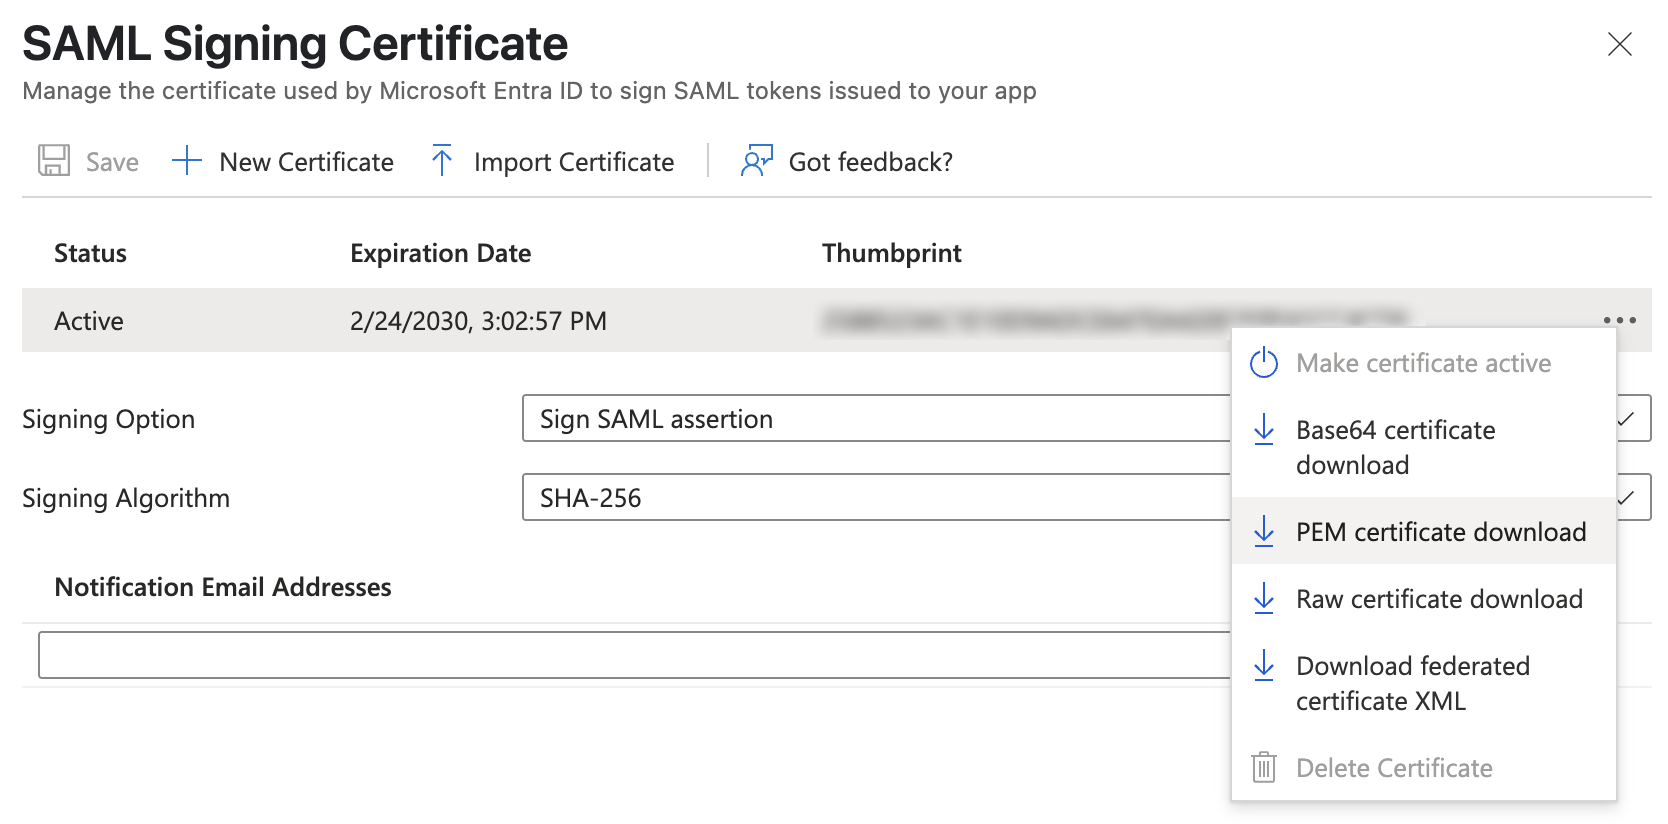
Still under SAML Certificates, click Edit, click the three dots menu to the right of your active SAML signing certificate, and select PEM certificate download. This is the Signing Certificate to use when setting up SSO on the platform.
On the X-Platform, in the Set Up Single Sign On dialog box. Select Add Certificate and under Sign-in URL, enter the App Federation Metadata URL copied in Step 4.
To the right of the Signing Certificate, click Upload Certificate File and choose the signing certificate to upload. Use the PEM certificate downloaded in Step 5.
Click Connect to connect SSO to the platform. Following a successful connection, the following SSO has been successfully connected message is displayed at the top of the dialog box:
Configure SCIM Sync
When SSO has been connected (see Connect SSO above for instructions on connecting SSO), SCIM Sync can be configured. As mentioned previously, SCIM Sync is used to automatically sync your users, roles, and groups with your existing directory. SCIM sync works on a push from your directory. When a change is made in your directory, the change is pushed to the platform when the system syncs periodically (every 40 minutes for Azure). SCIM sync also lets you manually push the sync from your IDP on demand (click here to see how). Follow the steps below to configure SCIM Sync for Azure.
Note
SCIM Sync works a little differently from AD Sync. AD Sync works by pulling information from your directory. For information on setting up AD Sync, click here.
Firstly, connect your Single Sign-On, as detailed in Connect SSO above. Then, in Microsoft Entra, under your Uniphore SCIM Provisioning application, click Overview in the left-side menu.
In the 3. Provision User Accounts card, click Get Started, and click Start Provisioning. This enables sync from your directory into Administration Platform (every 40 minutes for Azure).
On Administration Platform, go to Users & Accounts > Home, and click Continue setup to open the Choose How to Upload Data dialog box.
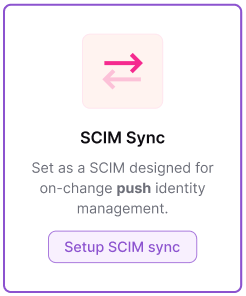
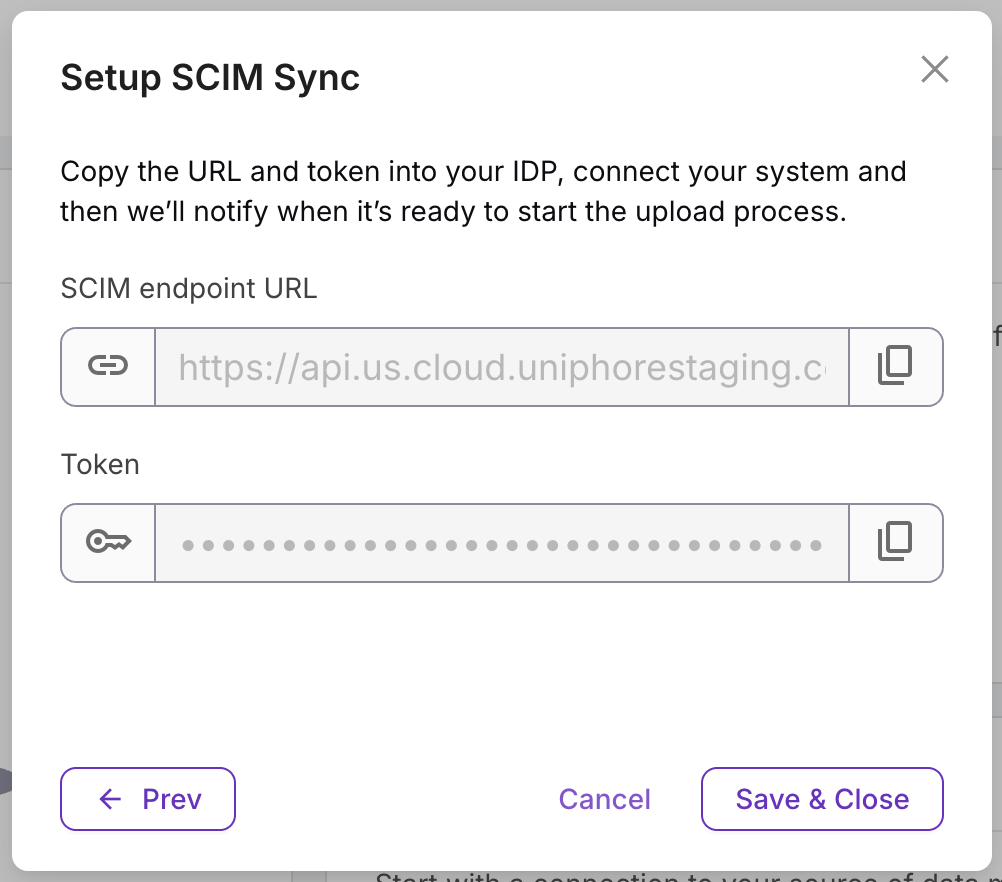
Click Setup SCIM sync to open the Setup SCIM Sync dialog box with the URL and token to connect your IDP.
Use the copy icons to the right of your SCIM endpoint URL and Token to copy them (these are required in the next steps).
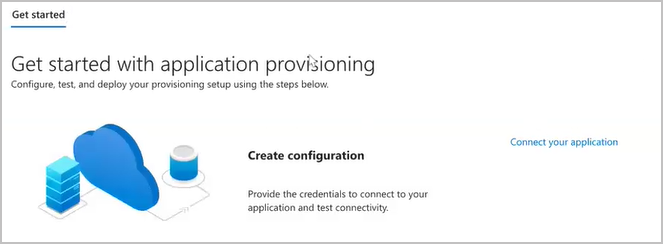
In Microsoft Entra, and under your Uniphore SCIM Provisioning application, click Provisioning in the left side menu. Then, next to Create configuration, click Connect your application.
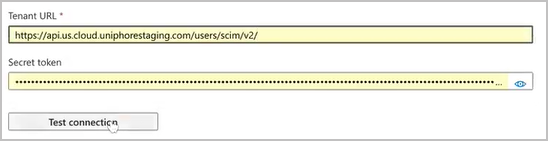
Paste your SCIM endpoint URL from Step 5 in the Tenant URL field, and paste your token from Step 5 in the Secret Token field.
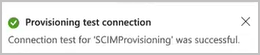
Click Test connection. After a successful connection test, the following message is displayed in the top right:
Click Create to complete your connection provisioning.
On Administration Platform, click Save & Close to begin the sync configuration.
Wait for the connection to be completed, while the connection is in progress, the following still in progress message on the Users & Accounts > Home page is displayed:

Once the connection is complete, the message is updated to the following connection is ready message:

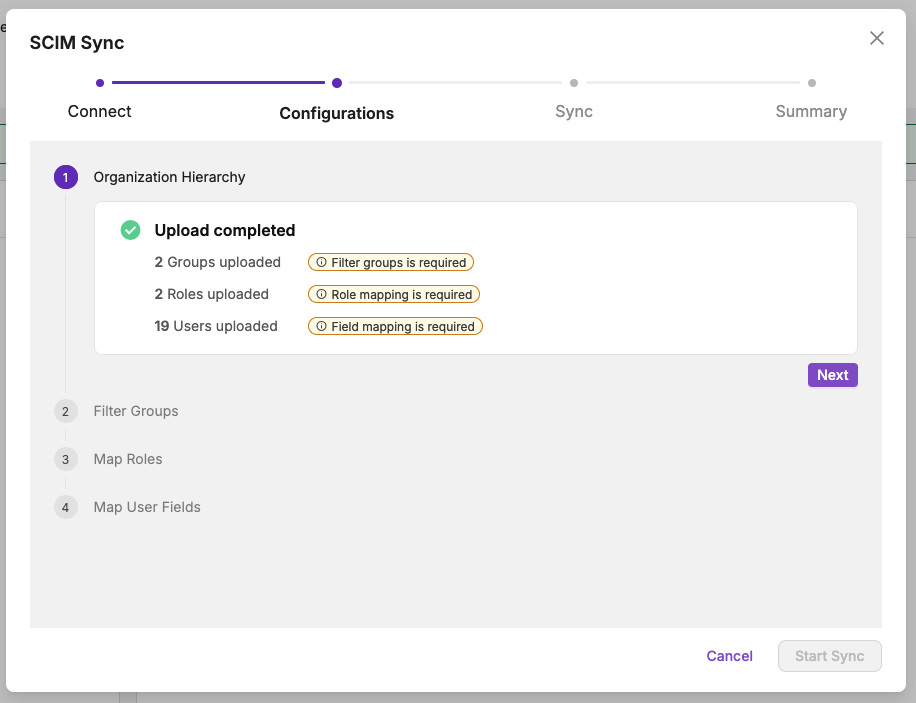
Click Continue setup, and review the Upload completed information. See how many Groups, Roles, and Users can be synced into the platform, showing you what's needed in the next steps. To get started with the configuration, click Next. The groups, roles, and users are uploaded in the sync connection.
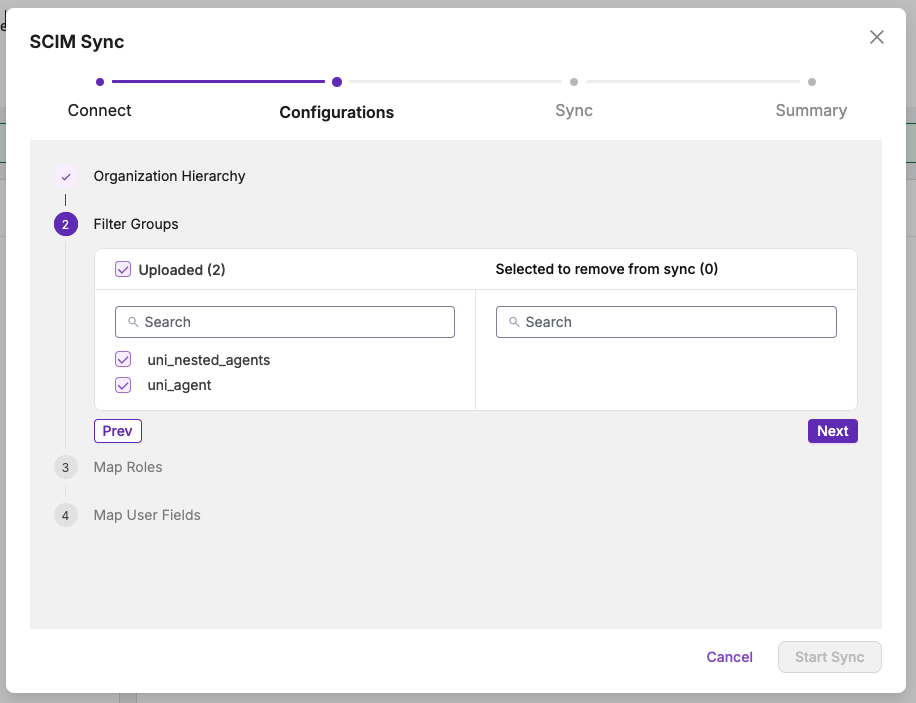
Under Filter Groups, determine which user groups to sync to the platform, and select all the groups that you want to appear in your platform Organization Hierarchy page. Any unselected groups are moved to the right-hand column. These groups are removed from the sync, and the users in these groups are not synced into the platform. At least one group must be selected. When all the required groups are selected, click Next.
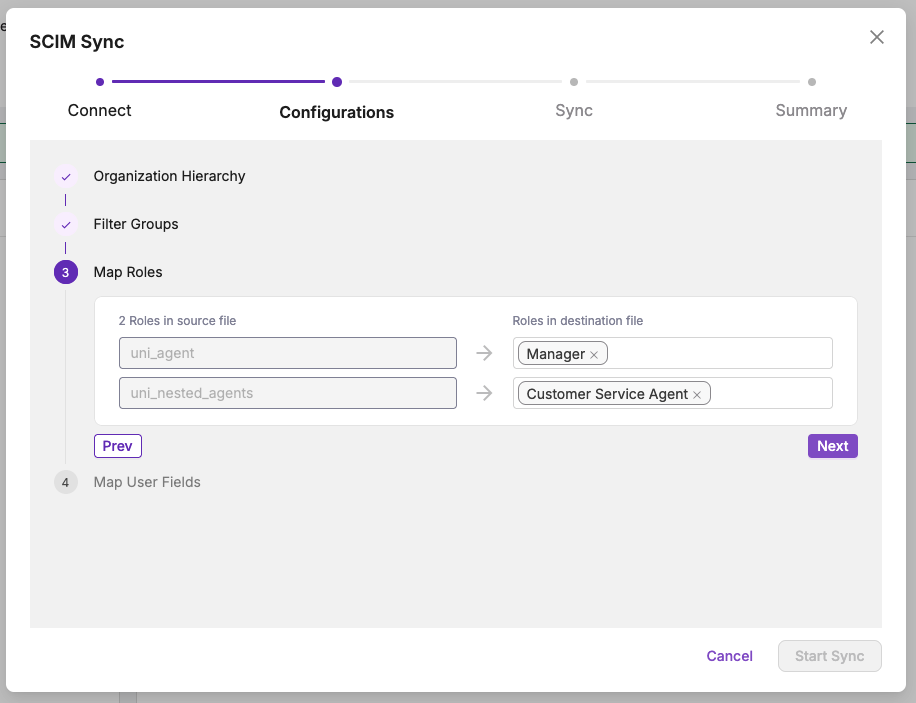
Under Map Roles, map your source roles to the platform roles. Roles determine user access permissions. For each source role in the left column, use the roles drop-down menu in the right column to select a platform role to map the source role with. Once all the roles are mapped, click Next. For more information on roles, click here.
Under Map User Fields, review the user metadata fields synced from your directory in the left column and compare the fields to the user properties on the platform in the right column.
Important
The following Uniphore properties are mandatory fields and must be mapped. All other fields are optional:
First Name
Last Name
Email
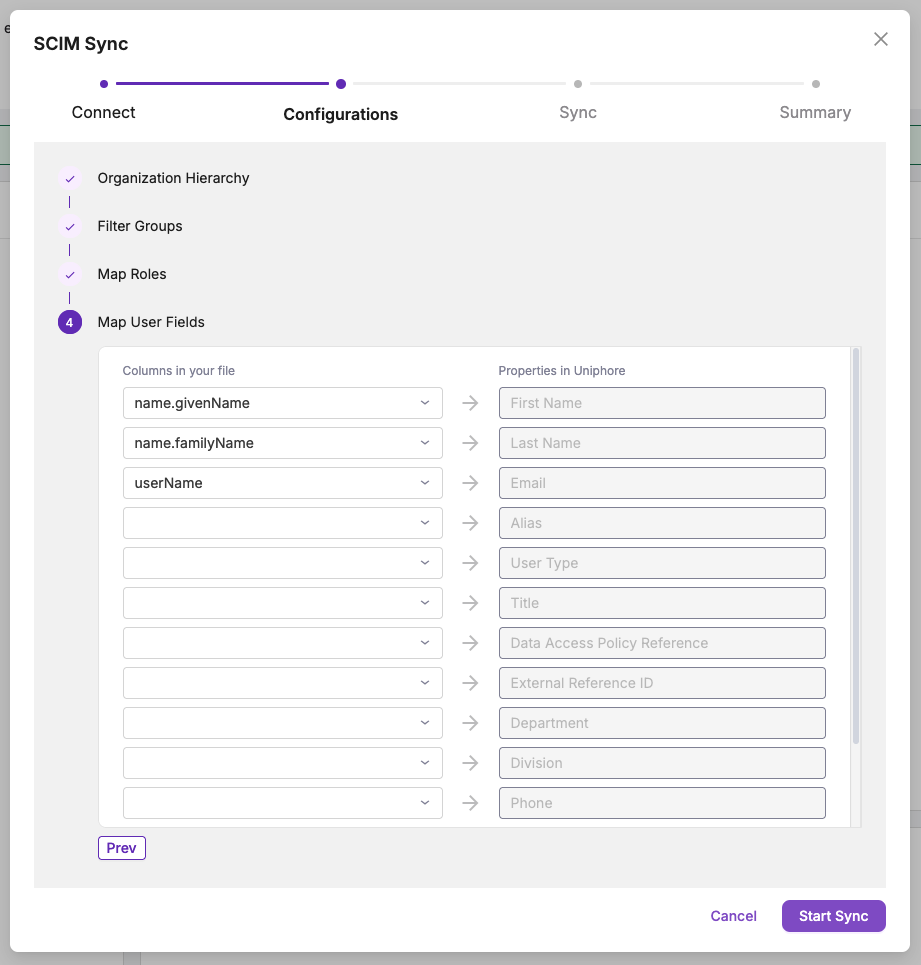
Confirm the details and click Start sync >. The system now syncs your Groups, Roles, and Users into the platform.
Once the Sync is completed, the Summary page is displayed. Review the summary cards to see how many roles have been mapped to the platform roles, how many users have been added, how many directories have been uploaded, and how many groups have been imported into your Organization Hierarchy.
Review the summary details and click Finish & close to close the SCIM Sync dialog box.
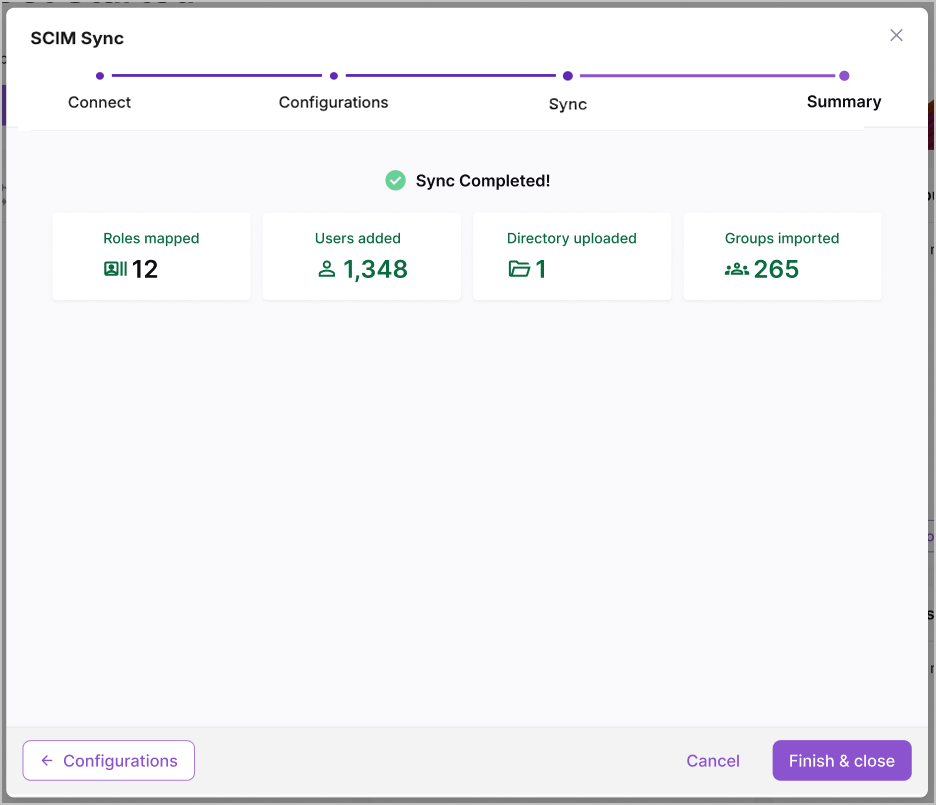
You can now find your users on the Users page and your groups on the Organization Hierarchy page. For information on viewing and managing your users, click here. For information on viewing your Organization Hierarchy, click here.
When your system syncs, logs are created for each sync job. For more information on sync logs, click here.
You can update your sync settings at any time. For more information on updating your sync settings, click here.
View Sync Logs
When your system syncs, a log for that sync is created in the Sync Log. To view your sync log go to Users & Accounts > Home and see the Log card, in this card you can see a quick list of your sync jobs, when the syncs were ran and their statuses.
Click View log to see a full list of the sync logs.
Edit Sync Settings
If you need to make changes to your sync settings after your initial sync, go to Users & Accounts > Home and click View logs , and then click Edit Settings. This opens the Sync dialog box with two stages, Configuration and Summary:
In the configuration stage, you can edit how the groups, rules, and user metadata fields are synced into the platform, hover over either Filter Groups, Map Roles, or Map User Fields, and click the Edit Pencil
to make changes:Filter Groups - determine which user groups to sync to the platform. Select all the groups that you want to appear in your platform Organization Hierarchy page, any unselected groups are moved to the right-hand column, these groups are removed from the sync and the users in these groups are not synced into the platform.
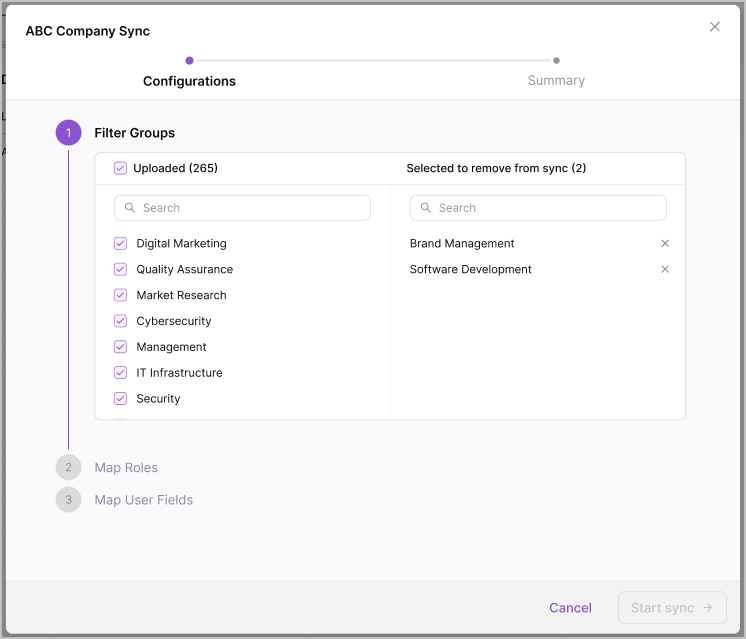
Map Roles - map your source roles to the platform roles. Roles determine user access permissions. For each source role in the left column, use the roles drop-down menu in the right column to select a platform role to map the source role with. For more information on roles, click here.
Map User Fields - review the user metadata fields synced from your directory in the left column and compare the fields to the user properties on the platform in the right column. As mentioned above, the First Name, Last Name, and Email Uniphore properties are mandatory fields and must be mapped. All other fields are optional.
Confirm your changes and click Save changes to save your configuration changes. The new sync configuration is used the next time the system syncs.
Push a Sync On-Demand
After a change to your directory, you may want it to sync with your platform immediately. This is done in your IDP. Follow the steps below to sync recent changes to an Azure Active Directory to the platform. Otherwise, your changes sync periodically (every 40 minutes for Azure).
Note
No user or group can be synced on demand that would not have been synced by the automated process. Ensure that your users are in a synced group, and your group is enabled for syncing. For information on updating your sync settings in the platform, click here. For information on updating your users and groups in the Microsoft Entra application, click here.
Only five users can be selected for on-demand sync at a time.
In Microsoft Entra, and under your Uniphore SCIM Provisioning application, click Provision on demand.
In the Select a user or group search box, enter the user group, userPrincipalName, or mail for the group or user that you want to sync and select them from the results that appear.
If selecting a group, you then need to select the users in the group to sync, select View members only, and then use the drop-down menu to select up to five users to sync.
If selecting users and not a group, then only the users sync and not the group
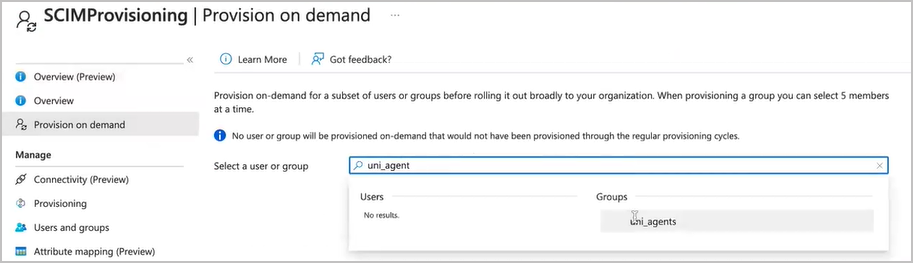
Review and confirm the users/groups to sync and click Provision to validate and run your sync.

Once the system has synced, a report of the sync is displayed in Azure, and you can find your synced users/groups in the platform.
Set Up SAML Authentication
This topic outlines the steps required to enable SAML Authentication, which allows your platform users, roles, and groups to be automatically synced with your Active Directory when they log in, enabling automated user management. As described in the User Onboarding Introduction, SAML Authentication adds and updates users when they log in.
Connect SSO
You need to connect your Single Sign On (SSO) to the platform, follow the steps below to set up SSO for your platform users.
Go to Users & Accounts > Home, and click Upload data to open the Let's Begin with Single Sign On dialog box.
Click Set up SSO login to open the following Set Up Single Sign On dialog box.
In a separate tab in your browser, find and copy your Metadata URL for your IDP. For example, in the Okta Admin Console go to Applications, find and open the application with the users you wish to have access to Administration Platform, click on the Sign On tab, under SAML see your Metadata URL, and click Copy.
Back in the Administration Platform, in the Set Up Single Sign On dialog box, select Via URL, and paste your Metadata URL under Metadata URL.
Click Connect. The system now saves the connection information. Once saved, a message is displayed at the top of the dialog box.
Download the metadata file by clicking the highlighted here link. This file includes the Single sign-on URL and Audience URI (SP Entity ID) that you need to enter in your IDP.

Open the file, find and copy the following:
Single sign-on URL: on the 27th line, under
AssertionConsumerService, copy theLocationvalue.Audience URI (SP Entity ID): on the first line, under
EntityDescriptor, copy theentityIDvalue.
In your IDP, go to your SAML settings and paste the above values. For example, in the Okta Admin Console go to Applications, click Edit in the SAML Settings box, click Next, paste the above values in their matching text fields, click Next, and then click Finish.
Back in the Administration Platform, in the Set Up Single Sign On dialog box, click Continue Setup.
The Choose How to Upload Data dialog box is now displayed, in which you configure how Roles and user attributes map into the Administration Platform system. For steps on mapping your Configure SAML Authentication, see Configure SAML Authentication below.
Configure SAML Authentication
Once the SSO is connected (see Connect SSO above), SAML can be configured. As mentioned previously, SAML Authentication automatically maps your user attributes and roles with your Active Directory when your users log in, enabling automated user management. Follow the steps below to configure SAML Authentication.
Note
SAML Authentication works a little differently to AD Sync and SCIM Sync. AD Sync and SCIM Sync work by pulling and pushing from your directory. When a change is made to your directory, the change is replicated in the platform when the system syncs (syncing methods vary between them), whereas SAML Authentication adds and updates your users when they log in.
To see configuration steps for AD Sync or SCIM Sync, check the introduction for more details and relevant links here.
In the Choose How to Upload Data dialog box, click Setup SAML to open the SAML Mappings dialog box.
Under Map Roles, map your source roles to the platform roles. Roles determine user access permissions (for more information on roles, click here):
Under Roles from SAML enter the exact name of a group from your IDP. For example, in the Okta Admin Console:
Go to Applications.
Find and open the application with the users you wish to have access to Administration Platform.
Click on the Assignments tab and go to Groups to see the list of groups to map.
Highlight and copy one of the group names.
In Administration Platform, paste the name into the Roles from SAML text box.
Click into the Roles in Uniphore text box to open a drop-down menu of the available roles in the platform, then select which platform role to map the your IDP group to.
To add another mapping click + Add row and repeat the above steps. Add a row for each of the groups you wish to map to roles in the platform.
Once all the roles are mapped, click Next.
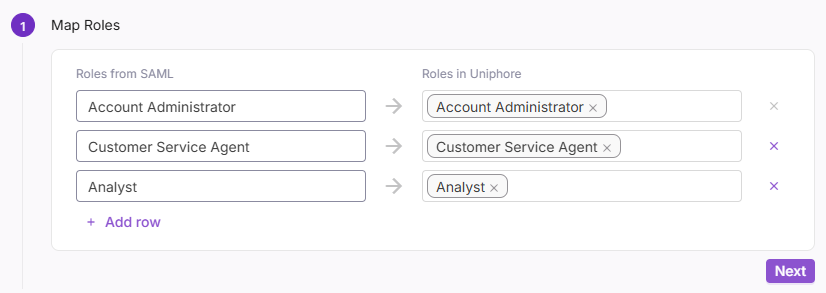
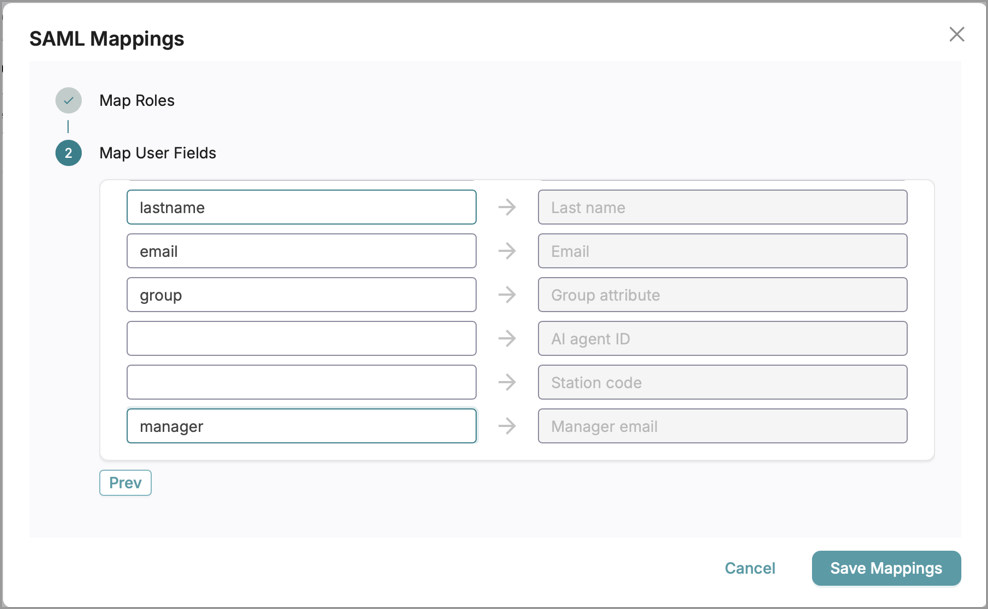
Under Map User Fields, map your IDP user attributes to the platform user attributes:
Important
The following Uniphore properties are mandatory fields and must be mapped. All other fields are optional:
First Name
Last Name
Email
Groups
Under User attributes in SAML enter the user attributes from your IDP. For example, in the Okta Admin Console:
Go to Applications,.
Find and open the application with the users you wish to have access to Administration Platform.
Click on the General tab and scroll down to ATTRIBUTE STATEMENTS to see the list of attributes to map.
Highlight and copy one of the attributes (e.g given_name).
In Administration Platform, paste the attribute into the User attributes in SAML text box to the left of the platform attribute you'd like to map it to.
Note
In the Okta Admin Console, the attribute Groups is found just under the ATTRIBUTE STATEMENTS list, in GROUP ATTRIBUTE STATEMENTS.
Add attributes from your IDP for all of the platform attributes you'd like to map, First Name, Last Name, Email, and Groups are required, all other fields are optional.
Once all the attributes are mapped, click Save Mappings.
Tip
Mapping an attribute to Manager email enables the automated mapping of an existing manager to the agent when the agent logs in. Like the other fields, this is refreshed whenever agent logs in, ensuring each agent is assigned the correct manager based on your Active Directory.
Your users can now log into the platform using SAML, their accounts are be added when they first log in, and their roles and attributes are updated with future logins. Once added, you can find them in your Users page. Users added through SAML have the Authentication Type of SAML.
To sign in with SAML, users enter the Organization Name on the login page, then click Continue with SAML where they are directed through their typical SAML Authentication, once signed in Uniphore prompts them to authorize the app, allowing access to their profile and email and allowing offline access.
View Directory Log
The Directory Log shows the log of when the SAML connection was created and provides access to edit your SAML settings (see Edit SAML Settings below).
To view your directory log, go to Users & Accounts > Home, and underneath Directory Log click View log.
Edit SAML Settings
From time to time you may want to update your SAML settings, if your Metadata URL needs updating, if there's a new group in your IDP to map, or a group name has changed, or you want to change how your user attributes map from your IDP into the platform. Administration Platform allows you to make changes to these settings. Follow the steps below to either update your Metadata URL, or update your Mappings.
Go to Users & Accounts > Home, and underneath Directory Log click View log.
Click Edit SSO to open the Setup Single Sign On dialog box.
Follow the instructions in Connect SSO to update your Metadata URL and connect your IDP.
Go to Users & Accounts > Home, and underneath Directory Log click View log.
Click Edit Mappings to open the SAML Mappings dialog box.
Follow the instructions in Configure SAML Authentication to update how your IDP groups and user attributes map into the platform.
Import Users
This topic outlines the steps required to import users. User Import is designed as an option to upload users using a .CSV file, providing a method to add users in bulk without SSO/sync from an existing directory. The .CSV template provides options to specify the attributes (name, email etc) - following an initial user onboarding with the Import method, user management is handled manually in Administration Platform.
Note
If you're looking for information on setting up SSO and Sync with your directory, see information on either setting up AD sync here or SCIM sync here.
Go to Users & Accounts > Home and click Upload data underneath Get Started to open the following Let's Begin with Single Sign On dialog box:
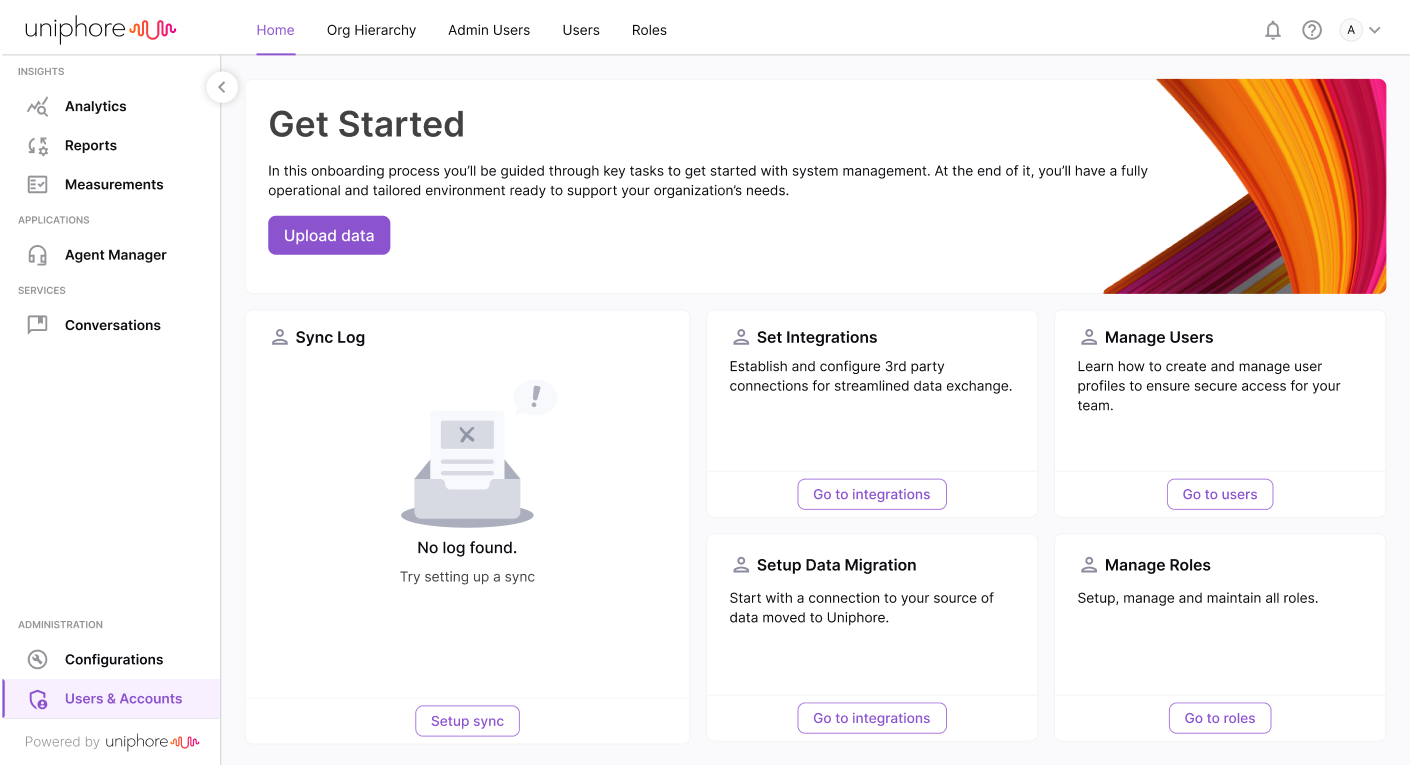
As we're not using SSO/Sync, underneath I don't have SSO, click Setup settings , and click Next >.
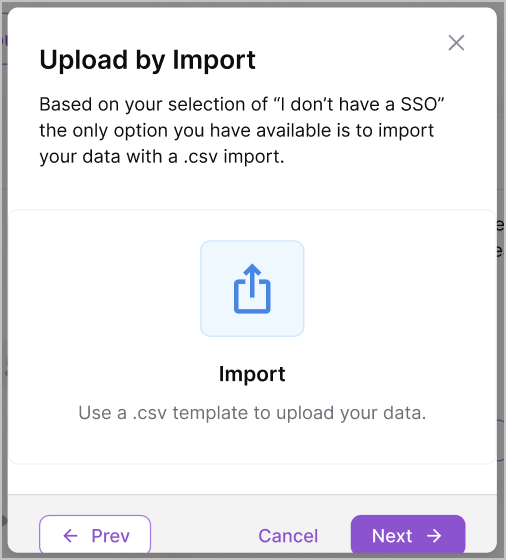
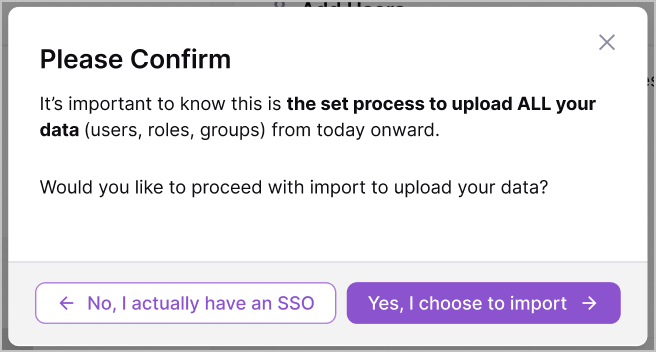
A confirmation box is displayed to make sure that you want to proceed with the import to upload the user and role data. Click Yes, I choose to import > to open the Import side drawer.
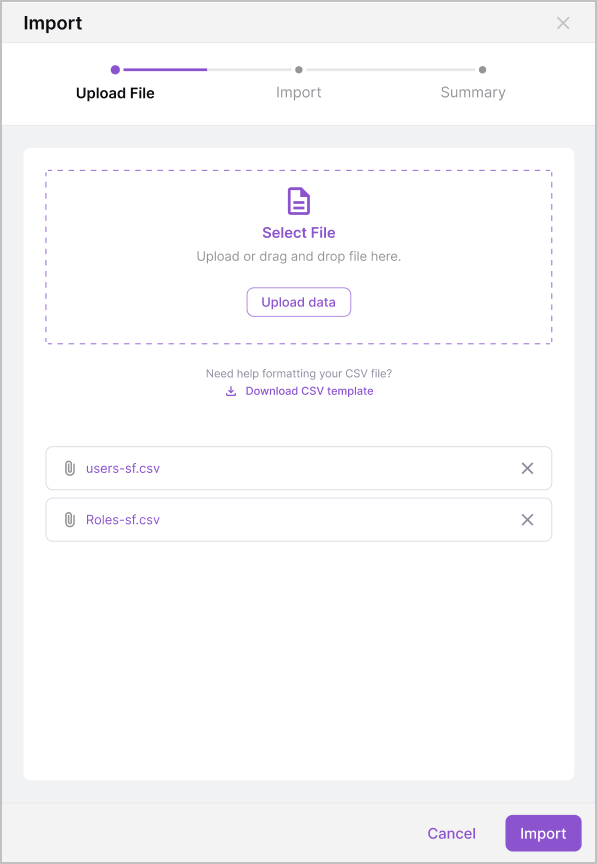
In the Import side drawer, click Download CSV template to download the templates required for uploading your users and roles.
Fill out the .CSV file with the data you wish to upload.
When you've added your users to the CSV file (and saved the file), upload the .CSV file. Either drag and drop the file into the Select File box, or click Upload data and select the .CSV file from your file explorer.
Once the files are uploaded, click Import. Your users and roles are now being imported to the platform.
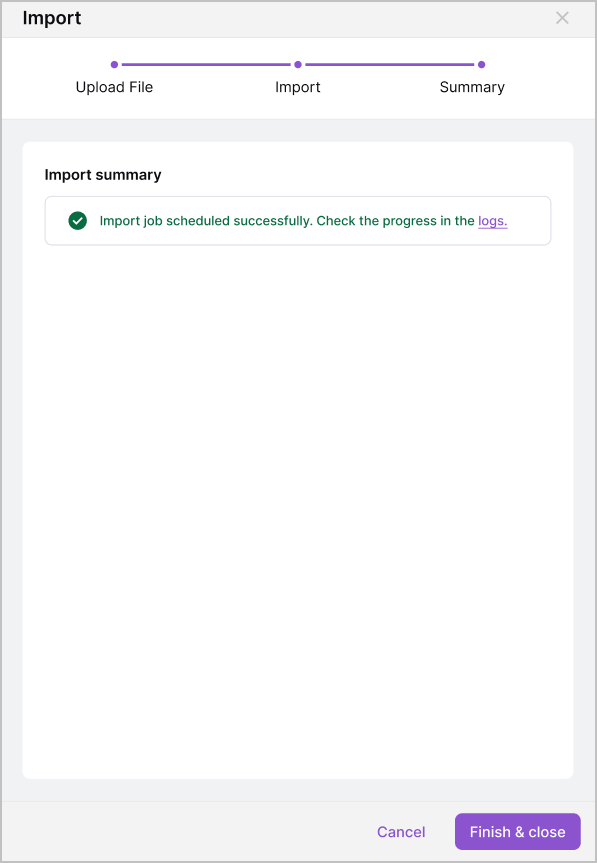
View the Import summary and confirm that the Import job has been scheduled successfully. Then click the logs link to see the progress of the import, or click Finish & close to close the Import side drawer.
You can now find your users on the Users page. For information on viewing and managing your users, click here.