Evaluate
Evaluate is the workspace where you test AI Agents against defined scenarios and measure their performance using standard and custom metrics. From the Evaluate screen, you can:
View a summary of all experiments.
Open an experiment to review its evaluation runs and results.
An experiment represents a repeatable test of an AI Agent against one or more datasets (scenarios). Each time an experiment is run, it is scored against Standard Metrics (applied automatically) and any Custom Metrics you have defined, so you can track how agent quality changes over time.
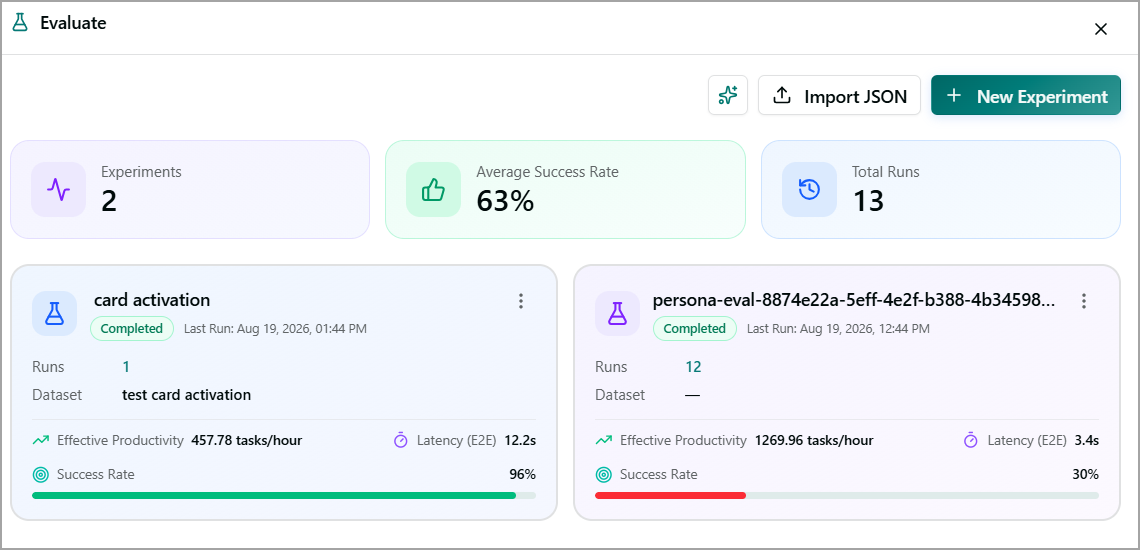
Component Name | Description |
|---|---|
Ask Helix | Click |
Import JSON | Click Import JSON to upload a JSON file of samples to create an experiment. |
+ New Experiment | Click + New Experiment to create and configure the experiment. |
Experiments | Displays the total number of available experiments. |
Average Success Rate | Displays the average success rate of the evaluation across all experiment runs. |
Total Runs | Displays the number of test runs performed. |
Experiment (Widget) | Displays all executed experiments. |

Key Concepts
Scenario - A simulated conversation defined by a persona and a goal of the end user.
Persona - The attributes and characteristics of the simulated end user, including context, intent, and tone.
Goal - The outcome the simulated end user wants to achieve during the conversation.
Metric - A measurable property used to evaluate the AI agent's behavior and performance in a scenario, such as Goal Completion.
Score - A numeric value between 0 and 1 that represents the result of applying a metric to a conversation.
Add New Experiment and Run Evaluation
From the Evaluate screen, click + New Experiment.
Enter a name for the experiment and click Create & Configure.
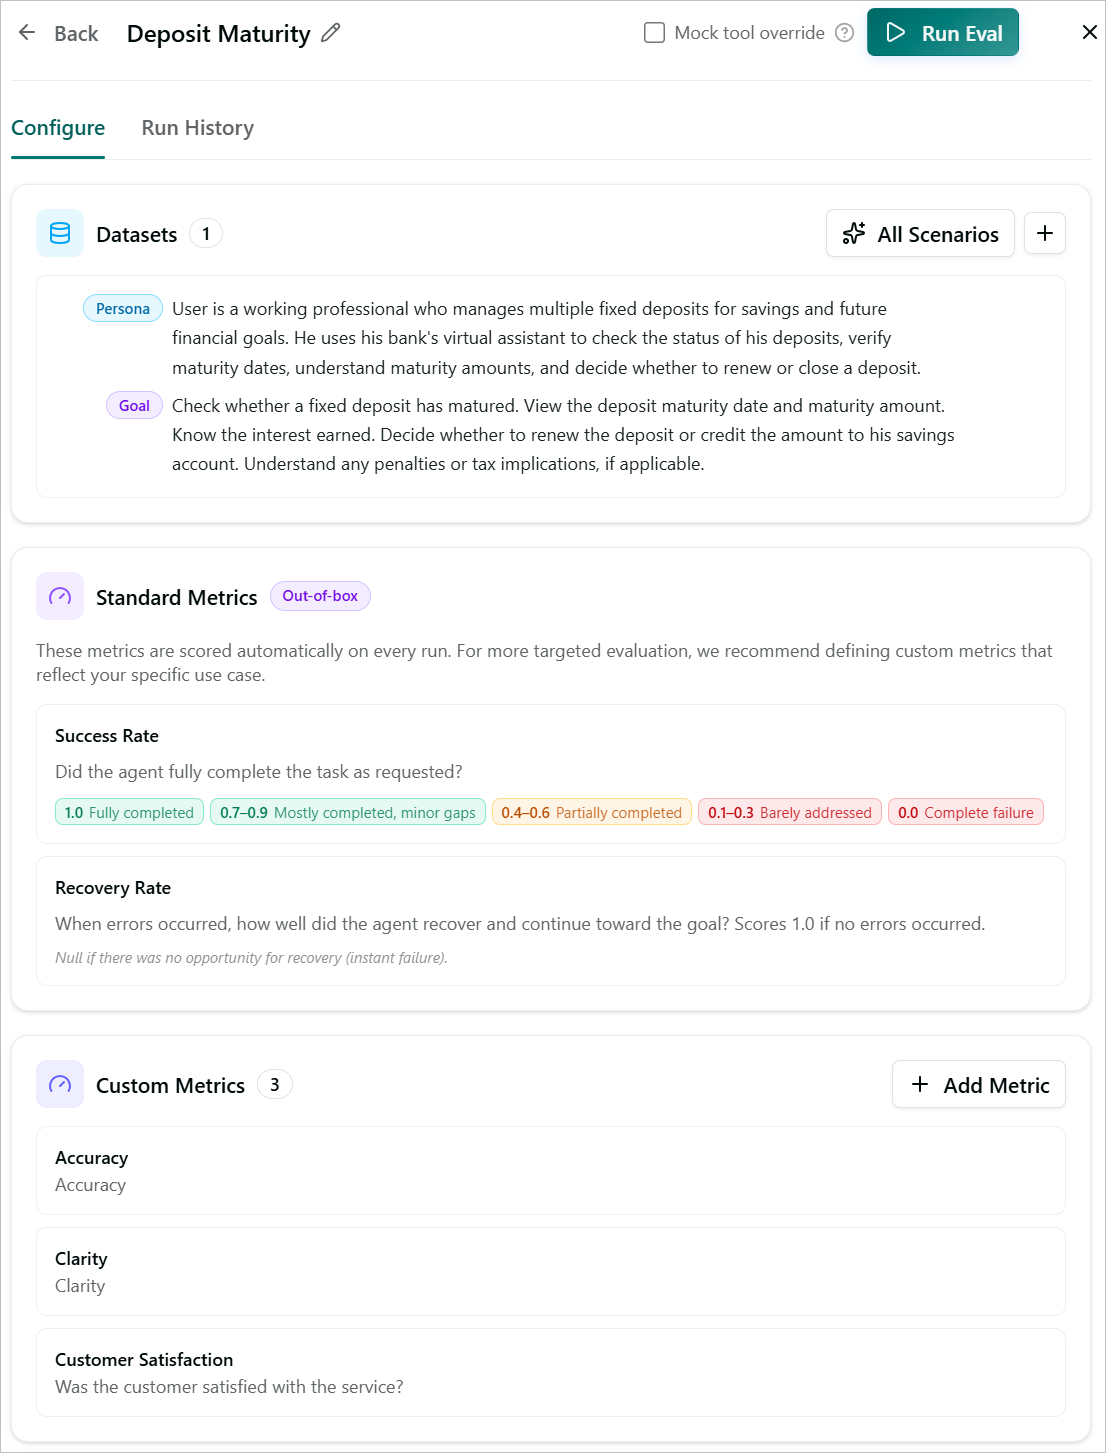
In the Configure tab, click + Add data point in the Datasets section, or click All Scenarios to choose from existing scenarios.
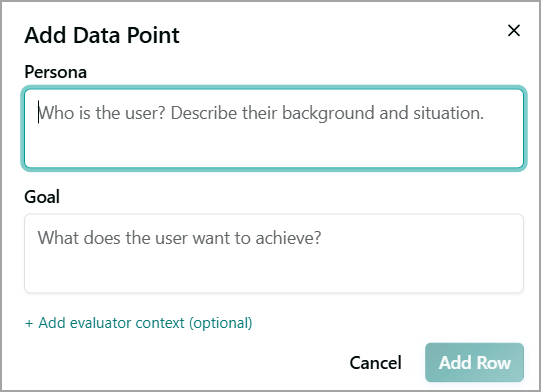
Define the Persona (who the end user is) and the Goal (what the user is trying to accomplish) for the scenario.
Review the Standard Metrics (Success Rate and Recovery Rate). These are applied automatically and do not need to be configured.
Optionally, click + Add evaluator context to provide scenario-specific facts or checks that the evaluator should verify when scoring the run. For example, you can specify that the agent must call a particular tool with specific parameters.
Click Add Row to add a dataset.
Review the Standard Metrics. These out-of-the-box metrics are automatically scored for each run, such as:
Success Rate – Measures how completely the agent performs the requested task.
Recovery Rate – Measures how effectively the agent recovers from errors and continues toward the goal.
In the Custom Metrics section, review the available metrics or click + Add Metric to define additional metrics specific to your use case. For more details, refer to Custom Metrics.
Review the experiment configuration.
To test the AI Agent without calling live backend systems, enable Mock tool override. When enabled, platform integration tools run as mock tools instead of calling the live integrations during the evaluation.
Click Run Eval to start the evaluation. Once the run completes, the evaluation results and scores for each metric are available in the Run History tab.
Custom Metrics
Custom metrics are customer-specific measurements defined on top of the standard set. A custom metric captures a rule or quality attribute that matters to a specific business (e.g., "verify caller identity before sharing account details"). You can be as detailed as you want in scoring the custom metric.
Supported metric types
Type | Use | Example |
|---|---|---|
Binary (pass/fail) | Clear yes/no rules | Did the agent authenticate the caller before sharing account information? |
Scalar (0–1) | Graded quality | How clearly did the agent explain the cancellation policy? |
LLM-judge Metrics
All standard and custom metrics are implemented as LLM-judge metrics. In this pattern, a separate language model reads the conversation and applies a scoring criterion to produce a score. LLM-judge metrics enable specifying new agent-quality metrics in natural language without writing code.
An LLM-judge metric consists of:
Name - the attribute being measured (e.g., Compliance score).
Score - the scoring scale and the criteria for each score (e.g., 1 if all rules followed, else 0).
Review the Evaluation
In the Run History tab, you can view previous evaluation runs, review the results for each run, and analyze how the AI Agent performed against the configured scenarios and metrics.
Each run displays the scores generated for the configured metrics, along with performance statistics.
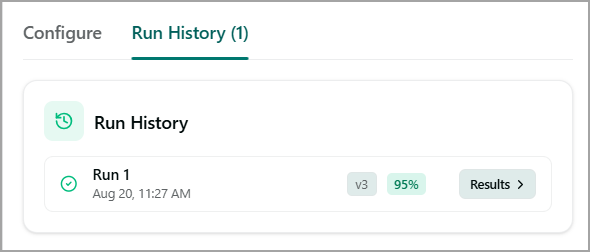 | 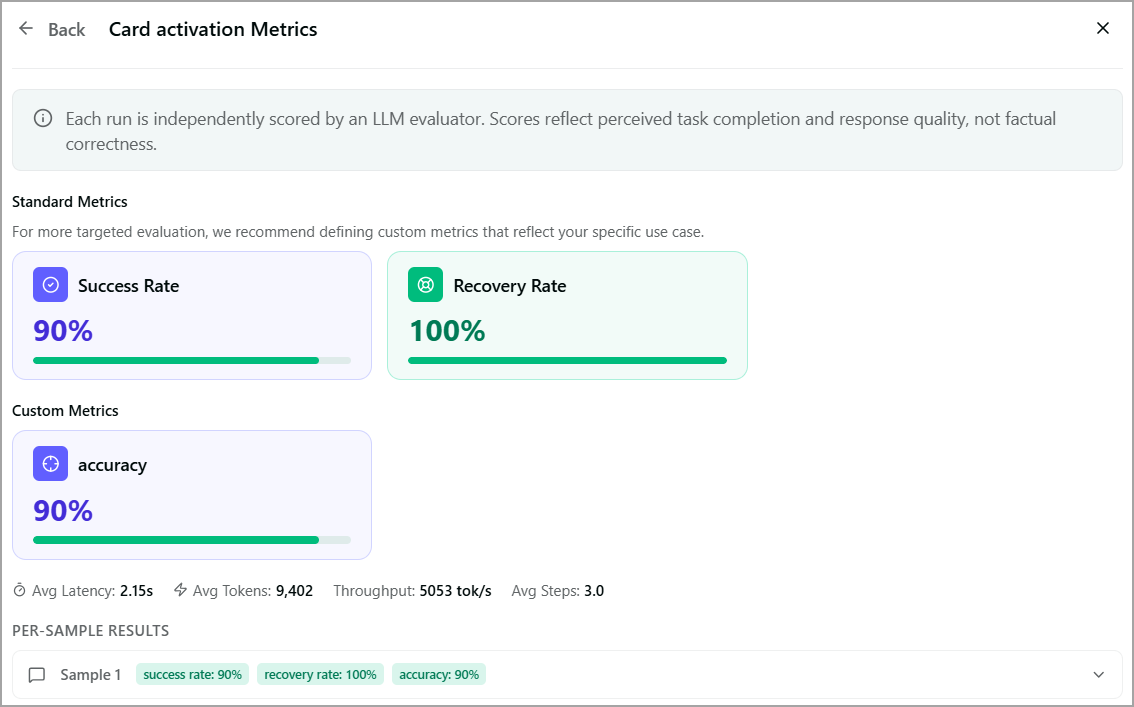 |
Click Results in the specific run to view its metric results and performance details. The metric results page displays the following information:
Standard metrics are applied automatically to each evaluation run.
Custom metrics measure specific aspects of the AI Agent's behavior based on your evaluation requirements.
The results page also displays performance statistics for the run:
Avg Latency – Average time taken to complete a run.
Avg Tokens – Average number of tokens used during the run.
Throughput – Average processing rate, measured in tokens per second.
Avg Steps – Average number of steps completed during the run.
The Per-Sample Results section shows the metric scores for each individual sample in the evaluation.
Import an Evaluation Dataset from JSON
This evaluation method allows you to quickly create an experiment with multiple scenarios.
From the Evaluate screen, click Import JSON (
 ).
).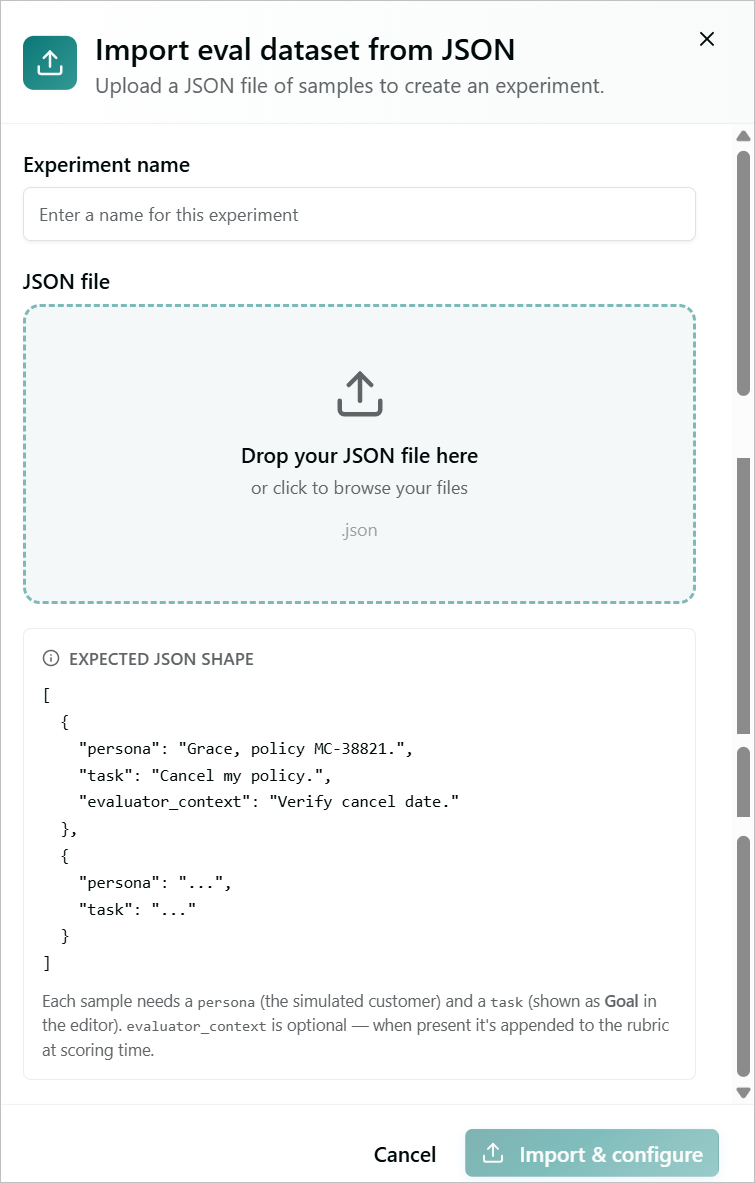
In the Import eval dataset from JSON dialog, enter a name for the experiment.
Upload a JSON file:
Drag and drop the JSON file into the upload area.
Alternatively, click the upload area and browse for the JSON file.
Make sure the JSON file follows the required format. The JSON file must contain an array of objects. Each object represents a sample and includes:
persona – Describes the simulated end user.
task – Describes what the end user is trying to accomplish. The task is shown as the Goal in the experiment editor.
evaluator_context – Optional information or checks that the evaluator should verify when scoring the run. When provided, this information is included in the evaluation rubric.
Note
Each sample must include a persona and a task. The evaluator_context field is optional.
Click Import & configure. The imported dataset is added to a new experiment. Review the experiment configuration, including the scenarios and metrics, before running the evaluation.
Follow steps 11 to 12 in Add New Experiment to run the evaluation.
Build Evaluations with Helix
Helix is a conversational assistant built into the Evaluate workspace. Instead of manually navigating experiments, scenarios, and run history, use Helix to create evaluations, define test scenarios, review run history, and analyze evaluation results.
From the Evaluate screen, click Ask Helix (
 ).
).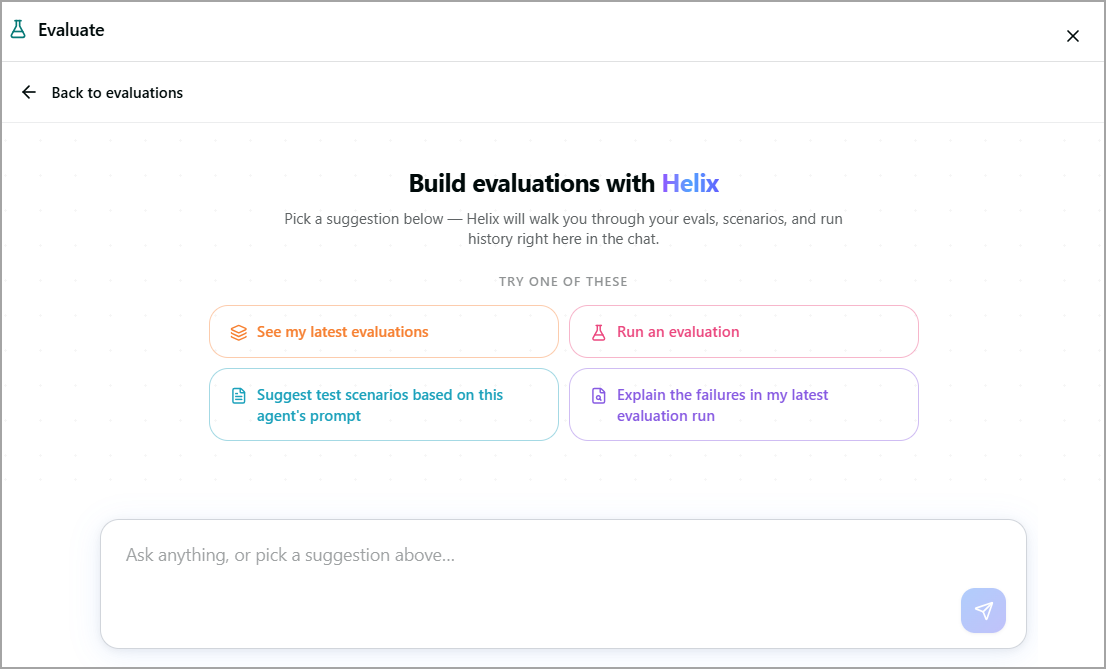
In the Build evaluations with Helix screen, choose an option or enter a request in the chat box.
See my latest evaluations – View your most recent evaluation results.
Run an evaluation – Start an evaluation for an AI Agent.
Suggest test scenarios based on this agent's prompt – Generate test scenarios based on the AI Agent's prompt.
Explain the failures in my latest evaluation run – Analyze failures from the most recent evaluation run.
Alternatively, enter a request in the chat box describing what you want Helix to do.
Follow Helix's prompts to provide any required information, such as the AI Agent, scenarios, or evaluation settings.
Review the evaluation configuration and results provided by Helix.