Data Orchestrator Agent
The Data Orchestrator Agent gives you a visual workspace to design, run, and monitor multi-step dataflows without writing code. It acts as the central control point for your data operations, managing the full lifecycle of your dataflows from the moment you build them to every subsequent run in production.
A dataflow in the orchestrator agent is a declarative representation of end-to-end data execution logic, where multiple data operations, pipelines, conditional branches, scripts, triggers, and dependencies are composed into a coordinated workflow to achieve a specific business outcome. It defines how data moves, transforms, and is processed across systems through a sequence of interconnected execution steps, including schema crawling, transformation pipelines, parallel task execution, conditional decision nodes, custom script execution, retries, error handling, and schedules.
The platform handles all sequencing, dependency checking, and task handoffs automatically. Before any pipeline starts, it verifies that all required inputs and connections are available. During execution, it continuously monitors workflow health and surfaces issues before they affect production. Your team stays focused on outcomes rather than on managing pipeline operations.
Key Capabilities
Visual Dataflow Builder - Design dataflows on a graphical canvas by adding and connecting task nodes.
Point-and-Click Execution - Run dataflows directly from the canvas without using a command line or separate tool. You trigger a run with a single action, and the execution engine handles the rest.
Integrity Validation - The agent verifies that all dependencies are met before a dataflow starts, preventing pipelines from failing mid-run due to missing inputs or unresolved connections.
Managed Execution - The platform executes the tasks seamlessly from start to finish. It handles sequencing, triggers, and task handoffs automatically so your team does not need to intervene at each step.
Dependency Maintenance - Throughout the entire automated workflow, the agent ensures all connections between pipeline steps remain intact.
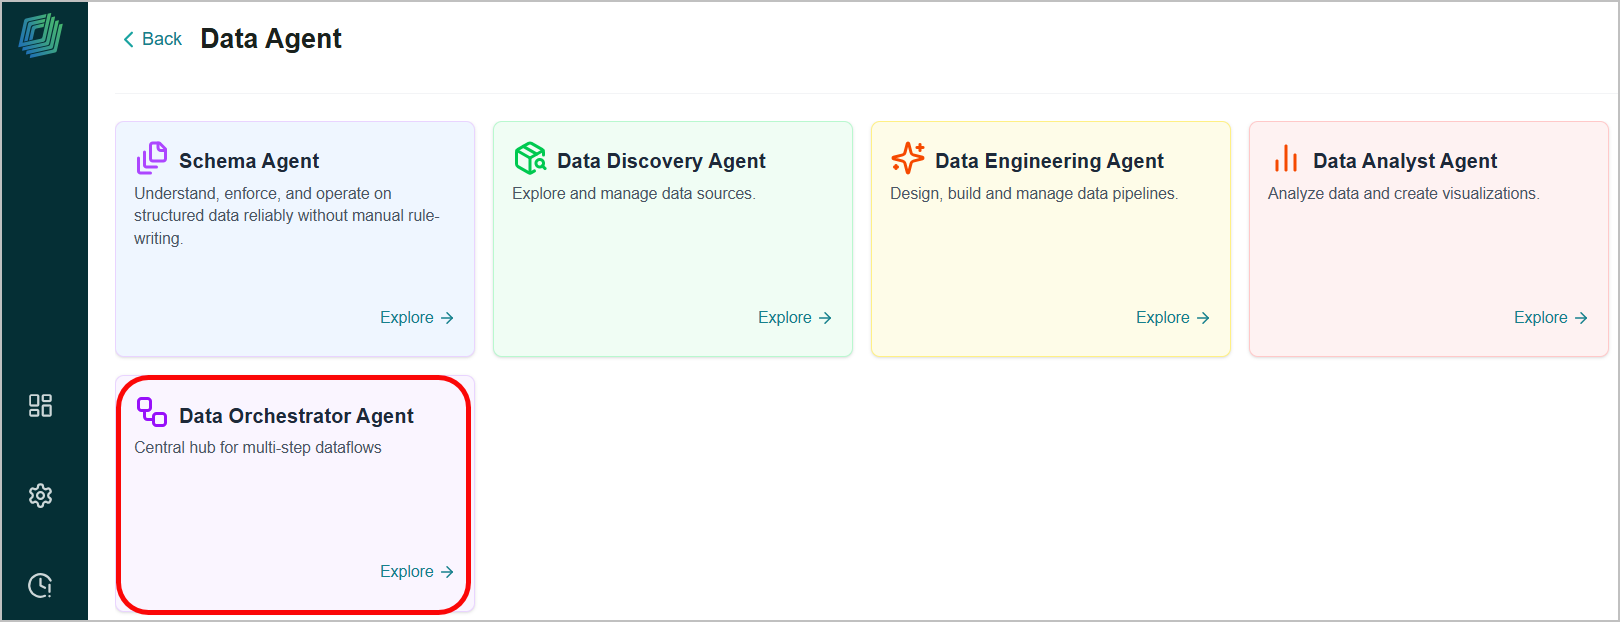
To access this feature, go to the Home page > Data Agents > Data Orchestrator Agent.
Creating a Dataflow
This feature enables you to define and execute a dataflow that runs multiple tasks or pipelines to achieve the required data.
To create a new dataflow:
Go to the Home page > Data Agents > Data Orchestrator Agent.
A dataflow can be created using one of two methods:
Automatic - Use the platform agent to agentically generate a dataflow based on your natural language input. Refer to Creating a Dataflow with an Agent more information.
Manual - Create a dataflow manually with the platform interface.
To create a pipeline manually, click Add Dataflow.
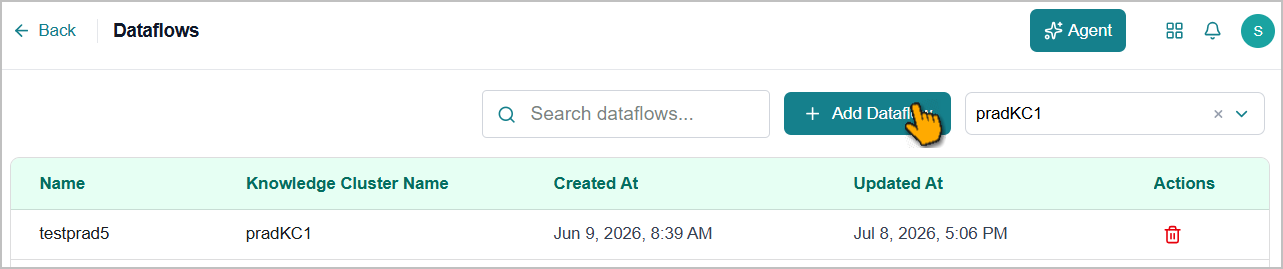
The Add Dataflow window opens.
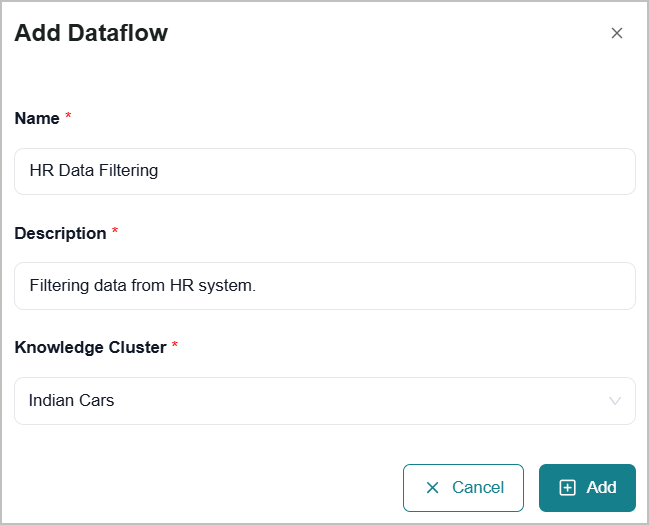
Enter a name for your dataflow.
Enter a brief description of what this dataflow does.
Select the target Knowledge Cluster from the dropdown.
Click Add.
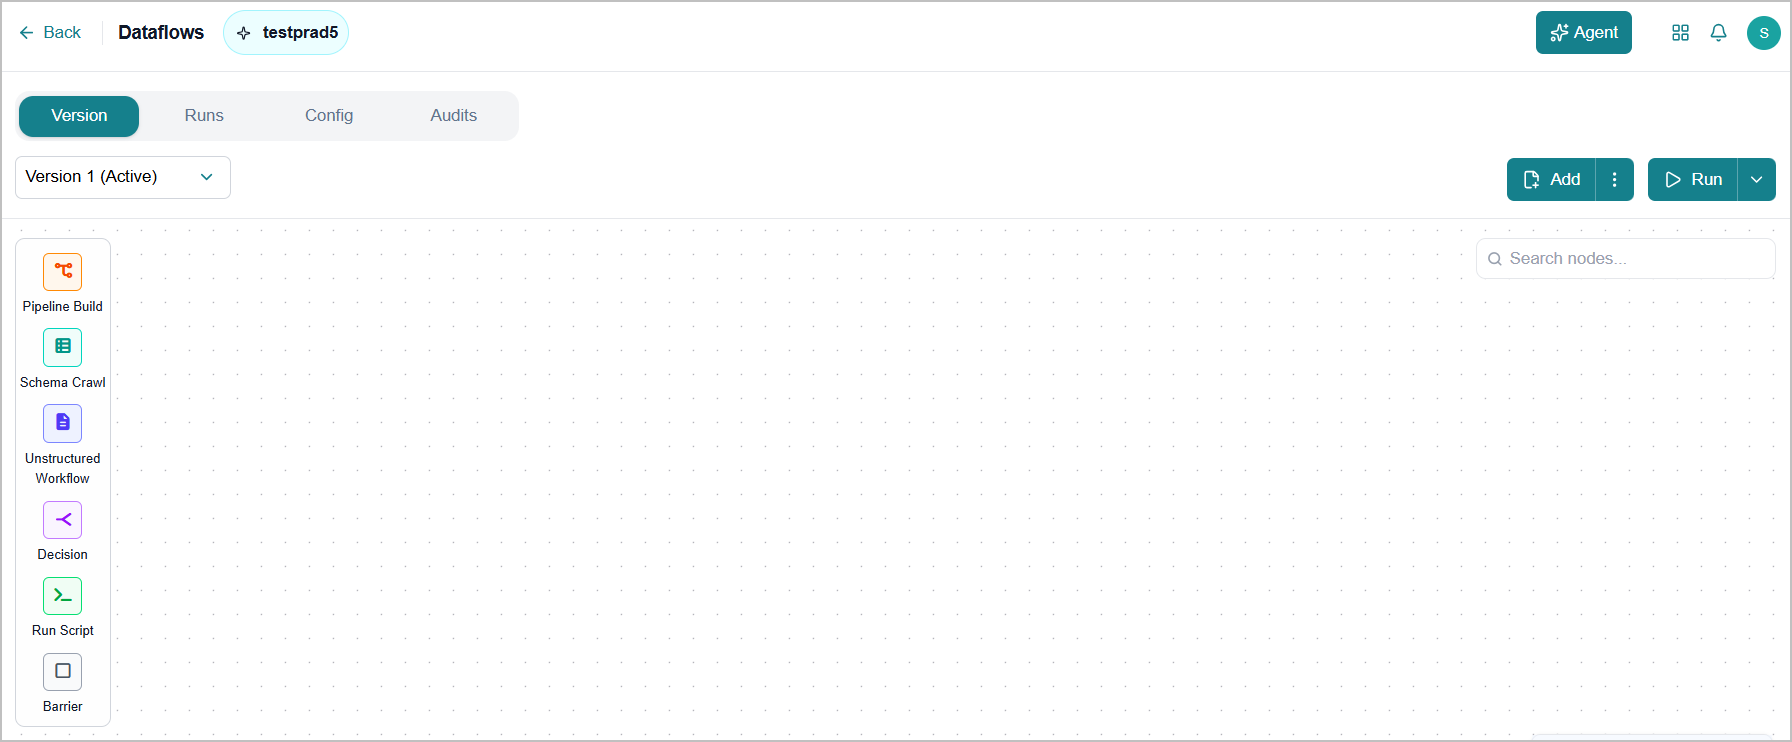
The dataflow is saved, and its canvas opens automatically. Refer to Creating a Dataflow Diagram for the dataflow execution process.
Creating a Dataflow with an Agent
The platform's agent-assisted dataflow creation lets you create and manage dataflow configurations through natural language interaction. Describe your requirements in plain language, and the agent analyzes your input, requests clarification when needed, and automatically generates the dataflow with its corresponding diagram and configuration.
You can also review and manually edit the generated diagram and configuration before you save the dataflow, giving you full control over dataflow behavior and output.
Tip
The agent helps you create a new dataflow or a new version of an existing dataflow.
To access the feature:
Select a Knowledge Cluster from the dropdown.
Click Agent.
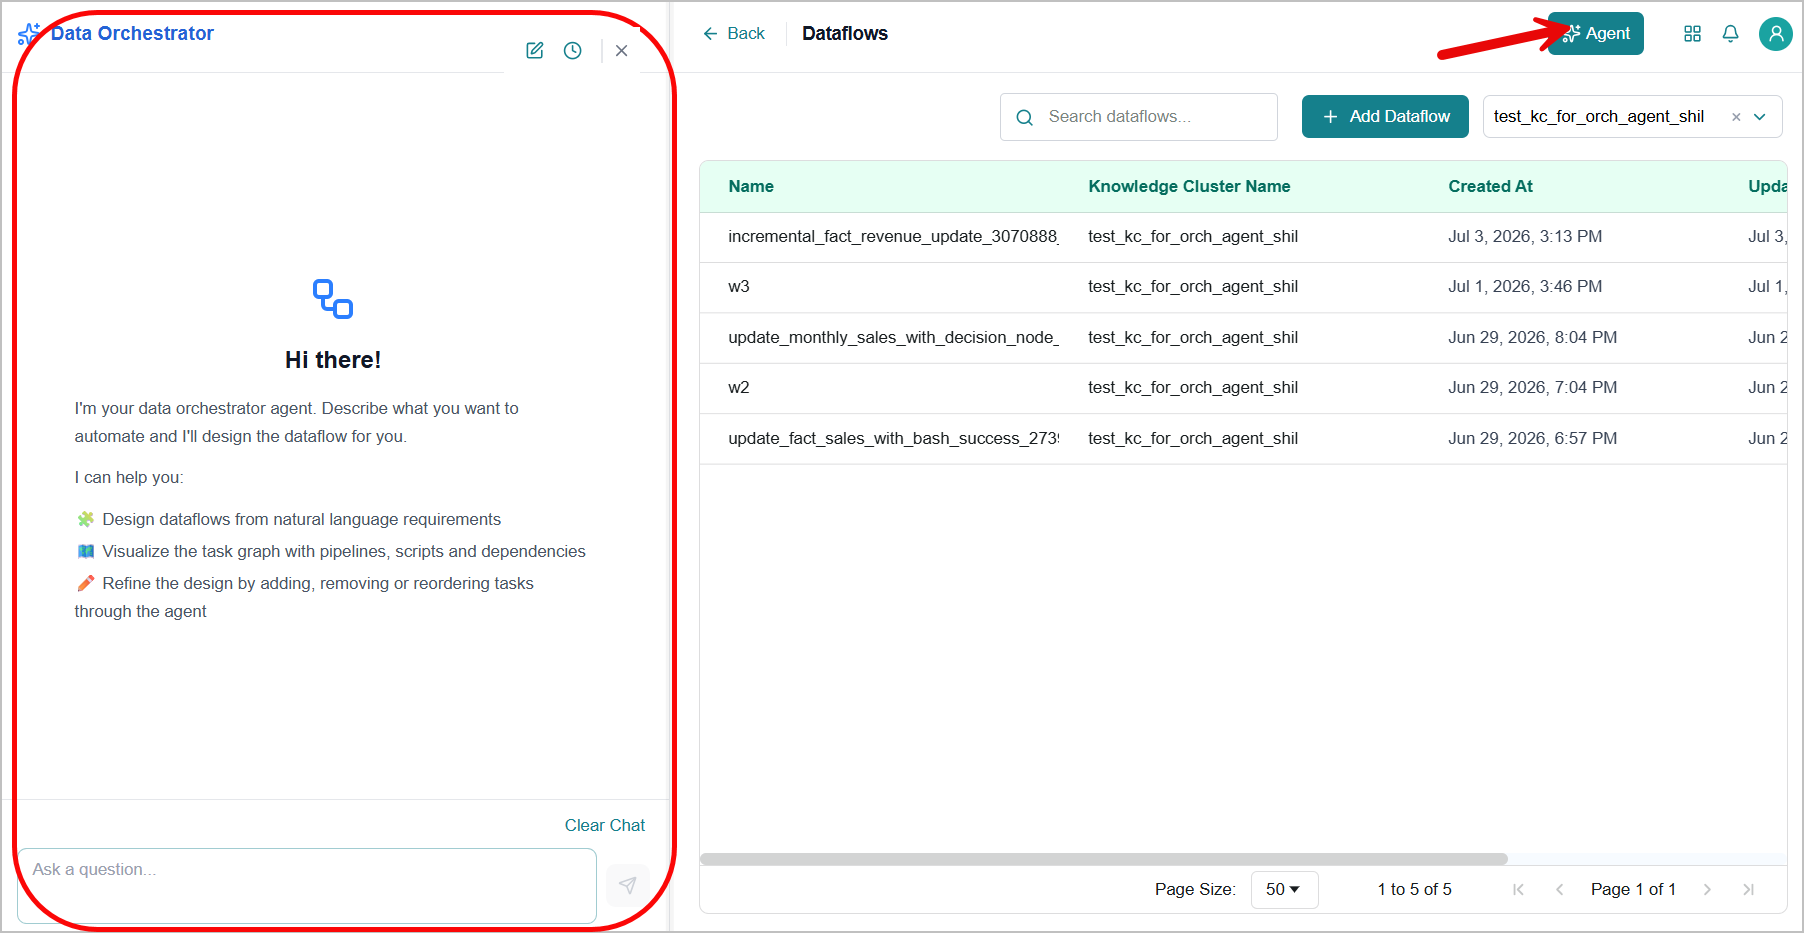
The agent interaction panel opens on the left side of the screen.
Describe your requirements in plain language, including the data you want to use and the outcome you want to achieve, and then press Enter.
Example: Create a dataflow that pulls in new support tickets every morning, removes duplicates, and loads the results into the Support knowledge cluster.
The agent processes your input and asks clarifying questions if it needs more information. Once the agent has sufficient context, it identifies the most relevant pipelines within the selected KC by running a similarity search across all available pipelines, and then displays them with their matching scores for your approval.
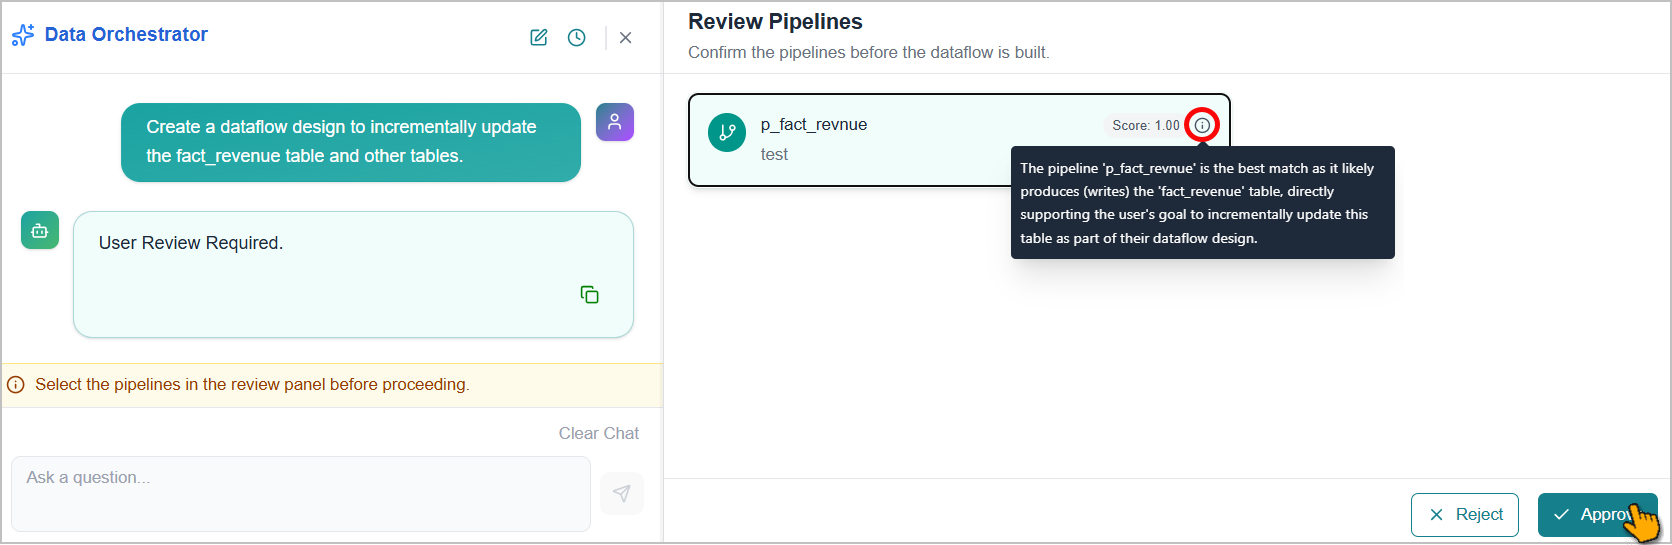
Click the Info
 icon next to Score to view the reason for the matching score.
If the identified pipelines are incorrect, click Reject to discard the agent's analysis. Continue the conversation to provide more context about your requirements.
Review the identified pipelines, select the required ones, then click Approve.
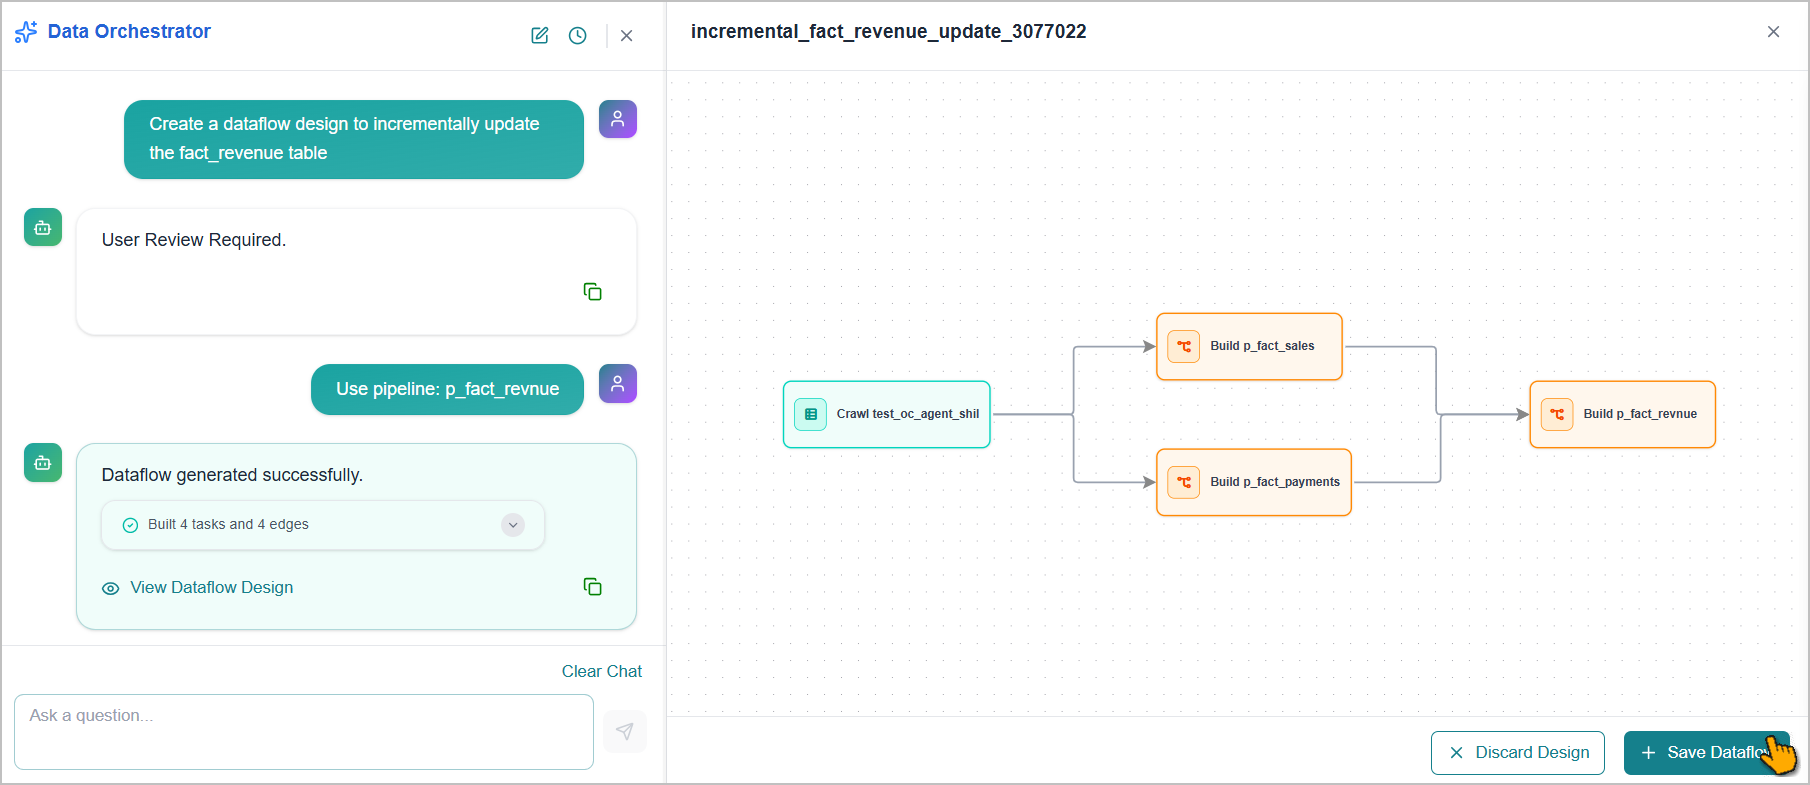
The agent generates dataflow diagrams based on data lineage to meet your requirements and displays them in the right panel.
If the generated dataflow diagram is incorrect, click Discard Design to clear it. Continue the conversation to provide more context about your requirements.
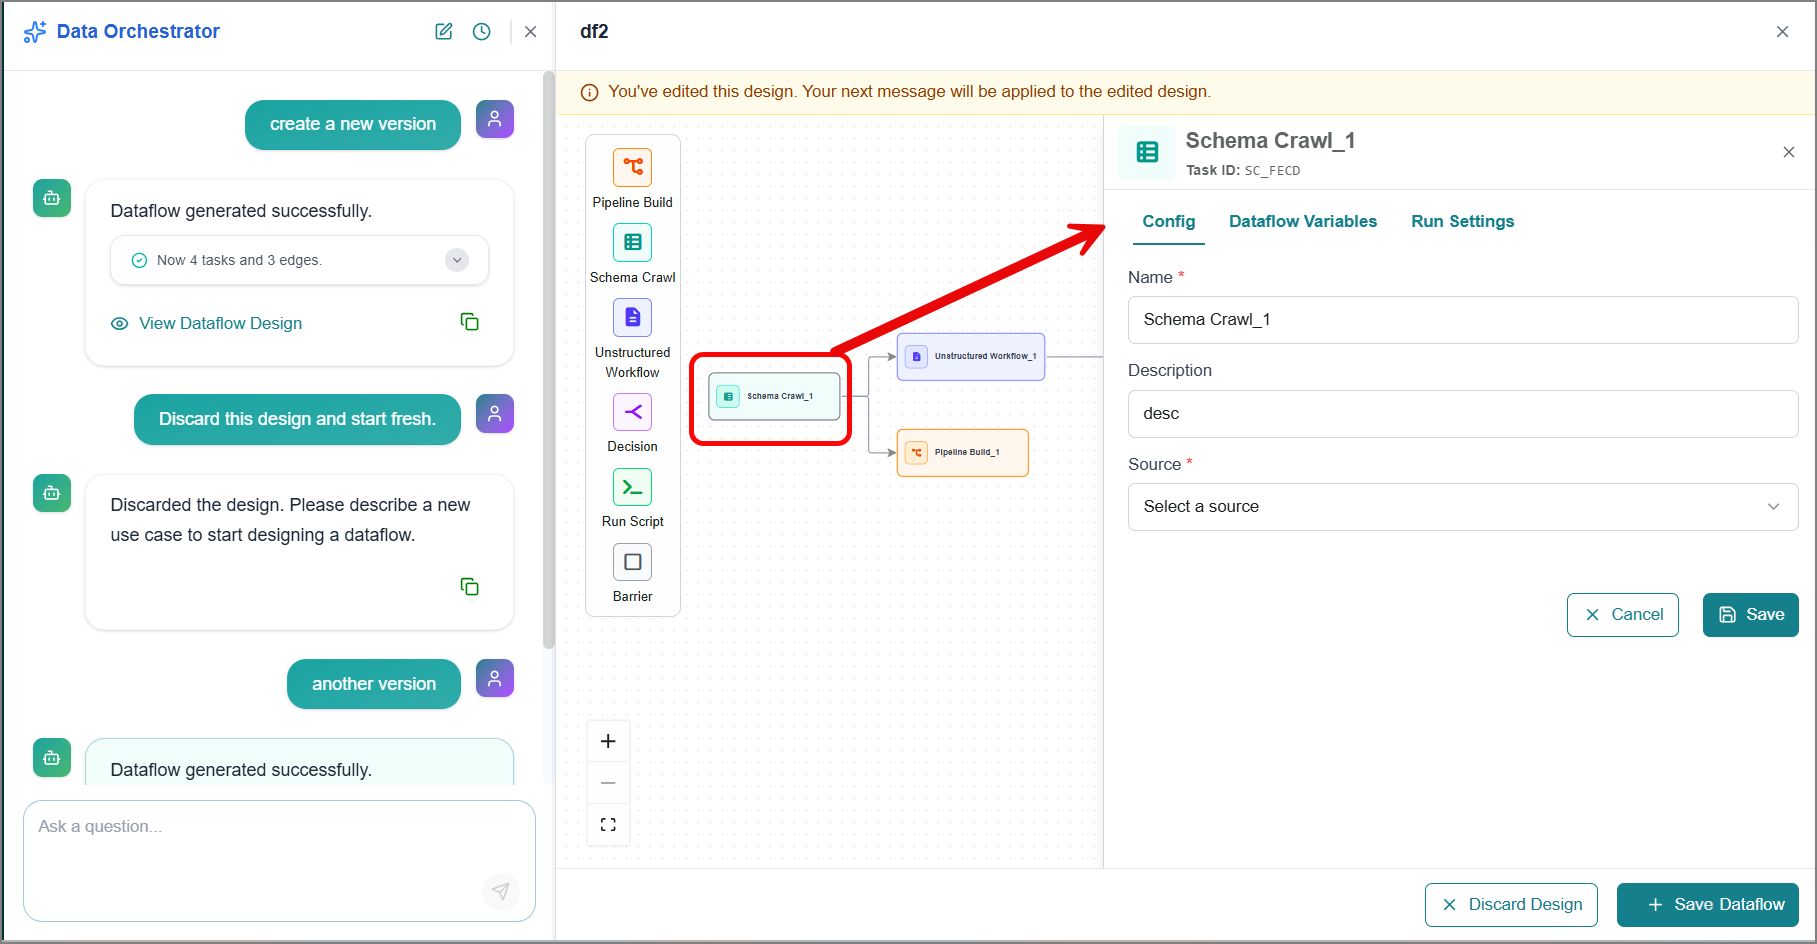
If the dataflow diagram requires refinement, describe the changes in plain language. The agent updates the diagram accordingly.
Alternatively, edit the diagram manually:
Add or remove task nodes on the canvas to update the diagram structure.
Double-click a task node to open its configuration panel on the right side of the screen, then add or update its configuration.
Once the dataflow diagram is finalized, click Save Dataflow in the right-side panel.
The Add Dataflow panel opens.
Note
If the generated dataflow diagram is incorrect, click Discard Design to clear it. Continue the conversation to provide more context about your requirements.
Update the dataflow Name and Description.
The Knowledge Cluster is preselected based on your earlier choice.
Click Add.
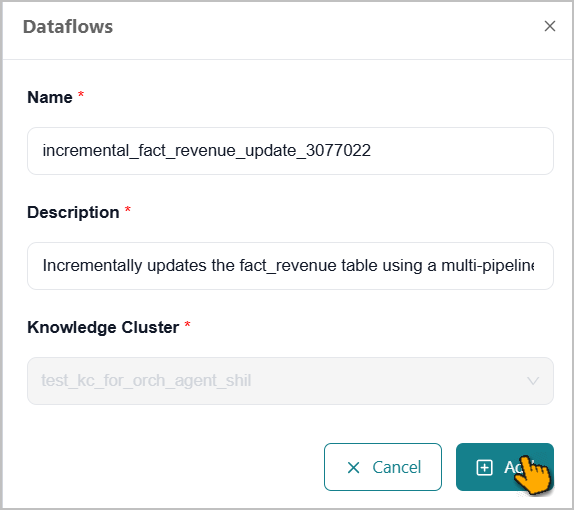
A success message is displayed, and the new dataflow is created with Version 1. This version is active by default.
Tip
You can manually update the dataflow diagram. Refer to Creating a Dataflow Diagram for more information.
You can execute the dataflow to generate the data. Refer to Running a Dataflow for more information.
To update, continue the conversation with the Agent to provide context about your requirements. After the agent updates the dataflow, click Update Dataflow.
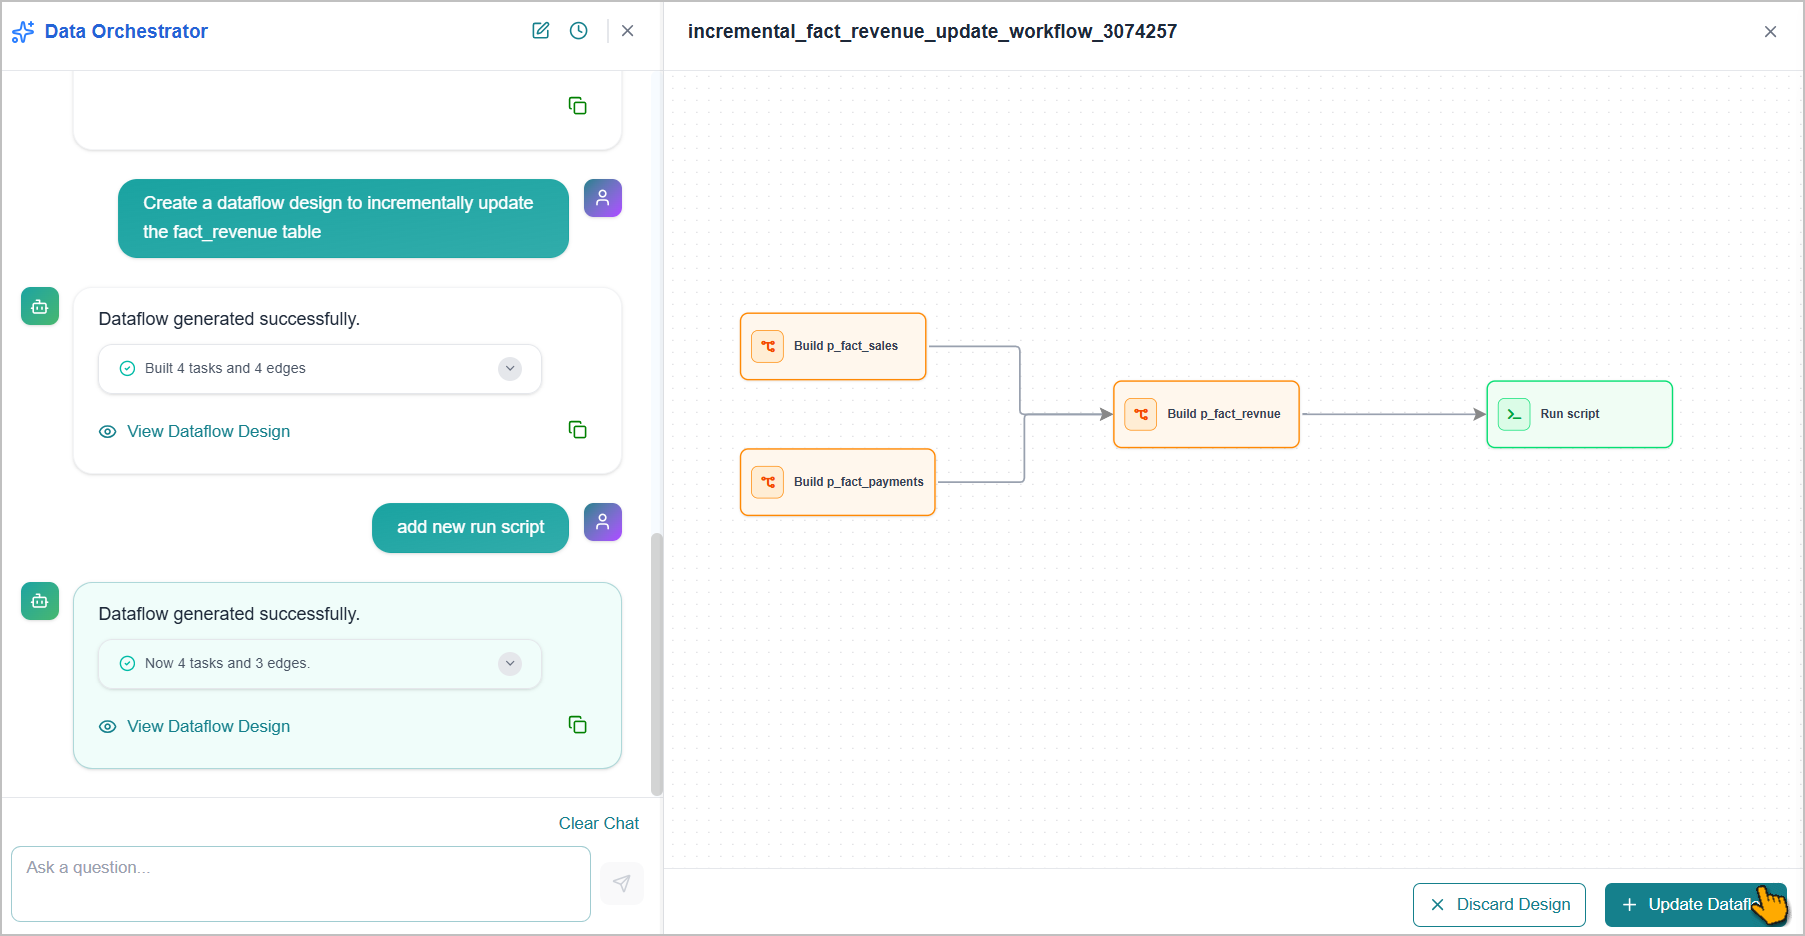
The update dataflow dialog box opens:
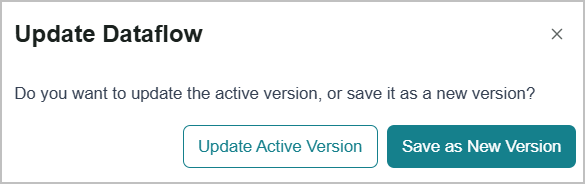
To update the current version, click Update Active Version.
To create a new version, click Save as New Version.
Use the available agent controls to manage your session:
New Conversation
 icon - Begins a new, separate chat session with the agent.
Session History
 icon - Lets you view and resume past conversations.
+ New Chat - Begins a new, separate chat session with the agent.
Delete Session
 icon - Lets you remove a session history from the list.
Clear Chat - Clears the current conversation for a fresh start.
Copy
 icon - Copies the generated agent response to the clipboard.
Creating a Dataflow Diagram
A dataflow diagram helps visualize how data moves from a source through a series of processing steps into a Knowledge Cluster.
To create a dataflow diagram:
Open the Dataflow.
The canvas opens and displays the Version tab by default.
Drag the required task nodes from the left panel onto the canvas. Refer to Task Node Types for more information.
Arrange the nodes sequentially or in parallel based on data requirements for business use cases.
Connect adjacent nodes by drawing an arrow from the output port of one node to the input port of the next.
The arrow defines the direction of data flow.
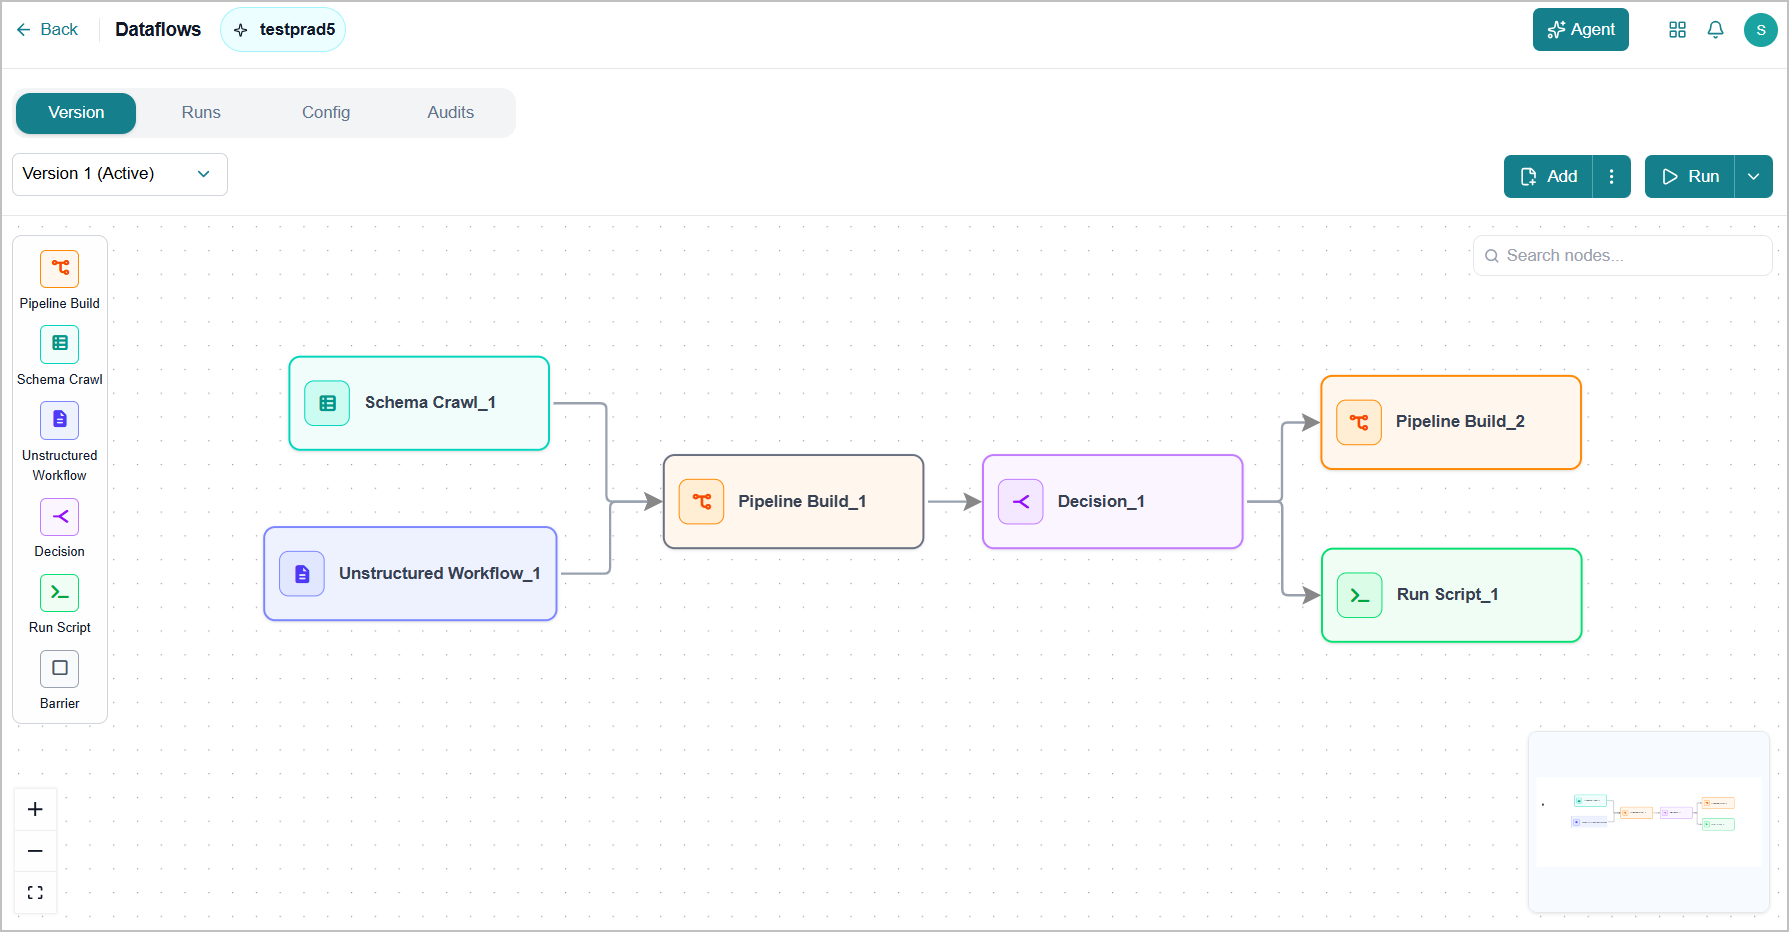
Select each node and configure its settings as required. Double-click a node to open its configuration settings in the right panel.
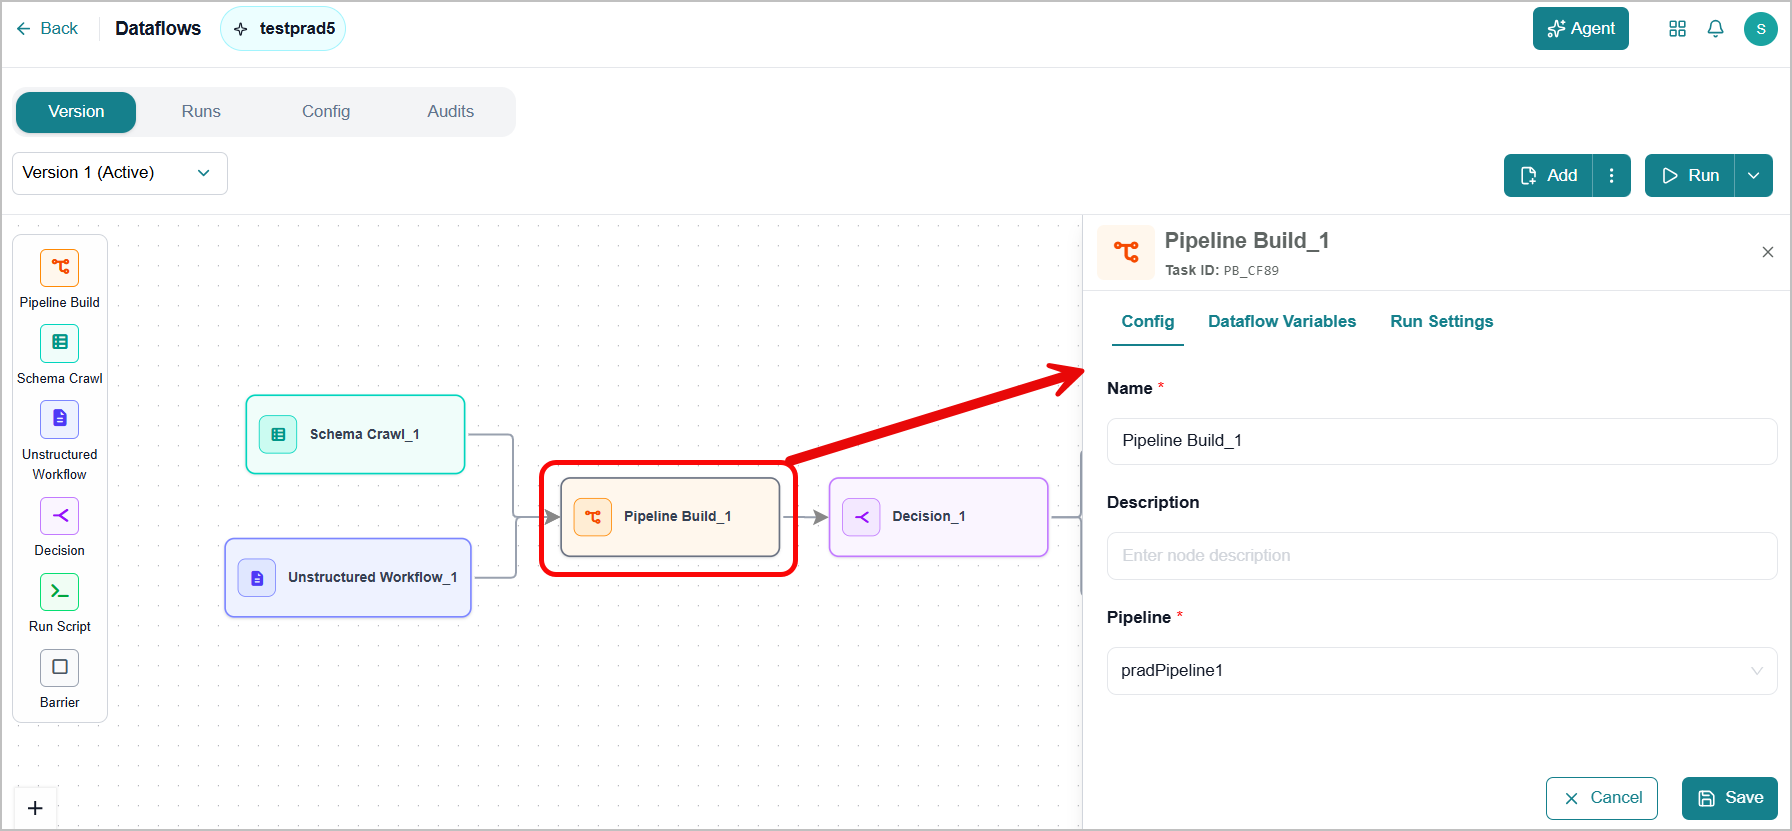
After the configuration, you need to execute the dataflow. Refer to Running a Dataflow for more information.
Task Node Types
A task node represents a single step in a Dataflow and defines the operation performed at that point in the execution sequence. Nodes are connected in a sequence to form the full Dataflow logic, and each node type serves a distinct purpose with its own configuration options.
The following task node types are available in the platform:
Schema Crawl - Connects to a configured data source and crawls its schema. Use this node to detect structural changes in the source before running downstream pipelines.
Unstructured Dataflow - Executes an existing unstructured data processing flow as a step within the current Dataflow. Use this node when your orchestration sequence includes unstructured document processing.
Pipeline Build - Executes a pre-configured data pipeline. Use this node to run ingestion, transformation, or enrichment pipelines within a Dataflow sequence.
Decision - Routes execution to one of two downstream branches based on whether the preceding node succeeded or failed. Use this node to implement conditional logic, such as triggering an alert when a pipeline fails or skipping a cleanup step when all preceding steps succeed.
Run Script - Executes a custom script. Use this node for actions not covered by other node types.
Barrier - A placeholder node that performs no operation; it just serves as the convergence point that holds execution until all branches are done. Use this node when you have multiple upstream nodes running in parallel, and you want to wait for all of them to finish before proceeding. You place a Barrier node downstream and configure its Run Settings to execute only after all upstream nodes have completed.
The Barrier node has two distinct uses:
No-op terminal - the "do nothing" branch in a Decision node.
Merge/sync point - wait for all parallel upstream nodes to finish before the Dataflow continues.
Task Nodes Configuration
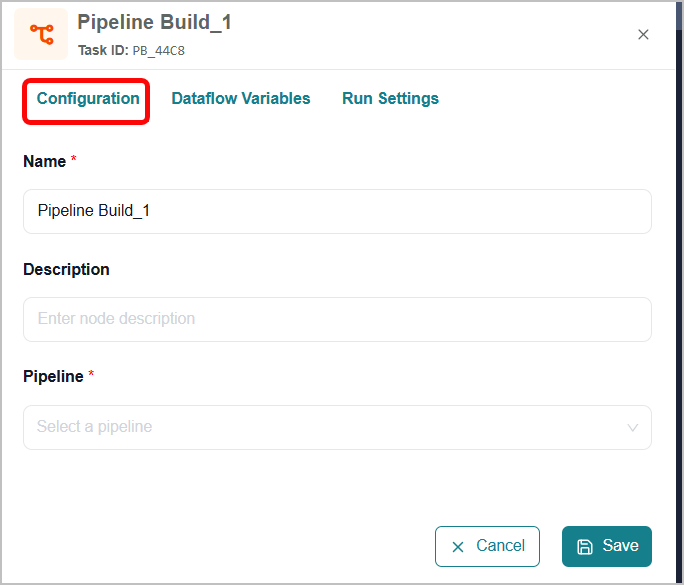
Each task node has a settings panel with three tabs:
Configuration tab
Dataflow Variables tab
Run Settings tab
Use these tabs to view and manage detailed information about the node.
Note
Mandatory fields are marked with  .
.
 |
Task Nodes | Fields | Values |
|---|---|---|
Schema Crawl | Name | Update this field to assign a meaningful name that reflects the node's role in the Dataflow. |
Description | Enter a short description of what this node does. | |
Source | From the dropdown, select the structured KB source. The list displays KBs associated with the selected Knowledge Cluster (KC). | |
Unstructured Dataflow | Name | Update this field to assign a meaningful name that reflects the node's role in the Dataflow. |
Description | Enter a short description of what this node does. | |
Dataflow | From the dropdown, select the unstructured KB source. The list displays KBs associated with the selected KC. | |
Pipeline Build | Name | Update this field to assign a meaningful name that reflects the node's role in the Dataflow. |
Description | Enter a short description of what this node does. | |
Pipeline | From the dropdown, select the pipeline. The list displays pipelines associated with the selected KC. If the list is empty, no pipelines have been created for the KC yet. | |
Decision | Name | Update this field to assign a meaningful name that reflects the node's role in the Dataflow. |
Description | Enter a short description of what this node does. | |
Mode |
| |
On Success - Go to task | From the dropdown, select the task node to execute when the preceding node completes successfully. Available when Simple mode is selected. | |
On Failure - Go to task | From the dropdown, select the task node to execute when the preceding node fails. Available when Simple mode is selected. | |
Route | Routes define the available output paths from this node. By default, Route 1 is created automatically.
Available when Advanced mode is selected. | |
Go to Node | For each route, select an existing node from the dropdown. This is the node the Dataflow executes when the route's expression evaluates to true. Available when Advanced mode is selected. | |
Expression | For each route, enter the condition that determines when this route is taken. The Dataflow evaluates each route's expression at runtime and follows the first route whose expression returns true. Available when Advanced mode is selected. | |
Run Script | Name | Update this field to assign a meaningful name that reflects the node's role in the Dataflow. |
Name | Enter a short description of what this node does. | |
Image URL | Enter the URL of the container image to use when executing the script. | |
Script Mode | Select how the script is provided.
| |
Script | Enter the script to execute directly in the text editor. Available when Script mode is selected. | |
Script File | Click the upload area or drag and drop a file to upload the script to execute. Available when Script File mode is selected. | |
Barrier | Name | Update this field to assign a meaningful name that reflects the node's role in the Dataflow. |
Description | Enter a short description of what this node does. |
The Dataflow Variables tab displays two categories of variables associated with the node.
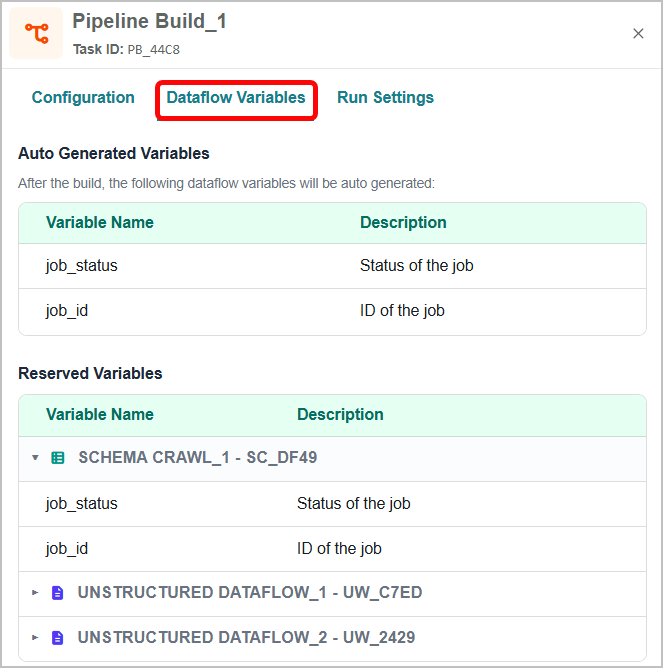 |
Auto Generated Variables - Displays variables created automatically after the node executes. These variables can be referenced by downstream nodes in the Dataflow.
Reserved Variables - Displays the input variables passed into this node from other task nodes in the Dataflow. These are grouped by source node and can be referenced at runtime within the script.
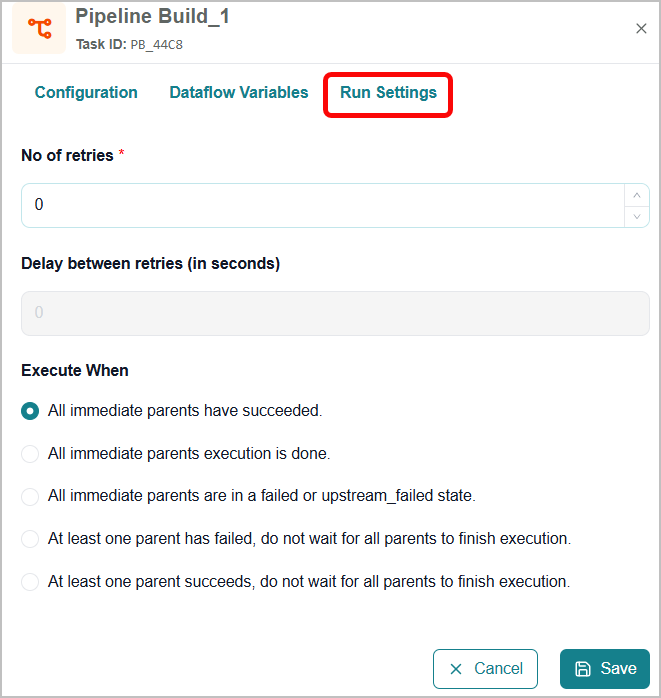 |
Field | Description |
|---|---|
Number of Retries | Enter the number of times the node should retry execution if it fails. Set to 0 to disable retries. |
Delay between Retries | Enter the wait time in seconds between each retry attempt. This field is active only when the number of retries is greater than 0. |
Execute When | Choose the required options:
|
Click Save to save all configurations.
Running a Dataflow
After you finish setting up your Dataflow diagram and its configuration, you are ready to run it. When you run a Dataflow, the platform automatically processes each pipeline in sequence, following the order you defined in the canvas.
Select the KC from the dropdown to view its associated Dataflows.
Select a Dataflow from the list to open the canvas.
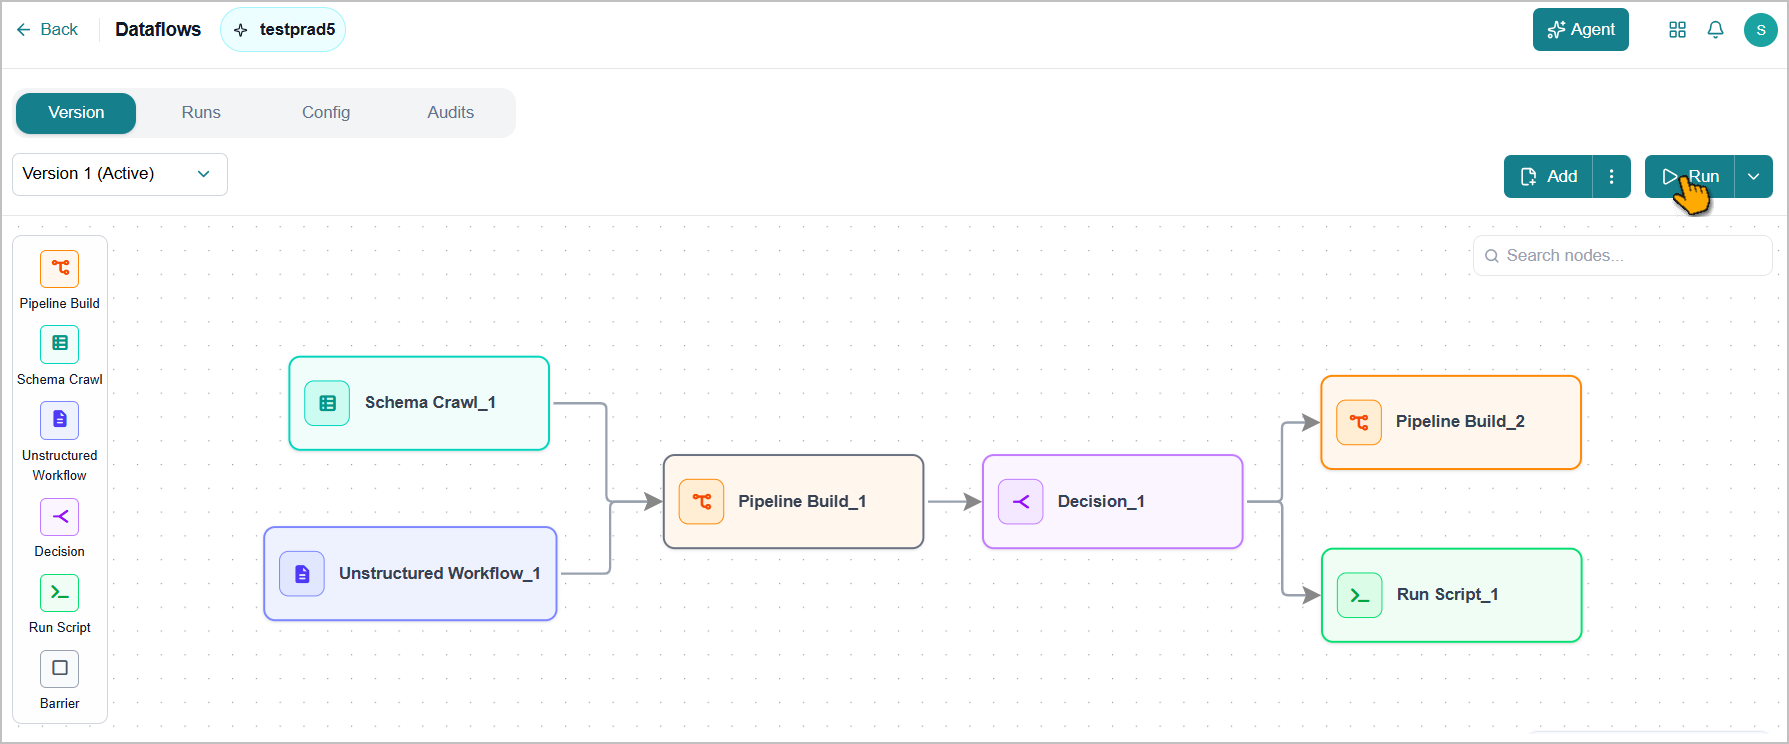
Select the Active version from the dropdown.
Important
The Run button is enabled only for the active SQL version. If you select a version that is not active, Run is disabled. To run a query, first set the version as active.
Click Run.
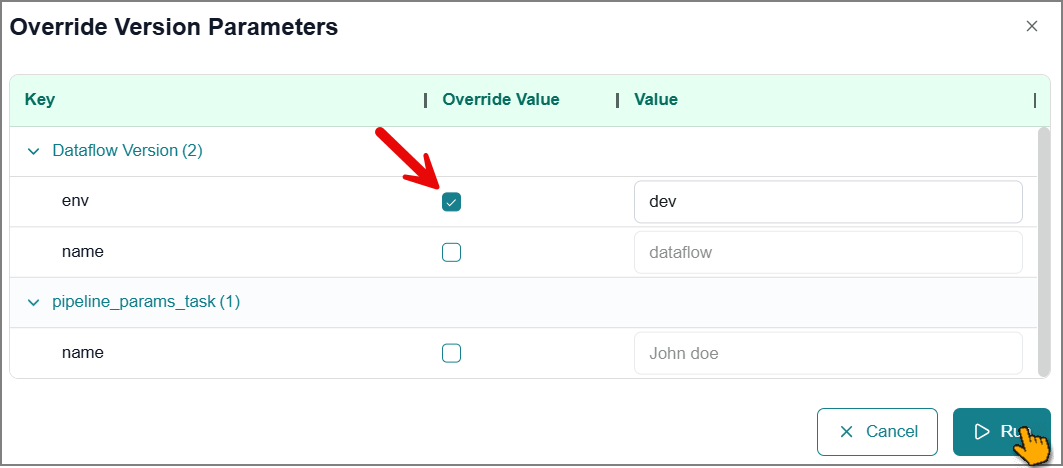
The Override Version Parameters window opens and displays any previously added dataflow and task-level parameters.
Enable the Override Value checkbox next to the key to enter a new value for that key.
Important
This Override Value applies to this run only.
After you review the parameters, click Run.
A confirmation message appears, and the Dataflow job is successfully submitted. The platform begins executing each pipeline in the order defined by your connections.
Note
After submitting the run, switch to the Runs tab to track the progress and status of your Dataflow execution in real time.
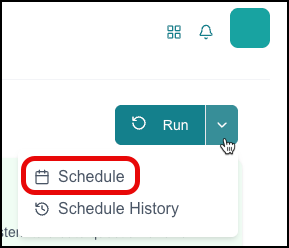
Click the dropdown next to Run.
Tip
Use the Schedules History option to view a complete list of schedulers and their execution details.
Click Schedule.
The Schedule window opens.
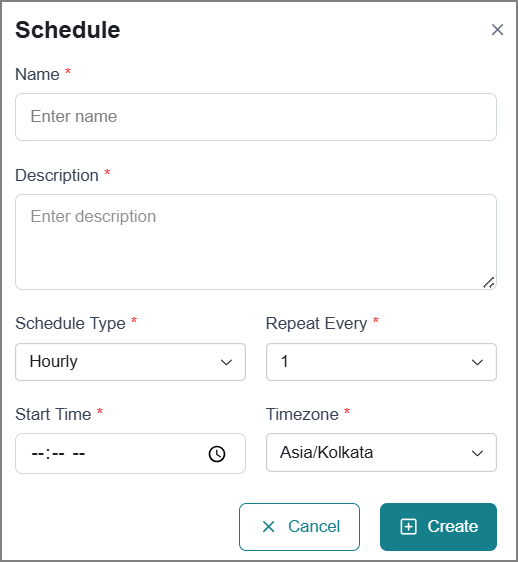
Enter relevant details in the fields.
Field
Description
Name
Enter a name for this schedule.
Description
Enter additional details about the purpose or scope of the schedule.
Schedule Type
Select how frequently the schedule should run:
Hourly
Daily
Weekly
Monthly
Yearly
Repeat Every
Specify the interval for the recurring schedule.
Hourly schedule - 1 to 23
Daily schedule - 1 to 31
Notice
If the scheduler tries to start a new job while a previous one is still running, the system will cancel the new job to avoid overlapping executions.
Days of the week
Select one or more days of the week to run the schedule.
Available for a Weekly schedule only.
Day of the Month
Select the specific date of the month to run the schedule.
Available for Monthly schedules only (1 to 30).
Day and Month
Select the specific month and date to run the schedule.
Available for Yearly schedules only.
Start Time
Set the time when the schedule should begin.
Timezone
Select your timezone to ensure the schedule runs at the correct local time.
Click Create.
The scheduled run is created, and dataflow execution will trigger automatically according to your selected schedule.
Tip
Follow the same procedure to update the existing dataflow schedule.
Managing a Dataflow Version
The platform supports multi-version management for dataflows. This versioning model allows you to maintain parallel configurations of the same dataflow, enabling controlled experimentation and safe iteration without impacting production execution. At any point, one version is designated as active; only the active version executes during both manual and scheduled runs.
Versions are created by copying an existing version as a base. Each version maintains an independent configuration state, including the canvas diagram, task node configurations, parameters, and run settings.
Create a Dataflow Version
You can create additional dataflow versions based on any existing version.
Important
Make sure you have already created at least one base dataflow version.
To create a new dataflow version:
Click Add.
The Create New Version window opens.
From the dropdown, select the base version you want to copy from.
To make this new version the active dataflow, enable the Make Active option.
Click Create.
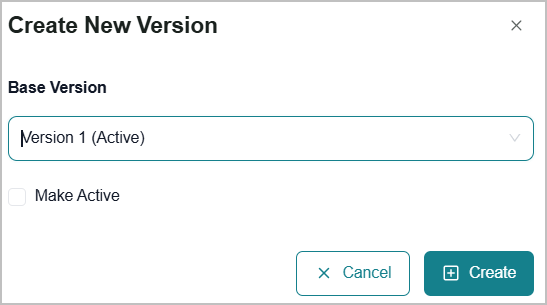
The new version is created from the base version you selected.
Edit the dataflow diagram and its configuration as needed:
Manual edits - Update the diagram directly. The platform auto-saves your changes.
Agent-assisted edits - Continue the conversation with the Agent to provide context about your requirements. After the agent updates the dataflow, click Update Dataflow.
The update dataflow dialog box opens:
To update the current version, click Update Active Version.
To create a new version, click Save as New Version.
Set a Dataflow Version as Active
Only one dataflow version can be active at a time. To change the active version:
From the version dropdown, select the dataflow version you want to activate.
Click the Ellipsis
 icon next to Add.
Note
The dropdown options are disabled for the active dataflow version.
From the dropdown, select Mark this Version Active.
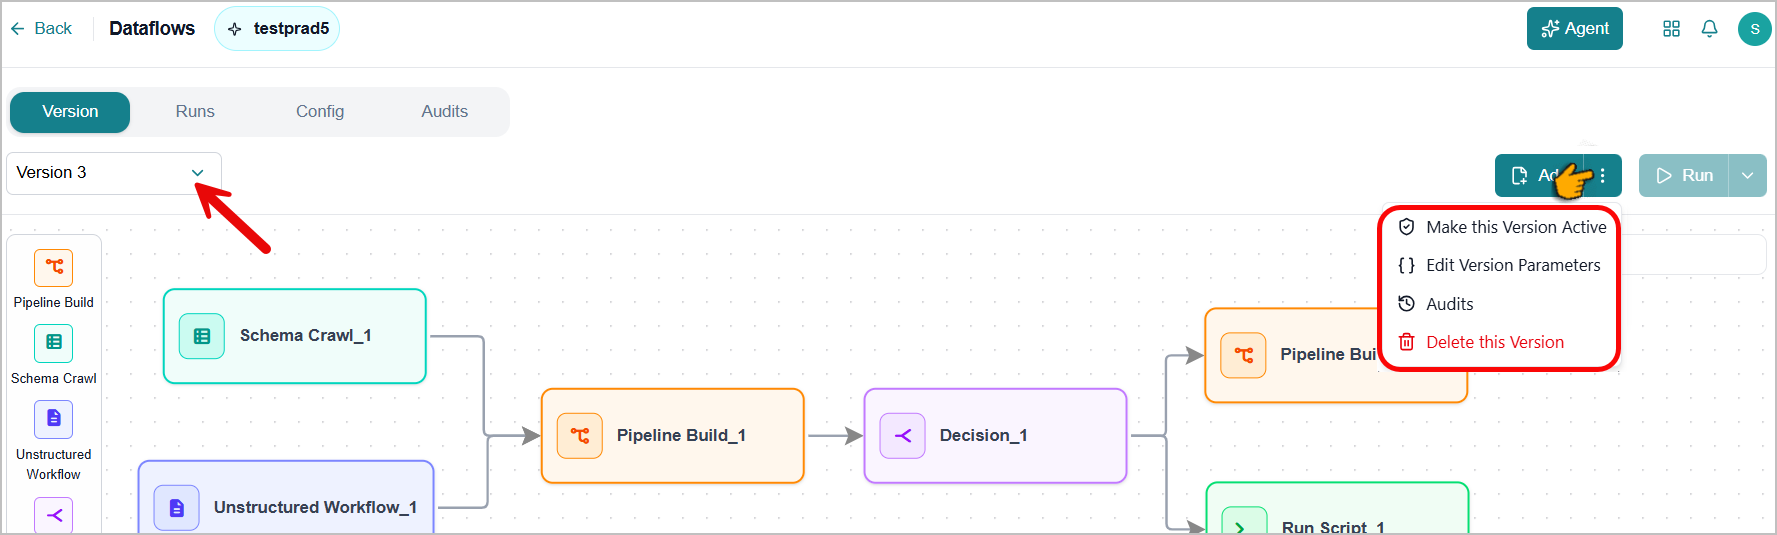
The selected version is now set as the active dataflow version.
Adding Dataflow Version Parameters
Dataflow Version Parameters let you define reusable values, such as date ranges, thresholds, or filter values, that your queries can reference instead of hardcoded numbers or text. You set these values once per dataflow version, use them in your query, and optionally change them for a single run without editing the saved version.
To add and view dataflow parameters:
Click the Ellipsis
icon next to Add.Click Edit Version Parameters.
The Parameters window opens and displays the previously added parameters.
To add a new one, click Add Parameter.
Enter a name in the Key field and the corresponding value in the Value field.
Important
Each key must be unique, and every key must have a value. You cannot save until this condition is met.
Use the Delete
icon next to any row you want to remove.Select Save to save your parameters.
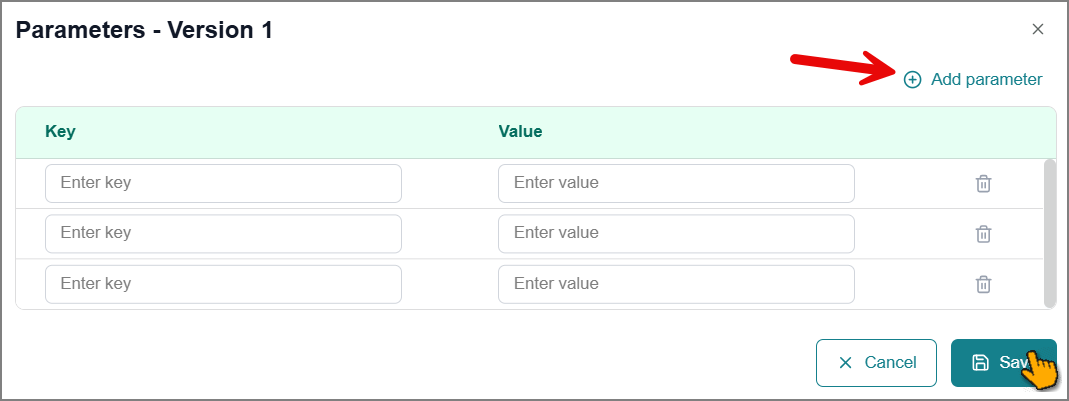
Tip
Once saved, you can reference these keys in your dataflow query. Update the values here at any time without changing your query.
View Dataflow Version Audits
The platform keeps a complete history of every change made to a dataflow version, including what changed, when it changed, and which events occurred.
To view the dataflow version audit:
Click the Ellipsis
icon next to Add Click Audits.
The Dataflow Audits window opens.
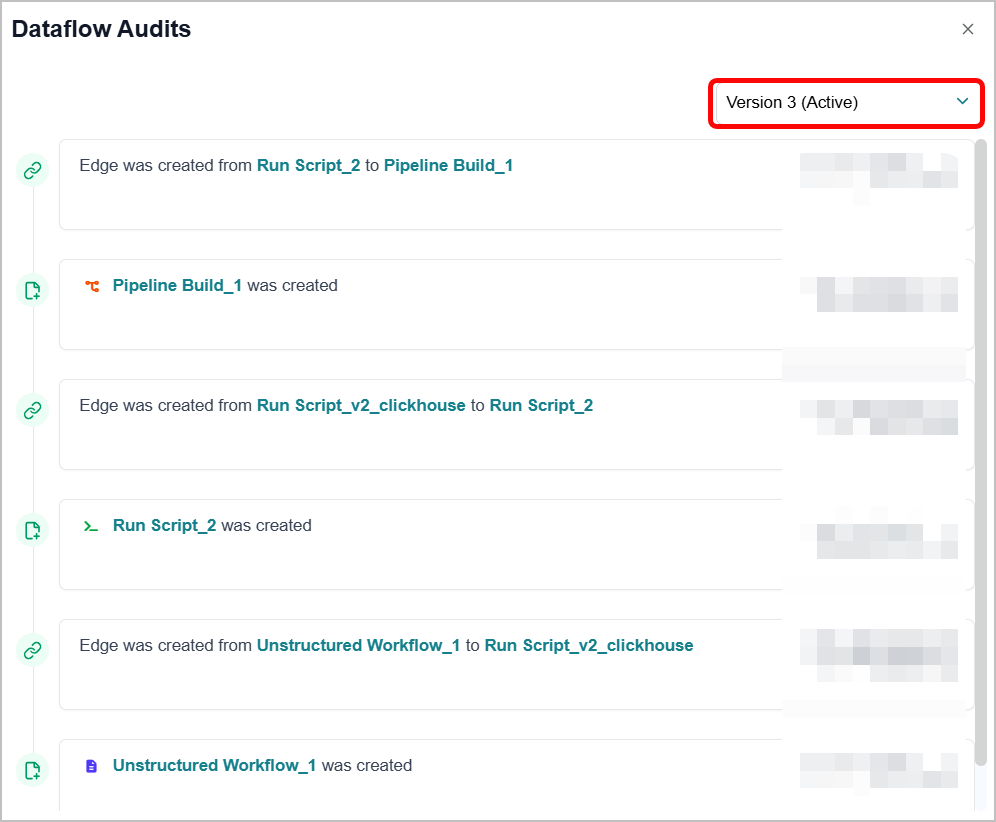
Select a version from the Version dropdown.
The audit log updates to display the change history for the selected version.
Delete a Dataflow Version
Note
You cannot delete the active version. Set a different version as active before deleting.
To remove a version:
From the version dropdown, select the version you want to remove.
Click the Ellipsis
icon next to Add.From the dropdown, select Delete this Version.
The confirmation dialog box opens.
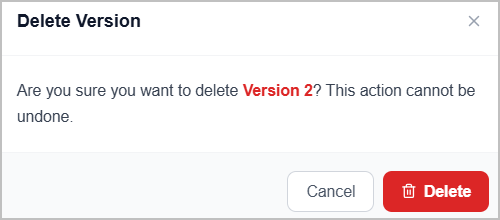
Click Delete.
The selected dataflow version is removed.
Viewing Dataflow Runs History
The platform allows you to review past and current executions of a Dataflow. You can check the status of each run, cancel an in-progress run, restart a failed run, and download logs for troubleshooting.
To view Dataflow runs:
Select a KC from the dropdown to view its associated Dataflows.
Select the Dataflow from the list.
The dataflow canvas opens in the Version tab.
Switch to the Runs tab.
All runs and their details are displayed.
Search for and select the required run from the left panel.
The details appear in the right panel.
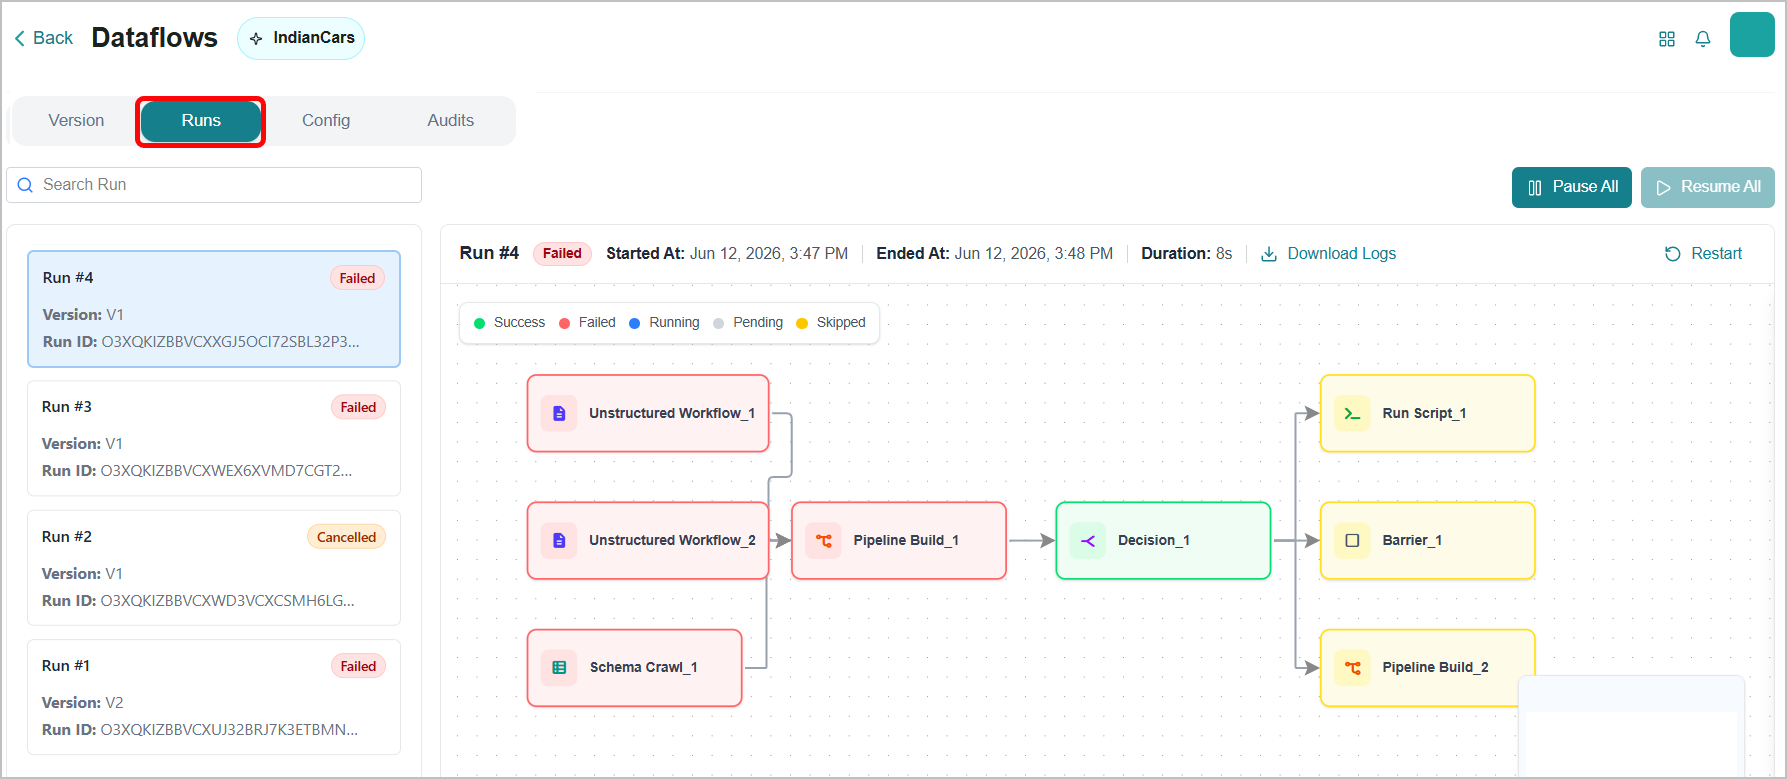
Use this tab to perform the following actions:
If a run is currently executing, click Cancel to stop it.
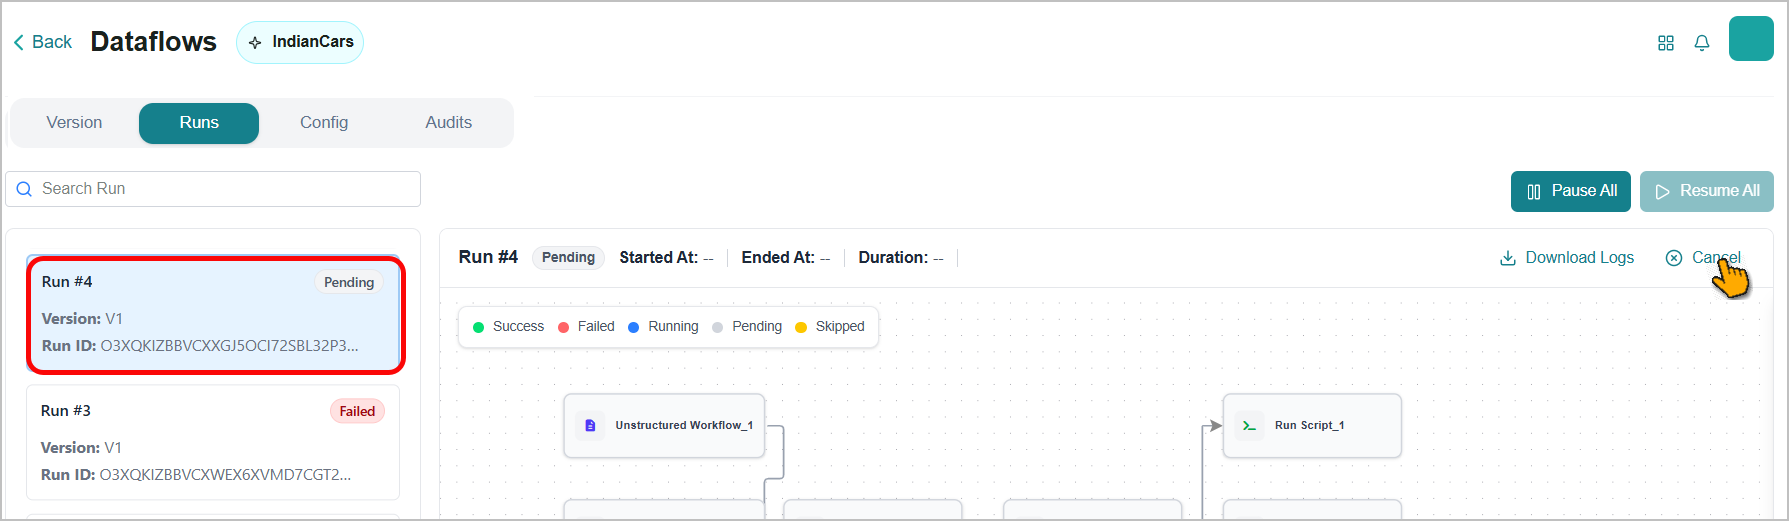
Note
Canceling a run stops all active tasks immediately. Tasks that have already been completed are not affected.
If a run has failed, click Restart to try again.
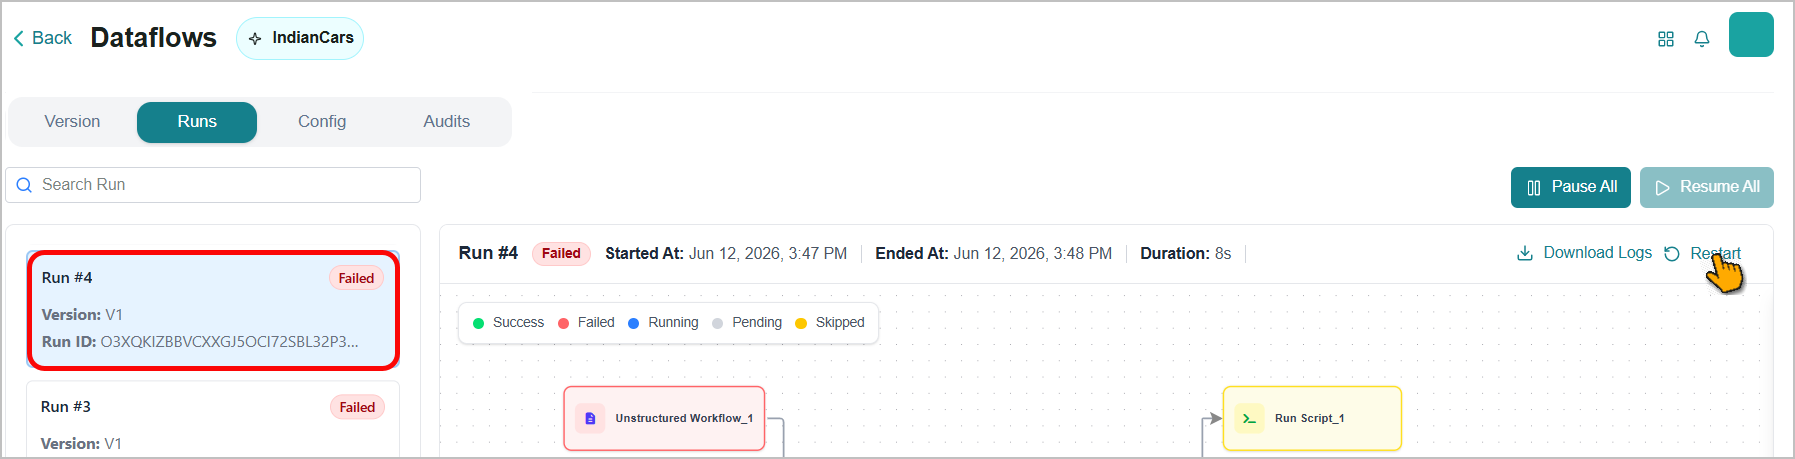
Tip
Review the run logs before restarting to understand why the run failed.
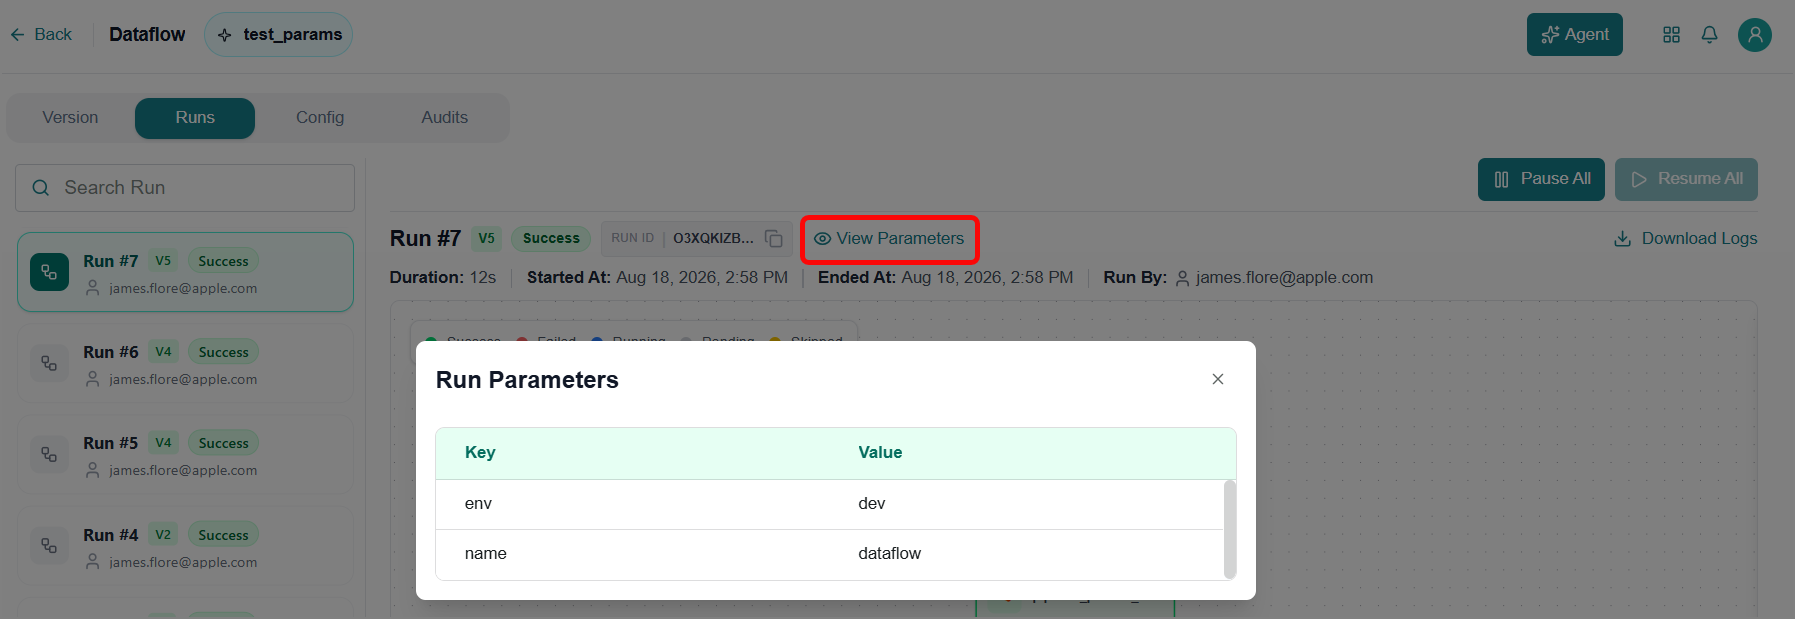
If the parameter is enabled for the run, click View Parameters to view key-value pairs used in the run.
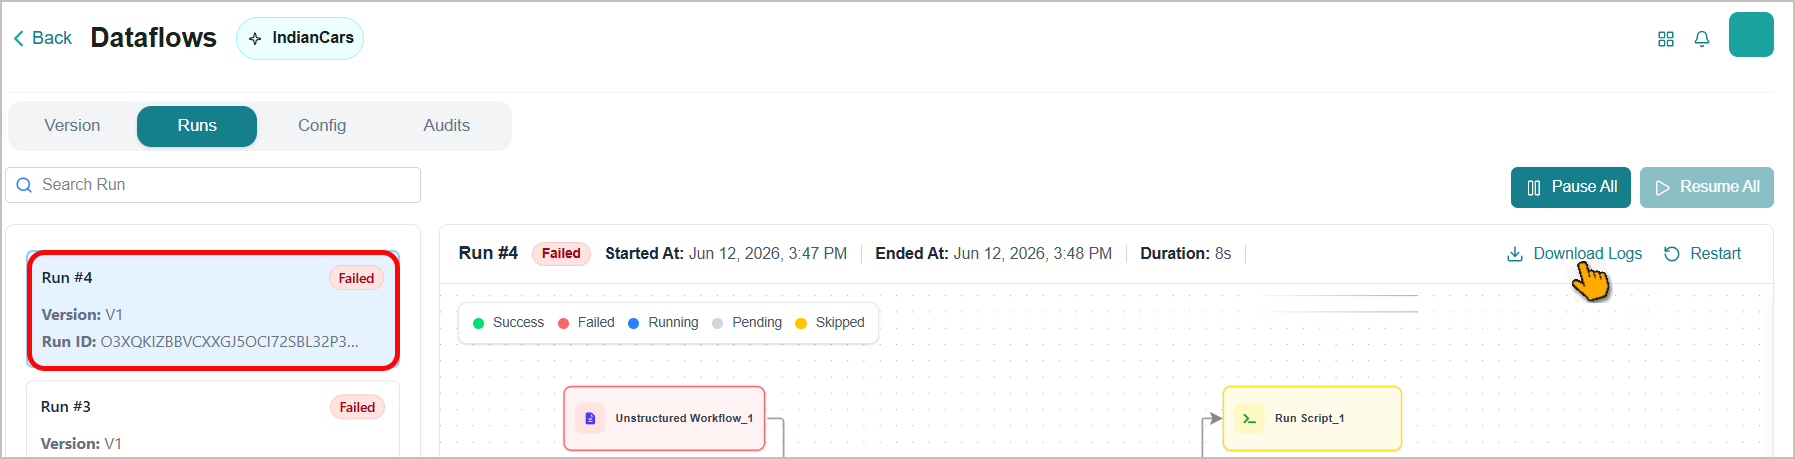
To export the logs for all nodes in a specific run, click Download Logs.
Double-click the node to view its Configuration details on the right panel.
Switch to the Logs tab to view logs related to the selected node run.
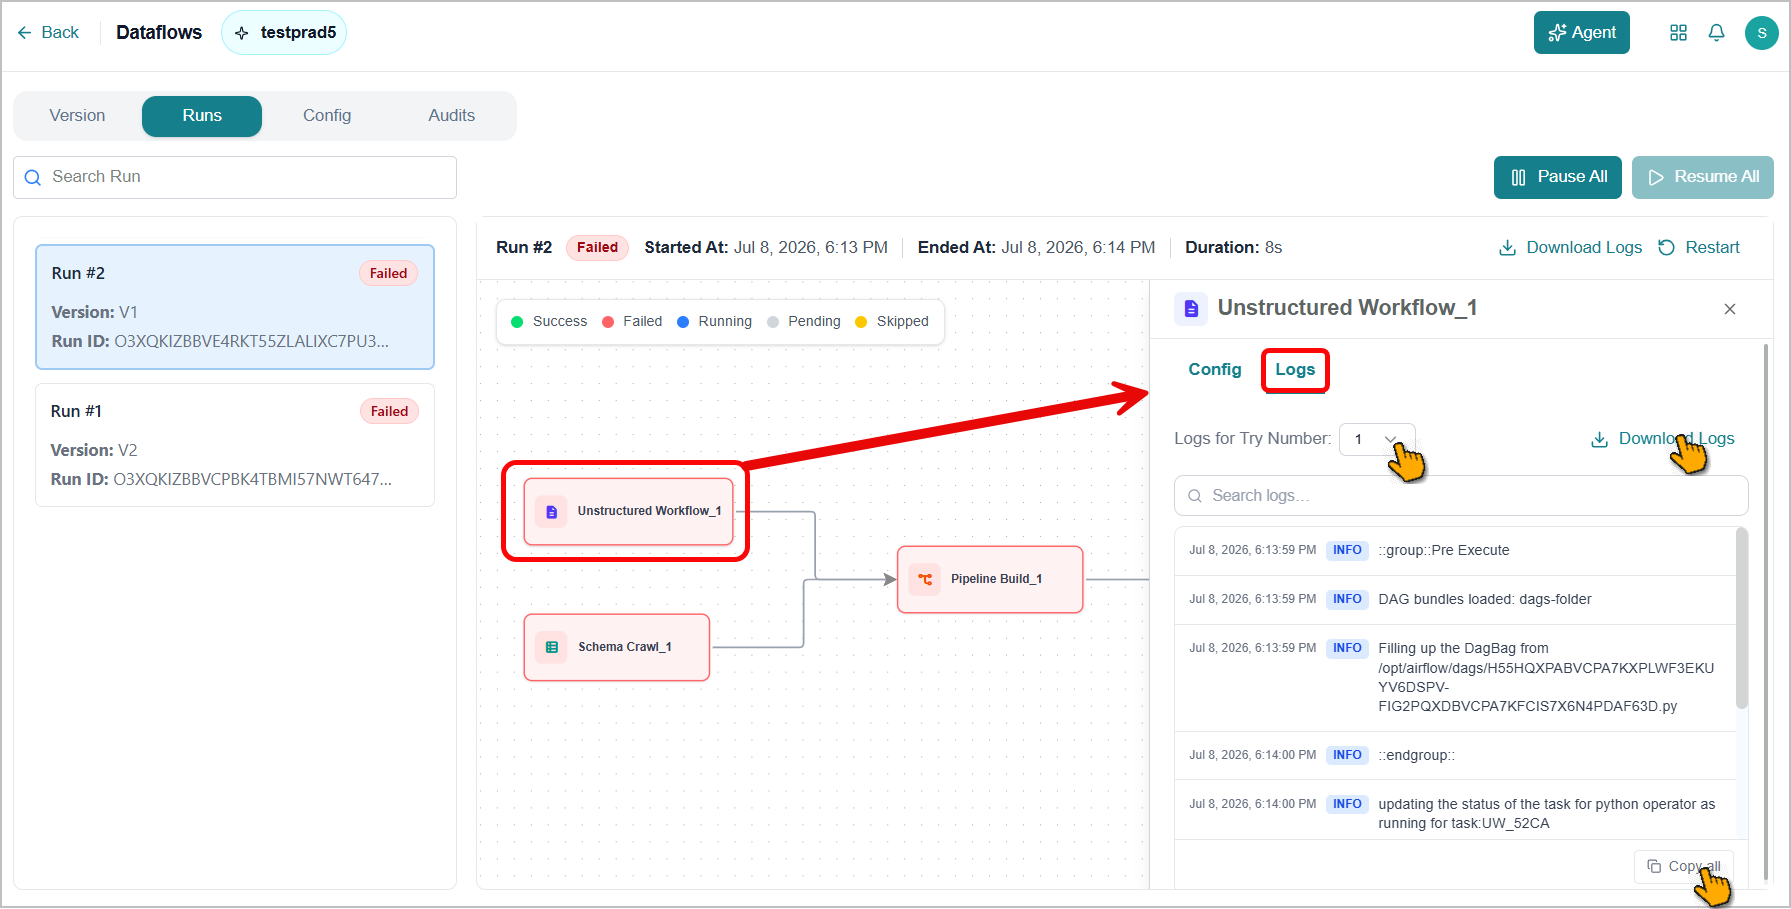
To view logs for that specific attempt, select the attempt number from the Try Number dropdown.
To copy the logs for that attempt, click Copy All.
To export all attempt logs for a specific node, click Download Logs.
Modifying Dataflow Configuration
The platform allows you to modify a Dataflow and its configuration at any time.
To update a Dataflow:
Select the KC from the dropdown to view its associated Dataflows.

Select a Dataflow from the list.
The canvas opens in the Version tab.
Update the diagram as needed. Refer to Creating a Dataflow Diagram for more information.
Switch to the Config tab.
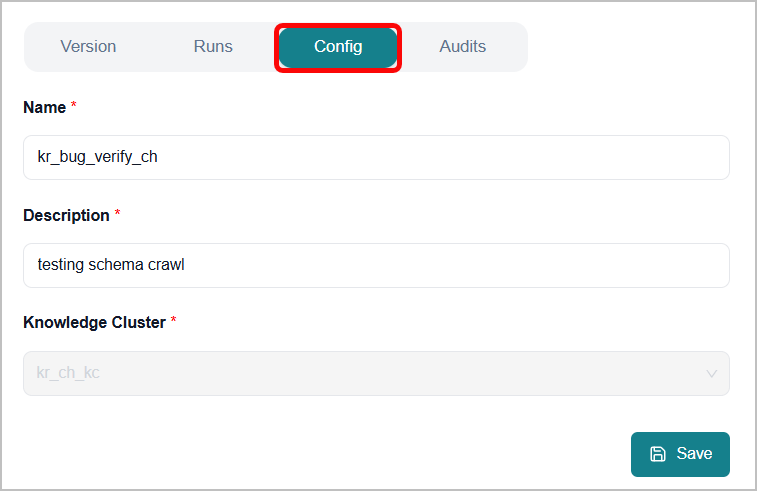
Update the Dataflow name and description as needed.
The Knowledge Cluster is pre-selected.
Click Save to save the updated changes.
Exporting and Importing a Dataflow
The platform supports exporting a dataflow configuration to a JSON file and importing that file into a target dataflow. This provides interoperability between dataflows and supports configuration reuse across dataflows and environments.
To access this feature, on the dataflow details page, switch to the Config tab.
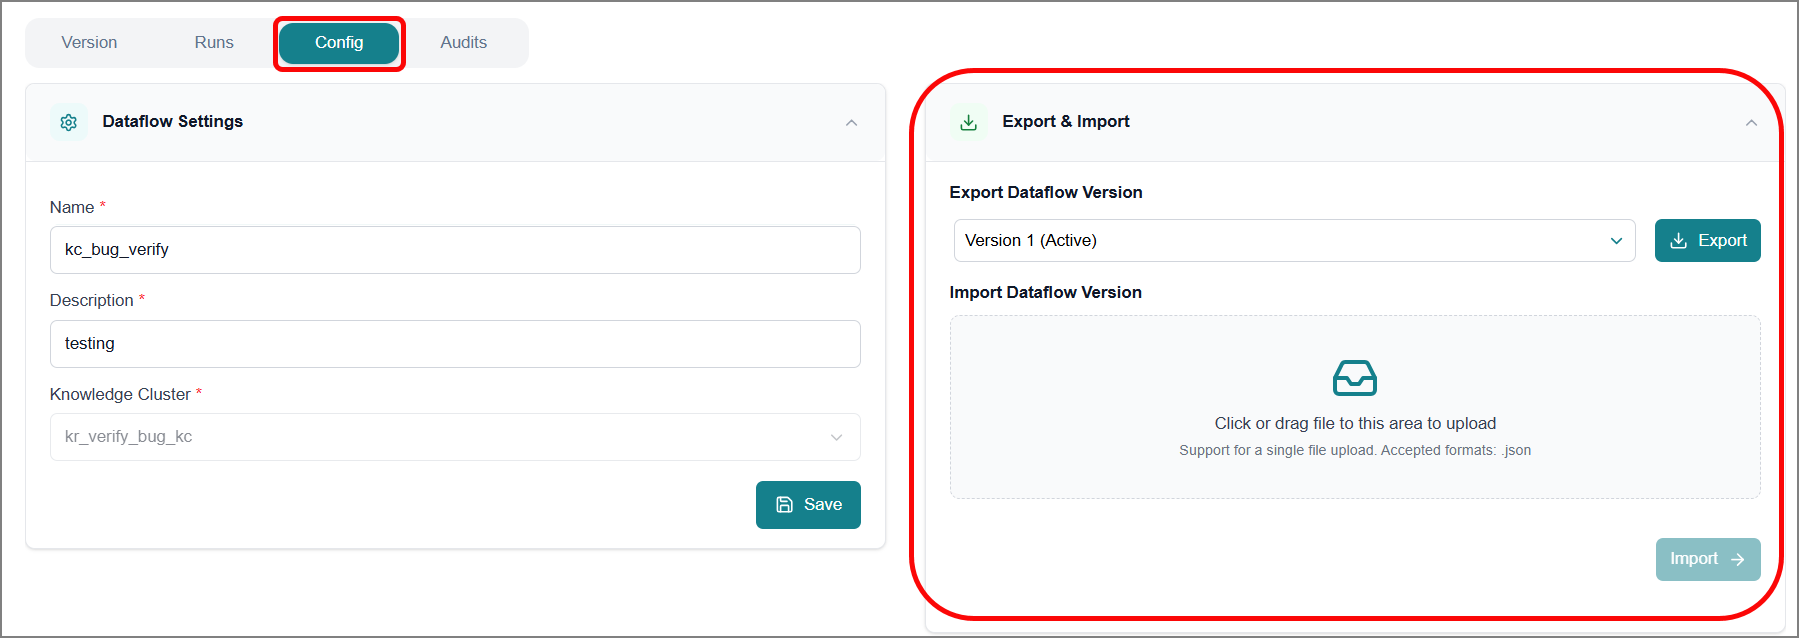
The current dataflow details are displayed, including a list of available dataflow versions you can export and an option to import a dataflow version.
To export a dataflow version:
From the dropdown list, select the dataflow version you want to export.
Click Export.
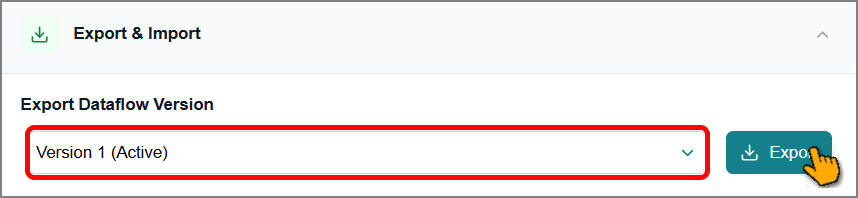
The platform automatically downloads a JSON file to your computer.
To import a dataflow version:
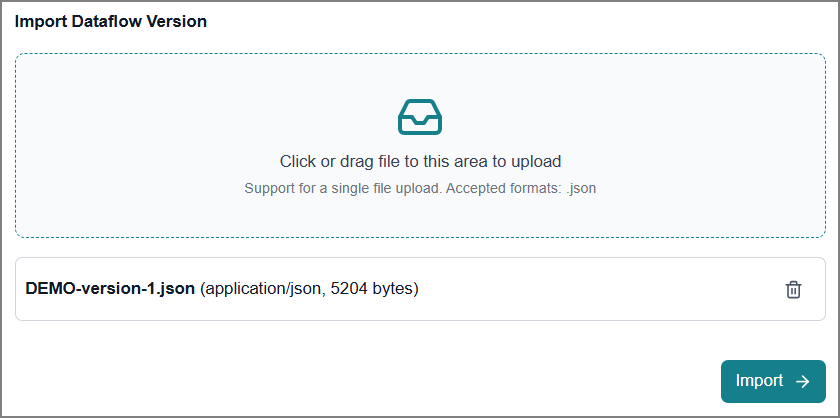
Upload the dataflow JSON file that you exported from the other dataflow version.
Click Import.
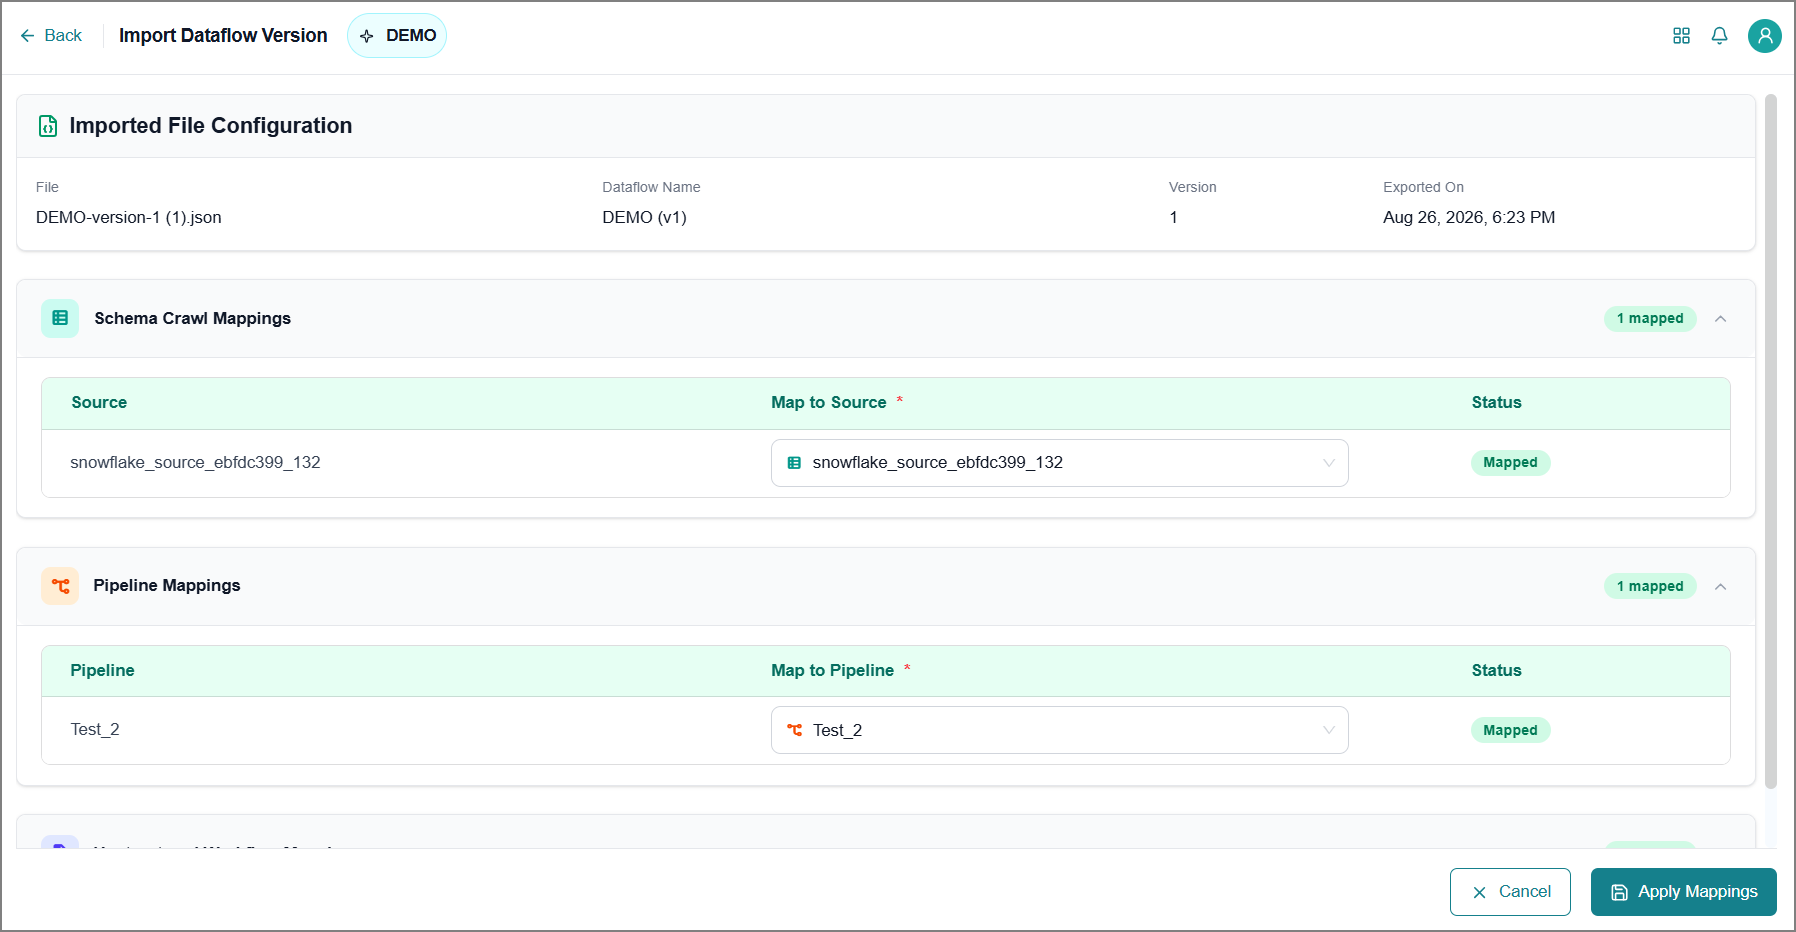
A mapping page opens. It shows the imported configuration and the source mapping that the platform identifies automatically.
Review and update the mapping as needed.
Important
Mapping is required for all tasks. Import is blocked until all tasks are mapped.
After finalizing, select Apply Mappings.
The mapping summary report page opens for review.
Click Go to Dataflow Version.
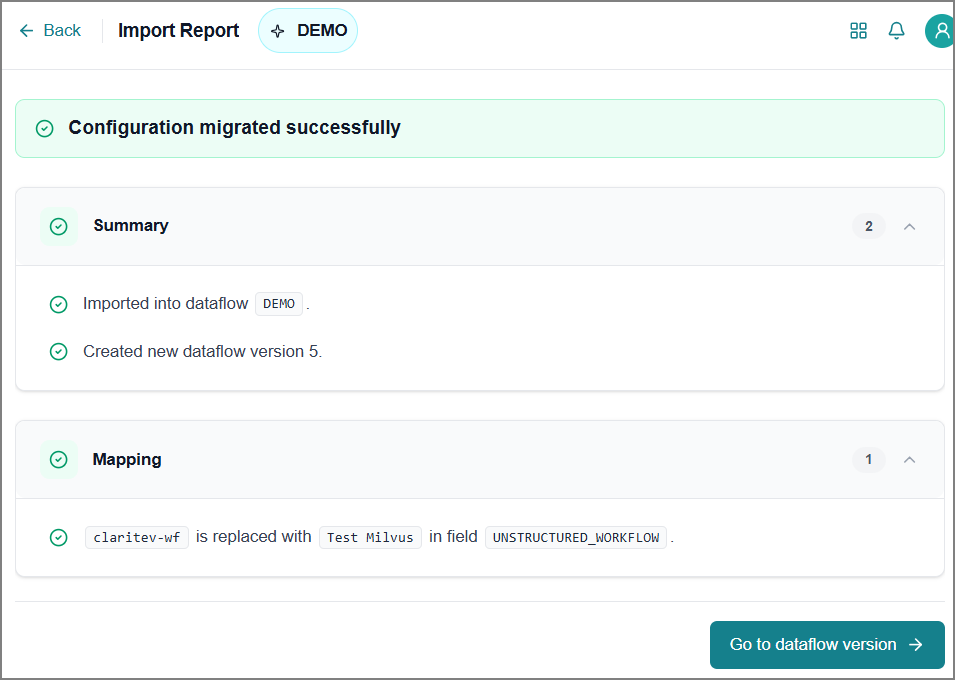
The Version tab opens. The platform creates a new dataflow version with the imported configuration.
Viewing Dataflow Audits
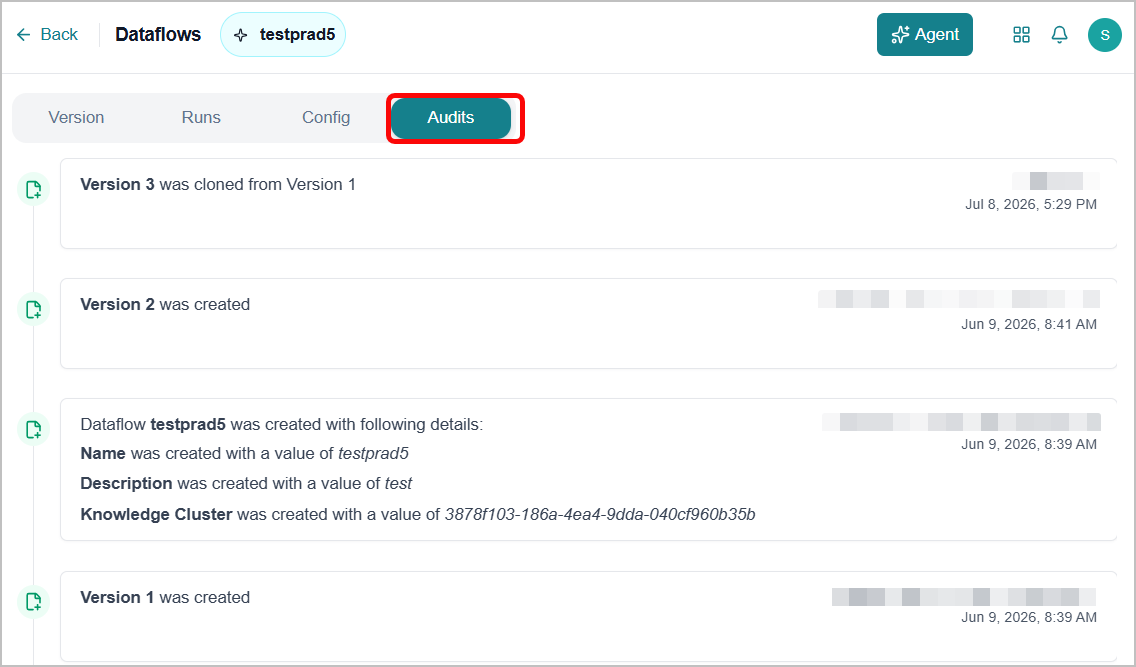
The Audits tab records all changes to the dataflow, allowing you to review and validate dataflow modifications. It supports change tracking and validation for administrators and technical users responsible for maintaining the integrity of the dataflow across the platform.
Switch to the Audits tab. It displays a list of all the dataflow changes, sorted with the most recent change at the top. Each entry shows the type of change and the date and time it occurred.
Delete a Dataflow
The platform allows you to delete a Dataflow associated with a Knowledge Cluster.
To delete a Dataflow:
Select a KC from the dropdown to view its associated Dataflows.
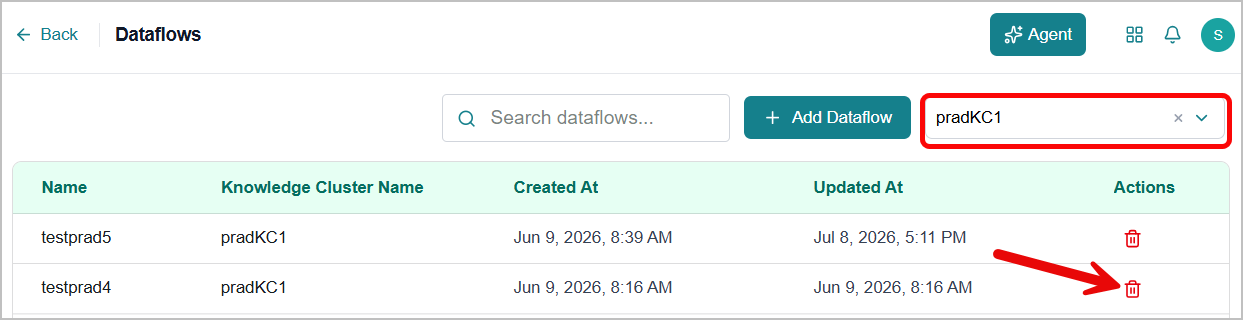
Select the Dataflow from the list and click the Delete
icon on the right.A confirmation dialog appears.
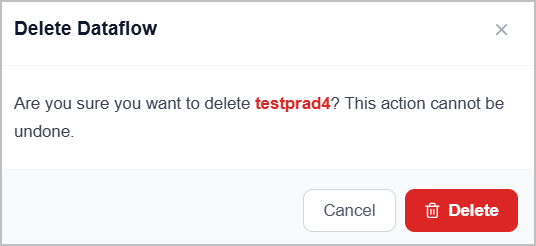
Click Delete.
The Dataflow is removed from the list.