Creating Tools
A Tool is a key component used in Guidelines and Tasks to perform pre-defined actions and operations based on specific instructions. A Tool enables the AI Agent to execute APIs, connect to external systems, fetch and push data, perform actions, and generate summaries.
A Tool is always created from one of the following Tool types:
REST API Tool - Enables the AI Agent to access a third-party application and receive responses in real time using standard REST API calls.
Transfer to Human - Provides the backend settings to transfer the current conversation to a human being (e.g., a support person or live Agent), enabling its redirection to a designated target URL or phone number.
Call Termination - Provides text instructions for the actions to be taken when the current conversation ends.
Summary Generation Tool - Invokes the call summary process for the current session, according to the Summary Template and Response variable assigned here.
Each Tool type can be the basis for creating a Tool instance that will be available for use by the current AI Agent. For some Tool types, you can create multiple instances, each with its own unique configuration and instructions.
Tools are especially useful when you want to ensure that the AI Agent performs a specific activity using a standardized method, for example, authenticating a customer or validating account details. Tools can also use natural language instructions to help accomplish their goals using the designated LLM.
To use a Tool, you add it to the desired Guideline or Task component for the AI Agent, as detailed here.
LLM Context or Session State?
While creating certain Tool types (e.g., the REST API Tool), you need to map the specific variables that a Tool instance will use to store and report related information.
In these cases, the Tools dialog enables you to choose between two different methods for mapping a variable:
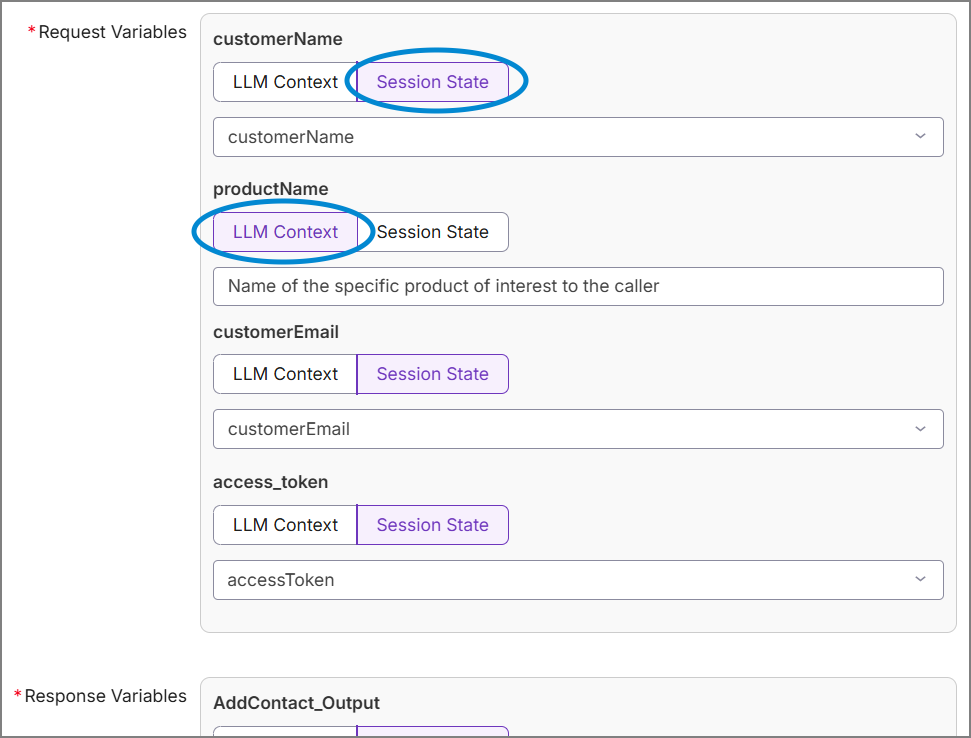 |
LLM Context - The variable value will be extracted from the caller's utterance or input and stored for use by the LLM. Examples: preferred product, credit or debit card.
When this method is used, you need to enter instructions in the accompanying text field to tell the LLM what to look for as the variable value and in what context. The advantage of this method is that the AI Agent can use a fully-customized variable value at runtime, without the need for pre-configuration.
Session State - You select the desired variable name from the list of pre-defined parameters stored on the Session State page.
The advantage of this method is that the AI Agent recognizes existing Session State parameter values and reuses them as required. For complete details on defining Session State parameters, click here.
Caution
Session State mapping must always be chosen for Response Variables used by REST API Tool types.
As shown above, you can use both mapping methods in the same Tool.
Click the AI Agent that will contain the Tool you want to add. The landing page for the selected AI Agent will be displayed.
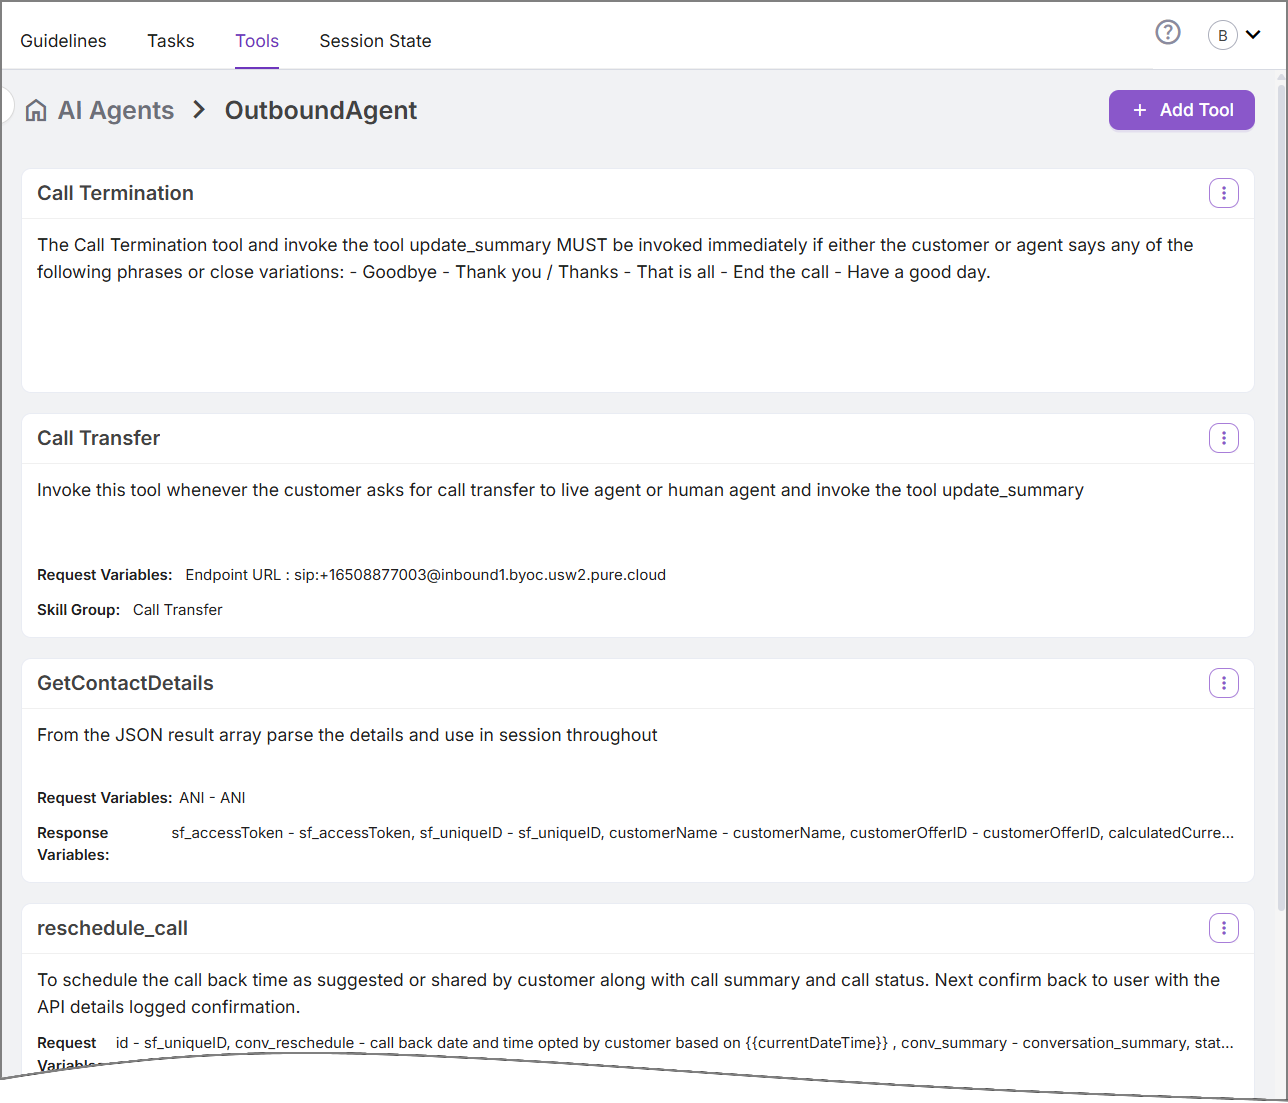
At the top of the page, click the Tools tab. The Tools page will be displayed, showing all of the Tool instances that already exist for the AI Agent:
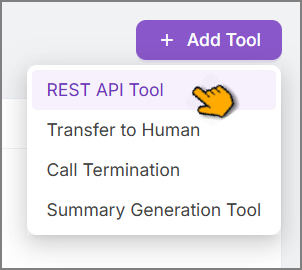
To create a new Tool instance, at the top right corner of the page, click Add Tool and select the desired Tool type from the dropdown list that is displayed:
Note
You can create multiple instances of each Tool type, based on the needs of the current AI Agent.
Complete the elements in the Add Tool dialog box according to the selected Tool type:
Tool Type
Field Name
Description
REST API Tool
Name
Enter a unique name for the new Tool.
API
From the dropdown list, select the API call that will be used for this Tool.
After selection, the dialog will present the chosen API's variables for configuration.
Important
Only API Integration Points that are pre-defined on the X-Platform will be displayed in the dropdown list. For details on creating and maintaining an API Integration Point, click here.
Instructions
Enter natural language text that will help the AI Agent understand when and how to use this API.
Request Variables
Assign the Variable value(s) that will be sent in order to execute the API call.
After selecting the API (above), the variable names relevant for the API will be displayed here.
For each variable that appears, choose one of the methods for mapping its value for purposes of this Tool, as detailed here.
LLM Context - The variable value will be extracted from the caller's utterance or input and stored for use by the LLM. Examples: preferred product, credit or debit card.
Session State - You select the desired variable name from the list of pre-defined parameters stored on the Session State page.
At the bottom of the dialog box, click Save. Your selected settings will be stored with the Tool.
Response Variables
Assign the Variable value(s) that will be received after executing the API call.
After selecting the API (above), the variable names relevant for the API will be displayed here.
For each variable that appears, choose one of the methods for mapping its value for purposes of this Tool, as detailed here.
LLM Context - The variable value will be extracted from the caller's utterance or input and stored for use by the LLM. Examples: preferred product, credit or debit card.
Session State - You select the desired variable name from the list of pre-defined parameters stored on the Session State page.
Caution
Session State mapping must always be chosen for Response Variables used by REST API Tool types.
At the bottom of the dialog box, click Save. Your selected settings will be stored with the Tool.
Transfer to Human
Name
The name of this Tool is provided automatically and is read only.
Instructions
Optionally enter natural language text to help the AI Agent understand when and how to use this Tool.
Request Variables
Assign a value for the transfer target:
Default URL. Enter the URL of the target telephony system.
Call Termination
Name
The name of this Tool is provided automatically and is read only.
Instructions
Optionally enter natural language text to help the AI Agent understand when and how to use this Tool.
Summary Generation Tool
Name
The name of this Tool is provided automatically and is read only.
Instructions
Enter natural language text that will help the AI Agent understand when and how to use this Tool.
Request Variables
From the Default Template ID dropdown, select the Summary template to use for generating the Summary.
Important
Only Summary templates that are pre-defined on the Administration Platform will be displayed in the dropdown list. For details on creating and using a Summary template, click here.
In the Default Version text box, if applicable, enter the Summary template version to use with this Tool.
From the Session State Template ID dropdown, select the Session State template to use for generating the Summary.
From the Session State Version dropdown, select the Session State version to use for generating the Summary.
Response Variables
The Summary variable name is provided automatically and is read only.
When finished, at the bottom right corner of the dialog box, click Create Tool. The new Tool will be created and added to the Tools page.
Editing a Tool
You can edit an existing Tool at any time.
On the right side of the Tool that you want to edit, click the Ellipse
 icon.
icon.Select Edit. The chosen Tool will be displayed for editing.
Make the necessary changes to the Tool.
When you are finished editing, at the bottom right corner of the dialog, click Save.
Deleting a Tool
You can delete a Tool at any time.
Note
You can only delete a Tool that is not currently assigned to an AI Agent Guideline or Task.
On the right side of the Tool that you want to delete, click the Ellipse
icon.Select Delete. A confirmation dialog is displayed.
From the confirmation dialog, click Delete. The selected Tool will be deleted and removed from the Tools page.
Deleting a Tool does not have any impact on the variables or components you have assigned to it.