Creating an AI Agent
Each AI Agent uses its Guidelines, Tasks, Tools and Session State components to achieve the results required by the AI Agent's specified business process.
From the Services section of the Administration Platform console, click Agentic Systems. The AI Agents page will open, displaying all AI Agents currently defined for the account.
At the upper right corner of the page, click + New AI Agent. The Create New AI Agent dialog box will be displayed:
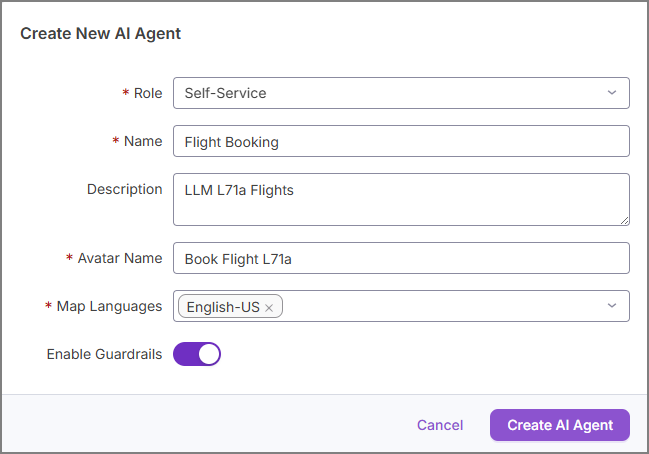
Complete all the elements in the Create New AI Agent dialog box:
Item
Description
Role
Select the specific Uniphore product or component that will use the AI Agent.
Name
Enter a unique name for the AI Agent.
Description
Provide some text that will help to identify the purpose or characteristics of the AI Agent.
Avatar Name
Enter a unique name for the AI Agent's avatar.
Map Languages
Select the initial Language to be used by the AI Agent. Additional languages can be added any time following AI Agent creation.
Enable Guardrails
Toggle this switch On to instruct the AI Agent to use topic Guardrails at runtime. For more details on how Uniphore Guardrails work, click here.
At the bottom right corner of the dialog box, click Create AI Agent. The new AI Agent will be created and added to the AI Agents displayed on the Agentic Systems page.
Note
Upon creation, a new AI Agent is also immediately available for use by Uniphore products.
Click the new AI Agent. The Guidelines page will be displayed.
Designing Guidelines
A Guideline defines the AI Agent's general behavior during the session. A Guideline includes the greeting, any required pre- and post-session actions, the primary objective of the AI Agent, and which knowledge base it uses to answer customer questions.
AI Agent Guidelines are written using natural language. They are presented to the active LLM as instructions at runtime to provide the critical knowledge and background needed by the AI Agent during a call or chat session.
You can personalize any text instruction in a Guideline (e.g., the AI Agent opening message) to include specific values that are relevant for the current session (such as the customer's name) by adding one or more pre-defined Session State parameters. To insert a parameter, enter an '@' at the location in the text field where you want to use the value. From the dropdown that appears, select the desired parameter. Only Session State parameters that have been pre-defined for the current AI Agent will be displayed in the list.
Click the desired AI Agent on the AI Agents page. The Instructions page for the selected AI Agent will be displayed:
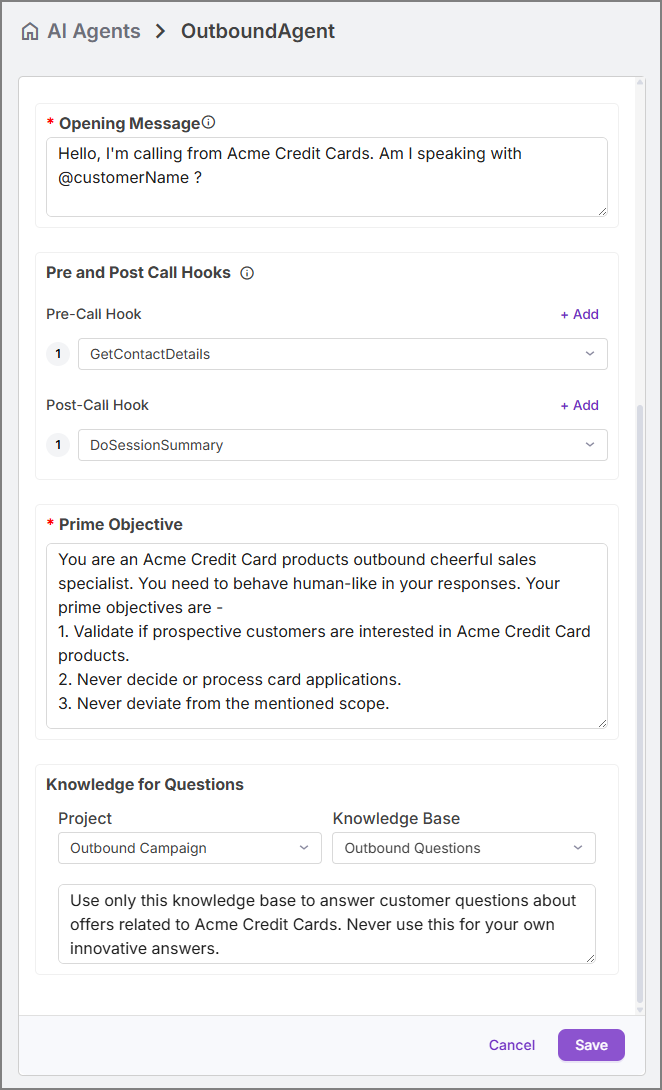
Enter the greeting to be used by the AI Agent in the Opening Message text field.
As noted above, you can personalize the greeting for each caller by inserting specific Session State parameters at relevant points in the text.
Important
The Opening Message greeting must be in the language that is assigned to the AI Agent.
Optionally, instruct the AI Agent to perform specific activities by assigning pre-defined Tools to Pre- and Post-Call Hooks.
Pre-Call Hook - Runs one or more assigned Tools at the start of the session, before a call is answered.
Post-Call Hook - Runs one or more assigned Tools immediately upon session completion, immediately after a call is finished.
To assign a Tool, click on the relevant dropdown and then select the desired Tool from the list that appears. Only Tools that have been pre-defined for this AI Agent will be displayed.
You can assign multiple Tools to the same Hook by clicking + Add at the upper right corner of the dropdown. At runtime, the Tools will be executed in the order they are listed.
To remove an already-assigned Tool from a dropdown, click the Trash
 icon found to the right of the Tool.
Important
A Tool must already be defined before it can be assigned to the AI Agent.
In the Prime Objective text box, enter the main prompt that will guide the AI Agent during the session, in accordance with the mapped LLM.
In simple natural language, describe the AI Agent's role and the key goals for this Guideline when it is run. This prompt should only relate to the activities of the currently-selected AI Agent. When required, describe the key restrictions for the AI Agent.
When the Uniphore Knowledge Layer is enabled for an account, the Knowledge for Questions mapping and instructions section will also be displayed on the Guidelines page. For more details on completing this section, click here.
When you are finished, at the bottom right of the page, click Save. The updated Instructions will be stored as a Guideline for the current AI Agent.
To exit the Guidelines page at any time without saving, at the bottom right of the page, click Cancel.
Adding Tasks
A Task specifies the outcomes to be achieved along with the steps that need to be taken by the AI Agent to achieve them during a call or chat session. For example: updating a customer's account details, finding a replacement flight, or filing an insurance claim. A Task is defined using natural language instructions and may also use one or more assigned Tools.
A Task leverages generative AI and other capabilities to identify the flow of events and data, and to execute the appropriate actions when required. Tasks use prompts that are processed at runtime, along with real-time data, by the designated LLM.
Note
In the current release, only one Task can be added to any AI Agent.
Click the AI Agent for which you want to add and design a Task. The landing page for the selected AI Agent will be displayed.
At the top of the page, click the Tasks tab. The Tasks page will be displayed, showing any Task that may already exist for this AI Agent:
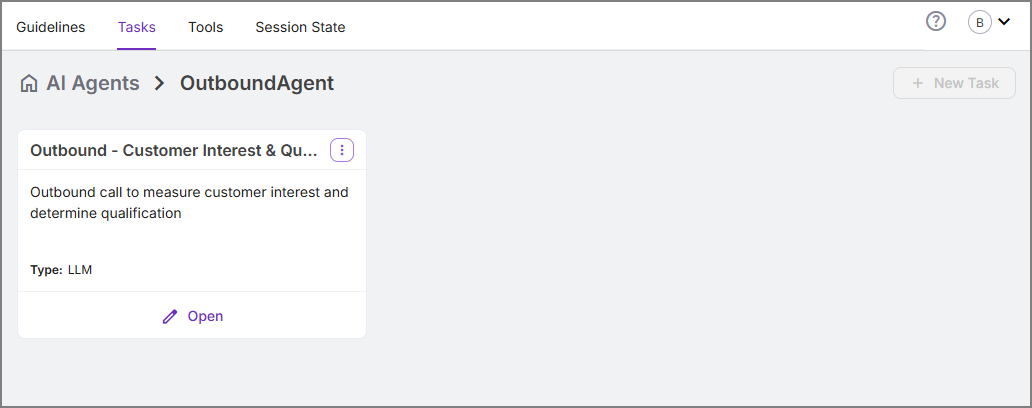
To create a new Task, at the top right corner of the page, click + New Task. The Create New Task dialog box will appear:
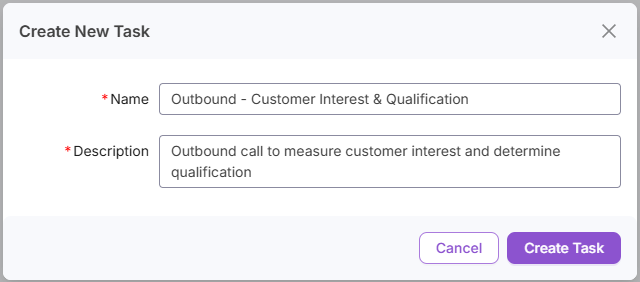
Complete the elements in the Create New Task dialog box:
Name
Enter a unique name for the new Task.
Description
Provide some text that will help to identify the purpose of the new Task.
At the bottom right corner of the dialog box, click Create Task. The new Task will be created and displayed.
Creating Instructions and Assigning Tools
Note
In the current release, only one Task can be added to any AI Agent.
To execute the appropriate actions, each Task uses a natural language text prompt, along with session data produced in real time. These components are processed at runtime by the designated LLM:
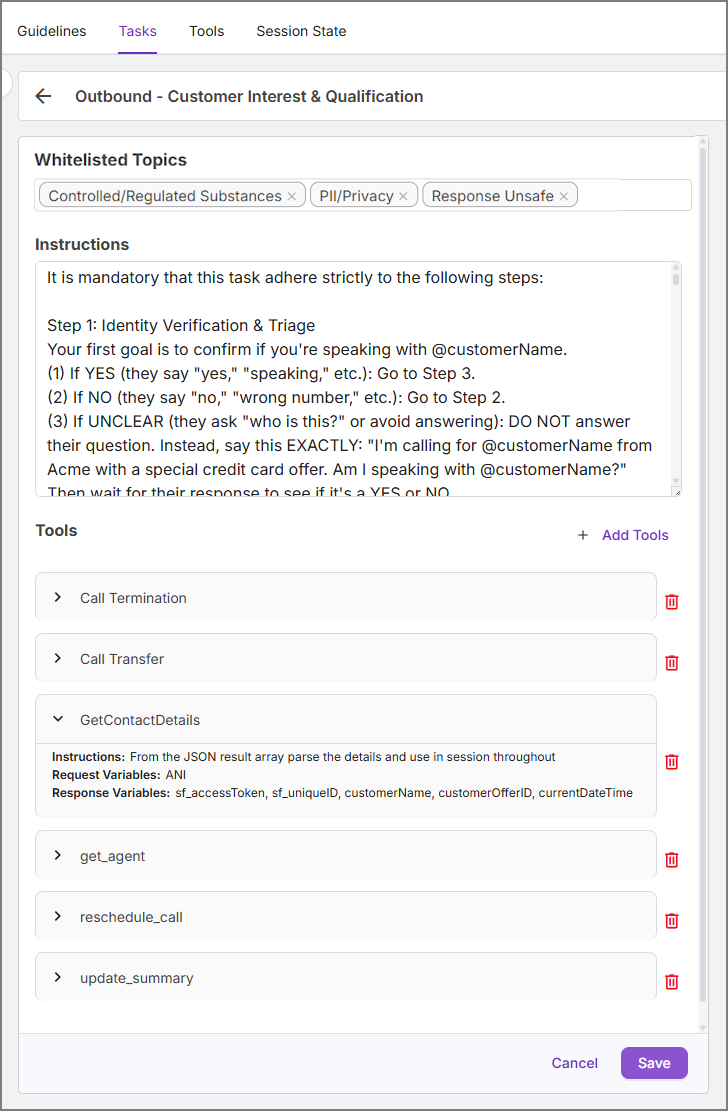
Optionally, from the Whitelisted Topics dropdown list, select one or more banned topics that should be allowed for use by this specific Task.
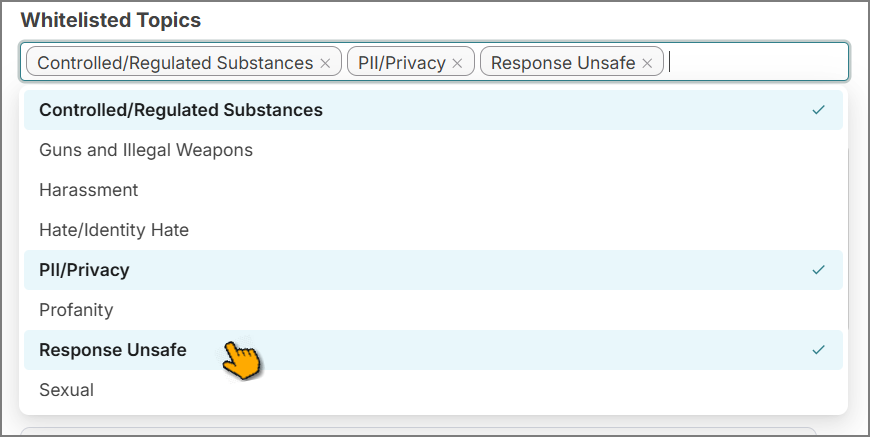
For more information about banned topic handling during a conversation, click here.
Tip
Topics are banned globally for a Uniphore account. We recommend that you consult with your Account Admin and other key stakeholders regarding which banned topics should be whitelisted for a specific Task in an associated AI Agent.
At its creation, a new Task contains an empty Instructions text field. Enter the prompt that will be processed by the designated LLM at runtime to determine which activities need to be performed and when.
In simple natural language, describe how this Task should proceed. As shown in the example above, you can provide basic procedures in the form of steps or lists. This prompt should only relate to activities specific to the current Task. At runtime, these instructions will be submitted to the LLM together with any Tools you have assign to the Task. Describe also any important restrictions for this Task, for example, what the AI Agent should never do, or any limits that must be placed on its activities while performing the Task.
You can personalize text instructions to include specific values that are relevant for the current session (such as the customer's name) by adding one or more pre-defined Session State parameters. To insert a parameter, enter an '@' at the location in the text field where you want to use the value. From the dropdown that appears, select the desired parameter. Only Session State parameters that have been pre-defined for the current AI Agent will be displayed in the list.
The exact content of your Instructions will depend largely on the goals you have set for the Task. In general, the more detailed your instructions are for the Task, the more information the AI Agent will have to perform its activities and the more predictable and repeatable its behavior will be at runtime.
Optionally, in the Tools section, click + Add Tools. Select one or more desired Tools from the dropdown list that appears:
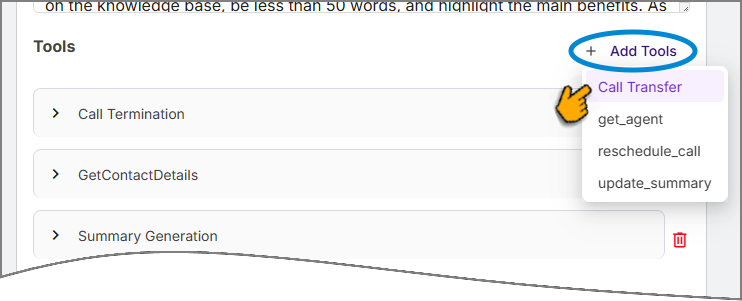
Each Tool you select is added to the Tools section. To view more details for a Tool, click the
 displayed on its left side. You can add the same Tool to multiple Tasks for the current AI Agent.
A Tool can be executed by its AI Agent whenever required. You can use the Instructions prompt to provide explicit details to the AI Agent about when to run a specific Tool you have assigned.
Note
The + Add Tools option will only be activated if one or more Tools already exist for the current AI Agent. For details on how to create Tools, click here.
When you are finished, at the bottom right of the page, click Save. The new or updated Task will be stored for the current AI Agent.
To exit the Instructions page at any time without saving it, in the upper left corner of the page, click the Exit  icon.
icon.
Editing a Task
You can change existing Task details or update Task components at any time.
In the upper right corner of the Task you want to edit, click the Ellipse
 icon and select Edit Task. The Edit Task Details dialog will be displayed.
Make the desired changes to the Task details. For information about Edit Task dialog fields, click here.
When finished, in the lower right corner of the dialog, click Save.
At the bottom of the Task you want to edit, click Open. The Task component details will be displayed.
Make the desired changes to the components and click Save. Your changes will be saved to the page.
Deleting a Task
In the upper right corner of the Task you want to delete, click the Ellipse
icon and select Delete Task. A confirmation message will appear.To confirm Task deletion, click Yes.
Using Tools
A Tool is a key component used in Guidelines and Tasks to perform pre-defined actions and operations based on specific instructions. A Tool enables the AI Agent to execute APIs, connect to external systems, fetch and push data, perform actions, and generate summaries.
You can assign multiple Tools to an AI Agent, greatly enhancing its efficiency and effectiveness. A Tool can be assigned to be run from a Guideline or a Task component, as detailed below.
The AI Agent currently supports a variety of Tool types for execution during a call or chat session. For the complete list of types, along with descriptions for each, click here.
Caution
You must create and define a Tool before it will be available for use by the AI Agent. For details on how to create Tools, click here.
All configured tools reside in the Tools panel for the AI Agent.
You can execute a Tool as a Pre- or Post-Call Hook for the AI Agent.
Open the specific Guideline where you want to use the Tool. The Guidelines page will be displayed.
From the Pre- and Post-Call Hooks section of the page, select and add the desired Tool to the relevant option:
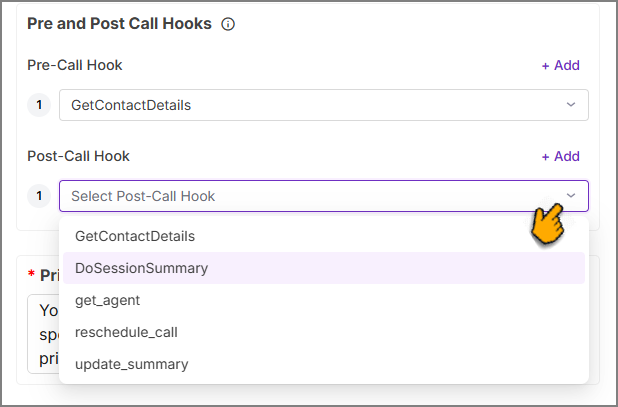
Pre-Call Hook - Runs one or more assigned Tools at the start of the session, before a call is answered.
Post-Call Hook - Runs one or more assigned Tools immediately upon session completion, immediately after a call is finished.
A finished call is indicated when its status changes to one of the following: Hang Up (when the caller ends the session), Transferred (when the session is transferred to a human Agent) or Ended (when the AI Agent ends the session).
In the current release, Chat session status cannot be changed to Hang Up.
Important
Only Tools that have been pre-defined for the current AI Agent will be displayed in the dropdown. For details on how to create Tools, click here.
You can assign multiple Tools to the same Hook by clicking + Add at the upper right corner of the dropdown. At runtime, the Tools will be executed in the order they are listed.
To remove an already-assigned Tool from a dropdown, click the Trash
icon found to the right of the Tool.When finished, in the lower right corner of the page, click Save. The new Tool assignment will be stored with the Guideline.
Open the specific Task where you want to use the Tool. The Instructions page for the Task will be displayed.
From the Tools section of the page, on the right side, click +Add Tools. A dropdown list will open, displaying all Tools that are currently available:
Important
The + Add Tools option will only be activated if one or more Tools already exist for the current AI Agent. For details on how to create Tools, click here.
Each Tool can be added to a Task only once.
To remove an already-assigned Tool from a dropdown, click the Trash
icon found to the right of the Tool.Click the desired Tool to add it to the current Instructions page.
In the main part of the Task, using simple natural language in the Instructions text field, describe when and how to use the Tool at runtime, as well as what to do after the Tool has executed.
When finished, in the lower right corner of the page, click Save. The new Tool assignment will be displayed in the Tools section.