Configure Telephony Agent
This article describes how to configure a Telephony Agent after it has been created. It covers agent configuration, Customer Experience settings, phone number mapping for call routing, speech settings, linking tools, creating and linking knowledge bases, and adding skills. You can simulate live calls based on the configuration and evaluate against test scenarios.
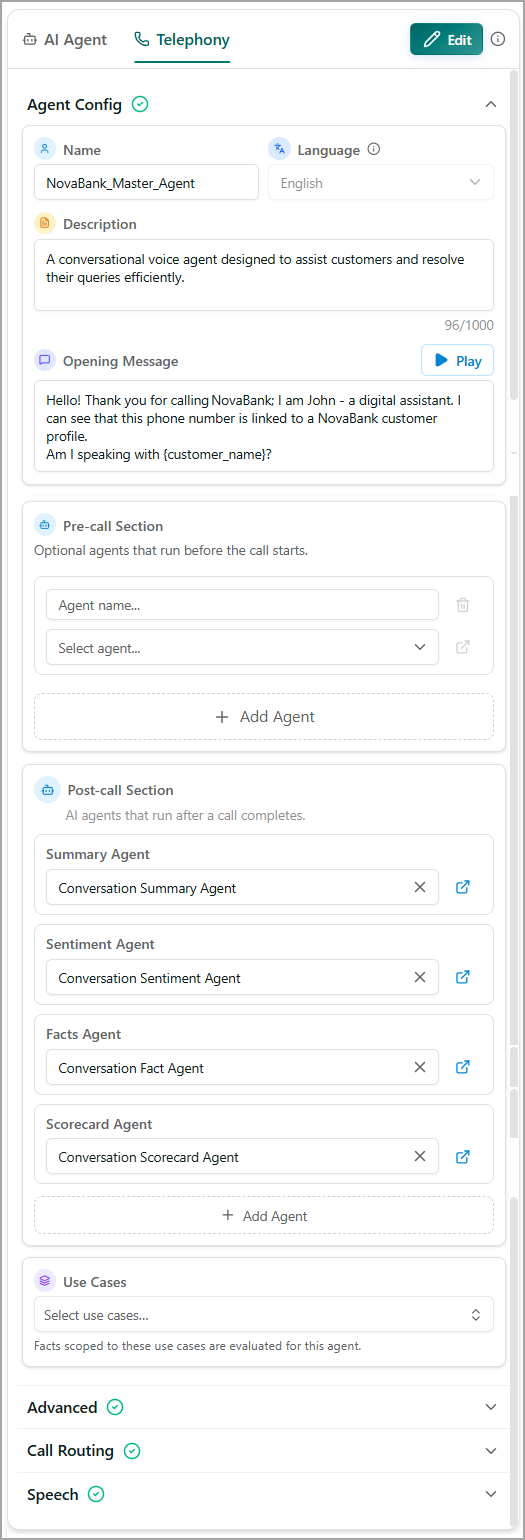
To Configure Telephony Agent:
Upon creating a Telephony Agent, the configuration page opens. Otherwise, you can also select a Telephony agent from the Agent studio and click Configure.
Ensure the Telephony tab is selected.
In the Agent Config section, you can modify the Name and Description. Add Opening Message and click Play to listen to the message.
In the Pre-call section, configure optional agents that run before the call starts.
Click + Add Agent.
Enter an Agent name and select an existing agent from the Select agent dropdown.
Click the External link icon to open and review the selected agent's configuration.
Click the Delete icon to remove the pre-call agent entry.
In the Post-call section, configure AI agents that run automatically after a call ends. These agents typically process and analyze the completed conversation. The following agent roles are pre-populated:
Summary Agent - Generates a summary of the call.
Sentiment Agent - Analyzes the emotional tone of the conversation.
Facts Agent - Extracts key facts from the conversation.
Scorecard Agent - Evaluates the conversation against a defined scoring rubric.
Click + Add Agent to add optional agents that run after a call ends. The Select agent dropdown lists only AI agents that were assigned the Post-call agent capability during AI agent creation.
Based on the configured post-call agents, AI-generated insights from the completed conversation are displayed on the Conversation Details screen. These insights can include the conversation summary, customer sentiment, key facts, scorecard results, and other insights generated by custom post-call agents. For more details, refer to Conversation Details.
In the Advanced section, you can configure Customer Experience settings and adjust Speech Quality Standard.
In No input time out, enter the time in seconds that the agent waits for the user's input. If no input is received within the specified time, the agent plays the No Input Prompt. You can set a value between 6 and 120 seconds.
In Number of retry attempts, enter a value between 1 and 5 to specify how many times the agent plays the retry prompt before proceeding.
In the Tool to execute after max retry attempts, select the action to execute after the maximum number of retry attempts is reached. By default, Call Termination is displayed. In case you want to add a different tool, you need create them in Flows. After you create, it is also available for selection. To learn about Flows, click here.
Enable Speech Barge-In to allow the users to interrupt the AI Agent while it is speaking.
Enable DTMF Barge-In to allow the user to interrupt the AI Agent by pressing a key on the phone. The user input provided during an AI agent's response will be processed.
Enable Background Ambient Sounds to play ambient background sounds during the call, creating a more natural conversation experience.
In Volume for Background Ambient Sounds, you can adjust the volume level of the background ambient sounds between 0.3 to 1.0.
Enable Agent Thinking Sound, to play a sound effect while the agent is thinking or processing a response.
In Volume of Agent Thinking Sounds, you can adjust the volume level of the agent thinking sounds between 0.5 to 1.0.
In the Speech & Audio section, you can set the Speech Quality Standard. By selecting a standard, you can define the TTS response's speed and voice quality. The Speech Quality Standards that are currently supported are:
Instant: This requires minimum processing time, and the response has the lowest latency. When selected, the STT accuracy and TTS naturalness are reduced. This shows aggressive pre-emptive speculations which means the LLM is called many times per turn. This standard is best for ultra-responsive, time-critical applications like real-time IVR.
Fast: The output has slightly improved STT transcription accuracy and TTS prosody over Instant. This shows pre-emptive speculation still occurs, so the LLM is called multiple times per turn, but less frequently than Instant. This standard is good for interactive voice flows where speed still matters.
Balanced: This default standard provides an optimal balance between latency, speech recognition accuracy, and voice naturalness. In this, pre-emptive speculation is limited, so the LLM is called fewer times per turn compared to Fast. This standard is recommended for most production deployments.
Relaxed: This enhances STT accuracy and provides richer TTS intonation. There is no pre-emptive speculations as the LLM is called once per turn. This standard is suitable when voice quality is a key differentiator. Enhances STT accuracy and provides richer TTS intonation. The LLM is called only once per turn, eliminating preemptive speculation. This setting is suitable when voice quality is a key priority.
Leisurely: The response will have the highest fidelity with best-in-class transcription accuracy and most natural speech synthesis. There is no pre-emptive speculation as the LLM is called once per turn. This standard is used when a premium, human-like voice experience is required.
In the Call Routing section, you need to configure the following:
Add DID Numbers (Direct Inward Dialing numbers) assigned to this agent for receiving inbound calls. The phone numbers configured in Setup > Phone integration are available for selection. Each DID number can be assigned to only one agent and cannot be assigned to multiple agents. For more information about adding a DID number, refer to Phone Integration.
Configure the CIDR Blocks of the source telephony systems. If one or more CIDR blocks are specified, only SIP requests originating from those IP ranges are allowed. If no CIDR blocks are configured, SIP requests from all sources are allowed.
In SIP Header Mapping, map incoming SIP headers to session state variables that the agent can use during conversations. Click + Add Mapping to enter SIP Header and Session Variable.
In the Speech section, you can add Speech to Text and Text to Speech configurations.
Select the ASR Engine (Automatic Speech Recognition) for voice input processing. Currently supports Deepgram only.
Select the TTS Provider from the dropdown. Currently supports Cartesia only.
Adjust the Speech Speed of the Agent. This controls how fast the agent speaks. You can set the speed between 0.6x and 1.5x. 1.0 is normal speed.
In Voice Expressiveness, you select the emotional tone of the speech. The available options are Neutral, Calm, Content, Excited, Sad, Angry, and Scared. The default tone is Neutral.
In Volume, you can adjust the loudness of the agent's voice. The available range is between 0.5 and 2.0, and 1.0 is the default level.