Shared With Me
The clips and playlists that others have shared with you are displayed here. It is grouped in three tabs as follows:
All: Shows all the clips and playlists that are shared with you (default tab)
Clips: Shows only the clips that are shared with you
Playlists: Shows only the playlists that are shared with you.
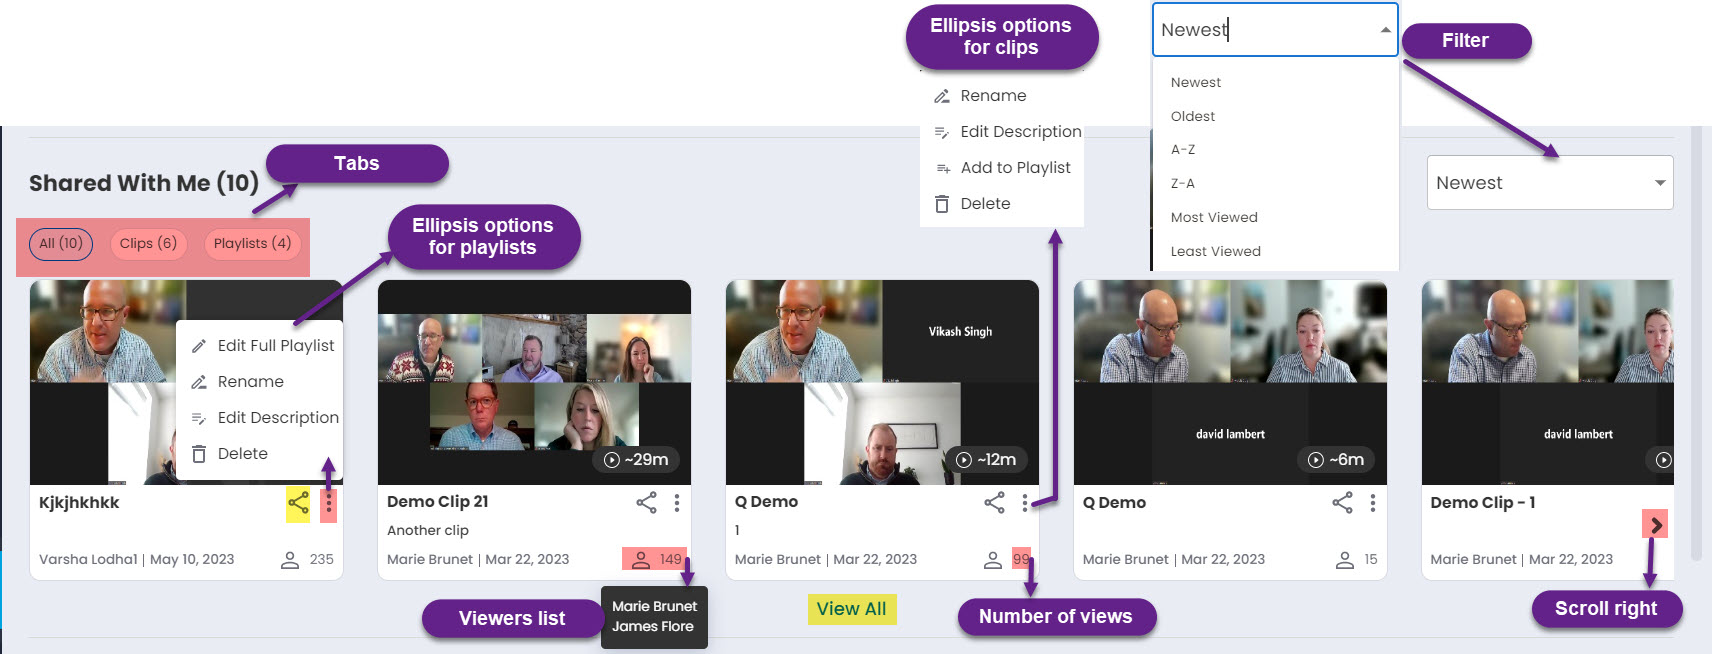
Click on the clip/playlist video icon to view the clip/playlist.
Important
A playlist video icon shows the number of clips it contains superimposed on it and thus helps to differentiate a playlist from a clip.
Filter
They can be filtered by Newest, Oldest, A-Z (Ascending order), Z-A (Descending order), Most Viewed, Least Viewed.
Playlist
If you click on a playlist, the playlist window is displayed with the first clip of the playlist selected by default and shows its details. You can click a clip to select it and view its details. The clip list on the right of the playlist is arranged in descending order of duration of the clip. The name of the playlist is displayed at the top left corner along with the date of creation (MMM DD, YYYY format).
Playlist Replay Window
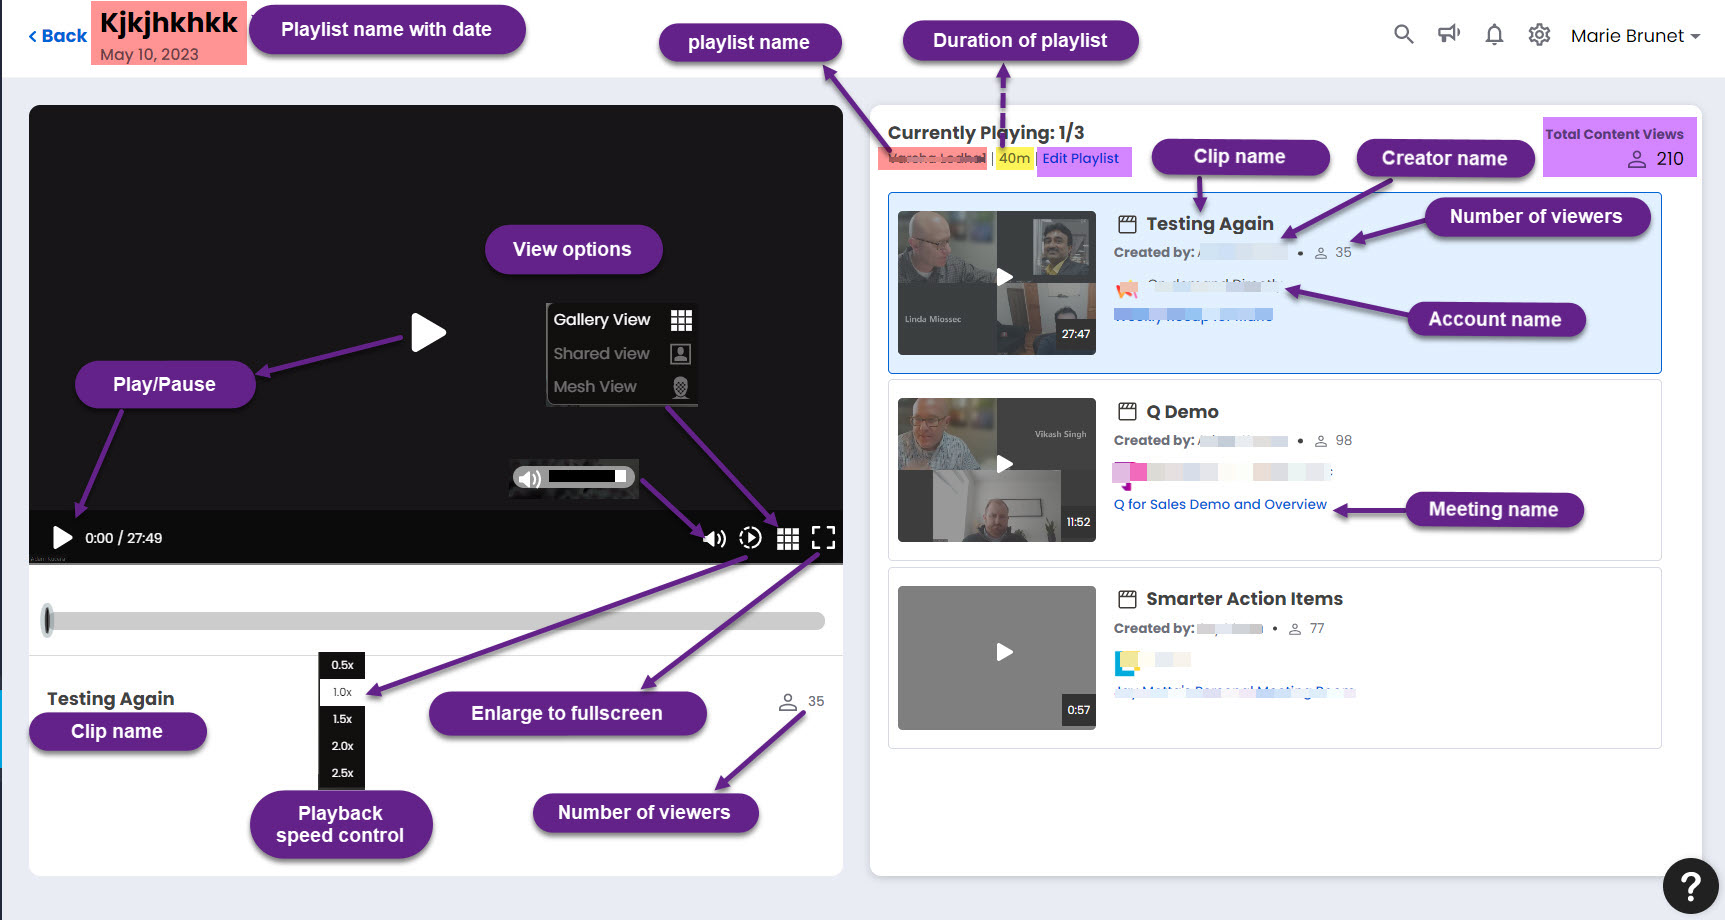
The video replay pane on the left contains:
Play/Pause buttons
Volume control
Playback speed control
View options (Gallery View, Shared View, and Mesh View)
Enlarge to full screen
Clip information (Clip name, and number of viewers).
The clip list on the right contains:
Edit Playlist button: Click on this button to view the edit playlist window. See Edit Playlist for details.
Clip name
Created by: The clip creator name
Total Content Views: The total number of times the playlist content (clips) was viewed
Number of viewers
Account name
Meeting name
Edit Playlist
Click the Edit Playlist button. The edit playlist window opens up as follows.
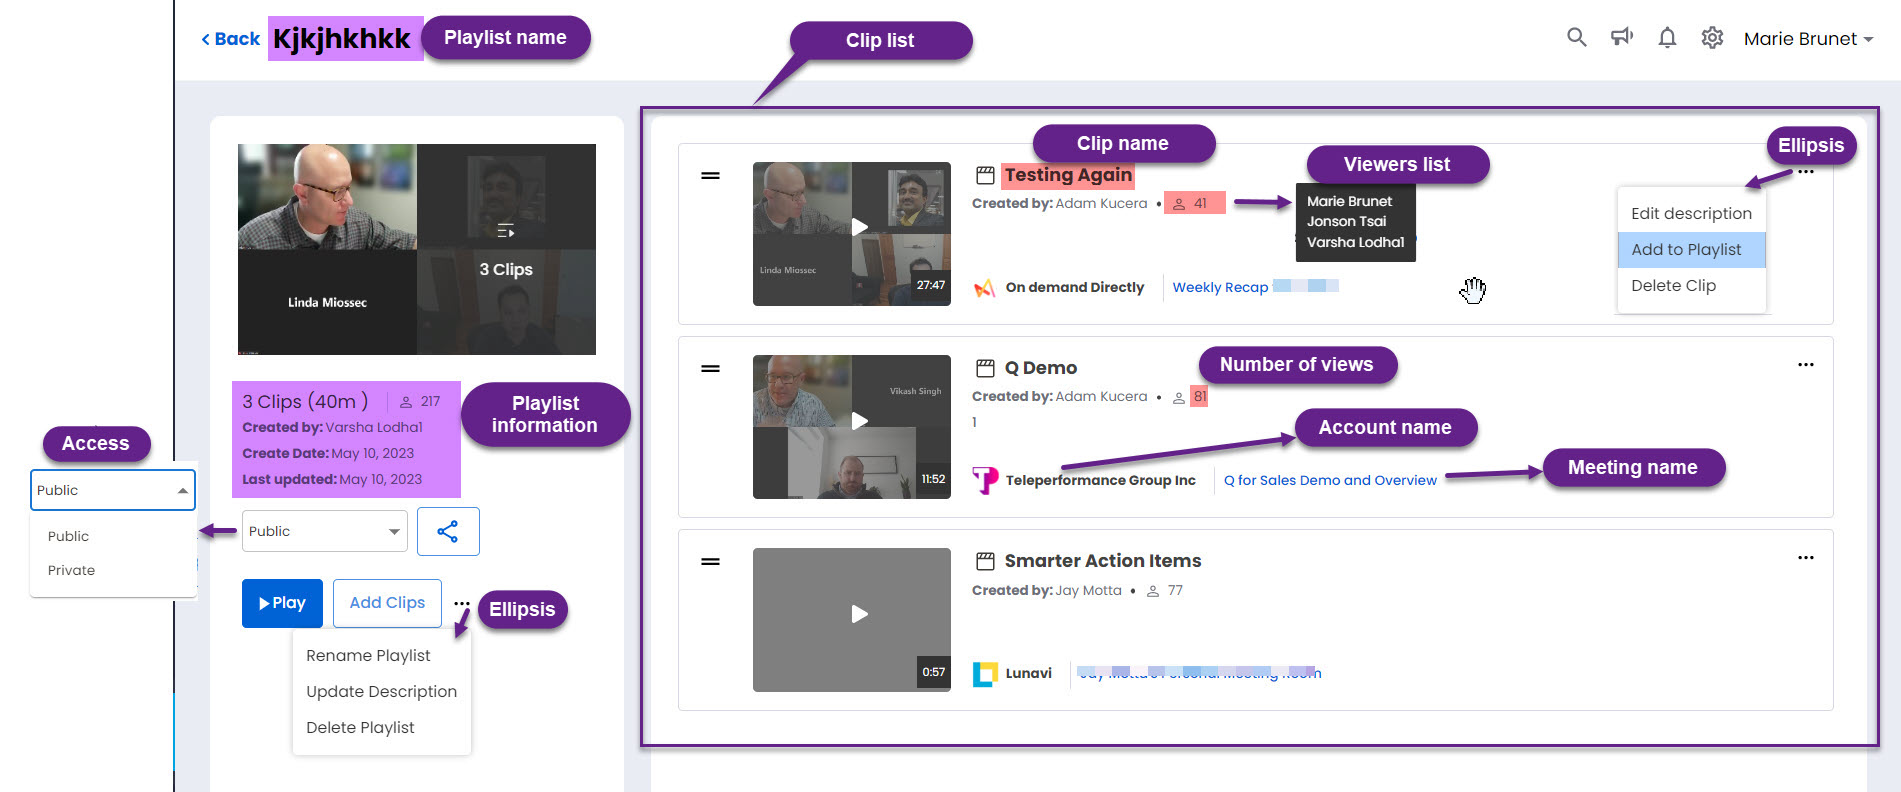
The information that follows is displayed in the edit playlist window:
Playlist name: the name of the playlist
Playlist Information: Number of clips, approximate total duration of all the clips (in HH:MM:SS format), Created by (Creator name), Create Date, Last updated (date last updated in MMM DD, YYYY format)
Access: Allows to change the level of access. Click to view the drop down and select either Public or Private. If you select Public all the app users can view the playlist. If you select Private only you and with whom you have shared can view the playlist.
Share Icon: Allows to share the playlist. When you click the share icon the Share Settings window opens up.
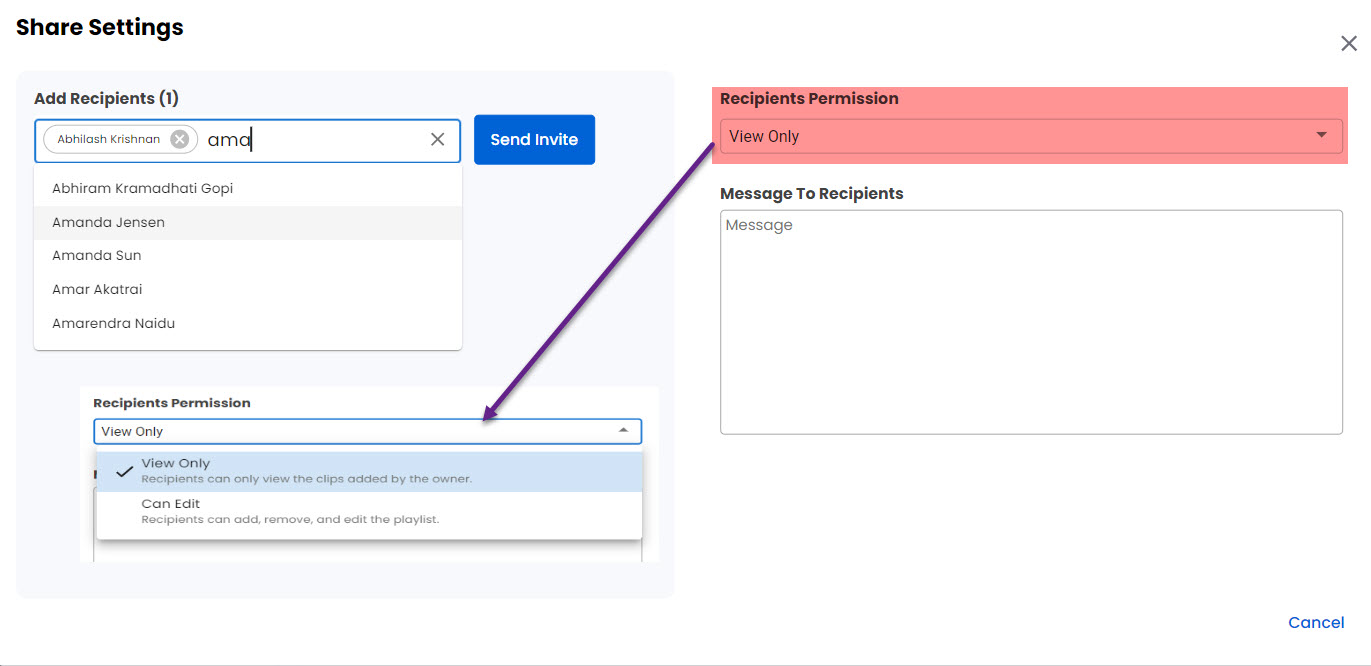
Click the Add Recipients dialogue box and choose the recipients from the available list or type in the recipient's name to choose. You can click the cancel icon next to a recipient to remove the recipient. You can click the cancel icon at the extreme right to remove all the recipients in one go.
Click the Recipients Permission dropdown and select either View Only or Can Edit as required. If you select View Only the recipient(s) can only view the playlist and can't do any other actions. If you select Can Edit the recipient(s) can view, add, remove, and edit the playlist.
Add a message in the Message To Recipients dialogue box to share any relevant information along with the clip. This is not mandatory.
Click Send Invite button to share the playlist or click Cancel button if you wish to discontinue sending the invite.
When you click the Send Invite button a mail is sent to the recipient with the link to the playlist. After the invite is sent a success message pops out at the upper right corner.
Play button: Click Play button to replay the clip.
Add Clips: Click to add clips. When you click, the My Library window pops out.
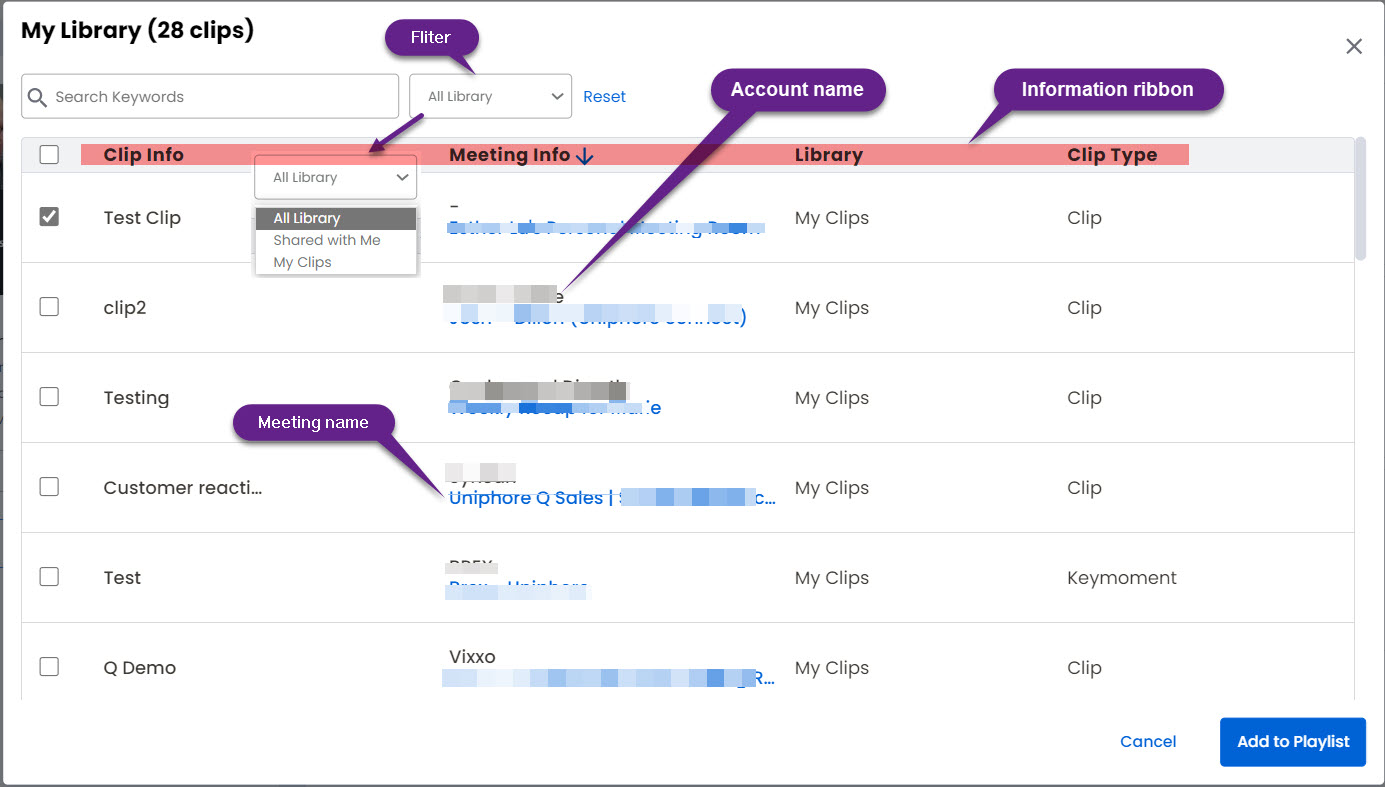
Search Keywords: Type a keyword to search for a clip.
Filter: From the filter drop down select either All Library, Shared with Me or My Clips.
Information ribbon: Shows the information that follows:
Clip Info: The name of the clip. Select a check box next to a clip to select a clip or select the check box next to the Clip Info to select all the clips in one go.
Meeting Info: Shows the meeting name and the account name. The clips are arranged in an ascending alphabetical order (Ato Z) of the meeting name. Click the meeting name to view the Meeting Replay page Left Pane – Video Area and Controls.
Library: The type of the library such as My Clips or Shared with Me
Clip Type: Shows the information whether it's a clip or a key moment.
Add to playlist: Click it to add the clip(s) to the playlist after you have selected the desired clip(s).
Ellipsis Icon: Click on the horizontal ellipsis icon to view the edit playlist options. The options are Rename Playlist, Update Description, and Delete Playlist.
Clip list: The clip list shows the information that follows:
Clip Name: The name of the clip
Created by: The name of the app user who created the clip.
Viewers List: Lists the names of the users who have viewed the clip. Hover above the icon or the numeric value to view the list.
Number of Views: Shown as a numeric digit of the number of views of the clip. A single user may view the clip multiple times. Hence, the number of views may be much greater than the number of viewers.
Ellipsis: Click the horizontal ellipsis icon to view the edit options. The options are Edit description, Add to Playlist, and Delete Clip.
Account Name: The name of the account associated with the clip.
Meeting Name: The name of the meeting associated with the clip. Click to view the Meeting Replay page Left Pane – Video Area and Controls.
Clip Replay Window
If you click on a clip video icon from the list of clips/playlists the replay window pops out as shown below:
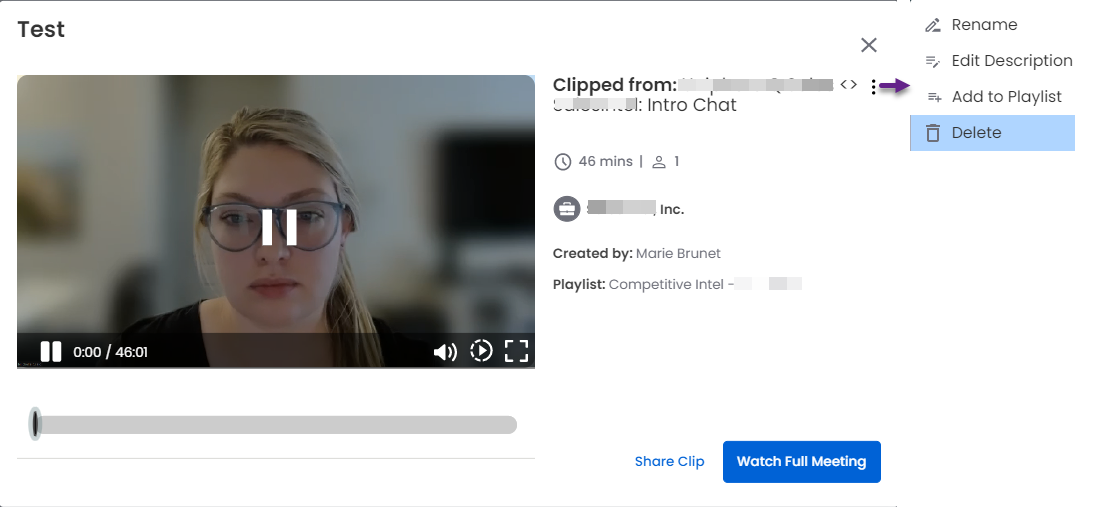
Click on Watch Full Meeting to view the full meeting in the Meeting Replay page Left Pane – Video Area and Controls.
Click on Share Clip to share the clip either inside organization or outside organization as shown below:
Click on the vertical ellipsis icon to Rename, Edit Description, Add to Playlist, Delete.
Click on share icon to share the playlist/clip. If you click the share icon of a playlist the Share Settings window pops out as shown below.
Share Clip
If you click the share icon of a clip the Share Clip window pops out as shown below.
Share Clip: To share inside organization
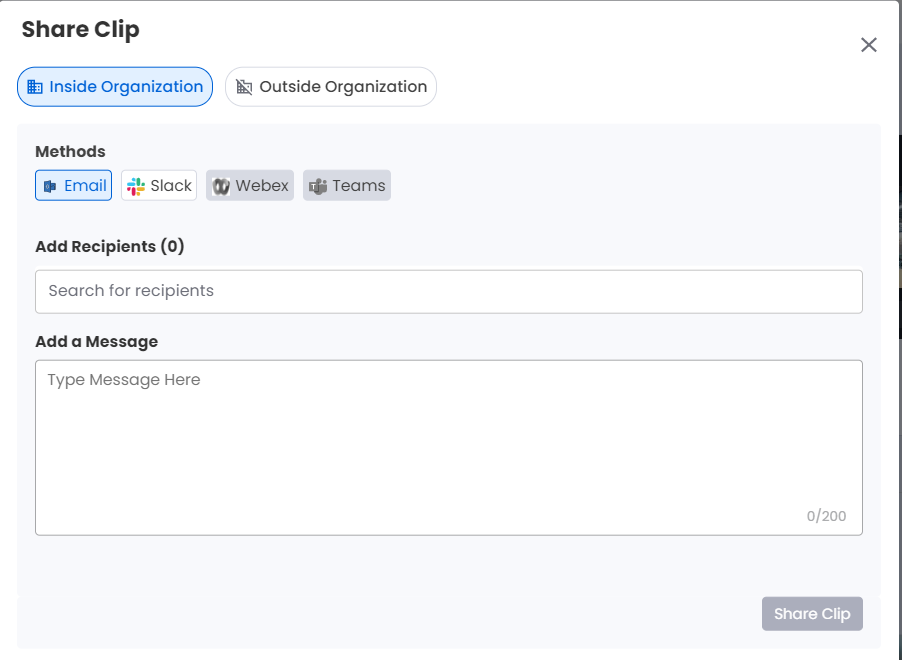
Click and choose either of the Methods (Email, Slack, Webex or Teams).
Click Add Recipients and choose the recipient(s) from the drop-down list or type the recipient's name to select. To deselect a recipient, click the clear icon near the recipient's name. To deselect all the recipients in one go, click the clear icon at the right of the Add Recipients search box.
Type the message in the Add a Message dialogue box if required (this is optional).
Click Share Clip.
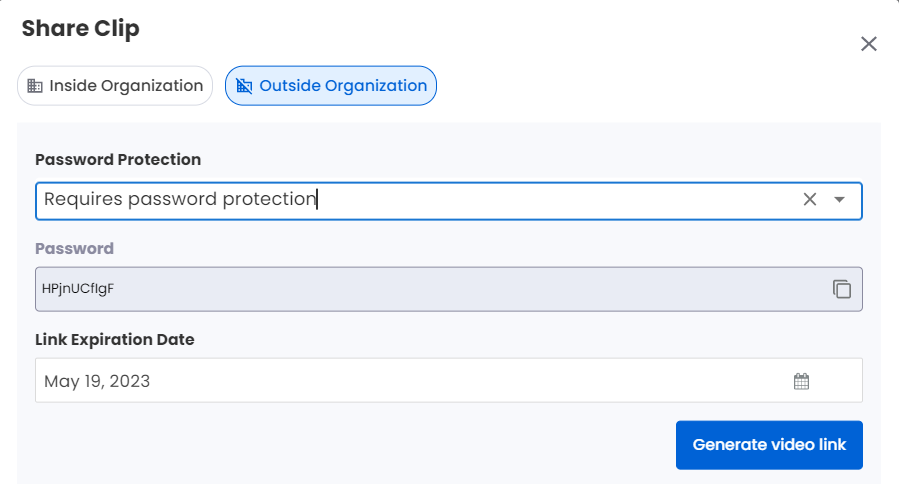
Share Clip: To share outside organization
Select the desired option from the Password Protection drop-down. You can choose any one of the options from the drop-down. The options are:
Requires password protection: For this option, the viewers will need to enter a system generated password to view the clip. When this option is selected a system generated password dialogue box appears below the Password Protection drop-down. It is non-editable. You can click the copy icon on the right of the dialogue box to copy the password
Open access: For this option, anyone with the link can have viewing access to the clip
Click the calendar icon in the Link Expiration Date to choose the expiration date. The date succeeding the current date is selected by default for link expiration.
Click Generate video link to create a link of the clip. The Link dialogue box appears below the Generate video link button. You can click the copy icon on the right of the dialogue box to copy the link.
View All
Click View All at the bottom to view all the clips and playlists that are shared with you.