Organization Hierarchy and Communication Recording Agent
Note
Within the Organization Hierarchy there are users, groups and subgroups. These groups and subgroups can be paired with claims in Access Policies, to allow various access permissions to calls using specified filters - See Access Policies for more information on understanding and managing Access Policies.
If access policies are configured to provide access to groups in your Organization Hierarchy, then adding users to your Organization Hierarchy groups will give those users access automatically. While this offers powerful automated access control, account administrators should be conscious of the access they can grant by adding users to groups in the Organization Hierarchy.
Viewing and updating your Organizational Hierarchy is simple. This topic describes the steps to update your Organization Hierarchy manually (Add users, groups, and/or subgroups to your Organization Hierarchy). If syncing is enabled, changes made to your groups in your directory are reflected in Administration Platform when the system syncs.
To View Your Existing Organization Hierarchy:
Go to Administration > Users & Accounts > Organization Hierarchy to display the following page:
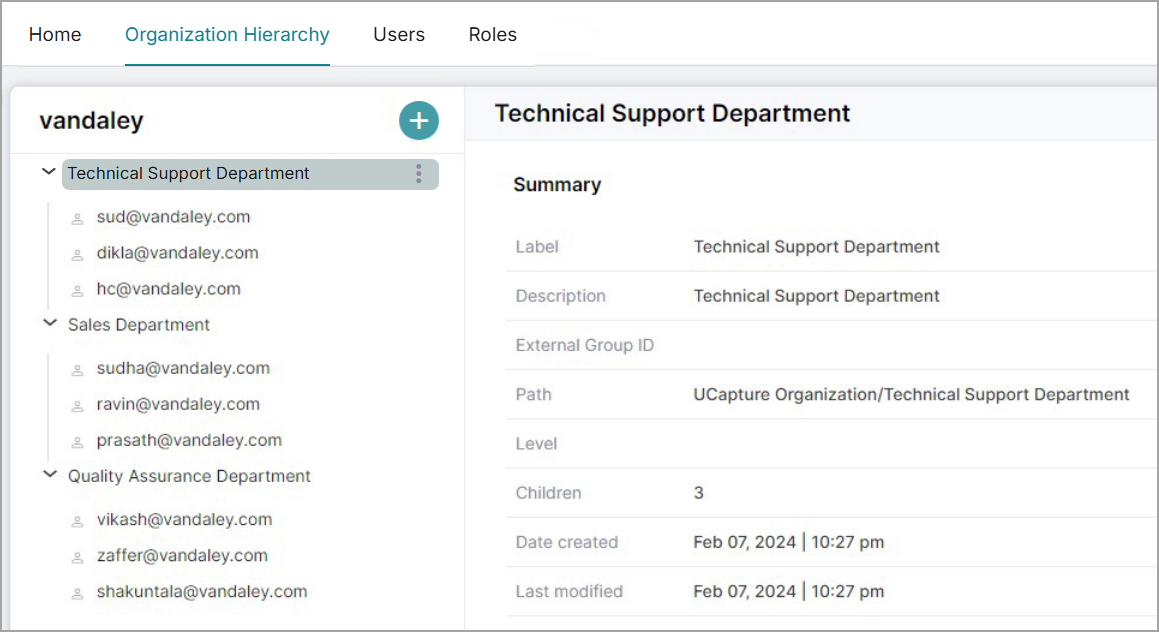
From here, see your groups (Nodes), subgroups (child Nodes), and users in your Organization Hierarchy. Click the arrows to expand and hide the Nodes to see the users in each.
Click on a node to open a Summary pane where you can see the following details:
Node ID: Unique identifier for each Node (auto-generated).
Label: Name of the Node (mandatory field).
Description: A brief but useful description about the Node (mandatory field).
External Group ID: The organization Identifier available for the node if the group is synced with an external directory (synced).
Path: The path of the node, where the Node sits in the Organization Hierarchy, for example: UAnalyze NG/Node1/Child1(auto-generated).
Level: The level at which the Node sits in the Organization Hierarchy (determined when the node is created).
Children: how many children (sub-groups and users) are in the Node (auto-generated).
Date created: Data and time for when the Node was created (auto-generated).
Last modified: Date and time for when the Node was last updated (auto-generated).
If your users and groups are synced with an external directory, your Organization Hierarchy is updated automatically when changes are made to the directory and synced with the system. As mentioned previously, users can be added and updated manually. The steps below outline the process to add groups (Nodes) and subgroups (Child nodes) manually.
To Add Groups (Nodes) and Subgroups (Child Nodes) to your Organization Hierarchy Manually:
Go to Administration > Users & Accounts > Organization Hierarchy to view your existing groups/subgroups/users structure.
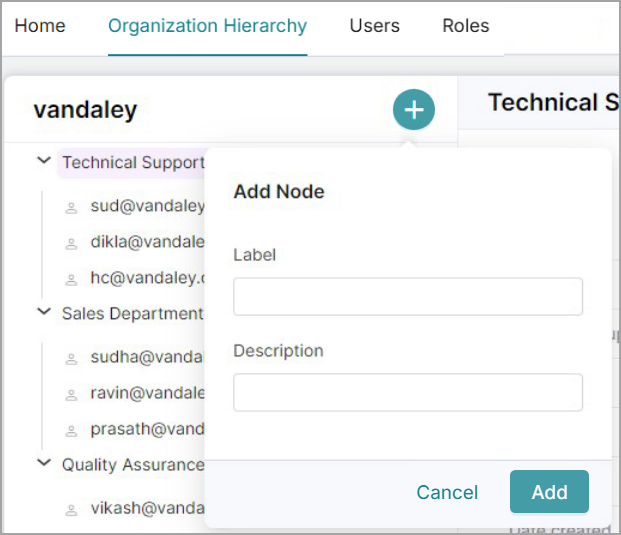
To add a group at the highest level, click the + next to your Organization name, then enter a Label (name of the Node/group) and Description (useful description for the Node/group), then click Add.
To add a subgroup under a Node, click the node that you want to add a subgroup/child node to, then click the Ellipsis
 menu to the right of the node label, click Add Child, then enter a Label and Description, then click Add.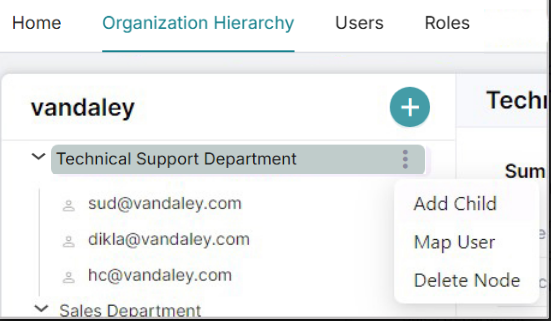
To add users to either a node/group or subgroup/child node, select the node by clicking the node that you want to add a user to, click the Ellipsis
menu to the right of the node label, click Map User (this presents a list of un-mapped users that you can add to your group), select a user from the list and click Add User.
From time to time, you may need to remove groups, subgroups, and/or users from your Organization Hierarchy. The easiest way to remove a user's access is on the Users page. See Deactivate or Delete Users for more information on quickly removing user access. If your groups/users are synced from an external directory, changes in your directory are reflected in your Organization Hierarchy when the system syncs. However, you may have groups, subgroups, and or users that are not synced with your directory. The steps below outline the process to remove groups, subgroups, and/or users from your Organization Hierarchy manually.
Note
Changes made to areas of your Organization Hierarchy that are synced with an external directory may be undone when the system syncs.
To Remove Groups, Subgroups, or Users From Your Organization Hierarchy Manually:
Important
After you delete a group, if you still have the external group syncing with your External Directory Services, the group is recreated when the system syncs with your directory. Ensure that the group is either removed from the synced directory or deselected in your sync settings to avoid the group being recreated in Administration Platform. For information on editing your sync settings, click here.
Go to Administration > Users & Accounts > Organization Hierarchy to see your existing groups/subgroups/users structure. From here, you can see your groups (nodes), subgroups (child nodes), and users in your Organization Hierarchy. Click the arrows to expand and hide the nodes to see the users in each.
Find the group, subgroup, or user that you want to remove, click on the object to select it, then click the Ellipsis
menu.Click Delete Node.
This opens a confirmation box for you to confirm that you want to delete the group, subgroup, or user. Deleting a group or subgroup removes any child groups/nodes and children from the Organization Hierarchy. Click Yes, delete node to confirm.
Warning
Deleting a Node (group or subgroup) removes any child groups/nodes and children from the Organization Hierarchy. There is no undo for this action.