Data Preparation
Data Preparation is where you transform raw, unstructured data into organized, standardized information ready for AI use and reliable search, retrieval, and decision-making.
Business AI Cloud automates this process before your data enters a knowledge base. The platform scans your data sources, identifies key information, and structures it into standardized formats across all sources. By the time your data reaches a knowledge base, it is fully organized, enriched, and optimized for accurate search and retrieval, giving your AI operations a reliable, high-quality foundation to work from.
To access this page, go to the home page and select Data Ingestion.
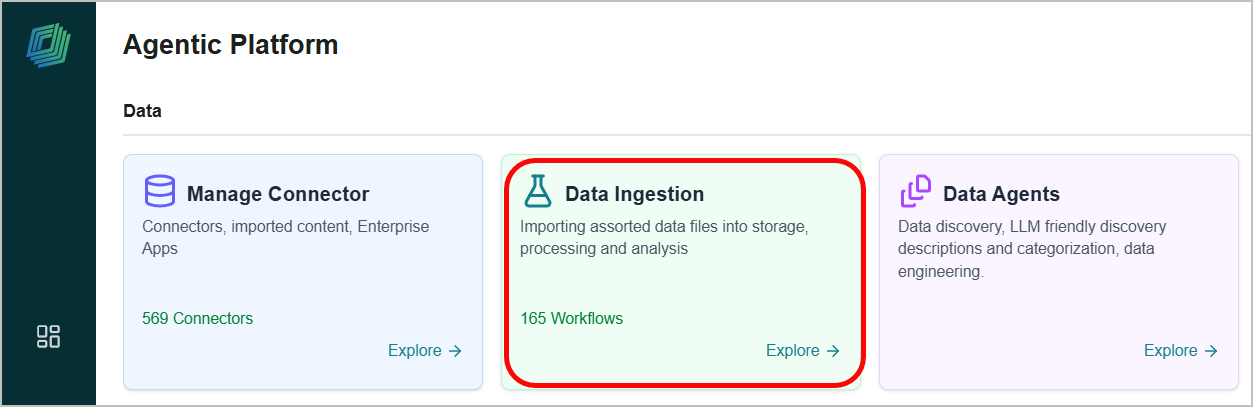
You can view the following information on the Data Prep tab:
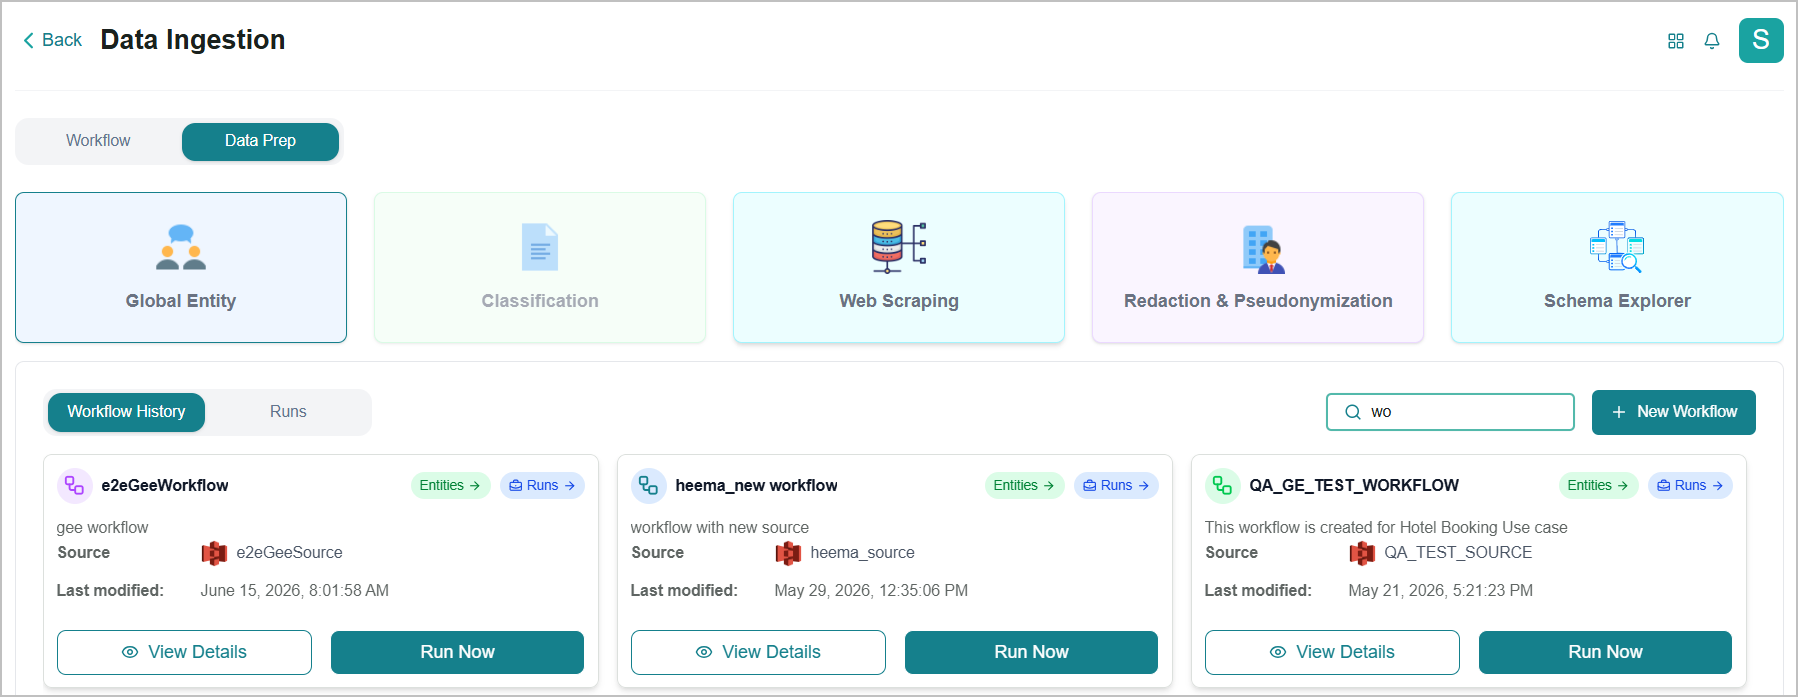
Global Entity - Use this option to define and manage entity labels for your KBs. Global Entities Extraction autonomously identifies key information elements appearing consistently across your knowledge base, ensuring standardized entity recognition and classification throughout your data sources.
Classification - This is an on-demand feature and is not enabled by default.
Use this option to automatically organize identified entities into predefined categories and taxonomies. Assign entities to relevant classes based on their characteristics, enabling structured data organization that improves search accuracy and facilitates targeted information retrieval across your AI operations.
Web Scraping - Use this option to automatically extract and ingest data from specified websites into your KBs. Configure web scraping to navigate web pages, extract relevant content, and transform online information into structured data for AI processing.
Redaction & Pseudonymization - Use this option to automatically remove sensitive information or replace sensitive identifiers with artificial substitutes from your data before it enters your KBs. Identify and redact or pseudonymize confidential content, such as personal identifiers, financial data, or proprietary information, ensuring compliance with privacy regulations while preserving the data's utility.
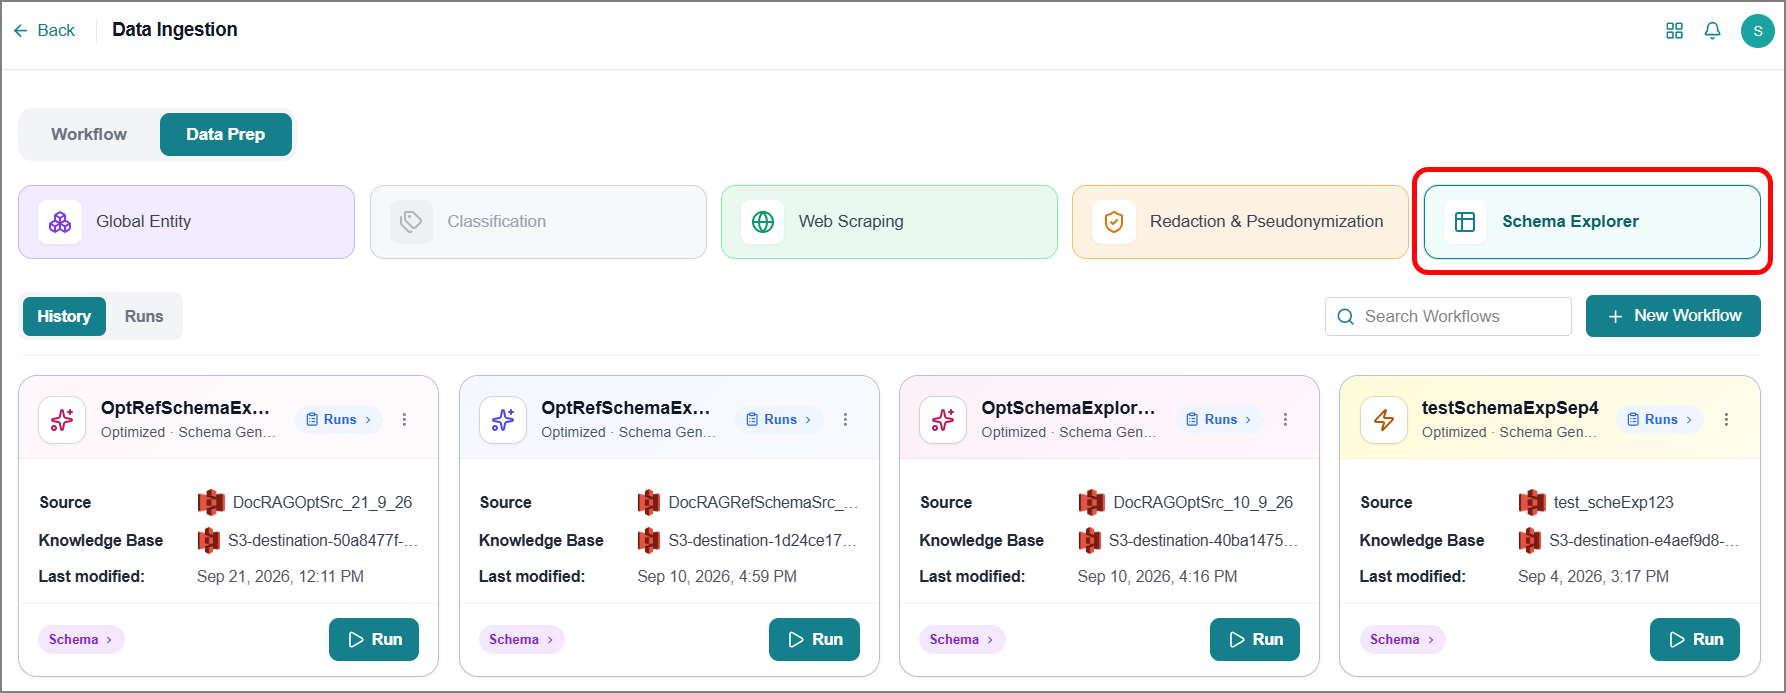
Schema Explorer - Use this option to automatically generate a schema from your source documents. The platform reads your documents, identifies key fields and data patterns, and builds a structured template you can review, refine, and promote for use in your data workflows.
Global Entity is a system that creates and maintains a master reference library of entity labels extracted from your data sources, establishing standardized entity definitions during data extraction. It ensures consistent entity recognition and classification throughout all data processing operations, improving AI accuracy, reducing duplication, and enabling reliable entity-based search, RAG, and analytics across the platform.
The Business AI Cloud platform helps extract entity labels from your source before ingestion, stores them as a global reference library, and then uses this library to enrich all subsequent data by consistently matching and standardizing entities across Knowledge Bases.
To access this feature, go to the Home page > Data Ingestion > Data Prep > Global Entity.
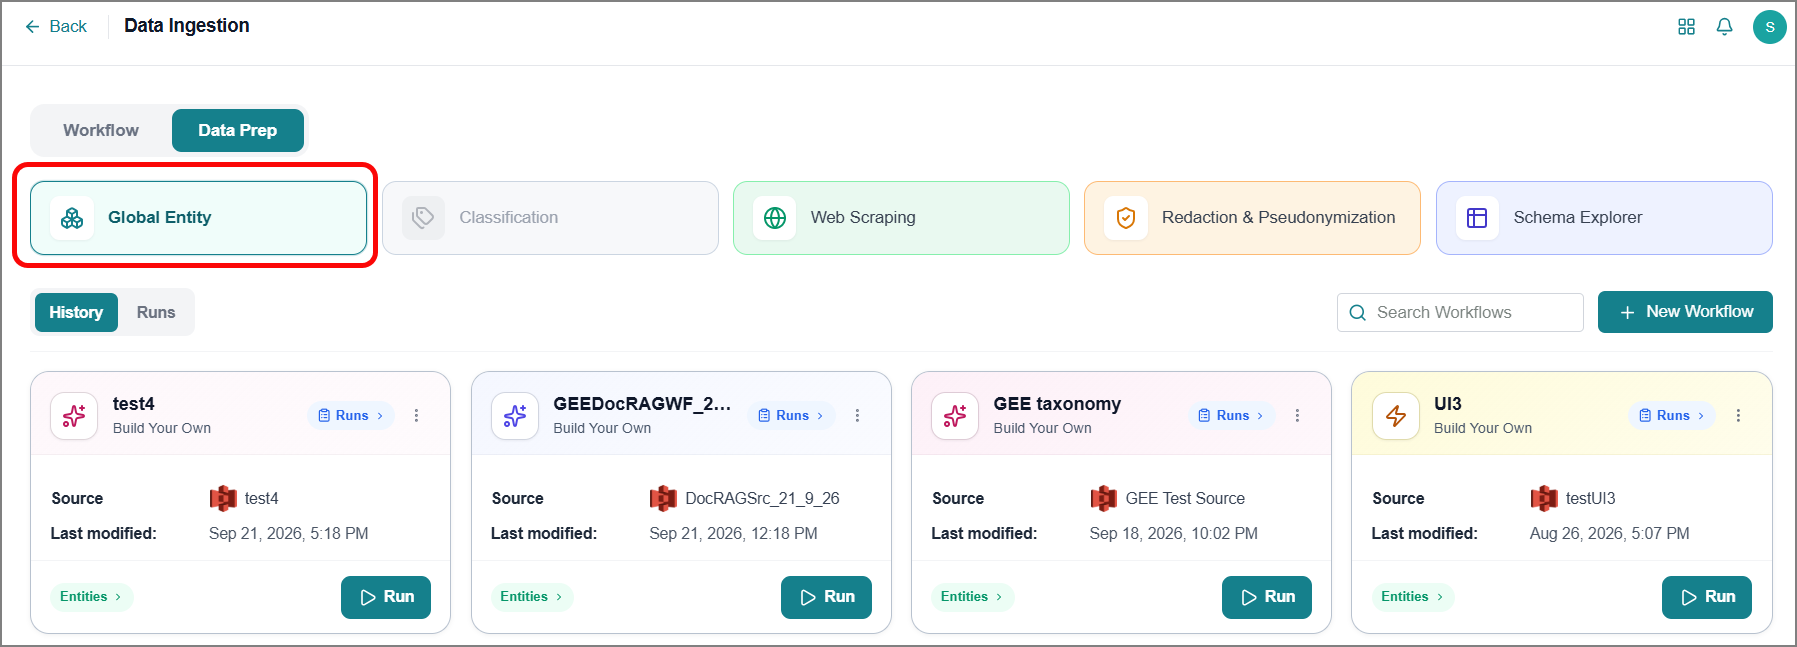
Creating an Entity Workflow
To create a new entity workflow:
Click New Workflow.
The Generate Entities page opens.
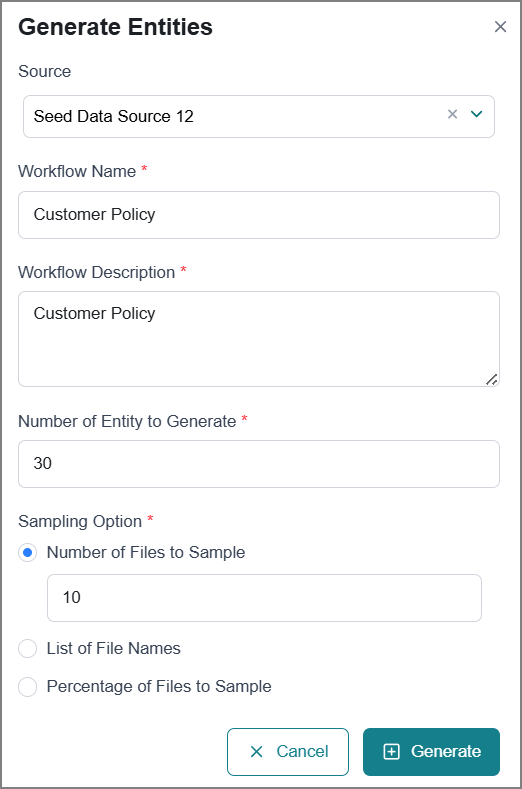
Select a Source from the dropdown.
Enter a name for your entity extraction workflow.
Enter detailed information about the workflow's purpose and scope.
Enter the Number of Entities to Generate between 5 and 50.
Each one represents a different entity label that the platform will identify from your source.
Define how the platform samples your data to identify entity labels.
Number of Files to Sample - Enter an exact number of files to analyze. The platform will randomly select this number of files from your data source.
List of File Names - Select one or more specific source files from the dropdown to analyze.
Percentage of Files to Sample - Enter a percentage value. The platform randomly samples the corresponding proportion of your total file set.
Click Generate.
The Global Entity page opens, and the default workflow is automatically created.
Review the workflow and click Save and Run to execute it and begin extracting entity labels from the source.
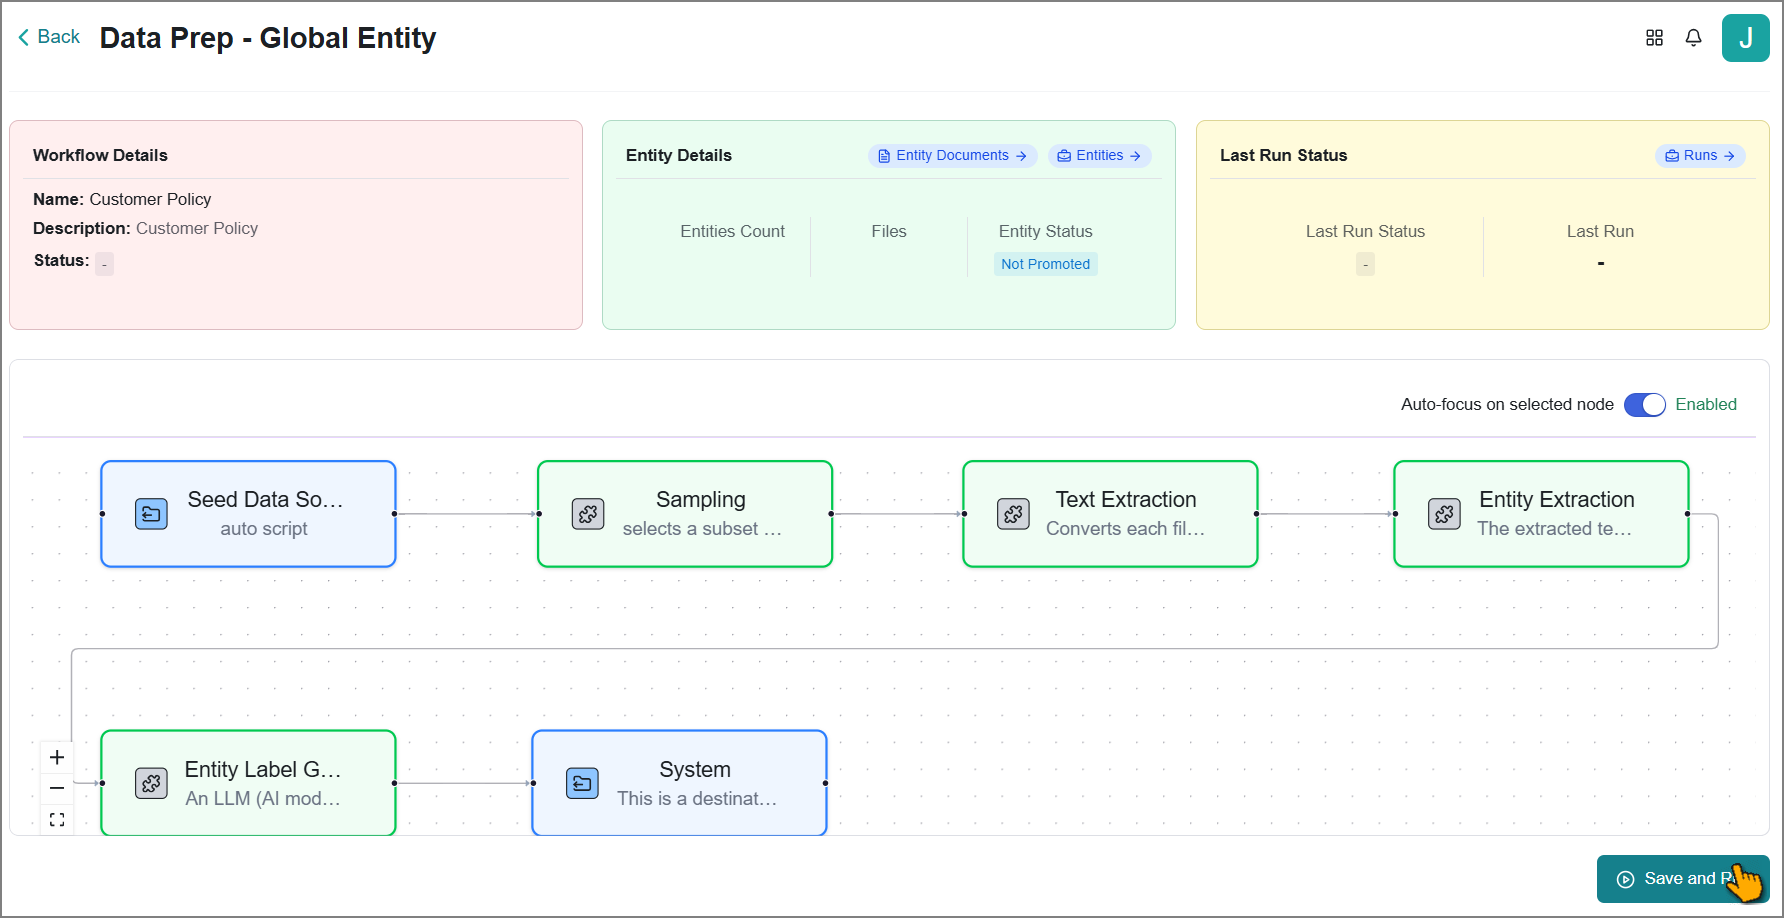
A success message confirms the action, and the extracted entity labels are saved to the data catalog.
Click Save & Exit to save and close the workflow page.
Reviewing and Promoting Entity Labels
Entity promotion is the process of approving extracted entity labels for inclusion in the Global Entity Library. Once promoted, these entity labels serve as a baseline template during KB creation, providing standardized entity definitions that can be reused across multiple KBs.
The platform helps you review the extracted entity labels from the source and promote them as needed.
To begin:
Find the relevant workflow using the Search box.
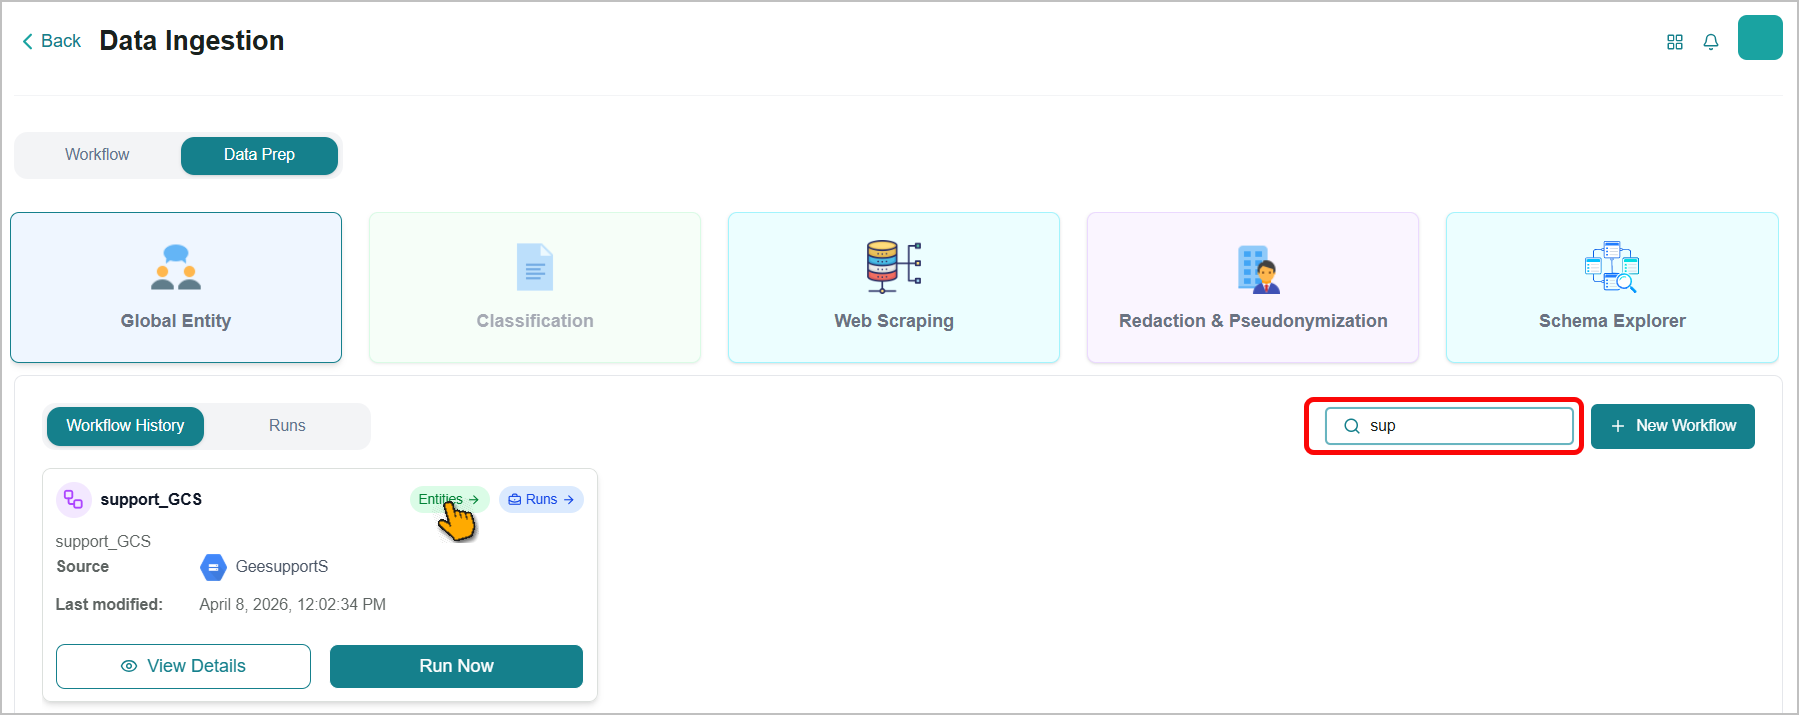
Click Entities on the workflow card.
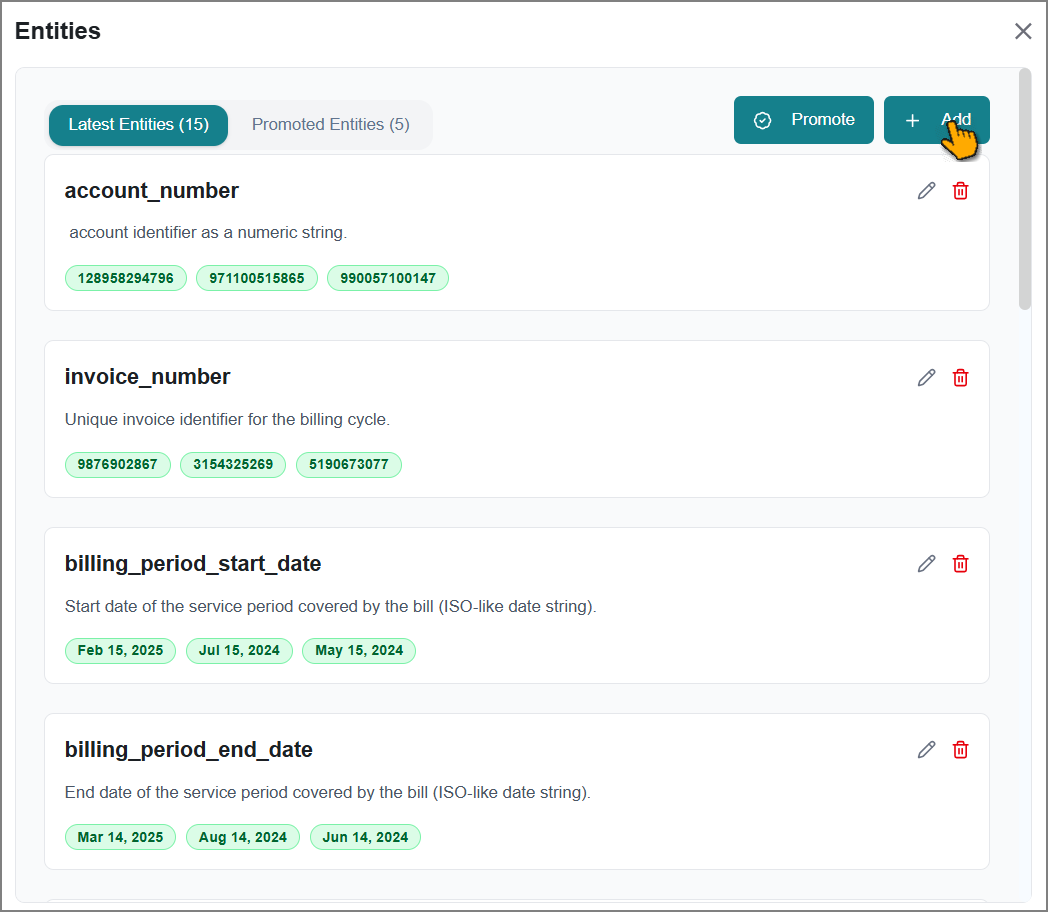
The Entities panel opens and displays all extracted entity labels, along with their descriptions and values.
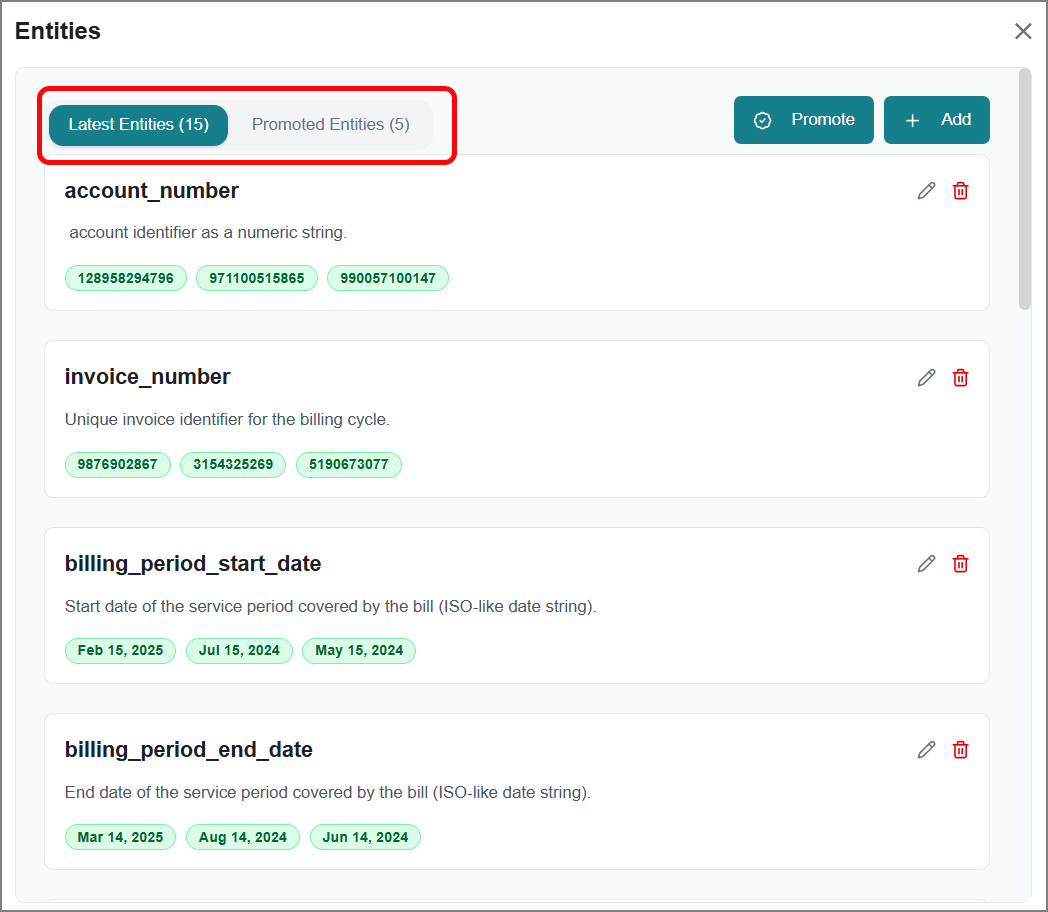
Latest Entities tab - Displays entity labels extracted from the most recent run.
Promoted Entities tab - Displays entity labels that have been promoted to the global entity library.
Note
You can also review the entity labels on the workflow page.
Review the extracted entity labels and update them as needed.
To add new entity labels, refer to Creating Entity Labels.
To update existing entity labels, use the following icons:
Icon
Action
Description

Edit
Modify the name or description of the existing entity label.

Save
Save your changes after making modifications.

Cancel
Close the editor without saving changes.

Delete
Remove an entity label from the list quickly.
Click Promote.
The entity labels are readily available in the global entity library for KB creation, RAG experimentation, and more.
When you update or extract new entity labels in subsequent runs, you need to promote them to make them available in the global entity library.
Click Promote.
The Compare Entities page opens, which presents two side-by-side sections for review:
Promoted Entities - Display all entity labels that were promoted in your last update.
Latest Entities - Display all entity labels extracted from the most recent run.
Click Promote to replace the existing entity labels with the latest ones.
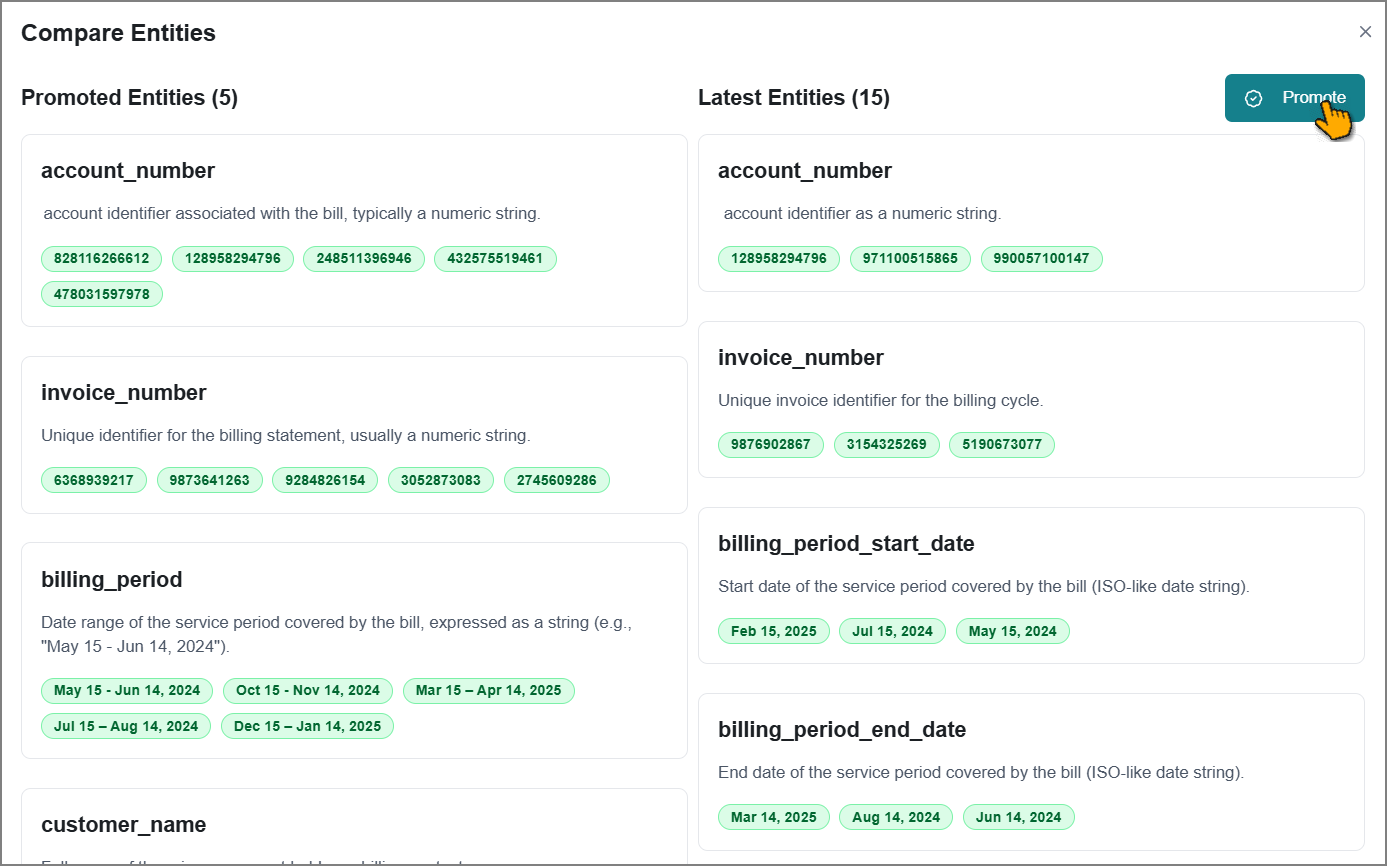
The success message appears for confirmation.
Creating Entity Labels
You can create new entity labels and add them to the existing list.
To create a new entity label:
Click Add.
Enter a new entity label name.
Enter a detailed description explaining the entity's purpose and scope.
Add Example Values for the entity:
Type an example value in the input field.
Either check the checkbox next to the value or press Enter to add it.
Repeat to add multiple example values.
Click Save Entity to save.
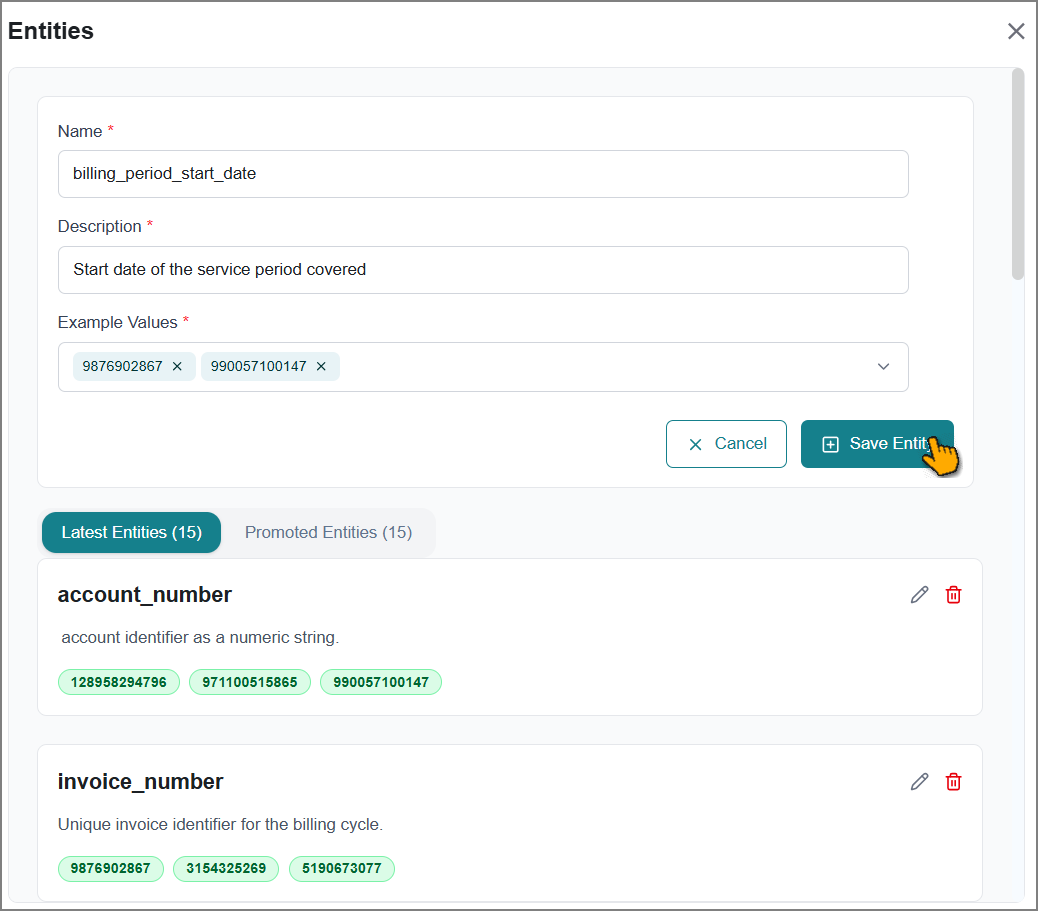
The success message appears for confirmation.
Viewing a Workflow History
At the bottom of the Data Prep page, you can view real-time details of existing workflows in a card view. Each card displays workflow configurations, execution status, and error diagnostics, enabling you to maintain data integrity, monitor performance, and troubleshoot issues effectively.
To find a specific workflow, select the Global Entity, then either enter the workflow name in the Search Workflow box or scroll through the list of available workflows.
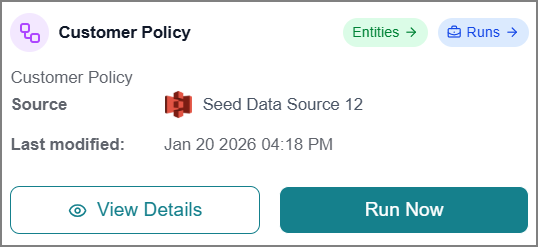 |
Click Run to execute the workflow manually.
Click the card to open the Workflow page, where you can view and act on additional details.
Click Entities to review the extracted entity labels and promote them.
Click Runs to view information about all workflow executions in the Runs tab.
Click the Ellipsis
 icon, then click Edit.
The Edit Workflow window opens, where you can update the workflow name and description.
Rerunning Workflows
You can rerun workflows multiple times using the same configuration to get real-time entity labels from the source.
Manual Run
Find and select the workflow you want to run.
Click Run on the workflow card.
The Run Workflow window opens.
Update the configuration as needed. Refer to Creating an Entity Workflow for more information.
Click Run.
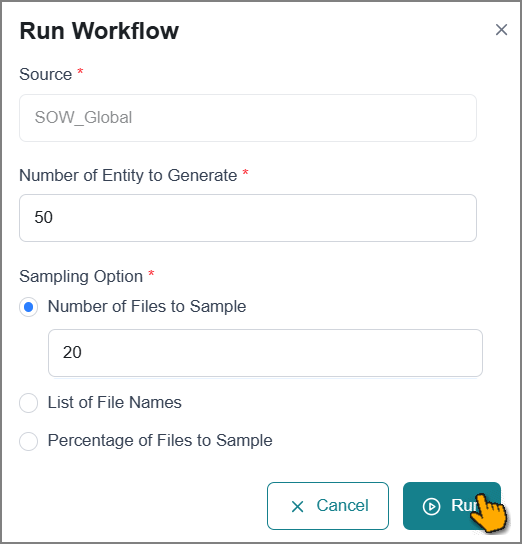
The configured steps are re-executed with real-time status updates.
Viewing Workflow Details
You can view your entity labels extraction details on the workflow page.
To access, filter the workflow, then click on the workflow card.
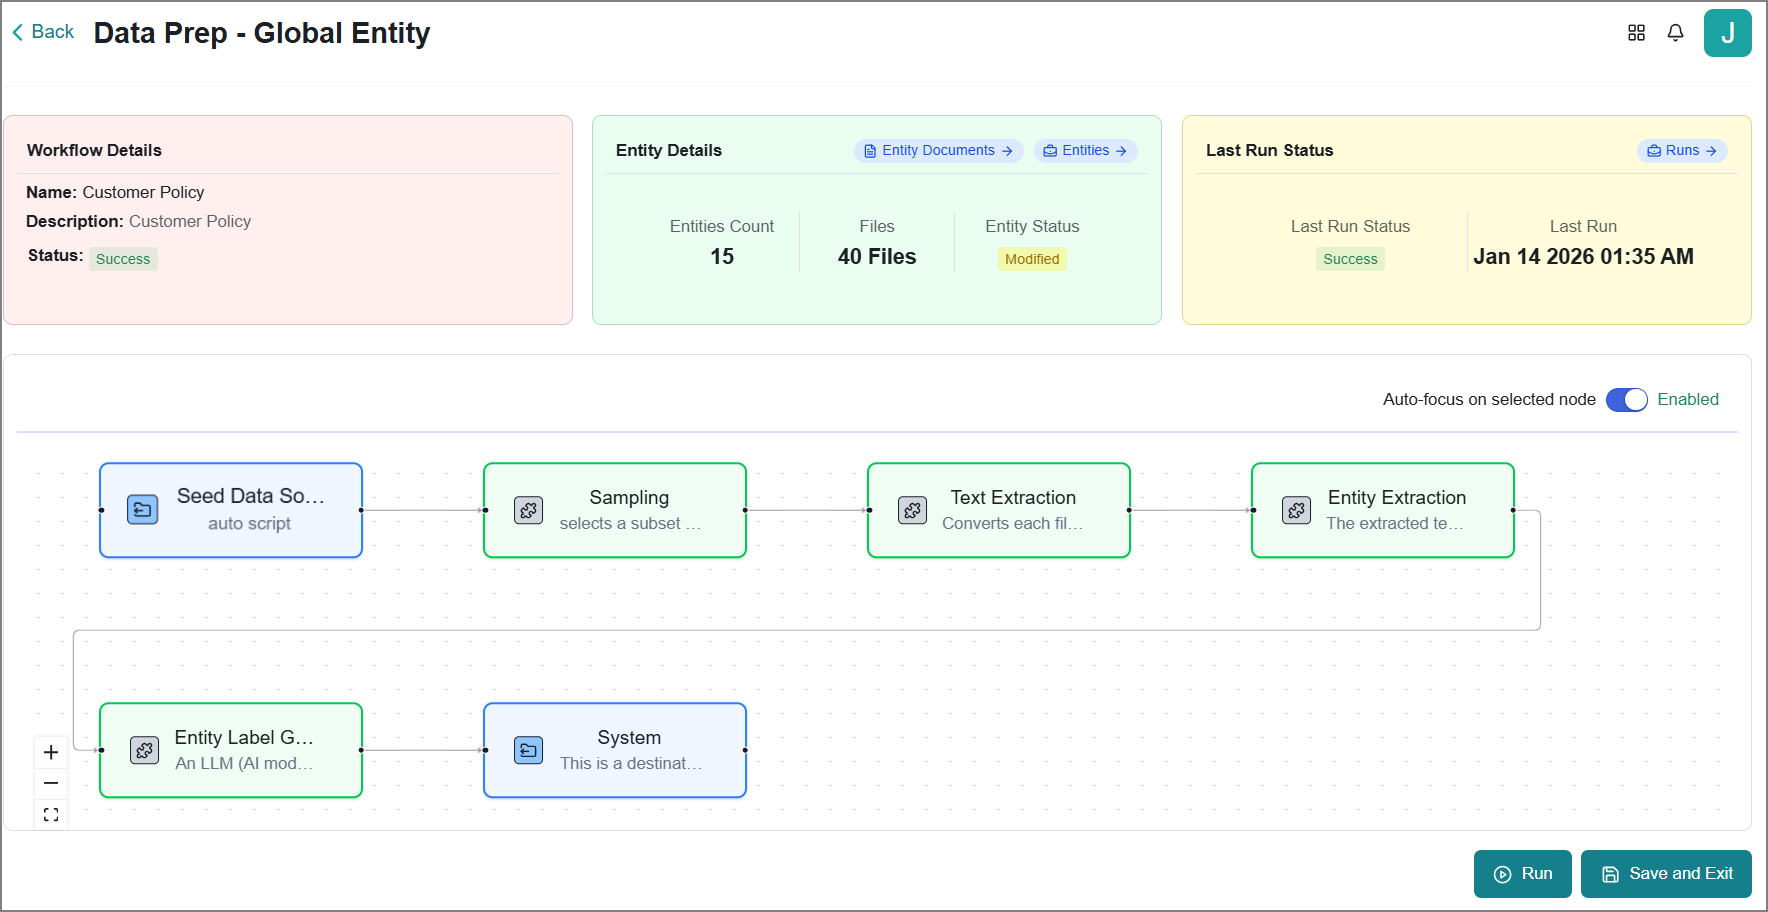
Workflow Details - The workflow name, description, and current status.
Entity Details - Key details from your most recent execution:
Entities Count – Number of entity labels extracted.
Files Count - Actual number of files used for entity labels extraction.
Entity Status - Current status of the entity labels promotion.
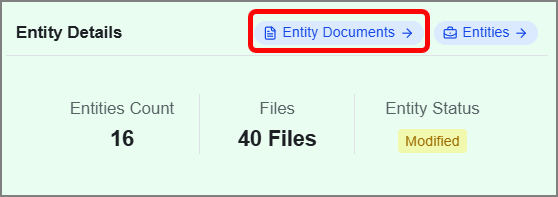
Entity Documents - Click to view extracted entity labels and their related documents. Refer to Entity Documents for more information.
Entities - Click to review the extracted entity labels and promote them. Refer to Reviewing and Promoting Entity Labels for more information.
Last Run Status – Key details from your most recent execution:
Run Status – Completed, Failed, or In-progress state.
Run Timestamp – Date and time of execution.
Entity Documents
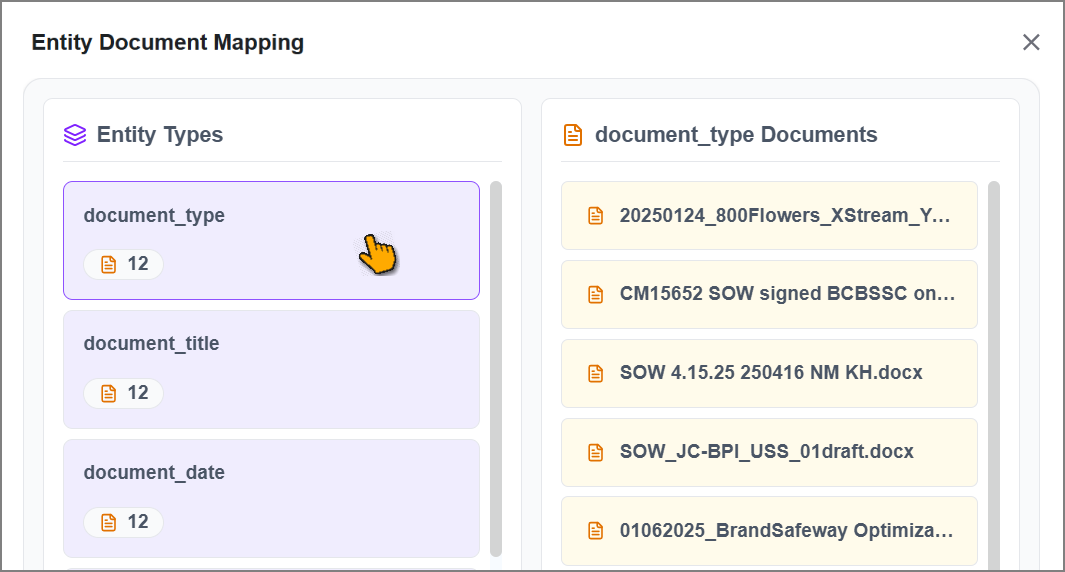
This card helps you to view extracted entity labels and their related documents from your most recent workflow execution.
Click Entity Document.
The Entity Document Mapping page opens and displays all extracted entity labels in the Entity Types panel.
Click on any entity label to view all its source documents from which it was extracted.
Last Run Status
This card helps you to view the status of the most recent workflow execution.
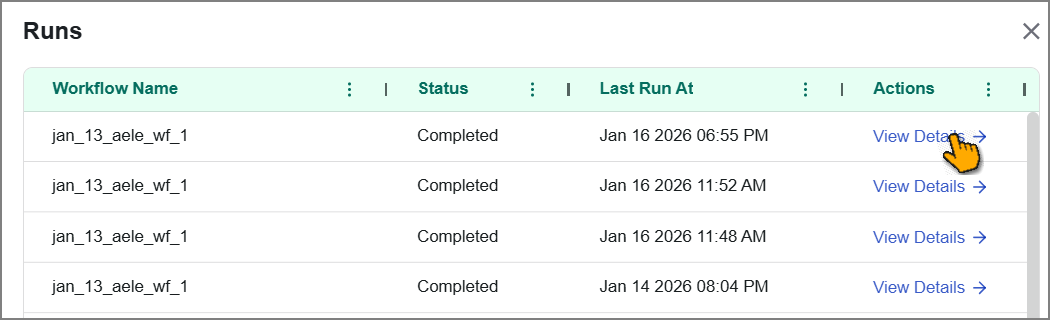
Click Runs to view information about all workflow executions in the panel on the right.
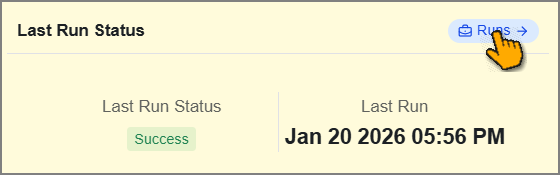
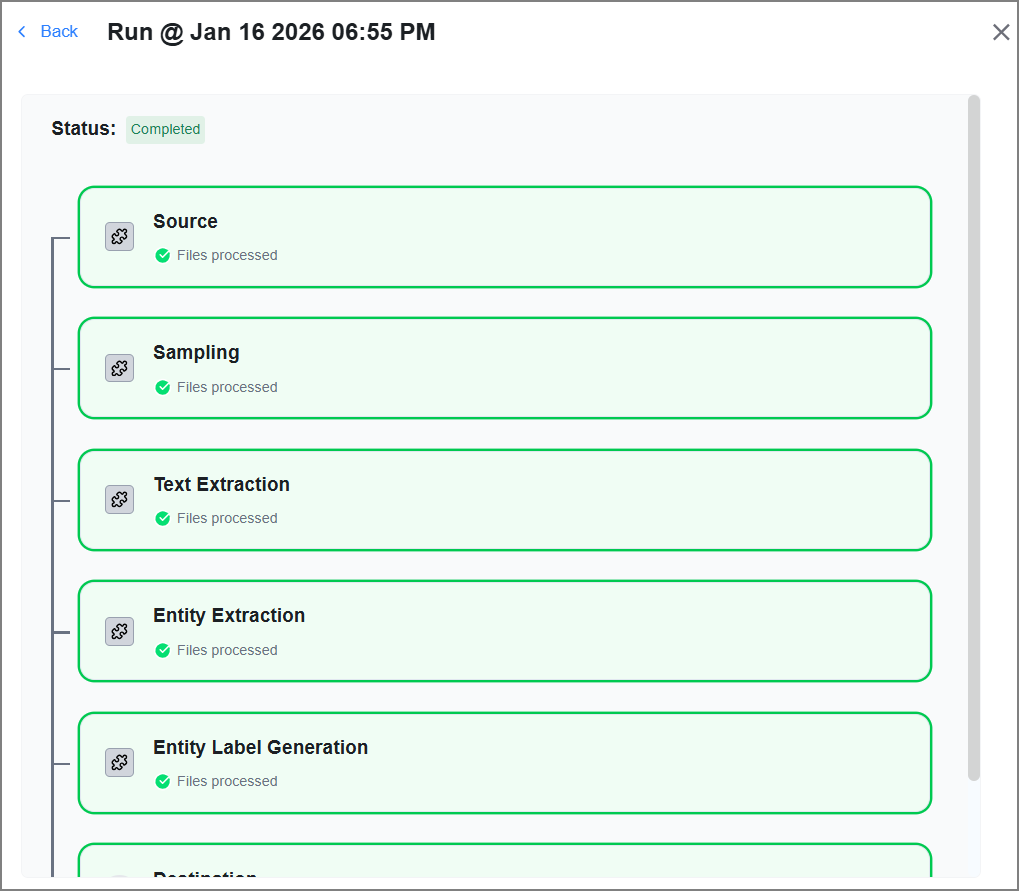
Click View Details to view additional information.
The last execution flow details are displayed.
Viewing Runs
At the bottom of the Data Prep page, you can view real-time details of existing workflow executions, including their workflow name, status, timestamp, and flowchart.
Go to the Runs tab to see a list of all execution instances initiated for the workflows.
Click the workflow dropdown and select the required workflow from the list to view its execution details.
Click View Details to view additional details for a specific execution.

The details are displayed on the right-side panel.
Web Scraping enables automated collection and structuring of data from websites, making external web content readily available for your KBs. This feature automates data gathering from online sources, extends your data coverage with external intelligence, and enables continuous monitoring of competitors, markets, and industry developments.
The Business AI Cloud platform allows you to configure web sources for automated extraction and to integrate scraped content directly into your KBs, enriching your existing data and powering RAG, search, and analytics capabilities across the platform.
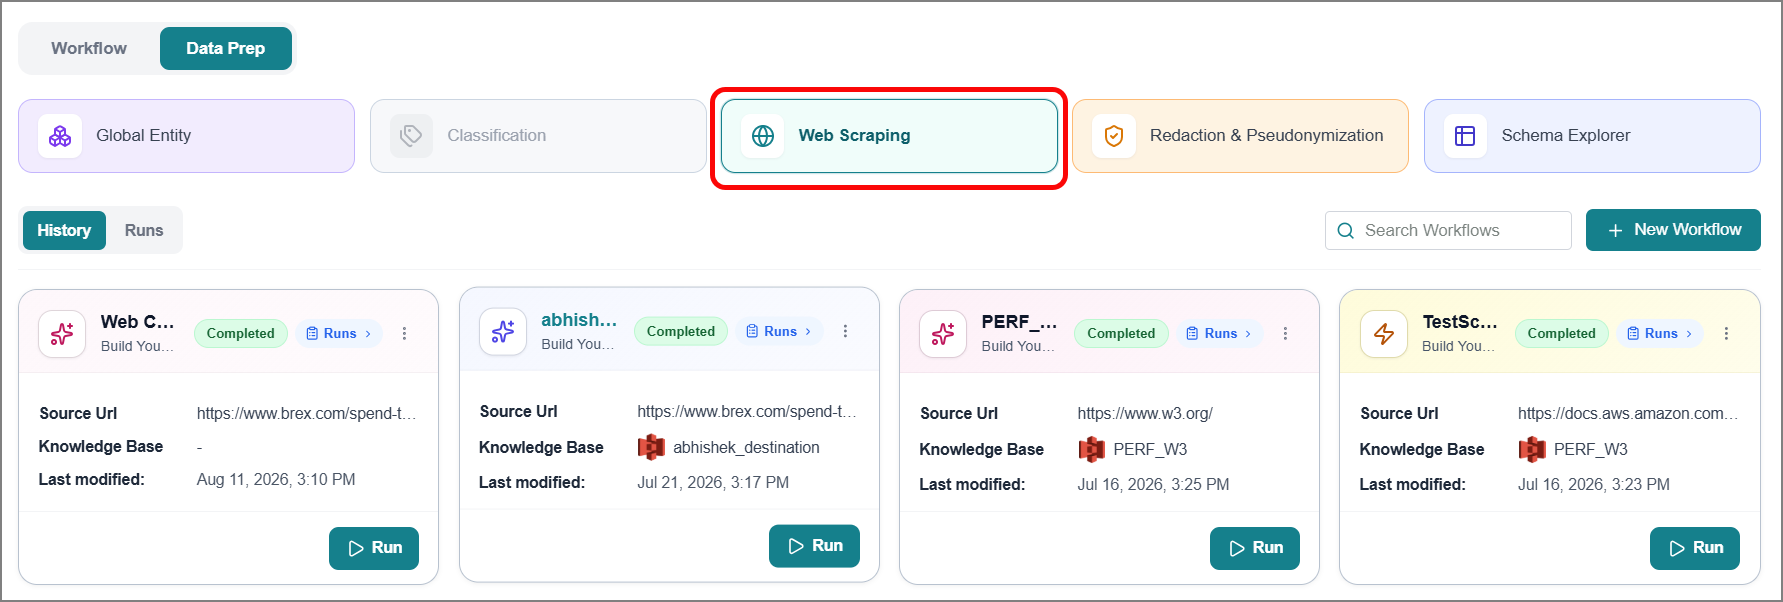
To access this feature, go to the Home page > Data Ingestion > Data Prep > Web Scraping.
Creating a Web Scraping Workflow
To create a new web scraping workflow:
Click New Workflow.
The Create Web Scrape page opens.
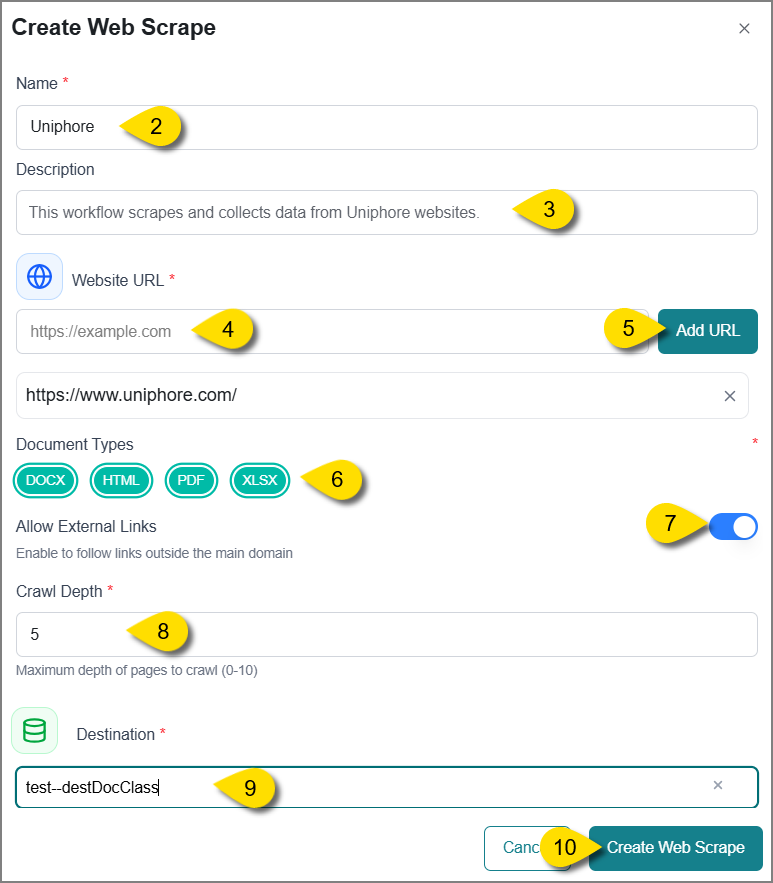
Enter a name for your web scrape workflow.
Enter detailed information about the workflow's purpose and scope.
Enter or copy and paste the Website URL in the box.
Click Add URL.
Tip
You can add multiple URLs as needed.
Select one or more Document Types to scrape from the website:
DOCX
HTML
PDF
XLSX
Enable Allow External Links to follow and scrape links that navigate outside the main domain.
Enter the maximum number of pages to crawl (up to 2 pages allowed).
Select the Destination KB from the dropdown.
Note
Currently, this feature supports only S3 destinations.
Click Create Web Scrape.
The workflow page opens, displaying the default workflow configuration.
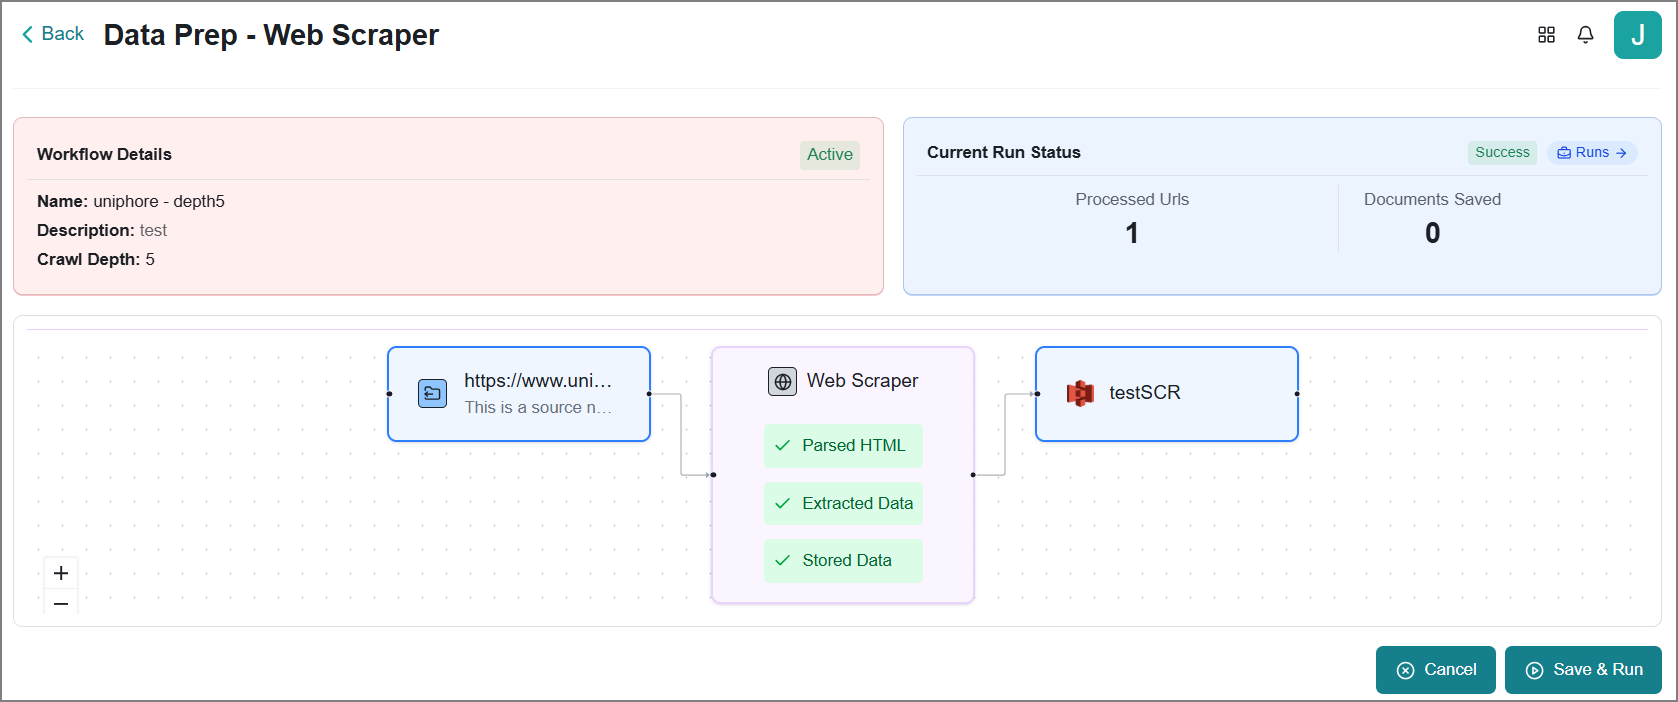
Click Save & Run to execute the workflow for extracting data from the websites.
Viewing a Workflow History
At the bottom of the Data Prep page, you can view real-time details of existing workflows in a card view. Each card displays workflow configurations, execution status, and error diagnostics, enabling you to maintain data integrity, monitor performance, and troubleshoot issues effectively.
To find a specific workflow, select Web Scraping, then either enter the workflow name in the Search box or scroll through the list of available workflows.
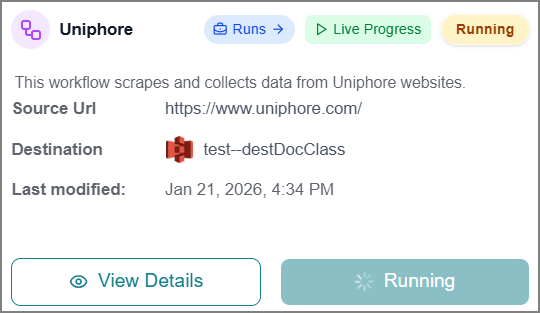 |
Click on the card to open the Workflow page and allow you to view and act on other details.
Click Run to manually execute the scraping process.
Click Runs to view information about all workflow executions in the Runs tab.
Click Live Progress to view detailed status information about data scraping from the URL.
Important
This option is available only while the workflow is actively executing.
Click the Ellipsis
icon, then click Edit.The Edit Workflow window opens, where you can update the workflow name and description.
Viewing Workflow Details
You can view various information related to your web scraping workflow.
To access, filter the workflow, then click on the workflow card.
The workflow detail page opens.
Workflow Details - The workflow name and description.
Current Run Status - Number of processed URLs and saved documents from the URLs.
Current Run Status
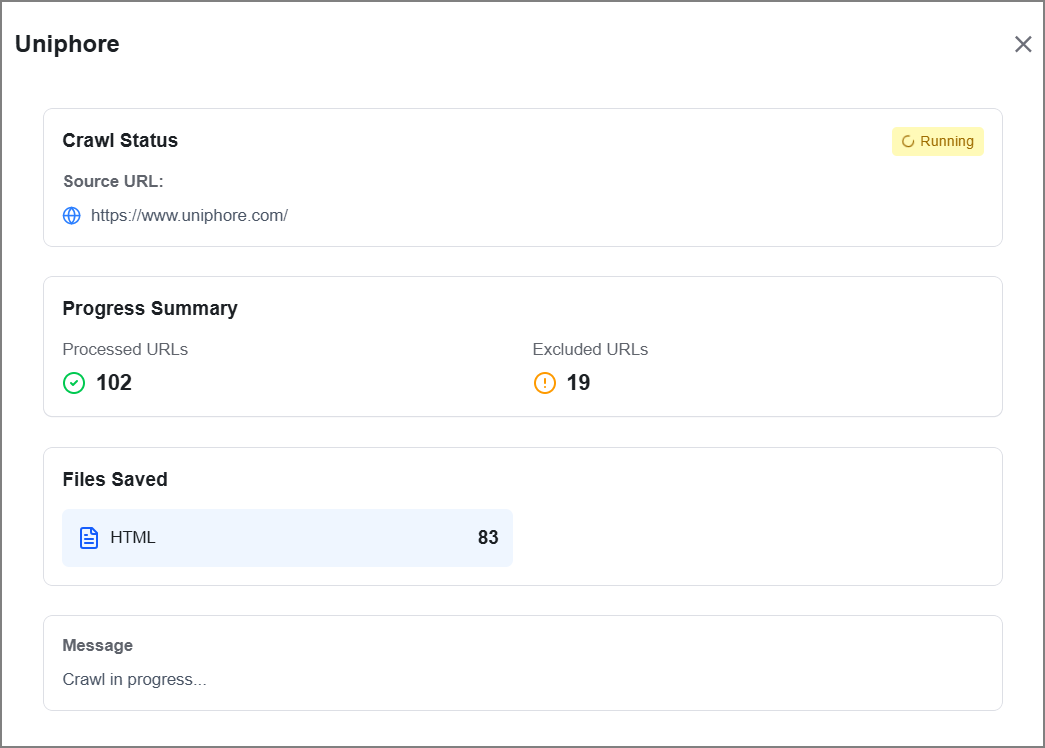
You can monitor and view the real-time progress of workflow execution.
Click Live to view detailed status information about the data scraping process in the panel on the right.
 |
Important
This option is available only while the workflow is actively executing.
 |
Last Run Status
You can monitor and view the status of the most recent workflow execution.
Click Runs to view information about all workflow executions.

Click View Details to view additional information.
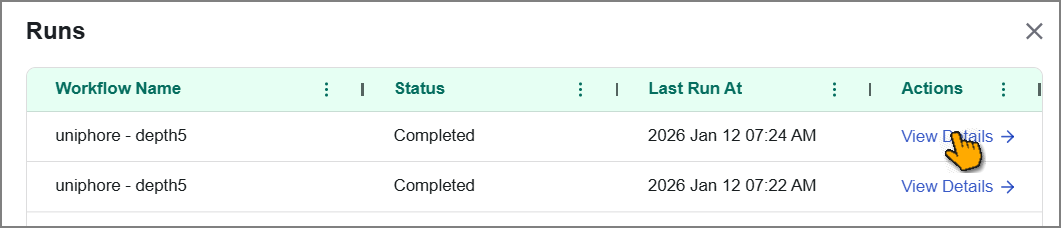
The last web scripting details are displayed.
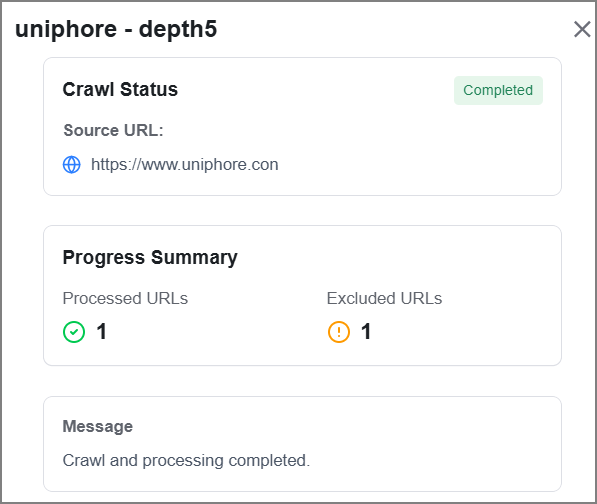
Rerunning Workflows
You can rerun workflows multiple times using the same configuration to get real-time data from the URLs.
Manual Run
Find and select the workflow you want to run.
Click Run to initiate manual execution of the workflow.
The configured steps are re-executed with real-time status updates.
Viewing Runs
At the bottom of the Data Prep page, you can view real-time details of existing workflow executions, including their workflow name, status, timestamp, and flowchart.
Go to the Runs tab to see a list of all execution instances initiated for the workflows.
Click the workflow dropdown and select the required workflow from the list to view its execution details.
Click View Details to view additional details for a specific execution.
The details are displayed on the right-side panel.
Redaction and pseudonymization are data privacy capabilities that protect sensitive information by either permanently masking it or replacing it with substitute identifiers before it enters data pipelines.
Redaction is the process of obscuring sensitive data, such as masking a credit card number as ****-****-****-3456, while securely retaining the original value so it can be retrieved by authorized users when required.
Pseudonymization is the process of replacing sensitive data with surrogate tokens or identifiers, such as substituting John Doe with User_8472, while maintaining a secure mapping that enables the original value to be recovered when needed.
The Business AI Cloud platform applies redaction and pseudonymization during the data preparation stage, scanning source content for defined entity types, such as names, contact details, financial identifiers, and custom-defined patterns, and transforming them before the data is stored or indexed. This ensures that personal and confidential data does not propagate into Knowledge Bases, model outputs, or agent responses. At the same time, it preserves the structural integrity needed for accurate RAG retrieval and model training, helping maintain compliance with data privacy regulations.
To access this feature, go to the Home page > Data Ingestion > Data Prep > Redaction & Pseudonymization.
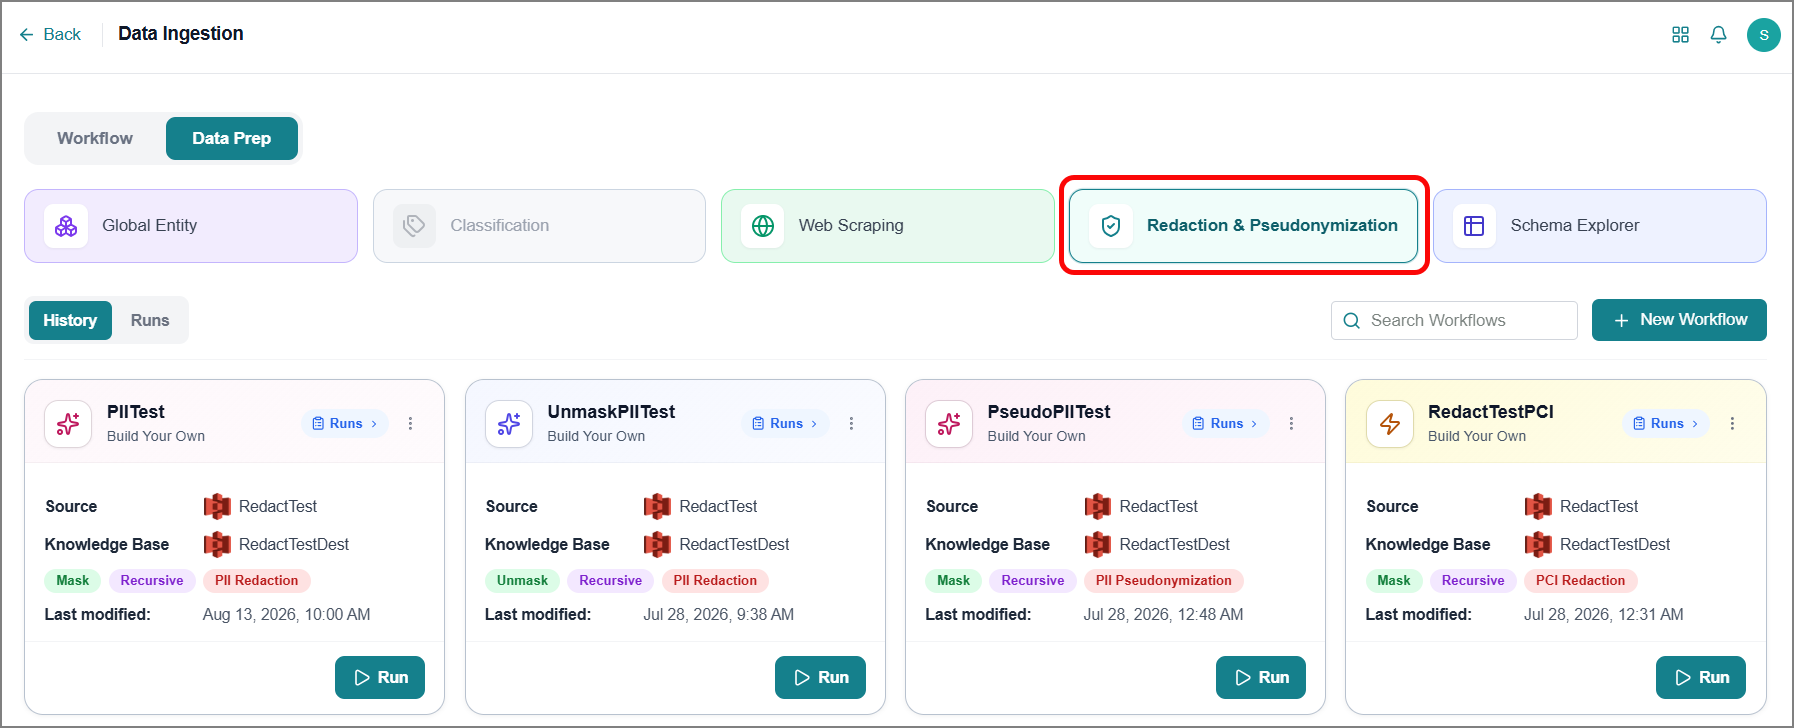
Creating a Data Protection Workflow
To create a new data protection workflow:
Click New Workflow.
The Create Data Protection Workflow page opens.
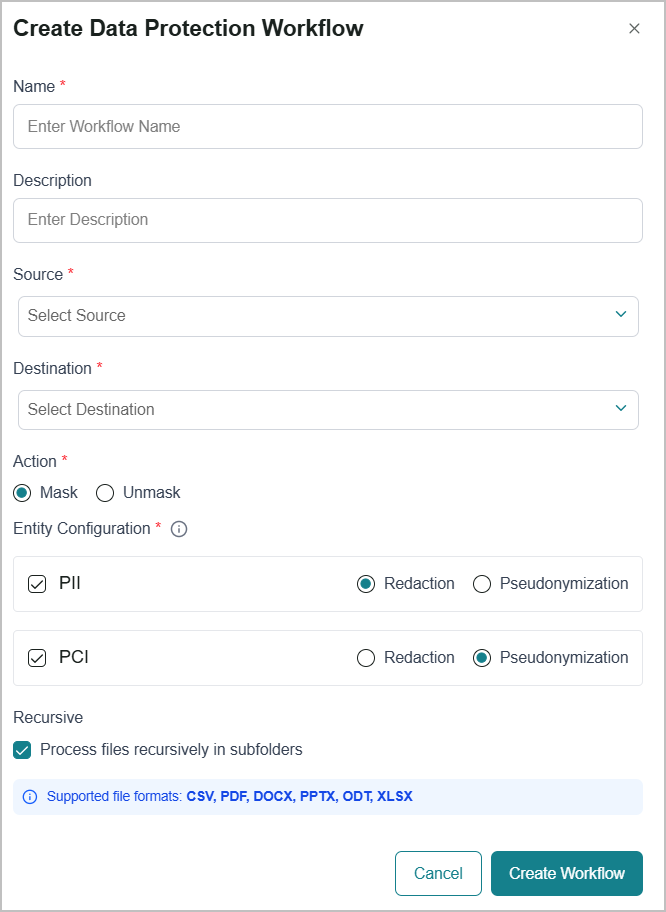
Enter a name for your workflow.
Enter detailed information about the workflow's purpose and scope.
Select a Source from the dropdown.
Important
Refer to the bottom of the page to view supported file formats.
Select a Destination from the dropdown.
Choose an action:
Mask - Applies masking to sensitive data.
Unmask - Returns previously masked data to its original state.
Important
Unmask is available only for data that was masked using this platform.
Select one or more data types to be processed:
PII - Personally Identifiable Information
PCI - Payment Card Information
Note
Click the Info
 icon to view details about a data type.
For each selected data type, choose a data protection method:
Redaction - Masking sensitive information.
Pseudonymization - Replacing identifying information with a reversible placeholder that can be re-linked to the original data under controlled conditions.
Enable Process files recursively in subfolders to include files in nested subdirectories.
Click Create Workflow.
The Data Protection page opens, and the default workflow is automatically created.
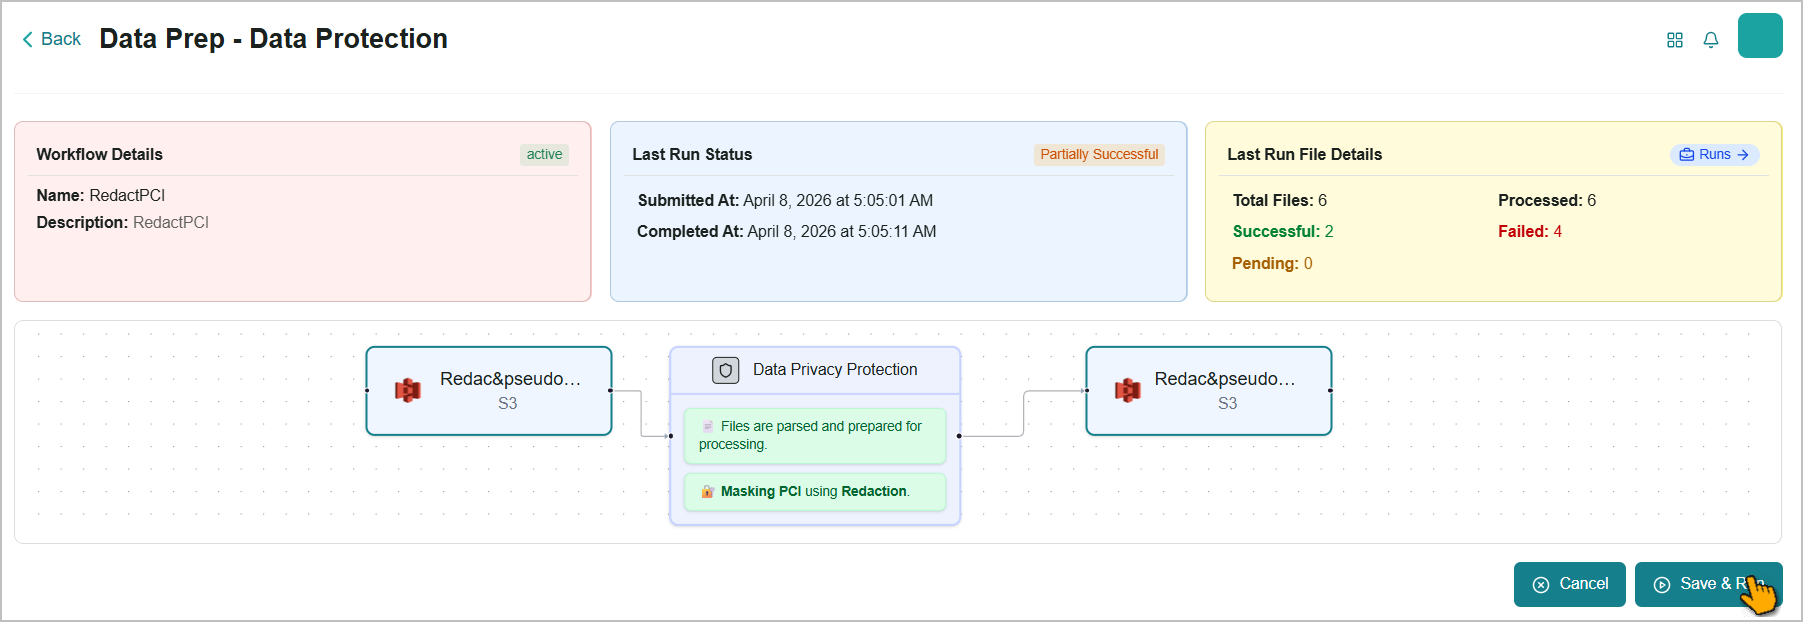
Review the workflow, then click Save & Run, and begin data protection from the source.
A success message confirms the action.
Click Cancel to close the workflow page without saving.
Viewing a Workflow History
At the bottom of the Data Prep page, you can view real-time details of existing workflows in a card view. Each card displays workflow configurations, execution status, and error diagnostics, enabling you to maintain data integrity, monitor performance, and troubleshoot issues effectively.
To find a specific workflow, select Redaction & Pseudonymization, then either enter the workflow name in the Search Workflow box or scroll through the list of available workflows.
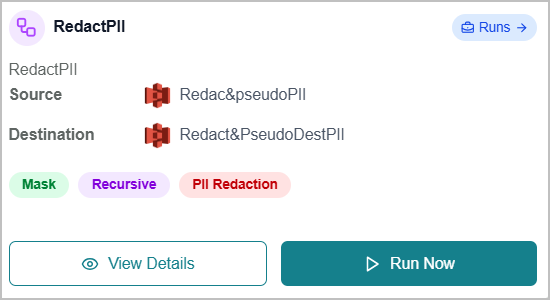 |
Click Run to execute the workflow manually.
Click on the card to open the Workflow page, where you can view and act on additional details.
Click Runs to view information about all workflow executions in the Runs tab.
Click the Ellipsis
icon, then click Edit.The Edit Workflow window opens, where you can update the workflow name and description.
Rerunning Workflows
You can rerun workflows multiple times using the same configuration to protect data from the source.
Find and select the workflow you want to run.
Click Run to initiate manual execution of the workflow.
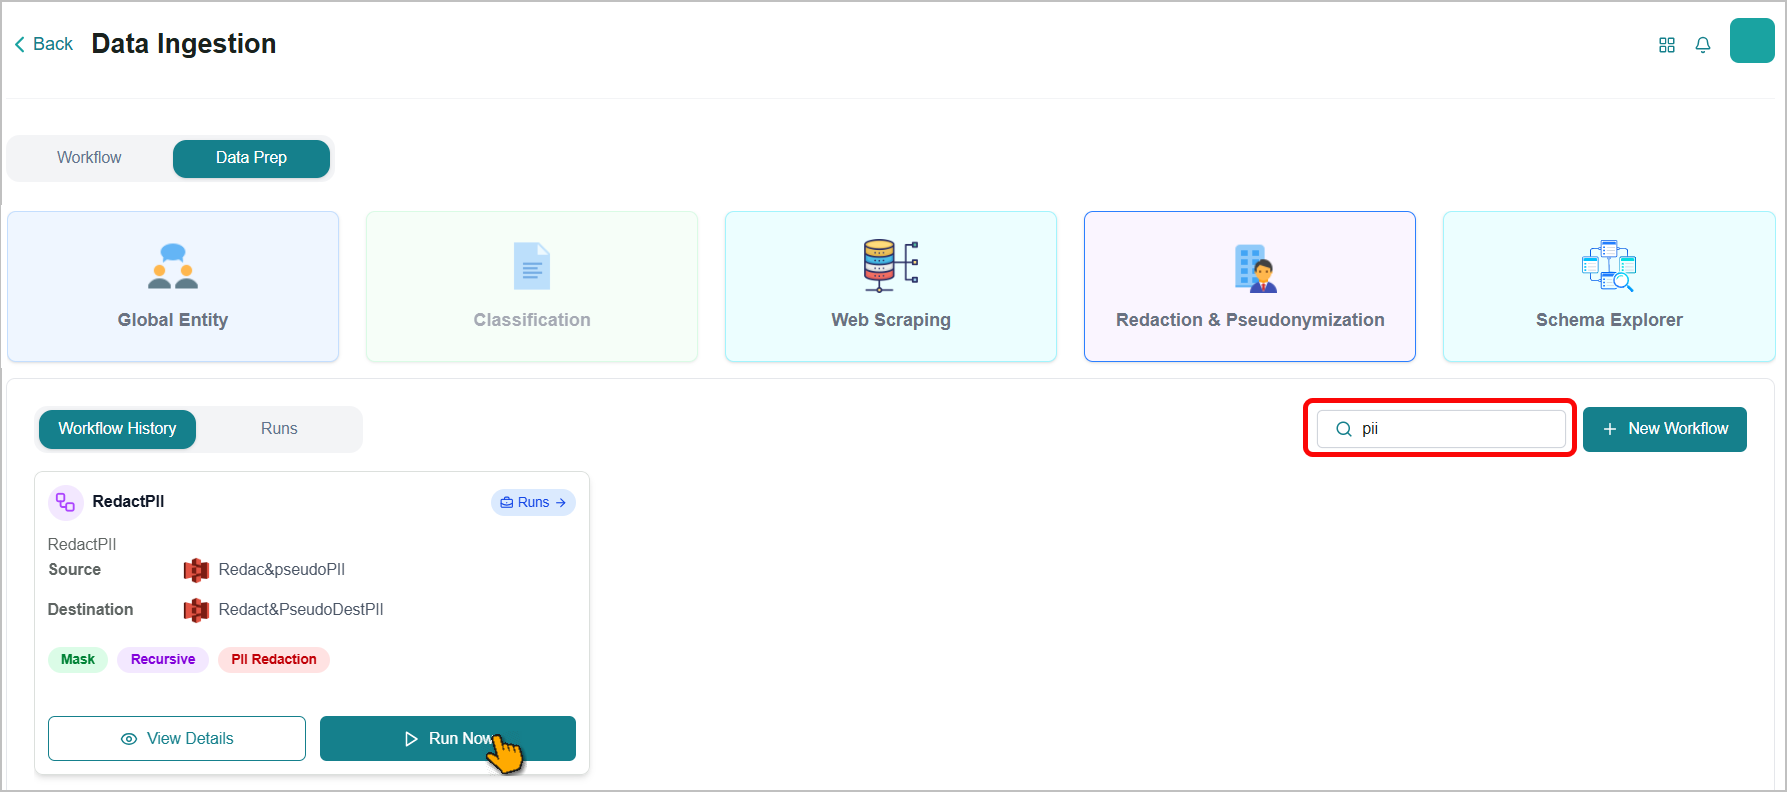
The configured steps are re-executed with real-time status updates.
Viewing Workflow Details
You can view your data protection details on the workflow page.
To access a workflow, filter the list, then click on the workflow card. The workflow detail page opens.
Workflow Details - The workflow name, description, and current status.
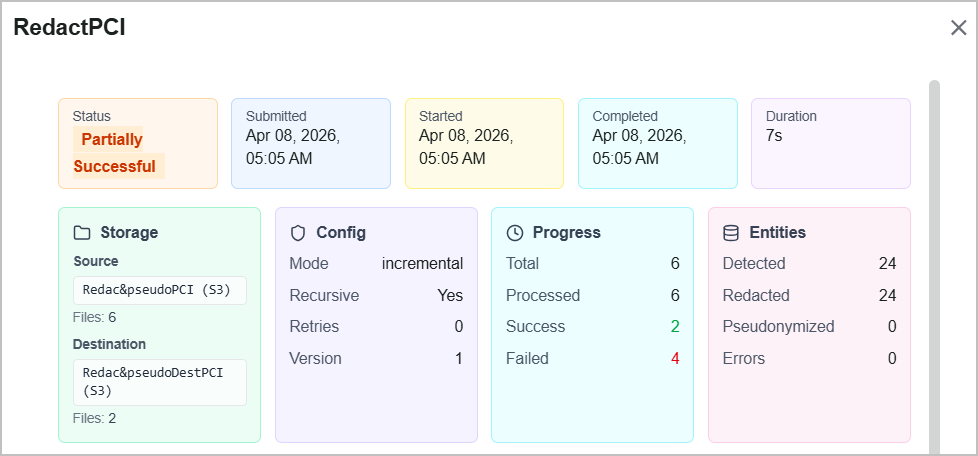
Last Run Status - Key details from your most recent execution:
Submitted - The date and time when the workflow execution started.
Completed - The date and time when the workflow execution finished.
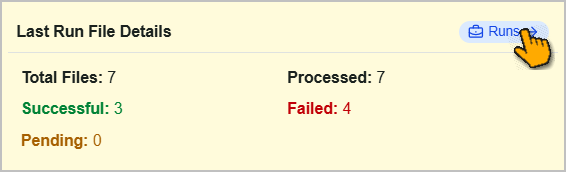
Last Run File Details - A breakdown of how files were handled during the most recent execution:
Total Files - The total number of files available in the source.
Processed - The number of files read from the source and submitted for processing.
Successful - The number of files that completed processing without errors.
Failed - The number of files that did not complete processing.
Pending - The number of files that are currently being processed.
Last Run Status
This card helps you to view the status of the most recent workflow execution.
Click Runs to view information about all workflow executions in the panel on the right.
Click View Details to view additional information.
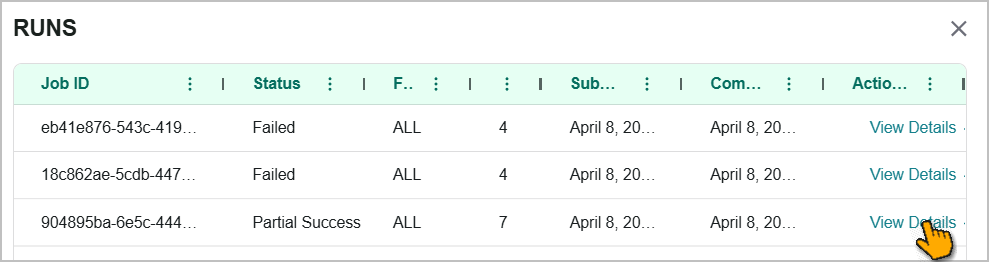
The last execution flow details are displayed.
Viewing Runs
At the bottom of the Data Prep page, you can view real-time details of existing workflow executions, including their workflow name, status, timestamp, and flowchart.
Go to the Runs tab to see a list of all execution instances initiated for the workflows.
Click the workflow dropdown and select the required workflow from the list to view its execution details.

Click View Details to view additional details for a specific execution.
The details are displayed on the right-side panel.
Schema Explorer is a feature in Data Preparation that automatically reads documents from your data source and generates a structured outline of the key information those documents contain. This outline, known as a schema, serves as a template that defines the structure of your documents and the types of data they contain.
The Business AI Cloud platform helps to learn the Schema Explorer structure directly from your actual documents. Once you review the generated schema, you can promote it as a template for use across your data ingestion workflows.
To access this feature, go to the Home page > Data Ingestion > Data Prep > Schema Explorer.
Creating a Schema Workflow
To generate a new schema:
On the Schema Explorer page, click New Workflow.
The Generate Schema Explorer Workflow window opens.
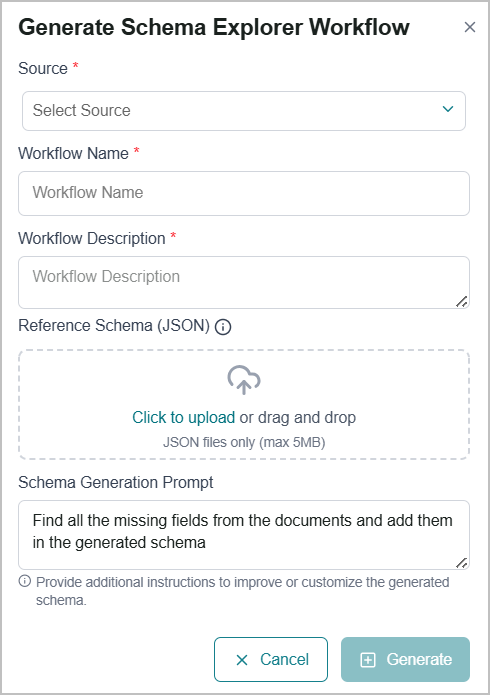
Select your data source from the Source dropdown.
Important
Currently, the platform supports a limited set of file types for ingestion. Refer to Supporting File Types - Agentic Search know supporting file formats.
Enter a name for the schema workflow.
Enter a description that explains what type of documents this schema represents.
Upload Reference Schema, if required:
Click the Info
icon next to the Reference Schema (JSON) , then click Download Sample File.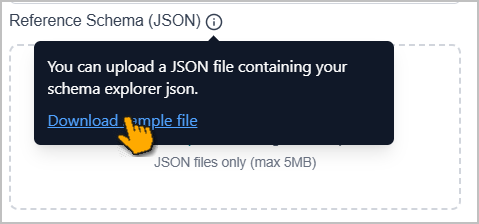
The sample JSON file downloads to your system.
Open the sample file and update it to match your document structure and requirements.
Upload your completed file using the Click to Upload option to attach the reference schema to the workflow.
Note
The reference schema must be in JSON format. The maximum file size is 5 MB.
Enter a prompt to improve or customize the schema generation, if required.
Click Generate.
The Schema Explorer page opens and displays the default workflow.
Click on the nodes to view their configurations, and you can update them:
Nodes
Fields
Values Description
Schema Generator
Repair corrupted PDFs
Enable this option to let the platform read the corrupted PDF and remove only the extra or garbage bytes appended after the final %%EOF marker. It does not change, drop, or rewrite any page or document content.
If a PDF is damaged in a way that cannot be fixed without altering its content, the platform rejects the file rather than repairing it.
Partitioner
Partition Strategy
Select from the following:
Fast - Choose this option if the uploaded file contains only text, with no embedded images or tables.
Hi Res - Choose this option if the uploaded file contains text with embedded images and tables.
VLM - Choose the Vision-Language Model (VLM) if the uploaded file contains scanned pages, handwritten notes, or other complex document types.
Review the workflow, then click Save & Run to execute it.
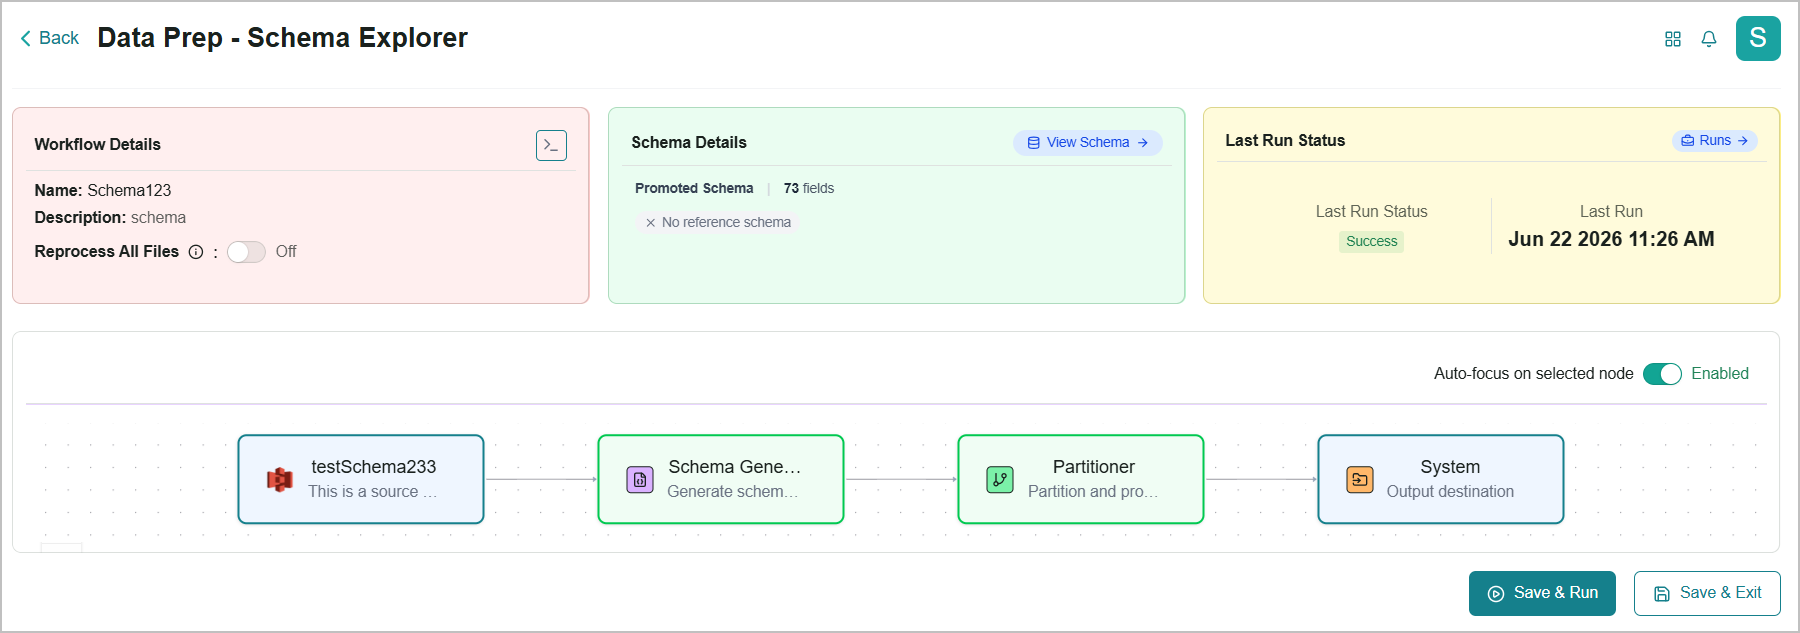
A success message confirms the action. The platform analyzes the reference schema and generates a document schema from the source.
Click Save & Exit to save and close the workflow page.
Reviewing and Promoting Schema
Schema promotion is the process of approving a generated schema for use in your data ingestion workflows. Once promoted, the schema becomes a selectable document type in the workflow, providing a reusable structure that ensures consistent document processing across pipelines.
The platform helps you review the generated schema fields and refine or promote them as needed.
To review and promote a schema:
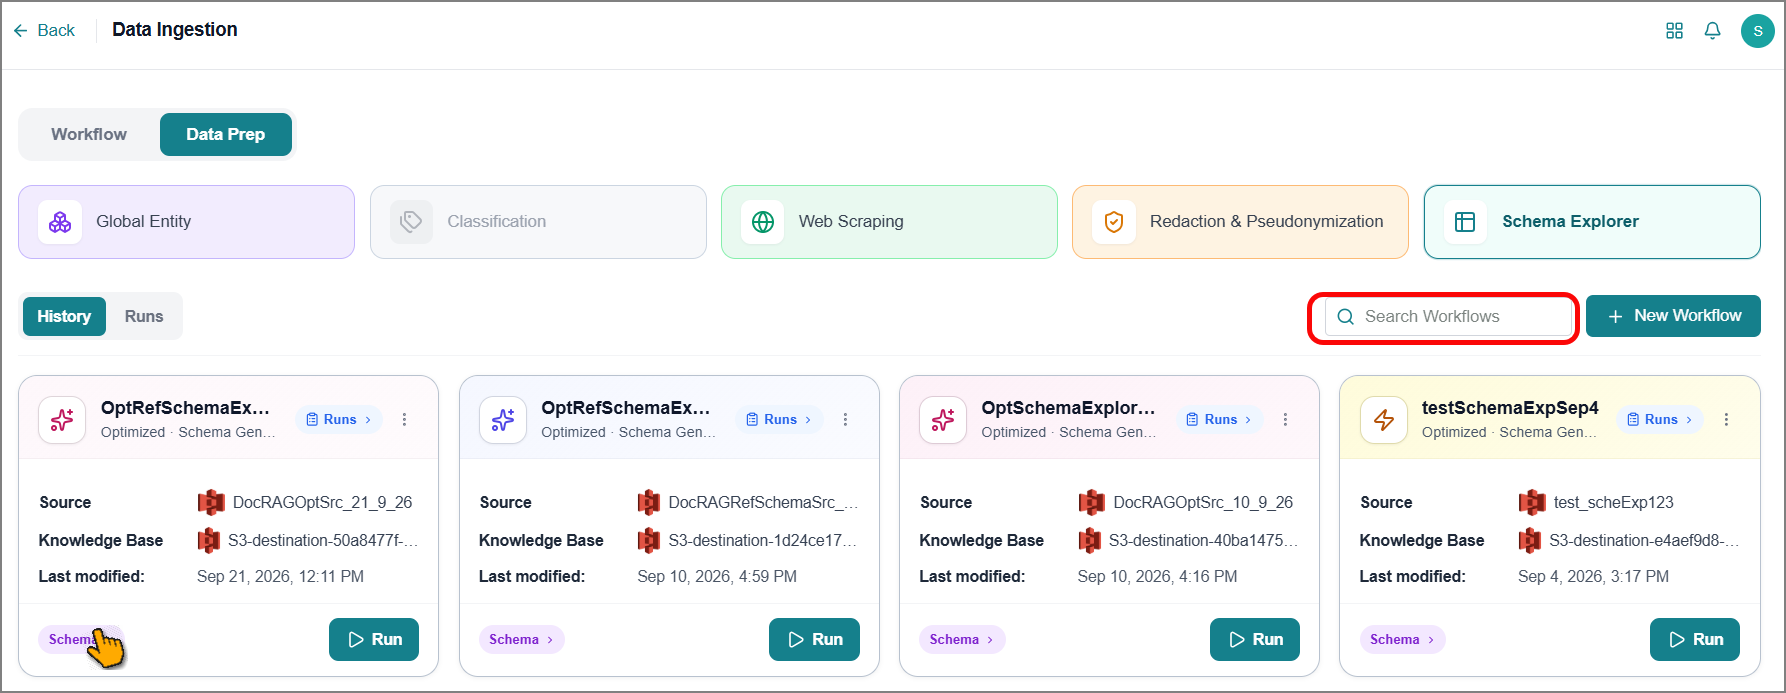
Locate the workflow using the Search box on the Schema Explorer page.
Click Schema on the card.
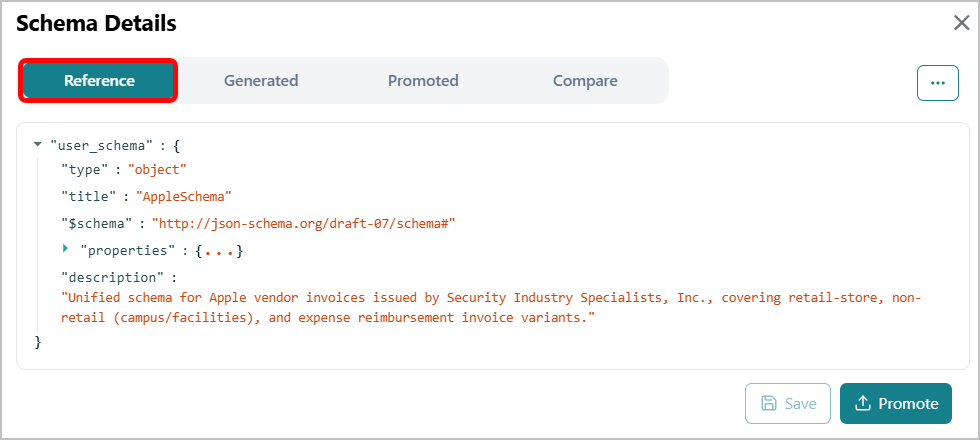
The Schema Details page opens and displays the Reference tab if a reference schema was previously uploaded.
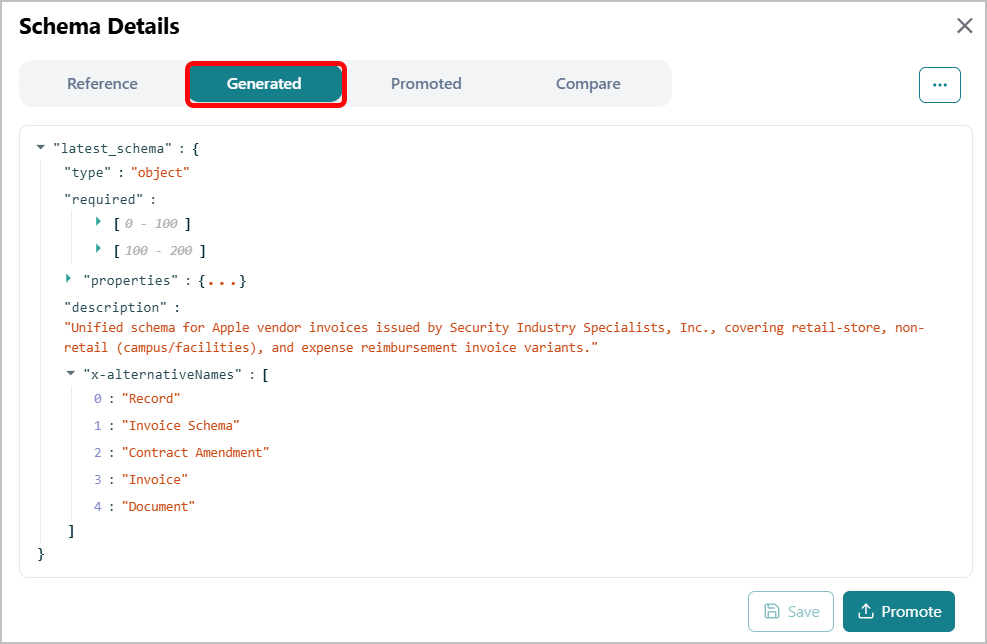
To view the schema generated from your source documents, click the Generated tab.
To view the schema promoted in the previous run, click the Promoted tab.
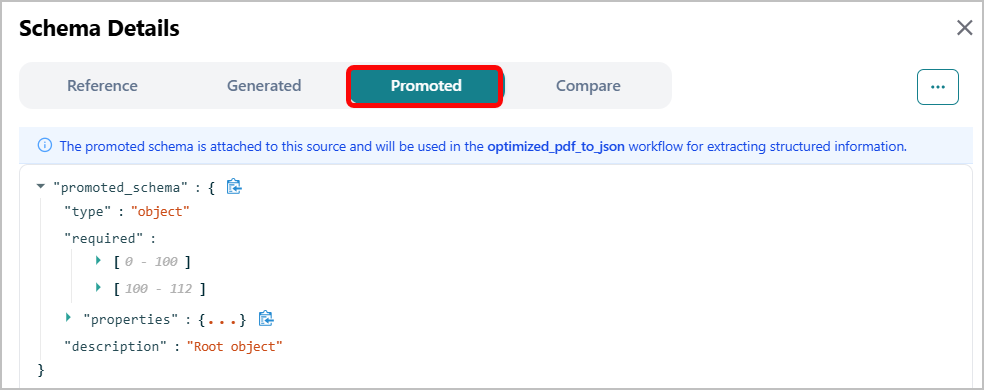
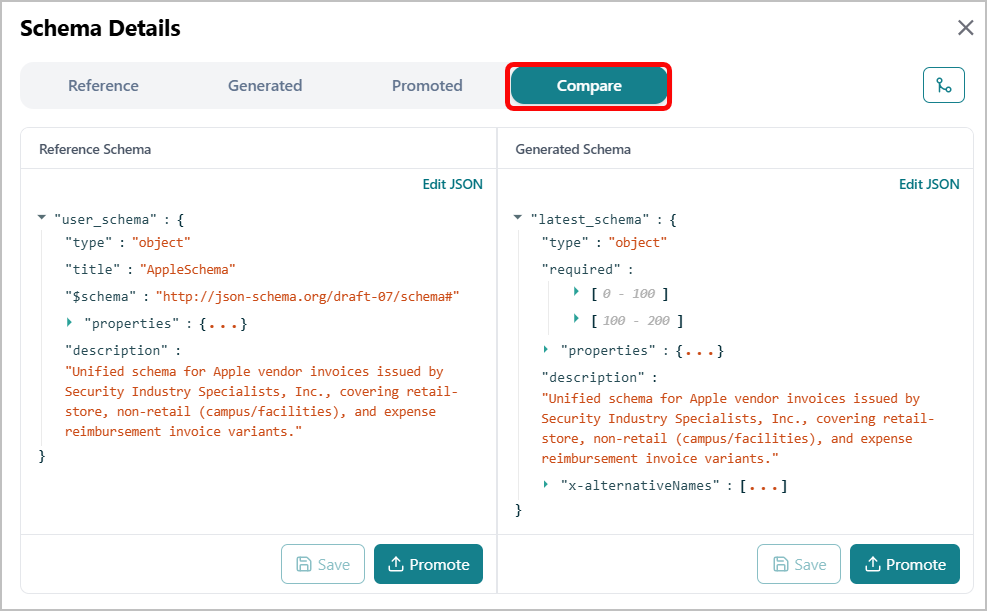
To compare the reference schema and the generated schema side by side, click the Compare tab.
Click the Actions
 icon to view more options.
Use the following options to manage the schema in each tab:
Options
Action
Edit JSON
Opens the schema for inline editing in the current tab.
Click Done to confirm the changes.
Click Cancel to discard the changes.
Add Custom Field
Enter a field name.
Select a field type from the dropdown.
Enter a description for the field.
Click Add Field to save the new field.
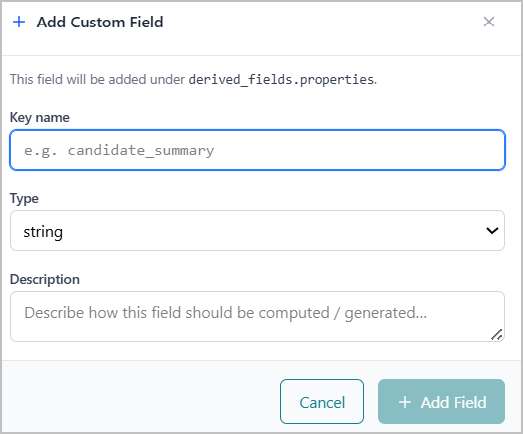
Custom fields are added under the derived_fields.properties section of the schema.
Download JSON
Downloads the schema from the current tab to your local system.
Import JSON
Uploads a new schema in the current tab from your local system.
View Differences
 icon
iconDisplays only the differences between schemas.
Available on the Compare tab.
Save
Saves your changes in the current tab.
Enabled only if there is a JSON modification.
After finalizing the schema, click Promote.
The confirmation dialog box opens.
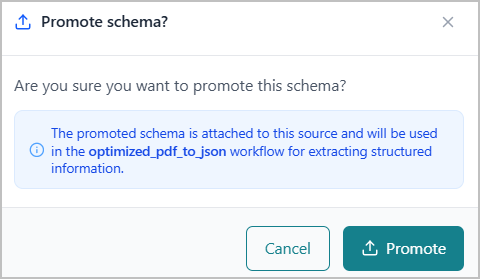
Click Promote.
A success message appears for confirmation.
Viewing a Workflow History
At the bottom of the Data Prep page, you can view real-time details of existing workflows in a card view. Each card displays workflow configurations, execution status, and error diagnostics, enabling you to maintain data integrity, monitor performance, and troubleshoot issues effectively.
To find a specific workflow, select the Schema Explorer, and then either enter the workflow name in the Search Workflow box or scroll through the list of available workflows.
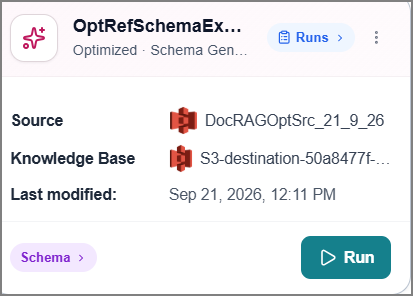 |
Click on the card to open the Workflow page and allow you to view and act on other details.
Click Run to execute the workflow manually.
Click Schema to review and promote the previously generated schemas.
Click Runs to view information about all workflow executions in the Runs tab.
Click the Ellipsis
icon, then click Edit.The Edit Workflow window opens, where you can update the workflow name and description.
Rerunning Schema Workflows
You can rerun workflows multiple times using the same configuration to get a real-time schema from the source.
Find and select the workflow you want to run.
Click Run on the workflow card.
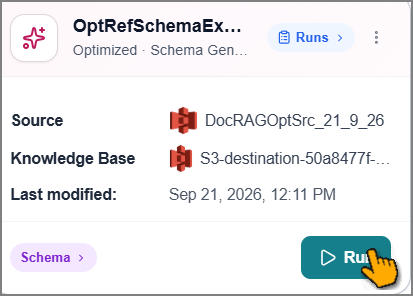
The Run Schema Explorer Workflow window opens.
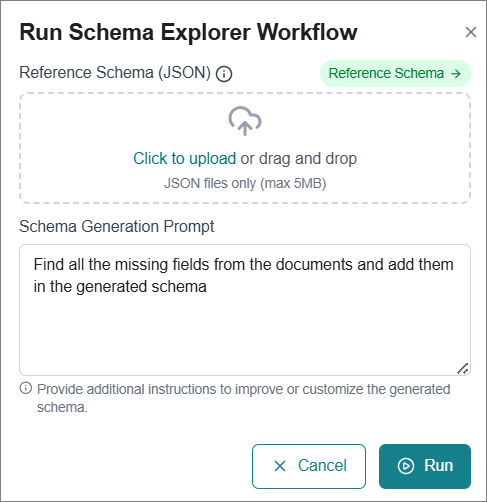
Click Reference Schema to view the existing reference schema if one was uploaded previously.
Upload a new reference schema JSON file to override the existing one, if required.
Update the prompt to modify the extraction instructions as needed.
Click Run.
The configured steps are re-executed with real-time status updates.
Viewing Schema Workflow Details
You can view the details of your schema explorer generation on the workflow page.
To access, filter the workflow, then click on the workflow card. The workflow details page opens.
Workflow Details - The workflow name, description, and current status.
Click the prompt
 icon to view the extraction instructions in the right panel.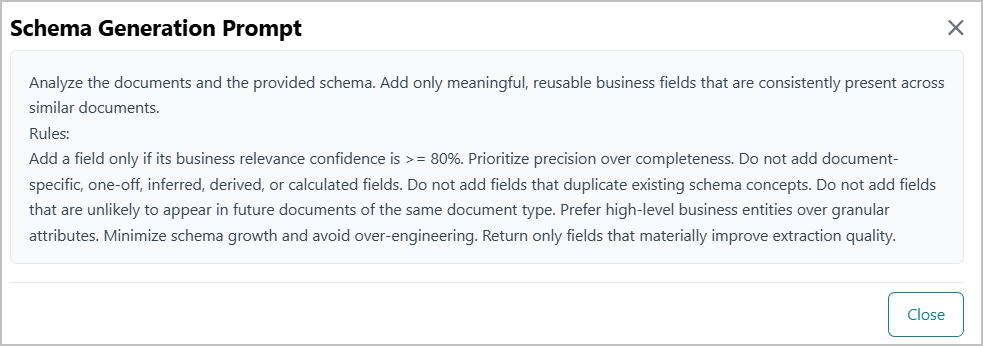
Reprocess All Files - Enable this option to apply your workflow configuration to all source files in future runs. Otherwise, only new or changed files get processed.
Important
This setting remains active once enabled. Only turn it on when you specifically need to reprocess the full dataset. If left enabled, your workflow will reprocess all data from the source every time it runs.
Schema Details - Key details from your most recent execution:
Promoted Schema - Number of fields promoted in the last time.
View Schema - Click to review schema details, edit them as needed, and promote. Refer to Reviewing and Promoting Schema for more information.
Last Run Status – Key details from your most recent execution:
Run Status – Completed, Failed, or In-progress state.
Run Timestamp – Date and time of execution.
Last Run Status
This card helps you to view the status of the most recent workflow execution.
Click Runs to view information about all workflow executions in the panel on the right.
Click View Details to view additional information.
The last execution flow details are displayed.
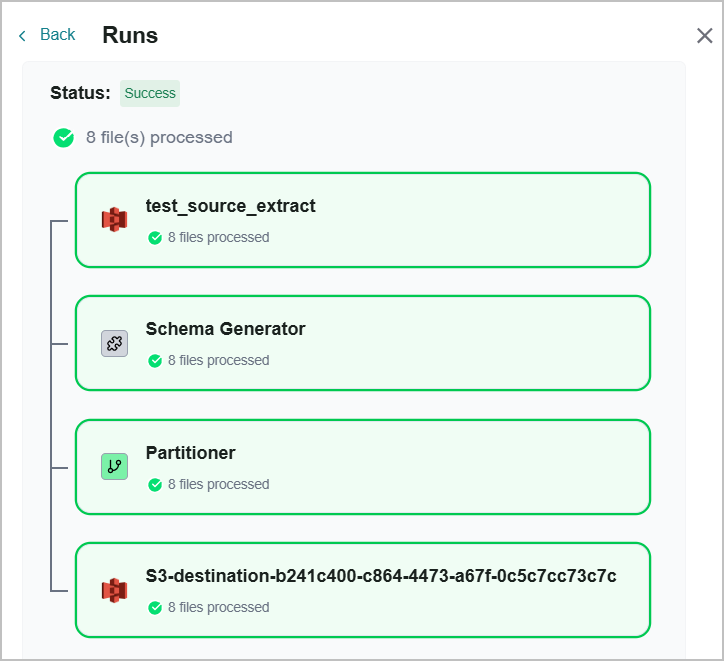
Viewing Runs
At the bottom of the Data Prep page, you can view real-time details of existing workflow executions, including their workflow name, status, timestamp, and flowchart.
Go to the Runs tab to see a list of all execution instances initiated for the workflows.
Click the workflow dropdown and select the required workflow from the list to view its execution details.
Click View Details to view additional details for a specific execution.
The details are displayed on the right-side panel.
Important
The Data Classification feature is available on demand. To enable it, please contact your Uniphore Business AI Cloud support team.
Data Classification is a categorization system that organizes your entities into structured categories and taxonomies. While Global Entity identifies what entities exist, Data Classification determines which groups they belong to, creating organized hierarchies that make information easily discoverable and accessible for an AI application.
The Business AI Cloud platform classifies entities from your source before ingestion using your defined categories and sample classifications as guides, stores them as a global categorization framework, and then uses this framework to consistently categorize all subsequent data across Knowledge Bases.
To access this feature, go to the Home page > Data Ingestion > Data Prep > Classification.
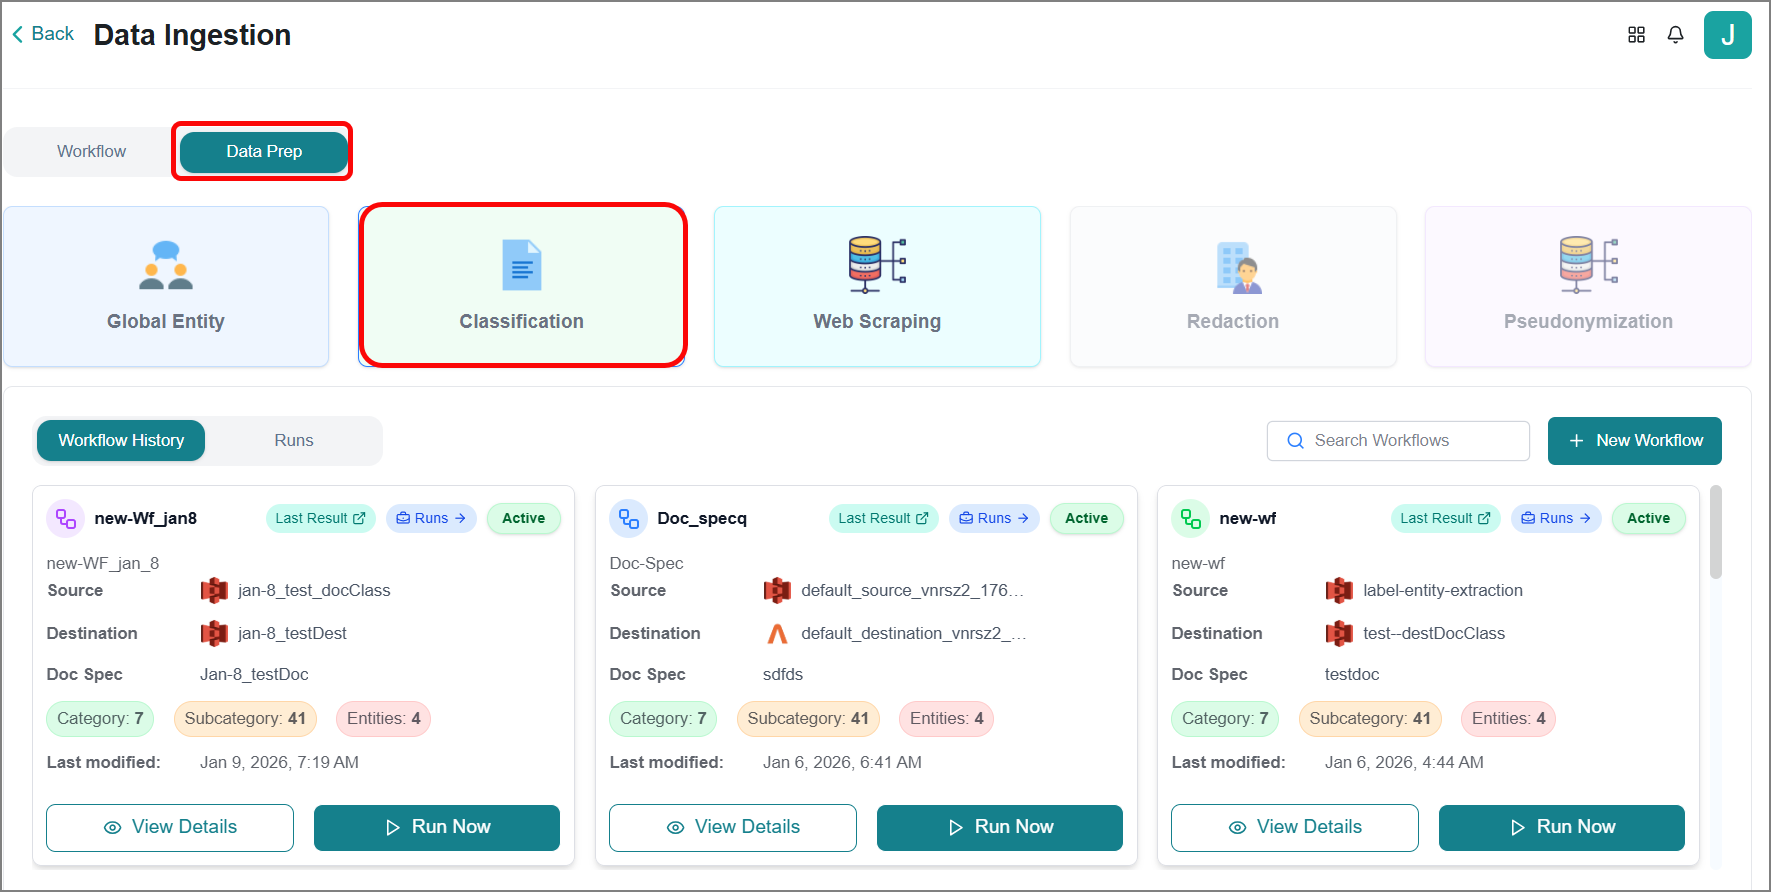
Creating a Classification Workflow
To create a new classification workflow:
Click New Workflow.
The Document Processing page opens. First, create a Document Specification.
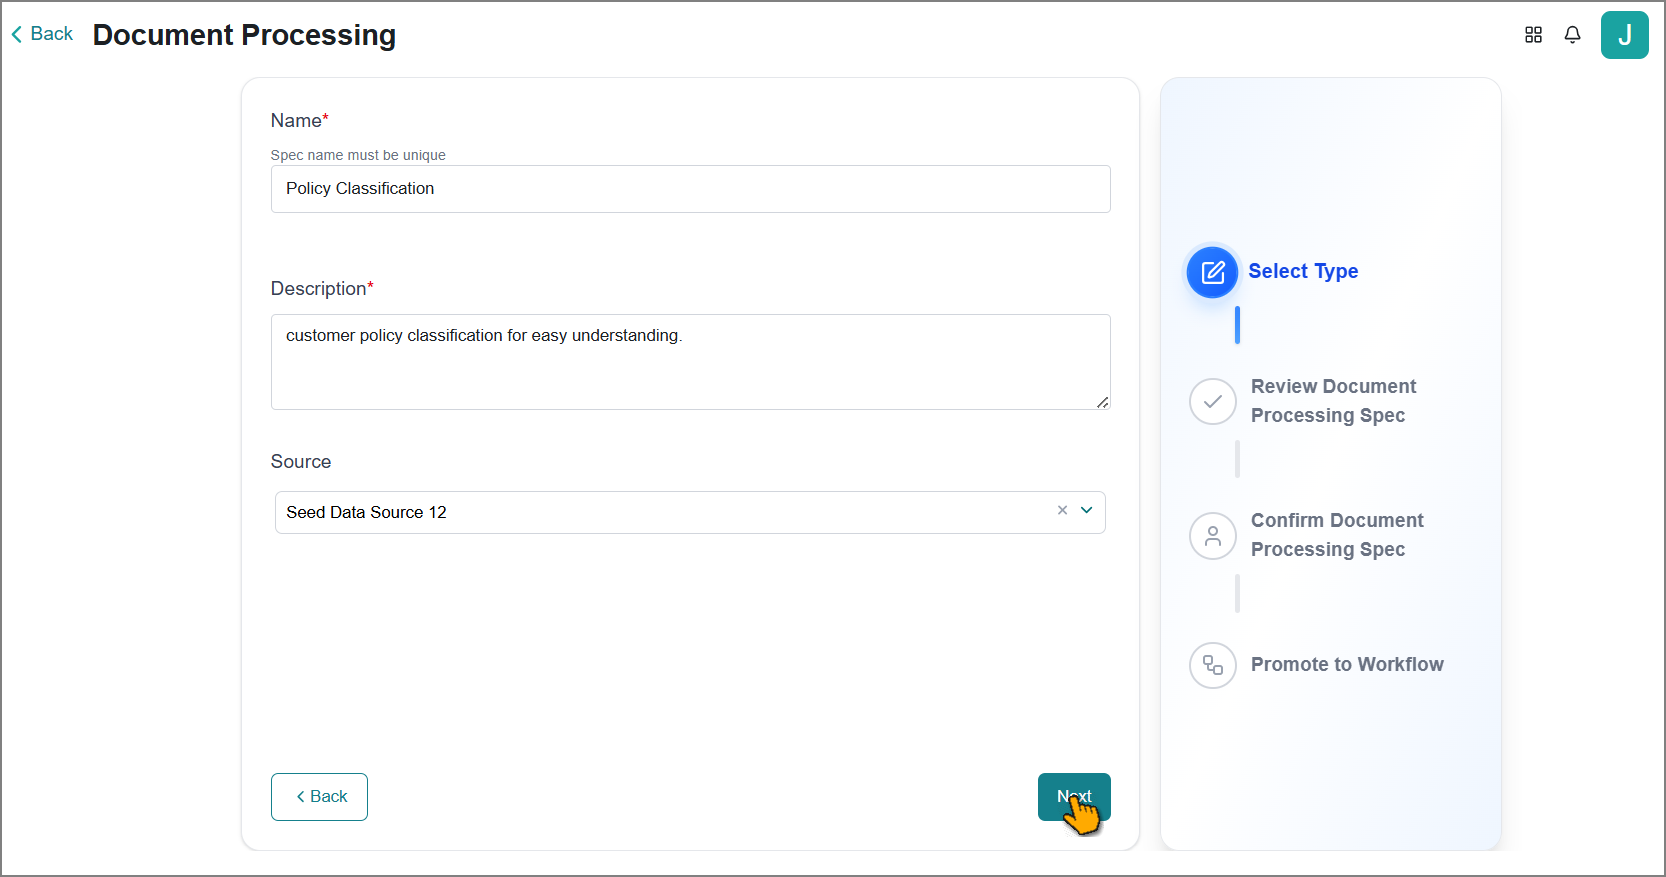
Enter a unique name for the specification.
Enter a detailed description explaining the specification.
Select your data source from the Source dropdown to tag the Document Specification with it.
Click Next to proceed to the classification setup.
Upload your classification rules template in CSV format:
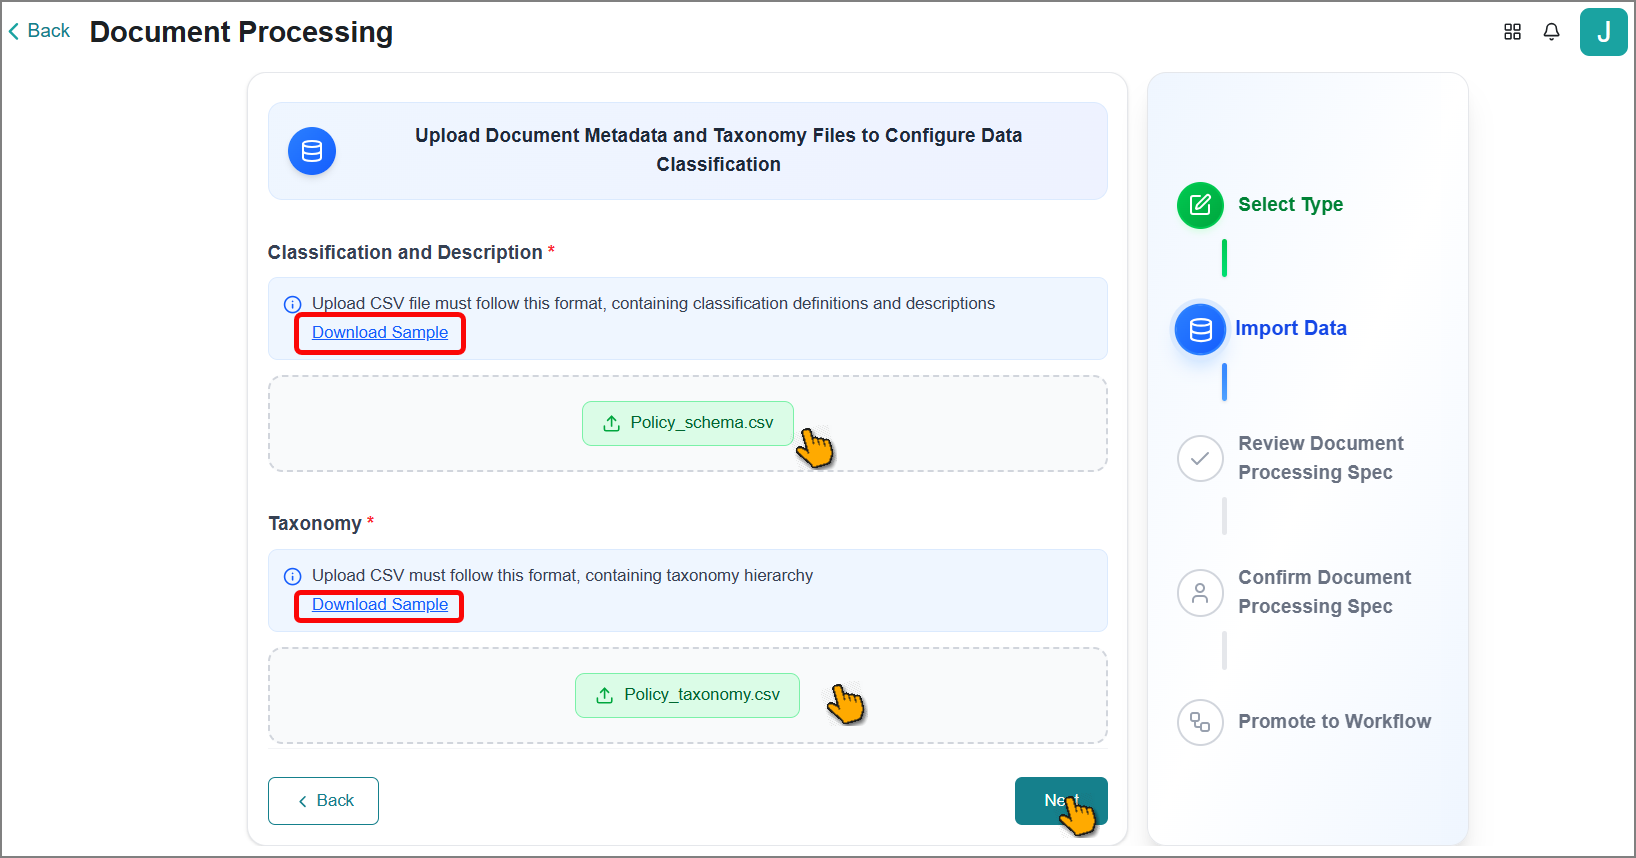
Click Download Sample to get a template file.
Fill in the template with your classification rules.
Click Upload CSV to submit your completed file.
Upload your taxonomy hierarchy in CSV format.
Click Download Sample to get a template file.
Fill in the template with your taxonomy data.
Click Upload CSV to submit your completed file.
Click Next to proceed.
Review the uploaded classification rules and update them as needed. Refer to Reviewing a Document Specification for more information.
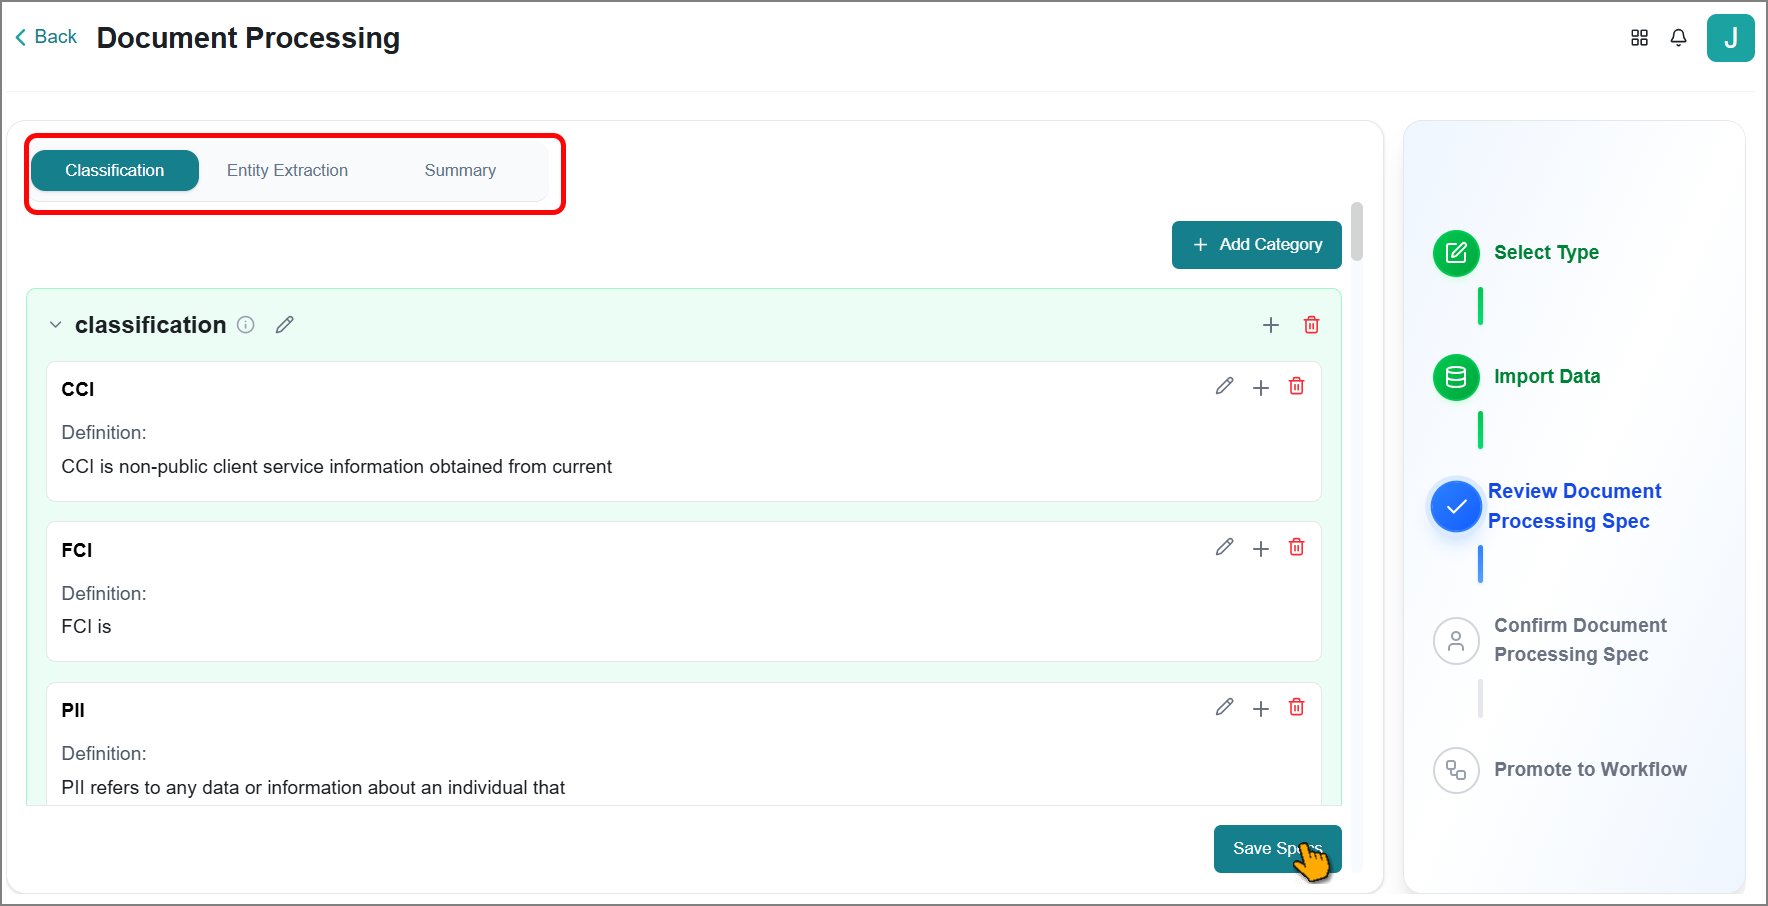
Click Save Specs to proceed with workflow configuration.
Enter a workflow name for the classification.
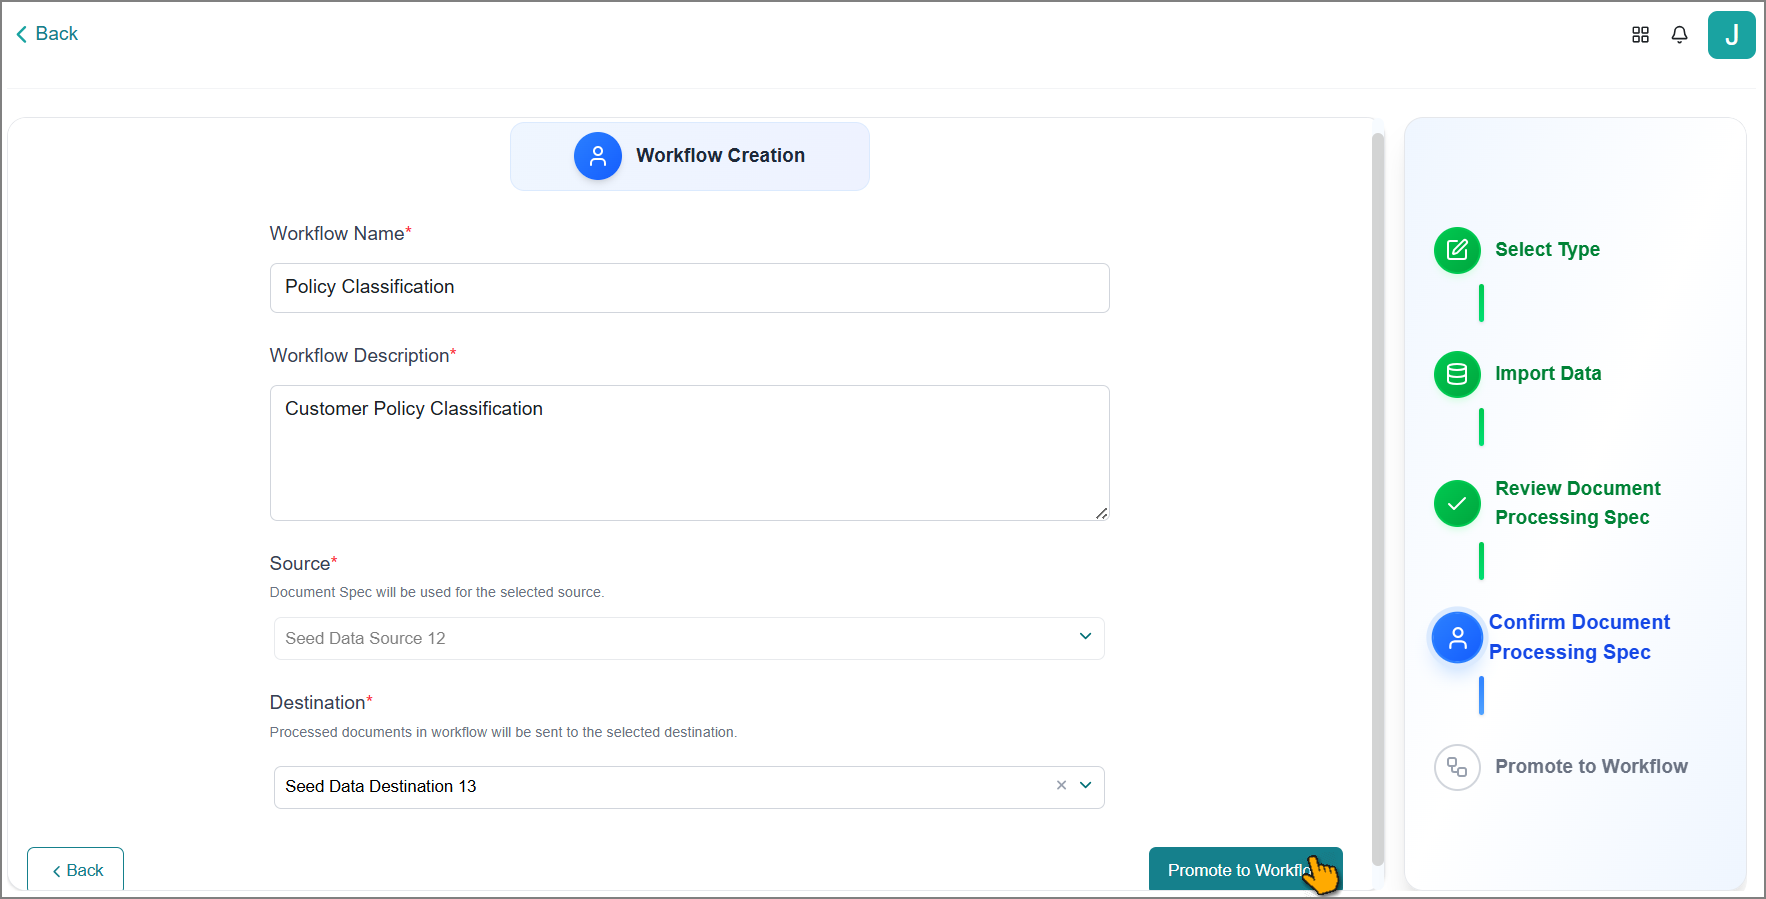
Enter a detailed description explaining the workflow's purpose and scope.
Your data source is automatically selected based on your previous selection.
Select the predefined Destination from the dropdown. It helps to store the classified data.
Click Promote to Workflow to generate your workflow.
The workflow page opens with the default flowchat.
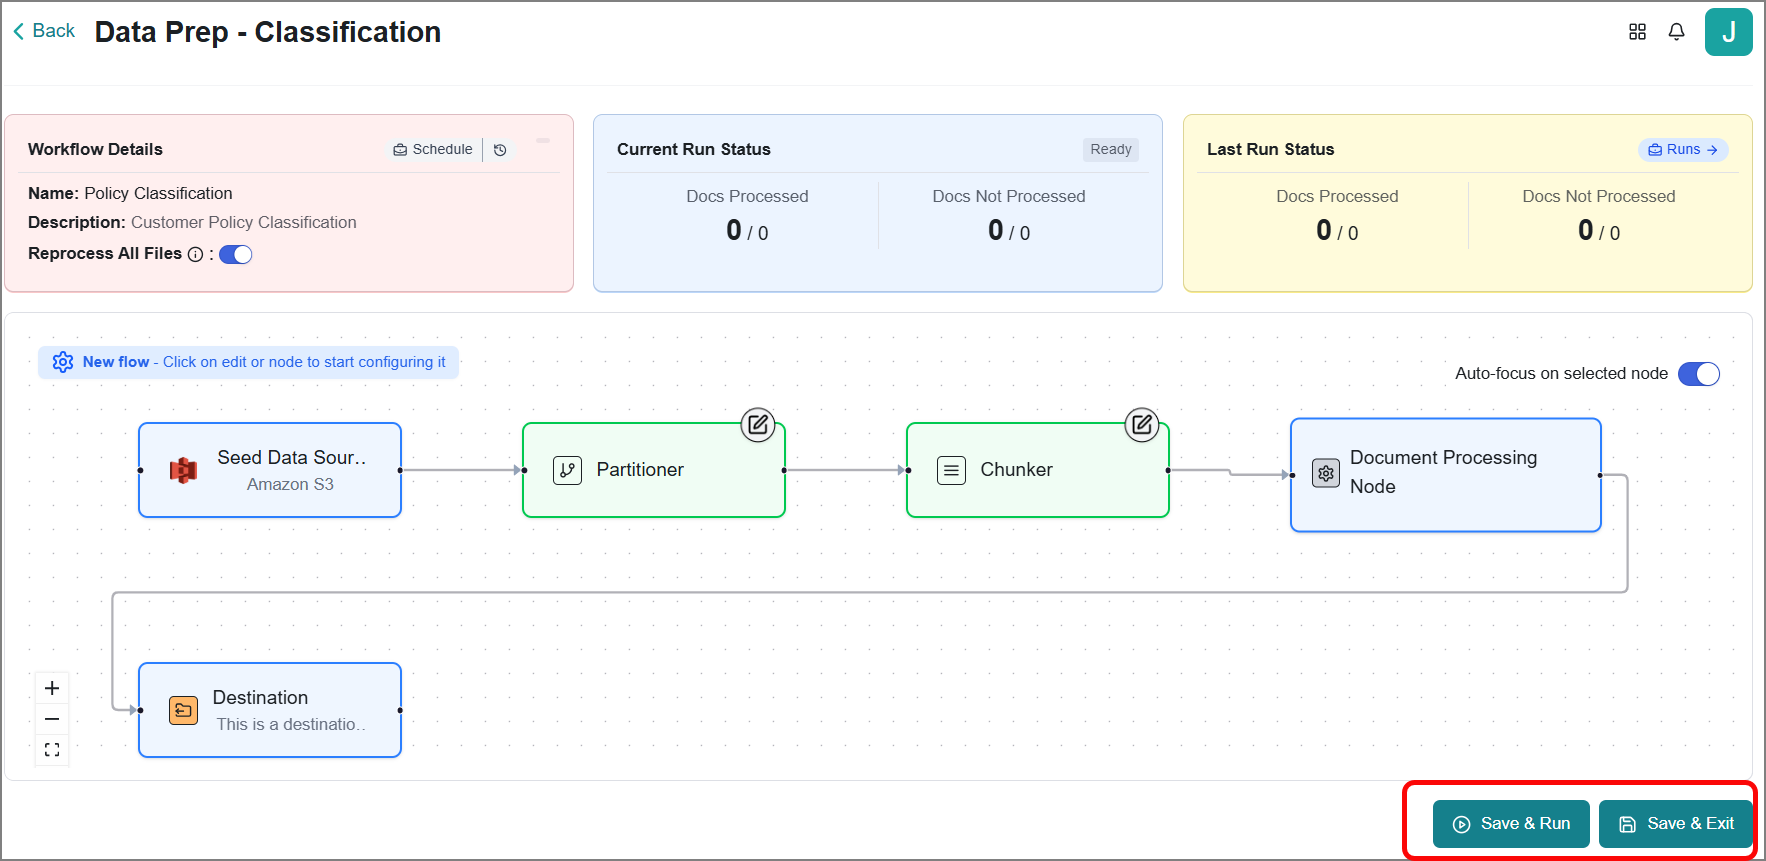
You can review and modify workflow models at any time to align with your data preparation needs.
Select the nodes to view their configuration in the right-side panel.
Update the configuration if needed.
Settings
Fields
Values Description
Partitioner
Partition Strategy
Select from the following:
Fast - Choose this option if the uploaded file contains only text, without any embedded images or tables.
Hi Res - Choose this option if the uploaded file contains text with embedded images or tables.
VLM - Choose the Vision-Language Model (VLM) if the uploaded file contains scanned pages, handwritten notes, or other complex document types.
Chunker
Chunker
Select from the following:
Chunk By Character - Splits the extracted content into uniform chunks based on a predefined character limit.
Chunk By Title - Splits content at each detected title or heading based on file structure.
Chunk By Page - Splits content page by page, preserving the original pagination from the source file.
Chunk By Similarity - Splits content based on semantic similarity between segments, using vector-based similarity thresholds.
Checkbox: Include Original Elements
Enable this option to include non-textual or structural elements—such as images, tables, and headers.
Contextual Chunking Strategy
Select either of the ones below:
V1 - Enable context-aware chunking to maintain semantic relationships between document sections.
None - Disable chunking strategy and process documents without contextual segmentation.
Max Characters
Enter the maximum number of characters allowed per chunk during the content splitting process.
Combine Text Under N Characters
Enter the minimum number of characters for a chunk. Chunks smaller than this will be merged with the next one.
Applicable for the Chunk By Title strategy only.
New After N Characters
Enter the number of characters after which a new chunk should be created, regardless of natural content boundaries.
Overlap
Enter the number of characters that should overlap between consecutive chunks during content splitting.
Checkbox: Overlap All
Enable this option to apply overlap to all chunks, including those formed by combining complete structural elements.
Caution
This may break meaningful content boundaries and add redundant or irrelevant text, which can affect retrieval accuracy.
Checkbox: Multipage Sections
Enable this option to detect and merge sections that span across multiple pages during document processing.
Applicable for the Chunk By Title strategy only.
Similarity Threshold
Enter the minimum similarity score required to group sentences or segments together.
Applicable for the Chunk By Similarity strategy only.
Important
Mandatory fields are marked with
 .
.For security reasons, specific field values are hidden by default. Click
 to view them.
Click Save & Run to execute the workflow and classify the source data, or click Save & Exit to save the workflow without executing it.
Reviewing a Document Specification
The platform lets you view and modify classification rules directly.
Classification tab - Displays all classification categories and subcategories that need to be identified from your source.
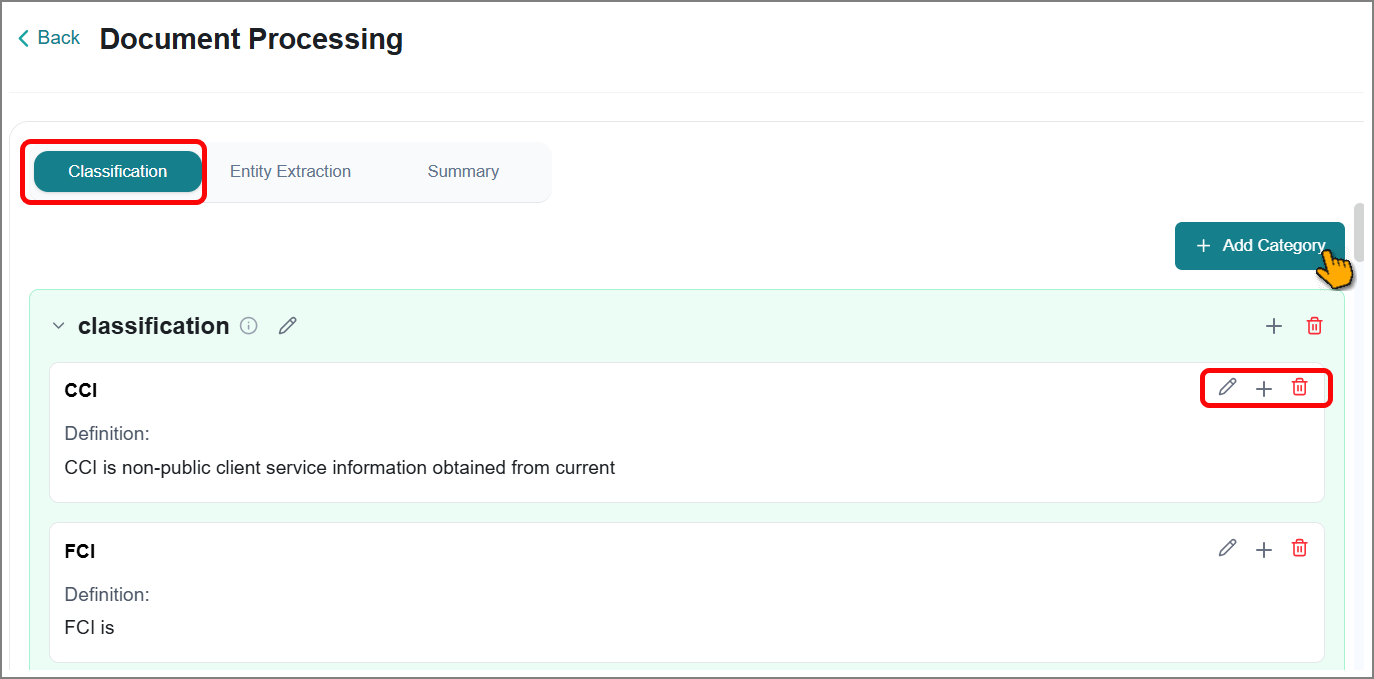
Click Add Category to add a new category.
Entity Extraction tab - Displays all entities that need to be extracted from your source.
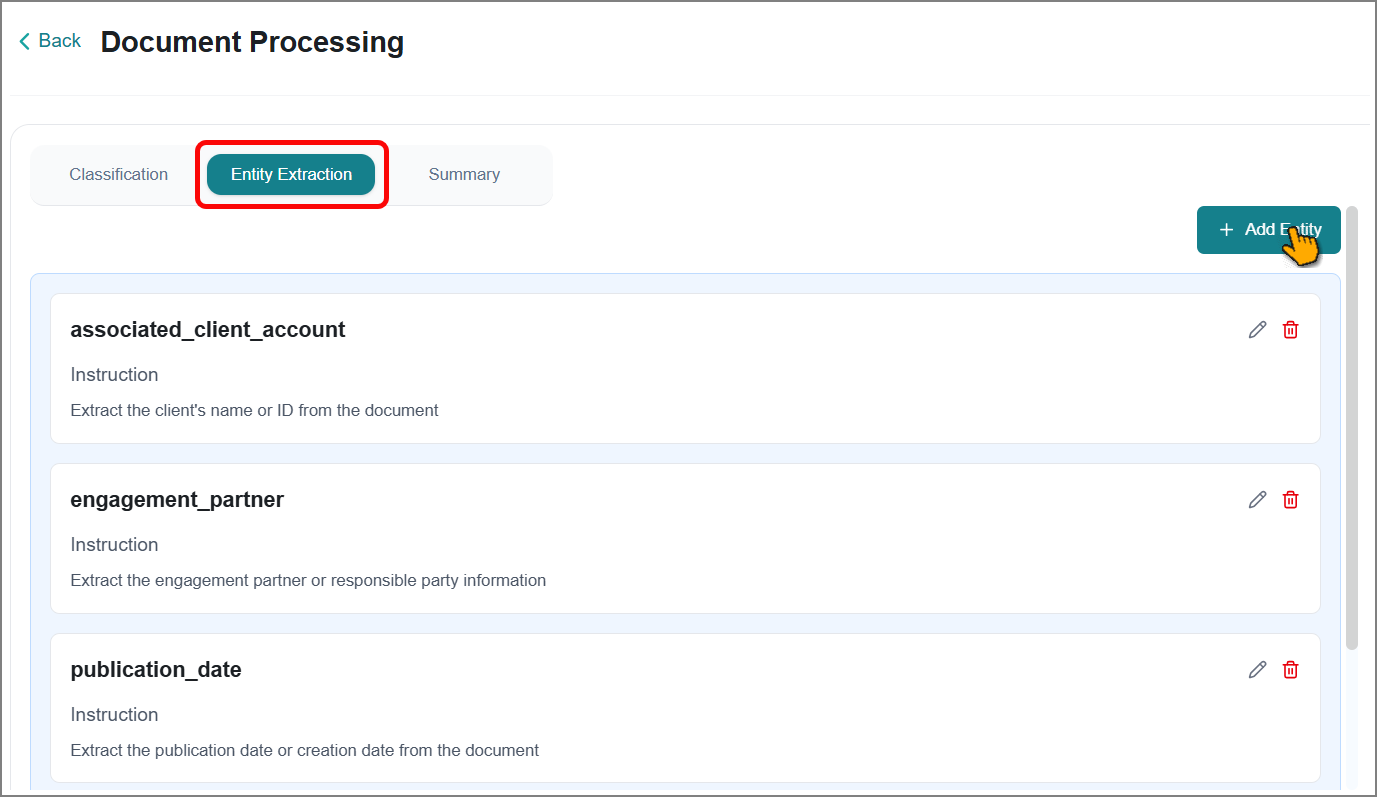
Click Add Entity to add a new entity.
Summary tab - Displays what should be the system-generated description about the source.
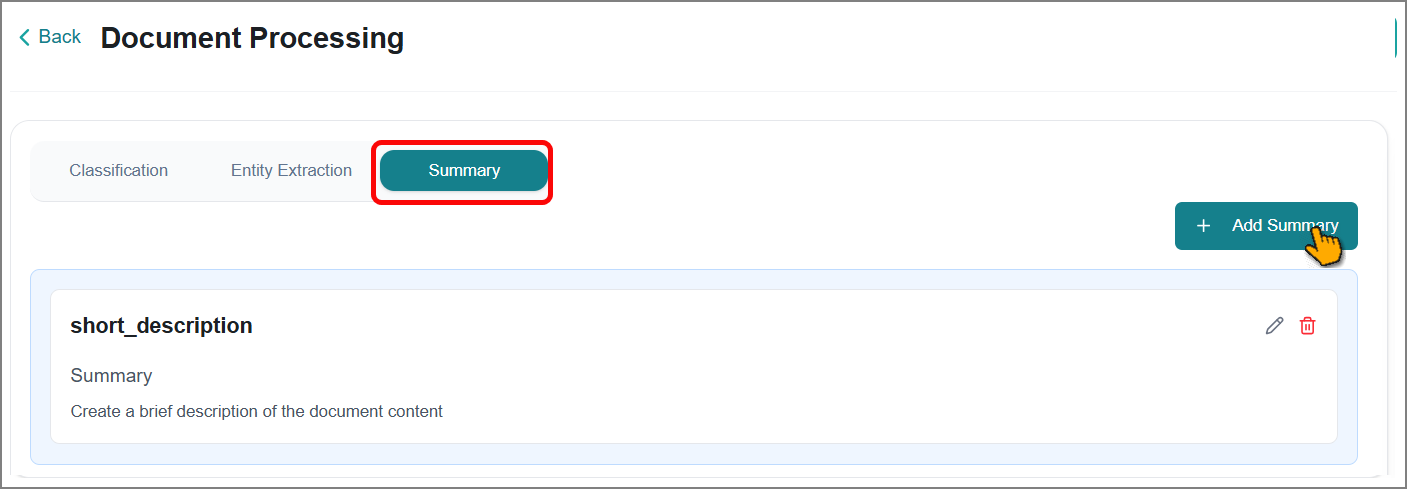
Click Add Summary to add a new summary.
Use the following icons for more actions:
Icon
Action
Description
Info
View system-generated explanation for category identification.

Add
Create a new classification category or subcategory within the list.
Edit
Modify the name or description of existing categories.
Save
Save your changes after making modifications.
Cancel
Close the editor without saving changes.
Delete
Remove a category or subcategory from the list.
Viewing Workflow History
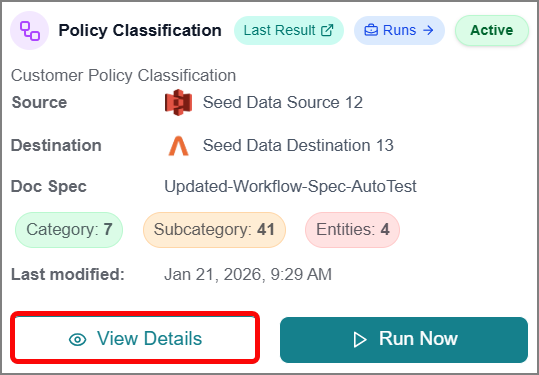
At the bottom of the Data Prep page, you can view real-time details of existing workflows in a card view. Each card displays pipeline configurations, execution status, and error diagnostics, enabling you to maintain data integrity, monitor performance, and troubleshoot issues effectively.
To find a specific workflow, select the Classification, then either enter the workflow name in the Search box or scroll through the list of available workflows.
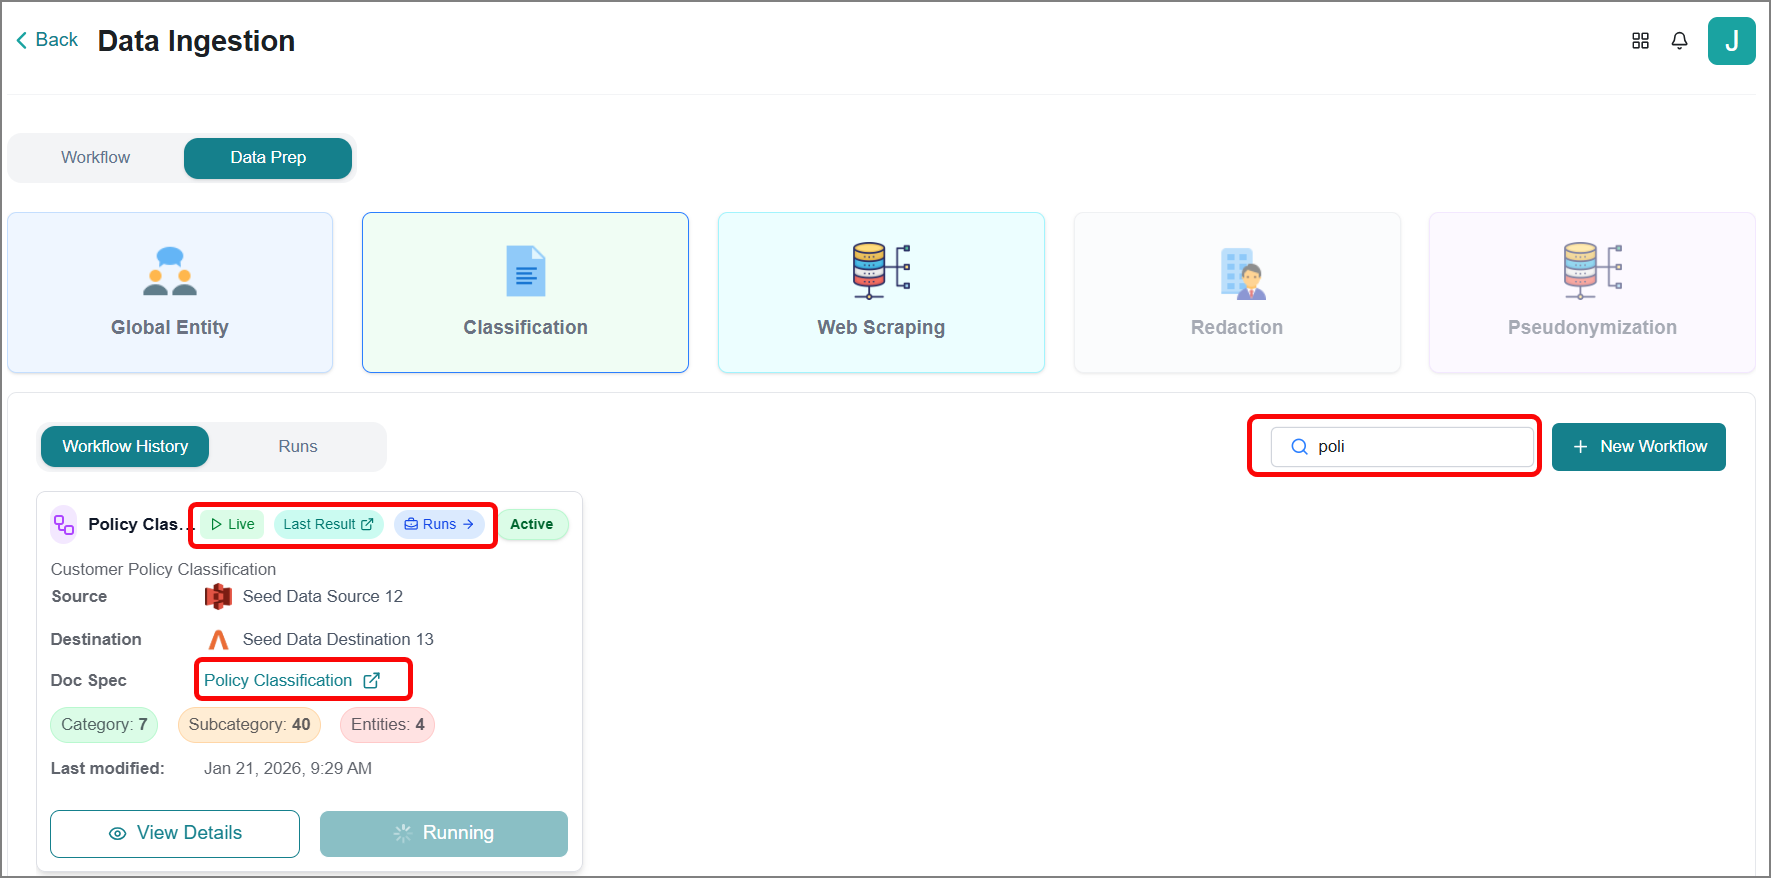
Click View Details to open the Workflow page and allow you to view and act on other details.
Click Run Now or Rerun to execute the workflow manually.
Click Live to view detailed status information for each component in the Live Panel on the right.
Click Last Result to view the recent Classified Data.
Click Runs to view information about all workflow executions in the Runs tab.
Hover over the Doc Spec name and click
 to open the Document Specification page.
Viewing Classified Data
After running the workflow, you can explore your results across three different views to understand how your data has been organized and processed.
Filter and find the required workflow.
Click Last Result on the workflow card.
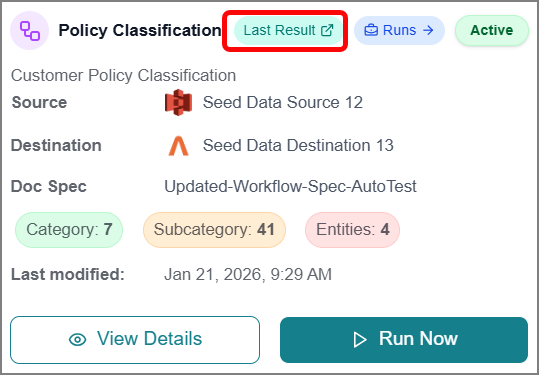
The Classified Data page opens with three tabs.
On the Classification tab, you can view all classified categories and their associated documents.
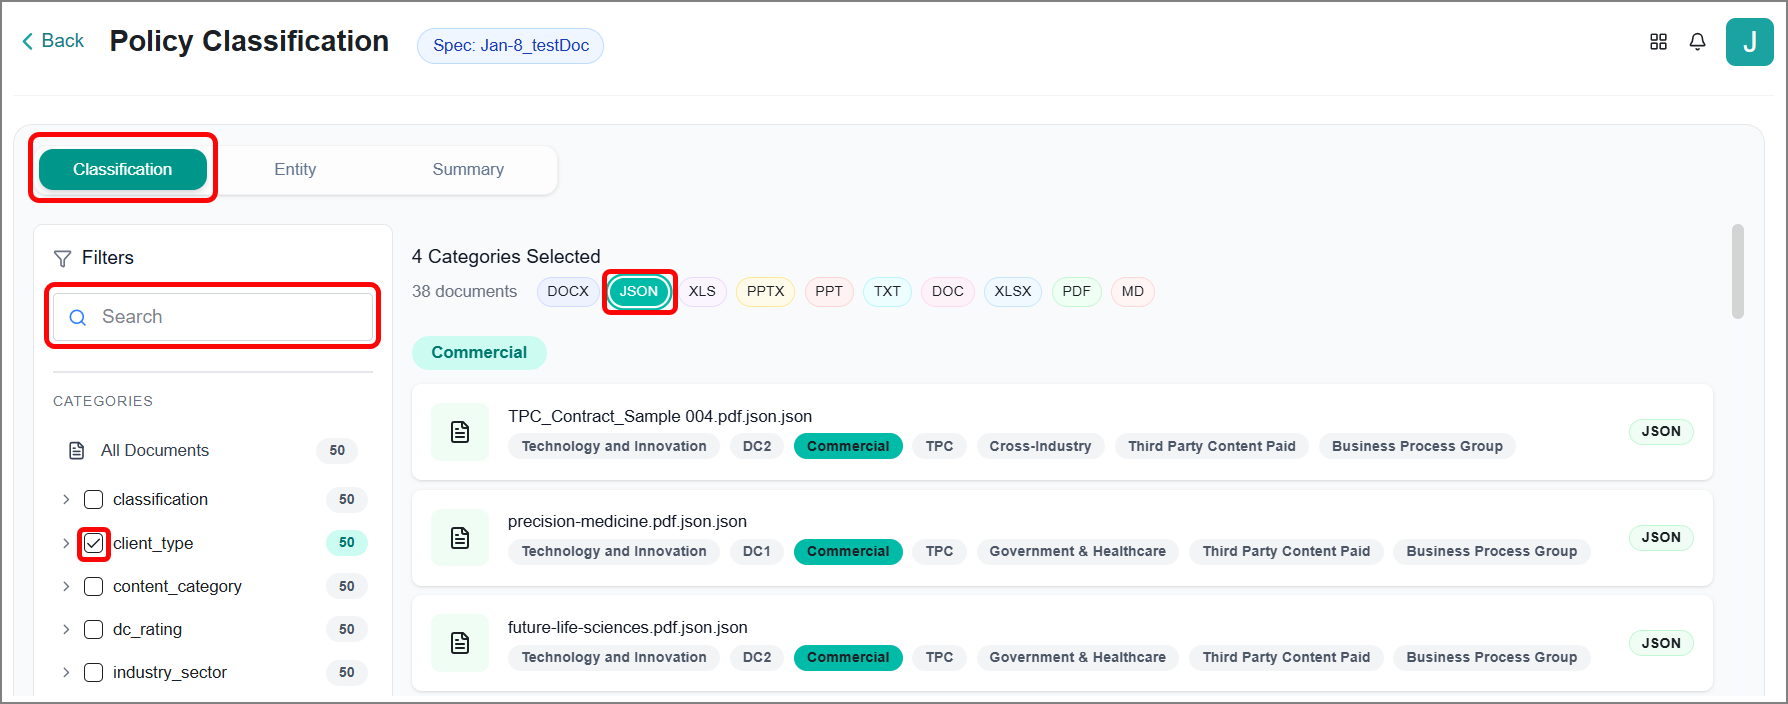
Use the search box to search the document by keywords.
Apply checkbox filters to narrow results.
Filter by document type to view specific document formats by selecting the required type.
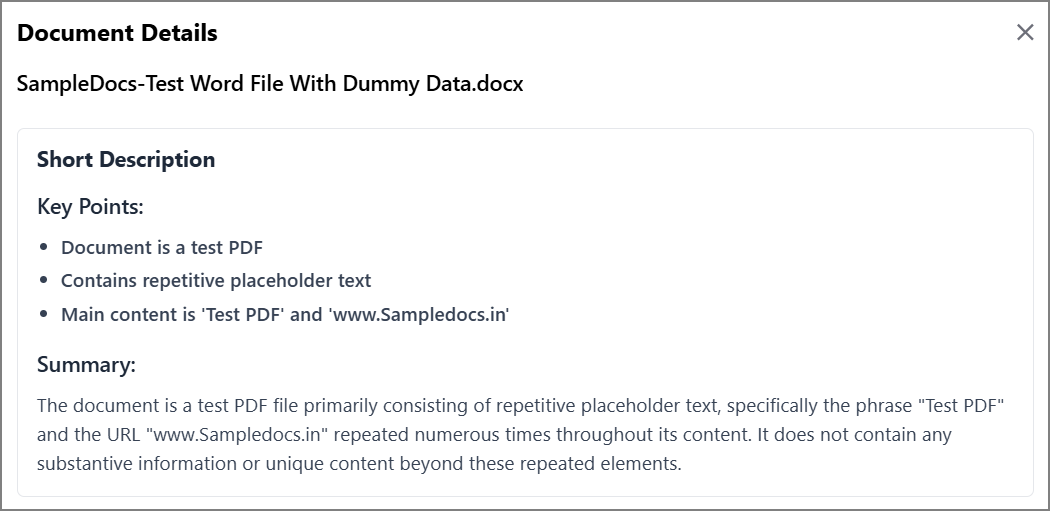
Click any document to open its details in the right side panel.
Switch to the Entities tab to view all entities from the source based on your specification rules.
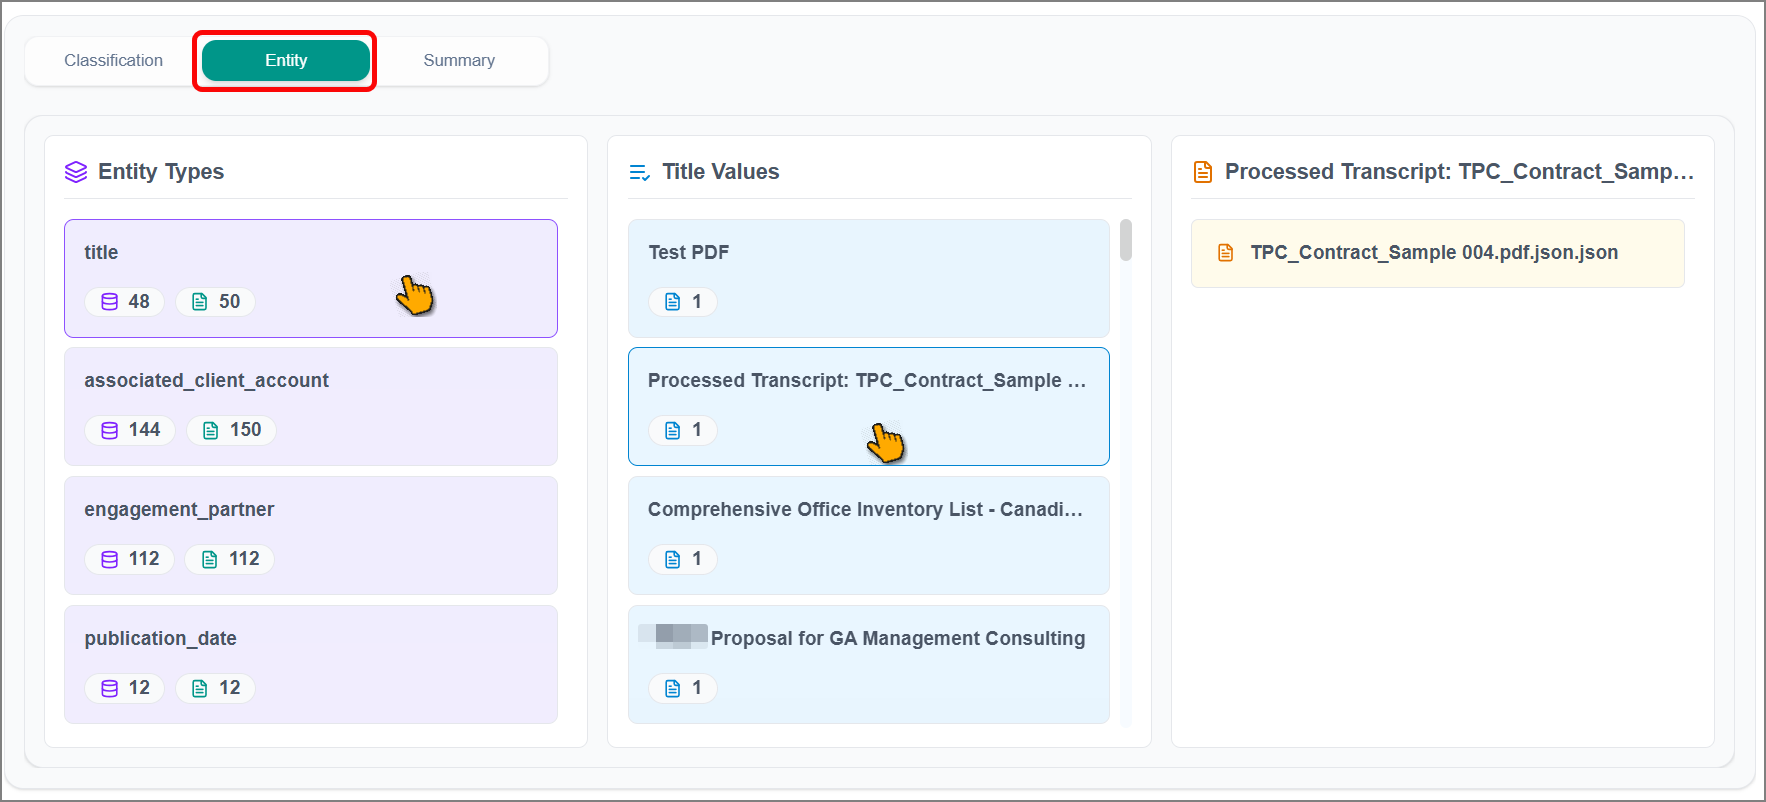
The Entity Type panel lists all available entity types.
Click any entity type to view all values for that entity.
Click any value to view which source documents contain it.
Click any document to view its full details in the right side panel.
Switch to the Summary tab to view brief descriptions of all documents in your source.
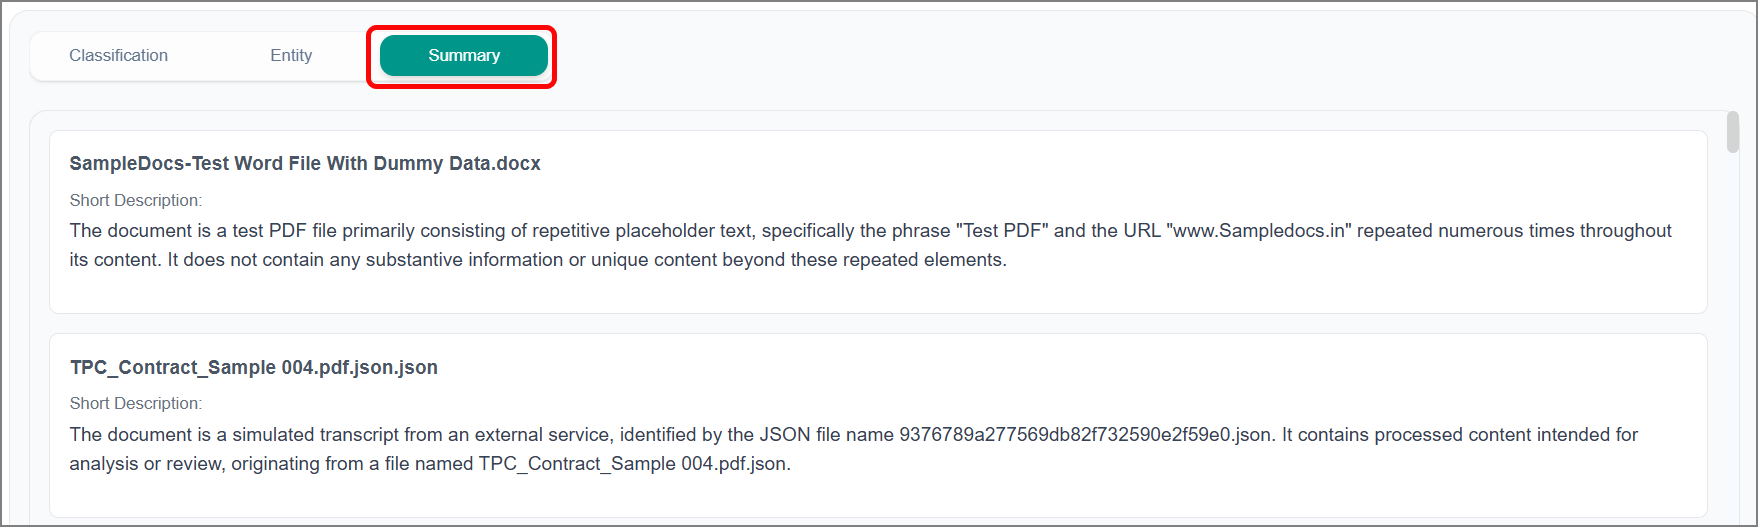
Click Show More next to any description to read the complete summary.
Click any document to view its full details in the right side panel.
Viewing Workflow Details
You can view various information related to your data classification workflow.
To access, filter the workflow, and click View Details on the workflow card.
 |
The workflow page opens.
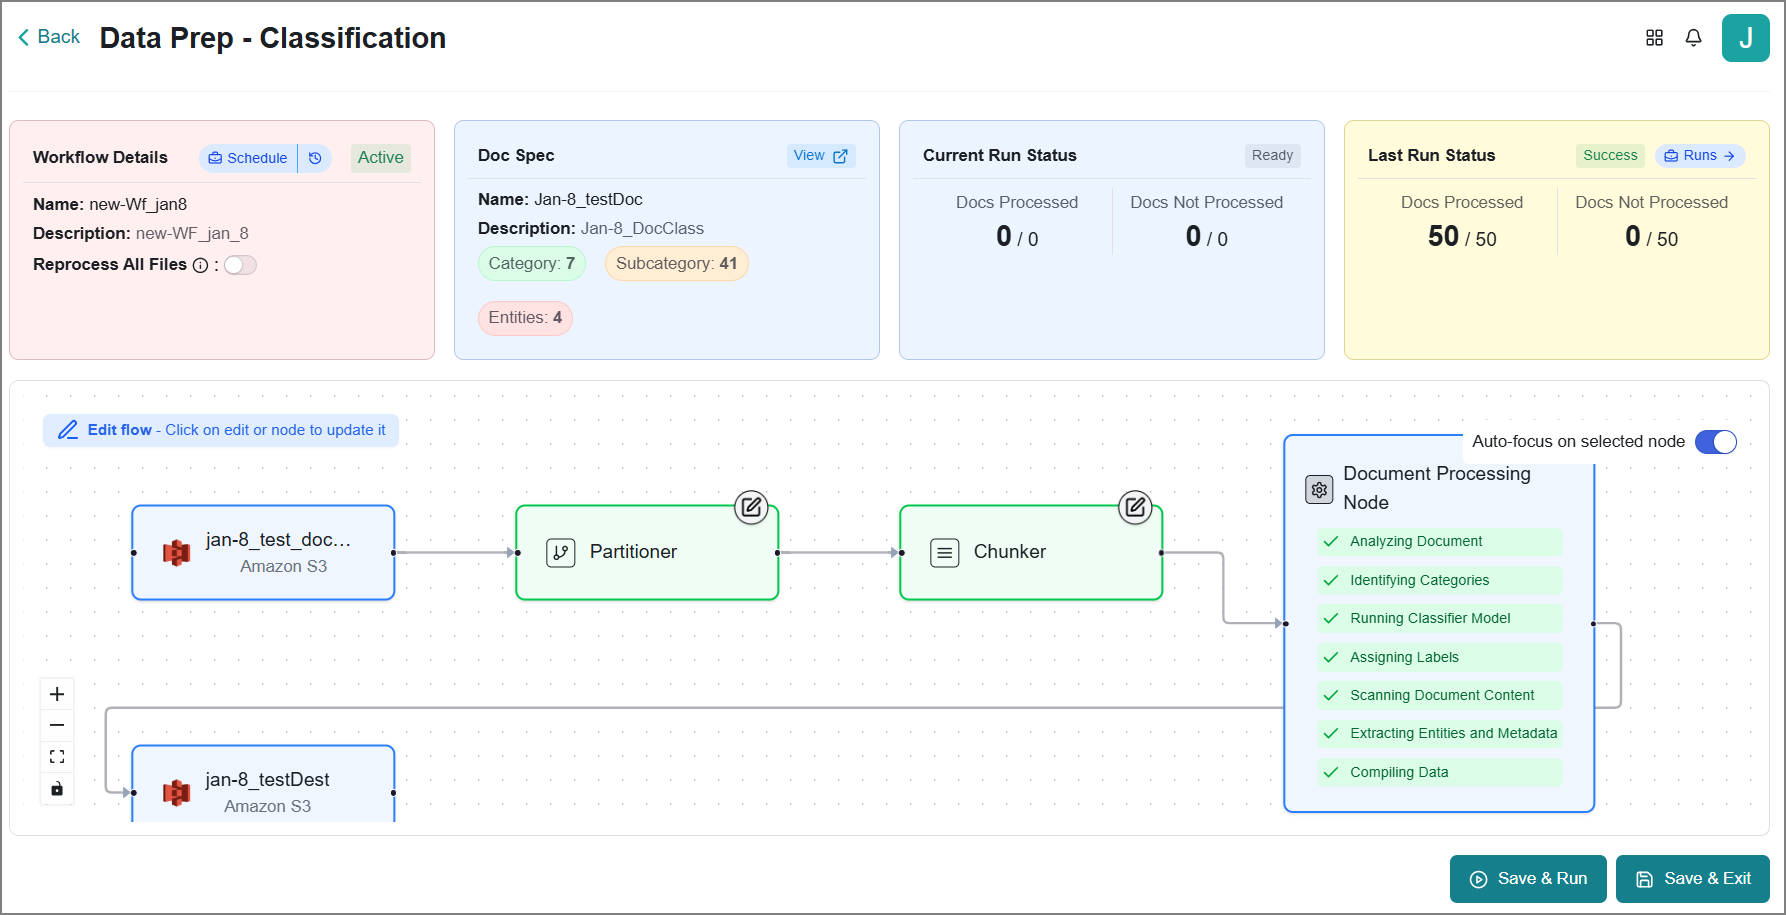
Workflow Details - The workflow name and description.
Reprocess All Files - Enable this option to apply your workflow configuration to all source files in future runs. Otherwise, only new or changed files get processed.
Docs Processed - Displays the number of files successfully processed out of the total files from the source location.
Docs Not Processed - Displays the number of files that could not be processed out of the total number of files from the source location.
Document Specification
This card helps you view the specification tagged to a workflow. It displays the specification name, description, classified data, and its count.
To view the specification:
Click View.
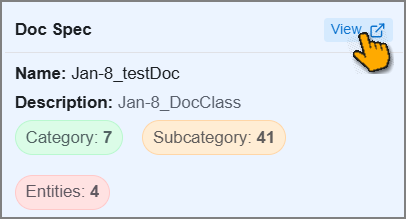
The Document Specification page opens.
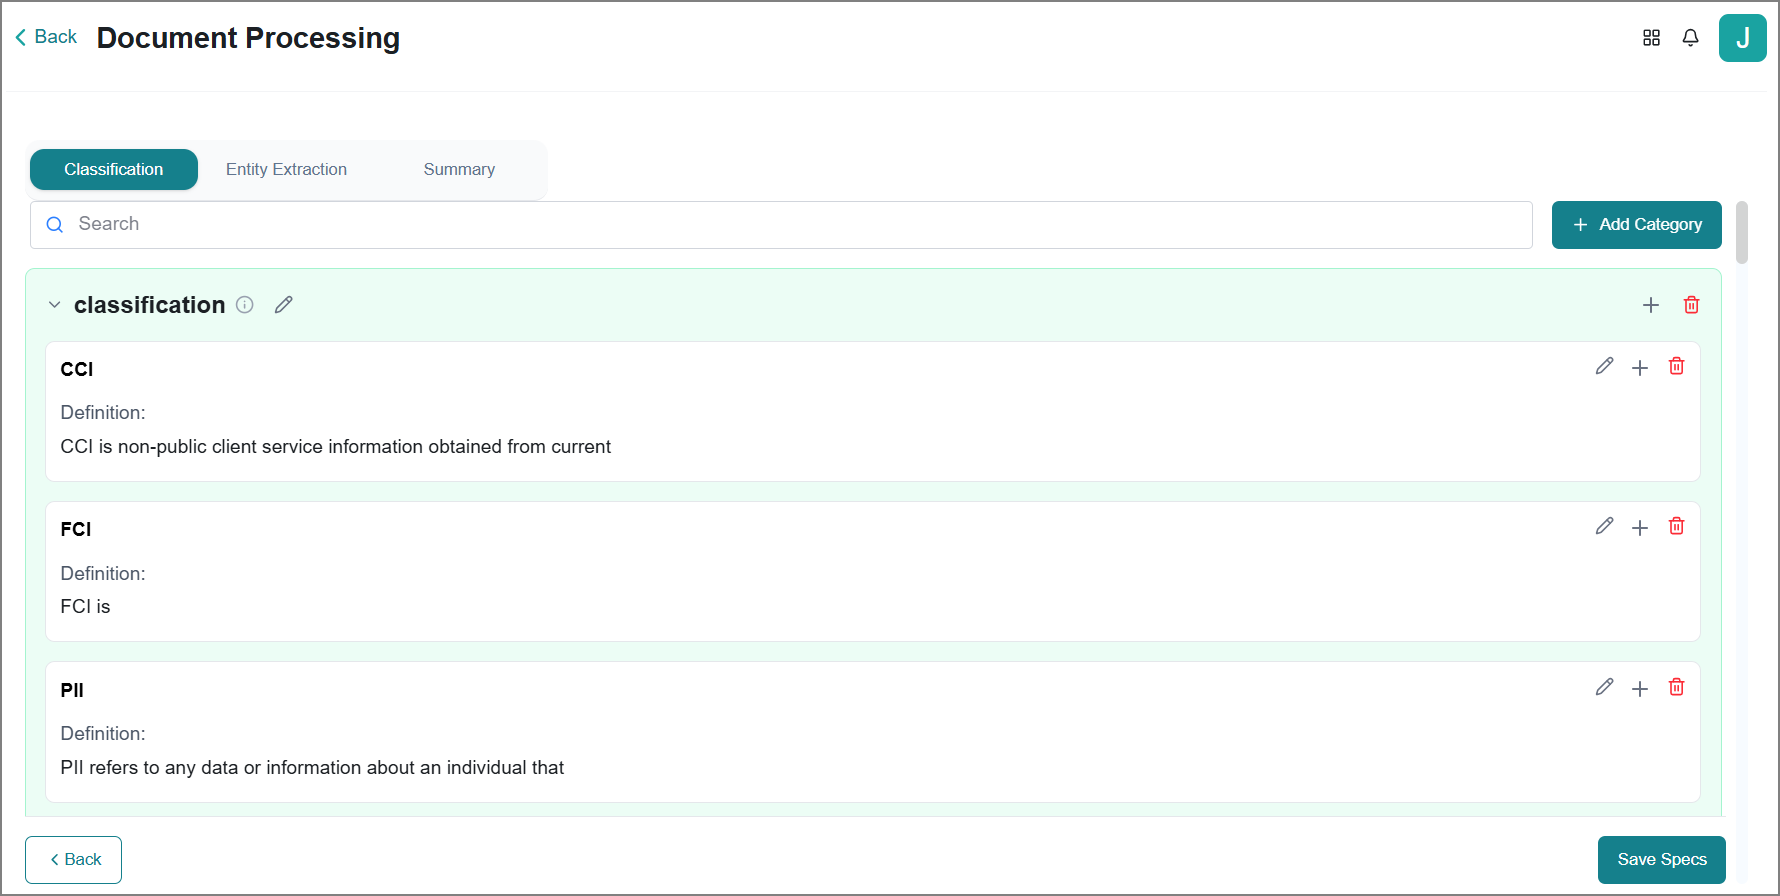
You can review and update the classification rules as needed. Refer to Reviewing a Document Specification for more information.
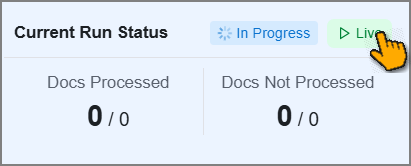
Current Run Status
This card helps you to view the real-time progress of a workflow execution.
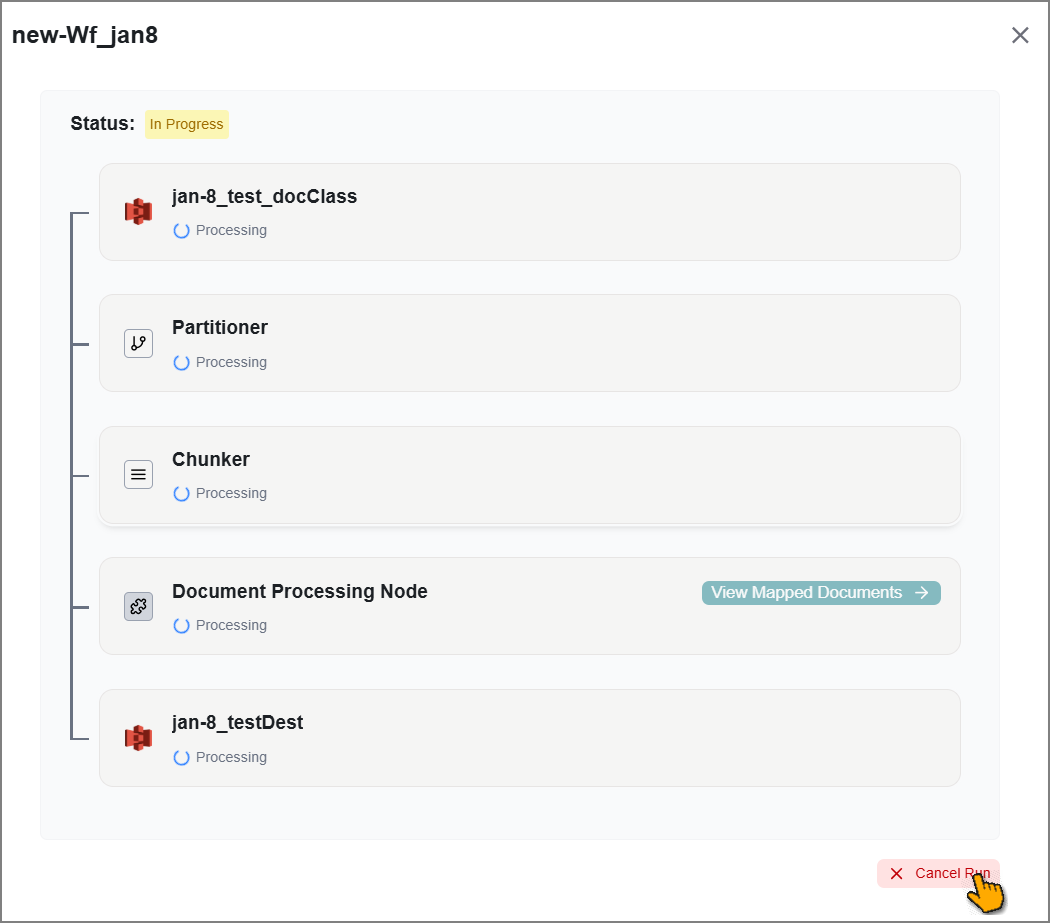
Click Live to view detailed status information for each component in the panel on the right.
Important
This option is available only while the workflow is actively executing.
To stop the execution, click Cancel Run.
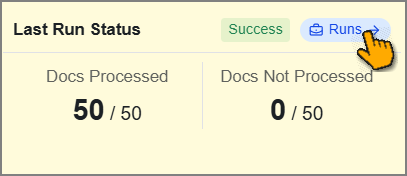
Last Run Status
This card helps you to view the status of the most recent workflow execution.
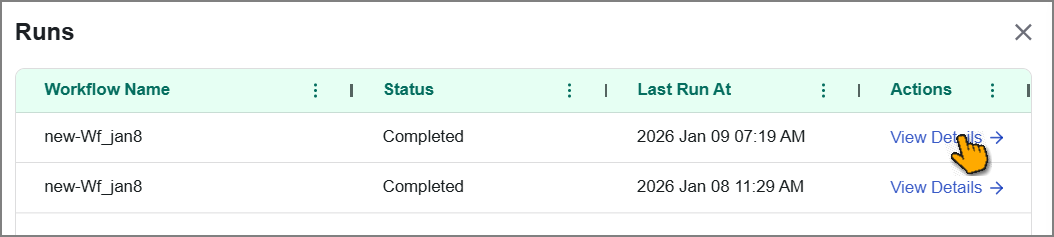
Click Runs to view information about all workflow executions in the panel on the right.
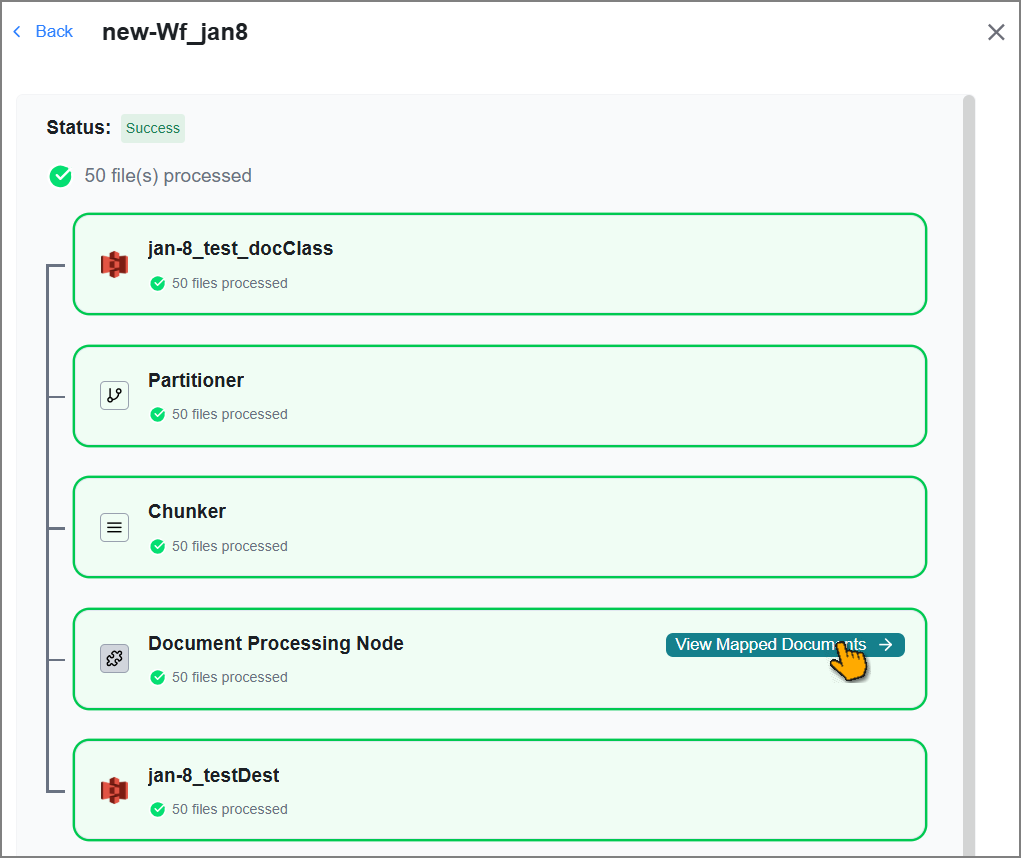
Click View Details to view additional details for a specific execution.
Click View Mapped Documents on the Document Processing Node to view the classified data.
Rerunning Workflows
You can rerun workflows multiple times using the same configuration to classify data in real time from the source. Choose to run them manually or schedule them to run automatically.
Manual Run
Go to the Home page > Data Ingestion > Data Prep.
Find and select the workflow you want to run.
Click Run Now or Rerun to initiate workflow manual execution.
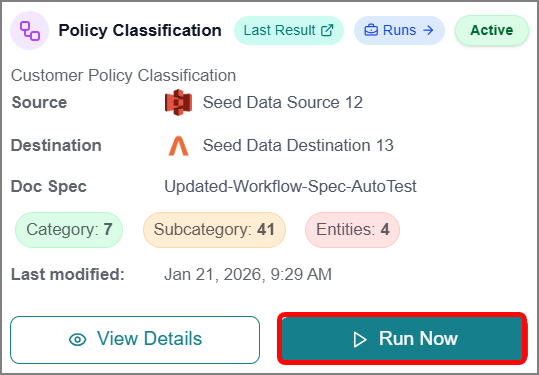
The configured steps are re-executed with real-time status updates.
Schedule Run
Go to the Home page > Data Ingestion > Data Prep.
Find and select the workflow you want to schedule a run for.
Click View Details to open the workflow page.
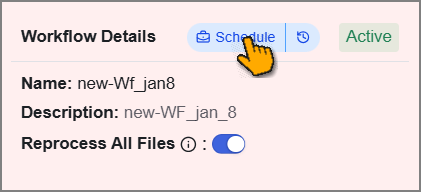
Click Schedule from the workflow details card.
Tip
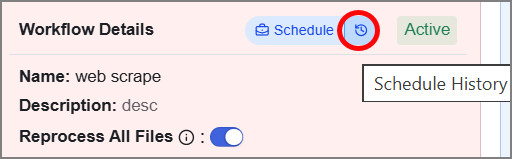
Use the
 icon to open the Schedules History and view a complete list of workflow schedulers and their execution details.
The Schedule window opens.
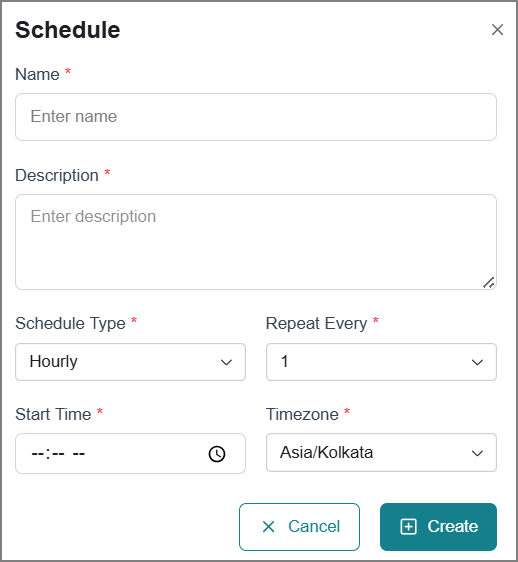
Enter relevant details in the fields.
Field
Description
Name
Enter a name for this schedule.
Description
Enter additional details about the purpose or scope of the schedule.
Schedule Type
Select how frequently the schedule should run:
Hourly
Daily
Weekly
Monthly
Yearly
Repeat Every
Specify the interval for the recurring schedule.
Hourly schedule - 1 to 23
Daily schedule - 1 to 31
Notice
If the scheduler tries to start a new job while a previous one is still running, the system will cancel the new job to avoid overlapping executions.
Days of the week
Select one or more days of the week to run the schedule.
Available for a Weekly schedule only.
Day of the Month
Select the specific date of the month to run the schedule.
Available for Monthly schedules only (1 to 30).
Day and Month
Select the specific month and date to run the schedule.
Available for Yearly schedules only.
Start Time
Set the time when the schedule should begin.
Timezone
Select your timezone to ensure the schedule runs at the correct local time.
Click Create.
The scheduled run is created, and the run will be triggered automatically according to your selected interval.
Note
Follow the same procedure to update the existing schedule.
Schedules History
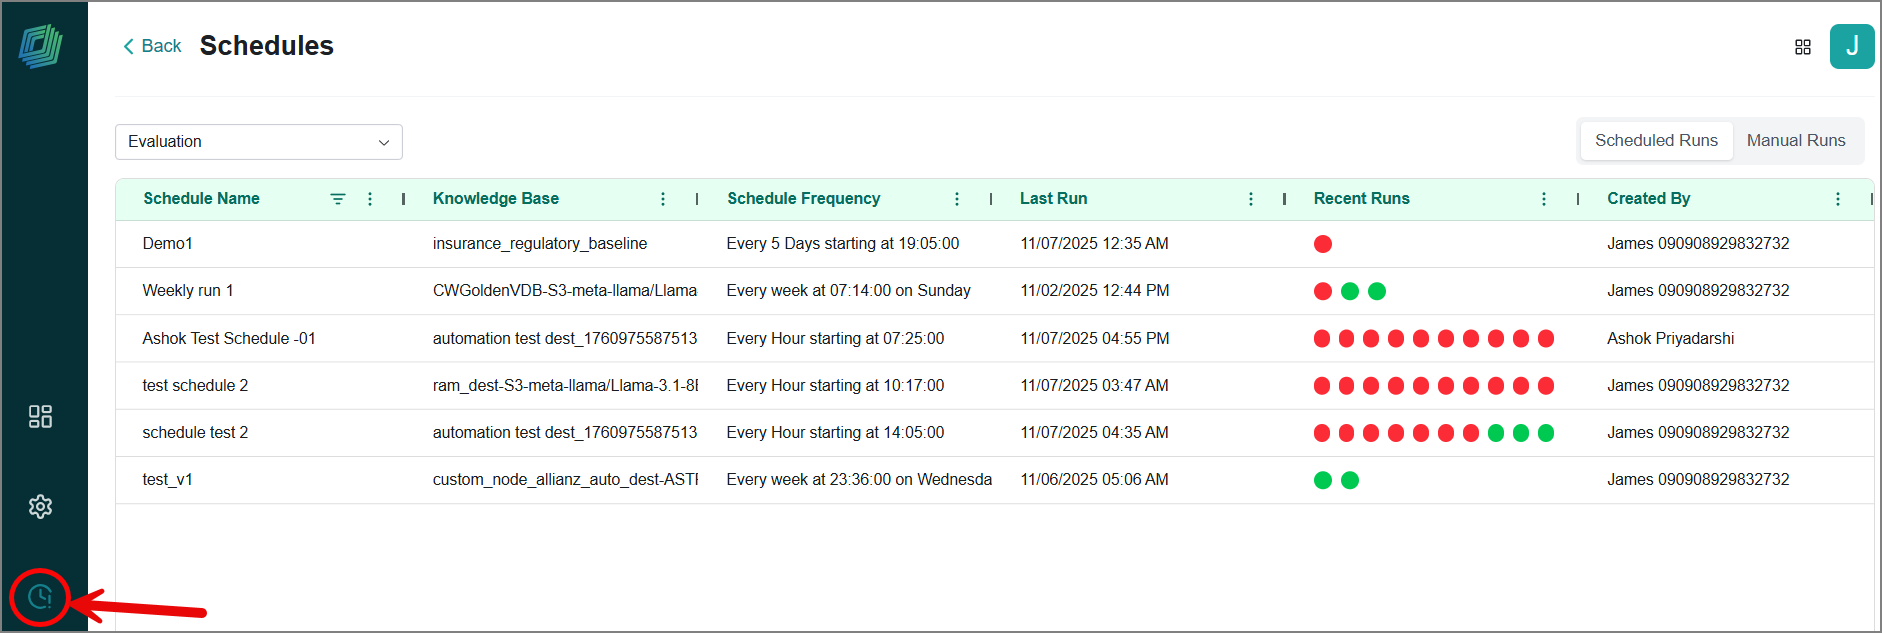
The Schedules feature tracks the execution history of both automated and manual runs, and helps you monitor and manage your processes efficiently.
To access the Schedules page:
Click the Schedules icon in the left-side panel.
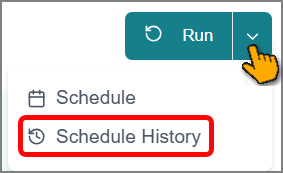
Alternatively, select the Schedule History option from the following sections:
Data Ingestion > Workflow
Data Agents, Evaluation, and Fine-tuning Studio
The Schedules page opens and displays execution details and historical data for all runs. The page is organized into two tabs:

Scheduled Runs tab - Displays the complete history of automated executions.
Agent
Classification Workflows
Data Engineering Agent
Data Orchestration Agent
Data Workflows
Evaluation
Fine-tuning Studio
Manual Runs tabs - Displays the complete history of manually triggered executions.
Agent
Data Engineering Agent
Data Orchestration Agent
Data Prep Workflows
Data Workflows
Evaluation
Fine-tuning Studio
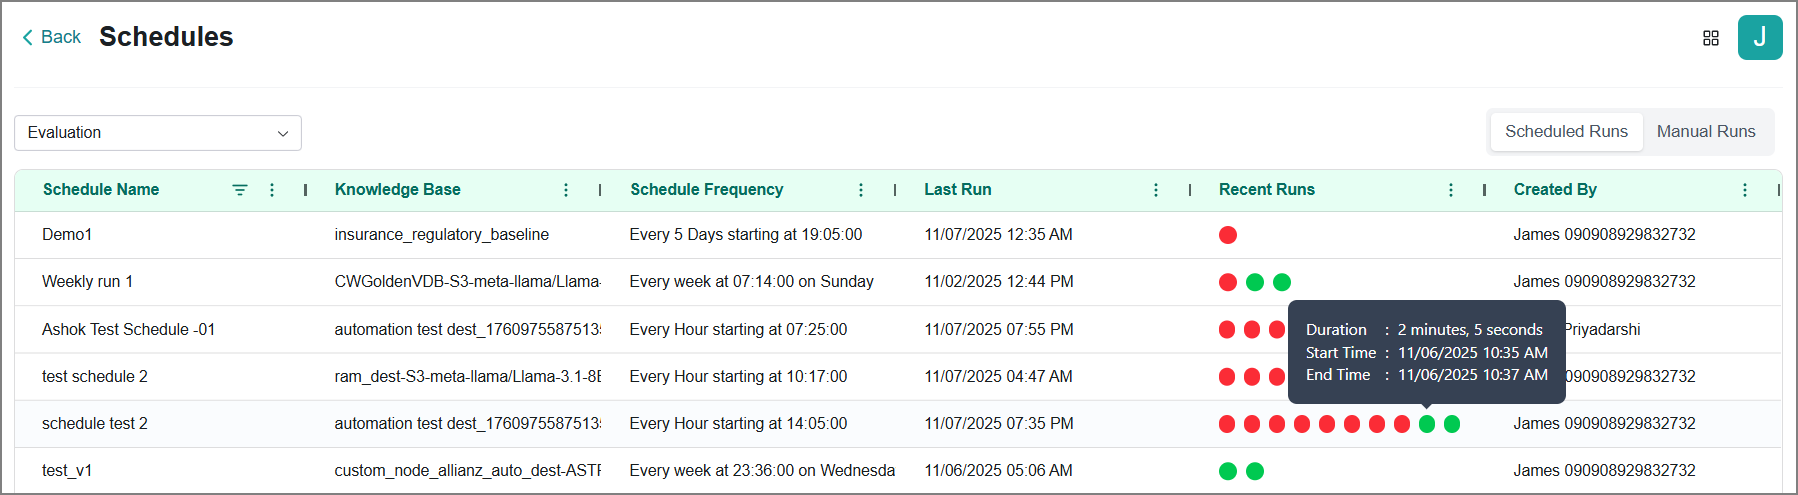
Each item displays up to ten historical runs in the Recent Runs column. Status is indicated through color coding:
Green - Execution successful
Orange - Execution in progress
Red - Execution unsuccessful
Hover over the indicator to view its detailed information.
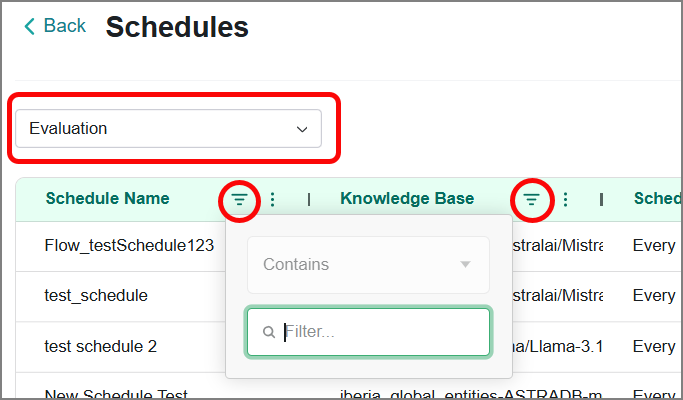
Filtering Runs
Use the top filters to find the required run:
Dropdown Filter – Click the dropdown and select a run category to narrow your results.
Search Box – Type the schedule name or knowledge base name to quickly find results.
Viewing Runs
At the bottom of the Data Prep page, you can view real-time details of existing workflow executions, including their workflow name, status, timestamp, and flowchart.
Go to the Runs tab to see a list of all execution instances initiated for the workflows.
Click the workflow dropdown and select the required workflow from the list to view its execution details.
Click View Details to view additional details for a specific execution.
The details are displayed on the right-side panel.
Click View Mapped Documents to view the classified data.