Agent Action Library
The Agent Action Library allows you to define custom tools that extend the capabilities of your AI agents. These tools enable seamless integration with external systems, dynamic data manipulation, and the delivery of personalized and intelligent user experiences.
The Agent Action Library includes four key elements:
API Integration - Connect your AI agents to third-party APIs and services to retrieve or send data in real time.
Database Operations - Perform Create, Read, Update, and Delete (CRUD) operations on structured datasets across connected DBs.
Message Handling - Interpret, process, and generate responses based on user inputs or system-generated events.
Custom Functions - Define purpose-built logic and workflows tailored to your specific use cases or business processes.
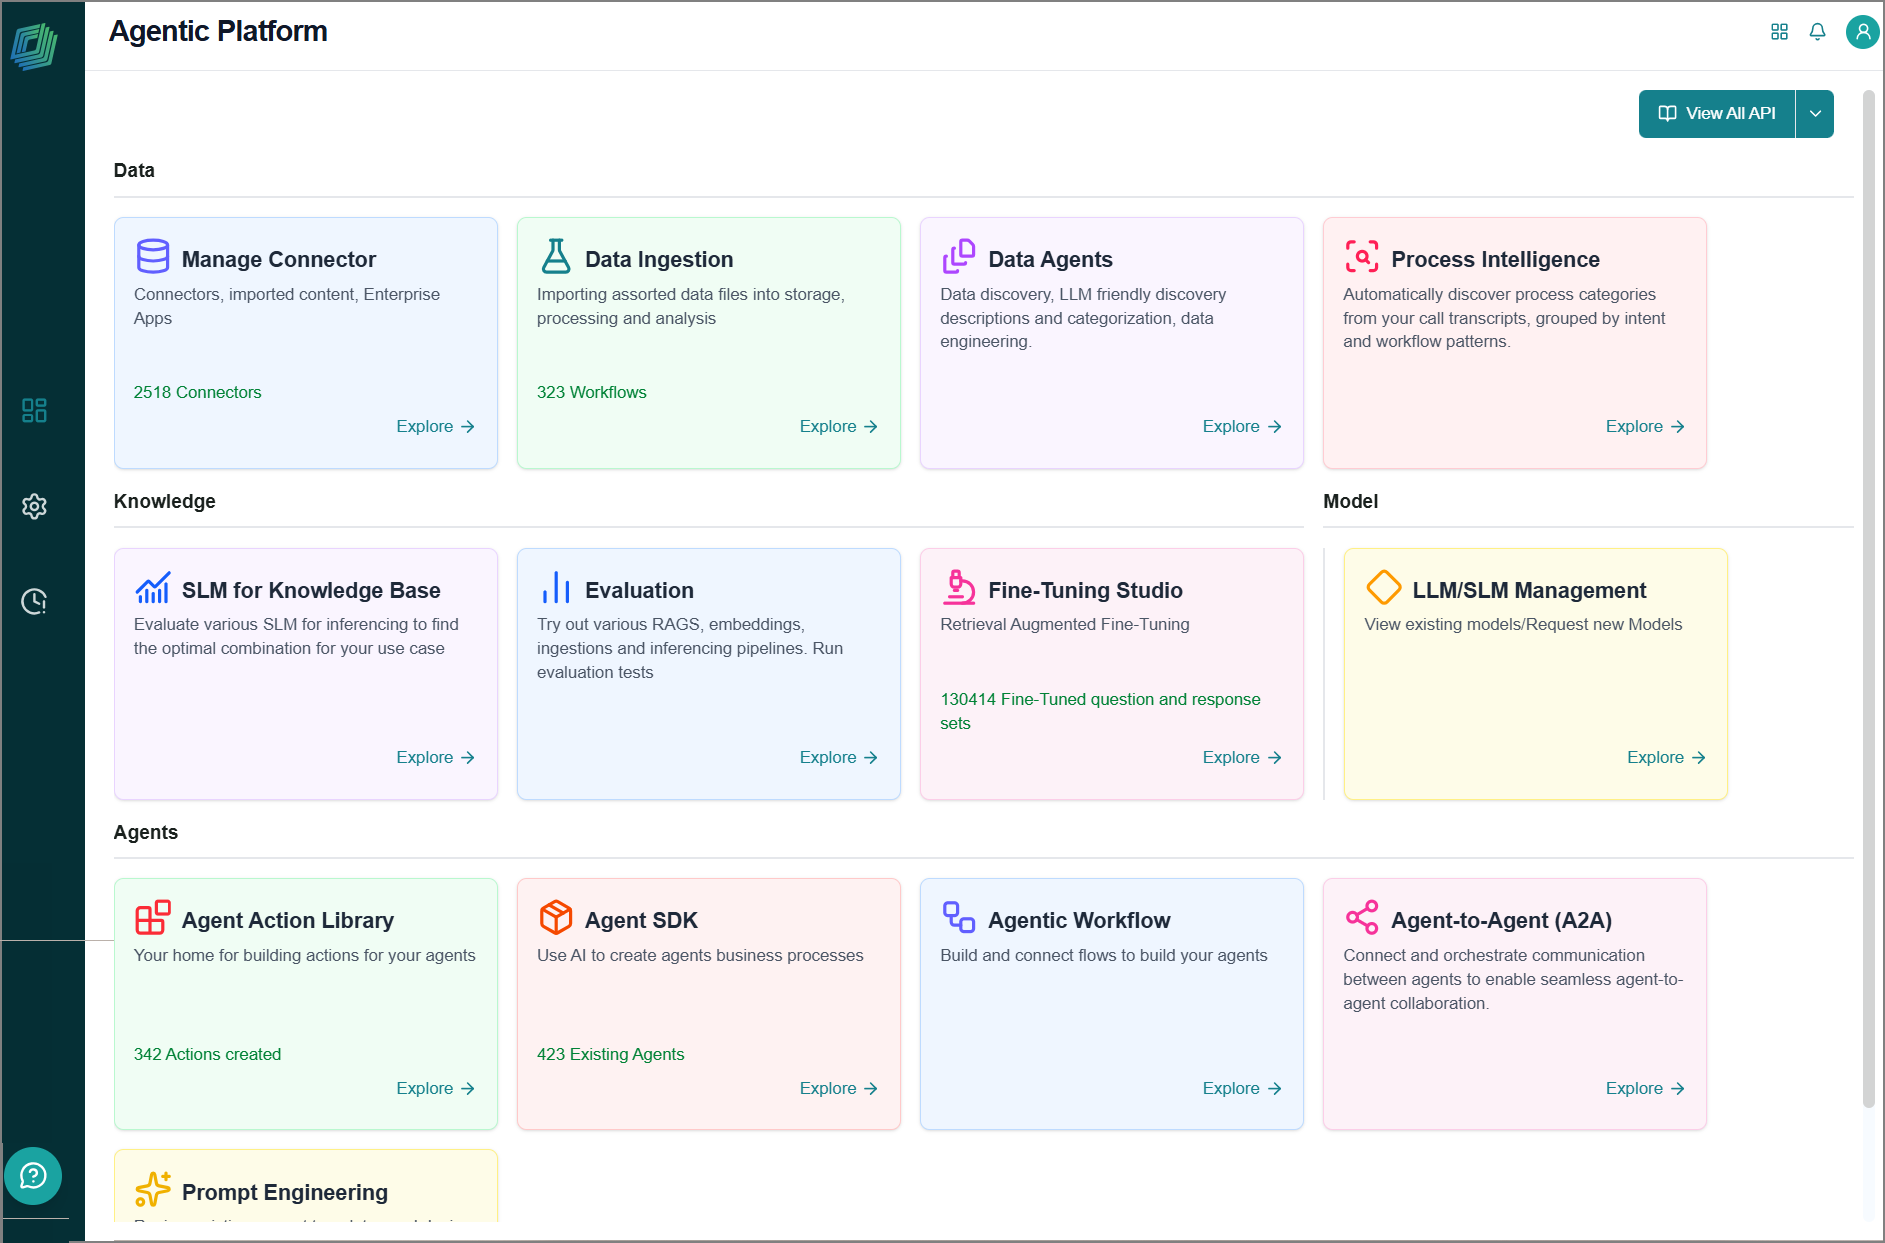
To access this page, go to the Home page > Agents > Agent Action Library.
Creating Tool Integrations
You can configure integrations with third-party tools. This enables AI agents you create via the Agent SDK tool to interact with external systems and expand their functionality. You can configure code or services as tools and combine them in a sequence.
While this section focuses on creating tool integrations, please note that, in addition to the tool integrations you create, some pre-built Darwin tools are included. You can also create MCP integrations.
To integrate new tools:
Go to the Home page > Agent Action Library.
The Agent Action Library page opens.
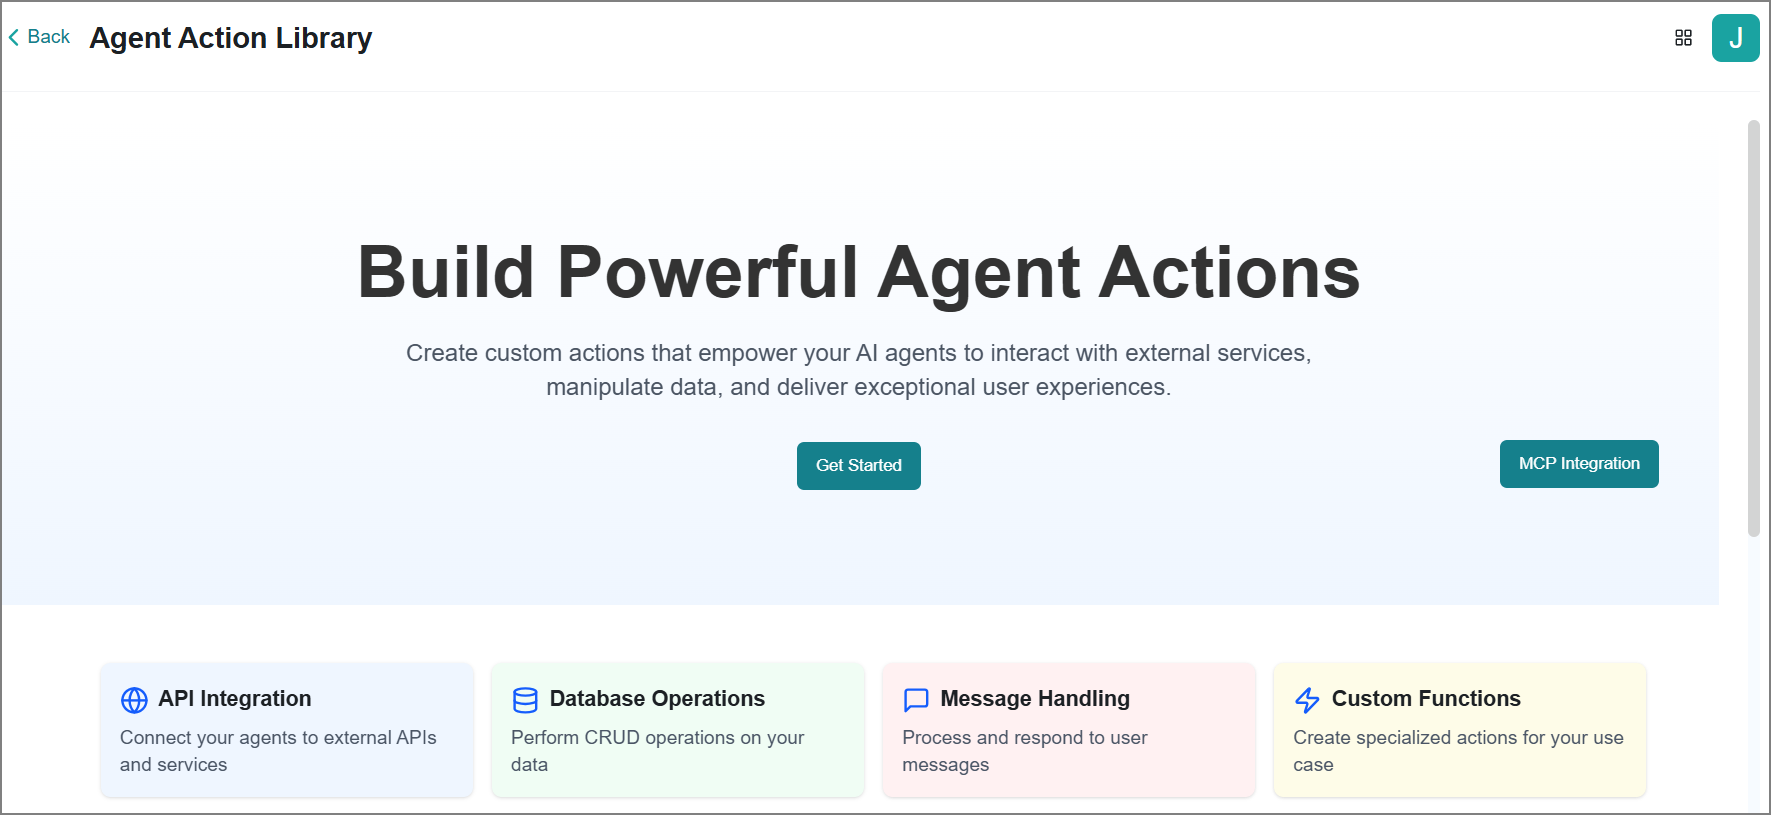
Click Get Started.
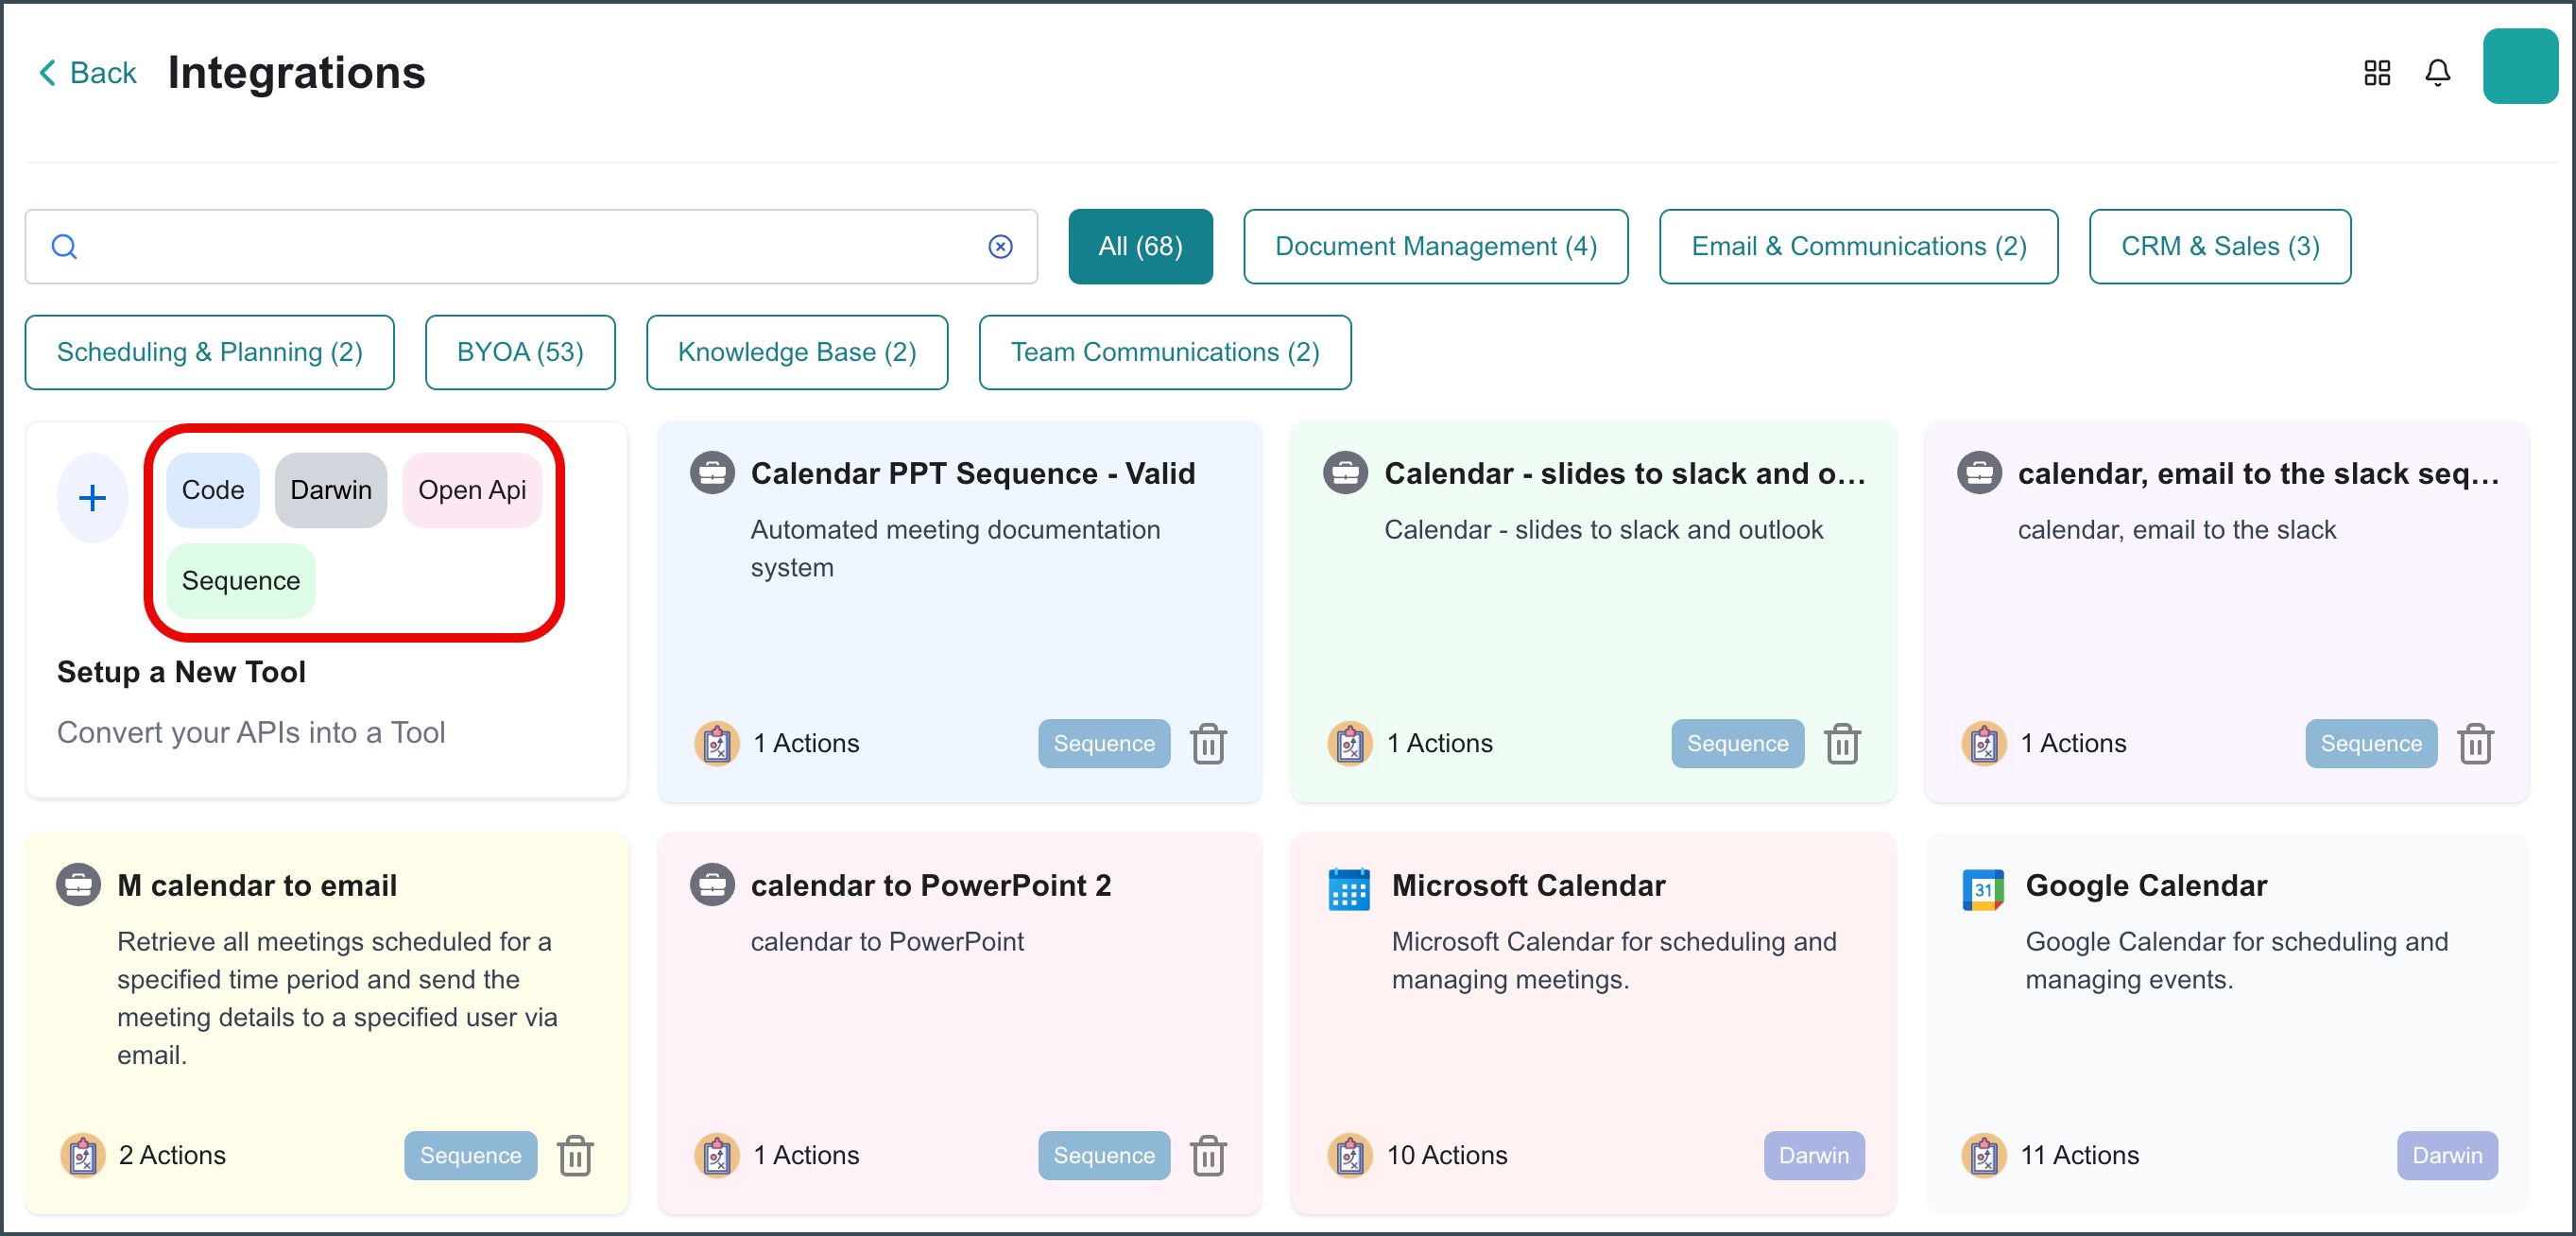
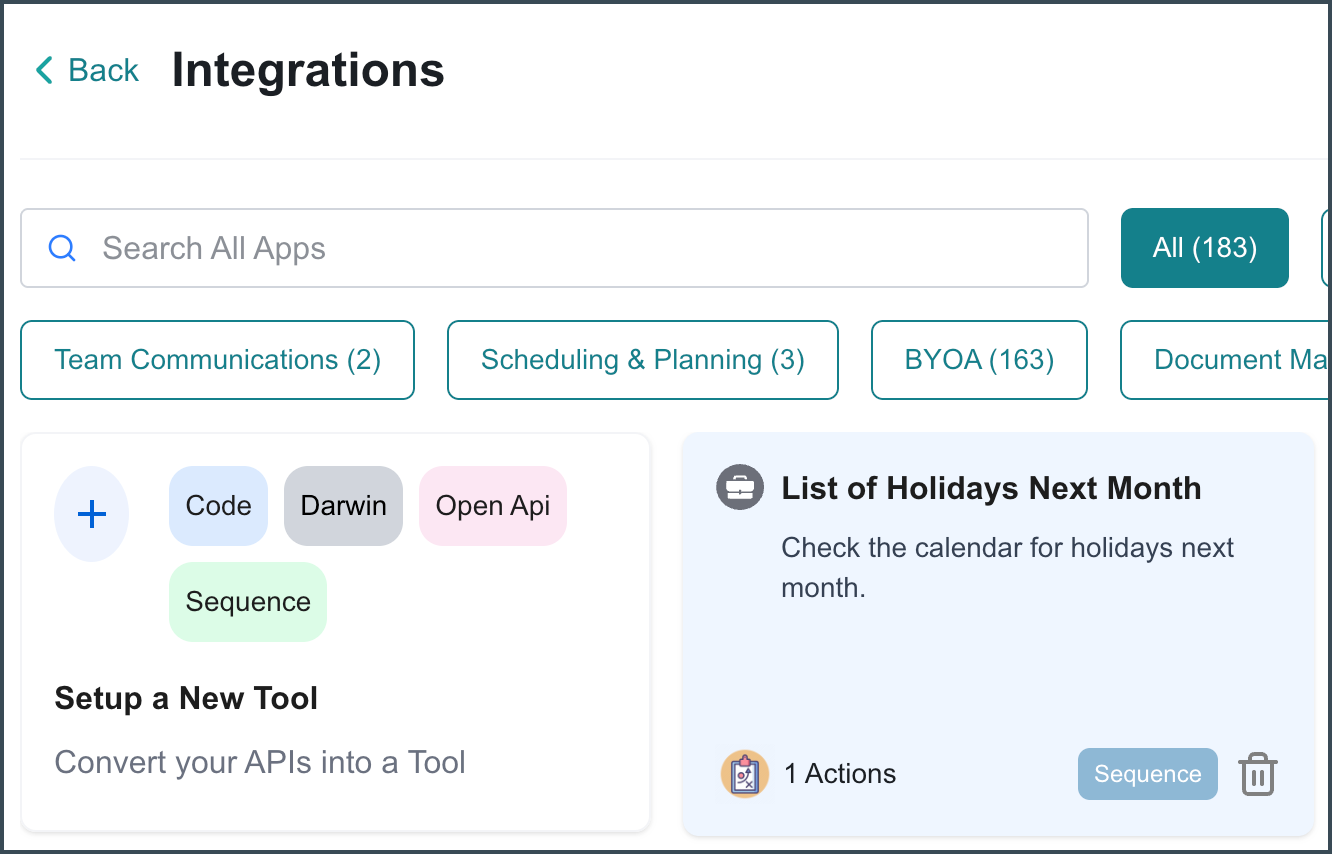
The Integrations page opens and displays a predefined list of commonly supported tools, categorized by functionality to simplify discovery and configuration.
Tip
In addition to any tools you or your organization have created, there are also some default tools available. These tools have the "Darwin" label.
Select the type of tool to create:
To edit the tool, click the tool in the Apps list.
To delete the tool, click the Delete
 icon and then click Delete.
Configuring Code as a Tool
Code-based tools are reusable code snippets that run exactly as written. They are fixed, not dynamic. You can write the code yourself, or describe what you need in natural language and let the tool generate it. Generated code can be reviewed and edited before being approved for use.
Code-based tools are best for:
Custom business logic or orchestration that does not already exist as a stable API
Data transformations, calculations, or glue logic between multiple systems
Prototyping tools quickly without needing API contracts or backend changes
Once defined, they are saved as build-time configurations and executed deterministically at run time. This makes them ideal for predetermined agent actions such as mathematical functions and data processing.
To configure your own code as a tool, click Code.
The Create Code Actions panel opens on the right side.
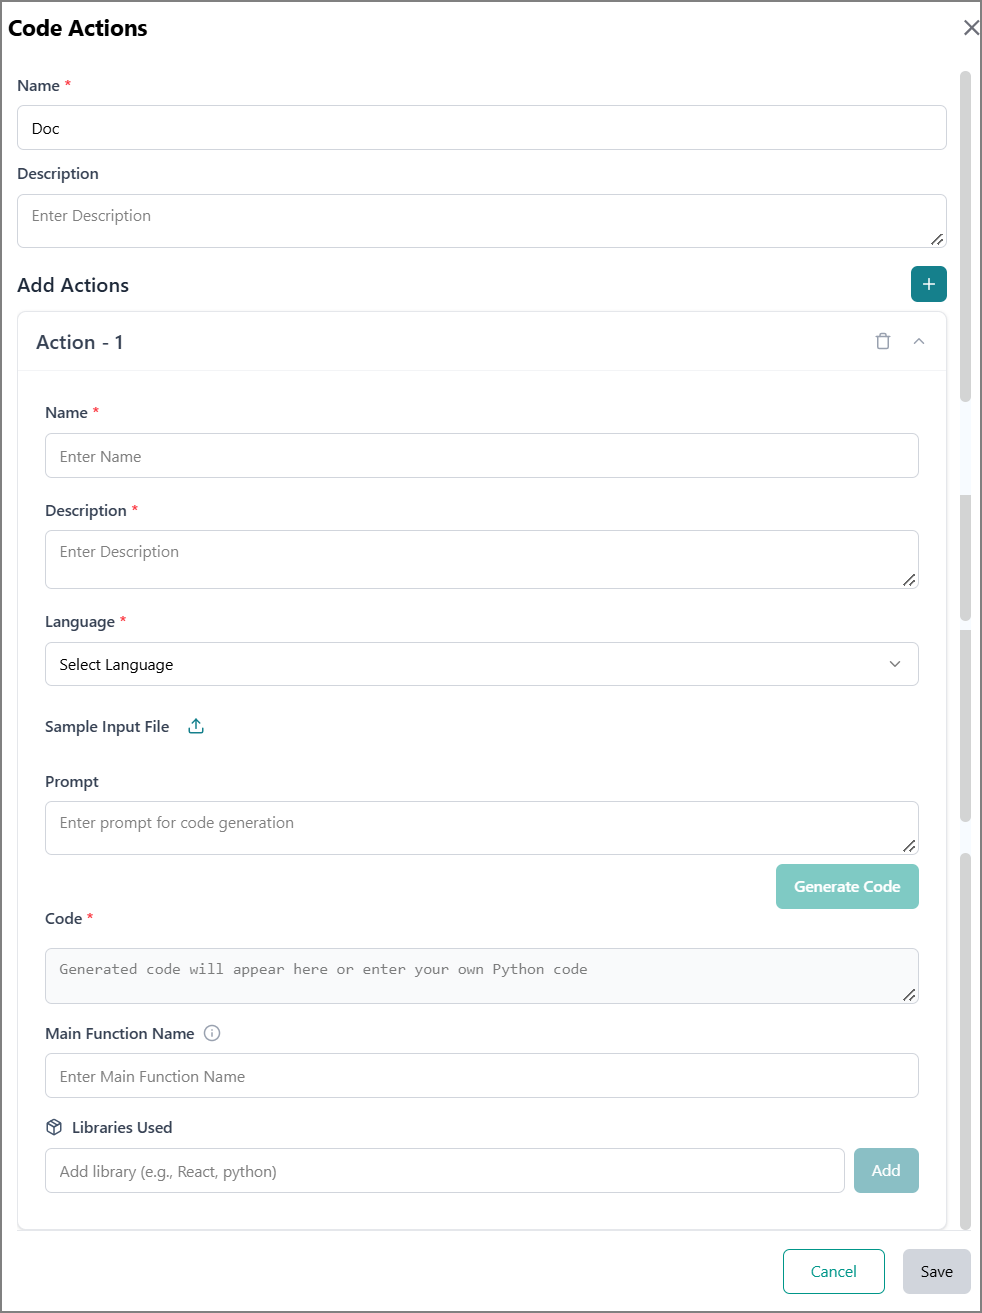
Enter a unique name for the tool.
Enter a detailed description of the tool.
If required, click the Add
 icon to add a new code action for your tool.
You can create multiple actions, each serving as a different access point.
Click the Delete
icon to remove the code action if no longer needed.Click the Action row to expand its configuration panel.
Enter a unique name for the code.
Enter a detailed description of the code.
Select the code language from the dropdown.
Python
Alternatively, generate code using LLM:
Enter the prompt in the Prompt box.
Click Generate Code to let the platform create the code for you in the Code box.
You can update the code as needed.
Enter the required code in the Code box.
Enter the function name from the code snippet below that will be executed at runtime.
This should match the main function defined in your code.
In the Libraries Used field, enter the name of the library you want to use (for example, React or Python) and click Add.
The library is added to the tool's configuration. Likewise, you can add more libraries.
Click Save to finalize your configuration.
The new tool is then added to the Integrations page.
Configuring a Service as a Tool
An Open API service is a tool that wraps an existing HTTP/REST API, whose contract is described using an OpenAPI (Swagger) spec. You point the platform to an OpenAPI definition, and the endpoints in that spec become callable tools with typed parameters and responses.
The platform also supports Workato integration, which uses OpenAPI to expose a wider variety of agent actions.
Service tools are best for:
Integrating with internal or external services that already have REST APIs
Performing CRUD operations, lookups, or workflows that are already standardized
Situations where you want strongly typed, auto-generated tools from an API spec instead of writing code wrappers by hand
To configure your own service as a tool, click Open API.
The Open API Actions panel opens.
Enter a unique name for the tool.
Enter a detailed description of the tool.
Select your desired access level from the Access Level dropdown:
User: Grants permission to individual users
Tenant: Grants permission to all users within the tenant organization
This setting controls which users are authorized to execute this API action.
From the Type dropdown, select one of the following connection methods for the Open API:
Open API Json Configuration - Use a JSON file to configure the API connection.
Open API URL - Provide a URL to access the Open API directly.
Rest API Configuration - Configure the connection using REST API details.
Configuring Open API with JSON
After selecting this option:
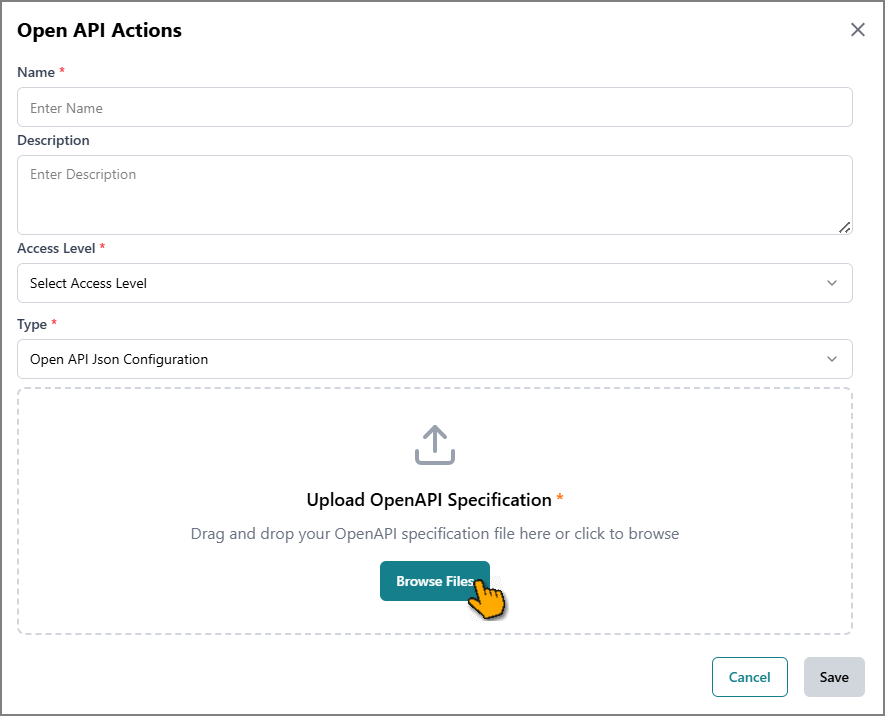 |
Drag and drop your OpenAPI specification file, or click Browse Files to upload it from your local system.
Note
You can upload files only in YAML or JSON format.
All action items are derived from this file only.
Click Save.
The form is updated with new fields based on the content of the OpenAPI specification file you uploaded.
Enter the parameters as directed, then click Save again.
The Integrations page opens and displays a list of tools.
Click your tool in the list and then click Connect to App:
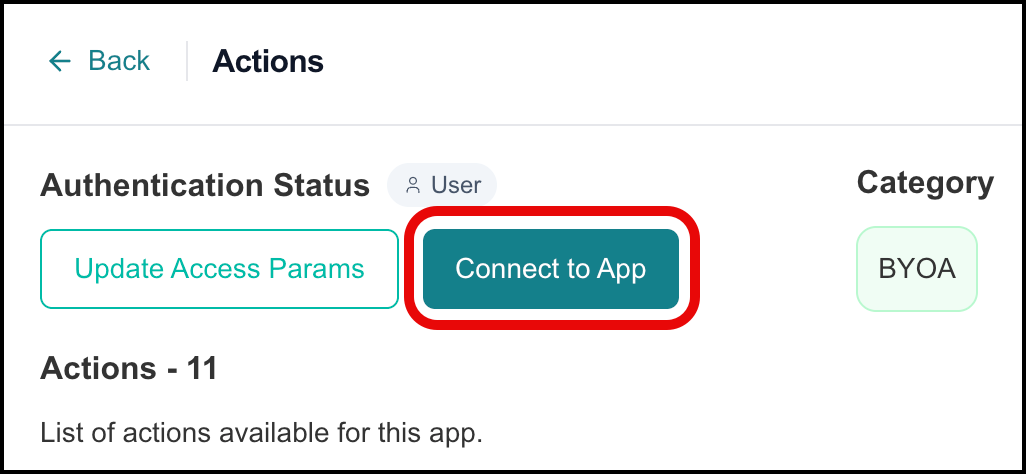
If you have entered the correct credentials in the JSON configuration and this is your first time connecting to this application, you will be presented with a Callback URL. This is the URL you will need to register with the application you are connecting to. You may need to send this to an administrator of the tool or service. Once the connection is approved, return to your tool and click Connect to App again.
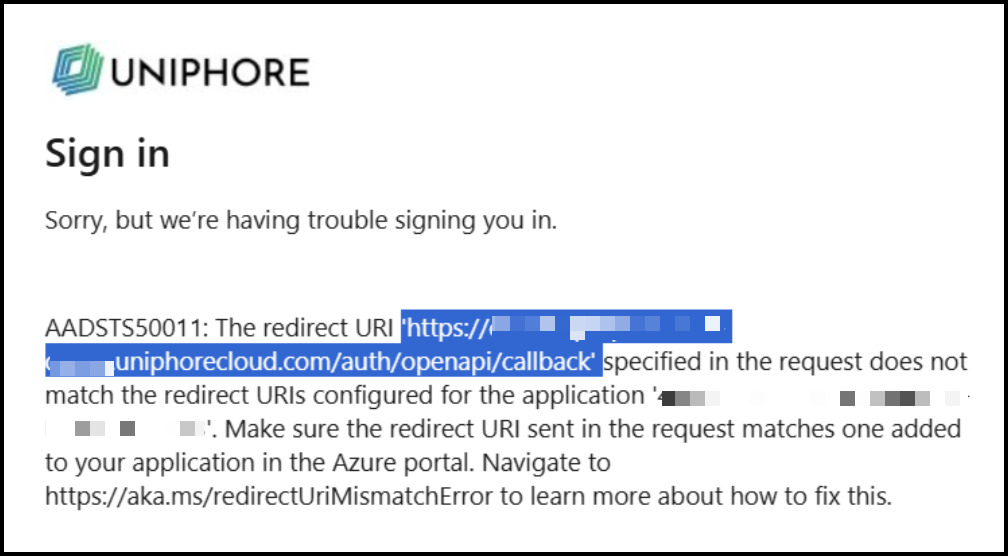
If the credentials entered in the JSON configuration are not correct, an error message is displayed:
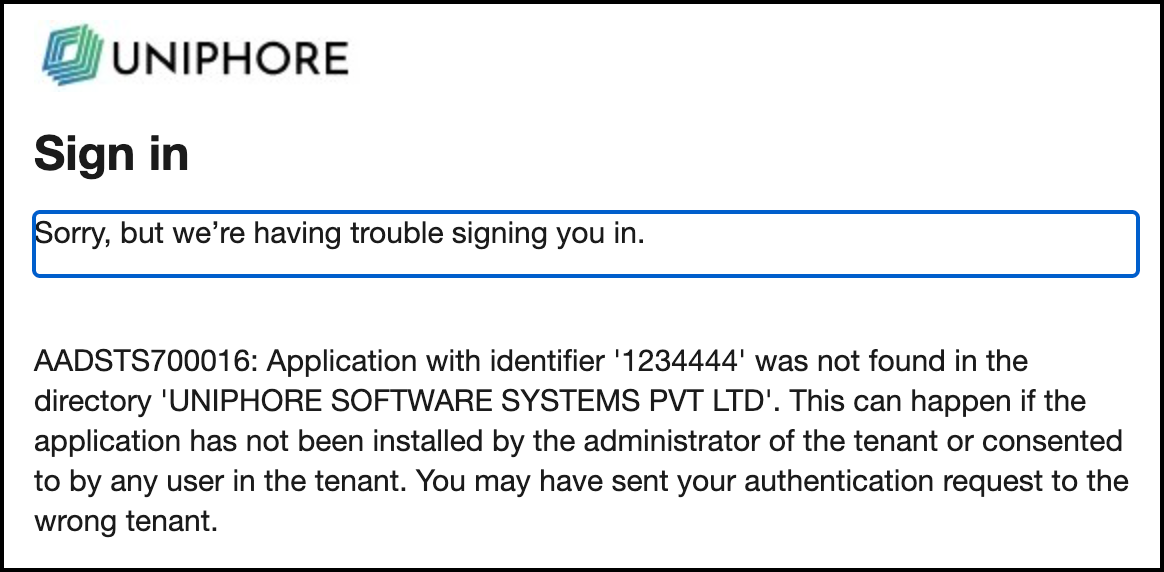
Go back to the Open API Actions page and enter the correct credentials.
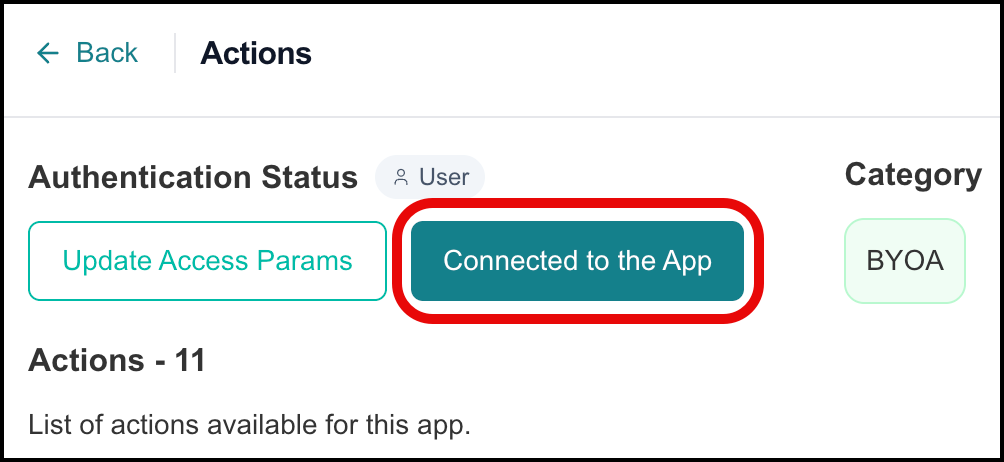
Once the connection is successful, the button is updated to "Connected to the App", and the tool is ready to use.
Configuring Open API with URL
After selecting this option:
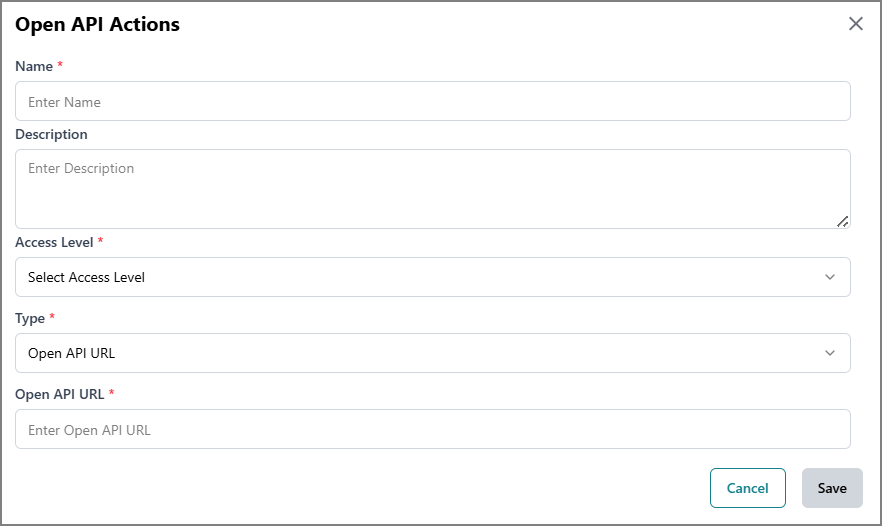 |
Enter the valid URL to access the Open API directly.
If required, enter the necessary authentication token to proceed.
A confirmation message appears when validation is successful.
Click Save to save the configuration
The new tool is then added to the Integrations page.
Configuring Rest API
Note
Ensure you have complete REST API documentation and parameter details from the third party before beginning configuration to avoid setup issues.
After selecting this option:
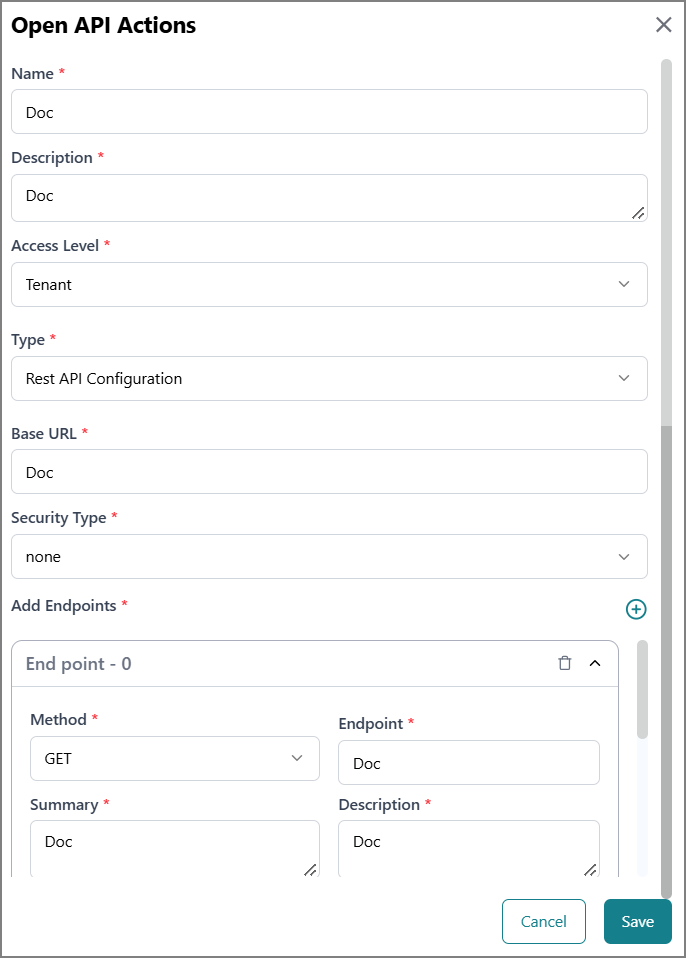 |
Enter all required fields to configure the API.
Fields | Description |
|---|---|
Base URL | Enter the root URL of the API server that hosts all endpoints. |
Security Type | Choose the appropriate type from the dropdown:
|
Token | Enter the authentication token required to access the API endpoint. Available only when the Bearer security type is selected. |
Key | Enter the authentication key required to access the API endpoint. Available only when the API key security type is selected. |
Value | Enter the authentication key value required to access the API endpoint. Available only when the API key security type is selected. |
Add to | From the dropdown, select where to include the key-value pair in the API request:
Available only when the API key security type is selected. |
Username | Enter the username required to access the API endpoint. Available only when the basic security type is selected. |
Password | Enter the password associated with the username. Available only when the basic security type is selected. |
Access Token URL | Specify the OAuth2 authorization server endpoint URL used to exchange credentials for access tokens. Available only when both OAuth2 security types are selected. |
Access Authorization URL | Specify the OAuth 2 authorization server endpoint URL to which you're redirected to log in and grant access. Available only when the OAuth2 Authorization Code Flow security type is selected. |
Client ID | Enter the unique client identifier provided by the OAuth2 service. Available only when both OAuth2 security types are selected. |
Client Secret | Enter the confidential client secret key for authentication. Available only when both OAuth2 security types are selected. |
Scope | Enter the requested permissions or access scope for the OAuth2 token. Available only when both OAuth2 security types are selected. |
Add Endpoints | Click the Add You can create multiple endpoints, each serving as a different access point for your API. |
End point - 0 | Click the endpoint row to expand its configuration panel. Click the Delete |
Method | Choose the appropriate HTTP verb from the dropdown:
This defines the type of request the endpoint will handle. |
Endpoint | Enter the API path (e.g., /users, /orders/{id}). |
Summary | Write a brief, one-line summary of what this endpoint does. |
Description | Write a more detailed explanation of the endpoint’s purpose, usage, and behavior. |
Parameters Configuration | |
| Click the Add
|
Request Body Configuration | |
Request Body | Click the Add
|

Important
Mandatory fields are marked with  .
.
Click Save to save the configuration.
The new tool is then added to the Integrations page.
Configuring a Sequence of Tools
A sequence is a composed tool that chains multiple existing tools (Code, Open API, or other pre-existing tools) into a fixed sequence. You define a step-by-step flow: Tool A > Tool B > Tool C, passing data between steps.
Sequences are best for:
Multi-step operations that should behave like a single high-level tool from the agent's perspective
Enforcing a specific order of operations and guardrails (e.g., validate > enrich > write > notify)
Encapsulating complexity so the LLM does not have to plan every micro-step
To configure a sequence of pre-existing tools to execute in response to a prompt, click Sequence.
The Create Sequence panel opens.
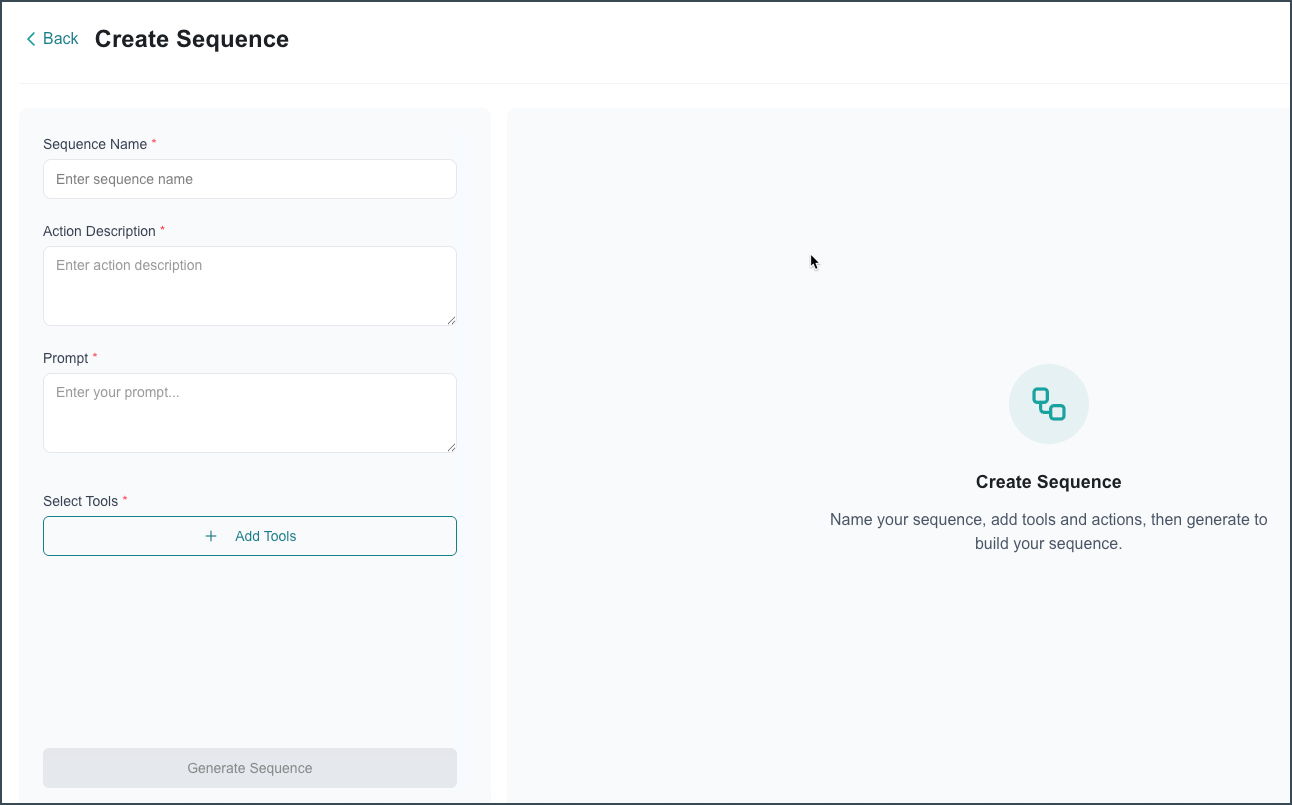
Enter a unique name for the sequence.
Enter a description for the sequence.
Enter a prompt for which a sequence of one or more tools will be executed. For example, "Find holidays on the calendar for next month and send them to me via Slack." For this example prompt, the Slack and Microsoft Calendar agents would be required.
Click Add Tools.
A list of available tools opens.
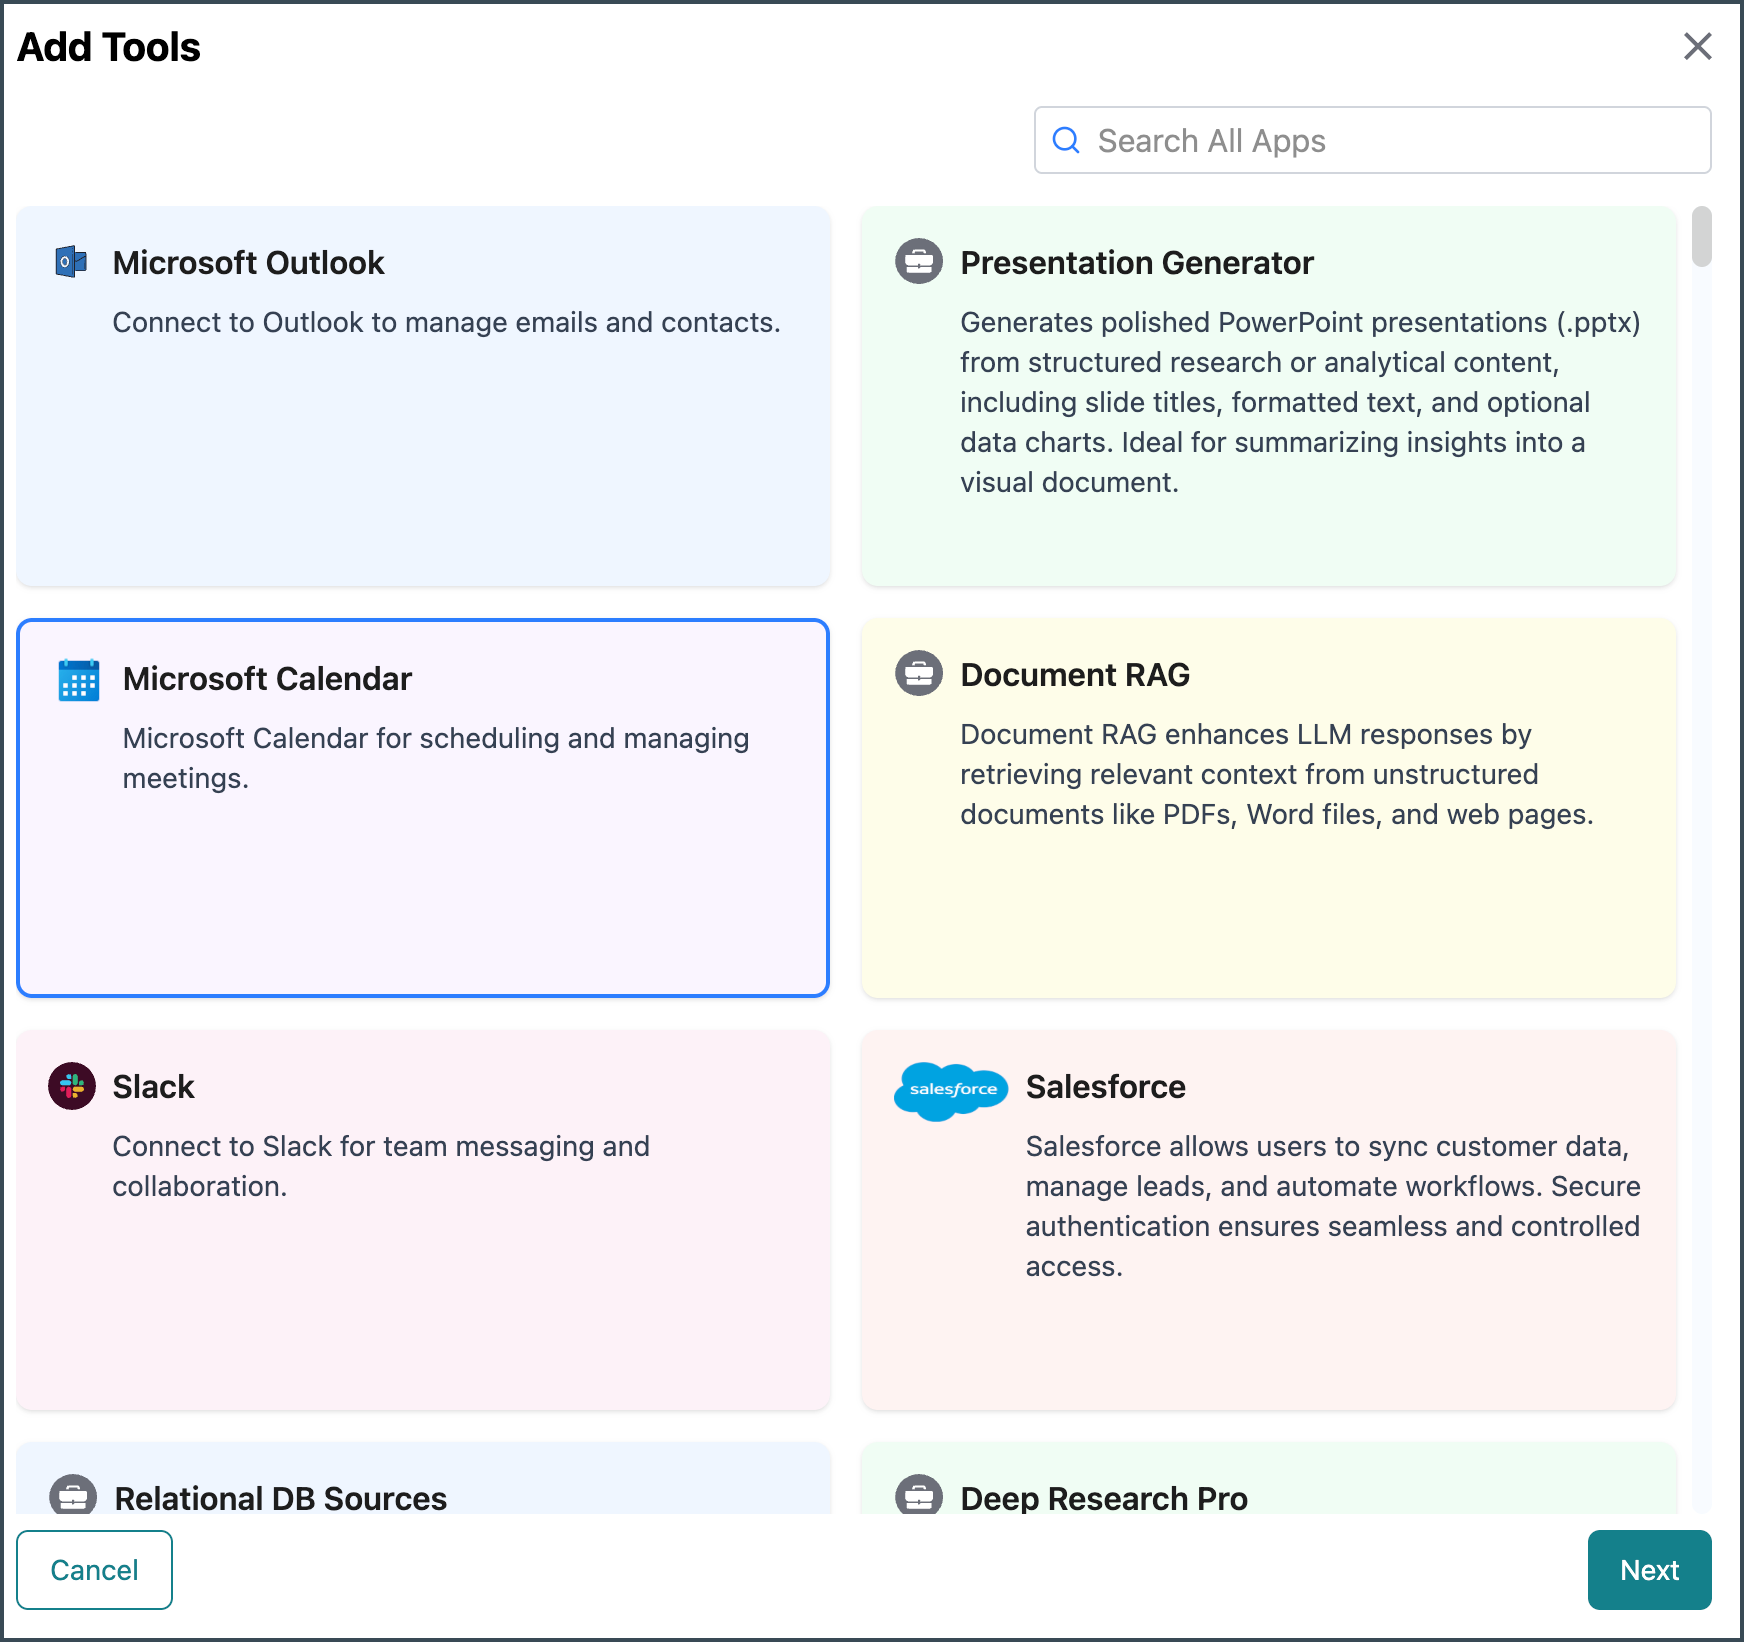
Select one or more tools and click Next.
A list of tool actions opens (if you selected multiple tools, the actions are grouped by tool). For each tool, select the specific actions to allow, or click Select All Actions.
Note
Selecting more actions than needed is okay. During the Generate Sequence phase, any actions that are not relevant to your prompt are excluded. However, if you do not select an action that the tool needs to complete a task, it will not be added automatically. When in doubt, select all actions.
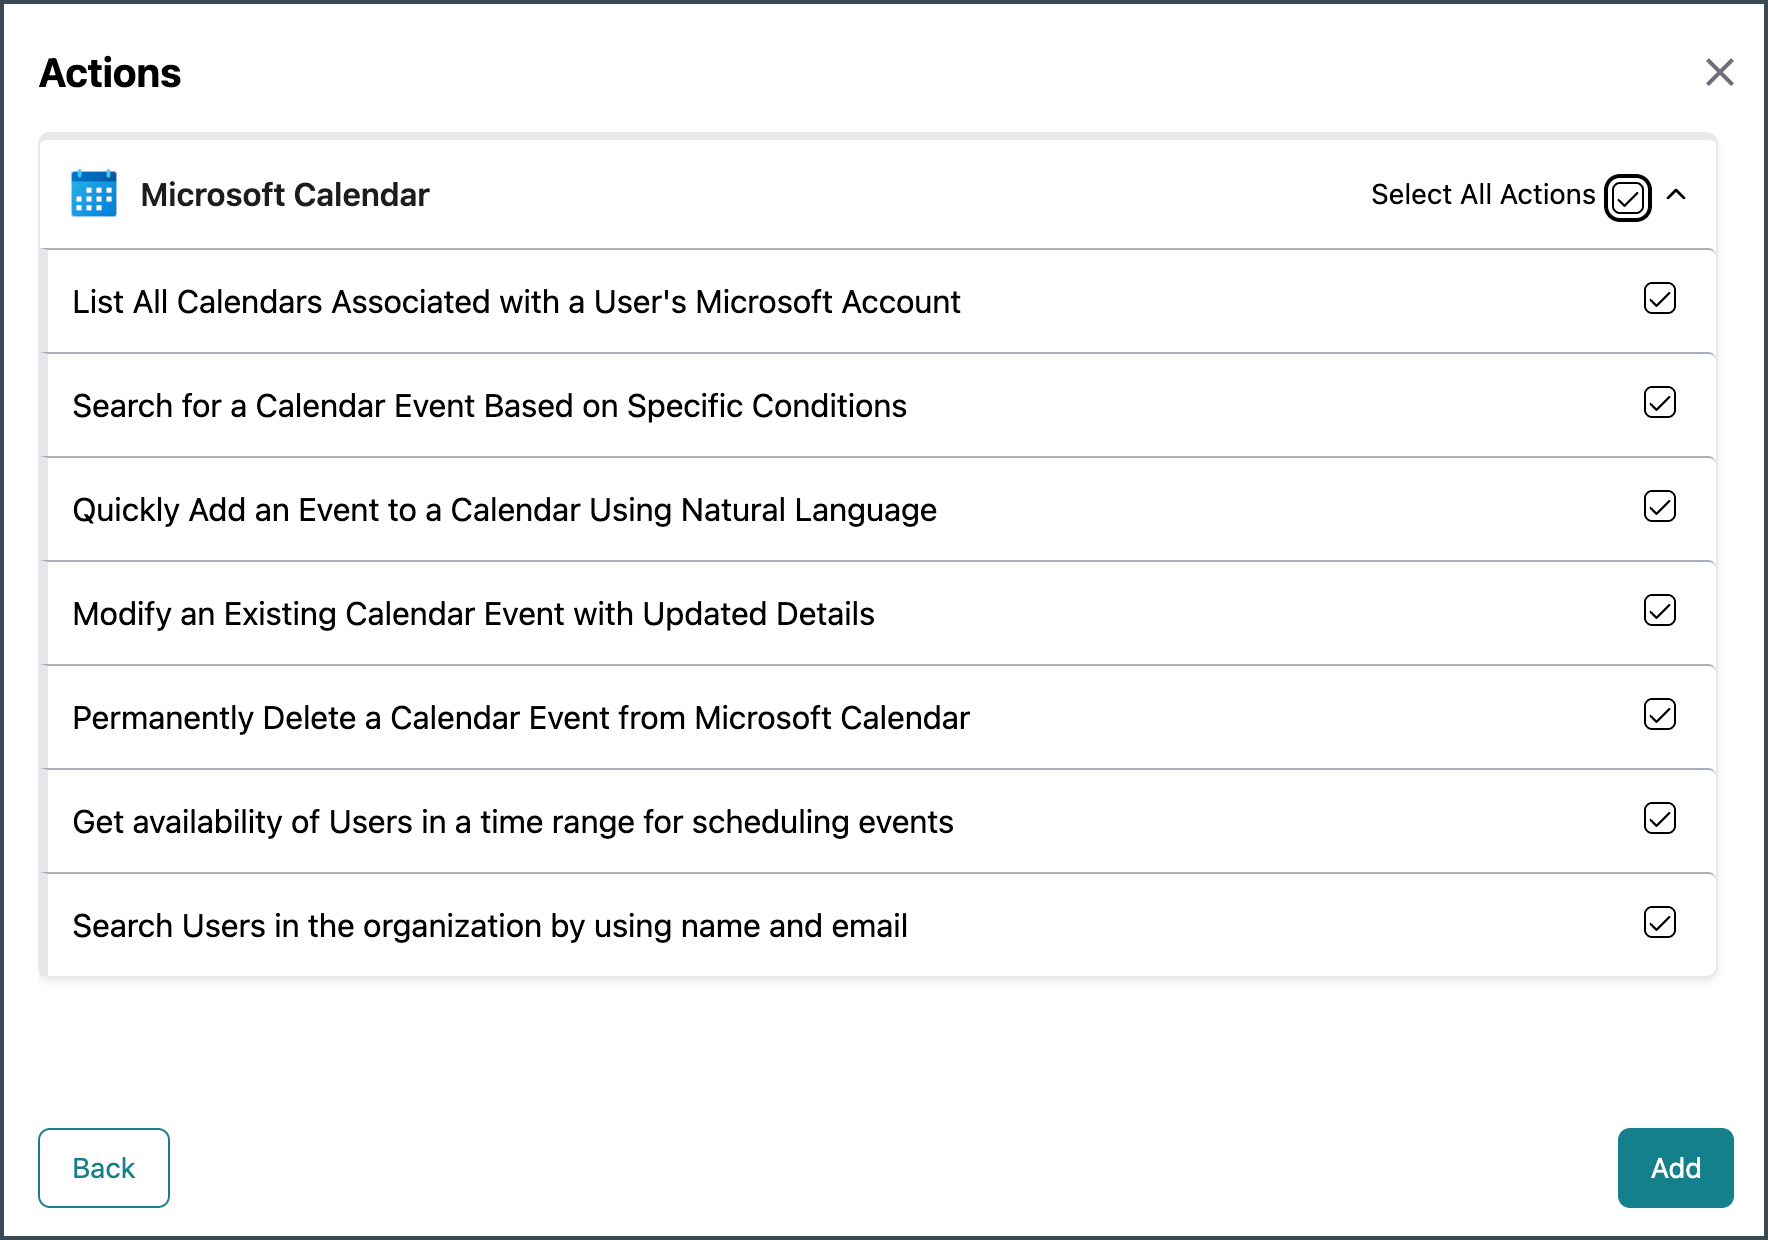
Click Add.
The Selected Tools list now shows the added tool(s).
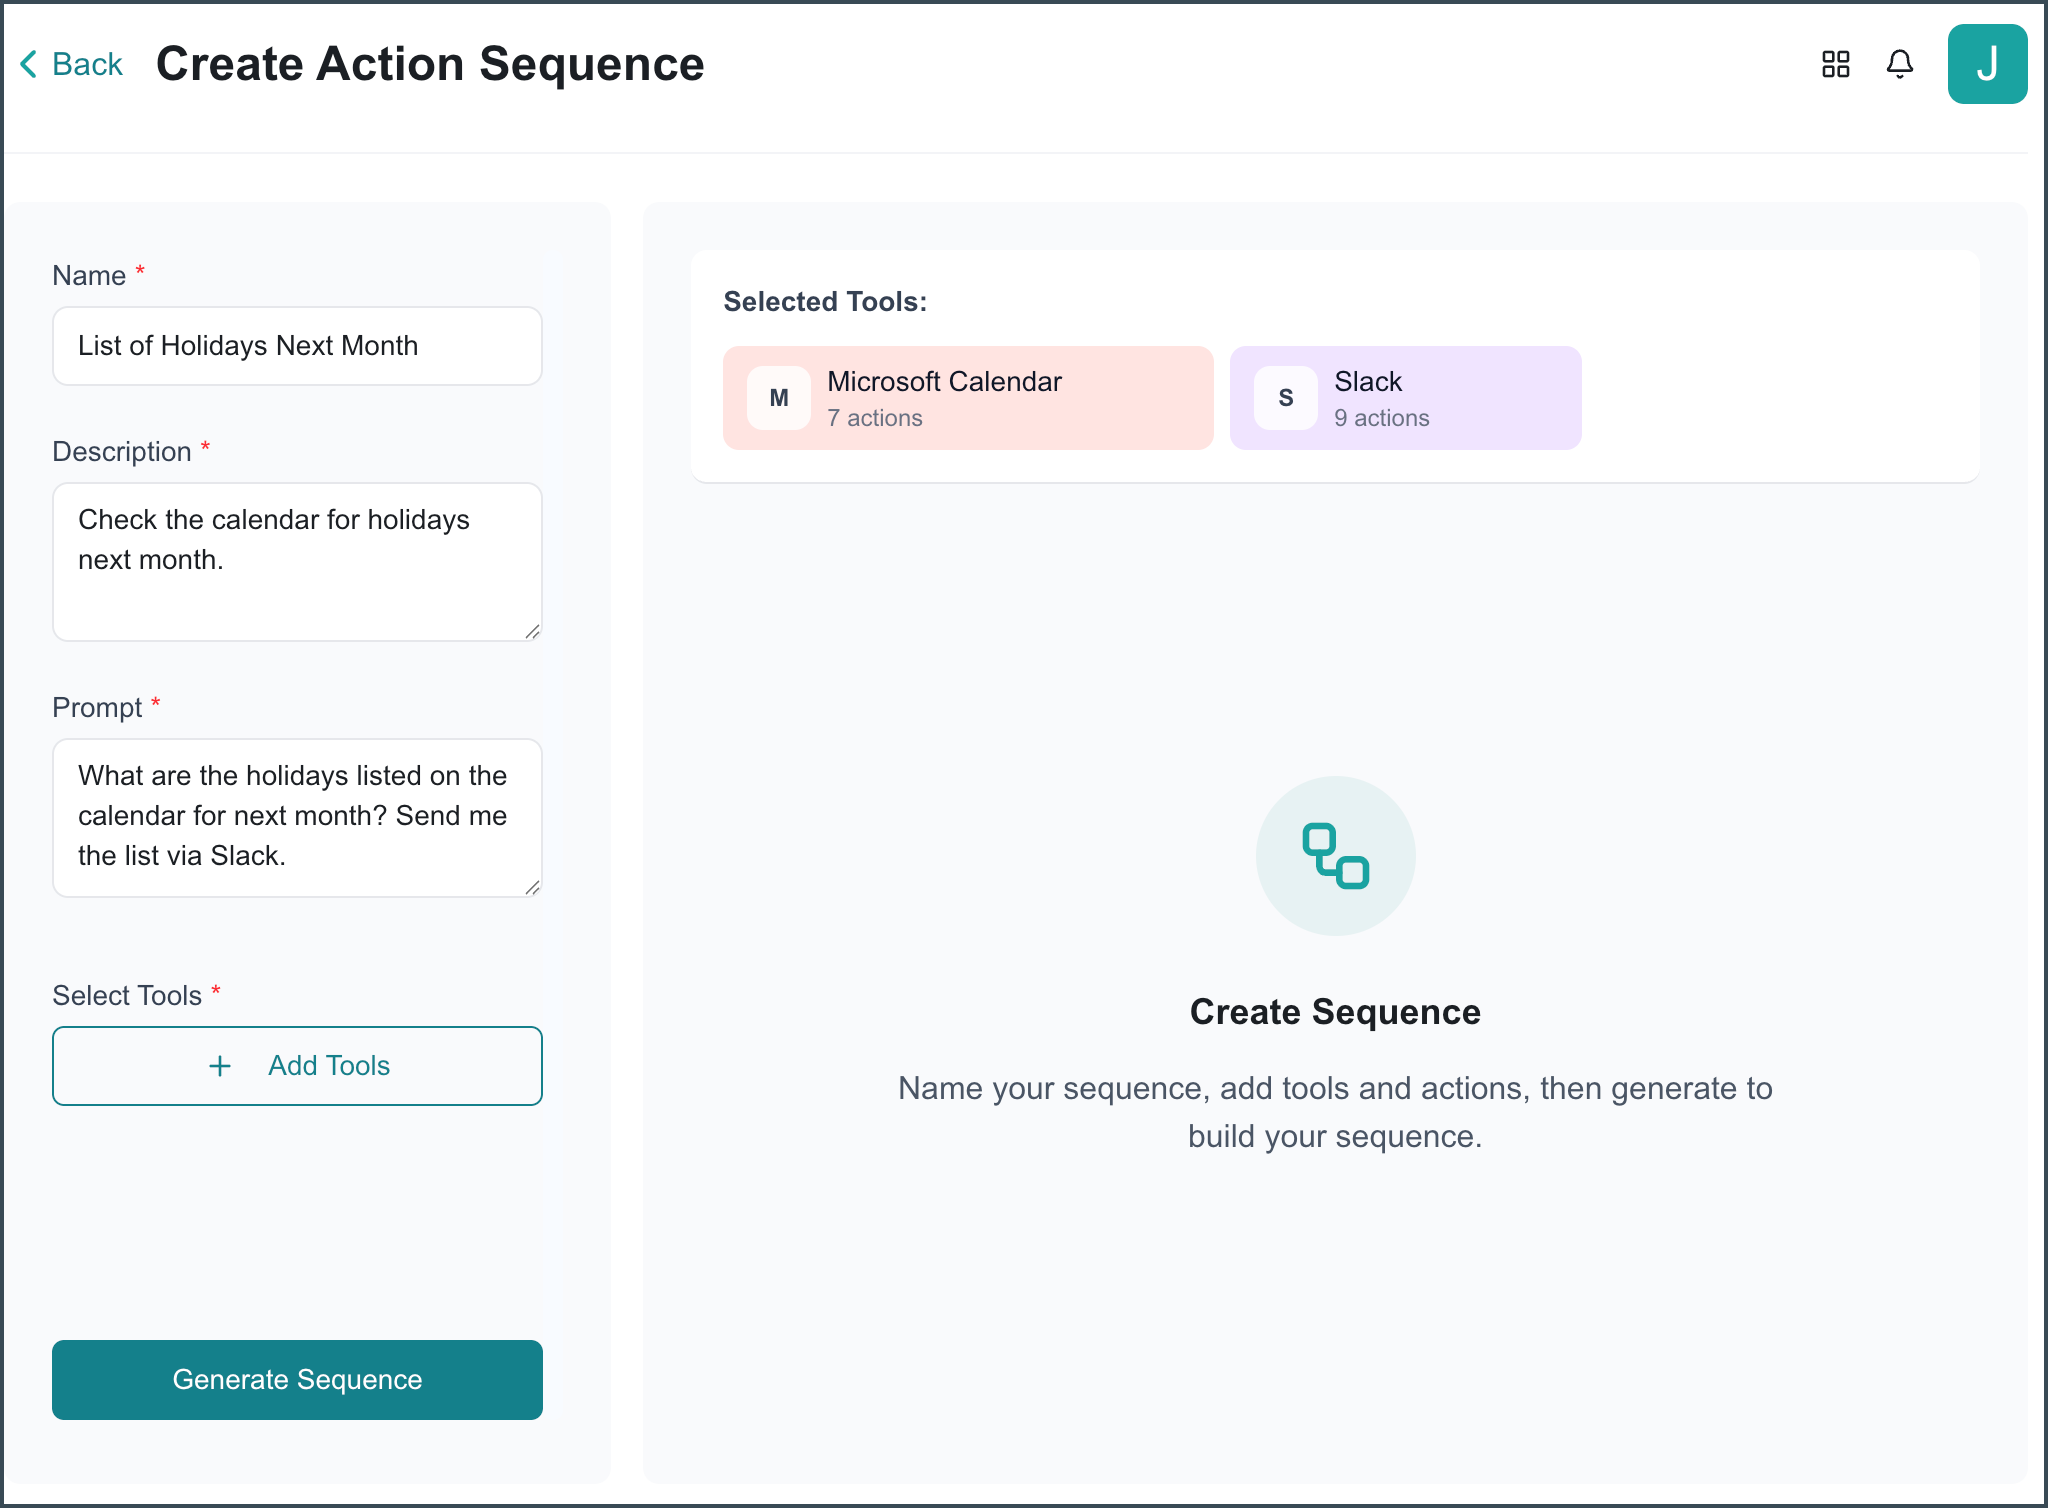
Continue adding tools until the sequence is complete.
Click Generate Sequence.
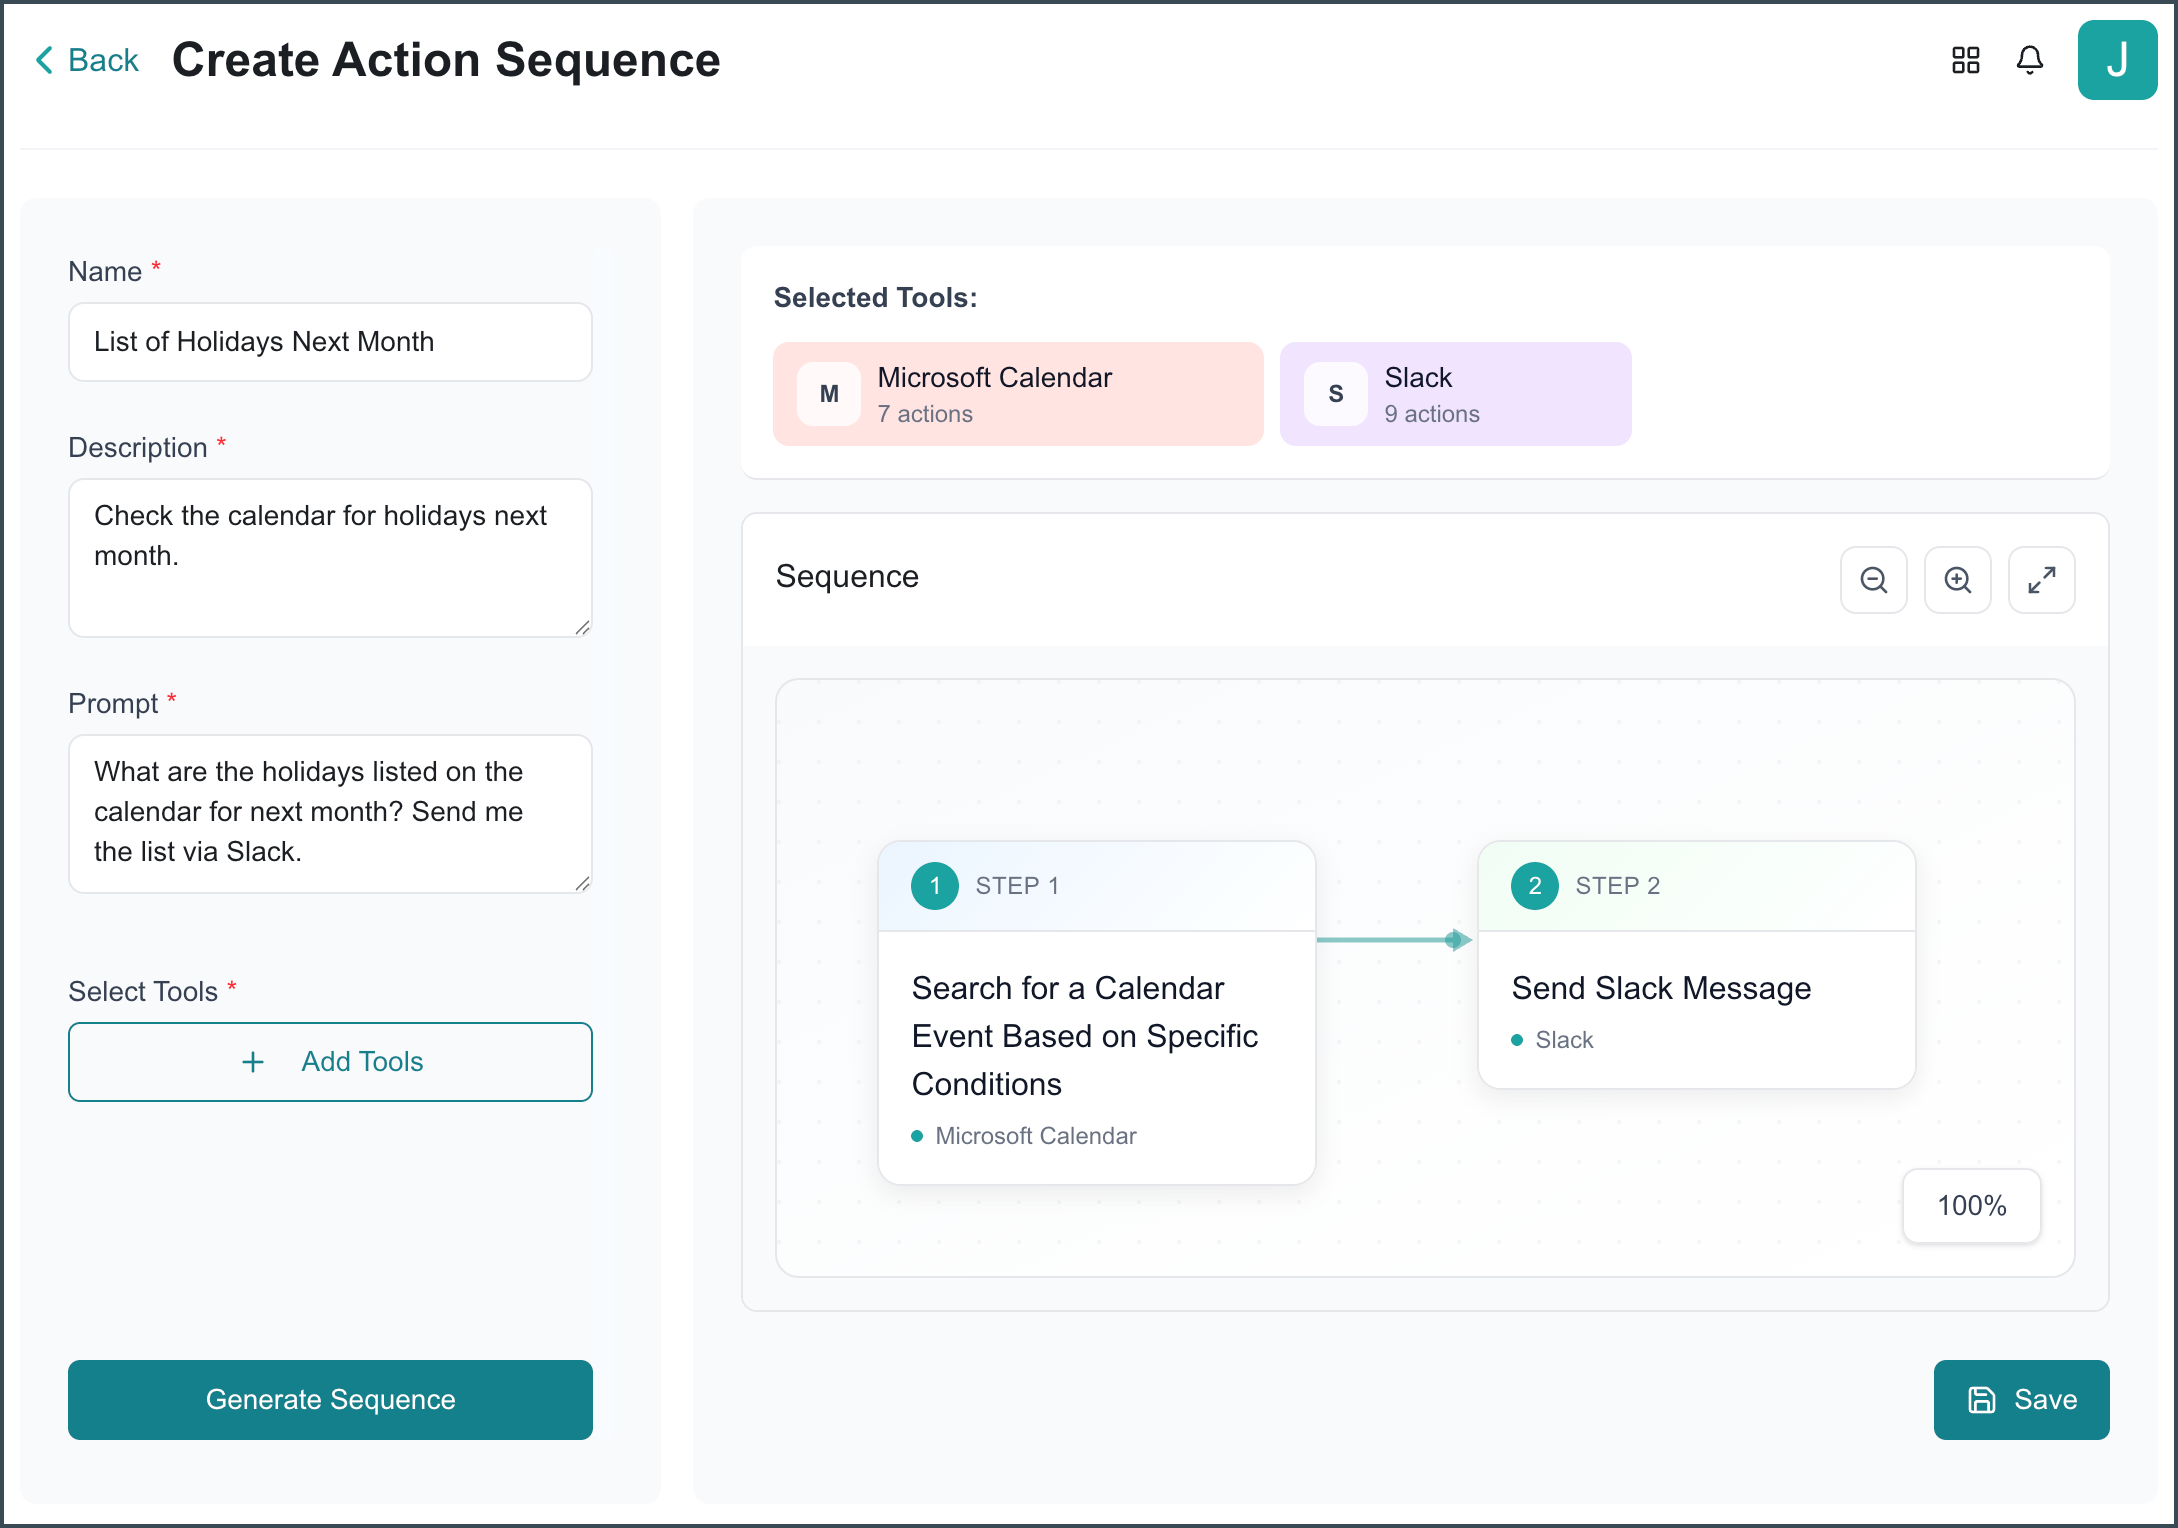
Verify the list of tools and the steps in the Sequence. If the prompt is not structured properly for the selected tools, tools or steps may be dropped from the Sequence. For example, given the prompt above, adding a tool that creates timesheets would not be valid, so the tool would not be included in the Sequence.
Click Save.
The tool is added to the list.
Creating an MCP Integration
You can configure integrations with third-party services using the Model Context Protocol (MCP). This enables AI agents to interact with external services and extend their functional capabilities.
To integrate an MCP service:
Go to the Home page > Agent Action Library.
The Agent Action Library page opens.
Click MCP Integration.
The MCP Integration page opens, providing a comprehensive overview of the current MCP integration status, connected registries, and other details of the existing MCP services.
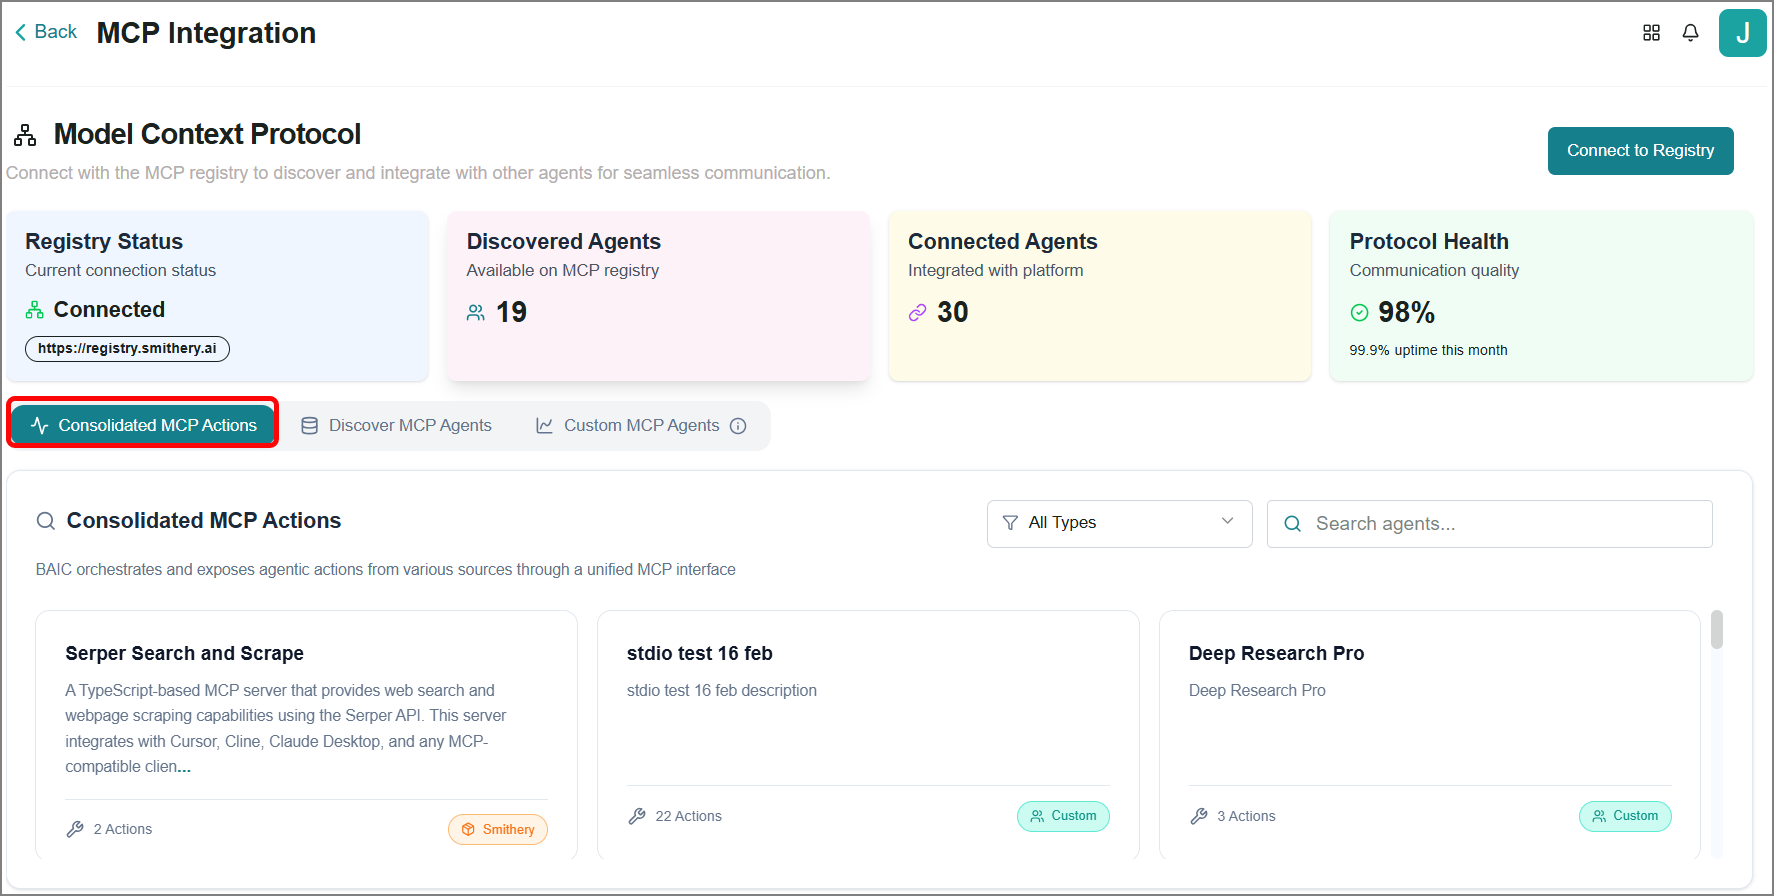
At the top of the MCP Integration page, you can see the following information:
Registry Status - registry name and current connection status.
Discovered Agents - agents available on the MCP registry.
Connected Agents - number of agents connected with the platform.
Protocol Health - uptime for STDIO ports used for connecting with server-side events from the MCP server.
The Consolidated MCP Actions tab is selected by default and displays a list of all existing MCP services in card view.
Note
Business AI Cloud is a centralized orchestrator, offering unified access to actions from providers such as Google, Microsoft, Salesforce, and others through a single MCP endpoint. End users connect to the Business AI Cloud’s MCP server, eliminating the need to interact with multiple vendor-specific MCP servers.
Use the available filters to quickly find the MCP service you need.
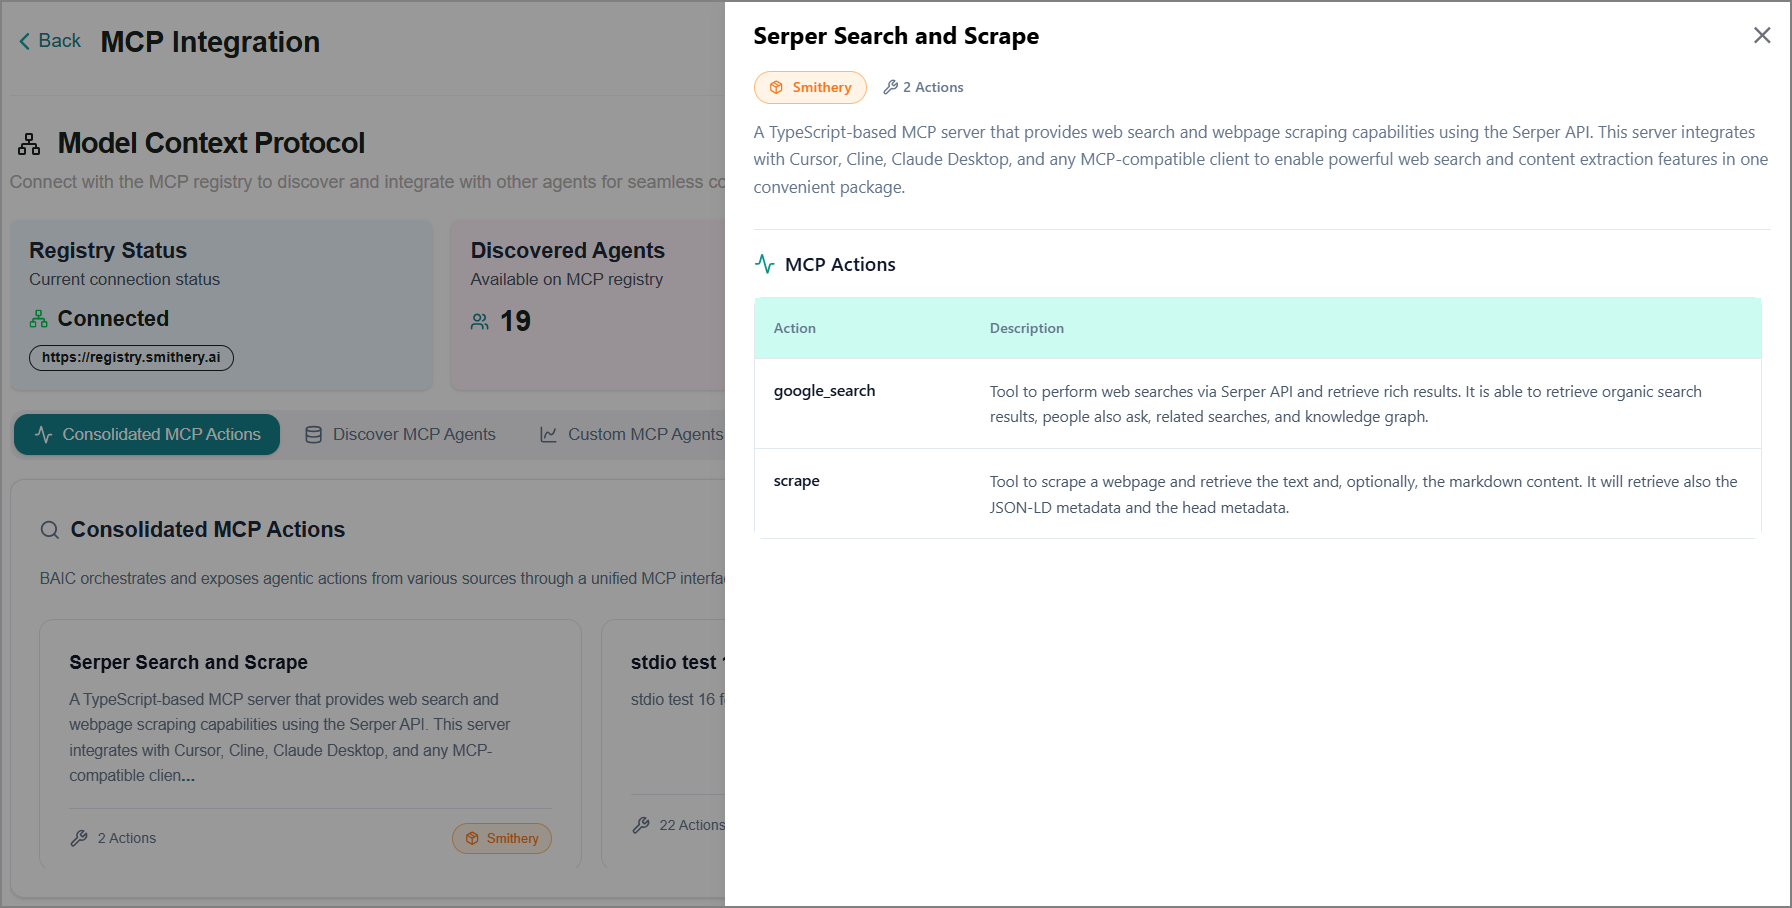
Click the MCP service to view its details and configured actions on the right panel.
Switch to the Discover MCP Agents tab to integrate a new MCP service.
This displays all available services from the MCP registry.
Note
The platform is currently integrated with the Smithery MCP Registry. It is a third-party platform for discovering and managing MCP servers. It lists 2,000+ MCP servers across various categories. Refer to the Smithery website for more information.
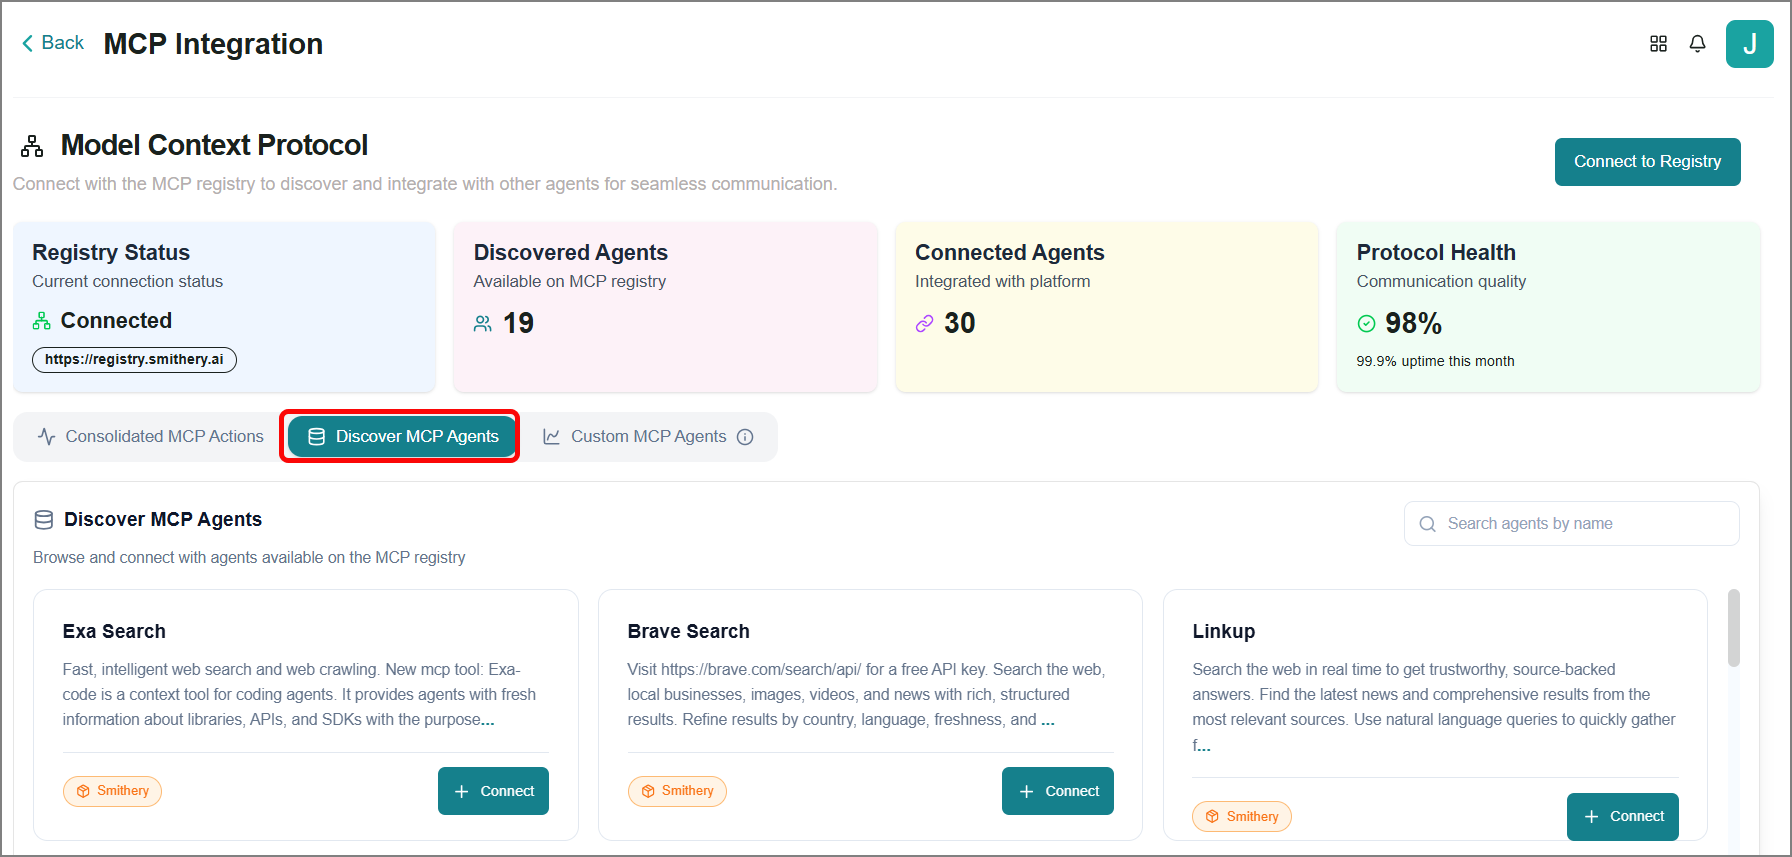
Click any MCP service to view its details and configured actions in the right panel.
To create a new MCP service connection, refer to Connecting an MCP Service. OAuth connections use an inline authorization flow with automatic connection status polling.
To remove an existing connection, click Disconnect on the MCP service card.
Switch to the Custom MCP Agents tab to view all existing MCP services that are not registered on public registries.
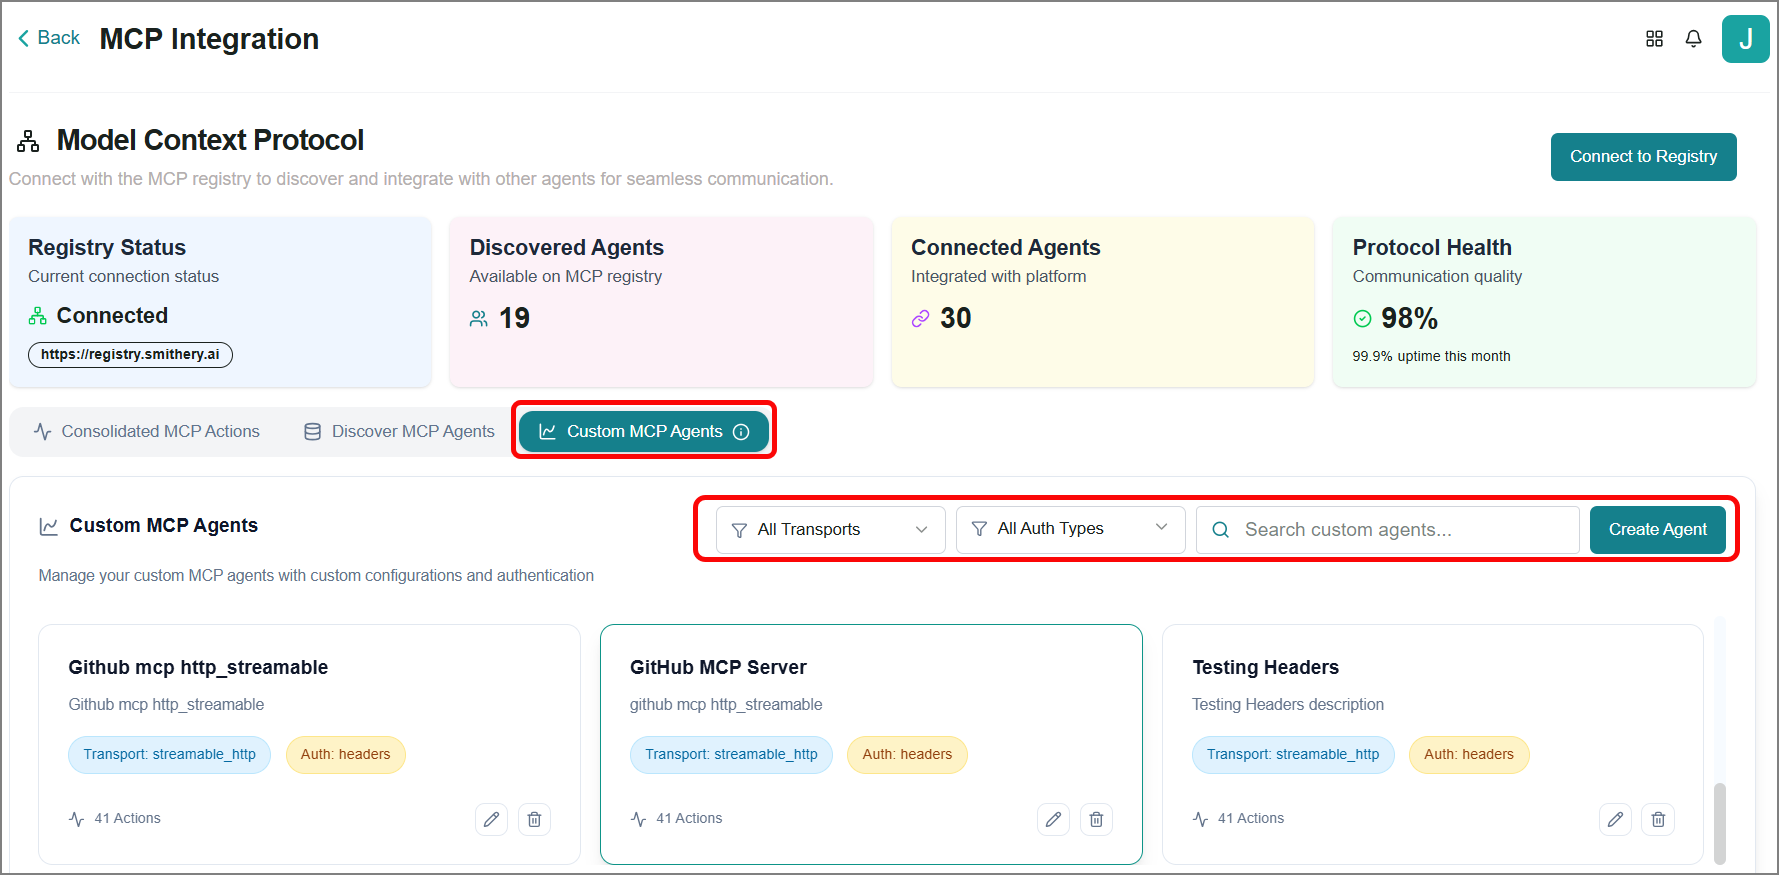
Use the available filters to quickly find the MCP service you need.
Click any MCP service to view its details and configured actions in the right panel.
To create a new MCP service, refer to Creating a Custom MCP Service.
To modify an existing service, click the Edit
 icon on the MCP service.
To remove an existing service, click the Delete
 icon on the MCP service.
Connecting an MCP Service
Enter the required service name in the search box and click Search to filter the results.
Select the required service and click + Connect.
The Connection Credentials pop-up opens.
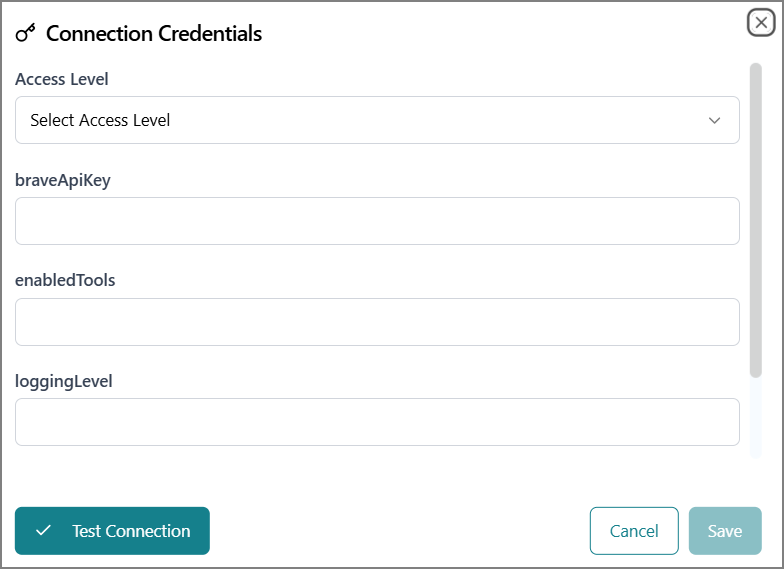
Note
The required credentials may vary depending on the selected service.
Select an Access level from the dropdown. This option determines who is authorized to execute the action.
User - Only you can execute this service.
Tenant - All users in your organization can execute this service.
Enter the appropriate credentials.
Click Test Connection.
The platform attempts to establish a connection to the service. If the connection requires OAuth, it launches an inline authorization flow with automatic connection status polling.
If successful, a confirmation message is displayed.
If unsuccessful, an error message is displayed. Review and update the credentials, then click Test Connection again.
Click Save for server integrations.
The platform scans the connection for prompt injection, tool poisoning, data leakage risks, and privilege escalation, and blocks registration if any of these vulnerabilities are detected, providing detailed security findings.
Insecure Connection - The platform prevents you from saving the service due to the following issues:
E001 - Tool poisoning, prompt injection
E002 - Tool poisoning, cross-server interaction
E003 - Tool poisoning, hijacking agent behavior
Review vulnerability details, contact the MCP provider to resolve issues, modify tool descriptions to remove injection attempts, and re-test after fixes.
Secure with Warnings - You receive a warning message due to the following issues.
W001 - Tool poisoning, suspicious word used
W003 - Entity has changed
TF001 - Data Leak Toxic Flow
TF002 - Destructive Toxic Flow
Review it carefully and click Accept Warnings & Save to proceed.
Fully Secure Connection - The server is automatically integrated.
Note
The new MCP agents connected on this tab will appear in the Consolidated MCP Actions tab and the Integrations page.
Creating a Custom MCP Service
Click Create Agent.
The Create Custom Agent panel opens on the side.
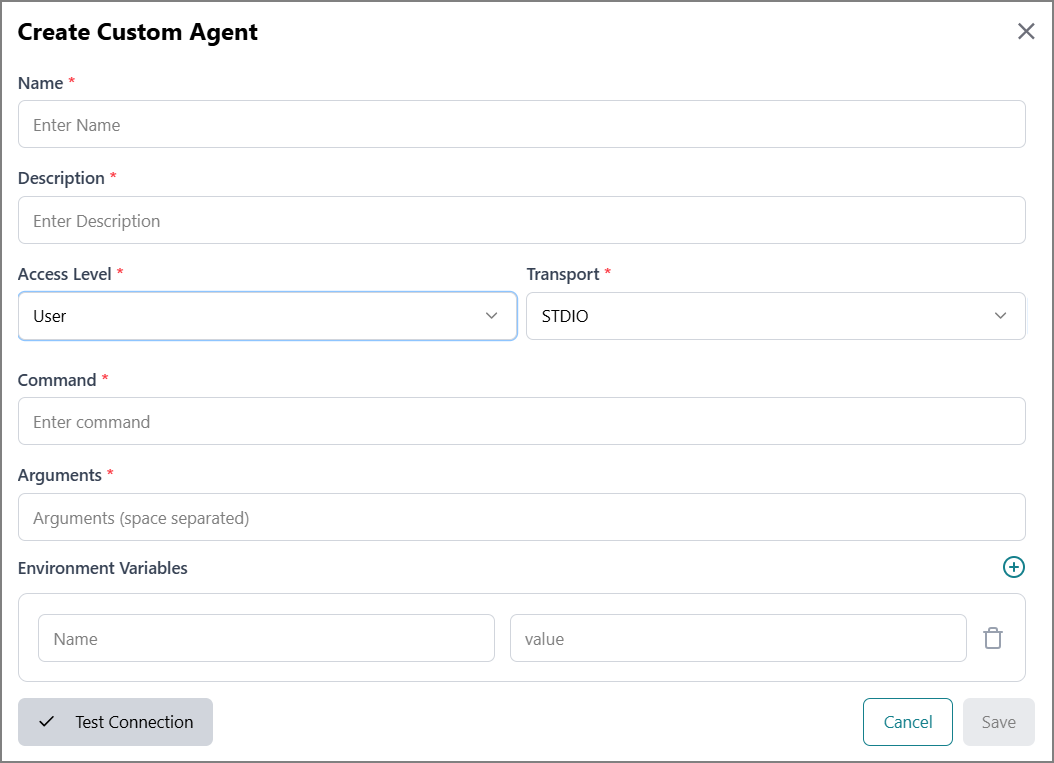
Enter a name for the MCP service.
Enter a detailed description of the MCP service.
Select an Access Level from the dropdown. This option determines who is authorized to execute the action.
User - Only you can execute this service.
Tenant - All users in your organization can execute this service.
Select a Transport option from the dropdown.
Different configuration fields appear based on the transport option you select.
Transport Types
Field
Description
STDIO
(Standard input/output communication for local processes)
Command
Enter the executable command or the program's path.
Arguments
Enter any command-line arguments your program needs, separated by spaces.
Environment Variables
Add one or more environment variables for your service, each formatted as a key-value pair.
Click the Add
 icon to add a new pair.
Click the Delete
icon to remove the pair from the list.
SSE
(Server-Sent Events for real-time server-to-client streaming)
Streamable http
(HTTP-based streaming for web-compatible connections)
URL
Enter the server endpoint URL for the SSE connection.
Enter the URL of the streaming service's HTTP endpoint.
Authentication Type
Select the authentication method required by your service.
API Key
Enter the API key provided by your service for authentication.
Add one or more configuration parameters your service requires, formatted as key-value pairs.
Headers - Add one or more custom HTTP headers needed for your service, formatted as key-value pairs.
OAuth
Enter the OAuth client ID assigned to your application.
Enter the confidential client secret for OAuth authentication.
Enter the OAuth scope(s) that define the access permissions required for your service.
Click Test Connection.
The platform attempts to establish the connection. If prompted, provide the authentication credentials. Upon successful connection, a confirmation message is displayed.
Click Save for server integrations.
The platform scans the connection for prompt injection, tool poisoning, data leakage risks, and privilege escalation, and blocks registration if any of these vulnerabilities are detected, providing detailed security findings.
Insecure Connection - The platform prevents you from saving the service due to the following issues:
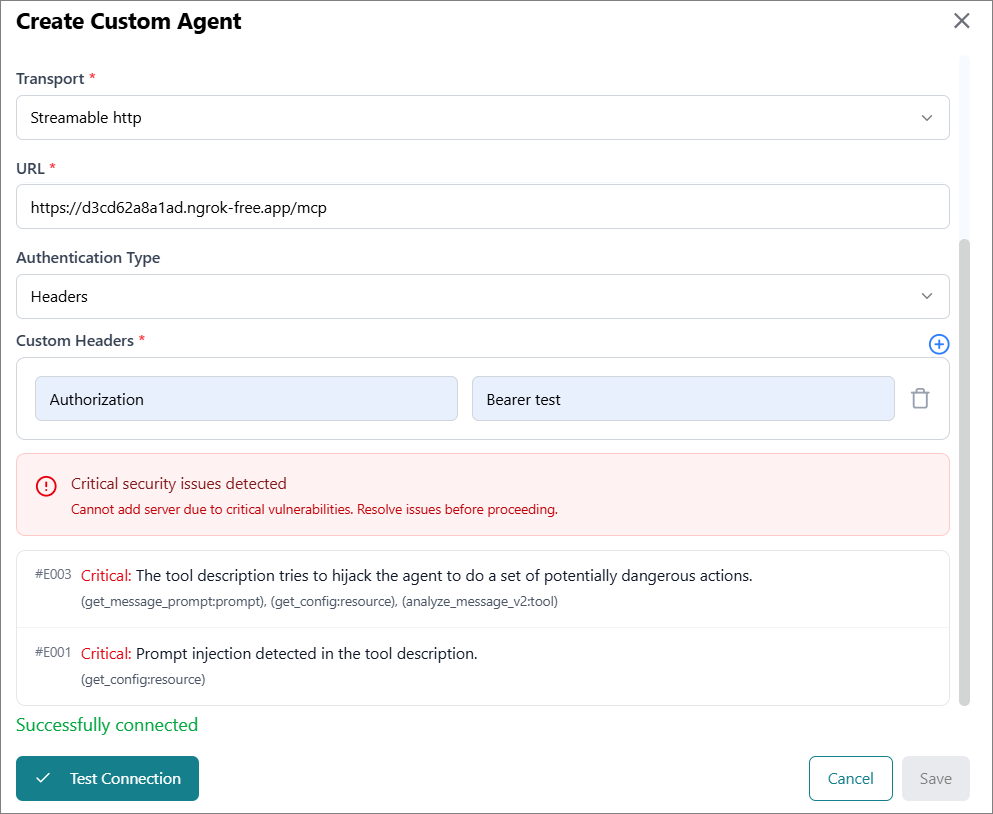
E001 - Tool poisoning, prompt injection
E002 - Tool poisoning, cross-server interaction
E003 - Tool poisoning, hijacking agent behavior
Review vulnerability details, contact the MCP provider to resolve issues, modify tool descriptions to remove injection attempts, and re-test after fixes.
Secure with Warnings - You receive a warning message due to the following issues.
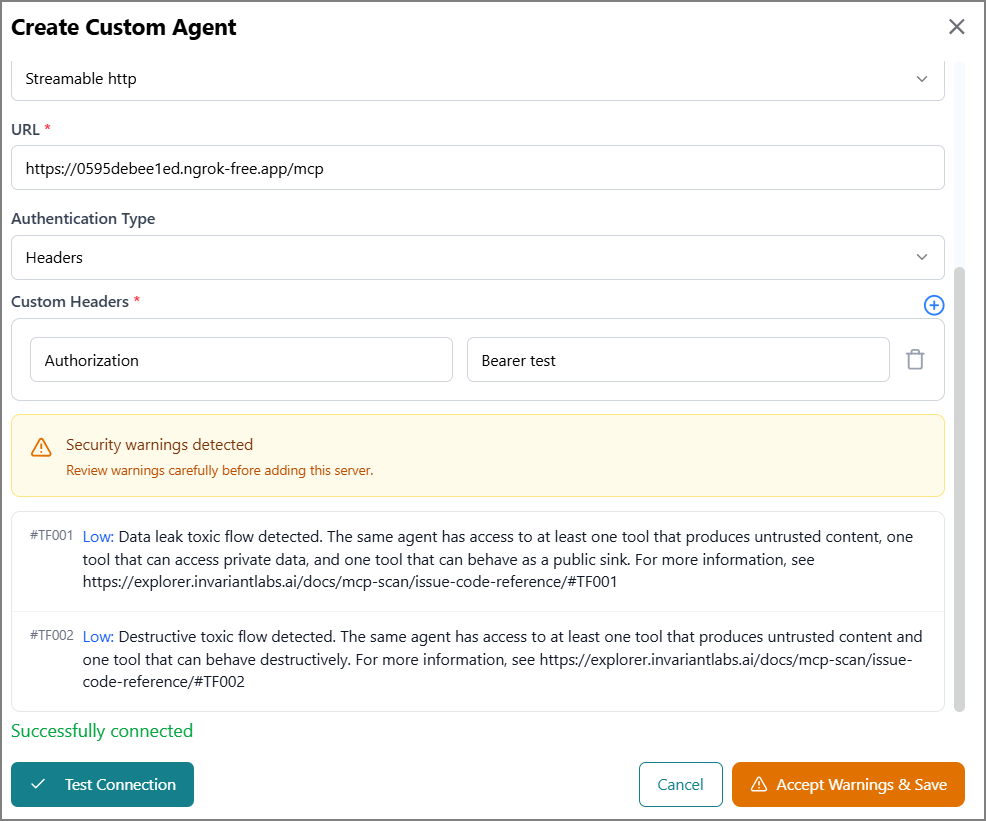
W001 - Tool poisoning, suspicious word used
W003 - Entity has changed
TF001 - Data Leak Toxic Flow
TF002 - Destructive Toxic Flow
Review it carefully and click Accept Warnings & Save to proceed.
Fully Secure Connection - The server is automatically integrated.
Note
The new MCP agents connected on this tab will appear in the Consolidated MCP Actions tab and the Integrations page.
Creating an MCP Registry Connection
The platform enables you to connect to the relevant MCP registry according to your specific requirements.
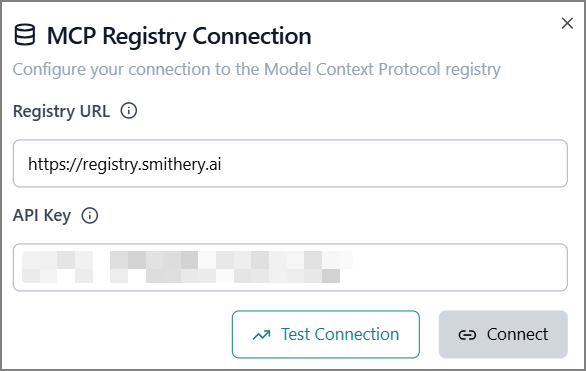 |
Click Connect to Registry.
The MCP Registry Connection window opens.
Enter the MCP Registry URL.
Enter the API Key for the new registry.
Click Test Connection.
The platform attempts to establish the connection. If prompted, provide the authentication credentials. Upon successful connection, a confirmation message is displayed.
Click Connect to store the credentials.
The new MCP registry is now connected and can be used to discover the required MCP services.
Viewing and Modifying Integrated Tools
The platform lets you view and modify the configuration settings for predefined integration tools.
Enter the tool name in the search box or select a category name to filter and locate the desired tool from the list.
Note
Use the Delete icon to permanently remove the selected tool from the list.
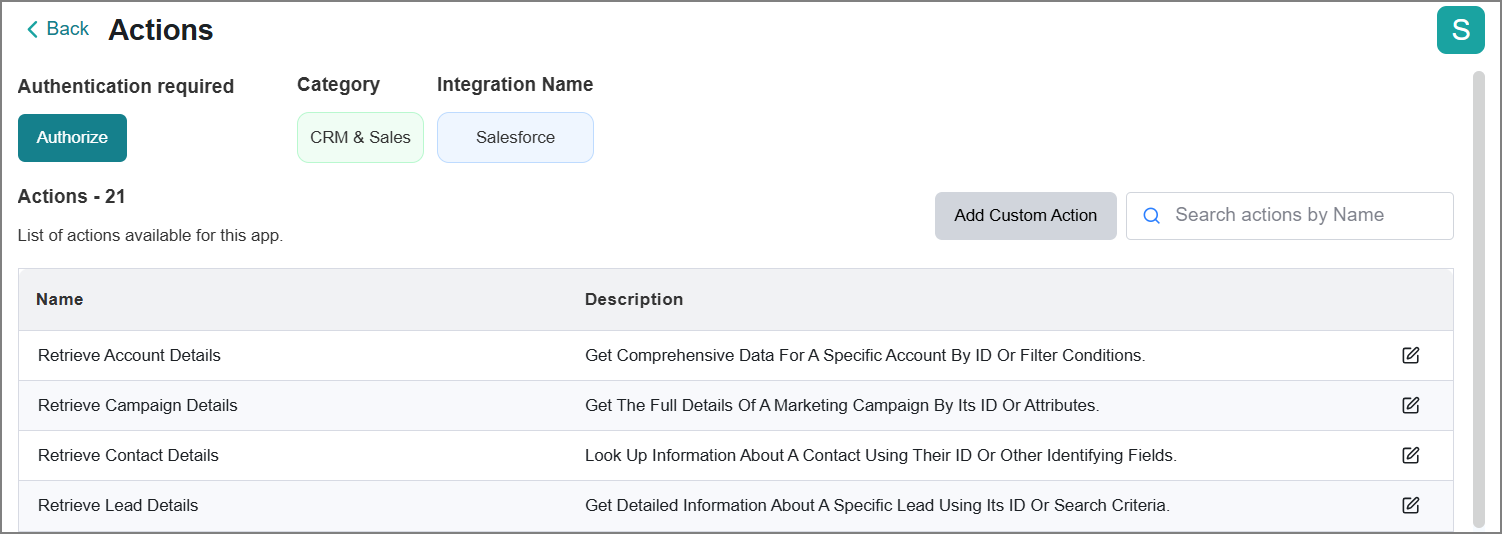
Select a tool to view its configured actions, which define what the tool will execute in response to AI agent requests. On the Actions page, you can perform the following tasks:
Authorization
Adding New Actions (only available for some tools)
Copying Action's Snippet Code
Authorization
This option allows access to the tool using its authorization details.
Click Authorize.
The Authorization Parameters panel opens on the right side.
If the tool has SSO enabled, you will be automatically redirected to the authentication page to log in using your organizational credentials.
Note
For SSO authentication issues, contact your company admin support team.
Else, the Authorization Parameters panel opens on the right side.
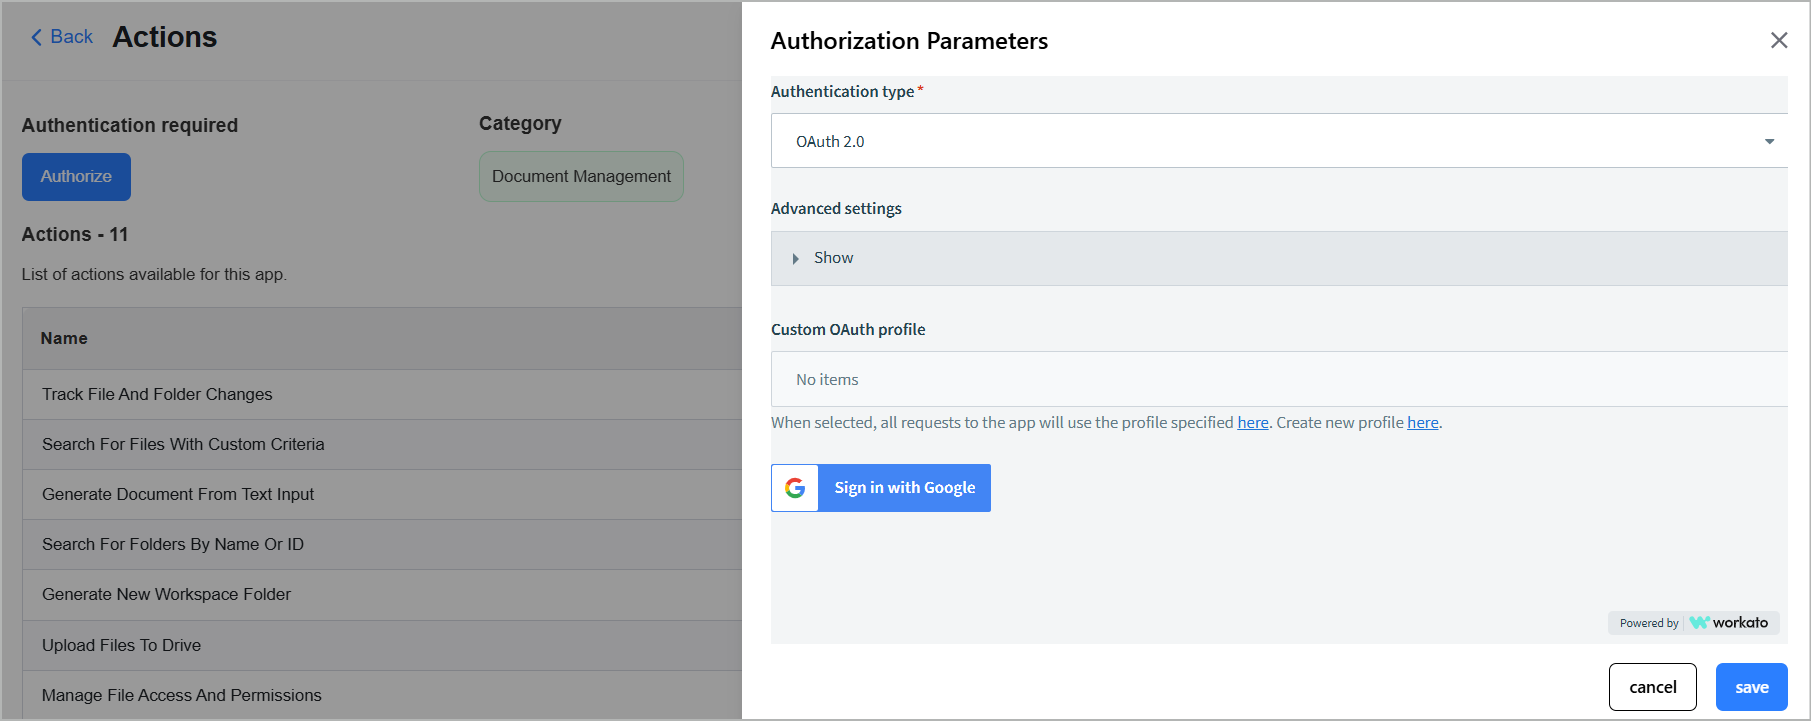
Enter the tool’s authorization credentials.
The required credentials may vary depending on the selected tool.
Click Save to validate and store the credentials.
After successful authentication, the page displays a confirmation status showing that your account is connected.
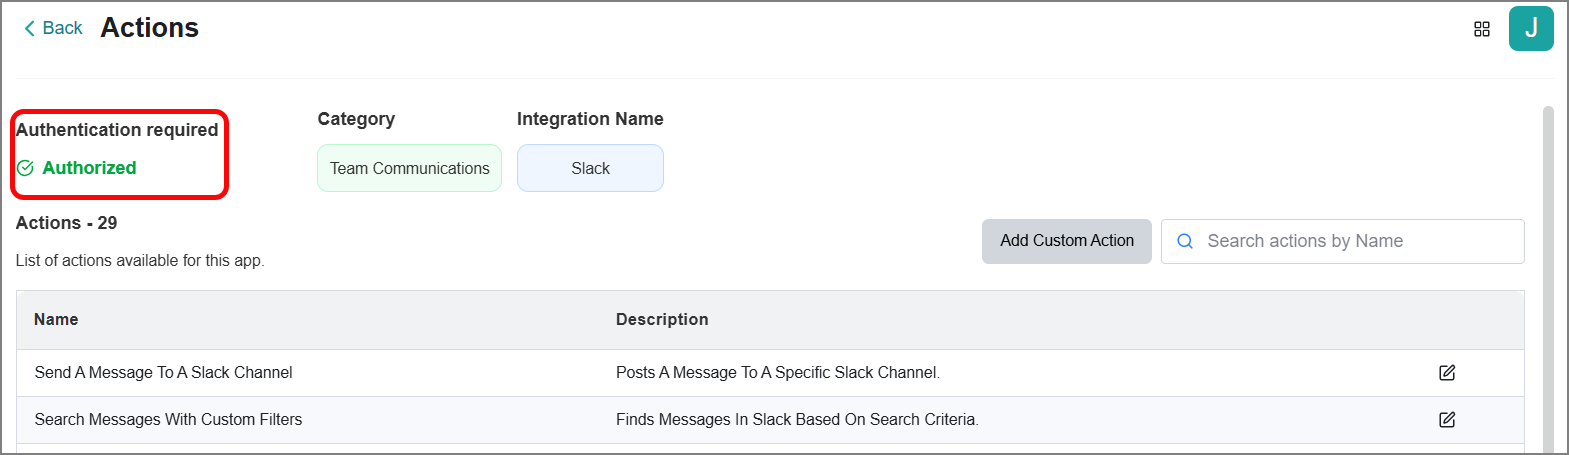
Tip
You can view a tool's authentication status in the Profile Management.
Adding New Actions
Use this option to define new custom actions for the selected tool. This feature applies to a limited set of tools.
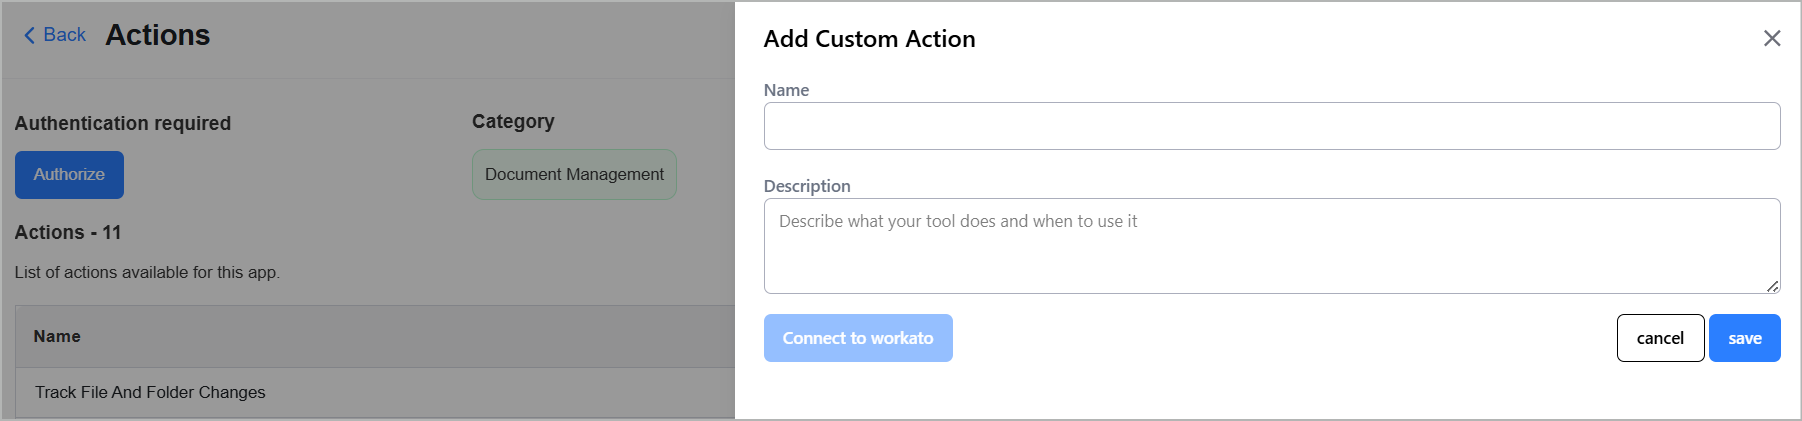
Click Add Custom Action.
The Add Custom Action panel opens on the right side.
Enter the action name.
Enter a clear and concise description of the action, including its purpose and expected behavior.
Click Save.
The new action is added to the existing list of configured actions.
Copying Snippet Code
Use this option to view and copy the source code of the action for alternative purposes, such as customization or reuse.
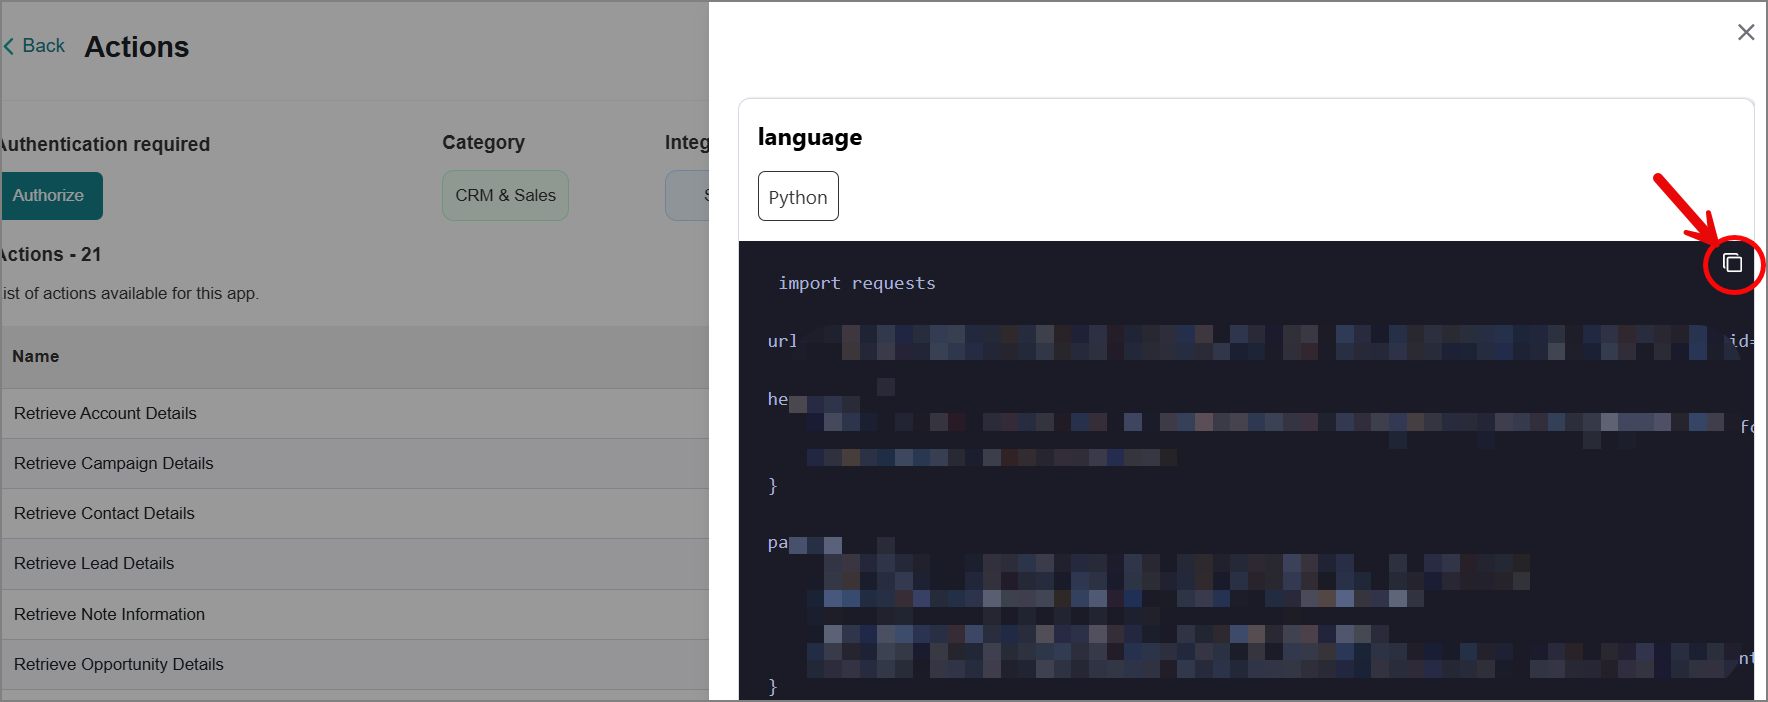
Select the required action.
The source code appears in the right-side panel.
Click the Copy
 icon to copy the code.
A confirmation message is displayed.
Click X to close the panel.