Manage Connectors
Manage Connectors is where you set up the connections that allow Business AI Cloud to access your data. A connector is an integration component that establishes secure communication between the platform and an external system, such as a file repository, a relational database, an enterprise application, or a conversation source.
Two types of connectors work together to create a complete data pipeline: a source connector that brings data into the platform, and a destination connector that stores the processed output in a vector database for use in AI workflows. Both must be configured before you can run data ingestion.
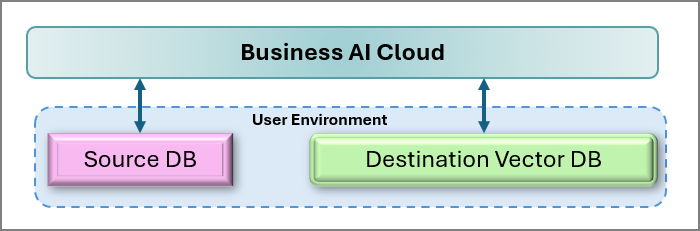 |
Understanding the types of sources you are integrating with, such as static files, dynamic knowledge, or transactional systems, helps you select the appropriate connector type and optimize its configuration. By defining connectors at this stage, you enable a scalable, end-to-end data pipeline that supports intelligent processing, real-time analytics, and adaptive knowledge delivery across your entire enterprise environment.
Key Capabilities
Source Connectors - Connect to the systems where your data lives.
Destination Connectors - Define where processed data is stored after ingestion. The destination is typically a vector database that makes your data available for retrieval, analysis, and AI-driven operations across the platform.
Connection Testing - When you save a connector, the platform automatically tests the connection and confirms whether it succeeded. If the test fails, an error message guides you to review and correct your configuration.
Security Scanning - The platform scans each connection for security threats, helping ensure that your integrations meet security standards before data flows through them.
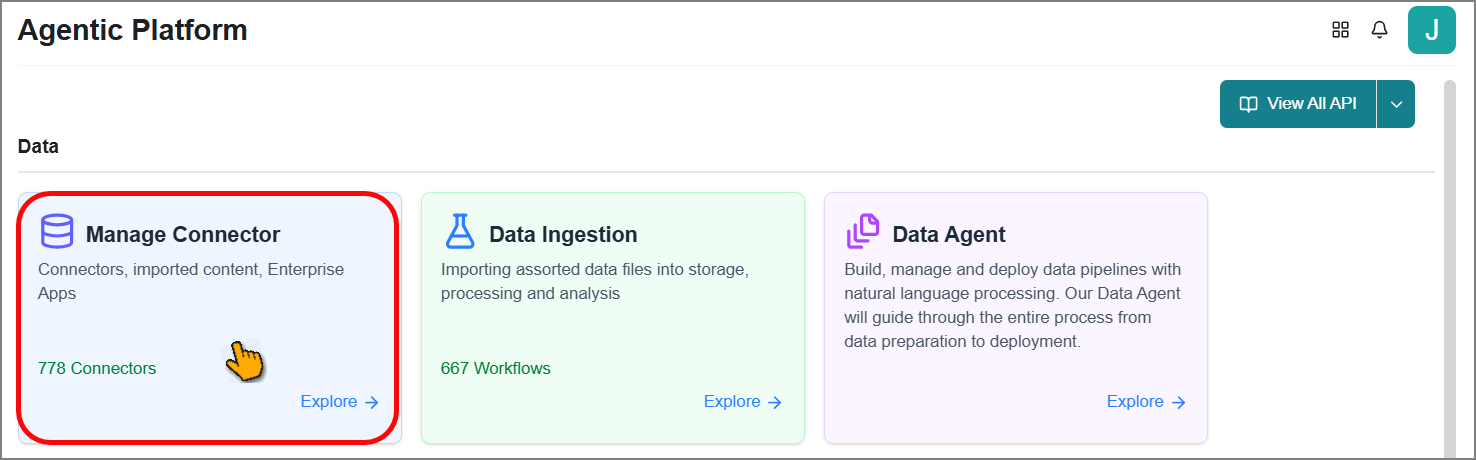
To access this page, go to the Home page > Manage Connector.
 |
Creating a Source Connector
This configuration is performed at the Data layer to define the target source for data collection. The platform enables you to configure the target data source according to the type of data to be ingested.
Important
Before you begin, ensure you have all the information required to configure the source in the platform.
To connect the data storage:
On the home page, click Manage Connector.
The Manage Connector page opens.
Select one of the preferred data source types:
Conversation Source - Connect to conversation-based data sources, including chat transcripts and messaging platforms.
Document Source - Connect to file-based sources, including PDFs, DOCX files, and plain text documents.
Enterprise Application Source - Connect to enterprise systems such as CRMs, ticketing platforms, or business applications.
Relational DB Source - Connect to structured data in relational database systems.
NoSQL Source - Connect to flexible, document-oriented databases that store data in formats other than traditional rows and columns.
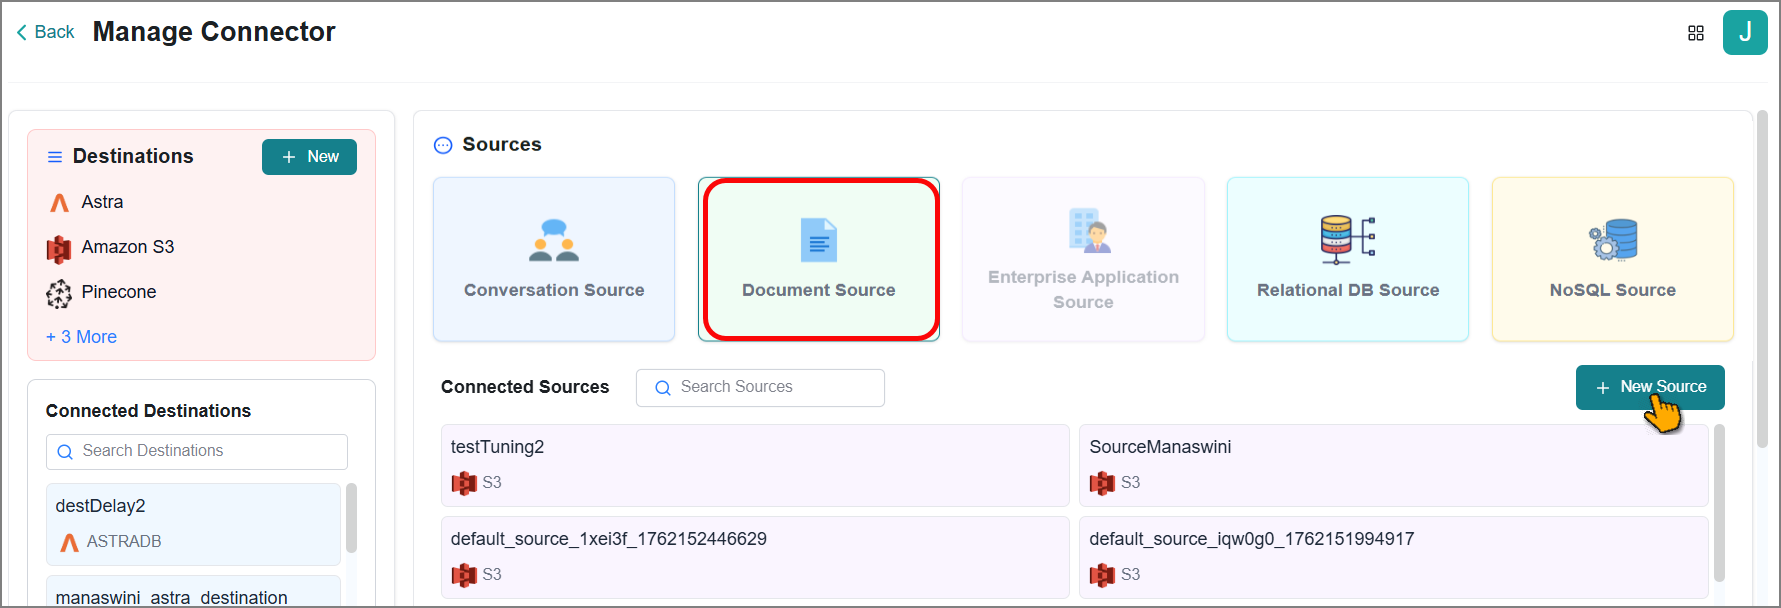
The existing relevant source connections are displayed in the Connected Sources section.
Click New Source.
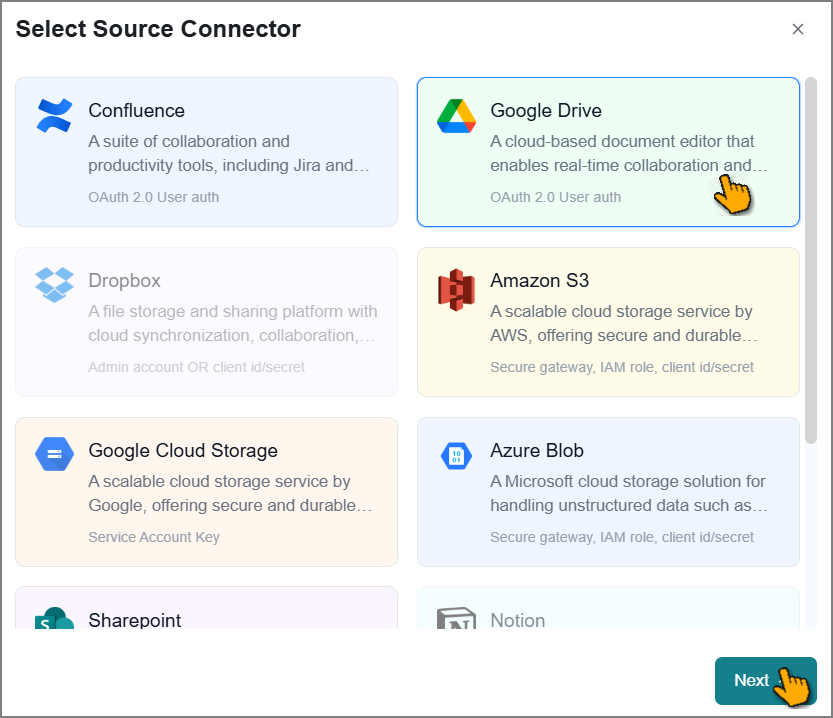
The Select Source Connector window opens, displaying several data sources in a card layout. The available data source options may vary depending on the selected source type.
Note
If you need assistance, please contact your Uniphore Business AI Cloud support team.
Select the required source from the card list, then click Next.
The configuration page opens.
Enter the required configuration details on the page.
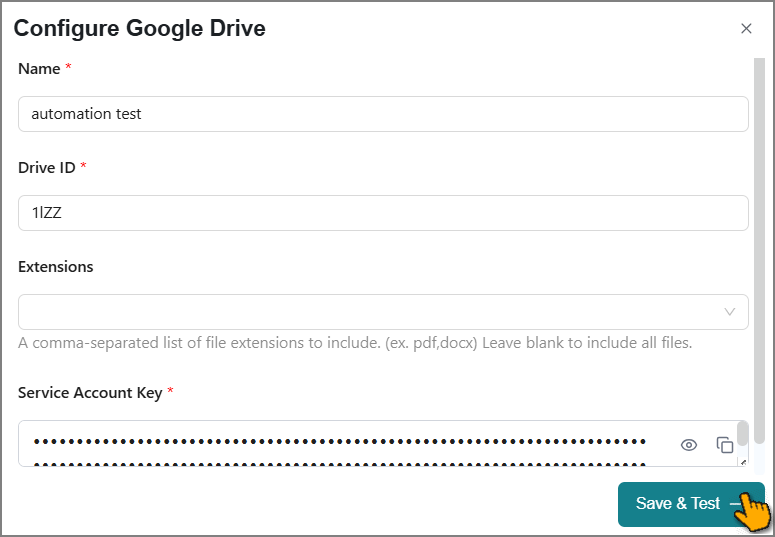
The fields may vary based on the selected source.
For Conversation Source:
Source Name
Fields
Value Description
Uniphore
Name
Enter a meaningful name to identify this configuration.
Tenant ID
Enter the tenant ID for Uniphore’s conversation application you want to configure.
Start Date
Select the start date to begin pulling historical conversations from the conversation source.
End Data
Select the end date to stop pulling historical conversations from the conversation source.
For Document Source:
Source Name
Fields
Value Description
Confluence
Name
Enter a meaningful name to identify this configuration.
URL
Enter the base URL of your Confluence instance.
Max number of spaces
Enter the maximum number of Confluence spaces to retrieve.
This limits the number of spaces retrieved during data fetching.
Max number of docs from each space
Enter the maximum number of documents to retrieve from each Confluence space.
This helps control the volume of data fetched during synchronization.
Spaces
Enter the keys or names of the Confluence spaces to connect.
Check box: Extract images
Select this option to extract and include images from the Confluence pages.
Note
By default, images are excluded from the data retrieval process.
Check box: Extract files
Select this option to extract and include the files attached to the Confluence pages.
Note
By default, attached files are excluded from the data retrieval process.
Authentication Method
Choose the preferred authentication method from the dropdown list:
Username and API Token
Username and Password
Personal Access Token
Username
Enter your Confluence account username.
Token
Enter the API token generated for your Confluence account.
Password
Enter the password associated with your Confluence account.
Check box: Cloud
Select this option if you are connecting to the Confluence Cloud instance.
Google Drive
Name
Enter a meaningful name to identify this configuration.
Drive ID
Enter the unique identifier of the Google Drive you want to connect.
Extensions
Enter the file types to be extracted during file retrieval. Use comma-separated values to specify multiple types.
Note
By default, all file types are processed. However, if specific types are defined, only those will be included.
Service Account Key
Upload the JSON key file for your Google Cloud service account. This key authorizes access to Google Drive through the configured service account.
Check box: Recursive
Select this option to include data from all subfolders in Google Drive.
Amazon S3
Name
Enter a meaningful name to identify this configuration.
Authentication Method
Choose the preferred authentication method from the dropdown list:
Anonymous
Secret
Token
Amazon S3 Key
Enter the access key used to authenticate with your AWS account.
Applicable for both secret and token-based authentication.
Amazon S3 Secret
Enter the secret access key associated with your AWS account.
Applicable for both secret and token-based authentication.
STS Token
Enter the temporary security token issued by AWS STS.
Applicable for token-based authentication only.
Bucket URL
Enter the URL of the Amazon S3 bucket used to collect the data.
Custom URL
Enter the custom URL used to connect your Amazon S3 service.
Check box: Recursive
Select this option to include data from all sub-folders within the specified S3 bucket path.
Google Cloud Storage
Name
Enter a meaningful name to identify this configuration.
Service Account Key
Enter or paste the JSON service account key file from your Google Cloud. This key authenticates the platform's access to your Google Cloud Storage (GCS) bucket.
Bucket URL
Enter the full URL of your GCS bucket.
Check box: Recursive
Select this option to include data from all sub-folders within the specified GCS bucket path.
SharePoint
Name
Enter a meaningful name to identify this configuration.
Client ID
Enter the application (client) ID generated in Azure Active Directory (AD) for the SharePoint integration.
SharePoint Site URL
Enter the full URL of the SharePoint site you want to connect.
SharePoint Path
Enter the relative path within the SharePoint site where data is stored.
Check box: Recursive
Select this option to include data from all sub-folders within the specified SharePoint path.
Tenant ID
Enter the Azure AD tenant ID associated with your Microsoft account.
Authority URL
Enter the OAuth 2.0 authority URL used to authenticate against Azure AD.
Client Secret
Enter the client secret associated with your Azure AD.
User Principal Name (UPN)
Enter the email address of your account that has access to the specified SharePoint site.
Password
Enter the password for your account specified in the UPN field.
Azure Blob
Name
Enter a meaningful name to identify this configuration.
Authentication Method
Choose the preferred authentication method from the dropdown list:
SAS Token
Account Key
Connection String
Account Name
Enter your Azure Blob account name.
Applicable for SAS token/Account Key-based authentication only.
SAS Token
Enter the Shared Access Signature (SAS) token to grant secure, delegated access to your Azure storage resources without sharing your account key.
Applicable for SAS token-based authentication only.
Account Key
Enter the Azure Storage Account Key to authenticate access to your Azure storage account.
Applicable for Account Key-based authentication only.
Connection String
Enter the Azure Storage connection string to authenticate and connect to your storage account.
Applicable for Connection String-based authentication only.
Enterprise Application Source - Under development, coming soon!
For Relational DB Source:
Source Name
Fields
Value Description
Snowflake
Name
Enter a meaningful name to identify this configuration.
Account Identifier
Enter your Snowflake account identifier, which includes your account name and region.
Username
Enter your Snowflake username for authentication.
Private Key
Upload your private key for secure authentication to Snowflake.
Source Database
Enter the name of the Snowflake database you want to connect to.
Source Schema
Enter the schema name within your source database.
Role
Enter the Snowflake role that defines access permissions for this connection.
Warehouse
Enter the virtual warehouse name that will execute queries for this connection.
Databricks
Name
Enter a meaningful name to identify this configuration.
Server Hostname
Enter the Databricks workspace hostname.
Access Token
Enter your Databricks personal access token.
HTTP Path
Enter the HTTP Path for your Databricks SQL cluster.
Source Schema
Enter the database schema name of the source you want to connect to.
Source Database
Enter the database name of your source.
Big Query
Name
Enter a meaningful name to identify this configuration.
Project Id
Enter your Google Cloud Project ID where your BigQuery datasets are located.
Source Database
Specify the BigQuery dataset name you want to connect to.
Service Account JSON
Copy and paste your full service account JSON key file here. This file provides the authentication credentials needed to access your BigQuery data.
ClickHouse
Name
Enter a meaningful name to identify this configuration.
Connection URL
Enter the full ClickHouse connection URL in the required format.
Username
Enter the ClickHouse database username used to authenticate the connection.
Password
Enter the password associated with the specified ClickHouse username.
Postgres
Name
Enter a meaningful name to identify this configuration.
Connection URL
Enter the full PostgreSQL connection URL in the required format.
Schema
Enter the name of the PostgreSQL schema containing the target tables.
Username
Enter the PostgreSQL database username used to authenticate the connection.
Password
Enter the password associated with the specified PostgreSQL username.
Cloud SQL for MySQL
Name
Enter a meaningful name to identify this configuration.
Host
Enter the host address or IP of your Cloud SQL for MySQL instance.
Username
Enter your MySQL username for authentication.
Password
Enter the password associated with the MySQL username.
Source Schema
Enter the database name you want to connect to.
For NoSQL Source:
Source Name
Fields
Value Description
MongoDB
Name
Enter a meaningful name to identify this configuration.
Connection String
Enter the full MongoDB connection string used to connect to your database instance.
Database Name
Enter the name of the MongoDB database that contains the collections you want to connect to.
Username
Enter your MongoDB username for authentication.
Password
Enter the password associated with the MongoDB username.
Auth Database
Enter the name of the MongoDB database where the user credentials are stored.
This is the database MongoDB uses to verify the username and password you provided.
Note
Mandatory fields are marked with
 .
.For security reasons, specific field values are hidden by default. Click
 to view them.
To request the addition of new connectors to the predefined list, please contact your Uniphore Support representative.
Click Save & Test.
The configuration is saved, and the source access is tested.
If the test is successful, a success message appears, and the source is listed in the Connected Sources section.
If the test fails, an error message appears. Review and validate your credentials, then click Save & Test again.
Note
If you need assistance, please contact your Uniphore Business AI Cloud support team.
Creating a Destination Connector
This configuration is performed in the Data layer to specify the target destination for vector data storage, which supports retrieval, analysis, and AI-driven operations.
Caution
Before you begin, ensure your destination DB setup is complete and that you have all the required information to configure it in the platform.
To define the destination storage:
Note
Mandatory fields are marked with
.For security reasons, specific field values are hidden by default. Click
to view them.To request the addition of new connectors to the predefined list, please contact your Uniphore Support representative.
On the home page, click Manage Connector.
The Manage Connector page opens.
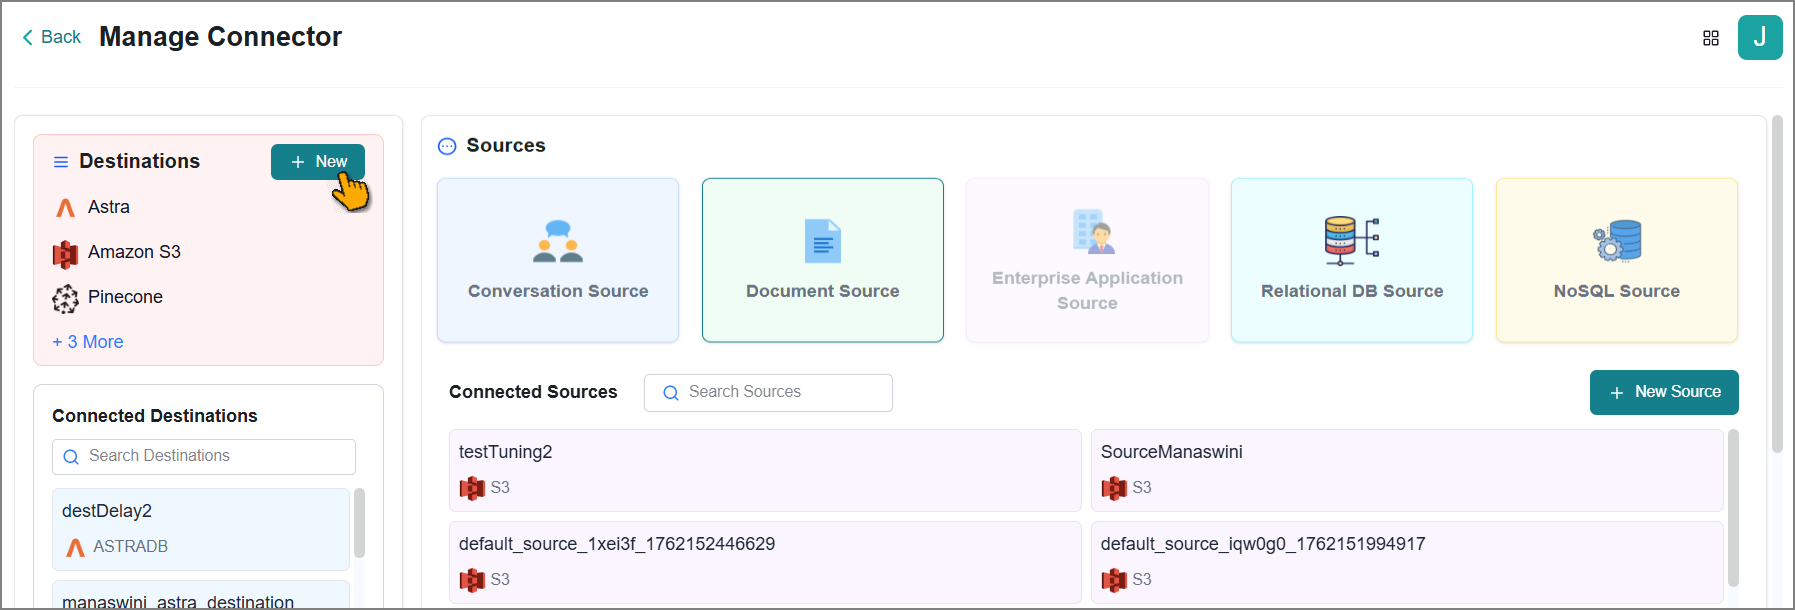
In the left side Destinations panel, click New or any of the required DB names.
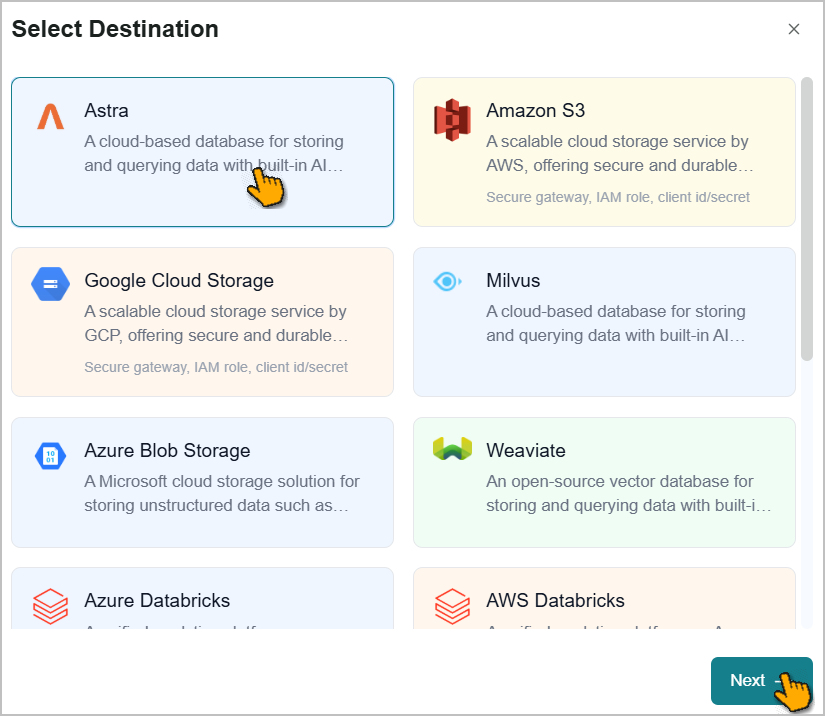
The Select Knowledge Base Connector window opens, displaying the default vector DBs.
Note
To integrate your vector DBs, please contact your Uniphore Business AI Cloud support representative.
Select the required DB from the list, then click Next.
The configuration page opens.
Enter the required configuration details.
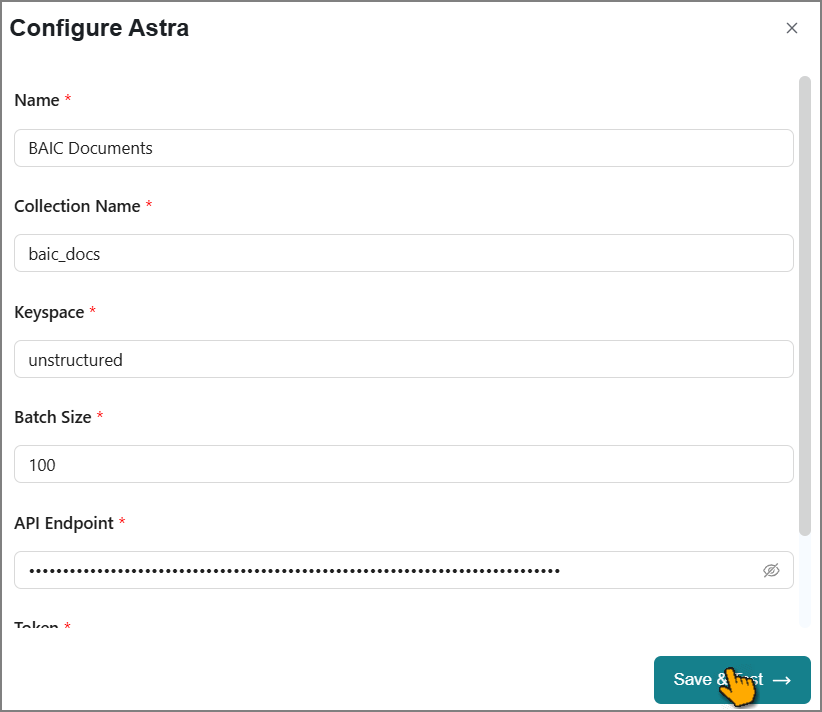
The fields may vary based on the selected DB.
DB Name
Fields
Value Description
Astra
Name
Enter a meaningful name to identify this configuration.
Collection Name
Enter the name of the collection in the DB that will store your records.
The name must follow the appropriate naming format as per the DB.
Keyspace
Enter the keyspace name that defines the logical namespace for your data within the database.
Batch Size
Specify the maximum number of records that can be processed together in a single batch operation.
API Endpoint
Enter the URL of the API endpoint used to connect to the DB.
Token
Enter the secure access token used to authenticate API requests and authorize access to the DB.
Amazon S3
Name
Enter a meaningful name to identify this configuration.
Authentication Method
Choose the authentication method from the dropdown:
Secret
Token
Amazon S3 Key
Enter the access key used to authenticate your AWS account.
Amazon S3 Secret
Enter the secret access key associated with the AWS account.
STS Token
Enter the temporary security token issued by AWS Security Token Service (STS).
Applicable for token-based authentication only.
Bucket URI
Enter the Uniform Resource Identifier (URI) of the Amazon S3 bucket used for storing the data.
Custom URL
Enter the custom URL of the Amazon S3 service.
Google Cloud Storage
Name
Enter a meaningful name to identify this configuration.
Service Account Key
Enter or paste the JSON service account key file from your Google Cloud. This key authenticates the platform's access to your Google Cloud Storage (GCS) bucket.
Bucket URL
Enter the full URL of your GCS bucket.
Milvus
Name
Enter a meaningful name to identify this configuration.
Collection Name
Specify the name of the Milvus collection where vector embeddings will be stored.
Endpoint URL
Enter the complete endpoint URL of your Milvus instance.
Authentication Method
Choose the authentication method from the dropdown list:
Password
Token
Username
Enter the Milvus database username.
Applicable for password authentication only.
Password
Enter the corresponding password for the username.
Applicable for password authentication only.
Token
Enter the authentication token for secure access.
Applicable for token authentication only.
DB Name
Specify the Milvus database name where your collections are stored.
Azure Blob Storage
Name
Enter a meaningful name to identify this configuration.
Authentication Method
Choose the authentication method from the dropdown list:
SAS Token - Authenticate using a Shared Access Signature token.
Account Key - Authenticate using the storage account's access key.
Connection String - Authenticate using a full connection string that combines the account name, key, and endpoint configuration into a single value
Account Name
Enter the name of your Azure Storage account.
Applicable for SAS Token or Account Key authentication only.
SAS Token
Enter the Shared Access Signature token generated from your Azure Storage account.
Applicable for SAS Token authentication only.
Account Key
Enter the access key associated with your Azure Storage account.
Applicable for Account Key authentication only.
Connection String
Enter the full connection string for your Azure Storage account, available from the Azure portal under Access Keys.
Applicable for Connection String authentication only.
Remote URL
Enter the URL pointing to the target Azure Blob Storage container or object path.
Weaviate
Name
Enter a unique name to identify this connection.
Cluster URL
Enter the endpoint URL of your Weaviate cluster.
API Key
Enter the API key used to authenticate access to your Weaviate cluster.
Collection
Enter the name of the Weaviate collection where your data will be stored.
Azure Databricks
AWS Databricks
Name
Enter a unique name to identify this connection.
Description
Enter an optional description to provide context about the connector's purpose.
Workspace URL
Enter the URL of your Databricks workspace.
Databricks Token
Enter the personal access token generated from your Databricks workspace.
Region
Select the cloud region from the dropdown where your Databricks workspace is hosted.
Catalog Name
Enter the name of the Unity Catalog in your Databricks workspace.
Schema Name
Enter the schema in the specified catalog from which data will be read or to which data will be written.
Volume Name
Enter the name of the Databricks Volume to be used for file-based data storage.
Click Save & Test to complete the Knowledge Base setup.
The configuration is saved, and the platform automatically initiates a connection test to validate your credentials.
If the test is successful, a success message appears, and the new Knowledge Base is listed in the Connected Destinations section.
If the test fails, an error message appears.
Note
If you need assistance, please contact your Uniphore Business AI Cloud support team.
Updating Connectors
Use the Manage Connectors page to view and manage all existing connectors. You can review, modify, delete, or troubleshoot configured connections as needed.
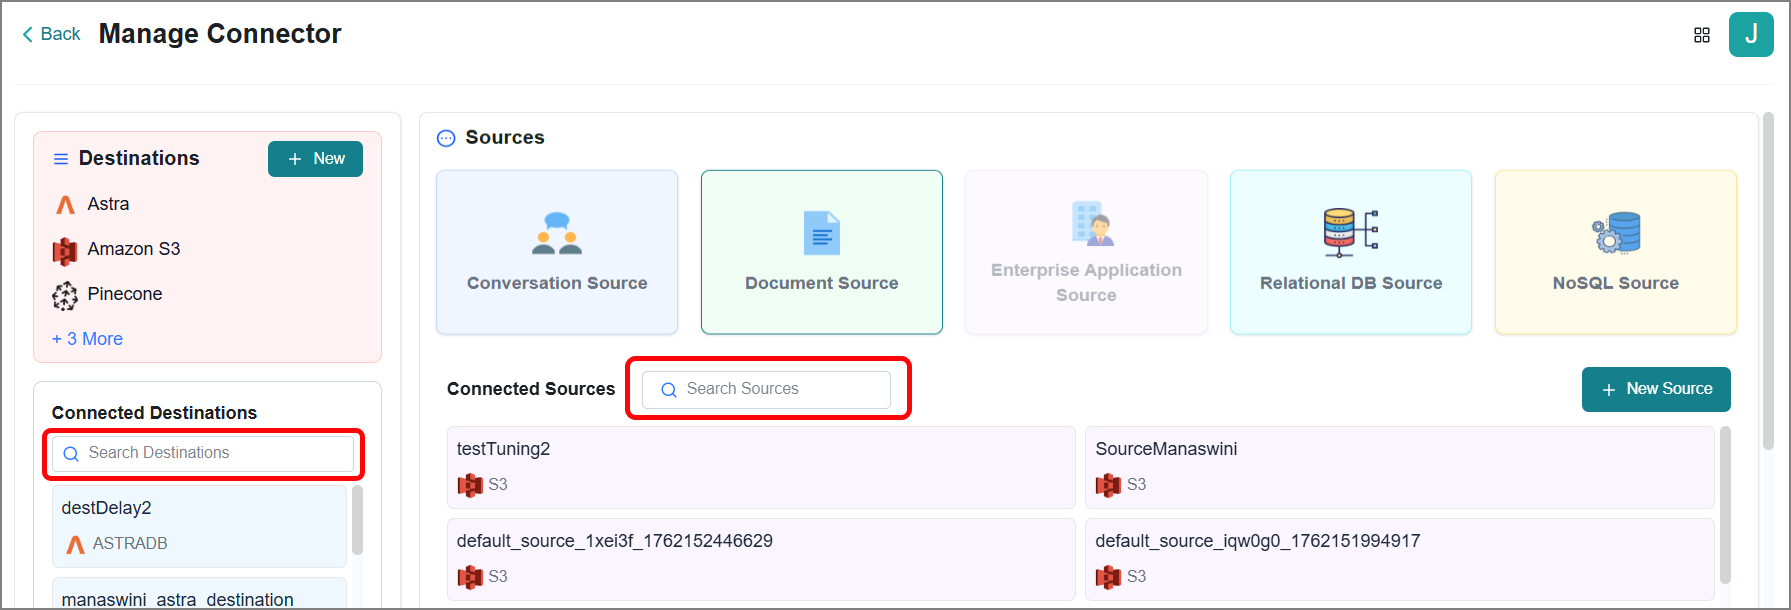
KB Connectors are listed under the Connected Destinations section in the left navigation panel.
Source Connectors are available under the Connected Sources section.
Use either the Search Destinations or Search Sources search box to locate a specific connector.
Modifying a Connector
You can review, modify, or troubleshoot connectors by following these steps:
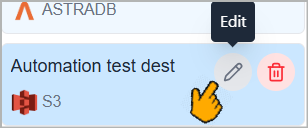
Hover over the desired connector.
Click
 to edit.
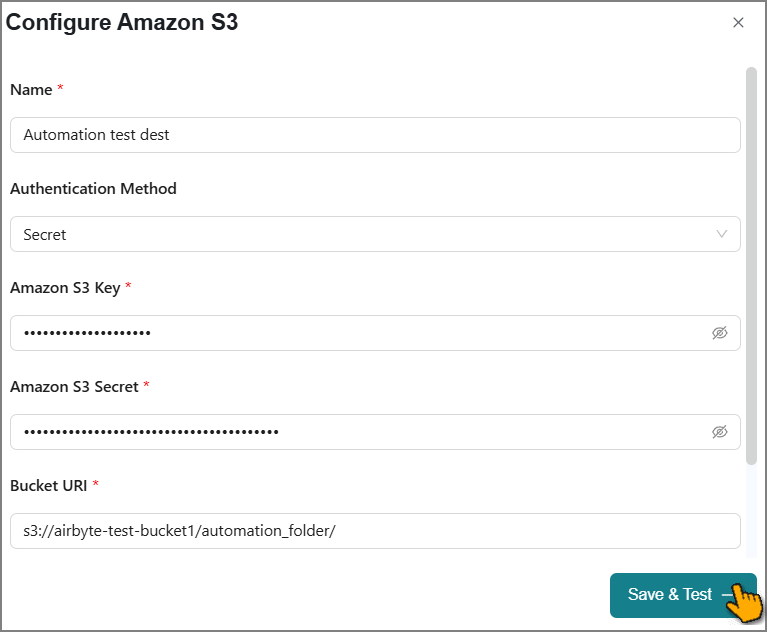
The configuration window opens.
Review and update the details as needed.
Click Save & Test.
The configuration is saved, and the connector is tested.
If the test is successful, a success message appears.
If the test fails, an error message appears.
Removing a Connector
You can remove any connector from the list when it is no longer needed.
Hover over the desired connector.
Click
 to remove.
A confirmation message appears.
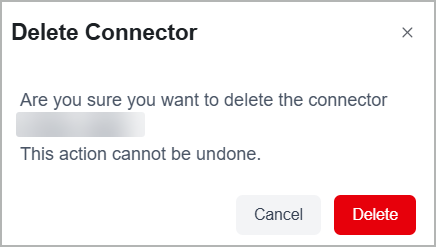
Click Delete again to confirm the action.
The connector is removed from the list, and a success message is displayed.
Important
If the connector is being used in any workflow, the platform will display a warning message and prevent deletion.