Create Organization Hierarchy
Conversation Insights Agent uses a robust account hierarchy system to accurately represent the structure of customer organizations. This hierarchy is structured as a versatile tree, allowing detailed classification of teams and departments. Each account can be segmented into multiple hierarchical levels for effective management and analysis.
The Organization and its Hierarchy are called Nodes. The First created node is the Organization, and the nodes created under it are called Child.
Key features
Customizable hierarchy based on business needs, with nodes providing labels for organization categorization.
Node labels can be modified independently without affecting other configurations.
To create Organization Hierarchy (Node):
Click Admin from the Configuration section in the left pane.
Select the Organization Hierarchy tab.
Click the + button, and the Add Node dialog appears.
Enter the Label and Description.
When created, each Node will have the following details. You can modify the Label, Description, External Group ID, and Experience ID.
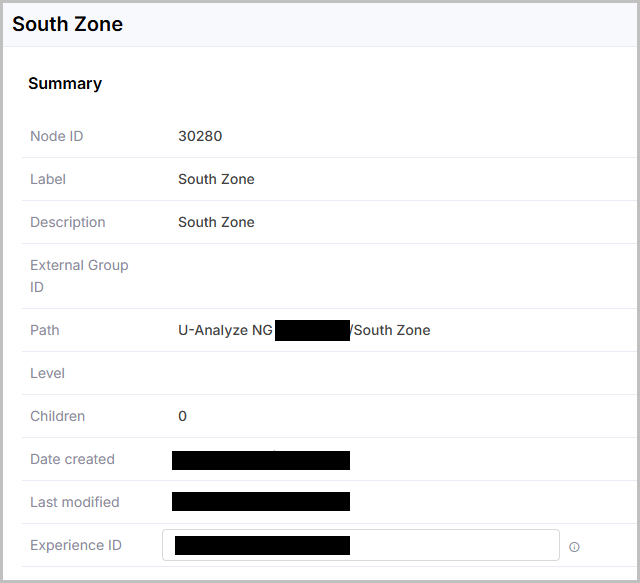
Node ID: Unique auto-generated ID for each node.
Label: Name of the node. Mandatory field.
Description: A brief description of the node. Mandatory field.
External Group ID: The organization ID available for the node in the organization or customer's external system.
Path: The path of the node. Auto-generated. Example: UAnalyze NG/Node1/Child1
Level: The level at which the node is created.
Children: Number of Child nodes available for a node. Auto-generated.
Date created: Date on which the node was created. Auto-generated.
Last modified: Date on which the node was last modified. Auto-generated.
Experience ID: Experience ID from Real-time Guidance Agent.
To edit a Node:
Editing allows you to add a child node, map a user to a node, and delete a child or a parent node.
Click the vertical ellipses icon of the Node that needs to be edited.
Click Add Child to add a child node under the selected node. Up to 7 child nodes can be created for each node.
Click Map User to add a user to the respective Node. A user can only be mapped to one node.
To delete a Node:
Click Delete Node to delete the respective node.
Caution
When a node is deleted, all of its connected child nodes are also deleted, and the action cannot be undone.